
Verwandte Anleitungen für Bresser 7007600000000


Inhaltszusammenfassung für Bresser 7007600000000
- Seite 1 Wetterstation · Weather Station · Station météo · Meteorologická stanice · Translucidus Bedienungsanleitung Instruction manual Mode d’emploi Návod k obsluze...
- Seite 2 Desidera ricevere informazioni esaustive su questo prodotto in una lingua specifica? Venga a visitare il nostro sito Web al seguente link (codice QR Code) per conoscere le versioni disponibili. www.bresser.de/P7007600000000 GARANTIE · WARRANTY · GARANTÍA · GARANZIA www.bresser.de/warranty_terms...
- Seite 3 Deutsch ....English...... Français....Česky ......
-
Seite 4: Inhaltsverzeichnis
Inhaltsverzeichnis Impressum ................ 6 Gültigkeitshinweis.............. 6 Eigenschaften ................. 7 Zu dieser Anleitung .............. 8 Allgemeine Sicherheitshinweise........... 8 Teileübersicht und Lieferumfang........ 11 Display-Anzeigen.............. 11 Vor der Inbetriebnahme ............ 12 Stromversorgung herstellen .......... 13 10 Automatische Zeiteinstellung .......... 14 11 Manuelle Zeiteinstellung............ 14 12 Weckrufeinstellung .............. 15 13 Schlummerfunktion.............. 16 14 Temperaturalarmeinstellung .......... 16 15 Automatische Messwerteübertragung ....... 17 16 Manuelle Messwertanzeige .......... 17 17 Wettertrend ................ 17... - Seite 5 18 Anschluss von Funksensoren .......... 18 19 Technische Daten............... 18 20 EG-Konformitätserklärung .......... 19 21 Entsorgung ................. 19 22 Garantie ................ 20...
-
Seite 6: Impressum
Hersteller-Anschrift gerichtete Anfra- gen oder Einsendungen nicht bearbeitet werden können. Irrtümer und technische Änderungen vorbehalten. © 2019 Bresser GmbH Alle Rechte vorbehalten. Die Reproduktion dieser Dokumentation – auch auszugs- weise – in irgendeiner Form (z.B. Fotokopie, Druck, etc.) so- wie die Verwendung und Verbreitung mittels elektronischer Systeme (z.B. -
Seite 7: Eigenschaften
Anleitungsversion: v1119 Bezeichnung dieser Anleitung: Manual_7007600QT5000_Translucidus_de-en-fr-cs_BRES- SER_v112019a Informationen bei Serviceanfragen stets angeben. 3 Eigenschaften • Grafische 12-Stunden-Wettertrendanzeige • DCF Funkuhr Empfang und Anzeige • Weckruf mit Schlummerfunktion (Snooze) • Außentemperaturalarm (Frostwarnung) • Außentemperatur (in °C oder °F) • Innentemperatur (in °C oder °F) •... -
Seite 8: Zu Dieser Anleitung
4 Zu dieser Anleitung HINWEIS Diese Bedienungsanleitung ist als Teil des Gerätes zu betrachten! Lesen Sie vor der Benutzung des Geräts aufmerksam die Sicherheitshinweise und die Bedienungsanleitung. Bewahren Sie diese Bedienungsanleitung für die erneute Verwendung zu einem späteren Zeitpunkt auf. Bei Verkauf oder Weitergabe des Gerätes ist die Bedienungsanleitung an jeden nachfolgenden Besitzer/Benutzer des Produkts weiterzugeben. - Seite 9 GEFAHR Gefahr eines Stromschlags! Dieses Gerät beinhaltet Elektronikteile, die über eine Strom- quelle (Netzteil und/oder Batterien) betrieben werden. Bei unsachgemäßer Verwendung dieses Produkts besteht die Gefahr eines Stromschlags. Ein Stromschlag kann zu schweren bis tödlichen Verletzungen führen. Beachten Sie daher unbedingt die nachfolgenden Sicherheitsinformatio- nen.
- Seite 10 HINWEIS Gefahr von Sachschäden! Bei unsachgemäßer Handhabung können das Gerät und/ oder die Zubehörteile beschädigt werden. Verwenden Sie das Gerät deshalb nur entsprechend den nachfolgenden Si- cherheitsinformationen. • Bauen Sie das Gerät nicht auseinander! Wenden Sie sich im Falle eines Defekts an Ihren Fachhändler. Er nimmt mit dem Service-Center Kontakt auf und kann das Gerät ggf.
-
Seite 11: Teileübersicht Und Lieferumfang
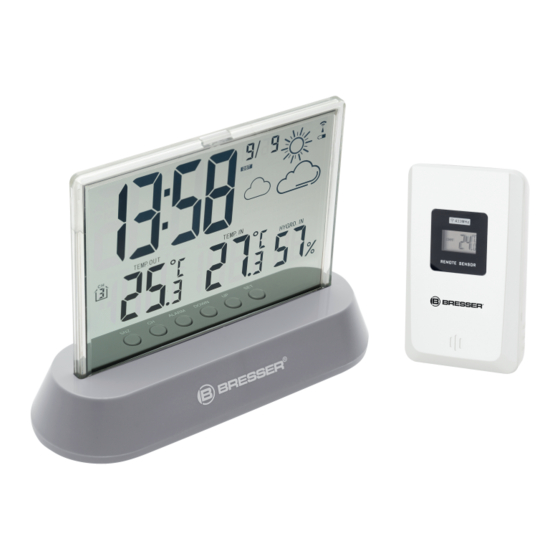
6 Teileübersicht und Lieferumfang Lieferumfang Basisgerät (A), Funksensor (B), Batterien (o. Abb.) Erforderliche Batterien (im Lieferumfang enthalten): 4 Stck. Micro-Batterien (1.5V, Typ AAA) 7 Display-Anzeigen Abb. 1: Display-Anzeigen für Basisstation (links) und Funksensor (rechts) AM/PM-Information im 12- Standard: Aktuelle Uhrzeit; Stunden-Zeitmodus Alarm: Weckzeit Symbol für aktiven Weckruf Symbol für akktive Zonenzeit... -
Seite 12: Vor Der Inbetriebnahme
Grafische Wettertrendanzei- Symbol für das Funksignal Batteriestandsanzeige (Ba- Luftfeuchtigkeitsinformation sisstation) (innen) Luftfeuchtigkeitswert (innen) Innentemperatur-Information Innentemperaturwert Batteriestandsanzeige (Funk- sensor) Außentemperaturwert Symbol für Temperaturalarm (oberer oder unterer Wert) Gewählter Kanal vom Funk- Außentemperatur-Information sensor Symbol für aktive Schlum- Batteriestandsanzeige merphase (Funksensor) Symbol für das Funksignal Außentemperaturwert Gewählter Übertragungska- 8 Vor der Inbetriebnahme... -
Seite 13: Stromversorgung Herstellen
Basisgerät und Sensor innerhalb des effektiven Über- tragungsbereichs aufstellen/betreiben. Sicherstellen, dass Basisgerät und Funksensor auf den gleichen Kanal eingestellt sind. Bei einem Batteriewechsel stets die Batterien sowohl im Ba- sisgerät als auch im Sensor entfernen und in richtiger Rei- henfolge wieder neu einsetzen, damit die Funkverbindung erneut aufgebaut werden kann. -
Seite 14: Automatische Zeiteinstellung
Batteriefachdeckel entfernen. Batterien in das Batteriefach einsetzen. Dabei die kor- rekte Ausrichtung der Batteriepole (+/-) beachten. CH-Taste drücken, um den gewünschten Übertra- gungskanal einzustellen (Einstellung CH1, CH2 oder CH3 mit Anzeige auf dem Display). °C/°F-Taste drücken, um die gewünschte Temperatu- reinheit einzustellen (Einstellung °C oder °F mit Anzei- ge auf dem Display). -
Seite 15: Weckrufeinstellung
UP- oder DOWN-Taste drücken, um den Wert zu ver- ändern. SET-Taste drücken, um die Eingabe zu bestätigen und zur nächsten Einstellung zu wechseln. Reihenfolge der Einstellungen: Jahr > Monat > Tag > Zeitzone > 12-/24-Stunden-Modus > Stunden > Minu- SET-Taste abschließend drücken, um Einstellungen zu speichern und den Einstellungsmodus zu verlassen. -
Seite 16: Schlummerfunktion
13 Schlummerfunktion Beim Ertönen des Weckrufs die SNZ-Taste drücken, um die Schlummerfunktion zu aktivieren. Weckruf er- tönt erneut nach 5 Minuten. Beim Ertönen des Weckrufs eine beliebige andere Tas- te drücken, um den Weckruf bis zum erneuten Errei- chen der eingestellten Weckzeit auszusetzen. 14 Temperaturalarmeinstellung DOWN-Taste im normalen Zeitanzeigemodus etwa 2 Sekunden gedrückt halten, um in den Temperaturalar-... -
Seite 17: Automatische Messwerteübertragung
HINWEIS! Der Alarm kann nur über den Punkt Tem- peraturalarm ON/OFF im Temperatureinstellmodus deaktiviert werden (OFF = Temperaturalarm aus). 15 Automatische Messwerteübertragung Sobald die Batterien eingelegt wurden, beginnt die Basis- station mit der Anzeige der Messwerte für den Innenbe- reich. Die ersten vom Außensensor empfangenen Messwer- te werden innerhalb von etwa 3 Minuten nach Inbetriebnah- me angezeigt. -
Seite 18: Anschluss Von Funksensoren
Abb. 2: Symbole der Wettertrendanzeige Sonnig Teilweise bewölkt Bewölkt Regen 18 Anschluss von Funksensoren Die Wetterstation kann die Messwerte von bis zu 3 Funk- sensoren* des gleichen Typs anzeigen. Dabei muss jeder Funksensor auf einen separaten Kanal eingestellt sein. Zur Kanaleinstellung folgendermaßen vorgehen: Batteriefachabdeckung des Funksensors entfernen. -
Seite 19: Eg-Konformitätserklärung
60 x 96 x 27 mm (B x H x T) Gewicht 52 g (ohne Batterien) 20 EG-Konformitätserklärung Hiermit erklärt Bresser GmbH, dass der Funkanlagentyp mit Artikelnummer 7007600000000 7007600QT5000 der Richtlinie 2014/53/EU entspricht. Der vollständige Text der EG-Konformitätserklärung ist unter der folgenden Internet- adresse verfügbar: http://www.bresser.de/down-... -
Seite 20: Garantie
Tag des Kaufs. Um von einer verlängerten, freiwilligen Ga- rantiezeit wie auf dem Geschenkkarton angegeben zu profi- tieren, ist eine Registrierung auf unserer Website erforder- lich. Die vollständigen Garantiebedingungen sowie Informatio- nen zu Garantiezeitverlängerung und Serviceleistungen können Sie unter www.bresser.de/garantiebedingungen einsehen. 20 / 76... - Seite 21 Contents Imprint ................. 23 Validity information ............ 23 Features ................ 24 About this Instruction Manual........... 25 General safety instructions .......... 25 Parts overview and scope of delivery ...... 27 Screen display .............. 28 Before starting operation........... 29 Setting up power supply............ 30 10 Automatic time setting............
- Seite 22 18 Connecting remote sensors .......... 34 19 Technical data .............. 35 20 EC Declaration of Conformity .......... 36 21 Disposal ................ 36 22 Warranty ................ 37...
-
Seite 23: Imprint
Errors excepted. Subject to technical modifications. © 2019 Bresser GmbH All rights reserved. Reproduction of this document, including extracts, in any form (photocopied, printed etc.) or the use and distribution of this document by electronic means (image file, website etc.) is not permitted without the prior written consent of the... -
Seite 24: Features
Manual description: Manual_7007600QT5000_Translucidus_de-en-fr- cs_BRESSER_v112019a With any service inquiries, please state these information. 3 Features • Graphical 12-hours weather trend display • Radio-controlled clock with DCF signal reception and display • Alarm with snooze function • Outdoor temperature alarm (frost warning) •... -
Seite 25: About This Instruction Manual
4 About this Instruction Manual NOTICE These operating instructions are to be considered a component of the device. Please read the safety instructions and the operating in- structions carefully before use. Keep these instructions for renewed use at a later date. When the device is sold or given to someone else, the in- struction manual must be provided to the new owner/user of the product. - Seite 26 DANGER Risk of electric shock This device has electronic parts operated via a power source (power supply and/or batteries). Improper use of this product can cause an electric shock. An electric shock can cause serious or potentially fatal injuries. The following safety information must be observed at all times.
-
Seite 27: Parts Overview And Scope Of Delivery
• Do not immerse the unit in water! • Do not expose the device to impacts, vibrations, dust, constant high temperatures or excessive humidity. This can result in malfunctions, short-circuits or damage to the batteries and components. • Use only the recommended batteries. Always replace weak or empty batteries with a new, complete set of batteries at full capacity. -
Seite 28: Screen Display
7 Screen display Illustration 1: Screen display for base station (left) and remote sensor (right) AM/PM information in 12- Standard: Current time; hour time mode Alarm: Alarm time Symbol for active alarm Symbol for active time zone Symbol for active daylight Current date saving time (DST) Graphical weather trend dis-... -
Seite 29: Before Starting Operation
Outdoor temperature value Symbol for temperature alarm (highest or lowest value) Selected channel for remote Outdoor temperature informa- sensor tion Symbol when snooze func- Battery level indicator (Re- tion is activated mote sensor) Symbol for radio signal Outdoor temperature value Selected transmission chan- 8 Before starting operation NOTICE... -
Seite 30: Setting Up Power Supply
supply must be disconnected for a short moment also for this device when exchanging the batteries. If batteries are exchanged in only one of the devices (i.e. the remote sensor) the signal can’t be received or can’t be received correctly. Note, that the effective range is vastly affected by building materials and position of the main and remote units. -
Seite 31: Automatic Time Setting
10 Automatic time setting After the power supply was established, the clock will auto- matically search for the radio signal. This will take approxim- ately 3 to 8 minutes to finish this process. If the radio signal is received correctly, the date and time will be set automatically and the radio control signal icon turns on. -
Seite 32: Snooze Function
Press and hold ALARM button for approx. 2 seconds to change to alarm time setting mode. Digits to be set are flashing. Press UP or DOWN button to change the value. Press ALARM button to confirm and continue to the next setting. -
Seite 33: Receiving Measurements Automatically
Settings order: ON/OFF (Temperature alarm on/off) > Temperature highest limit > Temperature lowest limit > Exit Press UP or DOWN button to change the value. Press SET button to confirm and continue to the next setting. The temperature settings mode will be quit automatic- ally after 30 seconds of inactivity. -
Seite 34: Weather Trend
Press UP button for approx. 2 seconds during highest or lowest value display to irrevocable delete all saved values. NOTICE! Saved highest and lowest values will be deleted automatically every day on 0:00! 17 Weather trend The weather station will calculate a weather trend for the next 12 hours on basis of the measured values. -
Seite 35: Technical Data
Press the CH button on the base station repeatedly to display the measurements of the different channels. The selected channel is shown on the display. *one remote sensor included, more optionally available 19 Technical data Base station Batteries 2x AAA, 1.5V Radio controlled signal Maximum number of sensors 3 Temperature unit... -
Seite 36: Ec Declaration Of Conformity
20 EC Declaration of Conformity Hereby, Bresser GmbH declares that the equipment type with item number 7007600000000 7007600QT5000 : is in compliance with Directive: 2014/30/EU. The full text of the EU declaration of conformity is available at the following in- ternet address: http://www.bresser.de/down-... -
Seite 37: Warranty
You can consult the full guarantee terms as well as informa- tion on extending the guarantee period and details of our services at www.bresser.de/warranty_terms. 37 / 76... - Seite 38 Table des matières Mentions légales .............. 40 Remarque de validité ............ 41 Propriétés................ 41 À propos du présent manuel.......... 42 Consignes générales de sécurité ........ 42 Vue d’ensemble des composants et contenu de la livraison .................... 45 Écrans d’affichage ............... 45 Avant le démarrage .............. 46 Brancher l’alimentation électrique ........ 47 10 Réglage automatique de la date et de l’heure .... 48 11 Réglage manuel de la date et de l’heure ...... 49 12 Réglage du réveil.............. 49...
- Seite 39 18 Raccordement de capteurs sans fil ........ 52 19 Caractéristiques techniques .......... 53 20 Déclaration de conformité CE ........... 54 21 Disposition ................ 54 22 Garantie ................ 55...
-
Seite 40: Mentions Légales
être traitées, nous vous remercions pour votre compréhension à cet égard. Sous réserve d’erreurs et de modifications techniques. © 2019 Bresser GmbH Tous droits réservés. La reproduction, même partielle, de la présente documenta- tion, de quelque forme que ce soit (par ex. photocopie, im- pression, etc.), de même que l’utilisation et la diffusion à... -
Seite 41: Remarque De Validité
2 Remarque de validité La présente documentation est valable pour les produits portant les numéros d’article suivants : 7007600000000 7007600QT5000 Version du manuel : v1119 Désignation du présent manuel : Manual_7007600QT5000_Translucidus_de-en-fr-cs_BRES- SER_v112019a Toujours mentionner ces informations lors de toute de- mande de service. -
Seite 42: Propos Du Présent Manuel
4 À propos du présent manuel INFORMATION Le présent mode d’emploi fait partie intégrante de l’ap- pareil ! Avant d’utiliser l’appareil, veuillez lire attentivement les consignes de sécurité et le mode d’emploi. Conservez le présent mode d’emploi pour une réutilisation ultérieure de l’appareil. En cas de revente ou de cession de l’appareil, le mode d’emploi doit être remis à... - Seite 43 DANGER Risque de décharge électrique ! Cet appareil comprend des composants électroniques ali- mentés par une source de courant (bloc d’alimentation et/ou piles). Toute utilisation non conforme de ce produit peut en- trainer un risque de décharge électrique. Une décharge électrique peut provoquer des blessures graves voire mor- telles.
- Seite 44 INFORMATION Risque de dommages matériels ! Une utilisation non conforme peut endommager l’appareil et/ou les accessoires. Par conséquent, utiliser l’appareil ex- clusivement dans le respect des consignes de sécurité sui- vantes. • Ne pas démonter l’appareil ! En cas de panne, s’adres- ser à...
-
Seite 45: Vue D'ensemble Des Composants Et Contenu De La Livraison
6 Vue d’ensemble des composants et contenu de la livraison Contenu de la livraison Appareil de base (A), capteur sans fil (B), piles (ill. ci-des- sus) Piles requises (incluses dans la livraison) : 4 x micro-piles (1,5 V, type AAA) 7 Écrans d’affichage Fig. 1: Écrans d’affichage pour la station de base (à... -
Seite 46: Avant Le Démarrage
Symbole pour réveil actif Symbole pour heure locale active du fuseau horaire Symbole pour l’heure d’été Date actuelle active Représentation graphique de Symbole pour le signal radio la tendance météo Niveau de charge des piles Information relative à l’humi- (station de base) dité... -
Seite 47: Brancher L'alimentation Électrique
Placez la base (récepteur) et le capteur extérieur (émetteur) le plus près possible. Reliez l'alimentation électrique à la base de la station et attendez que la température intérieure soit affichée. Insérez les piles dans le capteur extérieur. Positionnez la station de base et le capteur de télécom- mande dans la plage de transmission effective. -
Seite 48: Réglage Automatique De La Date Et De L'heure
Retirer le couvercle du compartiment à piles. Insérer les piles dans le compartiment. Lors de cette étape, respecter la polarité (+/-). Replacer le couvercle du compartiment à piles. Patienter jusqu’à ce que la température intérieure soit affichée sur l’appareil de base. Capteur sans fil Retirer le couvercle du compartiment à... -
Seite 49: Réglage Manuel De La Date Et De L'heure
Si la recherche n’aboutit toujours pas, régler l’heure et la date manuellement. 11 Réglage manuel de la date et de l’heure Presser le bouton SET pendant env. 2 secondes afin de passer au mode de réglage de la date et de l’heure. Les chiffres à... -
Seite 50: Fonction De Répétition Du Réveil (Snooze)
Presser ensuite le bouton ALARME pour enregistrer les paramètres et quitter le mode de réglage. Presser le bouton SET pour activer le réveil. Le sym- bole s’affiche à l’écran. Le réveil est alors activé. Presser de nouveau le bouton SET pour désactiver le réveil. -
Seite 51: Transmission Automatique Des Valeurs Mesurées
Si, après 30 secondes, vous n’avez réalisé aucun ré- glage, le mode de réglage de la température se ferme automatiquement. Les réglages réalisés jusqu’à ce mo- ment-là sont enregistrés. Si la température extérieure atteint l’une des valeurs li- mites, le symbole d’alarme de la température clignote et un signal sonore retentit pendant environ trois se- condes. -
Seite 52: Tendance Météo
Presser et maintenir enfoncé le bouton UP pendant en- viron 2 secondes durant l’affichage de la valeur maxi- male ou minimale afin de supprimer définitivement toutes les valeurs enregistrées. INFORMATION ! Les valeurs maximales et minimales sont supprimées automatiquement tous les jours à mi- nuit ! 17 Tendance météo Une tendance météo pour les 12 prochaines heures est cal-... -
Seite 53: Caractéristiques Techniques
Presser le bouton CH plusieurs fois jusqu’à ce que le canal souhaité soit affiché à l’écran du capteur sans fil (CH1, CH2 ou CH3). Replacer le couvercle du compartiment à piles. Presser plusieurs fois le bouton CH de la station de base pour afficher les valeurs mesurées de chaque ca- nal. -
Seite 54: Déclaration De Conformité Ce
Poids 52 g (sans piles) 20 Déclaration de conformité CE Le soussigné, Bresser GmbH, déclare que l’équipement ra- dioélectrique du type 7007600000000 7007600QT5000 est conforme a la directive 2014/30/EU. Le texte complet de la déclaration UE de conformité est disponible a l’adresse internet suivante: http://www.bresser.de/down-... -
Seite 55: Garantie
êtes tenu de vous inscrire sur notre site Web. Vous pouvez consulter l’intégralité des conditions de garan- tie ainsi que les informations quant au prolongement de la durée de la garantie et des prestations de services sous le lien suivant : www.bresser. de/garantiebedingungen. 55 / 76... - Seite 56 Obsah Tiráž .................. 58 Informace o platnosti ............ 58 Vlastnosti ................ 59 Informace k tomuto návodu .......... 60 Všeobecné bezpečnostní pokyny ........ 60 Přehled dílů a součásti balení .......... 62 Zobrazené informace na displeji......... 63 Před uvedením do provozu .......... 64 Zajištění napájení .............. 65 10 Automatické nastavení času .......... 66 11 Manuální...
- Seite 57 18 Připojení bezdrátových senzorů ........ 70 19 Technické údaje .............. 70 20 Prohlášení o shodě v rámci ES ......... 71 21 Likvidace ................ 71 22 Záruka.................. 72...
-
Seite 58: Tiráž
1 Tiráž Bresser GmbH Gutenbergstr. 2 46414 Rhede Germany http://www.bresser.de Informace o nárocích z odpovědnosti nebo o požadavcích na servis naleznete v kapitolách „Záruka“ a „Servis“ v této dokumentaci. Na případné žádosti nebo písemné návrhy zaslané na adresu výrobce nemůžeme reagovat. Žádáme proto o vaše pochopení. -
Seite 59: Vlastnosti
7007600000000 7007600QT5000 Verze příručky: v1119 Popis příručky: Manual_7007600QT5000_Translucidus_de-en-fr- cs_BRESSER_v112019a Při jakýchkoli dotazech na ohledně servisu uvádějte tyto informace. 3 Vlastnosti • Grafické zobrazení 12hodinových povětrnostních trendů • DCF bezdrátové hodiny příjem a zobrazení • Funkce tichého buzení (Snooze) • Alarm venkovní teploty (varování před mrazem) •... -
Seite 60: Informace K Tomuto Návodu
4 Informace k tomuto návodu UPOZORNĚNÍ Tento návod k obsluze musí být pokládán za nedílnou součást přístroje. Před používáním přístroje si pečlivě pročtěte bezpečnostní pokyny a návod k obsluze. Tento návod k obsluze uschovejte pro případné pozdější použití. Při prodeji nebo předání přístroje dalším osobám musíte přístroj prodat/předat dalšímu vlastníkovi/uživateli spolu s návodem k obsluze. - Seite 61 zásahu elektrickým proudem. Zásah elektrickým proudem může vést k těžkým až smrtelným zraněním. Dbejte proto bezpodmínečně následujících bezpečnostních pokynů. • Neponechávejte děti při manipulaci s přístrojem nikdy bez dozoru! Přístroj se smí používat pouze tak, jak je popsáno v návodu, v opačném případě hrozí NEBEZPEČÍ...
-
Seite 62: Přehled Dílů A Součásti Balení
• Přístroj nevystavujte nárazům, otřesům, prachu, trvalým vysokým teplotám či extrémní vlhkosti. Může to vést k poruchám funkce, zkratům, poškození baterií a součástí. • Používejte pouze doporučené baterie. Slabé nebo vybité baterie vždy vyměňte za zcela novou sadu baterií s plnou kapacitou. Nepoužívejte baterie různých značek, typů... -
Seite 63: Zobrazené Informace Na Displeji
7 Zobrazené informace na displeji Obr. 1: Zobrazené informace na displeji základní stanice (vlevo) a bezdrátového senzoru (vpravo) Informace AM/PM ve Standardní: Aktuální čas; 12hodinovém časovém alarm: Čas buzení režimu Symbol aktivního buzení Symbol aktivního časového pásma Symbol aktivního letního Aktuální datum času Grafické... -
Seite 64: Před Uvedením Do Provozu
Hodnota vnitřní teploty Indikátor prostoru baterií (bezdrátový senzor) Hodnota venkovní teploty Symbol teplotního alarmu (horní nebo spodní teplota) Vybraný kanál z Informace o venkovní teplotě bezdrátového senzoru Symbol aktivní fáze tichého Indikátor prostoru baterií buzení (bezdrátový senzor) Symbol bezdrátového signálu 22 Hodnota venkovní... -
Seite 65: Zajištění Napájení
přístroj při výměně baterií toto napájení na krátkou dobu přerušit. Pokud se např. vymění baterie pouze v senzoru, nebude signál následně možné již přijmout správně, popř. vůbec přijmout. Mějte na paměti, že skutečný dosah závisí na příslušně použitých stavebních materiálech budovy a také příslušné poloze základní... -
Seite 66: Automatické Nastavení Času
Stiskněte tlačítko °C/°F pro nastavení požadované teplotní jednotky (nastavení °C nebo °F se zobrazením na displeji). Nasaďte kryt prostoru baterií. 10 Automatické nastavení času Po zapojení přístroje do elektrické sítě přístroj automaticky vyhledá bezdrátový signál. Tento proces potrvá cca 3-8 minut. -
Seite 67: Nastavení Budíku
Závěrem stiskněte tlačítko SET a dojde k uložení nastavení a opuštění režimu nastavení. 12 Nastavení budíku Pro zobrazení času buzení stiskněte tlačítko ALARM. Pro přechod do režimu nastavení času buzení stiskněte tlačítko ALARM na dobu cca 2 sekund. Číslice k nastavení zablikají. Pro změnu hodnoty stiskněte tlačítko UP nebo DOWN Pro potvrzení... -
Seite 68: Nastavení Teplotního Alarmu
14 Nastavení teplotního alarmu Podržte stisknuté tlačítko DOWN na dobu cca 2 sekund v běžném režimu zobrazení času pro přechod do režimu nastavení teplotního alarmu. Číslice k nastavení zablikají. Pořadí nastavení: ON/OFF (teplotní alarm zap/vyp) > Horní teplotní hranice > Spodní teplotní hranice > Ukončit (ON/OFF (Temperaturalarm ein/aus) >... -
Seite 69: Automatický Přenos Naměřených Hodnot
15 Automatický přenos naměřených hodnot Po vložení baterií začne základní stanice zobrazovat hodnoty naměřené v interiéru. První naměřené hodnoty přijaté od venkovního senzoru se zobrazí do cca 3 minut od uvedení do provozu. 16 Manuální ukazatel naměřených hodnot Několikrát stiskněte tlačítko UP pro zobrazení následujících uložených hodnot. -
Seite 70: Připojení Bezdrátových Senzorů
Slunečno Částečně zamračeno Zamračeno Déšť 18 Připojení bezdrátových senzorů Meteorologická stanice zobrazuje naměřené hodnoty až ze 3 bezdrátových senzorů* stejného typu. Přitom musí být každý bezdrátový senzor nastaven na samostatný kanál. Pro nastavení kanálu postupujte následovně: Sejměte kryt prostoru baterií bezdrátového senzoru. Několikrát stiskněte např. -
Seite 71: Prohlášení O Shodě V Rámci Es
Hmotnost 52 g (bez baterií) 20 Prohlášení o shodě v rámci ES Tímto prohlašuje Bresser GmbH, že typ radiového zařízení s číslem výrobku 7007600000000 7007600QT5000 odpovídá směrnici 2014/53/EU. Úplné znění prohlášení o shodě v rámci ES je k dispozici na této internetové adrese: http://www.bresser.de/download/7007600QT5000/... -
Seite 72: Záruka
Běžná záruční doba činí 2 roky a začíná dnem koupě. Abyste profitovali z prodloužené, dobrovolné záruční doby jak je uvedeno na dárkovém kartónu, je nutná registrace na našich webových stranách. Do úplných záručních podmínek a informací o prodloužení záruky a servisních výkonů můžete nahlédnout na www.bresser.de/garantiebedingungen. 72 / 76... - Seite 76 (doporučujeme kontakt přes email).. e-mail: service@bresseruk.com e-mail: service@bresser.de Telephone*: 00 800 6343 7000 Servisní horká linka*: 00 800 6343 7000 *free call * volání zdarma BRESSER GmbH Gutenbergstr. 2 46414 Rhede Deutschland / Germany Allemagne / Německo...