Bresser Meteo NBF Colour Bedienungsanleitung
Inhaltsverzeichnis
Verfügbare Sprachen
Verfügbare Sprachen
Quicklinks
Kapitel
Inhaltsverzeichnis

Verwandte Anleitungen für Bresser Meteo NBF Colour


Inhaltszusammenfassung für Bresser Meteo NBF Colour
- Seite 1 Wetterstation · Weather Station · Meteo NBF Colour Bedienungsanleitung Instruction manual...
-
Seite 3: Inhaltsverzeichnis
Inhaltsverzeichnis 1 Impressum .............................. 4 2 Gültigkeitshinweis............................ 4 3 Eigenschaften .............................. 4 4 Zu dieser Anleitung ............................ 5 5 Allgemeine Sicherheitshinweise........................ 5 6 Teileübersicht und Lieferumfang........................ 7 7 Display-Anzeigen............................ 9 8 Vor der Inbetriebnahme .......................... 10 9 Stromversorgung herstellen ........................ 10 10 Automatische Zeiteinstellung ........................ 11 11 Manuelle Zeiteinstellung und Einstellung der Wetterdatenanzeige ............ 11 12 Weckrufeinstellung ............................ 11 13 Schlummerfunktion............................ 12 14 Automatische Messwerteübertragung ....................... 12... -
Seite 4: Impressum
„Garantie“ und „Service“ in dieser Dokumentation. Wir bitten um Verständnis, dass direkt an die Her- steller-Anschrift gerichtete Anfragen oder Einsendungen nicht bearbeitet werden können. Irrtümer und technische Änderungen vorbehalten. © 2017 Bresser GmbH Alle Rechte vorbehalten. Die Reproduktion dieser Dokumentation – auch auszugsweise – in irgendeiner Form (z.B. Fotokopie, Druck, etc.) sowie die Verwendung und Verbreitung mittels elektronischer Systeme (z.B. -
Seite 5: Zu Dieser Anleitung
4 Zu dieser Anleitung HINWEIS Diese Bedienungsanleitung ist als Teil des Gerätes zu betrachten! Lesen Sie vor der Benutzung des Geräts aufmerksam die Sicherheitshinweise und die Bedienungsan- leitung. Bewahren Sie diese Bedienungsanleitung für die erneute Verwendung zu einem späteren Zeitpunkt auf. - Seite 6 GEFAHR Explosionsgefahr! Bei unsachgemäßer Verwendung dieses Produkts besteht Explosionsgefahr. Beachten Sie unbedingt die nachfolgenden Sicherheitsinformationen, um eine Explosion zu vermeiden. • Setzen Sie das Gerät keinen hohen Temperaturen aus. Benutzen Sie nur das mitgelieferte Netz- teil oder die empfohlenen Batterien. Gerät und Batterien nicht kurzschließen oder ins Feuer wer- fen! Durch übermäßige Hitze und unsachgemäße Handhabung können Kurzschlüsse, Brände und sogar Explosionen ausgelöst werden! HINWEIS...
-
Seite 7: Teileübersicht Und Lieferumfang
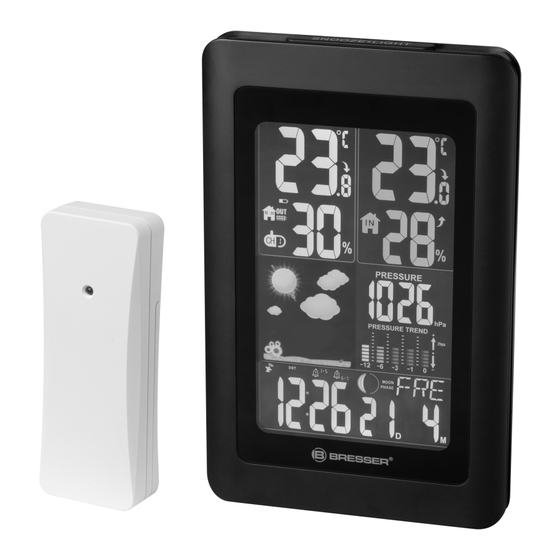
6 Teileübersicht und Lieferumfang 3 2 1 Abb. 1: Teileübersicht für Basisstation (oben) und Funksensor (unten) 1 SNOOZE/LIGHT-Taste (Schlummerfunkti- 2 Display on und temporäre Hintergrundbeleuch- tung) 3 MODE-Taste (Zeitmodus-Wahl und -Ein- 4 UP-Taste (Wertänderung aufwärts) stellungen) 7 / 24... - Seite 8 5 DOWN-Taste (Wertänderung abwärts, 6 Aufhängevorrichtung Zeitzonen-Wahl und Zeitsignal-Empfang initiieren) 7 CH-Taste (Kanalwahl) 8 MAX/MIN-Taste (Wechsel zwischen Höchst-, Tiefst- oder aktueller Werteanzei- 9 Batteriefachabdeckung 10 Batteriefach 11 DC-Anschlussbuchse für Hohlstecker 12 Standfuß (ausklappbar) 13 DC-Netzadapter mit EU-Netzstecker 14 DC-Hohlstecker 15 Funktionsleuchte 16 Aufhängevorrichtung 17 Kanal-Wahlschalter 18 Batteriefachabdeckung...
-
Seite 9: Display-Anzeigen
7 Display-Anzeigen Abb. 2: Display-Anzeigen für Basisstation 1 Außentemperaturwert 2 Temperatureinheit (°C oder °F wählbar) 3 Innentemperaturwert 4 Temperatureinheit (°C oder °F wählbar) 5 Temperaturtendenz (steigend oder fal- 6 Batteriestandanzeige (Basisstation) lend) 7 Symbol Höchst- (MAX) oder Tiefstwert 8 Luftfeuchtigkeitstendenz (steigend oder (MIN) innen fallend) 9 Luftfeuchtigkeitswert (innen) -
Seite 10: Vor Der Inbetriebnahme
23 Zeitzone (ZONE) 24 Symbol für das Funksignal 25 Sommerzeit (DST) 26 Schlummerfunktion aktiv 27 Grafische Wettertrendanzeige 28 Luftfeuchtigkeitswert (außen) 29 Gewählter Kanal vom Funksensor 30 Symbol für Datenempfang 31 Batteriestandanzeige (Funksensor) 32 Symbol Höchst- (MAX) oder Tiefstwert (MIN) außen 8 Vor der Inbetriebnahme HINWEIS Vermeidung von Verbindungsstörungen! -
Seite 11: Automatische Zeiteinstellung
HINWEIS! Beim Wechsel der Stromversorgungsart (Netzstrom oder Batterien) wird die Stromversorgung technisch bedingt kurzzeitig unterbrochen. Dabei gehen alle zuvor vorge- nommenen Einstellungen verloren. Funksensor 1. Batteriefachdeckel entfernen. 2. Batterien in das Batteriefach einsetzen. Dabei die korrekte Ausrichtung der Batteriepole (+/-) be- achten. -
Seite 12: Schlummerfunktion
7. MODE-Taste abschließend drücken, um Einstellungen zu speichern und den Einstellungsmodus zu verlassen. 8. Bei ausgewählter Alarmfunktion die UP-Taste mehrmals drücken, um den Alarm zu aktivieren und die gewünschte Intervallfolge einzustellen. Im Display erscheint das Wecksymbol (Glocke) sowie Ziffern, welche den Weckintervall angeben (1-5 = Montag - Freitag, 6-7 = Samstag – Sonntag, 1-5/6-7 = alle Tage). -
Seite 13: Eg-Konformitätserklärung
17 EG-Konformitätserklärung Eine „Konformitätserklärung“ in Übereinstimmung mit den anwendbaren Richtlinien und ent- sprechenden Normen ist von der Bresser GmbH erstellt worden. Diese kann auf Anfrage je- derzeit eingesehen werden. 18 Garantie Die reguläre Garantiezeit beträgt 2 Jahre und beginnt am Tag des Kaufs. Um von einer verlängerten, freiwilligen Garantiezeit wie auf dem Geschenkkarton angegeben zu profitieren, ist eine Registrierung auf unserer Website erforderlich.