Herunterladen Inhalt Inhalt Diese Seite drucken
Carrier HDB Gebrauchsanweisung
Vorschau ausblenden Andere Handbücher für HDB:

Werbung

Verfügbare Sprachen
  • DE

Verfügbare Sprachen

  • DEUTSCH, seite 27
owneR's Manual
Manuale Dell'utente
Manuel De l'utIlIsateuR
geBRaucHsanweIsung
Manual Del usuaRIo
InstRukcja oBsługI
HDB
Infrared Remote
BeDIenIng en onDeRHouD
O 
Manual Do utIlIzaDoR
DRIft- ocH skötselInstRuktIon
käyttäjän käsIkIRja

Werbung

Inhaltsverzeichnis
loading

Inhaltszusammenfassung für Carrier HDB

  • Seite 1 Infrared Remote owneR’s Manual BeDIenIng en onDeRHouD Manuale Dell’utente O  Manuel De l’utIlIsateuR Manual Do utIlIzaDoR geBRaucHsanweIsung DRIft- ocH skötselInstRuktIon Manual Del usuaRIo käyttäjän käsIkIRja InstRukcja oBsługI...
  • Seite 2 HDB - IR englIsH owner’s Manual ItalIano Manuale dell’utente fRanÇaIs Manuel de l’utilisateur DeutscH gebrauchsanweisung esPaÑol Manual del usuario neDeRlanDs Bediening en onderhoud K O  PoRtuguÊs Manual do utilizador sVenska Drift- och skötselinstruktion suoMI käyttäjän käsikirja PolskI Instrukcja obsługi...
  • Seite 3: Inhaltsverzeichnis

    HDB – IR Owner's manual The installation instructions for both the indoor and the outdoor unit are given in the manuals for each unit. Contents Page General information ................. Unit warning lights ................... Display of the selected functions .............. Use of the remote control .................
  • Seite 4: General Information

    HDB – IR General information • Remove the used batteries and insert new batteries. The remote control uses two alkaline batteries (1.5 V, LR03x2). • Press the reset button “O” with a sharp object to reset the remote control. • Do not use used batteries or batteries of different types, as this may cause the unit to malfunction.
  • Seite 5: Unit Warning Lights

    HDB – IR Unit warning lights E N G L I S H P: Green LED Q: Red LED R: yellow LED S: Remote control signal receiver The operation of the LEDs on the board is the following: The machine operating data can be checked by means of luminous warning lights called LEDs.
  • Seite 6: Display Of The Selected Functions

    HDB – IR Display of selected functions 1. Operating mode (from left to right): • Ventilation (fan only) • Heating (according to the unit configuration) • automatic (according to the unit configuration) • Cooling and dehumidification • Dehumidification only 2. Signal transmission symbol 3.
  • Seite 7: Use Of The Remote Control

    HDB – IR Use of the remote control E N G L I S H Current time adjusting and reset buttons Selection of the operating mode (buttons N and O) (button A) Press current time adjusting button for at least 5 seconds to With this button the operating mode of the air conditioner can be adjust the current time.
  • Seite 8 HDB – IR Use of the remote control Selecting the fan speed Louvre positioning (button E) Now this icon is flashing. Use button , to select desired position. Press button for confirmation. The fan speed can be selected by pressing button Now all icons are fixed on display.
  • Seite 9 HDB – IR Use of the remote control E N G L I S H DAILY timer (Everyday - button J) Timer SLEEP function with delayed switching off (Button M) Push the button when the ON or OFF timer is active. The icon will appear on display.
  • Seite 10: Troubleshooting

    HDB – IR Troubleshooting After inserting the batteries in the remote control, the display receiver; turn the remote control OFF and repeat the operation, does not illuminate: pointing the remote control in the correct direction. • There are obstacles (curtains, partitions, etc.) between the remote •...
  • Seite 11: Manuale Dell'utente

    HDB – IR Manuale dell'utente Le istruzioni di installazione delle unità interne ed esterne, sono riportate nei rispettivi manuali. Indice Pagina Informazioni generali ................Indicatori luminosi ................... Display di visualizzazione e funzioni selezionate ........Istruzioni d'uso del telecomando .............. Ricerca inconvenienti ................
  • Seite 12: Informazioni Generali

    HDB – IR Informazioni generali • Togliere le batterie usate ed inserire quelle nuove. Il telecomando necessita di due batterie alcaline (1,5V, LR03x2) • Premere il tasto di reset “O” con un oggetto appuntito per azzerare il telecomando. • Non utilizzare batterie usate o batterie di tipo diverso perchè...
  • Seite 13: Indicatori Luminosi

    HDB – IR Indicatori luminosi I T A L I A N O P : LED verde Q : LED rosso R : LED giallo S : Ricevitore segnale del telecomando Le informazioni di funzionamento della macchina possono essere Il funzionamento dei LED sulla schedina è descritto di seguito: monitorate tramite dei dispositivi luminosi chiamati LED.
  • Seite 14: Display Di Visualizzazione E Funzioni Selezionate

    HDB – IR Display di visualizzazione funzioni selezionate 1. Modalità di funzionamento (da sinistra a destra): • Solo ventilazione • Riscaldamento (in base alla configurazione dell'unità) • Automatico (in base alla configurazione dell'unità) • Raffrescamento e deumidificazione • Sola deumidificazione 2.
  • Seite 15: Istruzioni D'uso Del Telecomando

    HDB – IR Istruzioni d'uso del telecomando I T A L I A N O Selettore modo di funzionamento Tasti per la regolazione dell’ora attuale (Tasto A) di “reset” azzeramento (tasti N e O) Con questo pulsante si sceglie il modo di funzionamento del Per impostare l’ora attuale premere il tasto di regolazione dell’ora...
  • Seite 16 HDB – IR Istruzioni d'uso del telecomando Scelta della velocità del ventilatore Posizionamento alette (Tasto E) Ora sarà questa l'icona che lampeggerà. Utilizzare il tasto , per selezionare la posizione voluta. Premendo il pulsante si sceglie la velocità desiderata. Compiuta la scelta premere il tasto Ora tutte le icone sono fisse sul display.
  • Seite 17 HDB – IR Istruzioni d'uso del telecomando I T A L I A N O Tasto timer “giornaliero” (Daily - tasto J) Procedura “Timer SLEEP” Notturno spegnimento ritardato (Tasto M) Premere il tasto quando il Timer ON o OFF sono attivi.
  • Seite 18: Ricerca Inconvenienti

    HDB – IR Ricerca inconvenienti Inserendo le pile il display del telecomando rimane spento: • Sono interposti ostacoli (tende, pareti ecc.) tra il telecomando ed il ricevitore di segnali; eliminare eventuali ostacoli, riselezionare • Le batterie sono scariche o inserite con la polarità errata;...
  • Seite 19 HDB – IR Manuel de l'utilisateur Les instructions d’installation de l’unité interne et externe, sont reportées aux manuels correspondants. Sommaire Page Généralités....................Indicateurs lumineux ................Affichage des fonctions sélectionnées ............. L’utilisation de la télécommande............... Au cas où ....................F - 1...
  • Seite 20: Généralités

    HDB – IR Généralités • Enlever les piles usées et introduire les neuves. Dans la télécommande, il faut prévoir deux piles alcalines. (1,5V, LR03x2). • Appuyer sur la touche “O” à l’aide d’un objet pointu afin de mettre la télécommande à zéro.
  • Seite 21: Indicateurs Lumineux

    HDB – IR Indicateurs lumineux FRANÇAIS P : diode verte Q : diode rouge R : diode jaune S : Récepteur des signaux envoyés par la télécommande Les indications sur le fonctionnement de l’appareil peuvent être Le fonctionnement des diodes sur la carte est décrit ci-dessous: contrôlées à...
  • Seite 22: Affichage Des Fonctions Sélectionnées

    HDB – IR Affichage des fonctions sélectionnées 1. Mode de fonctionnement (de gauche à droite): • Ventilation (ventilateur seul) • Chauffage (Selon la configuration de l’unité) • Automatique (Selon la configuration de l’unité) • Refroidissement et déshumidification • Déshumidification seule 2.
  • Seite 23: L'utilisation De La Télécommande

    HDB – IR L'utilisation de la télécommande FRANÇAIS Touches de réglage de l’heure actuelle et de Sélecteur du mode de fonctionnement remise à zéro (touches N et O) (touche A) Appuyer sur la touche de réglage de l’heure actuelle pendant au Cette touche permet de sélectionner le mode de fonctionnement du...
  • Seite 24 HDB – IR L'utilisation de la télécommande Sélectionner la vitesse de ventilation Positionnement du volet (touche E) Cette icône se met ensuite à clignoter. Utiliser la touche pour sélectionner la position souhaitée. Appuyer sur la touche La vitesse du ventilateur peut être sélectionnée avec la touche pour la confirmer.
  • Seite 25 HDB – IR L'utilisation de la télécommande FRANÇAIS Fonction CHAQUE JOUR du programmateur Pour désactiver la fonction Chaque jour, appuyer sur la touche . Cette fonction (Touche J) restera active jusqu’à ce qu’une des Appuyer sur la touche lorsque la fonction Marche ou Arrêt du deux fonctions (Marche ou Arrêt) du...
  • Seite 26: Au Cas Où

    HDB – IR Au cas où ... Lorsqu’on vient de changer les piles de la télécommande, Lorsqu’on appuie sur une touche de fonction, la l’affichage ne s’allume pas: télécommande indique la fonction requise sur l’affichage, mais l’unité ne confirme pas qu’elle reçoit le signal en émettant un bip sonore, et n’accomplit pas cette fonction:...
  • Seite 27 HDB – IR Gebrauchsanweisung Die Installationsanweisungen für das Innen- und das Außengerät sind dem Prospekt für das jeweilige Gerät zu entnehmen. Inhalt Seite Allgemeine Hinweise ................Geräte-Leuchtdioden ................Anzeige der gewählten Funktionen ............Verwendung der Fernbedienung .............. Störungsermittlung .................. D - 1...
  • Seite 28: Allgemeine Hinweise

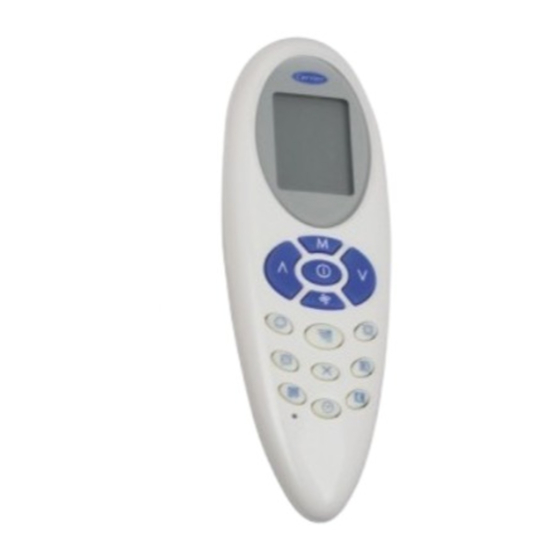
    HDB – IR Allgemeine Hinweise • Verbrauchte Batterien entfernen und die neuen einlegen. Die Fernbedienung funktioniert mit zwei Alkalibatterien (1,5V, LR03x2). • Die Taste “O” mit einem spitzen Werkzeug drücken, um die Fernbedienung erneut einzustellen. • Keine gebrauchten Batterien bzw. verschiedenen Batterien verwenden, da dies zu Störungen des Geräts führen könnte.
  • Seite 29 HDB – IR Geräte-Leuchtdioden DEUTSCH P : Grüne Leuchtdiode Q : Rote Leuchtdiode R : Gelbe Leuchtdiode S : Signalempfänger von der Fernbedienung Die Arbeitsweise der LEDs auf der Platine ist nachstehend Die Betriebsinformationen des Gerätes können über Leuchtvorrichtungen überwacht werden, die LEDs genannt werden.
  • Seite 30: Anzeige Der Gewählten Funktionen

    HDB – IR Anzeige der gewählten Funktionen 1. Betriebsart (von links nach rechts): • Lüftung (nur Ventilatorbetrieb) • Heizung (Entsprechend der Gerätekonfiguration) • Automatisch (Entsprechend der Gerätekonfiguration) • Kühlung und Entfeuchtung • Nur Entfeuchtung 2. Signalübertragungs-Symbol 3. Gewählte Temperatur 4. Adreß-Wahltaste 5.
  • Seite 31: Benutzung Der Fernbedienung

    HDB – IR Benutzung der Fernbedienung DEUTSCH Wahl der Betriebsart Einstelltasten für aktuelle Zeit (Taste A) Rückstellung (Tasten N und O) Mit dieser Taste kann die Betriebsart des Klimageräts gewählt Zur Einstellung der aktuellen Zeit die Einstelltaste drücken und werden.
  • Seite 32 HDB – IR Benutzung der Fernbedienung Wahl der Ventilatordrehzahl Luftlenklamellen-Positionierung (Taste E) Als nächstes leuchtet dieses Bildsymbol auf. Mit der Taste die gewünschte Position wählen. Taste zur Bestätigung drücken. Die Ventilatordrehzahl kann durch Drücken der Taste gewählt Jetzt sind alle Bildsymbole auf der Anzeige werden.
  • Seite 33: Adreß-Wahltaste (Ab)

    HDB – IR Benutzung der Fernbedienung DEUTSCH Verfahren "SLEEP-Zeitgeber" für die Nacht TÄGLICH-Zeitgeber (Everyday - Taste J) Verzögerte Ausschaltung (Taste M) Taste drücken, wenn der ON- oder OFF-Zeitgeber aktiv ist. Das Bildsymbol erscheint in der Anzeige. Diese Taste drücken, um den SLEEP-Zeitgeber mit der So werden die gespeicherten On- und OFF-Zeitgeber-Angaben Fernbedienung einzustellen.
  • Seite 34: Störungsermittlung

    HDB – IR Störungsermittlung Nachdem Batterien in die Fernbedienung eingelegt worden Beim Drücken irgendeiner Funktionstaste zeigt die sind, leuchtet die Anzeige nicht auf: Fernbedienung die gewählte Funktion auf der Anzeige an, aber das Gerät bestätigt den Empfang des Signals nicht durch einen Piepton und führt die Funktion nicht aus.
  • Seite 35 HDB – IR Manual del usuario Las instrucciones de instalación de las unidades interior y exterior están contenidas en las correspondientes unidades. Tabla de materias Página Información general ................. Indicadores luminosos ................Visualización de las funciones seleccionadas .......... Uso del control remoto ................
  • Seite 36: Información General

    HDB – IR Información general • Quitar las baterías usadas e introducir las nuevas. El mando necesita dos baterías alcalinas (1,5V, LR03x2). • Apretar el botón “O” con un objeto puntiagudo para resetear el mando. • No emplear baterías usadas o baterías de un tipo diferente porque podrían causar anomalías en la unidad.
  • Seite 37: Indicadores Luminosos

    HDB – IR Indicadores luminosos E S P A Ñ O L P : LED verde Q : LED rojo R : LED amarillo S : Receptor de la señal del control remoto Las indicaciones sobre el funcionamiento del aparato pueden ser...
  • Seite 38 HDB – IR Visualización de las funciones seleccionadas 1. Modo de funcionamiento (de izquierda a derecha): • Ventilación (sólo ventilador) • Calefacción (En base a la configuración de la unidad) • Modo automático (En base a la configuración de la unidad) •...
  • Seite 39: Uso Del Mando A Distancia

    HDB – IR Uso del mando a distancia E S P A Ñ O L Selección del modo Botones de ajuste de la hora actual y de de funcionamiento (botón A) reset (botones N y O) Con este botón es posible seleccionar el modo de funcionamiento Para definir la hora actual, pulsar la tecla de ajuste de la hora actual del aire acondicionado.
  • Seite 40 HDB – IR Uso del mando a distancia El icono dejará de parpadear. Selección de la velocidad del Posicionamiento de la rejilla ventilador (botón E) A continuación este icono parpadea. Usar el botón , para seleccionar la La velocidad del ventilador puede seleccionarse pulsando el botón posición deseada.
  • Seite 41 HDB – IR Uso del mando a distancia E S P A Ñ O L Temporizador DAILY Procedimiento “Timer SLEEP” Nocturno (todos los días - botón J) apagado retardado (Tecla M) Pulsar el botón cuando el temporizador esté en ON u OFF. El Pulsar este botón para definir la temporización SLEEP con el...
  • Seite 42 HDB – IR Qué ocurre si ..Después de haber colocado las pilas en el control, la lectura • Existen obstáculos (cortinas, paredes, etc) entre el control y de la visualización no se enciende: la unidad; repetir la operación después de haber sacado los obstáculos.
  • Seite 43: Bediening En Onderhoud

    HDB – IR Bediening en onderhoud Zie voor montage-instructies voor buiten- unit en de binnen-unit de betreffende handleidingen. Inhoud Blz. Algemene informatie ................Alarmlampjes ..................Afbeelden van de gekozen functies (display) ..........Bedienen van de afstandbediening ............Storingzoeken ..................NL - 1...
  • Seite 44: Algemene Informatie

    HDB – IR Algemene informatie • Plaats de nieuwe batterijen. • Druk met een puntig voorwerp op de toets “O” om de afstandbediening te resetten. • Gebruik nooit batterijen die al gebruikt zijn of twee verschillende batterijen. Dit kan de goede werking namelijk verstoren.
  • Seite 45: Alarmlampjes

    HDB – IR Alarmlampjes NEDERLANDS P : Groene LED Q : Rode LED R : Gele LED S : Zendsignaal van afstandbediening De werkingsinformatie van de machine kan worden afgebeeld Het functioneren van de LED op de kaart is beschreven als volgt: bij middel van een lichtinstallatie bestaande uit zogenaamde LED.
  • Seite 46: Afbeelden Van De Gekozen Functies (Display)

    HDB – IR Afbeelden van de gekozen functies 1. Bedrijfstype (van links naar rechts): • Alleen ventileren • Verwarmen (Afhankelijk van de configuratie van de unit) • Automatisch bedrijf (Afhankelijk van de configuratie van de unit) • Koelen + ontvochtigen •...
  • Seite 47: Bedienen Van De Afstandbediening

    HDB – IR Bediening van de afstandbediening NEDERLANDS Instellen huidige tijd en reset Keuze bedrijfstype (toetsen N en O) (toets A) Druk op toets om de huidige tijd te wijzigen. Hiermee kan het bedrijfstype worden gekozen. Druk met een puntig voorwerp op de reset toets “O” wanneer...
  • Seite 48 HDB – IR Bediening van de afstandbediening Ventilatorsnelheid Stand toevoerluchtrooster (toets E) Nu gaat dit symbool knipperen. Kies de gewenste stand met toets Druk op toets om uw keuze te Druk op toets om de ventilatorsnelheid te kiezen. bevestigen. Nu knippert op de display geen enkel Symbool op displayl symbool meer.
  • Seite 49 HDB – IR Bediening van de afstandbediening NEDERLANDS Procedure “Timer SLEEP” Nachtbedrijf DAGELIJKSE tijdklok (Everyday - toets J) vertraagde uitschakeling (Toets M) Druk op toets wanneer de ON of OFF tijdklok actief is. Het symbool wordt afgebeeld. Op deze wijze worden de instellingen van Druk op deze toets om de tijdklok voor nachtbedrijf in te stellen de ON en OFF tijdklokken elke dag herhaald.
  • Seite 50: Storingzoeken

    HDB – IR Storingzoeken De batterijen zijn geplaatst, maar de display wordt niet verlicht: Ook telefooncellen of draadloze telefoons kunnen storingen veroorzaken. • Batterijen zijn leeg of zijn niet goed geplaatst; vervang batterijen of controleer juiste plaatsing. Als er een functietoets wordt ingedrukt dan wordt de gewenste...
  • Seite 51 HDB – IR O              .     ..............  .................     ........   ..............  ............... GR - 1...
  • Seite 52 HDB – IR   •        .      . (1,5 V, LRO3x2). •    O,             .
  • Seite 53 HDB – IR   E   H N I K P :    Q :    R :    S :         LED  : ...
  • Seite 54 HDB – IR     1.  (    ): •  ( ) •   ( ανάλογα με τη διαμόρφωση της Μονάδας •  ( ανάλογα με τη διαμόρφωση της Μονάδας •     •   2.   3.   4.   5.    (   ) 6.
  • Seite 55 HDB – IR X  E   H N I K           ( N  O) ( )     ,                ...
  • Seite 56 HDB – IR X       .      .  ( E)          H          .   ...
  • Seite 57 HDB – IR X  E   H N I K    :    •    ( J  ) •              ...
  • Seite 58 HDB – IR   •       ,  .      ,    : •          •        .
  • Seite 59 HDB – IR Manual do utilizador As instruções de instalação da unidade interior e da unidade externa, estão inseridas nos relativos manuais. Índice Página Informação geral ..................Indicadores luminosos ................Visualização das funções seleccionadas ..........Utilização do comando remoto ..............
  • Seite 60: Informação Geral

    HDB – IR Informação geral • Tirar as pilhas usadas e inserir novas pilhas. O comando remoto necessita de duas pilhas alcalinas. (1,5V, LR03x2). • Premir a tecla “O” com um objecto pontiagudo para restabelecer o comando remoto. • Não utilizar pilhas usadas ou pilhas de outro tipo porque poderão causar anomalias ao aparelho.
  • Seite 61: Indicadores Luminosos

    HDB – IR Indicadores luminosos PORTUGUÊS P : LED verde Q : LED vermelho R : LED amarelo S : Receptor do sinal do comando remoto As informações de funcionamento da máquina podem ser O funcionamento dos LED na placa é descrito a seguir: monitoradas através dos dispositivos luminosos denominados LED.
  • Seite 62: Visualização Das Funções Seleccionadas

    HDB – IR Visualização das funções seleccionadas 1. Modo de funcionamento (da esquerda para a direita): • Ventilação (só ventilador) • Aquecimento (De acordo com a configuração da Unidade) • Automático (De acordo com a configuração da Unidade) • Arrefecimento e desumidificação •...
  • Seite 63: Utilização Do Comando Remoto

    HDB – IR Utilização do comando remoto PORTUGUÊS Botões de acerto do relógio e de reset Selecção do modo de funcionamento (botãoA) (botões N e O) Para configurar a hora actual carregar na tecla de acerto da hora Com este botão, pode-se seleccionar o modo de funcionamento do pelo menos por 5 segundos.
  • Seite 64 HDB – IR Utilização do comando remoto O ícone parará de piscar. Selecção da velocidade do ventilador Posicionamento das persianas (botão E) A seguir, este ícone pisca. Use o botão , para seleccionar a posição desejada. A velocidade do ventilador pode seleccionar-se carregando na tecla Carregue no botão...
  • Seite 65 HDB – IR Utilização do comando remoto PORTUGUÊS Temporizador diário (DAILY - botão J) Procedimento “Timer SLEEP” Noturno desligamento atrasado (Tecla M) Carregue no botão quando o temporizador ON ou OFF estiver activo. O ícone aparecerá no visor. Desta forma, a memorização do Carregue neste botão para regular o temporizador nocturno...
  • Seite 66: O Que Pode Ter Acontecido Se

    HDB – IR O que pode ter acontecido se ... Depois de colocar as pilhas no comando remoto o visor não Ao carregar em qualquer tecla das funções, no visor do acenda: comando aparece a função pedida mas a unidade não confirma a recepção da ordem pedida, não se ouvindo o sinal...
  • Seite 67 HDB – IR Drift- och skötselinstruktion Installationsinstruktioner för inom- och utomhusenhet medföljer respektive aggregat. Innehållsförteckning Sida Allmän beskrivning .................. Aggregatets kontroll ................Displayens funktioner ................Användning av fjärrkontrollen ..............Felsökning ....................S - 1...
  • Seite 68: Allmän Beskrivning

    HDB – IR Allmän beskrivning • Tag bort de gamla batterierna och sätt i nya. Fjärrkontrollen arbetar med två batterier av typen LR03x2, 1,5 V • Tryck ned återställningsknappen ”O” med ett spetsigt objekt för att återställa fjärrkontrollen. • Använd inte begagnade batterier eller batterier av olika sort då...
  • Seite 69: Aggregatets Kontroll

    HDB – IR Aggregatets kontroll S V E N S K A P : Grön lysdiod Q : Röd lysdiod R : Gul lysdiod S : Extern signalmottagare Maskinens driftinformation kan övervakas med lysdioderna. Lysdioderna på elkortet fungerar på följande sätt: Tre av dessa lysdioder sitter på...
  • Seite 70: Displayens Funktioner

    HDB – IR Displayens funktioner 1. Driftsläge (från vänster till höger): • Ventilation (endast fläkt) • Värme (Beroende på enhetens konfiguration) • Automatisk (Beroende på enhetens konfiguration) • Kyla och avfuktning • Endast avfuktning 2. Symbol för signalöverföring 3. Utvald temperatur 4.
  • Seite 71: Användning Av Fjärrkontrollen

    HDB – IR Användning av fjärrkontrollen S V E N S K A Justering av klockslag och återställning Val av driftsläge (knappar N och O) (knapp A) Håll justeringsknappen för tidsinställning nedtryckt i minst 5 Med denna knapp väljs luftkonditioneringens driftsläge.
  • Seite 72 HDB – IR Användning av fjärrkontrollen Val av fläkthastighet Inställning av tilluftsgaller (knapp E) Nu blinkar denna symbol. Använd knapp , för att välja önskad position. Tryck ned knapp ör bekräftelse. Fläkthastigheten väljs genom att knapp trycks ned . Nu blinkar inga symboler i displayen.
  • Seite 73 HDB – IR Användning av fjärrkontrollen S V E N S K A Nattprocedur ”Timer SLEEP” fördröjd Timer för daglig drift (DAILY) avstängning (M-knappen) (Everyday - knapp J) Tryck ned denna knapp för att ställa in nattdrift då fjärrkontrollen Tryck ned knapp när timern är i ON- eller OFF-läge.
  • Seite 74: Felsökning

    HDB – IR Felsökning Trots att fjärrkontrollen försetts med batterier, så lyser inte • Fjärrkontrollen har inte blivit rätt riktad mot aggregatets mottagare. displayen: Stäng av fjärrkontrollen och upprepa försöket med fjärrkontrollen i rätt riktning. • Batterierna är urladdade eller felaktigt placerade.
  • Seite 75: Käyttäjän Käsikirja

    HDB – IR Käyttäjän käsikirja Käytä sisäyksikön ja ulkoyksikön asennuksessa asianomaista asennusohjetta tämän ohjeen rinnalla. Sisältö Sivu Yleiset ohjeet ................... Yksikön varoitusvalot ................Valittujen toimintojen näyttö ..............Etäisohjaimen käyttö ................Vianetsintä ....................FIN - 1...
  • Seite 76: Yleiset Ohjeet

    HDB – IR Yleiset ohjeet • Poista käytetyt paristot ja vaihda ne uusiin. Kauko-ohjaimeen laitetaan kaksi alkaaliparistoa. (1,5V, LR03x2). • Paina O-näppäintä terävällä esineellä säätääksesi kauko- ohjaimen. • Älä käytä muita paristoja, sillä ne voivat vahingoittaa yksikköä. • Paristot kestävät normaalissa käytössä noin vuoden. Kauko- ohjaimen käytetyt paristot tulee hävittää...
  • Seite 77 HDB – IR Yksikön varoitusvalot S U O M I P : Vihreä valo (LED) Q : Punainen valo (LED) R : Keltainen valo (LED) S : Etäisohjaimen viestin vastaanottaja Koneen toimintatietoja voidaan valvoa LED-merkkivalojen avulla. Paneelin LED-merkkivalot toimivat seuraavasti: 3 merkkivaloa on sijoitettu sähköpaneeliin, jota kutsutaan...
  • Seite 78 HDB – IR Valittujen toimintojen näyttö 1. Käyttötunnukset (vasemmalta oikealle): • Puhallus • Lämmitys (Yksikön konfiguroinnin mukaan) • Automaattiasento (Yksikön konfiguroinnin mukaan) • Jäähdytys ja kuivaus • Vain kuivaus 2. Viestin lähetyksen merkki 3. Valittu lämpötila 4. Toiminnan valinta 5. Yksikön lämpötilanäyttö (°C tai °F) 6.
  • Seite 79 HDB – IR Etäisohjaimen käyttö S U O M I Toimintojen valinta Kelloajan säätö ja asetus painike (painike A) (painikkeet N ja O) Paina ajansäätöpainiketta vähintään 5 sekunnin ajan Tällä painikkeella ilmastointilaitteen toimintatilat voidaan säätääksesi vallitsevan ajan. valita. Paina asetuspainike ”O” pohjaan, jos kaukosäädin ei toimi Toistuvasti painamalla tätä...
  • Seite 80 HDB – IR Etäisohjaimen käyttö Puhallinnopeuden valinta Ilmansuuntaussäleiden suuntaus. (painike E) Ensin tämä tunnus vilkkuu. Käytä painiketta , valitessasi haluttua suuntausta. Puhaltimen nopeus voidaan valita painamalla painikketta.. Paina painiketta asetuksen hyväksymiseksi.Nyt on kaikki tunnukset Valittu merkki sidottu näyttöön.Jos haluat peruuttaa...
  • Seite 81 HDB – IR Etäisohjaimen käyttö S U O M I DAILY-Päivittäinen aikaohjelma Yöllinen “Timer SLEEP”-toiminto (Päivittäin-painike J) myöhemmin tapahtuvaa sammutusta varten (M näppäin) Paina painiketta kun ON- tai OFF-ajastintila toiminnassa. Tunnus ilmestyy näyttöön. Paina tämä painike SLEEP-ajastukseen kaukosäätimessä. Tällä tavoin ON- ja OFF-ajastintila toistuu jokapäivä.
  • Seite 82: Vianetsintä

    HDB – IR Vianetsintä Näyttö ei toimi vaikka ohjaimen patterit ovat paikoillaan: ohjelmointi oikeaan suuntaan. • Patterit ovat tyhjät tai ne ovat väärinpäin; vaihda patterit tai aseta • Ohjaimen ja kojeen välissä on este (verhot, seinä yms.) poista ne oikeinpäin.
  • Seite 83: Instrukcja Obsługi

    HDB – iR instrukcja obsługi instrukcje instalacji zarówno do jednostek wewnętrznych i zewnętrznych są podane w instrukcjach obsługi do każdego urządzenia. spis treści Strona Informacje ogólne ..............Diody ostrzegawcze/informujące o statusie urządzenia ....Wyświetlanie wybranych funkcji ..........Korzystanie z pilota zdalnego sterowania ........
  • Seite 84: Informacje Ogólne

    HDB – iR informacje ogólne • Usuń zużyte baterie i włóż nowe. Pilot wykorzystuje dwie baterie alkaliczne (1,5 V, LR03x2). • Naciśnij przycisk RESET "O" zaostrzonym przedmiotem, aby zresetować ustawienia pilota. • Nie używać zużytych baterii lub baterii różnych typów, ponieważ...
  • Seite 85: Diody Ostrzegawcze/Informujące O Statusie Urządzenia

    HDB – iR Diody ostrzegawcze/informujące o statusie urządzenia P O L S K I P: Zielona dioda LED Q: czerwona dioda LED R: Żółta dioda LED s: Zdalny odbiornik sygnału sterującego Dane eksploatacyjne urządzenia mogą być sprawdzane za Działanie diod na płycie/odbiorniku jest następujące: pomocą...
  • Seite 86: Wyświetlanie Wybranych Funkcji

    HDB – iR Wyświetlanie wybranych funkcji Tryb pracy (od lewej, do prawej): • Wentylacja (tylko wentylator) • Ogrzewanie (według konfiguracji urządzenia) • Praca automatyczna (według konfiguracji urządzenia) • chłodzenie i osuszanie • Tylko osuszanie Symbol przesyłania sygnału Ustawiona temperatura Adresowanie jednostek Zmiana ustawień...
  • Seite 87: Korzystanie Z Pilota Zdalnego Sterowania

    HDB – iR korzystanie z pilota zdalnego sterowania P O L S K I Wybór trybu pracy urządzenia Bieżąca regulacja czasu i przyciski (przycisk) resetu (przyciski N i o) Za pomocą tego przycisku może zostać wybrany tryb pracy Przytrzymaj bieżący przycisk regulacji czasu na co klimakonwektora.
  • Seite 88 HDB – iR korzystanie z pilota zdalnego sterowania Wybór prędkości wentylatora Pozycjonowanie żaluzji (przycisk E) Teraz ta ikona miga. Użyj przycisku , aby wybrać żądaną Prędkość wentylatora może być wybrana przez naciśnięcie pozycję. przycisku Naciśnij przycisk w celu potwierdzenia. Wykaz symboli Teraz wszystkie ikony są...
  • Seite 89 HDB – iR korzystanie z pilota zdalnego sterowania P O L S K I FUNkCJA „CoDziENNEGo zEGARA/ Funkcja zegara slEEP z opóźnieniem TiMER-A” (przycisk j) wyłączenia (Przycisk M) Naciśnij przycisk , gdy funkcja „włączenia” lub „wyłączenia” Naciśnij ten przycisk na pilocie, aby ustawić wyłącznik jest aktywna.
  • Seite 90: Rozwiązywania Problemów

    HDB – iR Rozwiązywanie problemów Po włożeniu baterii do pilota zdalnego sterowania, wyświetlacz pilot i powtórzyć operację, kierując pilot w odpowiednie miejsce nie świeci się: • Pomiędzy pilotem a odbiornikiem urządzenia znajdują się przeszkody (zasłony, przegrody, itp.), powtórzyć operację po ich • Baterie są wyczerpane lub biegunowość baterii jest usunięciu. nieprawidłowa; wymienić baterie lub sprawdź biegunowość. • Odbiornik na urządzeniu lub na pilocie jest narażony na intensywne promieniowanie słoneczne; unikać bezpośredniego światła słonecznego skierowanego na urządzenie, wyciągnąć i Po naciśnięciu przycisku regulacji zegara, nie miga godzina zasłonić zasłony lub przenieść pilota. wyświetlana na wyświetlaczu: • Transmisja sygnału jest zakłócane przez poważne zakłócenia pola • Przycisk regulacji zegara nie został naciśnięty poprawnie; elektromagnetycznego; unikaj wysyłania sygnałów, gdy komputery przytrzymać go przez co najmniej 5 sekund. i sprzęt gospodarstwa domowego działają w pobliżu (roboty kuchenne, ekspresy do kawy, itp.). Komórki lub bezprzewodowe telefony również mogą wpływać na Po naciśnięciu dowolnego przycisku wszystkie symbole sterowanie urządzeniem. pojawiają się na wyświetlaczu: • Pilot został nieodwracalnie uszkodzony, wymienić na nowy. Wyświetlacz pilota nie reaguje, gdy jakikolwiek przycisk jest naciskany: Po naciśnięciu przycisku „start”, urządzenie nie potwierdza • inny sygnał jest nadawany, wtedy symbol trójkąta 2 jest sygnału "beep": włączony, poczekaj aż sygnał 2 zniknie i powtórz operację. • Wyłącznik główny jest wyłączony, ustawić wyłącznik w pozycji ON. LED P (zielona dioda LED) miga na odbiorniku podczerwieni: • Baterie pilota są wyczerpane, wymień baterie. Pilot nie został...
  • Seite 92 L010127H90 - 1112 Via R. Sanzio, 9 - 20058 Villasanta (MI) Italy - Tel. 039/3636.1 The manufacturer reserves the right to change any product specifications without notice. La cura costante per il miglioramento del prodotto può comportare senza preavviso, cambiamenti o modifiche a quanto descritto. La recherche permanente de perfectionnement du produit peut nécessiter des modifications ou changements, sans préavis.

Inhaltsverzeichnis