Inhaltsverzeichnis
Werbung
Verfügbare Sprachen
Verfügbare Sprachen
Werbung
Kapitel
Inhaltsverzeichnis
Fehlerbehebung

Verwandte Anleitungen für auna Oakland DAB


Inhaltszusammenfassung für auna Oakland DAB
-
Seite 3: Inhaltsverzeichnis
Sehr geehrter Kunde, wir gratulieren Ihnen zum Erwerb Ihres Gerä- tes. Lesen Sie die folgenden Hinweise sorgfäl- tig durch und befolgen Sie diese, um möglichen Schäden vorzubeugen. Für Schäden, die durch Missachtung der Hinweise und unsachgemäßen Gebrauch entstehen, übernehmen wir keine Haf- tung. - Seite 4 WARNUNG VORSICHT: DAS GEHÄUSE NICHT ÖFFNEN, UM EINEN STROMSCHLAG UND ERNSTE PERSONENVERLETZUNGEN ZU VERMEIDEN. IM INNEREN KEINE VOM KUNDEN ZU WARTENDEN KOMPONENTEN. WENDEN SIE SICH AUSSCHLIESSLICH AN QUALIFIZIERTE FACHLEUTE. WARNUNG. UM DIE GEFAHR EINES BRANDS ODER EINES STROMSCHLAGS ZU VERRINGERN, DAS GERÄT NICHT IN WASSER, REGEN ODER FEUCHTIGKEIT AUSZUSETZEN.
-
Seite 5: Sicherheitshinweise
SICHERHEITSHINWEISE • Lesen Sie die Anleitung. Alle Anwendungshinweise müssen vor der Verwendung des Geräts gelesen werden. • Bewahren Sie die Bedienungsanleitung für den späteren Gebrauch auf. • Die Richtlinien für Aufmerksamkeit, Verwendung und Sicherheit müssen eingehalten werden. • Das Gerät darf nicht in der Nähe von Wasser verwendet oder mit Feuchtigkeit in Berührung gebracht werden. - Seite 6 bestimmungsgemäßer Verwendung leicht zugänglich sein. • Die Batterie darf keiner übermäßigen Hitze wie Sonne, Feuer oder dergleichen ausgesetzt werden. • Übermäßiger Schalldruck von Ohrhörern und Kopfhörern kann zu Hörverlust führen. • Halten Sie Mindestabstand (8 cm) um das Gerät herum für ausreichende Belüftung ein.
-
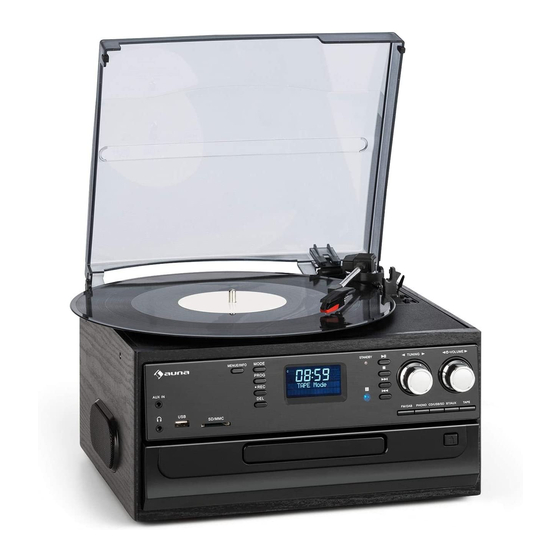
Seite 7: Overview
OVERVIEW Abdeckhaube 16 CD-Fach öffnen/schließen Rotierende Welle 17 Funktionswahltasten Plattenteller 18 Einstellknopf Modus (USB/ SD) 19 Titel zurück Mene/Info 20 Titel vor Radioband 21 Stopptaste AUX-Eingang 22 Wiedergabe-/Pausetaste Programmtaste 23 Lautsprecher 3,5 mm Kopfhöreranschluss 24 Kassettenfach 10 Aufnahmetaste 25 Lautstärkeregler Löschtaste 26 Tonkopf mit Nadel 12 USB-Anschluss... - Seite 8 Plattenspieler 30 45er-Puk 31 Tonarmhebel 32 Auto-Stop-Bedienung 33 Tonarmstütze 34 Drehzahlwähler (33/45/78 U/min 35 Tonarm Seite und Rückseite 36 Kassettenausgabe/ Schnell vorspulen 37 Kassettenfach 38 RCA LINE OUT Ausgang 39 FM-Antenne 40 Netzkabel...
- Seite 9 Fernbedienung 42 Stummschalten 48 Aufnahmetaste 43 Programmtaste 49 Stopptaste 44 Wiederholungstaste 50 Titel vor 45 Modustaste 51 Ordner nach oben 46 Titel vor 52 Ordner nach unten 47 Wiedergabe/ Pause...
-
Seite 10: Inbetriebnahme Und Bedienung
INBETRIEBNAHME UND BEDIENUNG Entpacken und Inbetriebnahme • Entnehmen Sie das Gerät aus dem Karton und entfernen Sie alle Verpackungsmaterialien vom Gerät. • Wickeln Sie das Netzkabel auf seine volle Länge ab. • Fahren Sie die FM-Antenne vollständig aus. • Stellen Sie das Gerät auf eine stabile, ebene Fläche, welche sich in der Nähe einer Steckdose befindet und sich außerhalb direkter Sonneneinstrahlung und in ausreichendem Abstand zu Wärmequellen, Staub, Feuchtigkeit, Dampf oder starken Magnetfeldern befindet. -
Seite 11: Radio Hören
RADIO HÖREN 1. Drehen Sie den Lautstärkeregler im Uhrzeigersinn, um das Gerät einzuschalten. 2. Wählen Sie mit der Funktionstaste den Radiomodus aus. 3. Stellen Sie den gewünschten Modus ein (AM, FM oder FM-Stereo). 4. Drehen und halten Sie den Einstellknopf für einige Sekunden, um einen Radiosender auszuwählen. -
Seite 12: Dab Radio
DAB Radio Wenn das Gerät das erste Mal eingeschaltet wurde, wird automatisch der DAB-Modus eingestellt und der automatische Sendersuchlauf startet. Während der automatischen Sendersuche wird auf dem Bildschirm „Scanning…“, gemeinsam mit einem Balken, welcher den Suchfortschritt und die bisher gefundenen Sender darstellt, angezeigt. Sobald die Sendersuche beendet ist, wählt das Radio automatisch den ersten alphanummerisch gefundenen Sender aus. - Seite 13 dynamische Bereich für jeden Radiosender wird vom Rundfunkveranstalter eingestellt und kann von Sender zu Sender variieren (wie beispielsweise Pop- oder klassische Musik oder eine Gesprächsrunde). Das Dynamik- Steuersignal wird parallel zum Audiosignal für jedes Programm übertragen. Mit diesem Steuersignal können Sie bei Ihrem Radio den Dynamikbereich (die Differenz zwischen dem lautesten und dem leisesten Ton) des wiedergegebenen Audiosignals erweitern oder komprimieren.
- Seite 14 Informationen wie Senderdetails etc. Signalstärke Der Bildschirm zeigt einen Balken an, welcher die Signalstärke anzeigt. Je stärker das Signal, desto länger ist der Balken von links nach rechts. Programmart Zeigt die Art des ausgestrahlten Programms an. Falls diese Information nicht verfügbar ist, zeigt der Bildschirm „Programme Type“ an Ensemble/ Multiplex (Gruppenname) Bei Ensemble/ Multiplex handelt es sich um eine Sammlung von Radiosendern, die in einer einzigen Frequenz gebündelt und übertragen...
-
Seite 15: Plattenspieler
PLATTENSPIELER 1. Öffnen Sie den Staubschutz und drehen Sie den Lautstärkeregler im Uhrzeigersinn, um das Gerät einzuschalten. 2. Verwenden Sie zur Auswahl von „Phono“ die Funktionsauswahltaste. 3. Stellen Sie den Drehzahlwahlschalter in die gewünschte Position: 33, 45 oder 78, abhängig von der Schallplatte, die abgespielt werden soll. 4. - Seite 16 Schallplatte wird dann bis zum Ende wiedergegeben, aber Sie müssen das Drehen des Drehtellers manuell beenden. (Bewegen Sie den Tonarm manuell zur Tonarmhalterung. Sollte sich der Drehteller noch immer drehen, schalten Sie das Gerät über den Lautstärkeregler ab. Ziehen Sie den Netzstecker aus der Steckdose, wenn Sie das Gerät für einen längeren Zeitraum nicht verwenden.) Phonodigitalisierung...
-
Seite 17: Kassettenrekorder
KASSETTENREKORDER 1. Drehen Sie den Lautstärkeregler zum Einschalten des Geräts im Uhrzeigersinn. 2. Verwenden Sie zur Auswahl von „TAPE/AUX“ die Funktionsauswahltaste. 3. Stecken Sie eine Kassette, wie in der Abbildung dargestellt, in das Kassettenfach hinein. Die Taste Kassettenausgabe/ Schnell vorspulen wird vollständig nach oben gedrückt und das Gerät beginnt automatisch mit der Widergabe. -
Seite 18: Cd-Player
1. Drücken Sie zum Beenden der Aufnahme die Stopptaste Der Bildschirm zeigt „END“ an und wechselt in den Kassetten-/Aux-Modus. Hinweis: • Die Aufnahmegeschwindigkeit ist 1:1. Die Aufnahme dauert genauso lange wie die wiedergegebene Schallplatte. • Das Aufnahmeformat ist auf MP3 mit Bitfrequenz 128 kbps eingestellt: CD-PLAYER 1. -
Seite 19: Usb- Und Sd-Kartenanschluss
USB- UND SD-KARTENANSCHLUSS Das Gerät kann alle MP3-/WMA-Dateien, welche sich auf Speichermedien befinden, dekodieren. 1. Drehen Sie zum Einschalten des Geräts den Lautstärkeregler im Uhrzeigersinn. 2. Befolgen Sie die in der Abbildung unten dargestellten Hinweise, zum Einstecken von USB-Sticks in den USB-Anschluss. Stellen Sie sicher, dass dieser richtig eingesteckt wurde. - Seite 20 TITEL ZURÜCK Drücken Sie diese Taste einmal, um die vorherige Datei abzuspielen, halten Sie diese Taste gedrückt, um schnell durch die Dateien/Spuren zu blättern. TUNING KNOB Drehen Sie diesen Knopf nach rechts/links, um einen Ordner rückwärts oder vorwärts zu suchen.. MODE Drücken Sie diese Taste, um zwischen dem USB- und SD- Kartenmodus umzuschalten.
-
Seite 21: Kopieren Von Mp3-/ Wma-Dateien
Kopieren von MP3-/ WMA-Dateien Fas Gerät ermöglicht das Kopieren von USB auf SD/MMC oder umgekehrt. Sie können eine/n einzige/n Audiodatei/Titel, einen Ordner oder alle auf dem Speichermedium befindlichen Audiodateien kopieren. Eine einzige Audiodatei kopieren 1. Stecken Sie einen USB-Stick oder eine Speicherkarte in den entsprechenden Anschluss und wählen Sie den USB-/SD-Modus (wie zuvor beschrieben) aus. -
Seite 22: Dateien Von Usb-Stick Oder Speicherkarte Löschen
1. Gerät alle Dateien kopiert. 2. Sobald alle Dateien kopiert wurden, hört das USB-/ oder SD-Symbol auf, auf dem Bildschirm zu blinken. Hinweis: Wenn Sie während des USB- oder SD-Modus die Taste drücken, werden die Dateien von USB auf SD oder umgekehrt kopiert. Dateien von USB-Stick oder Speicherkarte löschen Das Gerät kann auf dem USB-Stick oder der SD-Karte befindliche Audiodateien löschen. -
Seite 23: Aux-Anschluss
1. „DEL“ wird so lange auf dem Bildschirm angezeigt, bis der Ordner vollständig gelöscht ist. Hinweis: Das Drücken der Taste DEL führt dazu, dass alle auf dem Speichermedium befindlichen Audiodateien gelöscht werden. Auswerfen des USB-Sticks/ der SD-Karte • Wählen Sie mit der Funktionsauswahltaste einen anderen Modus aus (Radio, Phono, Kassette) und drehen Sie den Lautstärkeregler gegen den Uhrzeigersinn, um das Gerät auszuschalten. -
Seite 24: Verwendung Von Bt
1. Schalten Sie Ihr externes BT-Gerät ein und suchen Sie das externe Gerät in der Geräteliste. Verbinden Sie die Geräte miteinander. 2. Spielen Sie die Musik, so wie immer, auf dem BT-Gerät ab und diese wird dann auf Ihrem Gerät wiedergegeben Hinweis: •... -
Seite 25: Fehlersuche Und Fehlerbehebung
FEHLERSUCHE UND FEHLERBEHEBUNG Falls Sie Probleme bei der Verwendung des Geräts haben, überprüfen Sie zunächst die unten genannten Hinweise. Falls Sie das Problem nicht selbstständig beheben können, kontaktieren Sie den Kundendienst. Versuchen Sie keinesfalls das Gerät selbst zu reparieren oder zu modifizieren. - Seite 26 - stellen Sie das Gerät an einen anderen Ort, um zu überprüfen, ob der Empfang besser wird. - stellen Sie sicher, dass sich keine anderen elektrischen Geräte in der Nähe befinden, um Interferenzen zu vermeiden.
-
Seite 27: Hinweise Zur Entsorgung
HINWEISE ZUR ENTSORGUNG Befindet sich die linke Abbildung (durchgestrichene Mülltonne auf Rädern) auf dem Produkt, gilt die Europäische Richtlinie 2012/19/EU. Diese Produkte dürfen nicht mit dem normalen Hausmüll entsorgt werden. Informieren Sie sich über die örtlichen Regelungen zur getrennten Sammlung elektrischer und elektronischer Gerätschaften.