Herunterladen Inhalt Inhalt Diese Seite drucken
Inhaltsverzeichnis

Werbung

Verfügbare Sprachen
  • DE

Verfügbare Sprachen

  • DEUTSCH, seite 1
FUNK-WETTERSTATION / RADIO-CONTROLLED
WEATHER STATION / STATION MÉTÉO RADIOGUIDÉE
FUNK-WETTERSTATION
Bedienungs- und Sicherheitshinweise
STATION MÉTÉO RADIOGUIDÉE
Instructions d'utilisation et consignes de sécurité
BEZDRÁTOVÁ METEOROLOGICKÁ STANICE
Pokyny pro obsluhu a bezpečnostní pokyny
ESTAÇÃO METEOROLÓGICA COM
RÁDIO COMANDO
Instruções de utilização e de segurança
IAN 296289
RADIO-CONTROLLED WEATHER STATION
Operation and Safety Notes
DRAADLOOS WEERSTATION
Bedienings- en veiligheidsinstructies
ESTACIÓN METEOROLÓGICA
INALÁMBRICA
Instrucciones de utilización y de seguridad

Werbung

Inhaltsverzeichnis
loading

Inhaltszusammenfassung für Auriol 296289

  • Seite 1 Instructions d‘utilisation et consignes de sécurité Bedienings- en veiligheidsinstructies BEZDRÁTOVÁ METEOROLOGICKÁ STANICE ESTACIÓN METEOROLÓGICA INALÁMBRICA Pokyny pro obsluhu a bezpečnostní pokyny Instrucciones de utilización y de seguridad ESTAÇÃO METEOROLÓGICA COM RÁDIO COMANDO Instruções de utilização e de segurança IAN 296289...
  • Seite 2 DE / AT / CH Bedienungs- und Sicherheitshinweise Seite GB / IE Operation and Safety Notes Page FR / BE Instructions d‘utilisation et consignes de sécurité Page NL / BE Bedienings- en veiligheidsinstructies Pagina 117 Pokyny pro obsluhu a bezpečnostní pokyny Strana 155 Instrucciones de utilización y de seguridad Página 191...
  • Seite 3 25 23...
  • Seite 5: Inhaltsverzeichnis

    Einleitung ....................Seite Bestimmungsgemäße Verwendung ............. Seite Teilebeschreibung ..................Seite Technische Daten ..................Seite Lieferumfang ....................Seite 10 Sicherheit ....................Seite 10 Allgemeine Sicherheitshinweise ..............Seite 11 Sicherheitshinweise für Batterien / Akkus ............ Seite 11 Vor der Inbetriebnahme ............. Seite 13 Geräte aufstellen ..................
  • Seite 6 Luftdruck der vergangenen 12 Stunden ablesen ........Seite 30 Einstellung der Luftdruckanzeige ..............Seite 31 Kanal einstellen .................... Seite 32 Temperatur und Temperatur-Trend anzeigen ..........Seite 33 Luftfeuchtigkeit und Luftfeuchtigkeit-Trend anzeigen ........Seite 33 Maximale / minimale Temperatur / Luftfeuchtigkeit anzeigen ....Seite 34 Temperatur- und Frostalarm .................
  • Seite 7: Einleitung

    Funk-Wetterstation Einleitung Wir beglückwünschen Sie zum Kauf Ihres neuen Produkts. Sie haben sich damit für ein hochwertiges Produkt entschieden. Die Bedienungsanleitung ist Teil dieses Produkts. Sie enthält wichtige Hinweise für Sicherheit, Gebrauch und Entsorgung. Machen Sie sich vor der Benutzung des Produkts mit allen Bedien- und Sicherheits- hinweisen vertraut.
  • Seite 8: Teilebeschreibung

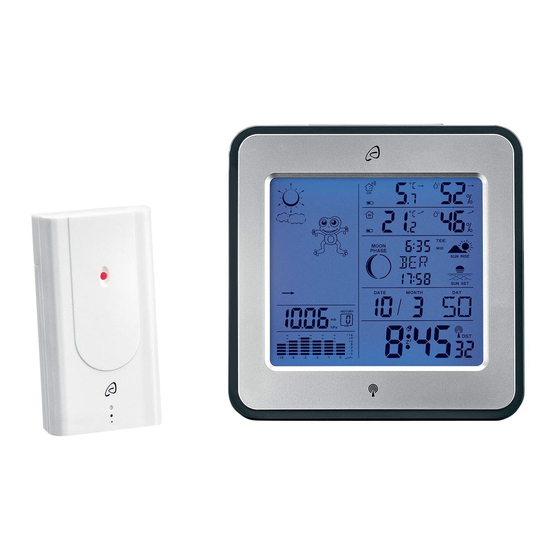
    Teilebeschreibung Wetterstation: Datums-Anzeige Innentemperatur (°C / °F) Monats-Anzeige Batterieanzeige Alarm 1 Luftfeuchtigkeit-Trend (Außen) SNOOZE-Anzeige Luftfeuchtigkeit (Außen) Funkturm-Symbol Temperartur- und Frost-Alarm DST-Anzeige (Sommerzeit) (maximal / minimal) Zeitanzeige Temperatur-Trend (Außen) Alarm 2 Außentemperatur (°C / °F) Wochentags-Anzeige Batterieanzeige (Außenfühler) Sonnenaufgang / Gewählter Kanal Uhrzeit des Sonnenaufgangs Luftdruck-Balkenanzeige Tidenhub-Anzeige...
  • Seite 9: Technische Daten

    CITY-Taste Batteriefach Außenfühler: Kontroll-LED Kanal-Wahlschalter Aufhängevorrichtung Batteriefach RESET-Taste Technische Daten Wetterstation: Temperaturmessbereich: 0 bis +50 °C +32 bis +122 °F Temperaturauflösung: 0,1 °C Messbereich Luftfeuchtigkeit: 20–95 % Auflösung Luftfeuchtigkeit: Funksignal: Batterie: 3 x AA, 1,5 V (Gleichstrom) Luftdruckbereich: 850 - 1050 hPa Frequenzband: 433.050 bis 434.790 MHz Außenfühler:...
  • Seite 10: Lieferumfang

    Messbereich Luftfeuchtigkeit: 20–95 % Auflösung Luftfeuchtigkeit: HF-Übertragungssignal: 433 MHz HF-Übertragungsreichweite: max. 30 Meter (im freien Gelände) Batterie: 2 x AA, 1,5 V (Gleichstrom) Schutzart: IPX4 (spritzwassergeschützt) Frequenzband: 433.050 bis 434.790 MHz Maximal übertragene Leistung: 433.999 MHz, <10 dBm Lieferumfang 1 Wetterstation 2 Batterien AA, 1,5 V (vorinstalliert) 1 Außenfühler 1 Bedienungsanleitung...
  • Seite 11: Allgemeine Sicherheitshinweise

    BEWAHREN SIE ALLE SICHERHEITSHINWEISE UND ANWEISUNGEN FÜR DIE ZUKUNFT AUF! Allgemeine Sicherheitshinweise Kinder unterschätzen häufig die Gefahren. Halten Sie Kinder stets vom Produkt fern. Dieses Produkt kann von Kindern ab 8 Jahren und darüber sowie von Personen mit verringerten physischen, sensorischen oder mentalen Fähigkeiten oder Man- gel an Erfahrung und Wissen benutzt werden, wenn sie beaufsichtigt oder be- züglich des sicheren Gebrauchs des Produkts unterwiesen wurden und die daraus resultierenden Gefahren verstehen.
  • Seite 12: Risiko Des Auslaufens Von Batterien / Akkus

    EXPLOSIONSGEFAHR! Laden Sie nicht aufladbare Batterien niemals wieder auf. Schließen Sie Batterien / Akkus nicht kurz und / oder öffnen Sie diese nicht. Überhitzung, Brandgefahr oder Platzen können die Folge sein. Werfen Sie Batterien / Akkus niemals in Feuer oder Wasser. Setzen Sie Batterien / Akkus keiner mechanischen Belastung aus.
  • Seite 13: Risiko Der Beschädigung Des Produkts

    Risiko der Beschädigung des Produkts Verwenden Sie ausschließlich den angegebenen Batterietyp / Akkutyp! Setzen Sie Batterien / Akkus gemäß der Polaritätskennzeichnung (+) und (-) an Batterie / Akku und des Produkts ein. Reinigen Sie Kontakte an Batterie / Akku und im Batteriefach vor dem Einlegen! Entfernen Sie erschöpfte Batterien / Akkus umgehend aus dem Produkt.
  • Seite 14: Außenfühler In Betrieb Nehmen

    Stellen Sie sicher, dass benachbarte Geräte nicht mit der gleichen Frequenz von 433 MHz betrieben werden. Diese Geräte können eine Störung der Funkverbindung verursachen. Stellen Sie die Geräte nicht neben oder auf Metallplatten. Die Funkübertragung zwischen den Geräten kann vermindert werden. Stellen Sie die Geräte nicht in Gebäuden aus Stahlbeton, z.
  • Seite 15: Wandmontage

    Hindernisse zwischen Außenfühler und Wetterstation befinden. Andernfalls kann die Übertragung der Daten gestört werden. Wandmontage: Hängen Sie den Außenfühler mit der Aufhängevorrichtung an eine Schraube. Wetterstation in Betrieb nehmen Batterie-Sicherungsstreifen entfernen: Öffnen Sie das Batteriefach auf der Rückseite der Wetterstation. Ziehen Sie den Batterie-Sicherungsstreifen heraus.
  • Seite 16 dauern. Das -Symbol blinkt einige Minuten lang. Bei erfolgreicher Verbindung zum Außenfühler wird im LC-Display das gewählte Kanal-Symbol mit dem Kanal des Außenfühlers angezeigt (Wechseln Sie ggf. den Kanal des Außenfühlers gem. des Kapitels „Kanal einstellen“). Kann keine automatische Verbindung hergestellt wer- den, kann dies folgendermaßen manuell geschehen: 1.
  • Seite 17: Bedienung

    Funksignal (DCF): Das DCF-Signal (Zeitsignalsender) besteht aus Zeitimpulsen, die von einer der genauesten Uhren der Welt, in der Nähe von Frankfurt / Main, Deutschland, abgegeben werden. Ihre Wetterstation empfängt diese Signale unter optimalen Bedingungen bis zu einer Distanz von ca. 2000 km um Frankfurt / Main. Der Empfang des Funksignals dauert in der Regel ca.
  • Seite 18: 24-Stundenformat / °C / °F / Hpa / Inhg / Zeitzone / Uhrzeit / Datum / Sprache Manuell Einstellen

    Um eventuelle Abweichungen von der exakten Zeit zu berichtigen, führt die Wetter- station täglich um 1:00, 2:00 und 03:00 Uhr automatisch eine Synchronisation mit dem DCF-Funksignal durch. Der Empfang des DCF-Funksignals kann an der Wetterstation auch manuell gestartet werden. Drücken Sie gleichzeitig die + und – -Taste .
  • Seite 19 Gehen Sie wie folgt vor: 1. Drücken und halten Sie die MODE-Taste ca. 3 Sekunden gedrückt. „12 Hr“ oder „24 Hr“ blinkt im Display. Drücken Sie die + oder – -Taste , um das gewünschte Stundenformat zu wählen. Hinweis: Das AM-Symbol in der Zeitanzeige steht im 12-Stundenformat für vormittags.
  • Seite 20 5. Bestätigen Sie Ihre Eingabe durch Drücken der MODE-Taste. Die Stundenanzeige der Zeitanzeige blinkt. Drücken Sie die + oder – -Taste, um den gewünschten Wert einzustellen. Hinweis: Die Uhrzeit und das Datum werden automatisch eingestellt, sobald die Wetterstation das DCF-Funksignal empfängt. Stellen Sie die Uhrzeit und das Datum manuell ein, wenn Sie kein DCF-Funksignal empfangen.
  • Seite 21: Weckzeit Einstellen

    die + oder – -Taste, um die gewünschte Sprache zu wählen. Hinweis: Sie haben die Wahl zwischen Deutsch (GE), Englisch (EN), Italie- nisch (IT), Französisch (FR) und Spanisch (SP) (Deutsch ist als Standardsprache eingestellt). 11. Bestätigen Sie Ihre Eingabe durch Drücken der MODE-Taste. Weckzeit einstellen 1.
  • Seite 22: Weckfunktion Aktivieren / Deaktivieren

    Wetterstation im Modus ALARM 1 befindet. Sie gelangen nun in den Modus ALARM 2. 7. Wiederholen Sie Schritt 2–5, um den Wert für ALARM 2 einzustellen. Weckfunktion aktivieren / deaktivieren 1. Drücken Sie kurz einmal oder zweimal die MODE-Taste , um in den Modus von ALARM 1 oder ALARM 2 zu gelangen.
  • Seite 23: Snooze-Funktion

    SNOOZE-Funktion Drücken Sie die SNOOZE- / LIGHT-Taste , um in den SNOOZE-Modus zu gelangen, während das Alarmsignal ertönt. Das Alarmsignal ertönt nach ca. 5 Minuten erneut. Wettervorhersage in Betrieb nehmen Hinweis: Bitte achten Sie zusätzlich auf die Wettervorhersage Ihres lokalen Wetterdienstes.
  • Seite 24 leicht bewölkt bewölkt regnerisch Regen + Schnee Die Wettersymbole zeigen die Wetterbewegungen der nächsten acht Stunden an und nicht das aktuelle Wetter. Die Wetterstation kann den Luftdrucktrend anzeigen. 24 DE/AT/CH...
  • Seite 25: Standort Auswählen

    Folgende Anzeigen sind möglich: Der Luftdruck wird steigen. Der Luftdruck bleibt konstant. Der Luftdruck wird sinken. Standort auswählen Drücken Sie die CITY-Taste . Die Anzeige des Standortes blinkt und der Längen- und Breitengrad wird angezeigt. Drücken Sie die + oder – -Taste , um Ihren Standort auszuwählen.
  • Seite 26: Standort Manuell Auswählen

    Standort manuell auswählen Drücken und halten Sie die CITY-Taste für ca. 2 Sekunden gedrückt. Drücken Sie die + oder – -Taste , um die Anfangsbuchstaben Ihres Standortes auszuwählen. Drücken Sie die CITY-Taste, um Ihre Eingabe zu bestätigen. Stellen Sie den 2.
  • Seite 27 Passau Bosnia & Sarajevo Folgende Länder und Her- Regensburg Städte können ausge- zegovina Rostock wählt werden: (BA) Saarbrücken SAA Croatia Split Germany Berlin (HR) Stuttgart (DE) Zagreb Bremen Czech Brno Würzburg Köln (CZ) Australia Canbera Dortmund Prague (AU) Dresden Denmark Alborg Melbourne Düsseldorf...
  • Seite 28 Lyon Milan Norway Bergen (NO) Marseille Naples Lillehammer Metz Palermo Oslo Nantes Parma Poland Cracow Nice Perugia (PL) Orleans Rome Gdansk Paris San Remo Poznan Perpignan Triest Warsaw Rouen Turin Portugal Faro Strasbourg Venice (PT) Toulouse Verona Lisbon Greece Athens Liechten- Vaduz Porto...
  • Seite 29 Bilbao Zurich Cordoba United Aberdeen Kingdom Eivissa Ibiza (GB) La Coruna Belfast Las Palmas Birmingham Leon Cardiff Madrid Glasgow Malaga London Palma de Manchester Mallorca Newcastle Salamanca upon Tyne Sevilla Plymouth Valencia United Los Angeles Zaragoza States (US) Sweden Gothenburg New York (SE) Washington...
  • Seite 30: Mondphasen

    Mondphasen Die Wetterstation verfügt über eine Anzeige, die automatisch die aktuelle Mond- Phase anzeigt. Neumond Wachsender Halbmond Wachsender Halbmond Vollmond Vollmond Abnehmender Halbmond Abnehmender Vollmond Halbmond Luftdruck der vergangenen 12 Stunden ablesen Drücken Sie wiederholt die HISTORY-ABS / REL-Taste , um die Luftdruckwerte der vergangenen 12 Stunden ablesen zu können.
  • Seite 31: Einstellung Der Luftdruckanzeige

    Einstellung der Luftdruckanzeige Die Wettervorhersage dieser Wetterstation beruht auf einer Auswertung der Veränderung des Luftdrucks. Die Luftdruckanzeige ist werksseitig auf den absoluten Luftdruck eingestellt. Da der Luftdruck generell mit der Höhe über dem Meeresspiegel absinkt, wird vom öffentlichen Wetterdienst in der Regel der so genannte relative Luftdruck angegeben. Dieser relative Luftdruck wird der Topografie des Geländes angepasst, um ver- gleichbare Werte zu erhalten.
  • Seite 32: Kanal Einstellen

    Wenn Sie möchten, dass die Wetterstation den absoluten Luftdruck anzeigt, gehen Sie vor wie folgt: Drücken und halten Sie die HISTORY ABS/REL-Taste für ca. 3 Sekunden gedrückt. Drücken Sie anschließend die + oder – -Taste, um zur absoluten Luftdruckanzeige zu wechseln. Bestätigen Sie durch Drücken der HISTORY ABS / REL-Taste. Kanal einstellen Die Wetterstation empfängt das Signal des Außenfühlers automatisch, nachdem Sie alle Einstellungen vorgenommen haben.
  • Seite 33: Temperatur Und Temperatur-Trend Anzeigen

    Temperatur und Temperatur-Trend anzeigen Die aktuelle Innentemperatur und der Temperatur-Trend (Innen) werden im LC-Display angzeigt. Nach erfolgreicher Verbindung mit dem Außenfühler wird die Außentemperatur und der Temperatur-Trend (Außen) angezeigt. Folgende Anzeigen sind möglich: Die Temperatur steigt. Die Temperatur bleibt konstant. Die Temperatur sinkt.
  • Seite 34: Maximale / Minimale Temperatur / Luftfeuchtigkeit Anzeigen

    Nach erfolgreicher Verbindung mit dem Außensensor zeigt die Wetterstation den Luftfeuchtigkeit-Trend (Außen) sowie die Luftfeuchtigkeit (Außen) im LC-Dis- play an. Maximale / minimale Temperatur / Luftfeuchtigkeit anzeigen Die minimale / maximale Temperatur / Luftfeuchtigkeit wird nach dem Einlegen der Batterien erstmals gemessen und in der Wetterstation gespeichert. Die maximalen und minimalen Werte für Temperatur, Hygrometer und Luftdruck werden automatisch gespeichert.
  • Seite 35: Temperatur- Und Frostalarm

    Temperatur- und Frostalarm Der Temperaturalarm ist ein kurzer Signalton, der ertönt, sobald die Außentemperatur den vorgegebenen Temperaturbereich über- oder unterschreitet. Gehen Sie zur Ein- stellung des gewünschten Temperaturbereichs wie folgt vor: Drücken Sie die – -Taste , um in den Modus des Temperaturalarms zu gelangen.
  • Seite 36: Hintergrundbeleuchtung

    Ist der Frostalarm aktiviert, erscheint das dazugehörige Symbol neben der Außentemperatur. Das Alarmsignal ertönt bei –1 °C bis + 3 °C. Ist der Temperaturalarm aktiviert, erscheint das dazugehörige Symbol neben der Außentemperatur. Das Alarmsignal ertönt bei den eingestellten Werten. Sind Temperatur- und Frostalarm aktiviert, erscheinen beide Symbole auf dem Display. Hintergrundbeleuchtung Drücken Sie die SNOOZE / LIGHT-Taste .
  • Seite 37: Batterien Wechseln

    Batterien wechseln Wetterstation: Wechseln Sie die Batterien, wenn das LC-Display unleserlich oder die Batteriean- zeige angezeigt wird. Entfernen Sie die Batteriefachabdeckung auf der Rückseite der Wetterstation. Entnehmen Sie die verbrauchten Batterien. Legen Sie 3 neue Batterien vom Typ AA, 1,5 V ein. Hinweis: Achten Sie dabei auf die richtige Polarität.
  • Seite 38: Fehler Beheben

    Fehler beheben Hinweis: Das Produkt enthält elektronische Bauteile. Daher ist es möglich, dass es durch Funkübertragungsgeräte in unmittelbarer Nähe gestört wird. Entfernen Sie solche Geräte aus der Reichweite der Wetterstation / des Außen- fühlers oder entnehmen Sie kurzzeitig die Batterien aus der Wetterstation / dem Außenfühler, wenn das Display Störungen anzeigt.
  • Seite 39: Reinigung Und Pflege

    Reinigung und Pflege Verwenden Sie in keinem Fall Flüssigkeiten und keine Reinigungsmittel, da diese das Produkt beschädigen. Reinigen Sie das Produkt nur äußerlich mit einem weichen trockenen Tuch. Spritzen Sie den Außensensor in keinem Fall, z. B. mit einem Gartenschlauch, ab.
  • Seite 40 Möglichkeiten zur Entsorgung des ausgedienten Produkts erfahren Sie bei Ihrer Gemeinde- oder Stadtverwaltung. Werfen Sie Ihr Produkt, wenn es ausgedient hat, im Interesse des Um- weltschutzes nicht in den Hausmüll, sondern führen Sie es einer fachge- rechten Entsorgung zu. Über Sammelstellen und deren Öffnungszeiten können Sie sich bei Ihrer zuständigen Verwaltung informieren.
  • Seite 41: Garantie

    Garantie Das Produkt wurde nach strengen Qualitätsrichtlinien sorgfältig produziert und vor Anlieferung gewissenhaft geprüft. Im Falle von Mängeln dieses Produkts stehen Ihnen gegen den Verkäufer des Produkts gesetzliche Rechte zu. Diese gesetzlichen Rechte werden durch unsere im Folgenden dargestellte Garantie nicht eingeschränkt. Sie erhalten auf dieses Produkt 3 Jahre Garantie ab Kaufdatum.
  • Seite 42: Informationen

    Informationen Vereinfachte EU-Konformitätserklärung Hiermit erklärt OWIM GmbH & Co. KG, Stiftsbergstraße 1, DE-74167 Neckarsulm, DEUTSCHLAND, dass das Produkt (Funk-Wetterstation Z31915) den Richtlinien 2014/53/EU und 2011/65/EU entspricht. Der vollständige Text der EU-Konformitätserklärung ist unter der folgenden Internetadresse verfügbar: www.owim.com 42 DE/AT/CH...
  • Seite 43 Introduction .................... Page 45 Intended use ....................Page 45 Parts description ................... Page 46 Technical data ....................Page 47 Included items ....................Page 48 Safety ......................Page 49 General safety information ................Page 49 Safety instructions for batteries / rechargeable batteries ......Page 50 Before use ....................
  • Seite 44 Reading the barometric pressure for the last 12 hours ......Page 67 Adjusting the air pressure indication ............Page 68 Setting the channel ..................Page 69 Displaying temperature and temperature trend ......... Page 70 Displaying the humidity and humidity trend ..........Page 70 Displaying the maximum / minimum temperature / humidity .....
  • Seite 45: Introduction

    Radio-controlled weather station Introduction We congratulate you on the purchase of your new product. You have chosen a high quality product. The instructions for use are part of the product. They contain important information concerning safety, use and disposal. Before using the prod- uct, please familiarise yourself with all of the safety information and instructions for use.
  • Seite 46: Parts Description

    Parts description Weather station: Date display Humidity trend (outdoor) Month display Humidity (outdoor) Alarm 1 Temperature and frost alarm SNOOZE display (maximum / minimum) Radio tower symbol Temperature trend (outdoor) DST display (summer time) Outdoor temperature (°C / °F) Time display Battery state display (outdoor Alarm 2 sensor)
  • Seite 47: Outdoor Sensor

    HISTORY ABS / REL button Battery compartment CITY button Outdoor sensor: Control LED Channel selector switch Mount Battery compartment RESET button Technical data Weather station: Temperature measurement range: 0 to +50 °C +32 to +122 °F Temperature resolution: 0.1 °C Humidity measurement range: 20 %–95 % Humidity resolution:...
  • Seite 48: Included Items

    Outdoor sensor: Temperature measurement range: –20 to +65 °C –4 to +149 °F Humidity measurement range: 20 %–95 % Humidity resolution: HF transmission signal: 433 MHz HF transmission range: max. 30 metres (in open area) Batteries: 2 x AA, 1.5 V (direct current) Degree of protection: IPX4 (splash-proof)
  • Seite 49: Safety

    Safety Please read all safety information and instructions. Failure to comply with the safety information and instructions may result in an electric shock, fire and / or severe injuries. KEEP ALL THE SAFETY ADVICE AND INSTRUCTIONS IN A SAFE PLACE FOR FUTURE REFERENCE! General safety information Children frequently underestimate the dangers.
  • Seite 50: Safety Instructions For Batteries / Rechargeable Batteries

    Safety instructions for batteries / rechargeable batteries DANGER TO LIFE! Keep batteries / rechargeable batteries out of reach of children. If accidentally swallowed seek immediate medical attention. DANGER OF EXPLOSION! Never recharge non-rechargeable batteries. Do not short-circuit batteries / rechargeable batteries and / or open them.
  • Seite 51: Before Use

    Remove batteries / rechargeable batteries if the product will not be used for a longer period. Risk of damage of the product Only use the specified type of battery / rechargeable battery! Insert batteries / rechargeable batteries according to polarity marks (+) and (-) on the battery / rechargeable battery and the product.
  • Seite 52: Preparing To Use The Outdoor Sensor

    Do not place the devices on valuable or sensitive surfaces unless these are appropriately protected. Otherwise they may be damaged. Please ensure that neighbouring devices are not operated at the same frequency of 433 MHz. Such devices may cause interference to the radio connection. Do not place the devices next to or on metal plates.
  • Seite 53: Preparing The Weather Station For Use

    sensor and the weather station. Otherwise there may be interference of the transmission of data. For wall mounting: Hang the outdoor sensor with the mount on one screw. Preparing the weather station for use Removing the battery safety strip: Open the battery compartment on the back of the weather station.
  • Seite 54 Connecting the weather station with the outdoor sensor and the DCF radio signal: After removal of the battery safety strip the weather station attempts to establish a connection with the outdoor sensor. This process can take a few minutes. The symbol will keep flashing for few minutes.
  • Seite 55: Operation

    the clock adjustments manually (“Setting the 12 / 24 hour mode / °C / °F / hPa / inHg / time zone / time / date / language manually”). Radio signal (DCF): The DCF signal (time signal transmitter) consists of time pulses emitted by one of the most accurate clocks in the world close to Frankfurt / Main, Germany.
  • Seite 56: Setting The 12 / 24 Hour Mode / °C / °F / Hpa / Inhg / Time Zone / Time / Date / Language Manually

    Note: In buildings made of reinforced concrete the reception of the radio signal may be severely impaired (see “Setting up the devices”). In order to correct any deviations from the exact time, the clock is automatically synchronised with the DCF radio signal every day at 1:00, 2:00 and 3:00. Reception of the DCF radio signal can also be started manually on the weather station.
  • Seite 57 Follow these steps: 1. Press and hold down the MODE button for about 3 seconds. “12 Hr” or “24 Hr” blinks in the display. Press the + or – button to choose the desired hour format. Note: The AM symbol in the time display stands for before noon in the 12 hour mode.
  • Seite 58 Tip: Hold the + or – button pressed down. This will speed up the process of setting the values. You can also use this fast setting option for subsequent settings. If you do not press any button for 20 seconds, the LCD automatically reverts to the standard display.
  • Seite 59: Setting The Alarm Time

    Setting the alarm time 1. Press the MODE button briefly in order to get to alarm mode. The currently set waking time appears in the LC display. 2. Press and hold down the MODE button for about 2 seconds. The hours display flashes.
  • Seite 60: Activating / Deactivating The Alarm Function

    Activating / deactivating the alarm function 1. Briefly press the MODE button briefly once or twice to reach ALARM 1 or ALARM 2 mode. 2. Press the + button . The ALARM 1 symbol or ALARM 2 symbol appears in the LC display. The alarm has been activated. 3.
  • Seite 61: Preparing To Use The Weather Forecasting Function

    Preparing to use the weather forecasting function Note: Please take the weather forecast from your local weather forecasting service into account as well as the forecast from your weather station. If there are discrepancies between the information from your product and from the local weather forecasting service, please take the advice of the latter as authoritative.
  • Seite 62 rainy rain + snow The weather symbols indicate the weather fluctuation over the next eight hours and not the current weather. The weather station can display the barometric pressure trend You may see the following displays: The barometric pressure will rise. The barometric pressure will remain constant.
  • Seite 63: Selecting The Location

    Selecting the location Press the CITY button . The location display blinks and the longitude and latitude are displayed. Press the + or – button to select your location. Press the CITY button to confirm your entry. If the abbreviation for your location does not appear in the display, you may enter a user-defined location (see “Selecting the location manually”).
  • Seite 64 After a brief moment, the weather station displays the times for sunrise and sundown, the lunar phases as well as the tidal range - low (TIDE LO), medium (TIDE MID) and high (TIDE TH). München Wels You can choose from the Nürnberg Belgium Antwerp...
  • Seite 65 France Ajaccio Ireland Dublin Monaco Monte Carlo (FR) (IE) (MC) Biarritz Italy (IT) Ancona Nether- Amsterdam lands Bordeaux Bari (NL) Brest Bolzano Arnhem Cherbourg- Cagliari Eindhoven Octeville Florence Groningen Clermont-Fer- Foggia rand Rotterdam Genoa Dijon The Hague Lecce Lille Wellington Messina Zealand Lyon...
  • Seite 66 Russian St. Petersburg Sevilla Manchester Federa- Valencia Newcastle tion (RU) upon Tyne Zaragoza Serbia Belgrade Plymouth Sweden Gothenburg (RS) (SE) United Los Angeles Slovakia Bratislava States Karlstad (SK) (US) Stockholm Kosice New York Switzer- Basel Slovenia Ljubljana Washington land (SI) (CH) Lithuania Vilnius...
  • Seite 67: Lunar Phases

    Lunar phases The weather station has a display which automatically displays the current lunar phase New moon Waxing half- Half-moon Waxing full moon moon Full moon Waning full Half-moon Waning half- moon moon Reading the barometric pressure for the last 12 hours Press the HISTORY ABS / REL button repeatedly to read the barometric pressure values for the last 12 hours.
  • Seite 68: Adjusting The Air Pressure Indication

    Adjusting the air pressure indication The forecast of this weather station is basing on an analysis of the change of the air pressure. The barometric pressure is factory provided adjusted to the absolute air pressure. As the air pressure generally decreases with the height beyond sea level, the public weather service always announces the so-called relative air pressure.
  • Seite 69: Setting The Channel

    If you want your weather station to announce the absolute air pressure, proceed like this: Press and hold the HISTORY ABS / REL button for approx. 3 seconds. After- wards press the + or – button, to change to the absolute air pressure. Confirm by pressing the HISTORY ABS / REL button.
  • Seite 70: Displaying Temperature And Temperature Trend

    Displaying temperature and temperature trend The current indoor temperature and the temperature trend (indoors) shown in the LC display. After successfully connecting with the outdoor sensor, the weather station can display the outdoor temperature and the temperature trend (outdoor) . You may see the following displays: The temperature is rising.
  • Seite 71: Displaying The Maximum / Minimum Temperature / Humidity

    = Humidity < 40 % COMFORT = Humidity 40–70 %, indoor temperature 20 °C–28 °C = Humidity > 70 % After a successful connection has been made with the outdoor sensor, the weather station shows the humidity trend (outdoors) and the humidity (outdoors) the LC display.
  • Seite 72: Temperature And Frost Alarm

    Temperature and frost alarm The temperature alarm is a short beep, which sounds as soon as the outdoor temperature exceeds or falls below the preset temperature range. Follow the below procedures to set the desired temperature range. Press the – button to get top the temperature alarm mode.
  • Seite 73: Background Lighting

    If the temperature alarm is activated, the corresponding symbol appears next to the outdoor temperature. The alarm signal sounds at the set values. If the temperature and frost alarm are activated, both symbols appear in the display. Background lighting Press the SNOOZE / LIGHT button .
  • Seite 74: Troubleshooting

    Remove the battery compartment cover on the back of the weather station. Remove the used batteries. Insert 3 new batteries type AA, 1.5 V. Note: Make sure that the polarity is correct when you insert the battery. The correct polarity is shown inside the battery compartment Close the battery compartment.
  • Seite 75: Cleaning And Care

    If the display indicates a problem, move such objects away from the weather station or outdoor sensor or remove the batteries from the weather station or outdoor sensor for a short while and then replace them. Obstacles such as concrete walls can also cause that the reception is disturbed. In this case, change the location (eg near a window).
  • Seite 76: Disposal

    Disposal The packaging is made entirely of recyclable materials, which you may dispose of at local recycling facilities. Observe the marking of the packaging materials for waste separation, which are marked with abbreviations (a) and numbers (b) with following meaning: 1–7: plastics / 20–22: paper and fibreboard / 80–98: com- posite materials.
  • Seite 77: Warranty

    Environmental damage through incorrect disposal of the batteries / rechargeable batteries! Batteries / rechargeable batteries may not be disposed of with the usual domestic waste. They may contain toxic heavy metals and are subject to hazardous waste treatment rules and regulations. The chemical symbols for heavy metals are as follows: Cd = cadmium, Hg = mercury, Pb = lead.
  • Seite 78: Information

    warranty becomes void if the product has been damaged, or used or maintained improperly. The warranty applies to defects in material or manufacture. This warranty does not cover product parts subject to normal wear, thus possibly considered consumables (e.g. batteries) or for damage to fragile parts, e.g. switches, rechargeable batteries or glass parts.
  • Seite 79 Introduction ..................Page 81 Utilisation conforme à l’usage prévu ............Page 81 Description des pièces et éléments ............Page 82 Données techniques .................. Page 83 Fourniture ....................Page 84 Sécurité ....................Page 85 Instructions générales de sécurité ............Page 85 Consignes de sécurité...
  • Seite 80 Consultation de la pression atmosphérique des dernières 12 heures ... Page 105 Réglage de l‘affichage de la pression atmosphérique ......Page 105 Réglage du canal ..................Page 107 Affichage de la température et de la tendance de température ... Page 107 Affichage de l’humidité...
  • Seite 81: Introduction

    Station météo radioguidée Introduction Nous vous félicitons pour l‘achat de votre nouveau produit. Vous avez opté pour un produit de grande qualité. Le mode d‘emploi fait partie intégrante de ce pro- duit. Il contient des indications importantes pour la sécurité, l’utilisation et la mise au rebut.
  • Seite 82: Description Des Pièces Et Éléments

    Description des pièces et éléments Station météo : Affichage de la date Indicateur de confort (maximal / Affichage du mois minimal) Alarme 1 Température ambiante (°C / °F) Affichage SNOOZE Affichage de l’usure des piles Symbole de tour hertzienne Tendance d’humidité de l’air Affichage DST (heure d’été) (extérieur) Affichage de l’heure...
  • Seite 83: Capteur Extérieur

    Prévision météorologique Touche canal (CH) Touche SNOOZE- / LIGHT Touche HISTORY ABS / REL Touche MODE Touche CITY Touche + Boîtier à piles Touche – Capteur extérieur : LED de contrôle Sélecteur de canal Dispositif de suspension Boîtier à piles Touche RESET Données techniques Station météo : Plage de température :...
  • Seite 84: Fourniture

    Capteur extérieur : Plage de température : -20 à +65 °C -4 à +149 °F Plage de mesure Humidité de l’air : 20–95 % Précision Humidité de l’air : Signal de transmission HF : 433 MHz Amplitude de transmission HF : max. 30 mètres (en extérieur) Pile : 2 x AA, 1,5 V (courant continu)
  • Seite 85: Sécurité

    Sécurité Lisez toutes les consignes de sécurité et instructions ! Tout manquement aux consignes de sécurité et instructions peut causer une électrocution, un incendie et de graves blessures. CONSERVEZ TOUTES LES CONSIGNES DE SÉCURITÉ ET INSTRUCTIONS POUR CONSULTATION ULTÉRIEURE ! Instructions générales de sécurité Les enfants sous-estiment souvent les dangers.
  • Seite 86: Consignes De Sécurité Relatives Aux Piles / Aux Piles Rechargeables

    Consignes de sécurité relatives aux piles / aux piles rechargeables DANGER DE MORT ! Rangez les piles / piles rechargeables hors de la portée des enfants. En cas d’ingestion, consultez immédiatement un médecin ! RISQUE D‘EXPLOSION ! Ne rechargez jamais des piles non rechargeables.
  • Seite 87: Risque D'endommagement Du Produit

    En cas de fuite des piles / piles rechargeables, retirez-les aussitôt du produit pour éviter tout endommagement. Utilisez uniquement des piles / piles rechargeables du même type. Ne mélangez pas des piles / piles rechargeables usées et neuves ! Retirez les piles / piles rechargeables, si vous ne comptez pas utiliser le produit pendant une période prolongée.
  • Seite 88: Mise En Service Du Capteur Extérieur

    PRUDENCE ! Lors du choix du lieu d’installation de l’appareil, assurez-vous que les appareils ne sont pas exposés aux rayons directs du soleil, à des vibrations, à la poussière, à la chaleur, au froid et à l’humidité. N’installez pas les appareils à proximité...
  • Seite 89: Montage Mural

    Montage du capteur extérieur : Remarque : Il vous faut une perceuse pour cette étape de travail. Cherchez un emplacement approprié pour le capteur extérieur. Remarque : veillez à monter le capteur extérieur dans un rayon de 30 m par rapport à la station météo. Assurez-vous qu’il n’y ait pas d’obstacles gênants entre le capteur extérieur et la station météo.
  • Seite 90 Remarque : pendant la réception, ne changez pas l’emplacement de la station météo. Sinon, la réception risque d’être entravée. Connexion de la station météo au capteur extérieur et au signal radio DCF : la bande de sécurité des piles ayant été retirée, la station météo tente d’établir une liaison avec le capteur extérieur.
  • Seite 91 Lorsque le signal radio DCF est capté, le symbole de tour hertzienne radio est affiché en permanence sur l’écran à cristaux liquides. Si, au moment de la mise en service, une synchronisation avec l’horloge de référence atomique n’est pas possible, vous pouvez également procéder manuellement au réglage de l’heure (voir « Réglage manuel du mode 12 / 24 h / °C / °F / hPa / inHg/ du fuseau horaire / de l’heure / de la date / de la langue »).
  • Seite 92: Utilisation

    Utilisation Réception du signal radio DCF Lorsque la connexion au capteur extérieur est établie ou 3 minutes après le retrait de la bande de sécurité des piles, l’horloge de la station météo se met automati- quement à rechercher le signal radio DCF. Cette recherche du signal est affichée sur l’écran à...
  • Seite 93: Réglage Manuel Du Mode 12 / 24 H / °C / °F / Hpa / Inhg / Du Fuseau Horaire / De L'heure / De La Date / De La Langue

    Si la connexion au signal radio DCF ne peut être établie, la recherche est interrompue. Remarque : si, en raison de défauts, d’une distance trop importante par rapport à l’émetteur etc., l’horloge de la station météo ne peut recevoir le signal radio DCF, vous avez la possibilité...
  • Seite 94 2. Confirmez les saisies par une pression sur la touche MODE. L‘unité de tempé- rature „°C“ ou „°F“ clignote à l‘écran. Appuyez sur la touche + ou - pour choisir l‘unité de température votre choix. 3. Confirmez les saisies par une pression sur la touche MODE. L‘unité de pression atmosphérique clignote à...
  • Seite 95: Régler L'heure Du Réveil

    réglages suivants. Si vous n’activez aucune touche pendant 20 secondes, l’écran à cristaux liquides repasse automatiquement à l’affichage par défaut. 6. Confirmez les saisies par une pression sur la touche MODE. L’affichage des minutes clignote. Appuyez sur la touche + ou – pour régler la valeur souhaitée. 7.
  • Seite 96: Activation / Désactivation De La Fonction Réveil

    2. Appuyez sur la touche MODE et maintenez-la enfoncée pendant env. 2 secondes. L’affichage des heures clignote. 3. Appuyez sur la touche + ou – , pour régler la valeur souhaitée. 4. Validez les entrées par une pression sur la touche MODE. L’affichage des mi- nutes clignote.
  • Seite 97: Désactivation De L'alarme

    3. Appuyez à nouveau sur la touche +. Le symbole alarme 1 ou le symbole alarme 2 s’éteint. L’alarme est désactivée. Désactivation de l’alarme Appuyez sur n’importe quelle touche à l’exception de la touche SNOOZE / LIGHT pour arrêter le signal d’alarme. Il n’est pas nécessaire de réactiver l’alarme.
  • Seite 98 La prévision météorologique est calculée d’après les variations de pression atmos- phérique et peut différer de la météo réelle. La station météo affiche les symboles météo suivants : ensoleillé légèrement nuageux nuageux pluvieux 98 FR/BE...
  • Seite 99 pluie + neige Les symboles météo indiquent les variations météorologiques pour les huit prochaines heures et non la météo actuelle. La station météo peut afficher la tendance de pression atmosphérique Les affichages suivants sont possibles : Pression atmosphérique en hausse. Pression atmosphérique constante. Pression atmosphérique en baisse.
  • Seite 100: Sélection Du Site

    Sélection du site Appuyez sur la touche CITY . L’affichage du site clignote; la longitude et la latitude sont affichées. Appuyez sur la touche + ou - pour sélectionner votre site. Appuyez sur la touche CITY pour confirmer votre saisie. Si l’abréviation pour votre site n’apparaît pas à...
  • Seite 101 Appuyez sur la touche + ou - pour régler la différence entre votre fuseau horaire et GMT. Appuyez sur la touche CITY pour confirmer votre saisie. Réglez les degrés de latitude et de longitude de votre site de la même manière. Après un court instant, la station météo affiche les heures de lever et de coucher du soleil, les phases lunaires ainsi que la marée basse (TIDE LO), la marée moyenne (TIDE MID) et la marée haute (TIDE TH).
  • Seite 102 Belgium Antwerp Cherbourg- Florence (BE) Octeville Foggia Brugge Clermont- Genua Ferrand Brussels Lecce Dijon Libramont Messina Lille Liege Milan Lyon Bosnia & Sarajevo Naples Her- Marseille Palermo zegovina Metz (BA) Parma Nantes Croatia Split Perugia Nice (HR) Rome Orleans Zagreb San Remo Paris Czech...
  • Seite 103 Groningen Spain Alicante Chur (ES) Rotterdam Geneva Andorra The Hague Lucerne Badajoz New Zea- Wellington Lugano land (NZ) Barcelona Sion Norway Bergen Bilbao St. Gallen (NO) Cordoba Zurich Lillehammer Eivissa Ibiza United Aberdeen Oslo La Coruna Kingdom Poland Cracow (GB) Las Palmas (PL) Belfast...
  • Seite 104: Phases Lunaires

    Bulgarie Sofia (BG) Roumanie Bucarest (RO) Chypre Nicosie (CY) Irlande du Belfast Nord (NI) Phases lunaires La station météo dispose d’un écran qui affiche automatiquement la phase lunaire actuelle. Nouvelle lune Premier Dernier Lune gibbeuse croissant quartier croissante Pleine lune Lune gibbeuse Dernier Dernier...
  • Seite 105: Consultation De La Pression Atmosphérique Des Dernières 12 Heures

    Consultation de la pression atmosphérique des dernières 12 heures Appuyez à nouveau sur la touche HISTORY ABS / REL pour pouvoir consulter les valeurs atmosphériques des dernières 12 heures. 0HR = Pression atmosphérique actuelle – 1HR = Pression atmosphérique une heure plus tôt –...
  • Seite 106 une fois à votre station météo la pression atmosphérique relative actuelle. Vous pouvez la trouver auprès de votre service météorologique local ou sur Internet. Pour le réglage, procédez comme suit : Appuyez sur la touche HISTORY ABS / REL et maintenez-la enfoncée pendant environ 3 secondes.
  • Seite 107: Réglage Du Canal

    Réglage du canal La station météo reçoit automatiquement le signal du capteur extérieur une fois l’ensemble des réglages et paramétrages effectués. Remarque : Si des appareils se trouvant à proximité occasionnent des interférences, les symboles de l’humidité de l’air (extérieure) et de la température extérieure clignotent.
  • Seite 108: Affichage De L'humidité De L'air Et De La Tendance De L'humidité De L'air

    Les affichages suivants sont possibles : La température monte. La température reste constante. La température baisse. Affichage de l’humidité de l’air et de la tendance de l’humidité de l’air La tendance de l’humidité de l’air (intérieur) actuelle ainsi que l’humidité de l’air (intérieur) actuelle s’affichent à...
  • Seite 109: Affichage De La Température / L'humidité De L'air Maximale / Minimale

    Affichage de la température / l’humidité de l’air maximale / minimale La température et l’humidité de l’air minimales / maximales sont mesurées après l’insertion des piles et mémorisées par la station météo. Les valeurs maximales et minimales de température, d’hygrométrie et de pression de l’air sont automatiquement mémorisées.
  • Seite 110: Activation / Désactivation De L'alarme De Température Et De Gel

    Maintenez la touche – enfoncée pendant 3 secondes. L’affichage de la tem- pérature maximale clignote. Appuyez sur la touche + ou - pour régler les valeurs. Appuyez sur la touche MODE pour confirmer votre saisie. L’affichage de la température minimale clignote. Appuyez sur la touche + ou – pour régler les valeurs.
  • Seite 111: Rétroéclairage

    Rétroéclairage Appuyez sur la touche SNOOZE / LIGHT . Le rétroéclairage s’allume pen- dant 5 secondes. Affichage de l’usure des piles Le témoin des piles s’affiche sur l’écran à cristaux liquides lorsque les piles du capteur extérieur sont faibles. Veillez à remplacer les piles à temps (voir « Rem- placement des piles »).
  • Seite 112: Dépannage

    Capteur extérieur : remplacez les piles lorsque le symbole des piles s’affiche. Retirez le couvercle du boîtier à piles sur la face arrière du capteur extérieur. Retirez les piles usées. Insérez 2 piles neuves de type AA, 1,5 V. Remarque : respectez la polarité. Celle-ci est indiquée dans le boîtier à piles Fermez le boîtier à...
  • Seite 113: Nettoyage Et Entretien

    d‘espace libre et signifie qu‘il ne doit y avoir aucun obstacle entre le capteur extérieur et la base. Un „contact visuel“ entre le capteur extérieur et la base améliore souvent la trans- mission. Le froid (températures extérieures inférieures à 0°C) peut influencer la puissance de la batterie du capteur extérieur et ainsi réduire la transmission radio.
  • Seite 114 Veuillez respecter l‘identification des matériaux d‘emballage pour le tri sélectif, ils sont identifiés avec des abbréviations (a) et des chiffres (b) ayant la signification suivante : 1–7 : plastiques / 20–22 : papiers et cartons / 80–98 : matériaux composite. Le produit et les matériaux d’emballage sont recyclables, mettez-les au rebut séparément pour un meilleur traitement des déchets.
  • Seite 115: Garantie

    Pollution de l’environnement par la mise au rebut incorrecte des piles / piles rechargeables ! Les piles / piles rechargeables ne doivent pas être mises au rebut avec les ordures ménagères. Elles peuvent contenir des métaux lourds toxiques et doivent être con- sidérées comme des déchets spéciaux.
  • Seite 116: Informations

    remplacement du produit sans frais supplémentaires. La garantie prend fin si le produit est endommagé suite à une utilisation inappropriée ou à un entretien défaillant. La garantie couvre les vices matériels et de fabrication. Cette garantie ne s’étend ni aux pièces du produit soumises à une usure normale (p. ex. des piles) et qui, par conséquent, peuvent être considérées comme des pièces d’usure, ni aux dommages sur des composants fragiles, comme des interrupteurs, des batteries ou des élé- ments fabriqués en verre.
  • Seite 117 Inleiding ....................Pagina 119 Correct gebruik ..................Pagina 119 Onderdelenbeschrijving ................ Pagina 120 Technische gegevens ................Pagina 121 Leveringsomvang ................... Pagina 122 Veiligheid ................... Pagina 123 Algemene veiligheidsinstructies ............. Pagina 123 Veiligheidsinstructies voor batterijen / accu‘s ........Pagina 124 Voor de ingebruikname ............
  • Seite 118 Luchtdruk van de afgelopen 12 uur aflezen ........Pagina 142 Instelling van de luchtdrukweergave ............ Pagina 143 Kanaal instellen ..................Pagina 144 Temperatuur en temperatuurtrend weergeven ........Pagina 145 Luchtvochtigheid en luchtvochtigheidstrend weergeven ...... Pagina 145 Maximale / minimale temperatuur / luchtvochtigheid weergeven ..Pagina 146 Temperatuur- en vorstalarm ..............
  • Seite 119: Inleiding

    Draadloos weerstation Inleiding Hartelijk gefeliciteerd met de aankoop van uw nieuwe product. U heeft voor een hoogwaardig product gekozen. De gebruiksaanwijzing is een deel van het product. Deze bevat belangrijke aanwijzingen voor veiligheid, gebruik en verwijdering. Maakt U zich voor de ingebruikname van het product met alle bedienings- en veiligheids- voorschriften vertrouwd.
  • Seite 120: Onderdelenbeschrijving

    Onderdelenbeschrijving Weerstation: Datumweergave Binnentemperatuur (°C / °F) Maandweergave Batterij-indicator Alarm 1 Luchtvochtigheidstrend (buiten) SNOOZE-weergave Luchtvochtigheid (buiten) Radiomastsymbool Temperatuur- en vorstalarm DST-weergave (zomertijd) (maximaal / minimaal) Tijdweergave Temperatuurtrend (buiten) Alarm 2 Buitentemperatuur (°C / °F) Weekdag-indicatie Batterij-indicatie (buitensensor) Zonsopgang / tijd van de Gekozen kanaal zonsopgang Luchtdruk balkweergave...
  • Seite 121: Technische Gegevens

    HISTORY ABS / REL-toets Batterijcompartiment CITY-toets Buitensensor: Controle-LED Kanaal-keuzeschakelaar Ophanginrichting Batterijcompartiment RESET-toets Technische gegevens Weerstation: Temperatuurmeetbereik: 0 tot +50 °C +32 tot +122 °F Temperatuurresolutie: 0,1 °C Meetbereik luchtvochtigheid: 20–95 % Resolutie luchtvochtigheid: Radiosignaal: Batterij: 3 x AA, 1,5 V (gelijkstroom) Luchtdrukbereik: 850–1050 hPa...
  • Seite 122: Leveringsomvang

    Buitensensor: Temperatuurmeetbereik: –20 tot +65 °C –4 tot +149 °F Meetbereik luchtvochtigheid: 20–95 % Resolutie luchtvochtigheid: HF overdrachtssignaal: 433 MHz HF overdrachtsreikwijdte: max. 30 meter (buitenshuis) Batterij: 2 x AA, 1,5 V (gelijkstroom) Beschermingsgraad: IPX4 (spatwaterdicht) Frequentieband: 433.050 tot 434.790 MHz Maximaal uitgezonden vermogen: 433.999 MHz, <10 dBm Leveringsomvang...
  • Seite 123: Veiligheid

    Veiligheid Lees alle veiligheidsinstructies en aanwijzingen. Nalatigheden bij de naleving van de veiligheidsinstructies en aanwijzingen kunnen elektrische schokken, brand en / of ernstig letsel tot gevolg hebben. BEWAAR ALLE VEILIGHEIDSTECHNISCHE INSTRUCTIES EN AANWIJZIN- GEN OM DEZE EVENTUEEL LATER TE KUNNEN RAADPLEGEN! Algemene veiligheidsinstructies Kinderen onderschatten de gevaren vaak.
  • Seite 124: Veiligheidsinstructies Voor Batterijen / Accu's

    Veiligheidsinstructies voor batterijen / accu‘s LEVENSGEVAAR! Houd batterijen / accu‘s buiten het bereik van kinderen. Raadpleeg bij inslikken onmiddellijk een arts! EXPLOSIEGEVAAR! Laad niet oplaadbare batterijen nooit op. Sluit de batterijen / accu‘s niet kort en / of open deze niet. Daardoor kan de batterij oververhit raken, in brand vliegen of exploderen.
  • Seite 125: Voor De Ingebruikname

    Gebruik alleen batterijen / accu‘s van hetzelfde type. Gebruik nooit nieuwe en oude batterijen / accu‘s door elkaar! Verwijder de batterijen / accu‘s, als u het product gedurende een langere periode niet gebruikt. Risico op beschadiging van het product Gebruik uitsluitend het aangegeven type batterij / accu! Plaats de batterijen / accu‘s volgens de weergegeven polariteit (+) en (-) op batterij / accu en op product.
  • Seite 126: Buitensensor In Gebruik Nemen

    Plaats de apparaten niet in de buurt van hittebronnen, bijv. verwarmingen. In het andere geval dreigt gevaar voor schade aan de apparaten. Plaats de apparaten niet zonder een geschikte bescherming op waardevolle of gevoelige oppervlakken. In het andere geval zouden deze beschadigd kunnen raken.
  • Seite 127: Weerstation In Gebruik Nemen

    Buitensensor monteren: Opmerking: voor deze werkzaamheden hebt u een boormachine nodig. Zoek een geschikte plaats voor de buitensensor. Opmerking: denk eraan, de buitensensor binnen een cirkel van 30 m rond het weerstation te monteren. Waarborg dat er zich geen storende hindernissen tussen buitensensor en weerstation bevinden.
  • Seite 128 Opmerking: verander de standplaats van het weerstation niet tijdens de ontvangst van het radiografische signaal. Anders kan dit tot ontvangststoringen leiden. Weerstation met de buitensensor en het DCF-signaal verbinden: Na het verwijderen van de isolatiestrook tussen de batterijen zoekt het weerstation contact met de buitensensor.
  • Seite 129: Radiografisch Signaal (Dcf)

    Bij een succesvolle ontvangst van het DCF-signaal wordt de radiomast constant op het LC-display weergegeven. Wanneer bij de ingebruikname geen synchronisatie met de atoomklok mogelijk is, dan kunt u de tijd ook handmatig instellen (zie “12- / 24- uur formaat / °C / °F / hPa / inHg / Tijdzone / Tijd / Datum / Taal handmatig instellen“). Radiografisch signaal (DCF): Het DCF-signaal (tijdsignaalzender) bestaat uit tijdimpulsen, die van een van de nauwkeurigste klokken ter wereld, in de buurt van Frankfurt am Main, Duitsland,...
  • Seite 130: Bediening

    Bediening DCF-radiosignaal ontvangen De klok van het weerstation begint na een succesvolle verbinding met de buiten- sensor of 3 minuten na het verwijderen van het batterij-isolatiestrookje automatisch met het zoeken naar het DCF-radiosignaal. Het zoeken wordt op het LC-display weergegeven door het knipperen van de radiomast Opmerking: in gebouwen van staalbeton kan de ontvangst van het radiosignaal negatief worden beïnvloed (zie “Apparaten plaatsen”).
  • Seite 131: 24-Uur Formaat / °C / °F / Hpa / Inhg / Tijdzone / Tijd / Datum / Taal Handmatig Instellen

    dan hebt u de mogelijkheid om de tijd handmatig in te stellen. Zodra een DCF-signaal ontvangen wordt, worden de handmatig ingestelde waarden overschreven. 12- / 24-uur formaat / °C / °F / hPa / inHg / Tijdzone / Tijd / Datum / Taal handmatig instellen De ontvangst van het DCF-signaal kan op de standplaats van het weerstation gestoord resp.
  • Seite 132 4. Bevestig de invoer door op de MODE-toets te drukken. De tijdzone-indicatie knippert op het display. Druk op de + of – -toets om de gewenste waarde (-2 t / m +2) in te stellen. Opmerking: wanneer u in een land bent waar weliswaar nog steeds het DCF-signaal ontvangen wordt, maar de actuele tijd afwijkt, kunt u de tijdzone- instelling gebruiken om het product op de actuele tijd in te stellen.
  • Seite 133: Wektijd Instellen

    7. Bevestig de invoer door op de MODE-toets te drukken. In de tijdweergave knippert nu het jaar. Druk op de + of – -toets om de gewenste waarde in te stellen. 8. Bevestig de invoer door op de MODE-toets te drukken. De maandaanduiding van de datumweergave knippert.
  • Seite 134: Wekfunctie Activeren / Deactiveren

    4. Bevestig de invoer door op de MODE-toets te drukken. De minutenweergave knippert. Herhaal stap 3 om de waarde voor de tweede plaats achter de komma in te stellen. 5. Bevestig de invoer door op de MODE-toets te drukken. Tip: houd de + of – -toets ingedrukt. Op deze wijze activeert u de functie voor het snelle instellen van de waarden.
  • Seite 135: Alarmsignaal Uitschakelen

    3. Druk opnieuw op de + -toets. Het Alarm-1-symbool of het Alarm-2-symbool op het LC-Display dooft. De wekfunctie is gedeactiveerd. Alarmsignaal uitschakelen Druk, m.u.v. de SNOOZE- / LIGHT-toets op een willekeurige toets om het alarmsignaal te stoppen. U hoeft het alarm niet opnieuw te activeren. Het alarm schakelt in de al ingestelde alarmtijd automatisch in.
  • Seite 136 De weersverwachting wordt door de evaluatie van de luchtdrukveranderingen berekend en kan afwijken van het daadwerkelijke weer. Het weerstation toont de volgende weersymbolen: zonnig licht bewolkt bewolkt regenachtig 136 NL/BE...
  • Seite 137: Standplaats Kiezen

    regen + sneeuw De weersymbolen tonen de weersveranderingen in de komende acht uur en niet het actuele weer. Het weerstation kan de luchtdruktrend weergeven. De volgende weergaven zijn mogelijk: De luchtdruk zal stijgen. De luchtdruk blijft constant. De luchtdruk zal dalen. Standplaats kiezen Druk op de CITY-toets .
  • Seite 138: Standplaats Handmatig Kiezen

    Druk op de + of – -toets om uw standplaats te selecteren. Druk op de CITY-toets om uw invoer te bevestigen. Wanneer de afkorting voor uw standplaats niet op het display verschijnt, dan kunt u de standplaats zelf in- voeren (zie “Standplaats handmatig selecteren“). Na een korte tijd toont het weerstation de tijden voor de zonsopgang en -onder- gang, de maanfasen alsmede de getijden eb (TIDE LO), gemiddelde waterstand (TIDE MID) en vloed (TIDE TH).
  • Seite 139 Na een korte tijd toont het weerstation de tijden voor de zonsopgang en -onder- gang, de maanfasen alsmede de getijden eb (TIDE LO), gemiddelde waterstand (TIDE MID) en vloed (TIDE TH). U kunt kiezen uit de volgende landen en steden: Germany Berlin München...
  • Seite 140 Denmark Alborg Strasbourg Venice (DK) Toulouse Verona Copenha- Greece Athens Liechten- Vaduz (GR) stein (LI) Odense Hungary Budapest Luxem- Lussem- Finland Helsinki (HU) burg (LU) burgo (FI) Ireland Dublin Monaco Monte France Ajaccio (IE) (MC) Carlo (FR) Italy (IT) Ancona Nether- Amsterdam AMS Biarritz...
  • Seite 141 Warsaw Madrid Belfast Portugal Faro Malaga Birming- (PT) Palma de Lisbon Cardiff Mallorca Porto Salamanca SAL Glasgow Russian St. Peter- Sevilla Londra Federa- sburg Valencia Manche- tion (RU) ster Zaragoza Serbia Belgrade Newcastle Sweden Gothenburg GOT (RS) upon Tyne (SE) Slovakia Bratislava Plymouth...
  • Seite 142: Maanfasen

    Maanfasen Het weerstation beschikt over een weergave die automatisch de actuele maan- stand toont. Nieuwe maan Wassende Halve maan Wassende halve maan volle maan Volle maan Afnemende Halve maan Afnemende volle maan halve maan Luchtdruk van de afgelopen 12 uur aflezen Druk opnieuw op de HISTORY-ABS / REL-toets , om de luchtdrukwaarden van de afgelopen 12 uur te kunnen lezen.
  • Seite 143: Instelling Van De Luchtdrukweergave

    Instelling van de luchtdrukweergave De weersvoorspelling van dit weerstation berust op een analyse van de verande- ring van de luchtdruk. De luchtdrukweergave is vanaf fabriek op de absolute luchtdruk ingesteld. Om- dat de luchtdruk in het algemeen met de hoogte boven NAP daalt, wordt door de openbare meteorologische dienst normaal gesproken de zogenoemde relatieve luchtdruk vermeld.
  • Seite 144: Kanaal Instellen

    Als u wilt, dat het weerstation de absolute luchtdruk weergeeft, dient u als volgt te werk te gaan: Druk de HISTORY ABS / REL-toets en houdt deze gedurende ca. 3 seconden ingedrukt. Druk vervolgens op de + of - -toets, om naar de absolute luchtdruk- weergave te wisselen.
  • Seite 145: Temperatuur En Temperatuurtrend Weergeven

    Temperatuur en temperatuurtrend weergeven De actuele binnentemperatuur en de temperatuurtrend (binnen) worden in het LC-Display weergegeven. Na een succesvolle verbinding met de buitensensor wordt de buitentemperatuur en de temperatuurtrend (buiten) weergegeven. De volgende weergaven zijn mogelijk: De temperatuur stijgt. De temperatuur blijft constant. De temperatuur daalt.
  • Seite 146: Maximale / Minimale Temperatuur / Luchtvochtigheid Weergeven

    Na een succesvolle verbinding met de buitensensor toont het weerstation de lucht- vochtigheidstrend (buiten) alsmede de luchtvochtigheid (buiten) op het LC- Display. Maximale / minimale temperatuur / luchtvochtigheid weergeven De minimale / maximale temperatuur en de luchtvochtigheid worden na het plaatsen van de batterijen voor het eerst gemeten en in het weerstation opgeslagen.
  • Seite 147: Temperatuur- En Vorstalarm

    Temperatuur- en vorstalarm Het temperatuuralarm is een kort geluidssignaal, dat te horen is, zodra de buiten- temperatuur het aangegeven temperatuurbereik over- of onderschrijdt. Ga voor het instellen van het gewenste temperatuurbereik als volgt te werk: Druk op de – -toets , om de modus van het temperatuur alarm te kiezen.
  • Seite 148: Achtergrondverlichting

    symbool naast de buitentemperatuur. Het alarmsignaal klinkt bij de ingestelde waarden. Wanneer de temperatuur- en vorstalarmen zijn geactiveerd, dan verschijnen beide symbolen op het display. Achtergrondverlichting Druk op de SNOOZE / LIGHT-toets . De achtergrondverlichting brandt gedurende 5 seconden. Batterij-indicator De batterij-indicator verschijnt in het LC-Display van het weerstation wanneer de batterijen bijna leeg zijn.
  • Seite 149: Storingen Verhelpen

    Open het batterijvakje aan de achterzijde van het weerstation. Neem de gebruikte batterijen eruit. Plaats 3 nieuwe batterijen van het type AA, 1,5 V. Opmerking: let daarbij op de juiste polariteit. Deze staat in het batterijvakje aangegeven. Sluit het batterijvakje. Buitensensor: Vervang de batterijen wanneer de batterij-indicatie verschijnt.
  • Seite 150: Reiniging En Onderhoud

    Verwijder dergelijke apparaten uit de reikwijdte van het weerstation / de buiten- sensor of verwijder kortstondig de batterijen uit het weerstation / de buitensensor als het display storingen weergeeft. Hindernissen zoals bijv. betonnen muren kunnen tot gevolg hebben, dat de ont- vangst duidelijk wordt verstoord.
  • Seite 151: Verwijdering

    Reinig het product alleen aan de buitenzijde met een zachte, droge doek. Spuit de buitensensor in géén geval af met bijv. een tuinslang. De buitensensor is alleen bestand tegen regen van boven. Verwijdering De verpakking bestaat uit milieuvriendelijke grondstoffen die u via de plaatselijke recyclingcontainers kunt afvoeren.
  • Seite 152: Garantie

    Gooi het afgedankte product omwille van het milieu niet weg via het huisvuil, maar geef het af bij het daarvoor bestemde depot of het ge- meentelijke milieupark. Over afgifteplaatsen en hun openingstijden kunt u zich bij uw aangewezen instantie informeren. Defecte of verbruikte batterijen / accu‘s moeten volgens de richtlijn 2006/66/EG en veranderingen daarop worden gerecycled.
  • Seite 153: Informatie

    Op dit product verlenen wij 3 jaar garantie vanaf aankoopdatum. De garantieperi- ode start op de dag van aankoop. Bewaar de originele kassabon alstublieft. Dit document is nodig als bewijs voor aankoop. Wanneer binnen 3 jaar na de aankoopdatum van dit product een materiaal- of productiefout optreedt, dan wordt het product door ons –...
  • Seite 154 De volledige tekst van de EU-conformiteitsverklaring staat ter beschikking via het volgende internetadres: www.owim.com 154 NL/BE...
  • Seite 155 Úvod ....................... Strana 157 Použití ke stanovenému účelu..............Strana 157 Popis dílů ....................Strana 158 Technické údaje ..................Strana 159 Rozsah dodávky ..................Strana 160 Bezpečnost ..................Strana 160 Všeobecné bezpečnostní pokyny ............Strana 161 Bezpečnostní pokyny pro baterie a akumulátory ........ Strana 161 Před uvedením do provozu ..........
  • Seite 156 Načtení tlaku vzduchu uplynulých 12 hodin ........Strana 179 Nastaení zobrazení tlaku vzduchu ............Strana 180 Nastavení kanálu ................... Strana 181 Zobrazení teploty a trendu teploty ............Strana 182 Zobrazení vlhkosti vzduchu a trendu vlhkosti vzduchu ....... Strana 182 Zobrazení maximální / minimální teploty / vlhkosti vzduchu ....Strana 183 Alarm pro výstrahu před teplotou a mrazem ........
  • Seite 157: Strana

    Bezdrátová meteorologická stanice Úvod Blahopřejeme Vám ke koupi nového výrobku. Rozhodli jste se pro kvalitní produkt. Návod k obsluze je součástí tohoto výrobku. Obsahuje důležité pokyny pro bez- pečnost, použití a likvidaci. Před použitím výrobku se seznamte se všemi pokyny k obsluze a bezpečnostními pokyny.
  • Seite 158: Popis Dílů

    Popis dílů Meteorologická stanice: Zobrazení data Trend vlhkosti vzduchu (venku) Zobrazení měsíce Vlhkost vzduchu (venku) Alarm 1 Alarm pro výstrahu před teplotou a Indikace funkce SNOOZE mrazem (maximum / minimum) Symbol rozhlasového vysílače Trend teploty (venku) Zobrazení DST (letní čas) Venkovní teplota (°C / °F) Zobrazení...
  • Seite 159: Venkovní Čidlo

    Tlačítko CITY Schránka na baterie Venkovní čidlo: Kontrolní LED Volič kanálu Závěs Schránka na baterie Tlačítko RESET Technické údaje Meteorologická stanice: Rozsah měření teploty: 0 až +50 °C +32 až +122 °F Rozlišení teploty: 0,1 °C Rozsah měření vlhkosti vzduchu: 20–95 % Rozlišení vlhkosti vzduchu: 1 % Rádiový...
  • Seite 160: Rozsah Dodávky

    Rozsah měření vlhkosti vzduchu: 20–95  % Rozlišení vlhkosti vzduchu: 1 % VF přenosový signál: 433 MHz VF dosah přenosu: maximálně 30 metrů (ve volném terénu) Baterie: 2 x AA, 1,5 V (stejnosměrný proud) Stupeň krytí: IPX4 (ochrana před stříkající vodou) Frekvenční pásmo: 433.050 do 434.790 MHz Maximální...
  • Seite 161: Všeobecné Bezpečnostní Pokyny

    USCHOVEJTE VŠECHNY BEZPEČNOSTNÍ POKYNY A INSTRUKCE PRO POUŽITÍ V BUDOUCNOSTI! Všeobecné bezpečnostní pokyny Děti často podcení nebezpečí. Chraňte vždy výrobek před dětmi. Tento výrobek mohou používat děti od 8 let, osoby se sníženými fyzickými, smyslovými nebo duševními schopnosti nebo s nedostatečnými zkušenostmi a znalostmi, jestliže budou pod dohledem nebo byly poučeny o bezpečném používání...
  • Seite 162 NEBEZPEČÍ VÝBUCHU! Nenabíjecí baterie nikdy znovu nenabí- jejte. Baterie nebo akumulátory nezkratujte ani je neotevírejte. Hrozí přehřátí, nebezpečí požáru nebo jejich prasknutí. Nikdy neházejte baterie nebo akumulátory do ohně ani do vody. Nevystavujte baterie nebo akumulátory mechanickému zatížení. Nebezpečí vytečení baterií / akumulátorů Zabraňte extrémním podmínkám a teplotám, např.
  • Seite 163: Před Uvedením Do Provozu

    Nebezpečí poškození výrobku Používejte jen udaný typ baterie nebo akumulátoru! Nasazujte baterie nebo akumulátory podle označení polarity (+) a (-) na bateriích nebo akumulátorech a na výrobku. Vyčistěte před vložením kontakty baterie nebo akumulátoru a kontakty v při- hrádce na baterie! Vybité...
  • Seite 164: Uvedení Venkovního Čidla Do Provozu

    Neumisťujte zařízení vedle kovových desek nebo na ně. Mohl by se tím omezit rádiový přenos mezi zařízeními. Zařízení neinstalujte v budovách ze železobetonu, jako jsou např. letiště, výš- kové budovy, továrny nebo sklepy. Radiový přenos mezi zařízeními se může silně omezit. Uvedení...
  • Seite 165: Montáž Na Stěnu

    Montáž na stěnu: Zavěste vnější čidlo pomocí závěsu na šroub. Uvedení meteorologické stanice do provozu Odstranění pojistných proužků baterií: Otevřete schránku na baterie na zadní straně meteorologické stanice. Vytáhněte pojistný proužek baterie. Schránku na baterie opět zavřete. Jakmile je pojistný proužek baterie odstraněn, spustí meteorologická stanice příjem rádiového signálu.
  • Seite 166 nedojde k automatickému spojení, je možné ho dosáhnout manuálně následujícím způsobem: 1. Stiskněte tlačítko kanálů (CH) . Symbol navoleného kanálu bliká na LC displeji. Venkovní teplota a vlhkost vzduchu (venku) ukazují „--._“, nyní přijímá meteorologická stanice signál venkovního čidla. 2. Stiskněte tlačítko RESET venkovního čidla.
  • Seite 167: Obsluha

    Vaše meteorologická stanice přijímá tyto signály za optimálních podmínek až na vzdálenost cca 2000 km od Frankfurtu nad Mohanem. Příjem rádiového signálu trvá zpravidla přibližně 3–10 minut. Příjem mohou značně omezovat různé překážky (např. betonové stěny) nebo zdroje rušení (např. jiné elektrické spotřebiče). Pokud dojde k problémům příjmu, změňte případně...
  • Seite 168: Ruční Nastavení 12 / 24Hodinového Formátu Času / °C / °F / Hpa / Inhg / Časového Pásma / Času / Data / Jazyka

    Stiskněte současně tlačítko + a – . Meteorologická stanice se pokusí při- jmout rádiový signál DCF. Tento proces trvá několik minut a na LC displeji je zobrazen prostřednictvím blikajícího symbolu rozhlasového vysílače. Pokud se navázání spojení s rádiovým signálem DCF nezdaří, vyhledávání se přeruší.
  • Seite 169 hodinovém formátu času dopoledne. Symbol PM v časovém zobrazení ozna- čuje ve 12 hodinovém formátu času odpoledne. 2. Potvrďte zadání stisknutím tlačítka MODE. Na displeji bliká k volbě jednotka pro měření teploty „°C“ nebo „°F“. Stiskněte tlačítko + nebo – k volbě poža- dované...
  • Seite 170: Nastavení Času Buzení

    Nestisknete-li po dobu 20 vteřin žádné tlačítko, vrátí se LC displej automaticky zpět ke standardnímu zobrazení. 6. Potvrďte zadání stisknutím tlačítka MODE. Začne blikat zobrazení minut zobra- zení času. Stiskněte tlačítko + nebo – pro nastavení požadované hodnoty. 7. Potvrďte zadání stisknutím tlačítka MODE. Začne blikat zobrazení roku zobra- zení...
  • Seite 171: Aktivace / Deaktivace Funkce Buzení

    2. Stiskněte tlačítko MODE a držte je stisknuté po dobu cca 2 vteřin. Začne blikat zobrazení hodin. 3. Stiskněte tlačítko + nebo – pro nastavení požadované hodnoty. 4. Potvrďte zadání stisknutím tlačítka MODE. Začne blikat zobrazení minut. Opakujte krok č. 3, čímž nastavíte hodnotu minut. 5.
  • Seite 172: Vypnutí Signálu Alarmu

    3. Stiskněte znovu tlačítko +. Symbol alarmu 1 nebo symbol alarmu 2 na LC displeji zmizí. Alarm je deaktivován. Vypnutí signálu alarmu Pro zastavení signálu alarmu stiskněte jakékoliv tlačítko kromě tlačítka SNO- OZE / LIGHT . Alarm nemusíte znovu aktivovat. Zapne se automaticky s již nastaveným časem buzení.
  • Seite 173 Předpověď počasí se vypočítává na základě vyhodnocení výkyvů tlaku vzduchu a může se od skutečného počasí lišit. Meteorologická stanice zobrazuje následující symboly počasí: slunečno mírně oblačno oblačno deštivo...
  • Seite 174 déšť + sníh Symboly počasí zobrazují posuny počasí pro příštích osm hodin, nikoliv aktuální počasí. Meteorologická stanice může zobrazit trend tlaku vzduchu Jsou možná následující zobrazení: Tlak vzduchu bude stoupat. Tlak vzduchu zůstává konstantní. Tlak vzduchu bude klesat. 174 CZ...
  • Seite 175: Volba Stanoviště

    Volba stanoviště Stiskněte tlačítko CITY . Zobrazení stanoviště bliká a zobrazí stupeň ze- měpisné délky a zeměpisné šířky. Stiskněte tlačítko + nebo – pro výběr svého stanoviště. Stiskněte tlačítko CITY pro potvrzení zadání. Pokud se zkratka pro vaše stanoviště neobjeví na displeji, můžete stanoviště zadat ručně (viz „Ruční volba stanoviště“). Po chvíli meteorologická...
  • Seite 176 Po chvíli meteorologická stanice zobrazí časy východu a západu slunce, fáze měsíce a odliv (TIDE LO), střední stav vody (TIDE MID) a příliv (TIDE TH). Lze zvolit následující München Villach země a města: Nürnberg Wels Osnabrück OSN Belgium Antwerp Germany Berlin (BE) (DE)
  • Seite 177 France Ajaccio Ireland Dublin Monaco Monte (FR) (IE) (MC) Carlo Biarritz Italy (IT) Ancona Nether- Amsterdam AMS lands (NL) Bordeaux Bari Arnhem Brest Bolzano Eindhoven Cagliari Cherbourg- -Octeville Groningen Florence Clermont- Rotterdam Foggia -Ferrand The Hague DHA Genua Dijon New Zea- Wellington WLG Lecce Lille...
  • Seite 178 Russian St. Peter- Sala- Glasgow Federa- sburg manca Londýn tion (RU) Sevilla Manches- Serbia Belgrade Valencia (RS) Zaragoza Newcastle Slovakia Bratislava upon Tyne Sweden Gothen- (SK) (SE) burg Plymouth Kosice Karlstad United Los Ange- Slovenia Ljubljana States Stockholm (SI) (US) Switzer- Basel Spain...
  • Seite 179: Fáze Měsíce

    Fáze měsíce Meteorologická stanice má k dispozici indikaci, která automaticky zobrazuje aktuální fázi měsíce Dorůstající Poslední čtvrť Dorůstající srpek měsíc Úplněk Couvající Poslední čtvrť Ubývající měsíc srpek Načtení tlaku vzduchu uplynulých 12 hodin Stiskněte opakovaně tlačítko HISTORY-ABS / REL , pro odečtení hodnot tlaku vzduchu za posledních 12 hodin.
  • Seite 180: Nastaení Zobrazení Tlaku Vzduchu

    Nastaení zobrazení tlaku vzduchu Předpověd‘ počasí této stanice je založená na vyhodnocení změny tlaku vzduchu. Zobrazení tlaku vzduchu je z výroby nastavené na absolutní tlak vzduchu. Protože tlak vzduchu klesá se stoupající nadmořskou výškou, udává veřejná meteo- rologická služba tzw. relativní tlak vzduchu. Pro dosažení srovnatelných hodnot se tento relativní...
  • Seite 181: Nastavení Kanálu

    Jestliže chcete, aby ukazovala meteorologická stanice absolutní tlak vzduchu, postupujte následujícím způsobem: Stiskněte a přidržte tlačítko HISTORY ABS / REL na dobu cca 3 vteřin. Potom stiskněte tlačítko + nebo – pro přechod k zobrazení absolutního tlaku vzduchu. Potvrďte Vaše zadání stisknutím tlačítka HISTORY ABS / REL. Nastavení...
  • Seite 182: Zobrazení Teploty A Trendu Teploty

    Zobrazení teploty a trendu teploty Aktuální vnitřní teplota a trend teploty (uvnitř) jsou zobrazeny na LC displeji. Po úspěšném spojení s venkovním čidlem se zobrazí venkovní teplota a trend teploty (venku) . Jsou možná následující zobrazení: Teplota stoupá. Teplota zůstává konstantní. Teplota klesá.
  • Seite 183: Zobrazení Maximální / Minimální Teploty / Vlhkosti Vzduchu

    Po úspěšném spojení s venkovním čidlem zobrazí meteorologická stanice na LC dis- pleji trend vlhkosti vzduchu (venku) i vlhkost vzduchu (venku) Zobrazení maximální / minimální teploty / vlhkosti vzduchu Minimální / maximální teplota / vlhkosti vzduchu se poprvé změří po vložení baterií a uloží...
  • Seite 184: Alarm Pro Výstrahu Před Teplotou A Mrazem

    Alarm pro výstrahu před teplotou a mrazem Teplotní alarm je krátký signál, který zazní jakmile venkovní teplota podkročí nebo překročí nastavený teplotní rozsah. Pro nastavení požadovaného teplotního rozsahu postupujte následujícím způsobem: Stiskněte tlačítko – , abyste se dostali do režimu alarmu pro výstrahu před teplotou.
  • Seite 185: Podsvícení Displeje

    Je-li aktivován alarm pro výstrahu před mrazem, objeví se příslušný symbol vedle zobrazení venkovní teploty. Signál alarmu zazní při teplotách od –1 °C do + 3 °C. Je-li aktivován alarm pro výstrahu před teplotou, objeví se příslušný symbol vedle zobrazení venkovní teploty. Signál alarmu zazní při dosažení nastavených hodnot. Pokud jsou aktivovány alarmy pro výstrahu před teplotou a mrazem, zobrazí...
  • Seite 186: Odstranění Poruch

    Odstraňte kryt schránky na baterie na zadní straně meteorologické stanice. Vyjměte opotřebované baterie. Vložte 3 nové baterie typu AA, 1,5 V. Upozornění: Dbejte přitom na správnou polaritu. Polarita je zobrazena ve schránce na baterie Zavřete schránku na baterie. Venkovní čidlo: Vyměňte baterie, pokud se zobrazí...
  • Seite 187: Čistění A Ošetřování

    Taková zařízení odstraňte z dosahu meteorologické stanice / venkovního čidla nebo krátkodobě vyjměte baterie z meteorologické stanice / vnějšího čidla, pokud se poruchy zobrazí na displeji LC. Překážky, jako například betonové stěny, mohou vést ke znatelnému rušení příjmu. V tomto případě zvolte jiné stanoviště (např. v blízkosti okna). Dbejte na umístění venkovního čidla v okruhu maximálně...
  • Seite 188: Likvidace

    Likvidace Obal se skládá z ekologických materiálů, které můžete zlikvidovat prostřednictvím místních sběren recyklovatelných materiálů. Při třídění odpadu se řiďte podle označení obalových materiálů zkrat- kami (a) a čísly (b), s následujícím významem: 1–7: umělé hmoty / 20–22: papír a lepenka / 80–98: složené látky. Výrobek a obalové...
  • Seite 189: Záruka

    Ekologické škody v důsledku chybné likvidace baterií / akumulátorů! Baterie / akumulátory se nesmí zlikvidovat v domácím odpadu. Mohou obsahovat jedovaté těžké kovy a musí se zpracovávat jako zvláštní odpad. Chemické symboly těžkých kovů: Cd = kadmium, Hg = rtuť, Pb = olovo. Proto odevzdejte opotřebované baterie / akumulátory u komunální...
  • Seite 190: Informace

    Záruka platí na vady materiálu a výrobní vady. Tato záruka se nevztahuje na díly výrobku podléhající opotřebení (např. na baterie), dále na poškození křehkých, choulostivých dílů, např. vypínačů, akumulátorů nebo dílů zhotovených ze skla. Informace Zjednodušené eu prohlášení o konformitě Tímto prohlačuje firma OWIM GmbH &...
  • Seite 191 Introducción ..................Página 193 Uso adecuado ..................Página 193 Descripción de las piezas ..............Página 194 Características técnicas ................. Página 195 Volumen de suministro ................Página 196 Seguridad ..................Página 197 Indicaciones generales de seguridad ........... Página 197 Indicaciones de seguridad sobre las pilas / baterías ......Página 198 Antes de la puesta en servicio ..........
  • Seite 192 Consultar la presión atmosférica de las últimas 12 horas ....Página 216 Ajuste del indicador de presión ............Página 217 Ajustar canal ..................Página 218 Mostrar la temperatura y la tendencia de temperatura ...... Página 219 Mostrar la humedad del aire y la tendencia de humedad ....Página 219 Visualizar la temperatura / humedad máxima / mínima ......
  • Seite 193: Introducción

    Estación meteorológica inalámbrica Introducción Enhorabuena por la adquisición de su nuevo producto. Ha optado por un producto de alta calidad. El manual de instrucciones forma parte de este producto. Contiene importantes indicaciones sobre seguridad, uso y eliminación. Antes de usar el pro- ducto, familiarícese con todas las indicaciones de manejo y de seguridad.
  • Seite 194: Descripción De Las Piezas

    Descripción de las piezas Estación meteorológica: Indicación de fecha Temperatura interior (°C / °F) Indicación de mes Indicación del estado de las pilas Alarma 1 Tendencia de la humedad del aire Indicación SNOOZE (exterior) Símbolo de torre Humedad del aire (exterior) Indicación DST (horario de verano) Alarma de temperatura y heladas Indicación de la hora...
  • Seite 195: Sensor Exterior

    Tecla MODE Tecla HISTORY ABS / REL Tecla + Tecla CITY Tecla – Compartimento de las pilas Tecla de canal (CH) Sensor exterior: LED de control Selector de canal Dispositivo para colgar Compartimento de las pilas Tecla RESET Características técnicas Estación meteorológica: Rango de temperaturas: 0 hasta +50 °C...
  • Seite 196: Volumen De Suministro

    Sensor exterior: Rango de medición de temperaturas: –20 hasta +65 °C –4 hasta +149 °F Rango de medición de la humedad del aire: 20 – 95 % Resolución de la humedad del aire: Alcance de transmisión HF: 433 MHz Alcance de transmisión HF: máx.
  • Seite 197: Seguridad

    Seguridad Lea todas las advertencias e indicaciones de seguridad. El incumplimiento de las advertencias e indicaciones de seguridad puede dar lugar a descargas eléctricas, incendios y / o lesiones graves. ¡GUARDAR TODAS LAS ADVERTENCIAS E INDICACIONES DE SEGURIDAD PARA FUTURAS CONSULTAS! Indicaciones generales de seguridad Los niños subestiman a menudo los peligros.
  • Seite 198: Indicaciones De Seguridad Sobre Las Pilas / Baterías

    Indicaciones de seguridad sobre las pilas / baterías ¡PELIGRO DE MUERTE! Mantenga las pilas / baterías fuera del alcance de los niños. ¡En caso de ingestión, acuda inmediatamente a un médico! ¡PELIGRO DE EXPLOSIÓN! No recargue nunca pilas no recar- gables.
  • Seite 199: Antes De La Puesta En Servicio

    En caso de sulfatación de las pilas / baterías, retírelas inmediatamente del pro- ducto para evitar daños. Utilice únicamente pilas / baterías del mismo tipo. ¡No mezcle pilas / baterías usadas con nuevas! Retire las pilas / baterías del producto si no va a utilizarlo durante un período de tiempo prolongado.
  • Seite 200: Puesta En Marcha Del Sensor Exterior

    ¡PRECAUCIÓN! Al elegir un lugar donde colocar los dispositivos, asegúrese de que éstos no están expuestos directamente a radiaciones solares, vibraciones, polvo, calor, frío o humedad. No sitúe los aparatos cerca de fuentes de calor (p. ej. radiadores). De hacerlo podrían sufrir daños. Utilice un protector indicado si coloca los dispositivos sobre superficies delica- das o de valor.
  • Seite 201: Montaje Mural

    Montaje del sensor exterior: Nota: para este paso se necesita un taladro. Busque un lugar apropiado para el sensor exterior. Nota: monte el sensor exterior a una distancia de 30 m con respecto a la es- tación meteorológica. Asegúrese de que no existan impedimentos perturbadores entre el sensor exterior y la estación meteorológica.
  • Seite 202 Nota: durante la recepción de la señal no cambie la estación meteorológica de lugar. De lo contrario podrían producirse fallos durante la recepción. Conexión de la estación meteorológica con el sensor exterior y la señal de radiofrecuencia DCF: La estación meteorológica intenta establecer una conexión con el sensor externo en cuanto de retira la cinta de seguridad de las pilas.
  • Seite 203 durar algunos minutos y en el display LC se muestra el símbolo de la torre de co- municaciones parpadeando. Si se recibe correctamente la señal de radiofrecuencia DCF, la torre aparecerá permanentemente en el display LC. Si al momento de poner en marcha la estación no es posible llevar a cabo la sincronización con el reloj atómico, también se puede ajustar la hora manualmente (véase “Ajuste manual de formato de hora 12 / 24 / °C / °F / hPa / inHg / idioma / zona horaria / hora / fecha“).
  • Seite 204: Manejo

    Manejo Recepción de la señal de radiofrecuencia DCF El reloj de la estación meteorológica comienza a buscar una señal de radiofre- cuencia DCF automáticamente tras establecer una conexión con el sensor exterior o al cabo de 3 minutos después de retirar la cinta de seguridad de las pilas. La búsqueda se muestra en el display LC mediante el parpadeo del símbolo de la torre de comunicaciones Nota: la señal puede disminuir considerablemente en edificios de hormigón armado...
  • Seite 205: Ajuste Manual De Formato De Hora 12 / 24 / °C / °F / Hpa / Inhg / Idioma / Zona Horaria / Hora / Fecha

    Si no se logra captar la señal de radiofrecuencia DCF, la búsqueda se interrumpe. Nota: Si el reloj de la estación meteorológica no puede recibir la señal debido a algún error, a que se encuentra a demasiada distancia del emisor, o similares, usted puede configurar la hora manualmente.
  • Seite 206 2. Confirme su entrada pulsando la tecla MODE. Aparecerá en la pantalla la unidad de temperatura „ºC“ o „ºF“. Para seleccionar la unidad de temperatura deseada, pulse la tecla „+“ o „-“. 3. Confirme su entrada pulsando la tecla MODE. Aparecerá la unidad de presión en la pantalla.
  • Seite 207: Configurar El Despertador

    6. Confirme su entrada pulsando la tecla MODE. El minutero del indicador hora- rio parpadea. Ajuste el valor deseado pulsando la tecla + o –. 7. Confirme su entrada pulsando la tecla MODE. En el indicador de tiempo par- padea el indicador del año. Ajuste el valor deseado pulsando la tecla + o –. 8.
  • Seite 208: Activar / Desactivar La Función De Despertador

    4. Confirme su entrada pulsando la tecla MODE. Empezará a parpadear la indi- cación de los minutos. Repita el paso 3 para ajustar los minutos. 5. Confirme su entrada pulsando la tecla MODE. Consejo: mantenga pulsada la tecla + o –. De este modo podrá ajustar los valores más rápido.
  • Seite 209: Desconexión De La Señal De Alarma

    Desconexión de la señal de alarma Pulse una tecla cualquiera, a excepción de SNOOZE / LIGHT para detener la alarma. No es necesario que vuelva a activar la alarma. Ésta se activará automáticamente con la hora ajustada. Nota: la señal de alarma se repite durante aprox. 2 minutos. Función SNOOZE Pulse la tecla SNOOZE / LIGHT , para acceder al modo SNOOZE, mien-...
  • Seite 210 La estación meteorológica muestra los siguientes símbolos: soleado ligeramente nublado nublado lluvioso 210 ES...
  • Seite 211 lluvia + nieve Los símbolos muestran la evolución del tiempo en las últimas ocho horas y no el tiempo actual. La estación meteorológica puede indicar la tendencia de la presión atmosférica Se pueden observar las siguientes indicaciones: La presión atmosférica va a aumentar. La presión atmosférica se mantiene constante.
  • Seite 212: Elegir La Ubicación

    Elegir la ubicación Pulse la tecla CITY . La indicación de la ubicación parpadea y se mues- tran los grados de longitud y latitud. Pulse la tecla + o – , para seleccionar su ubicación. Pulse la tecla CITY para confirmar su entrada. Si no se muestra la abreviatura de su localidad puede especificarla manualmente (véase “Indicación manual de la ubicación“).
  • Seite 213 Tras breves instantes se muestran los tiempos de la salida y puesta del sol, las fa- ses lunares, marea baja (TIDE LO), nivel medio del mar (TIDE MID) y marea alta (TIDE TH). Magde- Linz Puede seleccionar entre burg Salzburg los siguiente países y München Vienna...
  • Seite 214 Copenha- Strasbourg Venice Toulouse Verona Odense Greece Athens Liechtens- Vaduz Finland Helsinki (GR) tein (LI) (FI) Hungary Budapest Luxem- Luxem- France Ajaccio (HU) burg (LU) burgo (FR) Ireland Dublin Monaco Monte Biarritz (IE) (MC) Carlo Bordeaux Italy (IT) Ancona Nether- Amsterdam AMS lands Bari...
  • Seite 215 Warsaw Madrid Belfast Portugal Faro Malaga Birmin- (PT) gham Palma de Lisbon Cardiff Mallorca Porto Salamanca SAL Glasgow Russian St. Peters- Sevilla London Federa- burg Valencia Manches- tion (RU) Zaragoza Serbia Belgrade Newcastle Sweden Gothen- (RS) upon Tyne (SE) burg Slovakia Bratislava Plymouth...
  • Seite 216: Fases Lunares

    Fases lunares La estación meteorológica posee una indicación de la fase lunar actual. Luna nueva Media luna Media luna Luna llena creciente creciente Luna llena Luna llena Media luna Media luna menguante menguante Consultar la presión atmosférica de las últimas 12 horas Pulse varias veces la tecla HISTORY ABS/REL para consultar los valores de presión atmosférica de las últimas 12 horas.
  • Seite 217: Ajuste Del Indicador De Presión

    Ajuste del indicador de presión El pronóstico del tiempo de esta estación se basa en el análisis de los cambios de la presión atmosférica. El indicador de presión viene ajustado de fábrica a la presión absoluta. Puesto que en general la presión atmosférica disminuye a medida que aumenta la altura con respecto al nivel del mar, normalmente en los servicios meteorológicos públicos se utiliza la llamada presión relativa.
  • Seite 218: Ajustar Canal

    Si desea que su estación meteorológica muestre la presión absoluta, proceda del siguiente modo: Mantenga pulsada la tecla HISTORY ABS / REL durante aprox. 3 segundos. A continuación pulse la tecla „+“ o „-“ para cambiar al indicador de presión absoluta.
  • Seite 219: Mostrar La Temperatura Y La Tendencia De Temperatura

    Mostrar la temperatura y la tendencia de temperatura La temperatura interior actual y la tendencia de temperatura se muestra en la pantalla. Una vez que se produce la conexión con el sensor exterior se muestra la tempera- tura exterior y la tendencia de temperatura (exterior) .
  • Seite 220: Visualizar La Temperatura / Humedad Máxima / Mínima

    Están disponibles las siguientes categorías: = Humedad del aire < 40 % COMFORT = Humedad del aire 40–70 %, temperatura interior 20 °C–28 °C = Humedad del aire > 70 % En cuanto el sensor exterior se conecta, la estación meteorológica muestra en panta- lla la tendencia de humedad del aire (exterior) y la humedad del aire (exterior) Visualizar la temperatura / humedad máxima / mínima...
  • Seite 221: Alarma De Temperatura Y Helada

    Alarma de temperatura y helada La alarma de temperatura es una corta señal que suena en cuanto la temperatura exterior sobrepasa o desciende los niveles establecidos. Para ajustar los niveles de temperatura deseados proceda del siguiente modo: Pulse la tecla – para acceder al modo de alarma de temperatura.
  • Seite 222: Iluminación De Fondo

    Si se encuentra activada la alarma de helada se mostrará el símbolo respectivo junto a la temperatura exterior. La señal de alarma suena cuando la temperatura se encuentra entre -1 °C y +3 °C. Si se encuentra activada la alarma de temperatura se muestra el símbolo respectivo junto a la temperatura exterior.
  • Seite 223: Cambiar Pilas

    Cambiar pilas Estación meteorológica: Cambie las pilas cuando la pantalla se vuelva ilegible o se muestre el símbolo de la pila Retire la tapa del compartimento de las pilas de la parte trasera de la estación meteorológica. Retire las pilas agotadas. Introduzca 3 pilas nuevas del tipo 1,5 V / AA.
  • Seite 224: Eliminar Errores

    Eliminar errores Nota: El producto contiene componentes electrónicos. Por ello podría sufrir interferencias por otros equipos de radiotransmisión que se encuentren en las proximidades. Retire este tipo de aparatos del alcance de la estación meteorológica / del sensor exterior, o retire brevemente las pilas de la estación meteorológica / del sensor exterior, cuando la pantalla muestre fallos.
  • Seite 225: Limpieza Y Mantenimiento

    Limpieza y mantenimiento En ningún caso utilice líquidos o productos limpiadores, ya que estos podrían dañar el producto. Limpie el producto solo por fuera con un paño suave y seco. No salpique nunca el sensor externo con agua, p. ej. con la manguera del jardín.
  • Seite 226 Para obtener información sobre las posibilidades de desecho del producto al final de su vida útil, acuda a la administración de su comunidad o ciudad. Para proteger el medio ambiente no tire el producto junto con la basura doméstica cuando ya no le sea útil. Deséchelo en un contenedor de reciclaje.
  • Seite 227: Garantía

    Garantía El producto ha sido fabricado cuidadosamente siguiendo exigentes normas de calidad y ha sido probado antes de su entrega. En caso de defecto del producto, usted tiene derechos legales frente al vendedor del mismo. Nuestra garantía (abajo indicada) no supone una restricción de dichos derechos legales. Este producto dispone de una garantía de 3 años desde la fecha de compra.
  • Seite 228: Información

    Información Declaración de conformidad UE simplificada Nosotros, OWIM GmbH & Co. KG, Stiftsbergstraße 1, DE-74167 Neckarsulm, ALEMANIA, declaramos que el producto (Estación meteorológica inalámbrica Z31915) cumple con las directivas 2014/53/UE y 2011/65/UE. Puede consultar la declaración de conformidad UE completa en la siguiente dirección web: www.owim.com 228 ES...
  • Seite 229 Introdução ..................Página 231 Utilização correcta................. Página 231 Descrição das peças ................Página 232 Dados técnicos ..................Página 233 Material fornecido ................. Página 234 Segurança ..................Página 235 Indicações gerais de segurança ............Página 235 Indicações de segurança relativas às pilhas / baterias ....... Página 236 Antes da colocação em funcionamento ....
  • Seite 230 Consultar a pressão atmosférica das últimas 12 horas ...... Página 254 Ajuste da pressão atmosférica .............. Página 255 Configurar o canal ................. Página 256 Visualizar a temperatura e tendência de temperatura ......Página 257 Visualizar a humidade do ar e tendência da humidade do ar ..Página 257 Visualizar a temperatura / humidade do ar máxima / mínima....
  • Seite 231: Introdução

    Estação meteorológica com rádio comando Introdução Damos-lhe os parabéns pela aquisição do seu novo produto. Acabou de adquirir um produto de grande qualidade. O manual de instruções é parte integrante deste produto. Contém indicações importantes referentes à segurança, utilização e elimi- nação.
  • Seite 232: Descrição Das Peças

    funções de alarme diferentes. Este produto destina-se apenas ao uso privado e não comercial. Descrição das peças Estação meteorológica: Indicação da data Tendência da humidade do ar Indicação do mês (interior) Alarme 1 Humidade do ar (interior) Indicação SNOOZE Indicador de conforto (máximo / Símbolo da emissora mínimo) Indicação DST (horário de Verão)
  • Seite 233: Dados Técnicos

    Indicador de barras da pressão Botão SNOOZE / LIGHT atmosférica Botão MODE Indicador da pressão atmosférica Botão + na última hora Botão – Pressão atmosférica absoluta / Botão de canal (CH) relativa Botão HISTORY ABS / REL Tendência da pressão atmosférica Botão CITY Previsão meteorológica Compartimento de pilhas...
  • Seite 234: Material Fornecido

    Pilha: 3 x AA, 1,5 V (corrente contínua) Gama da pressão atmosférica: 850 - 1050hPa Espectro de frequência: 433.050 a 434.790 MHz Sensor exterior: Área de medição da temperatura: –20 a +65 °C –4 a +149 °F Amplitude de medição da humidade do ar: 20 – 95% Resolução da humidade do ar: Sinal de transmissão HF: 433 MHz...
  • Seite 235: Segurança

    Segurança Leia todas as indicações de segurança e instruções. A inobservância das indica- ções de segurança e instruções pode ter como consequência choques eléctricos, incêndios e / ou ferimentos graves. GUARDE TODAS AS INDICAÇÕES DE SEGURANÇA E INSTRUÇÕES PARA FUTURA CONSULTA! Indicações gerais de segurança As crianças frequentemente subestimam os perigos.
  • Seite 236: Indicações De Segurança Relativas Às Pilhas / Baterias

    Indicações de segurança relativas às pilhas / baterias PERIGO DE MORTE! Mantenha as pilhas e baterias fora do alcance das crianças. Se a pilha / bateria for ingerida, contacte imediatamente um médico! PERIGO DE EXPLOSÃO! Nunca carregue pilhas não recarregá- veis.
  • Seite 237: Antes Da Colocação Em Funcionamento

    Utilize apenas pilhas ou baterias do mesmo tipo. Não misture pilhas novas com pilhas ou baterias antigas. Remova as pilhas ou baterias, se o produto não foi utilizado durante um longo período. Perigo de dano ao produto Utilize apenas o tipo de pilha ou bateria indicado! Insira as pilhas / baterias de acordo com a especificação de polaridade (+) e (-) na pilha / bateria e produto.
  • Seite 238: Colocar O Sensor Exterior Em Funcionamento

    Não coloque os aparelhos nas proximidades de fontes de calor, como por ex., aquecedores. Caso contrário, os aparelhos podem ficar danificados. Não coloque os aparelhos sem uma protecção adequada sobre superfícies de valor ou delicadas. Caso contrário, as mesmas poderão ficar danificadas. Certifique-se de que os aparelhos contíguos não funcionam com a mesma fre- quência de 433 MHz.
  • Seite 239: Montagem Na Parede

    Procure um local adequado para o sensor exterior. Nota: tenha em atenção que o sensor exterior deve ser montado dentro de um raio de 30 m relativamente à estação meteorológica. Certifique-se de que não se encontram obstáculos entre o sensor exterior e a estação meteorológica que causem interferências.
  • Seite 240 Ligar a estação meteorológica ao sensor exterior e ao sinal de ra- diofrequência DCF: Após remover a fita de segurança das pilhas, a estação meteorológica procura estabelecer uma ligação com o sensor exterior. Este processo pode demorar alguns minutos. O símbolo pisca por alguns minutos. Se a ligação ao sensor exte- rior for estabelecida com sucesso, o visor LCD indica o símbolo do canal selec- cionado, juntamente com o canal do sensor exterior (se necessário, altere o canal...
  • Seite 241 Em caso de recepção bem sucedida do sinal de radiofrequência DCF, o símbolo da torre de rádio é indicado permanentemente no visor LCD. Se, no momento da colocação em funcionamento, não for possível uma sincronização com o relógio atómico, poderá também efectuar manualmente as configurações horárias (ver “Ajustar manualmente o formato de 12 / 24 horas / °C / °F / hPa / inHg / fuso horário / hora /data / idioma”).
  • Seite 242: Utilização

    Utilização Receber o sinal de radiofrequência DCF O relógio da estação meteorológica começa após uma ligação bem sucedida ao sensor exterior ou automaticamente 3 minutos após remoção da fita de segurança das pilhas, com a procura do sinal de radiofrequência DCF. A procura é sinali- zada no visor LCD através do símbolo da torre de rádio intermitente Nota: nos edifícios em betão armado, a recepção do sinal de radiofrequência pode ser significativamente influenciada (ver “Instalar os aparelhos”).
  • Seite 243: Ajustar Manualmente O Formato De 12 / 24 Horas / °C / °F / Hpa / Inhg / Fuso Horário / Hora / Data / Idioma

    Nota: se o relógio da estação meteorológica não conseguir receber o sinal de radiofrequência DCF devido a erros, a uma distância demasiado grande relativa- mente à emissora, entre outros, pode configurar as horas manualmente. Se a re- cepção do sinal de radiofrequência DCF for efectuada com sucesso, os valores configurados manualmente são substituídos.
  • Seite 244 3. Confirme a sua introdução premindo o botão MODE. No visor pisca a uni- dade de pressão atmosférica. Prima o botão + ou – para ajustar a unidade (hPa / inHg) desejada. 4. Confirme a sua introdução premindo o botão MODE. A indicação do fuso horário pisca no visor.
  • Seite 245: Definir A Hora De Despertar

    7. Confirme a sua introdução premindo o botão MODE. A indicação do ano fica intermitente. Prima o botão + ou – para ajustar o valor pretendido. 8. Confirme a sua introdução premindo o botão MODE. A indicação do mês da data fica intermitente.
  • Seite 246: Activar / Desactivar As Funções De Despertador

    5. Confirme a sua introdução, premindo o botão MODE. Dica: mantenha o botão + ou – premido. Deste modo o ajuste dos valores será mais rápido. Esta configuração rápida também pode ser utilizada para os próximos processos de configuração. Se não premir qualquer botão dentro de 20 segundos, o visor LCD regressa automaticamente à...
  • Seite 247: Desligar O Sinal De Alarme

    Desligar o sinal de alarme Prima um qualquer botão, à excepção de SNOOZE / LIGHT para parar o sinal de alarme. Não precisa voltar a activar o alarme. Este liga-se automati- camente à hora de alarme já ajustada. Nota: o sinal de alarme toca por aprox. 2 minutos. Função SNOOZE Prima o botão SNOOZE / LIGHT para aceder ao modo SNOOZE...
  • Seite 248 A estação meteorológica indica os seguintes símbolos meteorológicos: ligeiramente nublado nublado chuvoso 248 PT...
  • Seite 249 chuva + neve Os símbolos meteorológicos indicam as alterações meteorológicas das próximas oito horas e não as condições actuais. A estação meteorológica pode indicar a tendência da pressão atmosférica São possíveis as seguintes indicações: A pressão atmosférica vai aumentar. A pressão atmosférica permanece constante. A pressão atmosférica vai diminuir.
  • Seite 250: Seleccionar A Localização

    Seleccionar a localização Prima o botão CITY . A indicação da localização pisca e é indicada a longitude e latitude. Prima o botão + ou – , para seleccionar a sua localização. Prima o botão CITY para confirmar a sua introdução. Se não surgir a abrevia- tura para a sua localização no visor, pode introduzir a localização definida pelo utilizador (ver “Seleccionar manualmente a localização“).
  • Seite 251 Após um breve instante, a estação meteorológica indica das horas de nascer do sol e pôr-do-sol, as fases da lua e o nível de maré baixa (TIDE LO), médio (TIDE MID) a alto (TIDE TH). Podem ser seleccionados Magde- Linz burg os seguintes países e ci- Salzburg...
  • Seite 252 Copenha- Toulouse Verona Greece Athens Liechtens- Vaduz Odense (GR) tein (LI) Finland Helsinki Hungary Budapest Luxem- Luxem- (FI) (HU) burg (LU) burgo France Ajaccio Ireland Dublin Monaco Monte (FR) (IE) (MC) Carlo Biarritz Italy (IT) Ancona Nether- Amsterdam AMS lands (NL) Bari Bordeaux Arnhem...
  • Seite 253 Portugal Faro Malaga Belfast (PT) Palma de Birmin- Lisbon Mallorca gham Porto Salamanca SAL Cardiff Russian St. Peters- Sevilla Glasgow Federa- burg Valencia Londres tion (RU) Zaragoza Manchester MAN Serbia Belgrade Sweden Gothenburg GOT (RS) Newcastle (SE) Slovakia Bratislava upon Tyne Karlstad (SK) Plymouth...
  • Seite 254: Fases Da Lua

    Fases da lua A estação meteorológica possui uma indicação que mostra automaticamente a fase actual da lua Lua nova Quarto Meia-lua Quarto cre- crescente (minguante) scente (quase lua cheia) Lua cheia Quarto mingu- Meia-lua Quarto ante (quase (minguante) minguante lua cheia) Consultar a pressão atmosférica das últimas 12 horas Prima de forma repetitiva o botão HISTORY-ABS / REL para poder consultar...
  • Seite 255: Ajuste Da Pressão Atmosférica

    Ajuste da pressão atmosférica A previsão do tempo desta estação meteorológica baseia numa avaliação da alteração da pressão atmosférica. A indicação da pressão atmosférica está ajustada pela fábrica na pressão atmosférica absoluta. Como a pressão atmosférica em geral desce com a altura acima do nível do mar, o serviço meteorológico público indica geralmente a cha- mada pressão atmosférica relativa.
  • Seite 256: Configurar O Canal

    Se quiser que a estação meteorológica indique a pressão atmosférica absoluta, proceda da seguinte maneira: Prima e mantenha premido o botão HISTORY ABS / REL durante aprox. 3 segundos. Prima depois o botão + ou - para alternar entre a indicação da pressão atmosférica relativa ou absoluta.
  • Seite 257: Visualizar A Temperatura E Tendência De Temperatura

    Visualizar a temperatura e tendência de temperatura A temperatura interior actual e a tendência da temperatura (interior) são indicadas no visor LCD. Após a ligação com sucesso ao sensor exterior, a temperatura exterior tendência de temperatura (exterior) são indicadas. São possíveis as seguintes indicações: A temperatura aumenta.
  • Seite 258: Visualizar A Temperatura / Humidade Do Ar Máxima / Mínima

    = Humidade do ar < 40 % COMFORT = Humidade do ar 40–70 %, temperatura interior 20 °C–28 °C = Humidade do ar > 70 % Após a ligação com sucesso ao sensor exterior, a estação meteorológica mostra a tendência da humidade do ar (exterior) e a humidade do ar (exterior) visor LCD.
  • Seite 259: Alarme De Temperatura E Gelo

    Alarme de temperatura e gelo O alarme de temperatura é um sinal acústica curto que soa assim que a tempera- tura exterior subir acima ou descer abaixo da gama de temperaturas ajustada. Para o ajuste da gama de temperaturas desejada proceda da seguinte maneira: Prima o botão –...
  • Seite 260: Iluminação De Fundo

    peratura exterior. O sinal de alarme soa com os valores configurados. Se o alarme de temperatura e gelo estiverem activos, surgem ambos os símbolos no visor. Iluminação de fundo Prima o botão SNOOZE / LIGHT . A iluminação de fundo acende-se du- rante 5 segundos.
  • Seite 261: Eliminar Erros

    Retire a tampa do compartimento das pilhas na parte traseira da estação me- teorológica. Retire as pilhas gastas. Coloque 3 pilhas novas do tipo AA, 1,5 V. Nota: tenha em atenção a polaridade correcta. Esta é indicada no comparti- mento das pilhas Feche o compartimento das pilhas.
  • Seite 262: Limpeza E Conservação

    Retire estes aparelhos do alcance da estação meteorológica / do sensor exte- rior, ou remova momentaneamente as pilhas da estação meteorológica / do sensor exterior se o visor apresentar interferências. Obstáculos como, p. ex., paredes de betão, também podem provocar a perturbação da receção.
  • Seite 263: Eliminação

    Eliminação A embalagem é feita de materiais não poluentes que podem ser eliminados nos contentores de reciclagem locais. Esteja atento à especificação dos materiais da embalagem para a separação de lixo. Estas são identificadas com abreviações (a) e núme- ros (b) com o seguinte significado: 1–7: Plásticos / 20–22: Papel e papelão / 80–98: Materiais compostos.
  • Seite 264: Garantia

    As pilhas ou baterias avariadas ou gastas têm de ser recicladas de acordo com a diretiva 2006/66/CE e as suas alterações. Devolva as pilhas ou baterias e / ou o produto nos locais específicos destinados à sua recolha. Danos ambientais devido à eliminação incorreta das pilhas / baterias! As pilhas / baterias não podem ser eliminadas no lixo doméstico.
  • Seite 265: Informações

    Caso num espaço de tempo de 3 anos a partir da data da compra deste producto surja um erro de material ou de fabrico, o producto será reparado ou substituído por nós – segundo a nossa escolha – e sem qualquer custo. Esta garantia expira se o producto estiver danificado, se não for devidamente utilizado ou se não for efec- tuada a devida manutenção.
  • Seite 266 266 PT...
  • Seite 269 Version: 02 / 2018 Stand der Informationen · Last Information Update · Version des informations · Stand van de informatie · Stav informací · Estado de las informaciones · Estado das informações: 12 / 2017 · Ident.-No.: Z31915122017-8 IAN 296289...

Diese Anleitung auch für:

Z31915

Inhaltsverzeichnis