Herunterladen Inhalt Inhalt Diese Seite drucken
Inhaltsverzeichnis

Werbung

Verfügbare Sprachen
  • DE

Verfügbare Sprachen

  • DEUTSCH, seite 56
Video Graphic
Printer
取扱説明書
Page 2
Instructions for Use 
Mode d'emploi 
Page 38
Gebrauchsanweisung 
Manual de instrucciones 
Istruzioni perl'uso 
取扱説明書 
お買い上げいたただきありがとうございます。
電気製品は安全のための注意事項を守らないと、
火災や人身事故になることがあります。
この取扱説明書には、事故を防ぐための重要な注意事項と製品の取り扱いかたを示して
あります。この取扱説明書をよくお読みのうえ、製品を安全にお使いください。お読み
になったあとは、いつでも見られるところに必ず保存してください。
(
For UP-895MD/895CE)
UP-895
UP-895MD
UP-895CE
 1999 Sony Corporation
Page 20
Seite 56
página 74
pagina 92
3-868-286-13 (1)
JP
GB
FR
DE
ES
IT

Werbung

Inhaltsverzeichnis
loading

Inhaltszusammenfassung für Sony UP-895

  • Seite 1 取扱説明書 Page 2 Instructions for Use  Page 20 Mode d’emploi  Page 38 Gebrauchsanweisung  Seite 56 Manual de instrucciones  página 74 Istruzioni perl’uso  pagina 92 取扱説明書  お買い上げいたただきありがとうございます。 電気製品は安全のための注意事項を守らないと、 火災や人身事故になることがあります。 この取扱説明書には、事故を防ぐための重要な注意事項と製品の取り扱いかたを示して あります。この取扱説明書をよくお読みのうえ、製品を安全にお使いください。お読み になったあとは、いつでも見られるところに必ず保存してください。 For UP-895MD/895CE) UP-895 UP-895MD UP-895CE  1999 Sony Corporation...
  • Seite 2 日本語 安全のために 本機は正しく 使用すれば事故が起きないよう に、 安全には充分配慮して設計さ 警告表示の意味 れています。 しかし、 まちがった使いかたをする と、 火災や感電などによ り死亡 この取扱説明書および製品で や大けがなど人身事故につながる こ とがあ り、危険です。 は、次のような表示をしていま 事故を防ぐために次のこ とを必ずお守り く ださい。 す。表示の内容をよく理解して から本文をお読みください。 安全のための注意事項を守る 3∼5ページの注意事項をよく お読みく ださい。 製品全般の安全上の注意事項が 記されています。 この表示の注意事項を守らない 14 ページの 「本機の性能を保持するために」 も併せてお読みく ださい。 と、火災や感電などにより死亡 や大けがなど人身事故につなが 定期点検をする ることがあります。...
  • Seite 3: Inhaltsverzeichnis

    目次/主な特長 目次 主な特長 静かな高画質プリント はじめに • 高速 ドライ ブIC内蔵の薄膜サーマルヘッ ドを採用。 12.8 ド ッ ト/mmの高密度印画が可能になり ま した。 主な特長 ................• 白黒256階調表現する こ とができ ます。 ................• 温度差による印画ムラを防ぐ温度補正回路を内蔵しています。 ................簡単操作ですばやくプリント • PRINTボタ ンを押すだけで、 A7サイ ズ (STD、 NORMモー ド時) 準備 の高画質プリ ン ト が約3.9秒でできます。 •...
  • Seite 4 下記の注意を守らないと、 火災 感電 死亡 大けが や により や につながることがあります。 火災 感電 電源コードを傷つけない 本機は国内用です 電源コー ドを傷つける と、 火災や感電の原因と 交流 100V でお使いく ださい。 なる こ とがあ り ます。 海外などで、 異なる電圧で使う と、 火災や感電 • 設置時に、製品と壁やラ ック (棚) などの間 の原因となる こ とがあ り ます。 に、はさみこんだり...
  • Seite 5 下記の注意を守らないと、 けが 損害 をしたり周辺の物品に を与えることがあります。 ぬれた手で電源プラグをさわらない カッターの刃には触れない ぬれた手で電源プラグを抜き差しする と、 感電 カ ッ ターの刃に触れる と、 けがをする こ とがあ り の原因となる こ とがあ り ます。 ます。 本体内部に手を入れない 接続の際は電源を切る ドアが開いている と きに、 本体内部に手をいれ 電源コー ドや接続コー ドを接続する と きは、 電源 る と、 火傷および故障の原因となる こ とがあ り ま を切ってく...
  • Seite 6: 本機を使用状況に合わせる

    接続 本機を使用状況に合わせる 接続 本機を使用状況に合わせる 2種類のスイ ッチを使って、 本機を使用状況に合わせて設定でき ま す。 • 各機器の電源を切ってから、 接続してく ださい。 • プリ ンター用紙 ト レー内にあるスライ ドスイ ッチ • 電源コー ドは最後に接続してく ださい。 プリ ンター用紙の種類の設定、 プリ ン ト画の画質の調節など使用 頻度の高い設定を行います。 • 裏面パネルにあるDIPスイ ッチ 比較的使用頻度の低い動作モー ド、 プリ ンターの仕様などを設 ビデオ機器 定します。 カラー/白黒 プリンター用紙トレー内にあるスライ...
  • Seite 7: 裏面パネルの Dip スイッチを切り換える

    本機を使用状況に合わせる 裏面パネルの スイッチを切り換える SHARPNESS (シャープネス) 切り換えスイッチ プリ ン ト画の輪郭を強調します。 :輪郭を強調しないプリ ン ト画が作成されます。 下図は工場出荷時の各スイ ッチの設定位置を示します。 I、II、III:輪郭を強調させたいと きに各位置に設定します。 IIIに スイッチを切り換えるには いく 程輪郭はよ り強調されます。 小さい ドライ バーの先などで切り換えてく ださい。 GAMMA (ガンマ) 切り換えスイッチ 印画の ト ーン (濃度階調特性) を、 次のいずれかに切り換えます。 I: 軟調 II: 標準 III:硬調 1 2 3 4 5 6 7 8 9 q; qa qs 各...
  • Seite 8 本機を使用状況に合わせる INTERRUPT (プリント中断) 切り換えスイッチ SCAN (スキャンサイズ)切り換えスイッチ ON (SW-DOWN) : プリ ン ト中にも う1度PRINTボタ ンを押すと、 プリ ン トする画像の範囲を切り換えます。 プリ ン ト を中断し、 PRINTボタ ンを押した瞬間の画像を新たにプリ ン NORM、 WIDE 1、 WIDE 2の順にプリ ン ト する範囲が広く なり ます。 ト します。 プリ ン トする画像の範囲を切り換える ときは、 DIPスイ ッチを下表の OFF (SW-UP) : プリ...
  • Seite 9: プリンター用紙について

    プリンター用紙について Ω(インピーダンス) 切り換えスイッチ プリンター用紙を取り付ける場合: ON (SW-DOWN) :VIDEO OUTコネク ターに何も接続しない • プリ ンター用紙を取り付ける際は、 プリ ンター用紙の表面には触 ときは、 この位置に設定します。 れないでく ださい。 指紋や汗、 折り目がつく と、 印画ムラの原因に OFF (SW-UP) :VIDEO OUTコネクターからの出力信号をモ なり ます。 ニターテレビまたは他のビデオ機器につなぐと きは、 この位置に設 • プリ ンター用紙の先端に付いている ラベルをはがしたら、 必ず先 定します。 端の15∼20cmを引き出してく ださい。 ラベルの跡が印画ムラの ただしOUTPUT切り換えスイ...
  • Seite 10: プリンター用紙を取り付ける

    プリンター用紙を取り付ける プリンター用紙の先端に付いているラベルをはがし、 プリンター用紙を取り付ける 20cm ∼ 程引き出してから、プリンター用紙トレーに入 れます。 ご注意 ご注意 プリ ンター用紙を引き出すと きや、 ト レー内に入れる と きは、 プリ • プリ ンター用紙を取り付ける前に、 「 プリ ンター用紙について」 ( 9 ンター用紙を落と さないよ う お気をつけく ださい。 落と したりす ページ) をご覧く ださい。 る と、 ごみなどが付き、 使用できなく なる こ とがあり ます。 •...
  • Seite 11: プリントする

    プリントする プリント画がぶれていたら プリントする 速く 動いている画像を取り込むと、 画像がぶれてしま う こ とがあ り ま す。 このとき、 裏面のDIPスイ ッチ(MEMORY4)の設定をFIELD に変えてプリ ン ト する こ とによ り 、 プリ ン ト画からぶれを取り除く こ とが プリントする前に次のことを確認してください。 できます。 この場合、 解像度が少し落ちます。 • 接続は正しいですか (6ぺージ) • DIPスイ ッチ、 スライ ドスイ ッチは正しく 設定していますか ? (6、 7 SMALL モードでプリントするとき...
  • Seite 12: プリント画の向き/大きさを選ぶ

    プリントする ご注意 色々なプリント画を作るには • 電源を入れた直後など、 プリ ンターに画像が記憶されていない STD/SIDE 画像サイズ選択つまみ、 切り換えスイッチの設 状態でCOPYボタ ンを押すと、 アラームブザーが鳴り 、 コ ピーでき 定で作成するプリント画 ません。 下の表は、 画像サイ ズ選択つまみとSTD/SIDE 切り換えスイ ッチ • SMALLモー ドで、 1度しかPRINTボタ ンを押していない状態で の設定の組み合わせによ り作成でき るプリ ン ト画を表しています。 COPYボタ ンを押すと、 アラームブザーが鳴り 、 コ ピーでき ません。 同じ画像を連続してコピーするには...
  • Seite 13: 明るさやコントラストを調節する

    プリントする 白黒反転のプリント画を作るには ご注意 本機前面のPOSI/NEGAスイ ッチをNEGAの位置に設定します。 メモ リ ーに取り込まれた画像の明る さやコ ン ト ラス ト を変える こ とはで き ません。 明る さやコン ト ラス ト を変更したいと きは、 PRINTボタ ンを 明るさやコントラストを調節する 押して画像をメモリ ーに取り込む前に調節してく ださい。 本機前面のCONTRつまみ/BRIGHTつまみを使ってプリ ン ト画 リモコンを使ってプリントする の明る さ とコン ト ラス ト を調節でき ます。 本機裏面のREMOTE端子に接続したリ...
  • Seite 14: 本機の性能を保持するために

    本機の性能を保持するために/お手入れ 本機の性能を保持するために お手入れ 電源について キャビネットのクリーニング • 電源はAC100Vをお使いく ださい。 キャ ビネ ッ ト の汚れは、 水または水で薄めた中性洗剤溶液で湿らせ • 電源コー ドは傷つけないでく ださい。 た布をかたく しぼってから、 拭き取ってく ださい。 シンナーやベンジ • 長い間使わないときは、 電源コー ドを抜いておいてく ださい。 ン、 アルコールなどは表面の仕上げを傷める こ とがあ り ますので、 使 • 電源コー ドを抜く ときは、 電源プラグを持って抜いてく ださい。 用しないでく...
  • Seite 15 お手入れ ドアを手で押して閉めます。 FEED ボタンを、クリーニングシートが排出され始める まで押し続け、ブザーが鳴ったら離します。 FEED ボタンを押し続ける ピピピとブザーが 鳴ったら離す。 ク リ ーニングが終了します。 OPEN ボタンを押し、ドアを開けヘッドクリーニング シートを取り除きます。 ドアを手で押して閉めます。 ご注意 ヘッ ドク リ ーニングシー ト は必要に応じてお使いく ださい。 ヘッ ドのク リ ーニングを頻煩に行う と、 故障の原因になる こ とがあ り ます。 その他...
  • Seite 16: 主な仕様

    主な仕様 最大外形寸法 154×105×260mm (幅/高さ/奥行き) 主な仕様 質量 3.4kg ( 本体のみ) 付属品 プリ ンター用紙 (UPP-110HG) (1) BNCy BNCケーブル(1) 感熱ヘッ ド 薄膜サーマルヘッ ド ( ドライ ブIC内蔵) 1280 ド ッ ト AC電源コー ド(1) 階調数 256階調 3Py 2P AC変換アダプター(1) 解像度 (WIDE 1のとき) ヘッ ドク リ ーニングシー ト(1) EIA :...
  • Seite 17: 故障とお考えになる前に

    故障とお考えになる前に 全面が真っ黒に近い 真っ黒に近い画像を15枚以上プリ ン ト する と、 それ以上 故障とお考えになる前に 画像を連続してプリ ン プリ ン ト しなく なる こ とがあ り ます。 ト したら、 プリ ン ト しなく tサーマルヘッ ドの温度上昇を抑えるために保護回 なってしまった。 (ア 路が動作しているためです。 しばら く プリ ン ト をやめ ラームブザーが鳴る。 ) てく ださい。 修理にお出しになる前にも...
  • Seite 18: 各部の名称と働き

    各部の名称と働き 前面 各部の名称と働き 1 電源 ON/OFF スイッチとランプ スイ ッチをONにして電源を入れる と、 ラ ンプが点灯します。 ( ) 内の数字は参照ページを示します。 2 画像サイズ選択つまみ ( ) プリ ン トする画像の大き さ を選択します。 STD/SIDE (標準/横) 切り換えスイッチ ( ) 標準の向きにプリ ン トするか横向きにプリ ン トするかを選択し 前面 ます。 CONTR (コントラスト) つまみ ( ) 23456 7 8 9 q;...
  • Seite 19: 保証書とアフターサービス

    修理によって機能が維持できる場合は、 ご要望によ り有料修理さ qs プリント画出口/カッター せていただきます。 プリ ン ト画を出口でカ ッ トするための刃がついています。 裏面 部品の保有期間について 当社では、 ビデオグラフ ィ ッ クプリ ンターUP-895/895MDの補修用 REMOTE (リモコン) 端子 ( 、 ) 性能部品 (製品の機能を維持するために必要な部品) を、 製造打 別売りの リ モー ト コ ン ト ロールユニッ ト RM-91、 またはフ ッ ト スイ ッ...
  • Seite 20: Important Safeguards/Notices For Use In The Medical Environments

    If it is not installed and used in For the customers in the U.S.A. accordance with the instruction manual, it may cause (for UP-895/895MD) interference to other equipment. If this unit causes interference (which can be determined by unplugging the...
  • Seite 21: Overview

    Table of Contents/Overview Overview Table of Contents The UP-895/895MD/895CE is a black and white video Introduction graphics printer that can be used to print images displayed on a video monitor. Overview ..............21 This manual covers the UP-895/895MD/895CE models. Wherever the operation or any other item differs among...
  • Seite 22: Connection

    Connection/Setting Up the Printer Connection Setting Up the Printer You can set the printer to the desired specifications using Notes two kinds of switches. • Turn off the power to each device before making any • Slide switches on the paper tray inside the front door connections.
  • Seite 23: Setting The Dip Switches On The Rear Panel

    Setting Up the Printer B GAMMA switch Setting the DIP Switches on the Sets the tone of printouts (density gradation). Rear Panel I: Soft gradation II: Standard To change the DIP switch settings III: Hard gradation Use a small pointed tool such as a small screwdriver. The diagram below shows the curve of density The factory settings are as follows.
  • Seite 24 Setting Up the Printer 1 INTERRUPT switch 5 DIRECTION switch Sets whether the PRINT button is activated to enable Selects whether the top or bottom of the screen is to be interruption of the printing process and capture an image printed first.
  • Seite 25: Paper

    • To attach the printout to another piece of paper, use Use only UPP-110S/110HD/110HG paper as double-sided adhesive tape or water-based glue. specified for the UP-895/895MD/895CE. If another type of paper is used, the quality of the printout cannot be guaranteed. Use of another type of paper may also cause malfunction of the printer.
  • Seite 26: Loading Paper

    Loading Paper Loading Paper Notes • Before loading paper, read “Paper” on page 25. • Do not fold the paper or touch the printing surface. Dust or finger prints are likely to cause poor print Remove the label and pull out the first 15 to 20 cm (6 to 8 inches) of quality.
  • Seite 27: Operation

    Printing To stop printing and print another image Printing displayed on the video monitor To do this, DIP Switch 1 (INTERRUPT) must be set to ON (SW-DOWN). (See page 24.) Before making printouts Press the PRINT button while printing or copying. The Confirm the following: printer stops printing, captures the new image, and starts •...
  • Seite 28: Selecting The Printing Direction/Image Size

    Printing Selecting the Printing Direction/ Making copies of the last printout Image Size Press the COPY button. The printer makes a copy of the last printout. The image of the last printout is retained in You can make variations of printouts using the STD/ the printer’s memory until you press the PRINT button SIDE selector, image size selectors and the DIP again or turn the power off.
  • Seite 29 Printing Variations of printouts Image size Printing direction selector position selector Printouts obtained by the combination of the position SIDE STD/SIDE selector and image size selector The table in the right colum shows various printouts that (Normal) can be obtained according to the combination of settings of the STD/SIDE selector and image size selectors.
  • Seite 30: Adjusting The Contrast And Brightness

    Printing Adjusting the Contrast and To adjust the brightness You can adjust the brightness of printouts using the Brightness BRIGHT control. To make the image brighter, turn the BRIGHT control You can adjust the contrast and brightness of the clockwise. printout.
  • Seite 31: Others

    Precautions/Maintenance Precautions Maintenance On safety Cleaning the cabinet • Check the operating voltage before operation. Do not use strong solvents to clean the printer. Thinner Operate the unit only with a power source specified in or abrasive cleansers will damage the cabinet. “Specifications”.
  • Seite 32: Specifications

    Maintenance/Specifications Close the door by pushing it. Specifications Press the FEED button and keep it pressed. When the buzzer sounds and the printer start ejecting Power requirements and consumption the cleaning sheet, release the FEED button. 100 to 120 V AC, 50/60 Hz, 1.5 A 220 to 240 V AC, 50/60 Hz, 0.8 A Operating temperature 5°C to 35°C (41°F to 95°F)
  • Seite 33 Specifications REMOTE (stereo minijack) 1 GND 2 PRINT SIGNAL (TTL) Input of LOW pulse over 100 msec. initiates print. 3 PRINT BUSY (TTL) Goes HIGH during printing. Supplied accessories Paper roll (UPP-110HG) (1) BNC y BNC connecting cable (1) AC power cord (1) Head cleaning sheet (1) Media label (1) The following specifications are applied only to the...
  • Seite 34: Troubleshooting

    Is DIP Switch qa (INPUT) set to B & connected. Should the problem persist, unplug the letters on the screen W when the input signal is a black printer and contact your Sony dealer or local authorized are not printed and white signal? (page 25) Sony service facility.
  • Seite 35: Location And Function Of Parts

    Location and Function of Parts Front Location and Function of 1 Power switch and lamp Parts Turns the power on. The power lamp is lit while the power is on. For details, refer to the pages indicated in parentheses. 2 Image size selector (29) Selects the size of the image to be printed.
  • Seite 36: Back

    Location and Function of Parts qa OPEN button (26, 31) Back Opens or closes the door. Also, interrupts printing midway. Equipotential terminal (only for UP-895MD/ When the door is open, you can see the slide 895CE) switches in the paper tray. Used to connect to the equipotential plug to bring the various parts of a system to the same potential.
  • Seite 37 Others...
  • Seite 38 Français AVERTISSEMENT Pour UP-895MD/895CE Pour prévenir tout risque d’incendie ou d’électrocution, Instructions de sécurité importantes en vue d’une garder cet appareil à l’abri de la pluie et de l’humidité. utillsation dans un environnement médical 1. Tous les équipements raccordés à cet appareil doivent Pour prévenir tout risque d’électrocution, ne pas ouvrir le être agréés suivant les normes IEC601-1, IEC950, boîtier.
  • Seite 39: Présentation

    Table des matières/Présentation Table des matières Présentation La UP-895/895MD/895CE est une imprimante Introduction graphique vidéo noir et blanc qui peut être utilisée pour imprimer des images affichées sur un moniteur vidéo. Présentation ............39 Le présent mode d’emploi concerne les modèles UP- 895/895MD/895CE.
  • Seite 40: Préparation

    Raccordement/Configuration de l’imprimante Raccordement Configuration de l’imprimante Remarques • Mettez tous les appareils hors tension avant de Vous pouvez configurer l’imprimante suivant les procéder au raccordement. spécifications de votre choix à l’aide de deux types de • Branchez le câble d’alimentation en dernier lieu. commutateurs.
  • Seite 41: Réglage Des Microcommutateurs Du Panneau Arrière

    Configuration de l’imprimante B Commutateur GAMMA Réglage des microcommutateurs Réglage de la tonalité des tirages (gradation de la densité). du panneau arrière Gradation douce II : Standard Pour modifier le réglage des III : Gradation élevée microcommutateurs Le diagramme ci-dessous représente la courbe de la Utilisez un ustensile finement pointu comme un petit gradation de la densité...
  • Seite 42 Configuration de l’imprimante 1 Commutateur INTERRUPT 5 Commutateur DIRECTION Définit l’activation de la touche PRINT pour permettre Définit si c’est le haut ou le bas de l’écran qui est l’interruption du processus d’impression et saisir une imprimé en premier lieu. image dans la mémoire.
  • Seite 43: Papier

    à des endroits fort Utilisez uniquement du papier UPP-110S/110HD/ éclairés. 110HG tel que spécifié pour les imprimantes UP-895/ – Veillez à ce qu’aucun solvant organique volatile ni 895MD/895CE. Si vous utilisez un autre type de de chlorure de vinyle n’entre en contact avec les...
  • Seite 44: Chargement Du Papier

    Papier/Chargement du papier • N’empilez pas les tirages sur ou sous une diazocopie. Remarque Ne placez pas la surface imprimée contre la surface Lorsque vous tirez sur le dessus du rouleau de papier imprimée d’un autre tirage. Les tirages risquent en ou que vous le placez dans le magasin à...
  • Seite 45: Opération

    Impression Pour interrompre une impression en cours Impression Appuyez sur la touche OPEN ou FEED pendant l’impression. L’imprimante arrête l’impression en cours. Avant de réaliser des tirages Pour arrêter l’impression et imprimer une Vérifiez les éléments suivants : autre image affichée sur le moniteur vidéo •...
  • Seite 46: Sélection Du Sens D'impression/Format D'impression

    Impression – Veillez à ce qu’aucun solvant organique volatile ni Sélection du sens d’impression/ de chlorure de vinyle n’entre en contact avec les format d’impression tirages. L’alcool, les rubans adhésifs ou les films en plastique provoquent une décoloration des tirages. Vous pouvez réaliser plusieurs variantes d’un tirage à...
  • Seite 47 Impression Variantes d’un même tirage Réglage du Réglage du sélecteur de sens sélecteur du d’impression Les tirages obtenus par la combinaison du format de l’image SIDE sélecteur STD/SIDE et du sélecteur de format d’image (Normal) Le tableau de la colonne de droit présente les différents tirages qu’il est possible d’obtenir en fonction de la combinaison des réglages du sélecteur STD/SIDE et du sélecteur de format d’image.
  • Seite 48: Réglage Du Contraste Et De La Luminosité

    Impression Réglage du contraste et de la Pour régler la luminosité Vous pouvez régler la luminosité des tirages à l’aide de luminosité la commande BRIGHT. Pour rendre l’image plus claire, tournez la commande Vous pouvez régler le contraste et la luminosité des BRIGHT dans le sens horaire.
  • Seite 49: Autres

    Précautions/Entretien Précautions Entretien Sécurité Nettoyage du châssis • Vérifiez la tension secteur avant toute utilisation. N’utilisez pas de solvants puissants pour nettoyer le Faites uniquement fonctionner l’appareil avec l’une des châssis de l’imprimante. Le diluant et les nettoyants sources d’alimentation spécifiées dans les abrasifs risquent d’altérer le fini du châssis.
  • Seite 50: Spécifications

    Entretien/Spécifications Refermez le capot en poussant dessus. Spécifications Maintenez la touche FEED enfoncée. Lorsque le vibreur retentit et que l’imprimante Puissance de raccordement et consommation commence à éjecter la feuille de nettoyage, relâchez 100 à 120 V CA, 50/60 Hz, 1,5 A la touche FEED.
  • Seite 51 Spécifications REMOTE (miniprise stéréo) 1 GND 2 PRINT SIGNAL (TTL) Entrée d’une impulsion LOW sur 100 ms pour initialiser l’impression. 3 PRINT BUSY (TTL) Devient HIGH pendant l’impression. Accessoires fournis Rouleau de papier (UPP-110HG) (1) Câble de connexion BNC y BNC (1) Câble d’alimentation (1) Feuille de nettoyage de la tête thermique (1)
  • Seite 52: Dépannage

    Si le problème endroit froid dans un endroit persiste, débranchez l’imprimante et consultez votre chaud, il arrive fréquemment revendeur Sony ou un centre de service après-vente Sony que de la condensation se forme à l’intérieur. Dans ce agréé.
  • Seite 53: Localisation Et Fonction Des Composants

    Localisation et fonction des composants Avant Localisation et fonction 1 Interrupteur et témoin d’alimentation des composants Met l’imprimante sous tension. Le témoin est allumé lorsque l’imprimante est sous tension. Pour plus de détails, reportez-vous aux pages indiquées 2 Sélecteur du format de l’image (47) entre parenthèses.
  • Seite 54: Arrière

    Localisation et fonction des composants qa Touche OPEN (44, 49) Arrière Commande l’ouverture du capot. Permet également d’interrompre un cycle d’impression. Borne équipotentielle (UP-895MD/895CE Lorsque le capot est ouvert, vous apercevez les uniquement) curseurs du magasin à papier. Raccordez-y la fiche équipotentielle pour amener les différents composants du système au même potentiel.
  • Seite 55 Autres...
  • Seite 56 Deutsch VORSICHT Für UP-895MD/895CE Um Feuergefahr und die Gefahr eines elektrischen Schlags Wichtige Sicherhleitshinweise für den Gebrauch in zu vermeiden, darf das Gerät weder Regen noch medizinischen Umgebungen Feuchtigkeit ausgesetzt werden. 1. Alle Geräte, die an diese Einheit angeschlossen sind, müssen den Standards IEC601–1, IEC950 und IEC65 Um einen elektrischen Schlag zu vermeiden, darf das oder anderen IEC–/ISO–Standards, die für die Geräte...
  • Seite 57: Übersicht

    Videomonitor angezeigt werden, ausgedruckt Übersicht ..............57 werden können. Diese Bedienungsanleitung bezieht sich auf die Modelle UP-895/895MD/895CE. Sollten sich die Modelle Vorbereitungen hinsichtlich der Bedienung oder in sonstigen Punkten unterscheiden, wird in dieser Bedienungsanleitung auf Anschließen des Geräts ......... 58 diese Unterschiede deutlich hingewiesen.
  • Seite 58: Vorbereitungen

    Anschließen des Geräts/Konfigurieren des Druckers Anschließen des Geräts Konfigurieren des Druckers Hinweise • Schalten Sie unbedingt alle Geräte aus, bevor Sie Mit Hilfe von zwei Schaltertypen können Sie den irgendwelche Anschlüsse vornehmen. Drucker auf die gewünschten Spezifikationen einstellen. • Schließen Sie das Netzkabel zuletzt an. •...
  • Seite 59: Einstellen Der Dip-Schalter An Der Rückseite

    Konfigurieren des Druckers B Schalter GAMMA Einstellen der DIP-Schalter an der Einstellen der Graustufen der Ausdrucke Rückseite (Schwärzungsgradation). Weiche Gradation So ändern Sie die Einstellung von DIP- II: Standard Schaltern III: Harte Gradation Verwenden Sie einen kleinen spitzen Gegenstand wie Das Diagramm unten zeigt die z.
  • Seite 60 Konfigurieren des Druckers 1 Schalter INTERRUPT 5 Schalter DIRECTION Mit diesem Schalter wird festgelegt, ob Sie mit der Taste Gibt an, ob das Bild vom oberen oder unteren PRINT einen Druckvorgang unterbrechen und ein Bild Bildschirmrand her gedruckt werden soll. in den Speicher stellen können.
  • Seite 61: Papier

    – Achten Sie darauf, daß kein flüchtiges organisches Verwenden Sie nur das Papier UPP-110S/110HD/ Lösungsmittel und kein Vinylchlorid auf die 110HG, wie für den UP-895/895MD/895CE Ausdrucke gelangt. Alkohol, Kunststoffmaterialien angegeben. Wenn Sie einen anderen Papiertyp oder Folien bleichen den Druck aus.
  • Seite 62: Einlegen Von Papier

    Einlegen von Papier • Legen Sie die Ausdrucke nicht auf oder unter möglicherweise nicht mehr brauchbar, da Staub oder Lichtpauspapier. Achten Sie außerdem darauf, daß Fingerabdrücke unter Umständen zu mangelhafter bedruckte Oberflächen einander nicht berühren. Druckqualität oder Fehlfunktionen des Druckkopfes Andernfalls können die Ausdrucke sich verfärben.
  • Seite 63: Drucken

    Drucken So unterbrechen Sie den Druckvorgang Drucken Drücken Sie während des Druckens die Taste OPEN oder FEED. Der Drucker stoppt den Druckvorgang. Vorbereitungen So stoppen Sie einen Druckvorgang und Überprüfen Sie folgendes: drucken ein anderes Bild, das auf dem • Sind die Geräte korrekt miteinander verbunden? (Seite Videomonitor erscheint Dazu muß...
  • Seite 64: Auswählen Von Druckrichtung/Bildgröße

    Drucken • Legen Sie die Ausdrucke nicht auf oder unter Auswählen von Druckrichtung/ Lichtpauspapier. Achten Sie außerdem darauf, daß Bildgröße bedruckte Oberflächen einander nicht berühren. Andernfalls können die Ausdrucke sich verfärben. Mit Hilfe des Wählschalters STD/SIDE, des • Wenn Sie Ausdrucke auf anderem Papier befestigen Druckgrößenwählschalters und der DIP-Schalter können wollen, verwenden Sie doppelseitiges Klebeband oder Sie verschiedene Typen von Ausdrucken erstellen.
  • Seite 65: Ausdrucken Von Bildern Als Negativ

    Drucken Verschiedene Typen von Ausdrucken Position des Position des Druckrichtungswählschalters Druckgrößen- Ausdrucke, die sich durch die Kombination wählschalters SIDE des Wählschalters STD/SIDE und des Druckgrößenwählschalters erzielen lassen (Normal) In der Tabelle rechts sind die verschiedenen Typen von Ausdrucken dargestellt, die Sie je nach Kombination der Einstellung des Wählschalters STD/SIDE und des Druckgrößenwählschalters anfertigen können.
  • Seite 66: Einstellen Von Helligkeit Und Kontrast

    Drucken Einstellen von Helligkeit und So stellen Sie die Helligkeit ein Zum Einstellen der Helligkeit der Ausdrucke verwenden Kontrast Sie den Regler BRIGHT. Für hellere Bilder drehen Sie den Regler BRIGHT im Sie können Kontrast und Helligkeit der Ausdrucke Uhrzeigersinn. einstellen.
  • Seite 67: Sicherheitsmaßnahmen

    Sicherheitsmaßnahmen/Wartung Sicherheitsmaßnahmen Wartung Sicherheit Reinigen des Gehäuses • Überprüfen Sie vor dem Drucken die Betriebsspannung. Verwenden Sie zum Reinigen des Druckers keine starken Betreiben Sie das Gerät nur an einer unter “Technische Lösungsmittel. Verdünner oder Scheuermittel greifen die Daten” angegebenen Stromquelle. Gehäuseoberfläche an.
  • Seite 68: Technische Daten

    Wartung/Technische Daten Schließen Sie die Abdeckung, indem Sie sie Technische Daten zudrücken. Drücken Sie die Taste FEED, und halten Sie sie Betriebsspannung und Leistungsaufnahme gedrückt. 100 bis 120 V Wechselstrom, 50/60 Hz, Wenn ein Signalton zu hören ist und der Drucker das 1,5 A Reinigungsblatt ausgibt, lassen Sie die Taste FEED 220 bis 240 V Wechselstrom,...
  • Seite 69 Technische Daten REMOTE (Stereominibuchse) 1 Masse 2 PRINT SIGNAL (Drucksignal - TTL) Eingang von LOW-Impuls über 100 mSek. löst Druckvorgang aus. 3 PRINT BUSY (Druck läuft - TTL) Das Signal schaltet beim Drucken auf HIGH. Mitgeliefertes Zubehör Papierrolle (UPP-110HG) (1) BNC-BNC-Verbindungskabel (1) Netzkabel (1) Druckkopfreinigungsblatt (1)
  • Seite 70: Störungsbehebung

    Sollte sich ein Problem nicht beheben Raum gebracht wird, kann lassen, lösen Sie das Gerät vom Netzstrom, und wenden sich Feuchtigkeit Sie sich an Ihren Sony-Händler oder Ihren Sony- niederschlagen. Nehmen Sie in diesem Fall das Papier Vertragskundendienst.
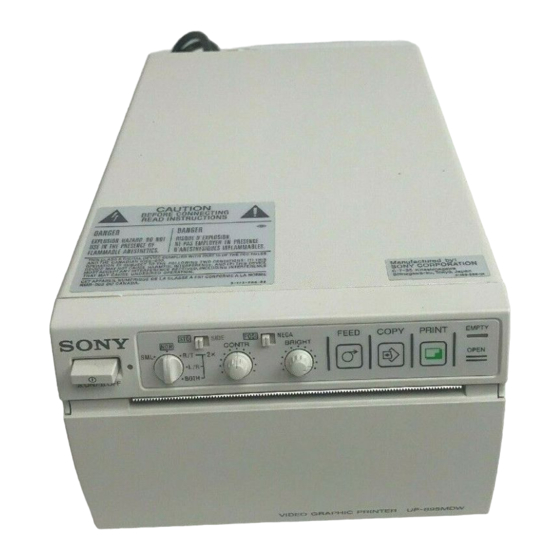
  • Seite 71: Lage Und Funktion Der Teile Und Bedienelemente

    Lage und Funktion der Teile und Bedienelemente Vorderseite Lage und Funktion der 1 Netzschalter und -anzeige Teile und Zum Ein-/Ausschalten des Geräts. Die Netzanzeige leuchtet, während das Gerät eingeschaltet ist. Bedienelemente 2 Druckgrößenwählschalter (65) Zum Auswählen der Größe des zu druckenden Näheres finden Sie auf den in Klammern angegebenen Bildes.
  • Seite 72: Rückseite

    Lage und Funktion der Teile und Bedienelemente qa Taste OPEN (62, 67) Rückseite Zum Öffnen oder Schließen der Abdeckung. Außerdem können Sie mit dieser Taste einen 1 Gleichpotentialanschluß (nur für UP-895MD/ laufenden Druckvorgang unterbrechen. 895CE) Wenn die Abdeckung geöffnet ist, können Sie die Zum Anschließen des Gleichpotentialsteckers, um Schiebeschalter am Papierfach sehen.
  • Seite 73 Weitere Informationen...
  • Seite 74 Español Para el UP-895MD/895CE ADVERTENCIA Normas/avisos de seguridad importantes para Para prevenir el riesgo de incendios o de electrocución, no utilización en ambientes médicos exponga la unidad a la lluvia ni a la humedad. 1. Todos los equipos conectados a esta unidad deberán estar certificados de acuerdo con la Norma 601-1, 950, o Para evitar descargas eléctricas, no abra la unidad.
  • Seite 75: Descripción General

    Descripción general ..........75 monitor de vídeo. Este manual hace referencia a los modelos UP-895/ Preparativos 895MD/895CE. En este manual se describen claramente las diferencias de funcionamiento o de cualquier otro Conexión ..............
  • Seite 76: Preparativos

    Conexión/Configuración de la impresora Conexión Configuración de la impresora Notas • Antes de realizar las conexiones, desconecte la La impresora se puede configurar conforme a las alimentación de todos los dispositivos. especificaciones deseadas mediante el uso de dos tipos • Conecte el cable de alimentación de CA en último de interruptores.
  • Seite 77: Ajuste De Los Interruptores Dip Del Panel Posterior

    Configuración de la impresora B Interruptor de tono (GAMMA) Ajuste de los interruptores DIP del Permite establecer la tonalidad de las impresiones panel posterior (gradación de densidad). Gradación suave Para cambiar el ajuste de los interruptores II: Estándar III: Gradación intensa Utilice una herramienta pequeña con punta, como un En el diagrama siguiente se muestra la curva de destornillador pequeño.
  • Seite 78 Configuración de la impresora 1 Interruptor de interrupción (INTERRUPT) 5 Interruptor de sentido (DIRECTION) Permite determinar si el botón PRINT está activado de Permite determinar si se va a imprimir primero la parte forma que se pueda interrumpir el proceso de impresión superior de la pantalla o la parte inferior.
  • Seite 79: Papel

    – No permita que entren en contacto con disolventes orgánicos volátiles ni con cloruro de vinilo. El Papel alcohol, las cintas plásticas o las películas hacen que éstas se borren gradualmente. Emplee sólo papel UPP-110S/110HD/110HG especificado para la UP-895/895MD/895CE. En Preparativos...
  • Seite 80: Inserción Del Papel

    Papel/Inserción del papel • No las apile sobre un juego de copias diazoicas o Nota debajo de éstas. Evite que las superficies impresas Tenga cuidado para que no se le caiga el rollo de entren en contacto. La copia impresa puede perder papel cuando tire de la parte superior de éste o lo color.
  • Seite 81: Operación

    Impresión Para interrumpir la impresión Impresión Pulse el botón OPEN o FEED durante este proceso. La impresora dejará de imprimir. Antes de imprimir Para interrumpir la impresión e imprimir otra Compruebe lo siguiente: imagen que aparece en el monitor de vídeo •...
  • Seite 82: Selección Del Sentido De Impresión/Tamaño De La Imagen

    Impresión • No las apile sobre un juego de copias diazoicas o Selección del sentido de impresión/ debajo de éstas. Evite que las superficies impresas tamaño de la imagen entren en contacto. La copia impresa puede perder color. Con el selector STD/SIDE, los selectores de tamaño de •...
  • Seite 83 Impresión Variaciones de las impresiones Posición del Posición del selector de sentido selector de de impresión Impresiones obtenidas mediante la tamaño de imagen SIDE combinación del selector STD/SIDE y del selector de tamaño de imagen (Normal) En la tabla de la columna derecha se muestran las distintas impresiones que pueden realizarse en función de cómo se combinen los ajustes del selector STD/SIDE y de los selectores de tamaño de imagen.
  • Seite 84: Ajuste Del Contraste Y El Brillo

    Impresión Ajuste del contraste y el brillo Para ajustar el brillo El brillo de las impresiones se puede ajustar con el control BRIGHT. Es posible ajustar el contraste y el brillo de la impresión. Para aumentar el brillo de la imagen, gire el control BRIGHT hacia la derecha.
  • Seite 85: Otros

    Precauciones/Mantenimiento Precauciones Mantenimiento Seguridad Limpieza del exterior • Antes de utilizar la impresora, compruebe la tensión de No utilice disolventes fuertes para limpiar la impresora. operación. Los diluyentes y limpiadores abrasivos pueden dañar la Alimente la unidad solamente con la fuente de superficie exterior.
  • Seite 86: Especificaciones

    Mantenimiento/Especificaciones Presione sobre la tapa para cerrarla. Especificaciones Mantenga pulsado el botón FEED. Cuando suene el zumbador y la impresora empiece a Alimentación y consumo expulsar la hoja limpiadora, suelte el botón FEED. 100 a 120 V CA, 50/60 Hz, 1,5 A 220 a 240 V CA, 50/60 Hz, 0,8 A Temperatura de operación 5°C a 35°C...
  • Seite 87 Especificaciones REMOTE (minitoma estéreo) 1 GND (masa) 2 PRINT SIGNAL (TTL) (señal de impresión) Entrada de pulso de nivel bajo sobre 100 mseg. para iniciar la impresión. 3 PRINT BUSY (TTL) (impresora ocupada) Pasa a nivel alto durante la impresión. Accesorios suministrados Rollo de papel (UPP-110HG) (1) Cable de conexión BNC y BNC (1)
  • Seite 88: Solución De Problemas

    Si el problema no se soluciona, desenchufe la cálido suele producir la impresora y póngase en contacto con su proveedor Sony condensación. Si se condensa o con el centro local de servicio autorizado.
  • Seite 89: Ubicación Y Función De Los Componentes

    Ubicación y función de los componentes Panel frontal Ubicación y función de 1 Interruptor de encendido e indicador los componentes Permite activar la alimentación. El indicador de activación se ilumina mientras la unidad está encendida. Consulte las páginas indicadas entre paréntesis para obtener información detallada.
  • Seite 90: Panel Posterior

    Ubicación y función de los componentes qa Botón OPEN (80, 85) Panel posterior Permite abrir o cerrar la tapa. Además, sirve para interrumpir el proceso de impresión. 1 Terminal equipotencial (sólo para UP-895MD/ Cuando la tapa está abierta, los interruptores 895CE) deslizantes de la bandeja de papel quedan visibles.
  • Seite 91 Otros...
  • Seite 92 Italiano Per UP-895MD/895CE ATTENZIONE Importanti avvertenze per l’uso in ambienti medicali Per evitare il pericolo di incendi o scosse elettriche, non 1. Tutte le apparecchiature collegate a questo apparecchio esporre l’apparecchio alla pioggia o all’umidità e non aprirlo. devono essere certificate conformi agli standard CEI601- 1, CEI950, CEI65 o ad altri standard CEI/ISO applicabili Per eventuali riparazioni, rivolgersi esclusivamente a alle apparecchiature.
  • Seite 93: Presentazione

    Presentazione ............93 Questo manuale si riferisce ai modelli UP-895/895MD/ 895CE. Se il funzionamento o un’altra voce di un Preprazione apparecchio varia da un modello all’altro, il manuale sottolinea con chiarezza tali differenze.
  • Seite 94: Collegamenti

    Collegamenti/Impostazione della stampante Collegamenti Impostazione della stampante Note • Spegnere tutti gli apparecchi prima di eseguire i È possibile impostare la stampante sulle funzionalità collegamenti. desiderate grazie all’uso di due interruttori. • Collegare il cavo di alimentazione CA per ultimo. •...
  • Seite 95: Impostazione Degli Interruttori Dip Sul Pannello Posteriore

    Impostazione della stampante B Interruttore GAMMA Impostazione degli interruttori DIP Imposta il tono della stampa (gradazione della densità). sul pannello posteriore I: Gradazione leggera II: Gradazione standard Per modificare le impostazioni degli III: Gradazione forte interruttori DIP Utilizzare un piccolo oggetto appuntito, ad esempio un Lo schema seguente mostra la curva della gradazione mini cacciavite.
  • Seite 96 Impostazione della stampante 1 Interruttore INTERRUPT 5 Interruttore DIRECTION Regola il tasto PRINT per attivare o meno l’interruzione Utilizzare questo interruttore per selezionare se stampare del processo di stampa e catturare un’immagine in prima la parte superiore o la parte inferiore memoria.
  • Seite 97: Carta

    Alcol, nastro o pellicola adesivi possono Utilizzare solo carta del tipo UPP-110S/110HD/ sbiadire la stampa. 110HG come specificato per i modelli UP-895/ 895MD/895CE. Se viene usato un altro tipo di carta, Preparazione...
  • Seite 98: Insertimento Della Carta

    Insertimento della carta • Non collocare i fogli stampati sopra o sotto un foglio Nota copiato diazoicamente. Inoltre, non attaccare la Quando si estrae la prima parte del rotolo di carta o superficie stampata su un’altra superficie stampata. La quando lo si inserisce nel vassoio della carta, fare stampa potrebbe scolorirsi.
  • Seite 99: Funzionamento

    Stampa Per interrompere la stampa Stampa Premere il tasto OPEN o il tasto FEED durante la stampa. L’operazione di stampa viene interrotta. Prima di stampare Interruzione della stampa e stampa di un’altra Verificare che: immagine visualizzata sullo schermo del • I collegamenti siano sono stati eseguiti correttamente. monitor (pagina 94) Per fare quanto segue, l’interruttore DIP 1...
  • Seite 100: Selezione Dell'orientamento Di Stampa E Selezione Del Formato Di Stampa

    Stampa • Non collocare i fogli stampati sopra o sotto un foglio Selezione dell’orientamento di copiato diazoicamente. Inoltre, non attaccare la stampa e selezione del formato di superficie stampata su un’altra superficie stampata. La stampa stampa potrebbe scolorirsi. • Se si desidera attaccare il foglio stampato ad un altro foglio di carta, utilizzare nastro a doppio lato adesivo o È...
  • Seite 101 Stampa Variazioni degli stampati Posizione Posizione del selettore dell’orientamento del selettore dell’immagine Stampati ottenuti dalla combinazione del del formato dell’immagine SIDE selettore STD/SIDE e del selettore del formato dell’immagine. (Normale) La tabella in questa pagina indica i diversi tipi di stampa che è...
  • Seite 102: Regolazione Del Contrasto E Della Luminosità

    Stampa Regolazione del contrasto Regolazione del contrasto e della È possibile regolare il contrasto dell’immagine usando il luminosità comando CONTR. Per aumentare il contrasto, girare il comando CONTR È possibile regolare il contrasto e la luminosità degli in senso orario. stampati.
  • Seite 103: Altro

    Precauzioni/Manutenzione Precauzioni Manutenzione Sicurezza Pulizia del rivestimento Non utilizzare forti solventi per pulire la stampante. • Controllare la tensione operativa prima dell’uso. Acquaragia o detergenti abrasivi possono danneggiare il Alimentare l’apparecchio solo con la fonte di rivestimento. alimentazione specificata in “Caratteristiche tecniche”. •...
  • Seite 104: Caratteristiche Tecniche

    Manutenzione/Caratteristiche tecniche Spingere per richiudere il coperchio. Caratteristiche tecniche Premere il tasto FEED e tenerlo premuto. Quando il cicalino comincia a suonare e la stampante Alimentazione e consumo inizia a espellere il foglio di pulizia, rilasciare il tasto Da 100 a120 V CA, 50/60 Hz, 1,5 A FEED.
  • Seite 105 Caratteristiche tecniche REMOTE (minipresa stereo) 1 GND 2 PRINT SIGNAL (TTL) Ingresso a impulso LOW oltre 100 msec inizia la stampa. 3 PRINT BUSY (TTL) Diventa HIGH durante la stampa. Accessori in dotazione Rotolo di carta (UPP-110HG) (1) Cavo di collegamento BNC - BNC (1) Cavo di alimentazione CA (1) Foglio di pulizia per testina (1) Etichetta (1)
  • Seite 106: Guida Alla Soluzione Dei Problemi

    Se il problema persiste, scollegare condensa al suo interno. In la stampante e contattare il proprio rivenditore Sony o il questo caso, rimuovere la carta inserita, scollegare più vicino centro di assistenza qualificato Sony.
  • Seite 107: Posizione E Funzione Delle Parti

    Posizione e funzione delle parti Lato anteriore Posizione e funzione 1 Interruttore e spia di accensione delle parti Accende l’apparecchio. La spia di accensione si accende quando l’apparecchio è acceso. Per i dettagli, fare riferimento alle pagine indicate fra 2 Selettore del formato dell’immagine (101) parentesi.
  • Seite 108: Lato Posteriore

    6 -Connettore AC IN (ingresso del cavo di alimentazione CA) (94) qs Alimentatore di carta e seghetta di taglio Collegare a una presa a muro usando il cavo di Taglia la carta di stampa. alimentazione CA in dotazione con l’apparecchio. Sony Corporation Printed in Malaysia Altro...

Diese Anleitung auch für:

Up-895mdUp-895ce

Inhaltsverzeichnis