Herunterladen Diese Seite drucken
Geemarc CLEARSOUND CL2L Bedienungsanleitung

Geemarc CLEARSOUND CL2L Bedienungsanleitung

Telefonklingelverstaerker mit blitz und tuerklngel

Werbung

Verfügbare Sprachen

Verfügbare Sprachen

Geemarc CLEARSOUND CL2L Bedienungsanleitung

Werbung

loading

Inhaltszusammenfassung für Geemarc CLEARSOUND CL2L

  • Seite 1 Connevans.info Solutions to improve the quality of life This product may be purchased from Connevans Limited DeafEquipment.co.uk secure online store at www.DeafEquipment.co.uk...
  • Seite 2 CL2L Telephone ringer amplifier with flasher and door bell Indicateur d’appel téléphonique avec flash et sonnette Telefonklingelverstärker mit Blitz und Türklingel English Page Français Page Deutsch Page...
  • Seite 3 CAUTION: The switch for Ringer ALARM selection must never be set during ringing/ flashing mode but always when CL2 is silent mode ( No incoming call ringing). ATTENTION: Le commutateur de configuration du mode Alarme ne doit jamais être changé lorsque le CL2 envoie sa sonnerie (ou flash lumineux ) mais uniquement durant le mode repos.
  • Seite 4 DESCRIPTION 1. DESCRIPTION The CL2 will alert you to both doorbell and telephone. It has adjustable volume and different tone settings for doorbell and telephone. FRONT VIEW Volume 4 ringer Door bell Phone ringer control settings Doorbell Tone amplifier tone control control Loud sound...
  • Seite 5: Installation

    INSTALLATION 2. INSTALLATION 230V Screw wall mount AC/DC Double plug Door Bell Button Door Bell Wall socket Telephone Option : Special cable to link two CL2s Option : Shaker (ref.: SHAKCL_BLK only) 1 - Connect the CL2 line cord in CL2 “Line IN”. 2 - Connect your Telephone in the double plug of the line cord.
  • Seite 6 INSTALLATION (*) Classified "hazardous voltage" according to EN60950 standard. Electrical connection: The apparatus is designed to operate from a 230V 50Hz supply only. (Classified as 'hazardous voltage" according to EN60950 standard). The apparatus does not incorporate an integral power on/off switch. To disconnect the power, either switch off supply at the mains power socket or unplug the AC adaptor.
  • Seite 7 BELL PUSH WALL MOUNTING 3.1. BELL PUSH – WALL MOUNTING The wire free bell push is mounted by the front door. It has a range of 20-60 metres depending on the structure of the building (see note). Test the system before mounting on the wall –...
  • Seite 8 BELL PUSH WALL MOUNTING WALL MOUNTING TEMPLATES To wall mount the bell push or the CL2, use these templates to mark the screw hole centres. We recommend the use of a spirit level to ensure the holes are level.
  • Seite 9 BELL PUSH CHANGE THE BATTERY 3.2. CHANGE THE BATTERY The door bell is supplied with a 23A 12V battery. The CL2 is supplied ready to use, it is not necessary to open the bell push when you first install the CL2. To replace the battery, open the access cover and unscrew the door bell from the wall, unscrew the three screws located on the base and open the box to get...
  • Seite 10 SETTINGS 4.1. CL2 SETTINGS ALARM MODE SETTING For incoming calls – choose which alarm mode you want by moving the alarm mode switch to one of the following positions: No alarm selected Doorbell/ringer amplifier and strobe Flasher: flasher Bell push – 3-4 flashes Telephone –...
  • Seite 11 Extra bell push – to cover a second door, such as a kitchen door. Shaker – the Geemarc shaker unit (CLA2) can be tucked under your pillow or at the side of your chair to vibrate when the doorbell or telephone rings. Particularly useful for hearing aid wearers, when they are not wearing their hearing aids at night.
  • Seite 12 SETTINGS PAIRING 4.2. The Pairing Procedure ( Note : Factory default setting : paired. ) 1. Press and hold the (Pairing/Test) button for 2 seconds to enter pairing mode, at the same time, the unit makes a beep sound. 2. The 1st LED lights, to pair the BELL PUSH, press and hold the (Pairing/Test) button and then Bell push button at the same time, the 1st LED flashes,...
  • Seite 13 SETTINGS PAIRING 4.3. Un- Register The Pairing 1. Press and hold the Pairing/Test button for 5 seconds to enter un-register mode, 3 LED light together. 2. If user wants to un-register the 1st BELL PUSH, press the Pairing/Test button within 2 seconds, the 1st LED will be flashing (the other 2 LED light), means user is now un-registering the 1st BELL PUSH, press the Pairing/Test button until the 1st LED goes off,...
  • Seite 14: Troubleshooting

    TROUBLESHOOTING 5. TROUBLESHOOTING If the CL2 system doesn't work correctly, please carry out the following checks before calling the helpline: ● If the phone rings but the CL2 does not ring: Check the connection between the phone socket and the CL2.
  • Seite 15 6. GUARANTEE From the moment your Geemarc product is purchased, Geemarc guarantee it for the period of one year. During this time, all repairs or replacements (at our discretion) are free of charge. Should you experience a problem then contact our helpline or visit our website at www.geemarc.com.
  • Seite 16: Recycling Directives

    – Or hand the old product to the retailer. If you purchase a new one, they should accept it. Thus if you respect these instructions you ensure human health andenvironmental protection. For product support and help visit our website at www.geemarc.com Telephone: +44 (0)1707 384438 or Fax +44 (0)1707 832529...
  • Seite 17 DESCRIPTION 1. DESCRIPTION Voyants AVANT 4 configurations repères Réglage du Réglage de la de sonnerie sonnette volume tonalité Réglage de la téléphone tonalité de sonnette Avertisseur Sonnerie Lumineux électronique Enregistrement /Test ARRIERE Ouvertures pour vis de fixation Sonnette murale (*)Prise coussinet (*)Prise ligne PTT vibrant (*)Prise ligne PTT ou...
  • Seite 18 INSTALLATION 2. INSTALLATION Couvercle d’accès aux vis Adaptateur 230V Prise de montage mural secteur téléphonique double Bouton sonnette Sonnette Prise téléphonique murale Téléphone ption : Câble spécial permettant la liaison de deux CL2 Option : Coussinet vibrant (ref.: CL2 RJ11/RJ11) (ref.: SHAKCL_BLK uniquement) 1 - Branchez le cordon PTT.
  • Seite 19 INSTALLATION Raccordement électrique : l’appareil est prévu pour fonctionner uniquement avec l’adaptateur secteur 230V 50Hz fourni. (Tension classée “dangereuse” selon les critères de la norme EN60950). Par précaution en cas de danger, le bloc alimentation secteur sert de dispositif de sectionnement de l’alimentation 230V.
  • Seite 20 SONNETTE MONTAGE MURAL 3.1. MONTAGE MURAL DE LA SONNETTE La sonnette est livrée avec une batterie de type 23A 12V pré-installée, il n’est donc pas nécessaire d’ouvir la sonnette pour l’utiliser. Pour monter votre sonnette sur un mur, suivez simplement les instructions suivantes: - Utilisez le gabarit de montage mural pour tracer l’emplacement des trous de fixations (les vis et chevilles de fixations sont fournies avec le CL2).
  • Seite 21 SONNETTE MONTAGE MURAL Note: Ne pas installer la base et la sonnette près d’un plan métallique ou d’équipements électriques (comme radio, TV, ordinateur, machine à laver...). Nous garantissons le fonctionnement du CL2 dans un rayon de 60m en champ libre (sans obstacles) et de 20m en champ réduit (murs, structures métalliques...).
  • Seite 22 SONNETTE REMPLACEMENT DE LA BATTERIE 3.2. REMPLACEMENT DE LA BATTERIE Pour remplacer la batterie, démontez la sonnette du mur puis dévissez les trois vis situées à l’arrière de la sonnette. Ouvrez ensuite la boîte pour accéder à la batterie. Remplacez ensuite la batterie type LR23 12V en veillant à...
  • Seite 23 FONCTIONNEMENT 4.1. FONCTIONNEMENT 1 - CONFIGURATION DE LA SONNERIE ( téléphonique ) Sélectionnez l’alarme par le commutateur positions. L’alarme sonore du CL2 sera validée suivant la position du commutateur : aucune alarme sélectionnée flash lumineux et sonnerie électronique activés flash lumineux et coussinet vibrant (si connecté) activés sonnerie électronique et coussinet vibrant (si connecté) activés...
  • Seite 24 FONCTIONNEMENT 3 - INTERRUPTEUR DE TONALITE DE SONNERIE (3 POSITIONS) Réglage de la tonalité de l’alarme de sonnerie (appel entrant). 4 - INTERRUPTEUR DE TONALITE POUR LA SONNETTE Réglage de la tonalité de sonnerie pour la sonnette. 5 - UTILISATION DE LA SONNETTE Appuyez simplement sur le bouton, le CL2 fonctionnera avec les réglages d’alarme.
  • Seite 25 FONCTIONNEMENT ENREGISTREMENT 4.2. Enregistrement d’une sonnette supplémentaire (Note : Par défaut, la sonnette est enregistrée sur le CL2) 1. Appuyez maintenez bouton « enregistrement sonnette » pendant 2 secondes jusqu’à ce que vous entendiez un bip sonore de confirmation. 2. La première LED orange s’allume. Appuyez en même temps bouton «...
  • Seite 26 FONCTIONNEMENT ENREGISTREMENT 4.3. Supprimer une sonnette Appuyez maintenez bouton « enregistrement sonnette » pendant 5 secondes jusqu’à ce que les 3 voyants clignotent. 2. Si vous voulez supprimer la première sonnette, appuyez bouton ”enregistrement sonnette » afin que le voyant orange clignote. Restez appuyer sur le bouton enregistrement sonnette jusqu’à...
  • Seite 27: Résolution Des Problèmes

    RÉSOLUTION DES PROBLÈMES 5. AIDE AUX PROBLEMES RENCONTRES - Vérifier le branchement de l’adaptateur téléphone secteur sonne, pas - Vérifier la bonne connection du cordon le CL2 entre la prise murale et la prise “Line In” du CL2 - Vérifier que le bouton de sonnerie du CL2 ne se t rouve pas su r une position...
  • Seite 28: Garantie

    DECLARATION : Ce produit respecte les exigences de compatibilité électro-magnétique sécurité électrique demandées par la directive européenne RTTE. Par ailleurs, il est compatible avec les différents réseaux téléphoniques européens (normes TBR21). La déclaration de conformité peut être consultée sur le site : www.geemarc.com...
  • Seite 29 à la protection de la santé humaine. Si vous avez besoin d'aide ou de soutien technique, consultez notre site Internet: www.geemarc.com Téléphone +33 (0)3 28 58 75 99 Ou Fax +33 (0)3 28 58 75 76...
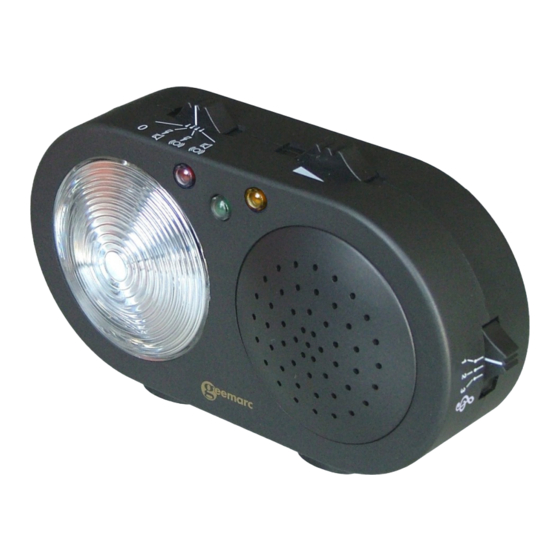
  • Seite 30 BESCHREIBUNG 1. BESCHREIBUNG Das CL2 informiert Sie über Türklingel und Telefon. Die Lautstärke regelbar gibt verschiedene Toneinstellungen für Türklingel und Telefon. Türklingel LED- VORDERANSICHT 4 Klingeleinstellun Lämpchen Lautstärkeregelung Einstellung Türklingelton Klingeltonregelung Blitzlicht Lautsprecher Paarungs /Testtaste RÜCKANSICHT Löcher für die Wandmontage TÜRKLINGEL (*)Anschluss Telefonkabel eingehen...
  • Seite 31 INSTALLATION 2. INSTALLATION 230V AC-Adapter Namenschild Telefonstecker Türklingel knopf Türklingel Steckdose Telefon Option : Spezialkabel um 2 CL2s zu verbinden Option : Vibrationskissen (Ref.: SHAKC_BLK) 1 – Schliessen Sie das CL2 RJ11 Kabel in ‘Line IN’. 2 - Schließen Sie das Telefonkabel an. 3 –...
  • Seite 32 INSTALLATION Wenn Sie ein Vibrationskissen verwenden möchten (Geemarc CLA2), wird Buchse für Vibrationskissen ((o)) hinten am CL2 gesteckt. Das Vibrationskissen kann dann unter ein Kopfkissen oder Sitzkissen gelegt werden, so spüren Sie die Vibration, wenn das Telefon klingelt oder es an der Tür läutet.
  • Seite 33 TÜRKLINGEL WANDMONTAGE 3.1. TÜRKLINGEL – WANDMONTAGE Die drahtlose Türklingel wird an der Haustür montiert. Sie hat, abhängig von der Gebäudestruktur, eine Reichweite von 20 - 60 Metern (siehe Hinweis). Testen Sie das System vor der Wandmontage – stecken Sie das CL2 ein und betätigen Sie den Klingelknopf um zu testen, ob das CL2 klingelt.
  • Seite 34 TÜRKLINGEL WANDMONTAGE WANDMONTAGE-SCHABLONEN Verwenden Sie für die Montage der Klingel oder des CL2 diese Schablonen, um die Mitte der Schraublöcher zu markieren. Wir empfehlen Verwendung einer Wasserwaage, sicherzustellen, dass sich die Löcher auf gleicher Höhe befinden.
  • Seite 35 TÜRKLINGEL WECHSELN DER TÜRKLINGELBATTERIE 3.2. WECHSELN DER TÜRKLINGELBATTERIE Die Türklingel ist mit einer 23A 12V Batterie ausgestattet. wird Zubehör geliefert funktionsbereit, es ist also nicht notwendig, bei Erstinstallation des CL2 die Klingel zu öffnen. Um die Batterie auszutauschen, öffnen Sie die Abdeckung, schrauben die Klingel von der Wand ab, schrauben die drei Schrauben auf der Rückseite ab und öffnen das Gehäuse, um auf die Batterien zugreifen zu...
  • Seite 36 EINSTELLUNGEN 4.1. CL2 EINSTELLUNGEN EINSTELLUNG ALARMMODUS Wählen Sie aus, mit welchem Alarmmodus Sie über eingehende Anrufe informiert werden möchten, indem Sie den Alarmmodusschalter auf eine der folgenden Positionen einstellen: Kein Wecker ausge wählt stärker für Tü /Telefonklingel und Blitzlicht ürklingel , Blitzlicht und Vibrationskissen (wenn verbunden)
  • Seite 37 Hörgeräte nachts nicht tragen. Alarmarmband – kann von einer bettläg erigen Person zu Hause getragen werden, um um Hilfe rufen zu können. Kontaktie ren Sie Ihren Händler, wenn Sie diese Produkte kaufen möchten. Schwierigkeiten besuchen bitte Geemarc-Website unter: www.geemarc.com...
  • Seite 38 EINSTELLUNGEN PAARUNG 4.2. Die Paarungprozedur (NB : Ab werk schon gepaart) 1. Drücken und halten Sie die (Paarungs /Testtaste) 2 Sek. um die Paarungsmodus zu kommen, zeitgleich erläutet ein Pipton. 2. Die erste LED leuchtet, um die Klingel zu paaren, drücken und halten Sie die (Paarungs /Testtaste) und die Türklingel zeitgleich.
  • Seite 39 EINSTELLUNGEN PAARUNG 4.3. Paarungprozedur (abmelden) 1. Drücken und halten Sie die Paarungs/Testtaste für 5 Sek. um den Paarungsmodus zu gelangen. Nun leuchten alle 3 LEDs zusammen auf. 2. Wenn Sie die erste Türklingel trennen wollen, drücken Sie die Paarungstaste 2 Sek. Die erste LED wird aufleuchten (die 2 LED leuchtet), drücken Sie die Paarungstaste bis die erste LED sich abschaltet, wird mit einem Pipton bestätigt.
  • Seite 40: Problembehandlung

    PROBLEMBEHANDLUNG 5. PROBLEMBEHANDLUNG Wenn das CL2 System nicht richtig funktioniert, führen Sie bitte die folgenden Tests durch, bevor Sie die Hotline anrufen: Wenn das Telefon klingelt, aber nicht das CL2: Überprüfen Verbindung zwischen Telefonsteckdose und dem CL2. Wenn die Türklingel nicht funktioniert: 1 Stellen Sie sicher, dass das CL2 in die Dose gesteckt und angestellt ist.
  • Seite 41 GARANTIE 6. GARANTIE Auf Ihr Geemarc Produkt wird von Geemarc Telecom SA eine zweijährige Garantie Kaufdatum gemäß diesen Garantiebestimmungen gewährt. Während dieser Zeit werden im Garantiefall nach Wahl der Geemarc Telecom SA Material- und Fabrikationsfehler unentgeltlich beseitigt oder Ihr Geemarc Produkt ausgetauscht.
  • Seite 42 Altgerät annehmen. Wenn Sie sich an diese Anweisungen halten, stellen Sie den Schutz der Gesundheit und Umwelt sicher. Produktsupport und Hilfe erhalten Sie auf unserer Webseite unter www.geemarc.com/de Telefon +49(0)228/ 74 87 09 0 Oder Fax +49(0)228/ 74 87 09 20...
  • Seite 43 UGCL2L_EnFrGe_Ver 1.4 UGCL2L_EnFr_Ver 1.5...