Herunterladen Diese Seite drucken
Geemarc AMPLICALL 16 Bedienungsanleitung

Geemarc AMPLICALL 16 Bedienungsanleitung

Türklingel verstärker

Werbung

Verfügbare Sprachen

Verfügbare Sprachen

0

Werbung

loading

Inhaltszusammenfassung für Geemarc AMPLICALL 16

  • Seite 2 DESCRIPTION Description Strobe flasher Low battery indicator Volume control Speaker Table mounting FRONT batteries compartment (4 X AA ) REAR Adaptor jack Pairing/Testing (OPTION) button...
  • Seite 3: Installation

    INSTALLATION Installation (See drawing) AC adaptor (option) 230V Door Bell button Door Bell 1 - Insert the 4 battery type AA in the compartment (option). 2 - Connect the adaptor 7.5V DC/1A (option). Electrical connection : The apparatus is designed to operate from a 230V 50Hz supply only.
  • Seite 4 INSTALLATION Telephone connection : Voltages present on the telecommunication network are classified TNV-3 (Telecommunication Network Voltage) according to the EN60950 standard. Setting up Door bell 1. The door bell can be take with the people who need the assistance. 2. The door bell can be fixed on the wall or door surround, drill two holes horizontally, 14mm apart, put the supplied anchor into the two holes, hang the door bell on to the two anchors and then instert and...
  • Seite 5 The door bell is supplied with a 23A 12V battery. The Door bell is supplied ready to use, it is not necessary to open the bell push when you first install the Amplicall 16. To replace the battery, unscrew the door bell from the wall, unscrew the five screws located on the base and open the box to get access to the battery compartment.
  • Seite 6 The device should sound the alarm and flash. Operation Once the Amplicall 16 and the Door bell have been placed in the required locations and all required batteries have been inserted, you are ready to use the device.
  • Seite 7: Troubleshooting

    INSTALLATION Trouble shooting Symptom Solution It makes sounds of 1) Check if the batteries “Dingdong” or sounds contact well. continuously without 2) Check if the power remote operation. adaptor connects normally. 3) Turn off the power switch for 10 minutes and then turn it on.
  • Seite 8: Garantie

    GARANTIE From the moment your Geemarc product is purchased, Geemarc guarantee it for the period of one year. During this time, all repairs or replacements (at our option) are free of charge. Should you experience a problem then contact our helpline or visit our website at www.geemarc.com.
  • Seite 9 - Or, hand the old product to the retailer. If you purchase a new one, they should accept it. Thus if you respect these instructions you ensure human health and environmental protection. For product support and help visit our website at www.geemarc.com Telephone 01707 384438 Or fax 01707 832529...
  • Seite 10 DESCRIPTIF Descriptif Indicateur de Flash lumineux batterie faible Réglage du volume Sonnerie Socle AVANT Compartiment des batteries (4 X AA) ARRIERE Bouton d’enregistrement Prise adaptateur sonnette/Bouton de test (option)
  • Seite 11 INSTALLATION Installation (voir dessin ci-dessous) Adaptateur secteur (option) 230V Bouton de Sonnette sonnette 1 – Mettre les 4 piles type AA (vendu en option) . 2 – Connectez l’adaptateur secteur (vendu en option) Raccordement électrique : l’appareil est prévu pour fonctionner uniquement avec l’adaptateur secteur 230V 50Hz fourni.
  • Seite 12 INSTALLATION Montage Mural De La Sonnette 1. La sonnette peut être portée par la personne nécéssitant de l’aide 2. Vous pouvez placer votre sonnette sur un mur ou une porte, percez 2 trous horizontallements espacés de 14 mm, mettre les 2 chevilles fournis et fixer votre sonnette avec les 2 vis, puis coller l’autocollant blanc fourni sur les 2 trous.
  • Seite 13 INSTALLATION Placez ensuite l'AMPLICALL16 sur les vis et tirez la base vers le bas afin que le boîtier soit bloqué. Table De Montage Si vous souhaitez installer l'AMPLICALL16 sur une table, posez le socle, puis insérez le boitier dedans. Remplacement Des Piles (vendu en option) Insérez les 4 piles type AA fournies avec l’appareil pour son fonctionnement.
  • Seite 14 INSTALLATION Note: Ne pas utiliser de pile rechargeable. Ne pas mettre la pile à la poubelle, utiliser les lieux de collecte approprié pour pile pour vous en débarasser. Enregistrement d’une sonnette supplémentaire Votre sonnette est déjà enregistrer à la base. Si cela ne fonctionne pas faire la procédure suivante : Appuyez et maintenir le bouton enregistrement de sonnette à...
  • Seite 15 INSTALLATION Aide Aux Problèmes Rencontrés Symptôme Solution L’Amplicall16 sonne 1) Vérifiez que les alors qu’il n’y a pas de batteries soient bien télécommande insérées. programmée. 2) Vérifiez que l’adaptateur secteur soit bien connecté. 3) Eteignez l’Amplicall16 pendant 10 minutes et rallumez-le L’indicateur de batterie 1) Vérifiez l’état des piles.
  • Seite 16 Lorsque votre produit ne fonctionne plus, ne le jeter pas dans votre poubelle ménagère. Suivez l’une des procédures décrite ci-dessous: La déclaration de conformité peut être consultée sur le site : www.geemarc.com...
  • Seite 17 à la protection de la santé humaine. Consultez notre site internet pour obtenir des informations et de l'aide sur nos produits : www.geemarc.com Vous pouvez nous contacter par téléphone 03 28 58 75 99 ou par fax 03 28 58 75 76...
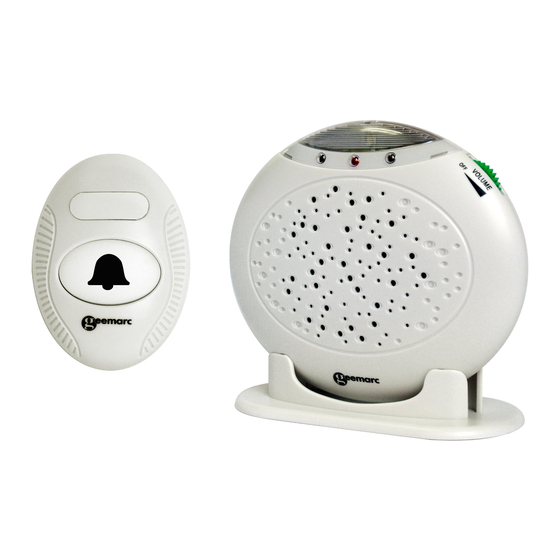
  • Seite 18 BESCHREIBUNG Beschreibung Niedrige Batterieanzeige Blinklicht Lautstärkeregel Akustisches Tischbefestigung Signal VORDERSEITE Batteriefach (4 X AA) RÜCKSEITE (*) Anschluss für Paarungs/Test den Adapter (optional) Taste (*) wird gemäß dem Standard EN60950 als TNV-3 eingestuft.
  • Seite 19 INSTALLATION Installation 230V AC-Adapter Türklingel Türklingel- knopf 4 x AA Batterien in das Fach einlegen 2. Stecken Sie den AC-Adapter in die Wandsteckdose. (*) wird gemäß dem Standard EN60950 als „gefährliche elektrische Spannung“ eingestuft.
  • Seite 20 INSTALLATION Stromanschluss: Das Gerät ist nur für eine Stromversorgung von 230V 50Hz entworfen worden. (Wird gemäß dem Standard EN60950 als „gefährliche elektrische Spannung“ eingestuft.) Das Gerät verfügt über keinen integrierten An/Aus-Schalter. Um das Gerät von der Stromversorgung zu trennen, muss entweder die Stromversorgung ausgeschaltet oder der Netzstecker gezogen werden.
  • Seite 21 INSTALLATION 3. Dir Türklingel kann mit dem mitgelieferten starkem Klebeband an die Tür geklebt werden. Entfernen Sie die Schutzfolie von dem Klebeband auf der Rückseite der Türklingel, und drücken Sie die Türklingel nun auf die gewünschte Fläche. Wandmontage: 1. Bohren Sie zwei Löcher (Horizontal) im Abstand von 96mm.
  • Seite 22 INSTALLATION Hinweis: Wenn die Batterieanzeige aufleuchtet, sollten Sie einen Batteriewechsel vornehmen. Während dieses Vorgehens, achten Sie bitte darauf, dass alle Stromnetzstecker und Telefonanschlüsse vorher entfernt wurden ! Bei Interesse eines optionalen Adapters wählenSie die Telefon +49(0)228/ 74 87 09 0 Batteriewechsel der Türklingel Die Türklingel wird mit einer 23A 12V Batterie geliefert.
  • Seite 23 Sie einmal den Paarungs/Test knopf. Danach sollte das Gerät Klingeln und Blitzen. Betrieb Sobald das Amplicall 16 und die Türklingel am gewünschten Standort plaziert sind, und alle benötigten Batterien eingelegt wurden, ist das Gerät betriebsfertig. Für die Verwendung des Gerätes, sollte die Person um...
  • Seite 24: Störungsbehebung

    INSTALLATION Störungsbehebung Anzeichen Solution Die Anlage erläutert 1) Prüfen Sie bitte die Funktion einen Klingelton der Batterien. oder klingelt 2) Prüfen Sie den richtigen ununterbrochen, ob Anschluss des Netzsteckers. wohl keiner die 3) Entfernen Sie den Türklingel betätigt. Netzstecker aus der Steckdose für 10 min.
  • Seite 25 GARANTIE Auf Ihr Geemarc Produkt wird von Geemarc Telecom SA eine zweijährige Garantie ab Kaufdatum gemäß diesen Garantiebestimmungen gewährt. Während dieser Zeit werden im Garantiefall nach Wahl der Geemarc Telecom SA Material- und Fabrikationsfehler unentgeltlich beseitigt oder Ihr Geemarc Produkt ausgetauscht. Bei Störungen oder Fragen wenden Sie sich an unsere Hotline oder besuchen Sie unsere Homepage www.geemarc.
  • Seite 26 Altgerät annehmen. Wenn Sie sich an diese Anweisungen halten, stellen Sie den Schutz der Gesundheit und Umwelt sicher. Produktsupport und Hilfe erhalten Sie auf unserer Webseite unter www.geemarc.com/de Telefon +49(0)228/ 74 87 09 0 Oder Fax +49(0)228/ 74 87 09 20...
  • Seite 27 Paarungs/T Taste...