Herunterladen Inhalt Inhalt Diese Seite drucken
Panasonic CZ-RTC5 Einbauanleitung
Vorschau ausblenden Andere Handbücher für CZ-RTC5:
Inhaltsverzeichnis

Werbung

Verfügbare Sprachen
  • DE

Verfügbare Sprachen

  • DEUTSCH, seite 40
ENGLISH
Read through the Installation Instructions before you proceed with the installation.
In particular, you will need to read under the "Safety Precautions" on page 4.
FRANÇAIS
Lisez les instructions d'installation avant de commencer l'installation.
En particulier, vous devez lire la section « Consignes de sécurité » en page 16.
ESPAÑOL
Lea las Instrucciones de instalacion antes de proceder con la instalacion del equipo.
En concreto, deberá leer detenidamente la sección "Precauciones de seguridad" situada en la página 28.
DEUTSCH
Lesen Sie die Einbauanleitung, bevor Sie mit der Installation beginnen.
Insbesondere müssen die „Sicherheitsvorkehrungen" auf Seite 40 gründlich durchgelesen werden.
ITALIANO
Leggere le Istruzioni di installazione prima di procedere con l'installazione.
Prestare particolare attenzione alla sezione "Precauzioni di Sicurezza" a pagina 52.
PORTUGUÊS
Leia cuidadosamente as instruções de instalação antes de prosseguir com a instalação.
Em particular, é necessário ler as informações na secção "Precauções de segurança" na página 64.
POLSKI
Przed przystąpieniem do instalacji należy przeczytać instrukcje instalacyjne,
a w szczególności „Środki ostrożności" na stronie 76.
85464369856010
Installation Instructions
High-spec Wired Remote Controller
Model No.
CZ-RTC5
2-15
E
NGLISH
2-3,16-27
F
RANÇAIS
2-3,28-39
E
SPAÑOL
2-3,40-51
D
EUTSCH
2-3,52-63
I
TALIANO
2-3,64-75
P
ORTUGUÊS
2-3,76-87
P
OLSKI
CV6233323473

Werbung

Inhaltsverzeichnis
loading

Inhaltszusammenfassung für Panasonic CZ-RTC5

  • Seite 1 Installation Instructions High-spec Wired Remote Controller CZ-RTC5 Model No. 2-15 ENGLISH Read through the Installation Instructions before you proceed with the installation. NGLISH In particular, you will need to read under the “Safety Precautions” on page 4. 2-3,16-27 FRANÇAIS Lisez les instructions d'installation avant de commencer l'installation.
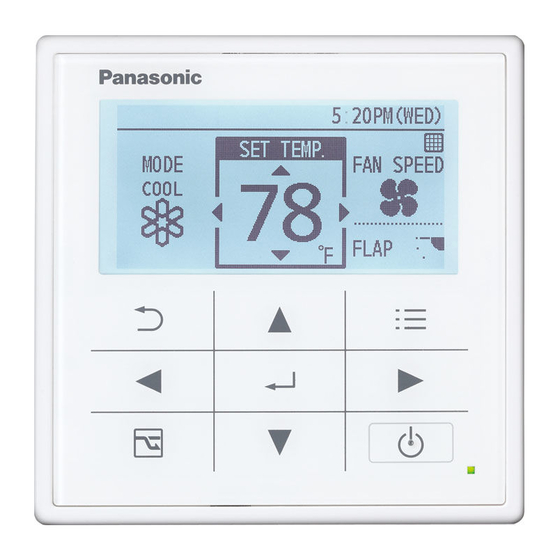
  • Seite 2: Part Names

    Part Names 5) Cursor buttons Selects an item. 1) LCD screen 2) Return button Left Right Returns to the previous screen. Down 3) Enter button 6) Menu button Fixes the selected Displays the menu content. screen. 4) Energy saving 7) Operation button indicator 8) Start/Stop button...
  • Seite 3 Note/Remarque/Nota/Hinweis/Nota/Nota/Uwaga Press centre No glove No pen Appuyez au centre Pas de gant Pas de stylo Guantes no Pulsar en el centro Bolígrafo no Mittlere Taste drücken Ohne Handschuh Ohne Stift Premere al centro Nessun guanto Nessuna penna Premir no centro Não usar luva Não usar pen Nacisnąć...
  • Seite 4: Safety Precautions

    ENGLISH Safety Precautions • This controller shall be installed in accordance with Read before installation National Wiring Regulations.  Read the Installation Instructions • Connect and fi x the specifi ed carefully to install the remote controller cables for wiring securely. correctly and safely.
  • Seite 5: Inhaltsverzeichnis

    M3.8 x 16 Instructions Reference *Remote control wiring is not supplied. (fi eld supplied item) Specifi cations Model No. CZ-RTC5 Dimensions (H) 120 mm x (W) 120 mm x (D) 16 mm Weight 180 g Temperature/ 0 ˚C to 40 ˚C / 20 % to 80 % (no condensation) Humidity range *Indoor use only.
  • Seite 6: Installation Precautions

    Installation Precautions Installation location  Install at the height of 1 to 1.5 m from 5 mm or more the fl oor (Location where average room temperature can be detected).  Install vertically against the fl oor.  When installing more than 1 remote 50 mm or controller next to each other, keep more...
  • Seite 7 *Wiring as shown below is prohibited. RC wiring R1 R2 R1 R2 R1 R2 Indoor unit Indoor unit Indoor unit When setting both the main and sub remote controllers After installation, set one remote controller to [Main] and the other to [Sub] for [Main/ sub] for “Setting”...
  • Seite 8: Mounting

    Mounting Remove the bottom case. Attention Mounting the bottom case Tighten the screws securely until the screw heads touch the bottom case. Insert the driver and (Otherwise, loose screw heads may slightly turn. hit the PCB and cause malfunction when mounting the top case.) Flat-blade Do not over-tighten the screws.
  • Seite 9: Embedded Type

    Embedded type Preparation: Make 2 holes for screws using a driver. Mount the bottom case to the wall. Pass the wire through the hole in the centre of the bottom case. Mount the top case. Align the claws of the top case and then align the claws of the bottom case.
  • Seite 10: Setting

    Setting  Language  Clock  Controller name Controller name Press Select [Initial settings]. ▲ ▼ → Select the item to set. ▲ ▼ → Default setting : English Language Set. ▲ ▼ → Clock Set. ▲ ▼ → ► → (Repeat) Controller name Set.
  • Seite 11: Service Contact

    Setting  Service contact Press and hold the 3 buttons for 4 seconds or more simultaneously. , ► Select the item to set. ▲ ▼ → Service contact Select. Name ▲ ▼ → Name Contact number ▲ ▼ ◄ ► → (Repeat the same procedure for all characters.) •...
  • Seite 12: Rc. Setting Mode

    Setting  RC. setting mode (Main/sub, Clock type, Password change)  Detailed settings (Vent output setting, Temp sensor setting, Temp display setting) Press and hold the 3 buttons for 4 seconds or more simultaneously. , ► Select the item to set. ▲...
  • Seite 13: Auto Address

    Setting  Auto address  Set elec. consumption Auto address Set. (Select the Code no. [A1] and O/D unit no.) ▲ ▼ → ► → (Repeat) Code no. O/D unit no. Code no. O/D unit no. Set the Auto address for each O/D unit no. •...
  • Seite 14: Confi Rming Information

    Confi rming Information  Sensor info.  Service check Press and hold the 3 buttons for 4 seconds or more simultaneously. , ► Select the item to set. ▲ ▼ → Sensor info. This displays each sensor temperature of the remote controller, indoor units and outdoor units.
  • Seite 15: Test Operation

    Test Operation Preparation: Turn on the circuit breaker of units and then turn the power on. The remote controller starts, and wait until the [Assigning] display disappears. (If [Assigning] continues to blink for 10 minutes or more, check the address setting of indoor units.) Press and hold the 3 buttons for 4 seconds or more simultaneously.
  • Seite 16: Consignes De Sécurité

    FRANÇAIS Consignes de AVERTISSEMENT • Avant l'installation, coupez le disjoncteur sécurité des unités. • Demandez à votre revendeur ou à des Lire avant installation professionnels d'effectuer l'installation et  Lisez attentivement les Instructions les travaux électriques. d'installation pour une installation •...
  • Seite 17: Accessoires Fournis

    Attache-fi ls M3,8 × 16 rapide *Le cable de la télécommande n’est pas fourni. (fourniture chantier) Spécifi cations Modèle n° CZ-RTC5 Dimensions (H) 120 mm × (L) 120 mm × (P) 16 mm Poids 180 g Plage de 0 °C à 40 °C / 20 % à 80 % (pas de condensation) Température/Humidité...
  • Seite 18: Précautions D'installation

    Précautions d'installation Installation de la télécommande  Installer la télécommande à une hauteur 5 mm ou plus comprise en 1 et 1,5 m du sol (Dans un endroit où il est possible de détecter la température ambiante moyenne).  Installer la télécommande verticalement contre le mur. 50 mm ou ...
  • Seite 19 *Un câblage comme indiqué ci-dessous est interdit. Télécommande Télécommande Câblage de la R1 R2 R1 R2 R1 R2 télécommande Unité intérieure Unité intérieure Unité intérieure Télécommande Lors du réglage des télécommandes princ./sec. Après l'installation, reglez une télécommande sur [princ.] et l'autre sur [sec.] pour [princ./sec.] pour «...
  • Seite 20: Montage

    Montage Retirez le boîtier inférieur. Attention Effectuez le montage du boîtier inférieur Serrez bien les vis jusqu'à ce que leur tête touche le boîtier inférieur. (Sinon, les têtes de vis lâches peuvent Insérez le tournevis et tournez toucher la carte de circuit imprimé et légèrement.
  • Seite 21: Type Encastré

    Type encastré Préparation : Faites 2 trous pour les vis avec un tournevis. Effectuez le montage mural du boîtier inférieur. Passez le câble à travers l'orifi ce au milieu du boîtier inférieur. Effectuez le montage du boîtier supérieur. Alignez les pinces du boîtier supérieur, puis alignez les pinces du boîtier inférieur.
  • Seite 22: Confi Guration

    Confi guration  Langue Horloge Nom télécommande Nom télécommande Appuyez sur Sélectionnez [Réglage initiaux]. ▲ ▼ → Sélectionnez l'élément à régler. ▲ ▼ → Réglage par défaut : Anglais Langue Réglez. ▲ ▼ → Horloge Réglez. ▲ ▼ → ► → (Répéter) Nom télécommande Réglez.
  • Seite 23: Contact Service

    Confi guration  Contact service Maintenez enfoncés les 3 boutons pendant au moins 4 secondes simultanément. , ► Sélectionnez l'élément à régler. ▲ ▼ → Contact service Sélectionnez. ▲ ▼ → Coordonnées ▲ ▼ ◄ ► → (Répétez la même procédure pour tous les caractères.) •...
  • Seite 24: Mode Télécommande

    Confi guration Mode télécommande (princ./sec., Type horloge, Changer MdP) Réglages détaillés (Réglage Sortie vent., Réglage Capteur temp., Réglage Affi chage temp.) Maintenez enfoncés les 3 boutons pendant au moins 4 secondes simultanément. , ► Sélectionnez l'élément à régler. ▲ ▼ → Mode télécommande Réglez.
  • Seite 25: Adresse Auto

    Confi guration  Adresse auto Rég. consommation élec. Adresse auto Réglez. (Sélectionnez le N°code [A1] et No U ext.) ▲ ▼ → ► → (Répéter) N°code No U ext. N°code No U ext. Réglez l'Adresse auto pour chaque No U ext.. •...
  • Seite 26: Confi Rmation De L'information

    Confi rmation de l'information  Info.capteur  Vérifi cation service Maintenez enfoncés les 3 boutons pendant au moins 4 secondes simultanément. , ► Sélectionnez l'élément à régler. ▲ ▼ → Info.capteur Permet d'affi cher la température de chaque capteur de la télécommande, des unités intérieures et extérieures.
  • Seite 27: Test

    Test Préparation : Allumez le disjoncteur des appareil puis effectuez la mise sous tension. La télécommande s'allume, patientez alors jusqu'à ce que l'affi chage [Affectation] disparaisse. (Si [Affectation] continue à clignoter pendant 10 minutes ou plus, vérifi ez le réglage de l'adresse des unités intérieures.) Maintenez enfoncés les 3 boutons pendant au moins 4 secondes simultanément.
  • Seite 28: Precauciones De Seguridad

    ESPAÑOL Precauciones ADVERTENCIA • Apague el disyuntor del circuito de las de seguridad unidades antes de realizar la instalación. • Solicite al proveedor o a un profesional Leer antes de la instalación que realicen la instalación y el trabajo  Lea detenidamente las Instrucciones eléctrico.
  • Seite 29: Accesorios Incluidos

    M3,8 x 16 rápida funcionamiento *El cableado del mando a distancia no se suministra. (elemento suministrado por separado) Especifi caciones N.º de modelo CZ-RTC5 Dimensiones (Al.) 120 mm x (An.) 120 mm x (Prof.) 16 mm Peso 180 g Temperatura/ 0 ˚C a 40 ˚C / 20 % a 80 % (sin condensación)
  • Seite 30: Precauciones Para La Instalación

    Precauciones para la instalación Lugar de la instalación  Instale a una altura de entre 1 y 1,5 m 5 mm o más del suelo (lugar donde se puede detectar la temperatura media de la habitación).  Instale de forma vertical respecto al suelo. ...
  • Seite 31 *Realizar el cableado como se muestra a continuación está prohibido. Cableado del R1 R2 R1 R2 R1 R2 Unidad interior Unidad interior Unidad interior Al confi gurar tanto el mando a distancia principal como los mandos a distancia segundarios Tras la instalación, ajuste un mando a distancia en [Ppal] y el otro en [Secund] en [Ppal/secund] para "Ajuste"...
  • Seite 32: Instalación

    Instalación Retire la carcasa inferior. Atención Instalación de la carcasa inferior Atornille los tornillos hasta que la cabeza de los mismos toque la carcasa inferior. (Una cabeza de tornillo demasiado fl oja Introduzca y gire el destornillador puede golpear la placa de circuitos impresos ligeramente.
  • Seite 33: Tipo Empotrado

    Tipo empotrado Preparación: Perfore dos orifi cios para los tornillos utilizando un taladro. Instale la carcasa inferior en la pared. Introduzca el cable por el orifi cio situado en el centro de la carcasa inferior. Instale la carcasa superior. Alinee los cierres de la carcasa superior y, a continuación, haga lo mismo con la carcasa inferior.
  • Seite 34: Ajuste

    Ajuste  Idioma Reloj Nombre del mando Nombre del mando Pulse Seleccione [Confi g. inicial]. ▲ ▼ → Seleccione el elemento que desea ajustar. Confi guración por defecto : Inglés ▲ ▼ → Idioma Ajuste. ▲ ▼ → Reloj Ajuste. ▲...
  • Seite 35: Contacto De Serv

    Ajuste  Contacto de serv. Mantenga pulsados los 3 botones simultáneamente durante un mínimo de 4 segundos. , ► Seleccione el elemento que desea ajustar. ▲ ▼ → Contacto de serv. Seleccionar. Nombre ▲ ▼ → Nombre Número de contacto ▲...
  • Seite 36: Modo Mando Distanc

    Ajuste Modo mando distanc (Ppal/secund, Tipo reloj, Cambio contraseña) Confi g. detallada (ajuste Salida ventil., ajuste Sensor de temp., ajuste de indicación de temp.) Mantenga pulsados los 3 botones simultáneamente durante un mínimo de 4 segundos. , ► Seleccione el elemento que desea ajustar.
  • Seite 37: Dirección Auto

    Ajuste  Dirección auto Ajustar consumo eléctr. Dirección auto Ajuste. (Seleccione el N.º de cód. [A1] y N.º un ext) ▲ ▼ → ► → (Repetir) N.º cód N.º un ext N.º cód N.º un ext Ajuste la Dirección auto de cada N.º un ext. •...
  • Seite 38: Confi Rmar Información

    Confi rmar información  Info. sensor  Comprob. servicio Mantenga pulsados los 3 botones simultáneamente durante un mínimo de 4 segundos. , ► Seleccione el elemento que desea ajustar. ▲ ▼ → Info. sensor Muestra la temperatura de los sensores del mando a distancia, las unidades interiores y las exteriores.
  • Seite 39: Prueba De Funcionamiento

    Prueba de funcionamiento Preparación: Active el disyuntor de circuito de las unidades y, a continuación, enciéndalas. El mando a distancia se pone en marcha y espera hasta que la indicación [Asignando] desaparezca. (Si la indicación [Asignando] sigue parpadeando durante más de 10 minutos, compruebe el ajuste de la dirección de las unidades interiores.) Mantenga pulsados los 3 botones simultáneamente durante un...
  • Seite 40: Sicherheitsvorkehrungen

    DEUTSCH Sicherheitsvorkehrungen WARNUNG Vor dem Einbau durchlesen • Schalten Sie vor dem Einbau den Sicherungsautomaten aus.  Für einen sicheren und sachgemäßen • Wenden Sie sich zwecks Einbau und Einbau der Fernbedienung lesen Sie Elektroarbeiten an Fachinstallateur. die Einbauanleitung gründlich durch. •...
  • Seite 41: Mitgeliefertes Zubehör

    Kurzanleitung Kabelklammer M3,8 x 16 *Das Kabel für die Fernbedienung ist bauseits bereitzustellen. Technische Daten Modellbezeichnung CZ-RTC5 Abmessungen (H) 120 mm x (B) 120 mm x (T) 16 mm Gewicht 180 g Temperatur-/ 0 ˚C bis 40 ˚C / 20 % bis 80 % (kondensatfrei) Luftfeuchtebereich *Nur für den Gebrauch in Innenräumen vorgesehen.
  • Seite 42: Einbauvorkehrungen

    Einbauvorkehrungen Einbauort  Der Einbau sollte in 1 bis 1,5 m Höhe 5 mm oder mehr erfolgen (an einer Stelle, an der vom Fühler eine durchschnittliche Raumtemperatur gemessen wird).  Montieren Sie das Gerät senkrecht.  Beim Einbau mehrerer Fernbedienungen 50 mm oder nebeneinander halten Sie jeweils 5 mm mehr...
  • Seite 43: Anmerkung

    *Verkabelung wie unten gezeigt ist untersagt. R1 R2 R1 R2 R1 R2 Verkabelung Innengerät Innengerät Innengerät Beim Einstellen der Haupt- und Neben-Fernbedienung Stellen Sie nach der Montage eine Fernbedienung mit der Einstellung [Main/sub] (Haupt/Neben) auf [Main] (Haupt) und die andere auf [Sub] (Neben) ein (siehe S. 48). Wenn Sie die Fernbedienungen* zusammen verwenden, stellen Sie dieses Gerät als [Haupt] ein.
  • Seite 44: Montage

    Montage Entfernen Sie das Achtung Gehäuseunterteil. Montage des Gehäuseunterteils. Drehen Sie die Schrauben soweit ein, bis die Schraubenköpfe das Gehäuseunterteil berühren, da herausstehende Schraubenköpfe Führen Sie den sonst beim Anbringen des Schraubenzieher ein und Gehäuseoberteils auf die Platine drehen Sie leicht. drücken und zu Funktionsstörungen Schlitzschraubenzieher führen können.
  • Seite 45: Eingebetteter Typ

    Eingebetteter Typ Vorbereitung: Durchbohren Sie mit einem Schraubendreher die beiden für die Schrauben vorgesehenen Öffnungen. Montage des Montieren Sie das Gehäuseunterteil an der Wand. Gehäuseoberteils. Führen Sie das Kabel durch das Loch in der Mitte des Gehäuseunterteils. Rasten Sie das Oberteil zuerst oben, dann unten auf dem Unterteil ein.
  • Seite 46: Einstellung

    Einstellung  Sprache Uhr Fernbedienung Name Fernbedienung Name Drücken Sie Wählen Sie [Anfängliche Einst]. ▲ ▼ → Wählen Sie die Funktion zum Einstellen aus. Standardeinstellung: Englisch ▲ ▼ → Sprache Einstellen. ▲ ▼ → Einstellen. ▲ ▼ → ► → (Wiederholen) Fernbedienung Name Einstellen.
  • Seite 47: Kundendienst

    Einstellung  Kundendienst Drücken und halten Sie die 3 Tasten gleichzeitig für 4 Sekunden oder länger. , ► Wählen Sie die Funktion zum Einstellen aus. ▲ ▼ → Kundendienst Auswählen. Name ▲ ▼ → Name Kontakt-Telefon Nummer ▲ ▼ ◄ ► → (Wiederholen Sie den Vorgang für alle Zeichen.) •...
  • Seite 48: Fernbedienungsmodus

    Einstellung Fernbedienungsmodus (Haupt/Sub, Uhr-Typ, Passwortänderung) Detaillierte Einst. (Abluft-Einstellung, Temp. sensor-Einstellung, Temp. anzeige-Einstellung) Drücken und halten Sie die 3 Tasten gleichzeitig für 4 Sekunden oder länger. , ► Wählen Sie die Funktion zum Einstellen aus. ▲ ▼ → Fernbedienungsmodus Einstellen. (Wählen Sie Code Nr. und Einst.dat..) ▲...
  • Seite 49: Auto-Adresse

    Einstellung Auto-Adresse Stromverbrauch einst. Auto-Adresse Einstellen. (Wählen Sie die Code Nr. [A1] und Außeng.Nr.) ▲ ▼ → ► → (Wiederholen) Code Nr. Außeng.Nr. Code Nr. Außeng.Nr. Wählen Sie die Auto-Adresse für jede Außeng.Nr. • Außengerät-Nummer Wählen Sie die Außeng.Nr. (Außengerät) für Auto-Adresse. Anmerkung Nachdem Fernbedienungsmodus, Detaillierte Einst.
  • Seite 50: Information Bestätigen

    Information bestätigen  Sensorinfrmation  Service-Überprüfung Drücken und halten Sie die 3 Tasten gleichzeitig für 4 Sekunden oder länger. , ► Wählen Sie die Funktion zum Einstellen aus. ▲ ▼ → Sensorinfrmation Zeigt alle Sensortemperaturen der Fernbedienung, der Innen- und der Außengeräte an.
  • Seite 51: Testbetrieb

    Testbetrieb Vorbereitung: Schalten Sie den Hauptschalter der Geräte ein und schalten Sie dann den Strom ein. Die Fernbedienung startet und wartet, bis [Zuordnung erfolgt]-Anzeige erlischt. (Blinkt die [Zuordnung erfolgt] ununterbrochen für über 10 Minuten, überprüfen Sie die Adresseinstellungen der Außengeräte.) Drücken und halten Sie die 3 Tasten gleichzeitig für 4 Sekunden oder länger.
  • Seite 52: Precauzioni Di Sicurezza

    ITALIANO Precauzioni di ATTENZIONE • Impostare su spento l'interruttore circuito Sicurezza delle unità prima dell'installazione. • Richiedere l'installazione e i lavori elettrici Leggere prima dell'installazione al rivenditore o a un professionista.  Leggere attentamente le istruzioni • Questo ricevitore deve essere installato per l'installazione per installare il in accordo ai regolamenti nazionali sui telecomando correttamente e in modo...
  • Seite 53: Accessori In Dotazione

    M3,8 x 16 l'uso rapido *Il cablaggio del telecomando non è fornito. (articolo fornito sul campo) Specifi che Modello N. CZ-RTC5 Dimensioni (H) 120 mm x (W) 120 mm x (D) 16 mm Peso 180 g Intervallo Da 0 °C a 40 °C / dav 20 % a 80 % (Niente condensa) temperatura/umidità...
  • Seite 54: Precauzioni Di Installazione

    Precauzioni di Installazione Sito di Installazione  Installare a un'altezza da 1 a 1,5 m dal 5 mm o più pavimento (posizione in cui può essere rilevata la temperatura media della stanza).  Installare verticalmente rispetto al pavimento. 50 mm o ...
  • Seite 55 *Sono proibite le cablature come quella indicata sotto. Cablatura RC R1 R2 R1 R2 R1 R2 Unità interna Unità interna Unità interna Quando si impostano sia il telecomando principale che quello secondario Dopo l'installazione, impostare un telecomando su [Princ] e l'altro su [Second.] per [Princ/second.] in "Impostazione"...
  • Seite 56: Montaggio

    Montaggio Rimuovere la copertura Attenzione inferiore. Montaggio della copertura del tasto Stringere bene le viti fi nché le teste delle viti non toccano la copertura inferiore. (Altrimenti, le teste delle viti allentate potrebbero battere contro il PCB e Inserire il causare malfunzionamenti al momento cacciavite e ruotare leggermente.
  • Seite 57: Tipo A Incastro

    Tipo a incastro Preparazione: Aprire due fori per le viti utilizzando un cacciavite. Montare la copertura inferiore sulla parete. Far passare il cavo attraverso il foro al centro della copertura inferiore. Montare la copertura superiore. Allineare le griffe della copertura superiore e poi allineare le griffe della copertura inferiore.
  • Seite 58: Impostazione

    Impostazione  Lingua Orologio Nome telecomando Nome telecomando Premere Selezionare [Impost. Inziali]. ▲ ▼ → Selezionare l'elemento da impostare. Impostazione predefi nita: Inglese ▲ ▼ → Lingua Imposta. ▲ ▼ → Orologio Imposta. ▲ ▼ → ► → (Ripetere) Nome telecomando Imposta.
  • Seite 59: Contratto Di Serv

    Impostazione  Contratto di serv. Tenere premuti i 3 tasti simultaneamente per almeno 4 secondi. , ► Selezionare l'elemento da impostare. ▲ ▼ → Contratto di serv. Selezionare. Nome ▲ ▼ → Nome Numero contatto ▲ ▼ ◄ ► → (Ripetere la stessa procedura per tutti i caratteri.) •...
  • Seite 60: Modal. Telecomando

    Impostazione Modal. telecomando (Princ/second., Tipo orologio, Cambia password) Impost. dettagliate (impostazione uscita vent., impostazione sensore temp., impostazione display temp.) Tenere premuti i 3 tasti simultaneamente per almeno 4 secondi. , ► Selezionare l'elemento da impostare. ▲ ▼ → Modal. telecomando Imposta.
  • Seite 61: Indirizzo Auto

    Impostazione  Indirizzo auto  Imposta consumo elettricità Indirizzo auto Imposta. (Selezionare il Codice n. [A1] e Unit. est. n.) ▲ ▼ → ► → (Ripeti) Codice n. Unit. est. n. Codice Unit. est. n. Impostare Indirizzo auto per ciascuna uni. est. n. •...
  • Seite 62: Conferma Informazioni

    Conferma informazioni  Info. sensore  Controllo servizio Tenere premuti i 3 tasti simultaneamente per almeno 4 secondi. , ► Selezionare l'elemento da impostare. ▲ ▼ → Info. sensore Questa funzione visualizza la temperatura di ciascun sensore del telecomando, delle unità interne e delle unità esterne. Selezionare.
  • Seite 63: Funzionamento Di Prova

    Funzionamento di prova Preparazione: Impostare su acceso l'interruttore circuito delle unità e poi effettuare l'accensione. Dopo che il telecomando si è avviato, attendere fi nché [Assegnazione] non sparisce. (Se [Assegnazione] continua a lampeggiare per più di 10 minuti, controllare l'impostazione indirizzo delle unità interne.) Tenere premuti i 3 tasti simultaneamente per almeno 4 secondi.
  • Seite 64: Precauções De Segurança

    PORTUGUÊS Precauções de AVISO • Desligue o disjuntor das unidades antes segurança de iniciar a instalação. • Peça ao seu fornecedor ou técnicos Ler antes da instalação profi ssionais que efetuem a instalação e o  Leia atentamente as Instruções de trabalho elétrico.
  • Seite 65: Acessórios Fornecidos

    Abraçadeira M3,8 x 16 operação *A cablagem do controlo remoto não éfornecida. (Itemadquirido localmente) Especifi cações N.º do modelo CZ-RTC5 Dimensões (A) 120 mm x (L) 120 mm x (P) 16 mm Peso 180 g Intervalo da 0 ˚C a 40 ˚C / 20 % a 80 % (sem condensação) temperatura/ *Apenas utilização interior.
  • Seite 66: Precauções De Instalação

    Precauções de instalação Local de instalação  Instale num local onde a altura ao solo seja 5 mm ou mais de 1 a 1,5 m (um local onde seja possível detetar a temperatura ambiente média).  Instale na vertical em relação ao solo. ...
  • Seite 67 *A cablagem como ilustrado em seguida é proibida. Cablagem do TC R1 R2 R1 R2 R1 R2 Unidade interior Unidade interior Unidade interior Quando confi gurar o telecomando principal e o telecomando secundário Depois de concluir a instalação, confi gure um telecomando como [Main] (Principal) e o outro como [Sub] (Secundário) na opção [Main/sub] (Principal/secundário) de “Confi...
  • Seite 68: Montagem

    Montagem Retire a placa inferior. Atenção Montar a placa inferior Aperte fi rmemente os parafusos até que a cabeça dos parafusos toque na placa inferior. (Se não o fi zer, a cabeça de parafusos Insira a chave de fendas e soltos pode tocar na placa de circuito rode ligeiramente.
  • Seite 69: Tipo Embutido

    Tipo embutido Preparação: Faça 2 orifícios para parafusos utilizando uma chave de fendas. Instale a placa inferior na parede. Passe o fi o através do orifício existente no centro da placa inferior. Monte a placa superior. Alinhe os grampos da placa superior e, em seguida, alinhe os grampos da placa inferior.
  • Seite 70: Confi Guração

    Confi guração  Idioma Relógio Nome do telecomando Nome do telecomando Prima Selecione [Initial settings] (Confi g. iniciais). ▲ ▼ → Selecione a opção que pretende confi gurar. Predefi nição: Inglês ▲ ▼ → Idioma (Language) Confi gure. ▲ ▼ → Relógio (Clock) Confi...
  • Seite 71: Contacto Da Assistência

    Confi guração  Contacto da assistência Mantenha os 3 botões premidos ao mesmo tempo durante 4 segundos ou mais. , ► Selecione a opção que pretende confi gurar. ▲ ▼ → Contacto da assistência (Service contact) Selecione. Nome ▲ ▼ → Nome Número de contacto...
  • Seite 72: Modo De Confi G. Do Tc

    Confi guração Modo de confi g. do TC (Principal/Secundário, Tipo de relógio, Mudança de palavra-passe) Confi g. detalhadas (Confi g. da saída de vent., Confi g. do sensor da temp., Confi g. da apresentação da temp.) Mantenha os 3 botões premidos ao mesmo tempo durante 4 segundos ou mais.
  • Seite 73: Endereçamento Auto

    Confi guração  Endereçamento auto  Confi g. consumo elect. Endereçamento auto (Auto address) Confi gure. (Selecione o N.º de código [A1] e o N.º da unidade ext.) ▲ ▼ → ► → (Repita) N.º de código N.º da unidade ext. N.º...
  • Seite 74: Confi Rmação De Informações

    Confi rmação de informações  Info. do sensor  Verifi cação do serviço Mantenha os 3 botões premidos ao mesmo tempo durante 4 segundos ou mais. , ► Selecione a opção que pretende confi gurar. ▲ ▼ → Info. do sensor (Sensor info.) Apresenta a temperatura de cada sensor do telecomando, das unidades interiores e das unidades exteriores.
  • Seite 75: Teste De Funcionamento

    Teste de funcionamento Preparação: Ligue o disjuntor das unidades e, em seguida, ligue a alimentação. O telecomando inicia; aguarde até que a indicação [Assigning] (A atribuir) desapareça. (Se a indicação [Assigning] (A atribuir) se mantiver intermitente durante 10 minutos ou mais, verifi que a confi guração do endereço das unidades interiores.) Mantenha os 3 botões premidos ao mesmo tempo durante 4 segundos ou mais.
  • Seite 76: Środki Ostrożności

    POLSKI • To urządzenie sterujące Środki ostrożności powinno być zainstalowane Przeczytać przed instalacją zgodnie z krajowymi przepisami  W celu poprawnego i bezpiecznego dotyczącymi okablowania. zainstalowania urządzenia zdalnego • Należy starannie podłączyć i sterowania należy dokładnie umocować poszczególne części. przeczytać instrukcje instalacyjne, •...
  • Seite 77: Akcesoria W Zestawie

    M 3,8 x 16 * Okablowanie zdalnego sterowania nie znajduje się w zestawie. (zasilanie przez urządzenie) Dane techniczne Nr modelu CZ-RTC5 Wymiary (WYS.) 120 mm x (SZER.) 120 mm x (GŁ.) 16 mm Masa 180 g Temperatura / 0 ˚C do 40 ˚C / 20 % do 80 % (bez skraplania) zakres wilgotności...
  • Seite 78: Środki Ostrożności Dotyczące Instalacji

    Środki ostrożności dotyczące instalacji Miejsce instalacji  Zainstalować na wysokości 1–1,5 m od 5 mm lub więcej podłogi (w miejscu, gdzie można zmierzyć średnią temperaturę w pomieszczeniu).  Zainstalować pionowo względem podłogi.  Instalując więcej niż 1 urządzenie zdalnego 50 mm lub sterowania (jedno obok drugiego), należy więcej zachować...
  • Seite 79 *Okablowanie w sposób przedstawiony poniżej jest zabronione. Okablowanie ZS R1 R2 R1 R2 R1 R2 Urządzenie Urządzenie Urządzenie wewnętrzne wewnętrzne wewnętrzne Podczas ustawiania zarówno głównego jak i zależnych urządzeń zdalnego sterowania Po instalacji ustawić jedno urządzenie zdalnego sterowania na [główne], a inne na [podrzędne] dla [główne/podrzędne] przy „Ustawienia”...
  • Seite 80: Mocowanie

    Mocowanie Zdjąć dolną część obudowy. Uwaga Montaż dolnej części obudowy Dokręcić dokładnie śruby do momentu, gdy łby wkrętów zetkną się z dolną częścią obudowy. Przyłożyć śrubokręt i delikatnie (niedokręcone łby śrub mogą zetknąć dokręcić. się z płytką PCB i spowodować usterkę podczas montażu górnej części obudowy).
  • Seite 81: Typ Wbudowany

    Typ wbudowany Przygotowanie do pracy: Przygotować 2 otwory dla wkrętów przy pomocy śrubokręta. Montaż dolnej część obudowy do ściany. Przełożyć przewód przez otwór w środku dolnej części obudowy. Montaż górnej części obudowy. Zrównać zatrzaski górnej części obudowy i dolnej części obudowy. Uważać, aby nie zakleszczyć...
  • Seite 82: Ustawienia

    Ustawienia Język Zegar Nazwa kontrolera Nazwa kontrolera Nacisnąć Wybrać [Początkowe ustawienia] ▲ ▼ → Wybrać pozycję do ustawienia. ▲ ▼ → Ustawienia domyślne: Angielski Język Ustawienie ▲ ▼ → Zegar Ustawienie ▲ ▼ → ► → (powtórzyć) Nazwa kontrolera Ustawienie ▲...
  • Seite 83: Kontakt Z Serwisem

    Ustawienia  Kontakt z serwisem Nacisnąć i przytrzymać jednocześnie 3 przyciski przez co najmniej 4 sekundy. , ► Wybrać pozycję do ustawienia. ▲ ▼ → Kontakt z serwisem Wybrać Nazwa ▲ ▼ → Nazwa Numer kontaktowy ▲ ▼ ◄ ► → (Powtórzyć...
  • Seite 84: Tryb Ustawień Pilota

    Ustawienia Tryb ustawień pilota (główne/podrzędne, Typ zegara, zmiana hasła) Szczegółowe ustawienia (ustawienie wylotu, ustawienie czujnika temp., ustawienie wyświetl. temp.) Nacisnąć i przytrzymać jednocześnie 3 przyciski przez co najmniej 4 sekundy. , ► Wybrać pozycję do ustawienia. ▲ ▼ → Tryb ustawień pilota Ustawienie (Wybrać...
  • Seite 85: Automatyczny Adres

    Ustawienia Automatyczny adres Ustawienie poboru prądu Automatyczny adres Ustawienie (Wybrać Kod nr i [AI] Urz. nr) ▲ ▼ → ► → (Powtórzyć) Kod nr Urz. nr Nr kodu Urz. nr Ustawić Automatyczny adres dla każdego Urz. nr. Wybrać Urz. nr (urządzenia zewnętrznego) dla Automatyczny •...
  • Seite 86: Informacje Potwierdzające

    Informacje potwierdzające opcja „Info o czujniku” Sprawdzenie serwisowe Nacisnąć i przytrzymać jednocześnie 3 przyciski przez co najmniej 4 sekundy. , ► Wybrać pozycję do ustawienia. ▲ ▼ → Info o czujniku Wyświetla temperaturę mierzoną przez czujniki urządzenia zdalnego sterowania, urządzenia wewnętrzne i urządzenia zewnętrzne. Wybrać...
  • Seite 87: Działanie Testowe

    Działanie testowe Przygotowanie do pracy: Nacisnąć przycisk wyłączający obwód urządzeń i włączyć zasilanie. Urządzenie zdalnego sterowania uruchamia się i czeka, aż zniknie informacja [Przypisanie]. (Jeśli informacja [Przypisanie] miga przez co najmniej 10 minut, sprawdzić ustawienia adresów urządzeń wewnętrznych). Nacisnąć i przytrzymać jednocześnie 3 przyciski przez co najmniej 4 sekundy.
  • Seite 88 Printed in Japan H0815-0...

Inhaltsverzeichnis