auna multimedia DTA80BT Handbuch
3-in-1 auto-mediacenter
Inhaltsverzeichnis
Verfügbare Sprachen
Verfügbare Sprachen
Quicklinks
Inhaltsverzeichnis

Verwandte Anleitungen für auna multimedia DTA80BT


Inhaltszusammenfassung für auna multimedia DTA80BT
- Seite 1 DTA80BT 3-in-1 Auto-Mediacenter 10027968 http://www.auna-multimedia.com...
-
Seite 2: Inhaltsverzeichnis
Inhalt Technische Daten Warnung / Sicherheitshinweise Kleine Objekte / Verpackungsteile Transport des Gerätes Reinigung der äußeren Oberfläche Bedienelemente Fernbedienung & Batterie Frontblende & Bedienteil Fernbedienung Rückseite Einbau Anschluss an die Handbremse Anschlussdiagramme Einbauskizze Allgemeine Funktionen Einstellungen Radio-Funktionen USB- / SD-Funktionen Fehlerbehebung Hinweise zur Entsorgung Konformitätserklärung... -
Seite 3: Technische Daten
Sehr geehrter Kunde, zunächst möchten wir Ihnen zum Erwerb Ihres Gerätes gratulieren. Bitte lesen Sie die folgenden Anschluss- und Anwendungshinweise sorgfältig durch und befolgen Sie diese um mögli- chen technischen Schäden vorzubeugen. Technische Daten Artikelnummer 10027968 Generelle Spezifikationen Video/Bildschirm Stromzufuhr DC 12V (10,8 - 16V) ISO-Ste- Bildschirm-Relationen 16:9 / 4:3... -
Seite 4: Kleine Objekte/Verpackungsteile
Kleine Objekte/Verpackungsteile (Plastikbeutel, Karton, etc.) Bewahren kleine Objekte (z.B. Schrauben anderes Montagematerial, Speicherkarten) Verpackungsteile außerhalb der Reichweite von Kindern auf, damit sie nicht von diesen verschluckt werden können. Lassen kleine Kinder nicht Folie spielen. besteht Erstickungsgefahr! Aufstellung Achtung - Stellen Sie keine Quellen offener Flammen, z.B. brennende Kerzen, auf das Gerät. •... -
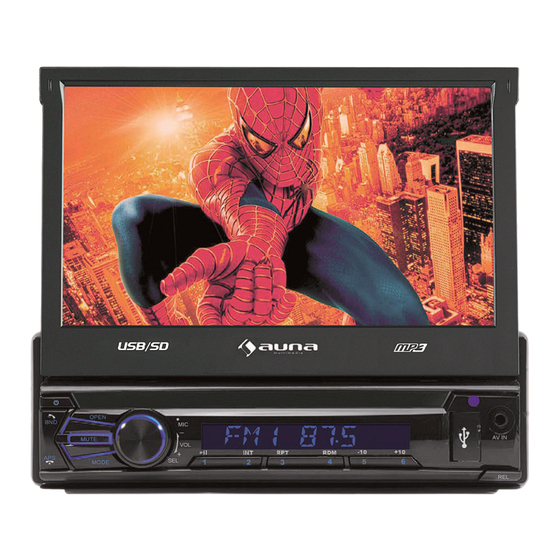
Seite 5: Frontblende & Bedienteil
Frontblende mit und ohne Bedienteil OPEN (öffnen) RPT (Repeat-Modus) / 3 MUTE (stummschalten) RDM (Zufalls-Modus) / 4 Monitor -10 (10 Tracks zurück) / 5 AV-Anschluss +10 (10 Tracks vor) / 6 Band / Tel (Rufannahme) (Ein-/Ausschalten) USB-Anschluss APS / Auflegen SD/MMC-Slot Reset MODE (Umschalten zwischen Eingangsquellen) -
Seite 6: Fernbedienung
Fernbedienung MUTE (Stummschaltung) SEL (Auswahl): Gedrückt halten, um den Bildschirm abzuschalten. Drücken Sie eine beliebige Taste, um den Bild- schirm wieder einzuschalten VOL + / - CLK (Uhr) EQ (Equalizer) BAND LOC / * RPT (Wiederhol-Modus) ZOOM / # Zifferntasten (0-9, +10) Auflegen / Gespräch abweisen Gespräch annehmen OPEN (Öffnen) -
Seite 7: Rückseite
Rückseite Sicherungsschraube Anschlussbuchse 1 Antenne Anschlussbuchse 2 Das Handbrems-Kabel („Parkkabel“) muss verbunden sein, damit der Monitor nur im haltenden, parkenden Fahrzeug funktioniert. Schrauben Sie das Clip-Ende des Masse-Kabels an der Sicherungsschraube (A) fest und befestigen Sie das andere Ende sicher an einem Masseführenden Teil / am Minuspol der Autobatterie. Einbau ACHTUNG: Setzen Sie das Autoradio in den dafür vorgesehenen ISO-Schacht ein oder wählen Sie einen Einbauort, der den... -
Seite 8: Anschlussdiagramme
Anschlussdiagramm für Anschlussbuchse 1: Anschlussdiagramm für Anschlussbuchse 2:... -
Seite 9: Einbauskizze
Testen Sie die Funktionen des DBA80BT durch, um auszuschließen, dass Anschlussfehler vorliegen, bevor Sie das Ge- rät wie in der folgenden Skizze ins Armaturenbrett ihres Wagens einbauen: Das DTA80BT kann in Standard-ISO-Einbauschächte eingesetzt werden. Hat Ihr Fahrzeug keinen solchen Einbau- schacht, wenden Sie sich bitte an Ihre Fachwerkstatt oder den Fachhandel. -
Seite 10: Einstellungen
Lautstärke einstellen Stelen Sie die Lautstärke mit dem Lautstärkeregler am Bedienteil ein oder drücken Sie auf der Fernbedienung VOL+ bzw VOL-. Stummschaltung Drücken Sie für die Stummschaltung des Geräts MUTE auf der Fernbedienung oder am Bedienteil. Drücken Sie MUTE nocheinmal, um die Stummschaltung wieder abzuschalten. EQ abrufen oder einstellen. - Seite 11 DATE: Datum / Uhrzeit T I M E Wechseln Sie hier zwischen den An- MODE zeigeoptionen 12h / 24h. SET TIME Uhrzeit-Einstellungen SET DATE Datums-Einstellungen DEFAULT: Standard-Einstellungen R A D I O Wählen Sie hier die Standard-Regi- AREA on, in der Sie sich aufhalten RDS ein-/ausschalten GENERAL: Generelle Einstellungen BEEP...
-
Seite 12: Radio-Funktionen
Farb-Einstellung der Bedienteil-LEDs Wählen Sie im MODE-Menü die Option CC.LED, um die Farben der Bedienteil-LEDs zu ändern. Wählen Sie AUTO (die 5 verfügbaren Farben wechseln automatisch und kontinuierlilch), RED, GREEN, BLUE, PURPLE, ORANGE (für eine ständige Displayfarbe) oder CUSTOM und stellen Sie die Farbe über die RGB-Balken nach Ihrer individuellen Vorliebe ein: Radio-Funktionen BAND... -
Seite 13: Usb- / Sd-Funktionen
PTY (Program Type) Mit der PTY-Funktion können Sie einen Interesse-bezogenen Sendersuchlauf auslösen. Drücken Sie PTY, um die Funk- tion einzuschalten und zwischen den Modi PTY MUSIC (Musik) und PTY SPEECH (Sprache) zu wählen. Wählen Sie mit den + und - Tasten auf der Fernbedienung zwischen den folgenden Programm-Optionen NEWS (Nachrichten) - AFFAIRS (Klatsch) - INFO - SPORT - EDUCATE (Lernen) - DRAMA (Hörspiel/Dramen) - CULTURE (Kultursendungen) - SCIENCE (Wissenschaft) - VARIED (Verschiedene) - PTY NONE (ohne PTY) - POP M - ROCK M - EASY M - LIGHT M - OTHER M (andere Musik) - WEATHER (Wetter) - FINANCE (Börsennews) - CHILDREN (Kinderprogramm) -... - Seite 14 Play/Pause Vor / Zurück Equalizer aufrufen (Fernbedienung: EQ) LOUD (Loudness ein-/ausschalten) Die passende Bildschirmauflösung finden (Fernbedienung: ZOOM) Blättern Untertitel ein/aus (Fernbedienung: SUB-T). Drücken Sie mehrfach, um die verfügbaren Sprachen für mögliche Untertitel durchzuschalten. ST/MONO Musik ein- oder ausschalten Bild vergrößern Modus wählen Bildinformationen anzeigen (falls vorhanden) Auto-Play...
- Seite 15 Wählen Sie den BT-Modus durch mehrmaliges Drücken der MODE-Taste. Um Ihr Smartphone / Tablet / Laptop mit dem DTA80BT zu verbinden, aktivieren Sie bei dem Gerät BT und verbinden Sie es mit DTA80BT. Falls Sie aufgefordert werden, ein Passwort für die Verbindung einzugeben, tippen Sie bitte „0000“ (viermal Null).
-
Seite 16: Fehlerbehebung
Fehlerbehebung Problem: Kein Bild, Kein Ton, keine Anzeige. Vergewissern Sie sich, dass das Gerät eingeschaltet ist. Stellen Sie sicher, dass die Anschlüsse und insbesondere das Stromkabel angeschlossen sind und guten Sitz haben. Schauen Sie, ob das Stromkabel oder die Sicherung beschädigt sind. Problem: Kein Ton, Bild wird aber angezeigt. -
Seite 17: Hinweise Zur Entsorgung
Problem: Das Radio funktioniert nicht. Ist das Antennenkabel richtig angeschlossen? Haben Sie die Fahrzeugantenne ausgezogen? Problem: Das Touch-Display hat die Sensitivität verloren. Gehen Sie in den Radio-Modus und drücken Sie erst dreimal +, dann dreimal -. Drücken Sie dann POWER. - Mit dieser Tastenkombination gelangen Sie in den Kalibrierungsmodus.