Herunterladen Diese Seite drucken
afx light 16-2709 Bedienungsanleitung

afx light 16-2709 Bedienungsanleitung

2-in-1 pixel-mapping matrix bar

Werbung

Verfügbare Sprachen

Verfügbare Sprachen

USER MANUAL
MANUEL D'UTILISATION
2-IN-1
BEDIENUNGSANLEITUNG
HANDLEIDING
PIXEL-MAPPING
LOTRONIC SA
Avenue Zénobe Gramme 9
1480 Saintes
Belgium
MATRIX BAR
Ref.: PIXCOLOR (16-2709)
BLINDER BAR 2-EN-1 AVEC ECLAIRAGE DE FOND EN
COULEUR ET CONTROLE DMX / ARTNET2-IN-1 PIXEL
MAPPING MATRIXLICHTLEISTE2-IN-1 BLINDER BAR MET
VERLICHTE ACHTERGROND & DMX, ARTNET BESTURING

Werbung

loading

Inhaltszusammenfassung für afx light 16-2709

  • Seite 1 LOTRONIC SA Avenue Zénobe Gramme 9 1480 Saintes Belgium MATRIX BAR Ref.: PIXCOLOR (16-2709) BLINDER BAR 2-EN-1 AVEC ECLAIRAGE DE FOND EN COULEUR ET CONTROLE DMX / ARTNET2-IN-1 PIXEL MAPPING MATRIXLICHTLEISTE2-IN-1 BLINDER BAR MET VERLICHTE ACHTERGROND & DMX, ARTNET BESTURING...
  • Seite 2 Contents of the carton: • 1 x LED pixel-mapping Matrix bar • 1x Signal cable 1x Mains lead • 1x User Manual • Unpacking Instructions Immediately upon receiving a fixture, carefully unpack the carton, check the contents to ensure that all parts are present and have been received in good condition.
  • Seite 3 Installation The unit should be mounted via its screw holes on the bracket. Always ensure that the unit is firmly fixed to avoid vibration and slipping while operating. Always ensure that the structure to which you are attaching the unit is secure and able to support a weight of 10 times of the unit’s weight.
  • Seite 4 Product Description 1. LCD display 2. Menu 3. Enter 4. Up 5. Down 6. Signal indicator 7. Microphone 8. Power input connector 9. Fuse 1.5A 250V 10. Power output connector 11. 3-pin DMX input 12. 5-pin DMX input 13. Ground terminal 14.
  • Seite 5 ELECTRICAL INSTALLATION FOR TWO OR MORE UNITS IN DMX MODE Use this function when you want to control the projectors by any DMX controller. Connect the projectors as shown in the drawing below. • First put the projectors in the desired DMX mode: see the different DMX charts and choose the one that suits you best.
  • Seite 6 0-255 Sound Control 0-255 1st Cree 3W On 0-255 2nd Cree 3W On 10CH 0-255 3rd Cree 3W On 11CH 0-255 4th Cree 3W On 12CH 0-255 5th Cree 3W On 13CH 0-255 6th Cree 3W On 14CH 0-255 7th Cree 3W On 15CH 0-255 8th Cree 3W On...
  • Seite 7 Cleaning Due to fog residue, smoke, and dust cleaning the internal and external lenses should be carried out periodically to optimize light output. 1. Use normal glass cleaner and a soft cloth to wipe down the out-side casing. 2. Clean the external optics with glass cleaner and a soft cloth every 20 days. 3.
  • Seite 8 Sécurisez l’appareil sur le dispositif de fixation au moyen d’une chaîne. Ne portez jamais l’appareil en le tenant par le boîtier. Tenez-le par l’étrier. La température ambiante ne doit pas dépasser 40°C. Ne pas faire fonctionner l’appareil à des températures supérieures.
  • Seite 9 Caractéristiques techniques Alimentation ..................110-240Vac 50 / 60Hz Source de lumière LED ............10x 3W LED CREE blanc chaud ..................... 60 x 0.3W RVB SMD5050 LEDs Température de couleur ............... 2600 ° K (LED CREE) Fusible ......................F1.5A / 250V Canaux DMX ........................ 9/190 Dimensions ....................
  • Seite 10 INSTALLATION AUTONOME AVEC CHASES INTÉGRÉS Utilisez cette fonction si vous voulez un show instantané sur seulement 1 projecteur. Branchez le projecteur sur le secteur. Sélectionnez l'un des modes suivants dans le menu de configuration: • Mode automatique: Sélectionnez ce mode pour contrôler l'émission des LED blanches. •...
  • Seite 11 0-255 Blanc pour la LED CREE de 3W 0-255 Effets intégrés 1 Effets de la LED CREE 3W, le dernier est le fonctionnement automatique 0-255 Effets intégrés 2 Effets des LED SMD5050, le dernier est le fonctionnement automatique 0-255 Vitesse pour les effets Lent à...
  • Seite 12 10CH 0-255 3ème LED CREE 3W allumée 11CH 0-255 4ème LED CREE 3W allumée 12CH 0-255 5ème LED CREE 3W allumée 13CH 0-255 6ème LED CREE 3W allumée 14CH 0-255 7ème LED CREE 3W allumée 15CH 0-255 8ème LED CREE 3W allumée 16CH 0-255 9ème LED CREE 3W allumée...
  • Seite 13 Inhalt des Kartons: 1 x LED-Pixel-Mapping-Matrixlichtleiste • 1x Signalkabel • • 1x Netzkabel • 1x Benutzerhandbuch Anweisungen zum Auspacken Unmittelbar nach Erhalt eines Geräts den Karton vorsichtig auspacken und den Inhalt prüfen, um sicherzustellen, dass alle Teile vorhanden und in gutem Zustand sind. Benachrichtigen Sie den Versender sofort und bewahren Sie das Verpackungsmaterial zur Inspektion auf, wenn Teile durch den Versand beschädigt wurden oder der Karton selbst Anzeichen von Mängeln aufweist.
  • Seite 14 Aufbau Das Gerät muss über seine Schraubenlöcher an der Halterung montiert werden. Stellen Sie immer sicher, dass das Gerät fest angebracht ist, um Vibrationen und Rutschen während des Betriebs zu vermeiden. Stellen Sie immer sicher, dass die Struktur, an der Sie das Gerät befestigen, sicher ist und ein Gewicht von 10 Mal des Eigengewichts des Geräts tragen kann.
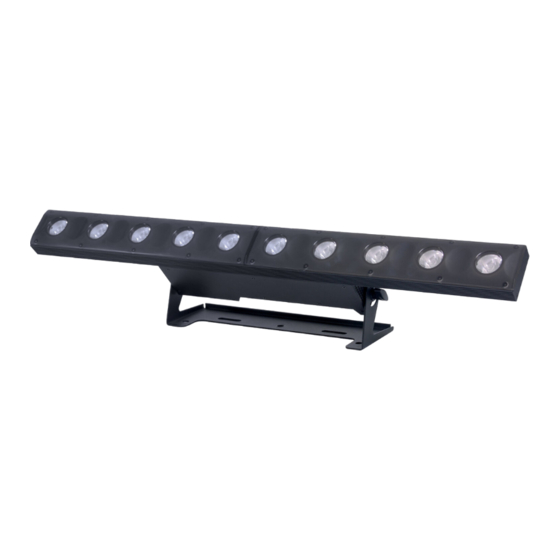
  • Seite 15 Produktbeschreibung 1. LCD Display 2. Menü 3. Enter 4. Up 5. Down 6. Signalanzeige 7. Mikrofon 8. Spannungseingang 9. Sicherung 1.5A 250V 10. Spannungsausgang 11. 3-poliger DMX-Eingang 12. 5-poliger DMX-Eingang 13. Masseelektrode 14. Ethernet-Anschluss IN / OUT für RJ45-Kabel 15. 3-poliger DMX-Ausgang 16.
  • Seite 16 Elektrische Installation für zwei oder mehr Geräte im DMX-Modus Verwenden Sie diese Funktion, wenn Sie die Projektoren mit einem beliebigen DMX-Controller steuern möchten. Schließen Sie die Projektoren wie in der folgenden Abbildung gezeigt an. • Stellen Sie zuerst die Projektoren in den gewünschten DMX-Modus: Wählen Sie eine unter den verschiedenen DMX-Kanaltabellen aus.
  • Seite 17 0-255 CREE LED 3 eingeschaltet 0-255 CREE LED 4 eingeschaltet 0-255 CREE LED 5 eingeschaltet 0-255 CREE LED 6 eingeschaltet 0-255 CREE LED 7 eingeschaltet 0-255 CREE LED 8 eingeschaltet 0-255 CREE LED 9 eingeschaltet 0-255 CREE LED 10 eingeschaltet 0-255 Rot für SMD5050 0-255 Grün für SMD5050 0-255 Blau für SMD5050...
  • Seite 18: Veiligheidsinstructies

    Reinigung Aufgrund von Nebelrückständen, Rauch und Staub sollte das Gerät regelmäßig gereinigt werden, um die Lichtleistung zu optimieren. 1. Verwenden Sie einen normalen Glasreiniger und ein weiches Tuch, um das äußere Gehäuse abzuwischen. 2. Reinigen Sie die externe Optik alle 20 Tage mit Glasreiniger und einem weichen Tuch. 3.
  • Seite 19 zekering zijn. • Veilige bevestiging aan het bevestigingsapparaat met behulp van een veiligheidsketting. Draag het armatuur nooit alleen bij zijn hoofd. Gebruik de draaggrepen. • Maximale omgevingstemperatuur (Ta) is 104°F (40°C). Gebruik het toestel niet bij hogere temperaturen. • Stop onmiddellijk het apparaat in het geval van een ernstig bedieningsprobleem. Probeer nooit het apparaat zelf te repareren.
  • Seite 20 Specificaties Voeding ..................... 110-240Vac 50 / 60Hz LED-lichtbron ..............10x 3W warm witte CREE-LED's ..................... 60x 0.3W RGB SMD5050 LED's Kleurtemperatuur ................... 2600°K (CREE led) Zekering ......................F1.5A / 250V DMX-kanalen ....................... 9/190 Afmetingen ..................... 780 x 103 x 72 mm Gewicht ........................
  • Seite 21 STAND-ALONE INSTALLATIE MET INGEBOUWDE CHASES Gebruik deze functie als u direct een show wilt op slechts één projector. Sluit de projector op het lichtnet aan. Selecteer een van de volgende modi in het setup-menu: • Automatische modus: selecteer deze modus om de show van de witte led's te regelen. •...
  • Seite 22 0-255 Ingebouwde effecten 1 CREE Effecten, de laatste is automatisch 0-255 Ingebouwde effecten 2 SMD5050 effecten, de laatste is automatisch 0-255 Snelheid voor ingebouwde Langzaam tot snel effecten 0-255 Kleurcontrole voor kanaal 8 0-255 Muziekbesturing 20-kanaalsmodus: DMX-kanaal Waarde Functie 0-255 Dimmer voor alle lampen 0-255 Strobe voor alle lampen...
  • Seite 23 0-255 3. CREE led aan 0-255 4. CREE led aan 0-255 5. CREE led aan 0-255 6. CREE led aan 0-255 7. CREE led aan 0-255 8. CREE led aan 0-255 9. CREE led aan 0-255 10. CREE led aan 0-255 Rood voor SMD5050 0-255...

Diese Anleitung auch für:

Pixcolor