Herunterladen Inhalt Inhalt Diese Seite drucken
Inhaltsverzeichnis

Werbung

Verfügbare Sprachen
  • DE

Verfügbare Sprachen

  • DEUTSCH, seite 4
ROWELD P 63 S6
DE Bedienungsanleitung
EN Instructions for use
FR Instruction d'utilisation
ES Instrucciones de uso
IT Istruzioni d'uso
PT Instruções de serviço
CZ Návod k používání
www.rothenberger.com

Werbung

Inhaltsverzeichnis
loading

Inhaltszusammenfassung für Rothenberger ROWELD P 63 S6

  • Seite 1 ROWELD P 63 S6 DE Bedienungsanleitung IT Istruzioni d’uso EN Instructions for use PT Instruções de serviço FR Instruction d’utilisation CZ Návod k používání ES Instrucciones de uso www.rothenberger.com...
  • Seite 2 A Overview ROWELD P63 S-6 thermostatic ROWELD P63 S-6 electronic Basic 230V no.: 053897X Basic 230V no.: 053896X Basic 110/115V no.: 1000001270...
  • Seite 3 2006/42 EC, EN 50144-1/A2:2004, 91368 EEC, 2006/95 EC, 2004/108 EC Herstellerunterschrift Manufacturer/ authorized representative signature José Ignacio Pikaza Geschäftsführer/ General Manager Technische Unterlagen bei/ Technical file at: ROTHENBERGER S.A. Ctra. Durango-Elorrio, Km 2 E-48220 Abadiano (Vizcaya)/ Spain...
  • Seite 4: Inhaltsverzeichnis

    Inhalt Seite Hinweise zur Sicherheit ......................3 Bestimmungsgemäße Verwendung ..................3 Allgemeine Sicherheitshinweise für Elektrowerkzeuge ............3 Spezielle Sicherheitshinweise .................... 5 Technische Daten ......................... 5 Funktion des Gerätes ......................5 Übersicht (A) ........................5 Bedienungsanleitung ......................5 3.2.1 Vorbereiten des Rohres...................... 5 3.2.2 Vorbereiten des Muffenschweißgeräts ................
  • Seite 5: Hinweise Zur Sicherheit

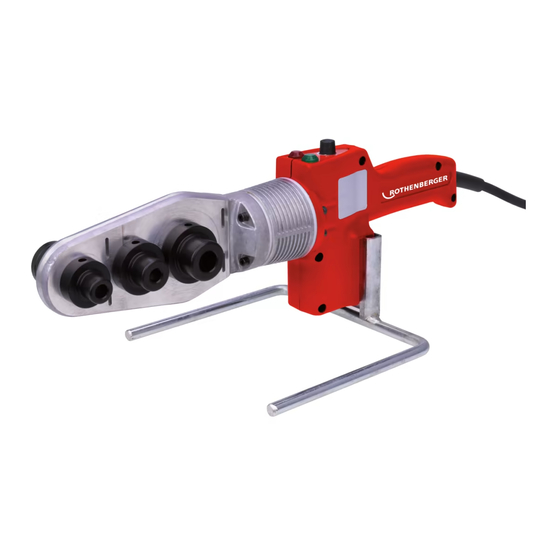
    Hinweise zur Sicherheit Bestimmungsgemäße Verwendung Das MUFFENSCHWEISSGERÄT SOCKET WELDER P63-S6 dient zum überlappenden Ver- schweißen von Kunststoffrohren und Formstücken aus PE, PP, PB und PVDF im Werkstatt- und Baustelleneinsatz. Vergewissern Sie sich, dass die Personen, die das Muffenschweißgerät verwenden, die dafür erforderlichen Voraussetzungen und Fähigkeiten besitzen.
  • Seite 6 Ein Moment der Unachtsamkeit beim Gebrauch des Elektrowerkzeuges kann zu ernsthaften Verletzungen führen. b) Tragen Sie persönliche Schutzausrüstung und immer eine Schutzbrille. Das Tragen persönlicher Schutzausrüstung, wie Staubmaske, rutschfeste Sicherheitsschuhe, Schutz- helm oder Gehörschutz, je nach Art und Einsatz des Elektrowerkzeuges, verringert das Ri- siko von Verletzungen.
  • Seite 7: Spezielle Sicherheitshinweise

    Spezielle Sicherheitshinweise Stellen Sie die Verwendung der korrekten Spannung sicher. Verwenden Sie die auf dem Typen- schild der Haupteinheit bzw. in der Gebrauchsanweisung angegebene Spannung. Weicht die Spannung von dieser Vorgabe ab, kann es zu Überhitzung, Rauchbildung oder Brand kommen. Das Gerät darf nur an das Stromnetz angeschlossen und zum Schweißen verwendet werden, wenn es mit dem Tischklemmstück an der Werkbank fixiert wird.
  • Seite 8: Vorbereiten Des Muffenschweißgeräts

    Reinigen Sie den zu verschweißenden Bereich und die Heizbuchsen und -dorne mit Zellulosepapier, das Sie mit Isopropylalkohol befeuch- ten. Kennzeichnen Sie die Einstecktiefe am Rohr. Die zu verschweißenden Flächen müssen unmittelbar vor dem Schweißvorgang behan- delt werden. Schützen Sie die Flächen vor Witterungseinflüssen. 3.2.2 Vorbereiten des Muffenschweißgeräts Befestigen Sie das Schweißgerät.
  • Seite 9 Vergewissern Sie sich vor der Befestigung von Buchsen und Dornen an der Heizplatte, dass diese kalt und nicht an das Stromnetz angeschlossen ist. Schließen Sie das Gerät an das Stromnetz an (230V/110V) an. Überprüfen Sie, ob sich beim Einschalten des Gerätes die Be- triebsanzeige-Kontrollleuchte (rot) einschaltet.
  • Seite 10: Schweißvorgang

    3.2.3 Schweißvorgang Dieser besteht aus vier Phasen: Erhitzen, Zusammenbau (Umstellen), Schmelzen und Abküh- len. Erhitzen: Stecken Sie mit leichtem Druck zugleich das Rohr auf die Heiz- buchse und das Formstück auf den Heizdorn. Lassen Sie Rohr und Formstück während der in der Tabelle 2 angegebenen Zeit (ANWÄRMZEIT) auf den Heizelementen.
  • Seite 11: Außerbetriebnahme

    Rohr Anwärmzeit Max. Wechsel- Schmelzzeit Abkühlzeit zeit (min) Durchmesser Fase (mm) (mm) Tabelle 2, Zeitangaben für den Schweißprozess von PP-Rohren 3.2.4 Außerbetriebnahme Wenn Sie das Gerät nicht mehr verwenden, sollten Sie es vor der Aufbewahrung ausschalten und abkühlen lassen. Bewahren Sie es sorgfältig und an einem trockenen Ort, außerhalb der Reichweite von Kindern und unter Verschluss auf.
  • Seite 12: Zubehör

    053896X ROWELD P63-S6 Elektronisch: 053897X ROWELD P63-S6 Thermostatisch: Kundendienst Die ROTHENBERGER Kundendienst-Standorte stehen zur Verfügung, um Ihnen zu helfen (sie- he Liste im Katalog oder online), und Ersatzteile und Kundendienst werden durch dieselben Standorte angeboten. Bestellen Sie Ihre Zubehör- und Ersatzteile bei Ihrem Fachhändler oder online über RoService+: Telefon: + 49 (0) 61 95/ 800 –...
  • Seite 13 Contents Page Safety Notes ........................12 Intended use ........................12 General Power Tool Safety Warnings ................12 Special safety instructions ....................13 Technical Data ........................14 Function of the Unit ......................14 Overview (A) ........................14 Operating instructions ...................... 14 3.2.1 Preparing the tube ......................
  • Seite 14: Safety Notes

    Safety Notes Intended use The SOCKET WELDER P63-S6 has been designed to weld tubes and accessories made of PE, PP, PB and PVDF, both in the workshop and on worksites. Ensure that the persons that use this equipment have the necessary attitudes and aptitudes. Do not use the socket welding device in any way except that described in this instruction manu- General Power Tool Safety Warnings WARNING!
  • Seite 15: Special Safety Instructions

    d) Remove any adjusting key or wrench before turning the power tool on. A wrench or a key left attached to a rotating part of the power tool may result in personal injury. e) Do not overreach. Keep proper footing and balance at all times. This enables better control of the power tool in unexpected situations.
  • Seite 16: Technical Data

    Technical Data Voltage ............230 V AC/ 115 V AC Power/ Current ..........Nominal power = 800 W Frequency: ..........50/60 Hz Working range ..........Ø 20-63 mm Temperature range ........max. 330 ºC Dimensions: ..........475 x 359 x 110 mm Weights: P63-S6 Thermostatic ........
  • Seite 17: Preparing The Socket Welding Device

    The surfaces to be welded must be cleaned immediately before welding. Protect the surfaces from weather conditions. 3.2.2 Preparing the socket welding device Mount the socket welding device. Mounting using the G-clamp The socket welding device is supplied with a G-clamp that can be used to attach it firmly to a workbench.
  • Seite 18: The Welding Process

    SOCKET WELDER P63-S6 Thermostatic Model The thermostat-controlled model has 6 position for the regulator knob: 0 Off 6 Working position SOCKET WELDER P63-S6 Electronic Model The SOCKET WELDER P63-S6 Electronic Model has a temperature scale marked from 200 ° C to 300 ° C: 260 °...
  • Seite 19: Shut-Down

    Assembly: Remove the tube and the accessory from the adapters. Without rotating them, introduce the tube into the accessory until the weld-length mark is reached. This operation should be carried out as quickly and carefully as possible, within the time (MAX AS- SEMBLY TIME) shown in Table 2.
  • Seite 20: Care And Maintenance

    053897X ROWELD P63-S6 Thermostatic: Customer service The ROTHENBERGER service locations are available to help you (see listing in catalog or on- line) and replacement parts and service are also available through these same service locations. Order your accessories and spare parts from your specialist retailer or using RoService+ online: Phone: + 49 (0) 61 95 / 800 –...
  • Seite 21: Disposal

    Disposal Components of the unit are recyclable material and should be put to recycling. For this purpose registered and certified recycling companies are available. For an environmental friendly dispos- al of the non-recyclable parts (e.g. electronic waste) please contact your local waste disposal authority.
  • Seite 22 Table des matières Page Consignes de sécurité......................21 Utilisation conforme aux dispositions ................21 Avertissements de sécurité généraux pour l’outil .............. 21 Instructions de sécurité ....................22 Données techniques ......................23 Fonctionnement de l'appareil .................... 23 Vue d'ensemble (A) ......................23 Instructions de service ......................
  • Seite 23: Consignes De Sécurité

    Consignes de sécurité Utilisation conforme aux dispositions Le POLYFUSEUR SOCKET WELDER P63-S6 a été conçu pour souder des tuyauteries et ac- cessoires en PE, PP, PB et PVDF, en atelier tout comme sur chantier. Assurez-vous que le personnel qui utilise le polyfuseur possède les attitudes et aptitudes néces- saires à...
  • Seite 24: Instructions De Sécurité

    d’inattention lors de l’utilisation de l’appareil peut entraîner de graves blessures sur les per- sonnes. b) Portez des équipements de protection. Portez toujours des lunettes de protection. Le fait de porter des équipements de protection personnels tels que masque anti-poussières, chaussures de sécurité...
  • Seite 25: Données Techniques

    Ne connectez l'appareil qu'au réseau et n'effectuez de soudure qu'une fois l'appareil fixé avec la mâchoire au plan de travail. Les pieds de l'appareil servent à la manipulation de celui-ci à froid, avant la fixation de la mâchoire et la connexion au réseau. Ne touchez pas les fiches avec les mains mouillées.
  • Seite 26: Préparation Du Polyfuseur

    Nettoyez la zone à souder et les matrices à l’aide de papier cellulo- sique humecté d’isopropanol. Marquez la profondeur de soudage sur le tube. Les surfaces à souder doivent être traitées immédiatement avant le soudage. Protéger les surfaces contre les influences climatologi ques. 3.2.2 Préparation du polyfuseur Fixes le polyfuseur.
  • Seite 27 Pour fixer les matrices à la plaque chauffante, assurez-vous que la plaque est froide et que l'appareil n'est pas connecté au réseau. Connectez l’équipement au réseau (230V/110V). Assurez-vous que la LED de mise en marche (rouge) s’allume après avoir connecté l’appareil. Sélectionnez la température de travail à...
  • Seite 28: Opérations De Soudage

    3.2.3 Opérations de soudage Le procédé de soudage comporte quatre opérations : chauffe, assemblage (changement), fusion et refroidissement. Chauffe: Exercer une légère pression pour introduire en même temps le tube et l’accessoire dans leurs matrices correspondantes (le tube dans la matrice femelle et l’accessoire dans la matrice mâle). Maintenez le tube et l’accessoire dans les matrices pendant la durée (T CHAUFFE) indiquée au Tableau 2.
  • Seite 29: Mise Hors Service

    Tube T Chauffe T max. T Fusion T Refroidissement (sec) Changement (sec) (min) DIAMÈTRE ÉPAISSEUR (mm) (mm) (sec) Tableau 2, durées des opérations de soudage de tuyauteries en PP 3.2.4 Mise hors service Lorsque l’appareil ne doit pas être utilisé, il est conseillé de l’éteindre et de le laisser refroidir avant de le ranger.
  • Seite 30: Accessoires

    053897X ROWELD P63-S6 Thermostatic: Service à la clientèle Les centres de service clientèle ROTHENBERGER sont disponibles pour vous aider (voir la liste dans le catalogue ou en ligne) et pour le remplacement des pièces, ainsi que pour la révision. Commandez vos accessoires et pièces de rechange auprès de votre revendeur spécialisé ou RoService+ online: Téléphone: + 49 (0) 61 95 / 800 –...
  • Seite 31 Índice Página Indicaciones de seguridad ....................30 Utilización exclusiva con los fines especificados .............. 30 Advertencias de peligro generales para herramientas eléctricas ........30 Instrucciones relativas a la seguridad ................32 Datos técnicos ........................32 Función del aparato ......................32 Vista general (A) ......................
  • Seite 32: Indicaciones De Seguridad

    Indicaciones de seguridad Utilización exclusiva con los fines especificados El POLIFUSOR SOCKET WELDER P63-S6 ha sido diseñado para soldar tuberías y accesorios, de PE, PP, PB y PVDF, tanto en taller como en obra. Asegúrese de que el personal que utilice el polifusor presente las actitudes y aptitudes necesarias para ello.
  • Seite 33 consumido alcohol, drogas o medicamentos. El no estar atento durante el uso de una herramienta eléctrica puede provocarle serias lesiones. b) Utilice un equipo de protección y en todo caso unas gafas de protección. El riesgo a lesionarse se reduce considerablemente si, dependiendo del tipo y la aplicación de la herramienta eléctrica empleada, se utiliza un equipo de protección adecuado como una mascarilla antipolvo, zapatos de seguridad con suela antideslizante, casco, o protectores auditivos.
  • Seite 34: Instrucciones Relativas A La Seguridad

    Instrucciones relativas a la seguridad Asegúrese de utilizar la tensión correcta. Utilice la tensión indicada en la placa de características de la unidad principal o en el manual de instrucciones. Si la tensión es distinta de la indicada, se pueden producer sobrecalentamientos, humos o incendios. El equipo solamente se debe conectar a la red eléctrica y soldar con él una vez que el equipo esté...
  • Seite 35: Preparación Del Polifusor

    Limpiar la zona a soldar y las matrices con papel celulósico humedecido en isopropanol. Marcar en el tubo la profundidad de soldadura. Las superficies a soldar deben ser tratadas inmediatamente antes de la soldadura. Proteger las superficies de las influencias climáticas. 3.2.2 Preparación del polifusor Fije el polifusor.
  • Seite 36: Proceso De Soldadura

    Para fijar las matrices a la placa calefactora asegúrese de que el la placa está fría y que el aparato no se encuentra conectado a red. Conecte el equipo a la red (230V/110V). Compruebe que se enciende el LED de encendido (rojo) al conectar el aparato.
  • Seite 37 Calentamiento: Con una ligera presión, inserte al mismo tiempo el tubo y el accesorio en sus matrices correspondientes (tubo en matriz- hembra, accesorio en matriz macho. Mantenga el tubo y el accesorio en las matrices durante el tiempo (T CALENTAMIENTO) indicado en la Tabla 2. Ensamblaje (cambio): Extraiga el tubo y el accesorio de sus matrices.
  • Seite 38: Puesta Fuera De Servicio

    En caso de que esto puntos estén correctos y el aparato no funcione bien contacte con su rep- resentante o distribuidor local. Accesorios Nombre del accesorio Número de pieza de ROTHENBERGER Matrices 20 mm ROWELD P63-S6 therm. 53511 Matrices 25 mm ROWELD P63-S6 therm.
  • Seite 39: Atención Al Cliente

    Atención al cliente Los puntos de servicio de ROTHENBERGER (consulte la lista en el catálogo o en internet) están a su disposición para ayudarle y ofrecerle piezas de repuesto y servicio técnico. Para realizar el pedido de accesorios y piezas de repuesto, acuda a su distribuidor especializado o utilice RoService+ online: Teléfono:...
  • Seite 40 Contenuto Pagina Istruzioni sulla sicurezza ....................39 Uso conforme ........................39 Avvertenze generali di pericolo per elettroutensili ............. 39 Istruzione speciale di Safty ....................41 Dati tecnici .......................... 41 Funzionamento dell'attrezzo ....................41 Panoramica (A) ........................ 41 Istruzioni di funzionamento ....................41 3.2.1 Preparazione del tubo ......................
  • Seite 41: Istruzioni Sulla Sicurezza

    Istruzioni sulla sicurezza Uso conforme IL POLIFUSORE SOCKET WELDER P63-S6 è stato progettato per saldare tubazioni ed acces- sori di PE, PP, PB e PVDF, sia in officina che in cantiere. Assicurarsi che il personale che utilizza il polifusore presenti la preparazione e la disposizione necessarie.
  • Seite 42 b) Indossare sempre equipaggiamento protettivo individuale, nonché guanti protettivi. Se si avrà cura d’indossare equipaggiamento protettivo individuale come la maschera anti- polvere, la calzatura antisdrucciolevole di sicurezza, il casco protettivo o la protezione dell’udito, a seconda dell’impiego previsto per l’utensile elettrico, si potrà ridurre il rischio di ferite.
  • Seite 43: Istruzione Speciale Di Safty

    Istruzione speciale di Safty Assicurarsi di utilizzare la tensione corretta. Utilizzare la tensione specificata nella targhetta in- dicatrice dell’unità principale o nel manuale delle istruzioni. Se si utilizza una tensione diversa da quella indicata, si possono verificare surriscaldamento, fumo o incendio. Collegare la macchina alla rete elettrica, e procedere alla saldatura soltanto dopo averla fissata con il morsetto al piano di lavoro.
  • Seite 44: Preparazione Del Polifusore

    Pulire l’area di saldatura e le matrici con carta cellulosica inumidita con isopropanolo. Marcare nel tubo la profondità di saldatura. Le superfici da saldare devono essere trattate subito prima della saldatura. Proteggere le superfici dagli agenti atmosferici. 3.2.2 Preparazione del polifusore Fissare il polifusore.
  • Seite 45: Processo Di Saldatura

    Per fissare le matrici alla piastra riscaldante, assicurarsi che la piastra sia fredda e che la macchina non sia collegata alla rete. Collegare il dispositivo alla rete elettrica (230V/110V). Assicurarsi che, collegando il dispositivo, si accenda il LED di accensione (rosso). Selezionare la temperatura di lavoro con la manopola di regolazione.
  • Seite 46 Riscaldamento: Con una leggera pressione, inserire contemporaneamente il tubo e l’accessorio nelle matrici corrispondenti (il tubo nella matrice femmina e l’accessorio nella matrice maschio). Mantenere il tubo e l’accessorio nelle matrici per il tempo (T RISCALDAMENTO) indicato nella Tabella 2. Assemblaggio (sostituzione): Estrarre il tubo e l’accessorio dalle rispettive matrici.
  • Seite 47: Messa Fuori Servizio

    • Il comando di selezione della temperatura si trova nella posizione corretta Se tali punti risultano corretti ma il dispositivo non funziona, contattare il proprio rappresentante o il distributore di zona. Accessori Nome accessorio Numero componente ROTHENBERGER Matrici 20 mm ROWELD P63-S6 therm. 53511 Matrici 25 mm ROWELD P63-S6 therm. 53512 Matrici 32 mm ROWELD P63-S6 therm.
  • Seite 48: Servizio Clienti

    Servizio clienti I centri di assistenza ROTHENBERGER sono disponibili per darvi supporto (vedere listino sul catalogo oppure online) fornendovi inoltre ricambi e assistenza tecnica. Ordinate gli accessori e i ricambi presso il vostro rivenditore di fiducia oppure il RoService+ onli- Telefono: + 49 (0) 61 95 / 800 –...
  • Seite 49 Índice Página Indicações sobre a segurança ................... 48 Utilização correcta ......................48 Indicações gerais de advertência para ferramentas eléctricas .......... 48 Instruções de segurança ....................50 Dados técnicos ........................50 Função do aparelho ......................50 Vista geral (A) ........................50 Instruções de funcionamento....................
  • Seite 50: Indicações Sobre A Segurança

    Indicações sobre a segurança Utilização correcta A MÁQUINA DE SOLDAR SOCKET WELDER P63-S6 foi concebida para soldar tubagens e acessórios, de PE, PP, PB e PVDF, tanto em oficinas como em obras. Certifique-se de que o pessoal que utiliza esta máquina de soldar tem presentes as atitudes e aptidões necessárias para a sua utilização.
  • Seite 51 b) Usar um equipamento pessoal de protecção. Sempre utilizar um óculos de protecção. Equipamento de segurança, como por exemplo, máscara de protecção contra pó, sapatos de segurança anti-derrapantes, capacete de segurança ou protecção auricular, de acordo com o tipo e aplicação da ferramenta eléctrica, reduzem o risco de lesões. c) Evitar uma colocação em funcionamento involuntária.
  • Seite 52: Instruções De Segurança

    Instruções de segurança Certifique-se de que utiliza a tensão correcta. Utilize a tensão indicada na sinalética de características da unidade principal ou no manual de instruções. Se a tensão for diferente da indicada, podem ocorrer sobreaquecimento, fumo ou incêndio. O aparelho só deve ser ligado à rede eléctrica e só o deve utilizar para soldar assim que o aparelho estiver fixo com um grampo à...
  • Seite 53: Preparação Da Máquina De Soldar

    Limpar a zona a soldar e os adaptadores com papel celulósico humedecido em isopropanol. Marcar no tubo a profundidade da soldadura. As superfícies a soldar devem ser tratadas imediatamente antes da soldadura. Proteger as superfícies das influências climatéricas. 3.2.2 Preparação da máquina de soldar Monte a máquina de soldar.
  • Seite 54: Processo De Soldadura

    Para fixar as matrizes à placa de aquecimento certifique-se de que a placa está fria e que o aparelho não está ligado à rede. Ligue o equipamento à corrente (230V/110V). Comprove que o LED de funcionamento (vermelho) está aceso quando ligar o aparelho. Seleccione a temperatura de trabalho com o botão regulador.
  • Seite 55 Aquecimento: Com uma ligeira pressão, introduza ao mesmo tempo o tubo e o acessório nos adaptadores correspondentes (tubo no adaptador fêmea, acessório no adaptador macho). Mantenha o tubo e o acessório nos adaptadores durante o tempo (T AQUECIMENTO) indicado na Tabela 2. Montagem (troca): Extraia o tubo e o acessório dos adaptadores.
  • Seite 56: Colocação Fora De Serviço

    No caso de estes pontos estarem correctos e de o aparelho não funcionar bem, contacte o representante ou distribuidor local. Acessórios Nome do acessório Número de peça da ROTHENBERGER Adaptadores 20 mm ROWELD P63-S6 therm. 53511 Adaptadores 25 mm ROWELD P63-S6 therm.
  • Seite 57: Serviço De Apoio Ao Cliente

    Serviço de apoio ao cliente As instalações de assistência da ROTHENBERGER estão disponíveis para ajudá-lo (consulte a lista no catálogo ou online). Estas instalações de assistência colocam também ao seu dispor peças de substituição e assistência. Encomende os seus acessórios e peças sobresselentes a um revendedor especialista ou de RoService+ online: Telefone: + 49 (0) 61 95 / 800 –...
  • Seite 58 Content Stránky Upozornění k bezpečnosti ....................57 Určený způsob použití ...................... 57 Všeobecná varovná upozornění pro elektronářadí............57 Zvláštní bezpečnostní pokyny ..................58 Technické údaje ........................59 Funkce zařízení ........................59 Přehled A ......................... 59 Návod k obsluze ....................... 59 3.2.1 Příprava trubky .........................
  • Seite 59: Upozornění K Bezpečnosti

    Upozornění k bezpečnosti Určený způsob použití POLYFÚZNÍ SVÁŘEČKA SOCKET WELDER P63-S6 slouží pro spojování plastových trubek a tvarovek z PE, PP, PB a PVDF v dílně i na stavbě. Ujistěte se, že osoby, které polyfúzní svářečku používají, disponují pro tento účel požadovanými předpoklady a schopnostmi.
  • Seite 60: Zvláštní Bezpečnostní Pokyny

    akumulátor. Máte-li při nošení stroje prst na spínači nebo pokud stroj připojíte ke zdroji proudu zapnutý, pak to může vést k úrazům. d) Než stroj zapnete, odstraňte seřizovací nástroje nebo šroubovák. Nástroj nebo klíč, který se nachází v otáčivém dílu stroje, může vést k poranění. e) Vyvarujte se abnormálního držení...
  • Seite 61: Technické Údaje

    Technické údaje Napětí ............230 V AC/ 115 V AC Příkon – intenzita el. proudu ......jmenovitý výkon = 800 W Frekvence ........... 50/60 Hz Ø 20-63 mm Pracovní rozsah .......... Tepelný rozsah ..........max. 330 ºC Rozměry ............475 x 359 x 110 mm Hmotnosti: P63-S6 Thermostatic ........
  • Seite 62: Příprava Svářečky

    Svařované plochy je bezprostředně před svařováním nutné ošetřit. Svařované plochy chraňte před povětrnostními vlivy. 3.2.2 Příprava svářečky Připojte svařovací stroj. Fixace pomocí svěrky pro připevnění ke stolu Společně se svářečkou je dodávána svěrka pro její bezpečné a stabilní upevnění k pracovnímu stolu. Zasuňte horní...
  • Seite 63: Svařování

    Model SOCKET WELDER P63-S6 Thermostatic Termostaticky regulovatelný model s 6 možnými nastaveními: 0 OFF 6 provozní poloha Model SOCKET WELDER P63-S6 Electronic Elektronicky regulovatelný model má tepelnou stupnici 200 ° C až 300 ° C: 260° C - 280° C - provozní poloha Ujistěte se, že svářečka dosáhla pracovní...
  • Seite 64: Odstavení Z Provozu

    Přestavění: Stáhněte trubku a tvarovku trhavým pohybem z topných prvků. Zasuňte oba díly ihned (bez pootáčení) do sebe až po rysku. Tato pracovní operace musí být provedena maximálně rychle a pečlivě a nesmí trvat déle než dobu uvedenou v tabulce 2 (MAX. DOBA PŘESTAVĚNÍ) Spojování: Spojení...
  • Seite 65: Péče A Údržba

    Je-li na tyto dotazy možné odpovědět kladně a svářečka přesto nefunguje správně, informujte svého zástupce nebo lokálního specializovaného prodejce. Příslušenství Název příslušenství Číslo dílu ROTHENBERGER Nahřívací trny 20 mm ROWELD P63-S6 s term. regulací 53511 Nahřívací trny 25 mm ROWELD P63-S6 s term. regulací...
  • Seite 66: Zákaznické Služby

    Zákaznické služby K dispozici je síť servisních středisek společnosti ROTHENBERGER, která vám poskytnou potřebnou pomoc a jejichž prostřednictvím jsou rovněž dodávány náhradní díly a zajišťovány servisní zásahy (viz seznam v katalogu nebo na webových stránkách). Příslušenství a náhradní díly můžete objednávat prostřednictvím svého specializovaného prodejce nebo RoService+ online služeb:...
  • Seite 67 NOTES...
  • Seite 68 Industrial Zone, Shanghai 201611, China export@rothenberger.es • www.rothenberger.es Tel. + 86 21 / 67 60 20 61 • + 86 21 / 67 60 20 67 Fax + 86 21 / 67 60 20 63 • office@rothenberger.cn ROTHENBERGER Sweden AB Sweden Hemvärnsgatan 22 •...

Inhaltsverzeichnis