Herunterladen Inhalt Inhalt Diese Seite drucken
Husqvarna TS 400 F Betriebs- Und Wartungsanleitung

Husqvarna TS 400 F Betriebs- Und Wartungsanleitung

Vorschau ausblenden Andere Handbücher für TS 400 F:

Werbung

Verfügbare Sprachen
  • DE

Verfügbare Sprachen

  • DEUTSCH, seite 33
FR
Manuel d'utilisation et d'entretien
GB
Operator's manual
DE
Betriebs- und Wartungsanleitung
IT
Manuale di istruzioni
ES
Manual de explicaciones
NL
Gebruiksaanwijzing
SE
Drift- och underhållshandbok
PT
Manual de instrucões
HUSQVARNA CONSTRUCTION PRODUCTS
TS 400 F

Werbung

Inhaltsverzeichnis
loading

Inhaltszusammenfassung für Husqvarna TS 400 F

  • Seite 1 Manuel d’utilisation et d’entretien Operator’s manual Betriebs- und Wartungsanleitung Manuale di istruzioni Manual de explicaciones TS 400 F Gebruiksaanwijzing Drift- och underhållshandbok Manual de instrucões HUSQVARNA CONSTRUCTION PRODUCTS...
  • Seite 2 DECLARATION CONFORMITY WITH DIRECTIVES EUROPEENNES EUROPEAN DIRECTIVES HUSQVARNA CONSTRUCTION PRODUCTS, 433 81 HUSQVARNA CONSTRUCTION PRODUCTS, 433 81 Partille, Sweden, déclare que la machine TS400F est Partille, Sweden, herewith declares that the machine conforme aux dispositions des DIRECTIVES : TS400F conforms to the DIRECTIVES : "MACHINES"...
  • Seite 3 FR -Informations Concernant L’environnement GB - Environmental Information Le symbole sur le produit ou sur son emballage indique The symbol on the product or on its packaging indicates que ce produit ne doit pas être traité comme déchet ménager. that this product may not be treated as household waste. Il doit obligatoirement être déposé...
  • Seite 7 230V...
  • Seite 8 400V...
  • Seite 9: Consignes Générales De Sécurité

    PRÉFACE DU MANUEL Avant de quitter notre usine, chaque machine subit une série de contrôles au cours desquels tout est minu- tieusement vérifié. La stricte observation de nos instructions assurera à votre machine, dans des conditions normales de tra- vail, une grande longévité. Les conseils d’utilisation et pièces détachées figurant sur ce document sont donnés à...
  • Seite 10: Consignes Particulières

    Ce symbole signifie que la machine est • Outils : Disques Diamantés à Eau Ø 300 / 350 / 400 mm(D) - alésage conforme à la directive européenne. 25,4mm (AL). (Renseignements auprès de votre fournisseur habituel) CONSIGNES PARTICULIÈRES Lame de scie Disque carbo Conçue pour assurer un service sûr et fiable dans des conditions d’utilisation conformes aux instruc-...
  • Seite 11 Contrôle - Description de la machine BLOCAGE TABLE POUR TRANSPORT ( VOIR FIG 4 ) • A réception, contrôler l’état de votre machine. • La conserver en permanence en bon état de pro- PLIAGE DES PIEDS ( VOIR FIG 5 ) preté.
  • Seite 12: Sécurité Électrique

    - Utiliser des prises de courant mono- Montage du disque phasé du type 2 P + T, ou 3 P + T / 3 P + N + T suivant tensions corres- Débrancher la tronçonneuse en désac- pondantes. couplant la fiche d’alimentation. •...
  • Seite 13: Recherche Des Pannes

    RECHERCHE DES PANNES Méthode de coupe En cas de fonctionnement anormal, se reporter Coupes droites(VOIR FIG 14) aux tableaux ci-après pour trouver une solution ≤ 570 mm : la butée de fin de course (C) per- aux problèmes rencontrés. met d’éviter le coincement des doigts entre •...
  • Seite 14 Réglages Réparation Nous sommes à votre entière disposi- • La machine étant réglée en nos ateliers, aucun tion pour vous assurer toute réparation réglage n’est nécessaire. dans les délais les plus réduits et aux meilleurs prix (voir adresse au verso). •...
  • Seite 15: Istruzioni Generali Di Sicurezza

    PREFAZIONE DEL MANUALE Prima di lasciare la nostra fabbrica, ciascuna macchina viene sottoposta a una serie di controlli durante i quali si procede ad un'accurata verifica di tutti i componenti. Il rigoroso rispetto delle nostre istruzioni assicura una notevole durabilità alla Vostra macchina in condizioni normali di lavoro.
  • Seite 16: Istruzioni Speciali

    Questo simbolo indica che la macchina • Attrezzi : Dischi diamantati ad è conforme alla direttiva europea acqua Ø 300 mm - Ø 350 mm, ale- satura 25,4xm (AL) (informazioni disponibili presso il Vostro fornitore abituale). ISTRUZIONI SPECIALI Lama di sega Disco carbone Progettata per assicurare un servizio sicuro ed affidabile in condizioni d'utilizzo conformi alle istru-...
  • Seite 17 Movimentazione - Trasporto Controllo - Descrizione della macchina La macchina può essere scomposta in tre parti. • Al ricevimento della macchina, controllare lo stato della stessa. PARTE DELLA TESTA ( VEDI FIG 2 ) • Conservarla permanentemente in un perfetto •...
  • Seite 18: Messa In Servizio

    - Utilizzare prese di corrente monofase Montaggio del disco di tipo 2 P + T, o 3xPx+xT / 3xPx+xNx+xT a seconda delle relati- Mettere fuori tensione la troncatrice ve tensioni. staccando la spina d'alimentazione. • Togliere i due volani (A), quindi il carter di prote- zione (VEDI FIG 9).
  • Seite 19: Ricerca Guasti

    Metodo di taglio • La macchina non funziona CAUSE RIMEDI Tagli dritti (VEDI FIG. 14) ≤ 570 mm: l'arresto del finecorsa (c) permette Allacciamento scorret- - Verificare il corretto di evitare lo schiacciamento delle dita tra la to o cavo danneggiato allacciamento dell'ali- tavola ed il telaio (VEDI FIG.
  • Seite 20: Pezzi Di Ricambio

    Regolazioni Riparazioni Siamo a Vostra completa disposizione • La macchina essendo regolata nelle nostre offi- per garantir Vi qualsiasi riparazioni nei cine, nessuna regolazione è necessaria. tempi più brevi e ai prezzi migliori (vedere l'indirizzo sul retro). • Tuttavia in caso di urti, di allentamento della bul- loneria, di manovre brusche durante l'inclinazio- ne della testa, agire sulle viti di arresto (D) e veri- ficare l'apertura angolare (per tagli rettilinei) .
  • Seite 21: Consignas Generales De Seguridad

    PREFACIO DEL MANUAL Antes de abandonar nuestra fábrica, cada máquina pasa por una serie de controles durante los cuales se verifica todo minuciosamente. El estricto cumplimiento de nuestras instrucciones garantizará a su máquina una gran longevidad, en condi- ciones normales de trabajo. Los consejos de utilización y las piezas sueltas que figuran en este documento se indican a título de infor- mación y no de compromiso .
  • Seite 22 Este anagrama certifica que la máqui- • Herramientasv : Discos Diamantados na cumple la normativa europea. al agua Ø 300 mm - Ø 350 mm (D) - Ø interior 25,4 mm (AL) (Informaciones disponibles en su pro- veedor habitual). CONSIGNAS PARTICULARES Hoja de sierra Disco carbo Diseñado para efectuar un servicio seguro y fiable...
  • Seite 23 Control - Descripción de la máquina BLOQUEO MESA PARA TRANSPORTE (VEASE FIG 4) Comprobar el estado de la máquina en el momento de su recepción. PLEGADO DE LOS PIES (VEASE FIG 5) • Conservarla constantemente en buen estado de lim- pieza •...
  • Seite 24: Montaje Del Disco

    - Utilizar tomas de corriente monofási- Montaje del disco tipo 3xPx+xTx/x3xPx+xNx+xT según las Desenchufar el cortador desacoplando tensiones correspondientes. el enchufe de alimentación. • Retirar los dos volantes (A) y después el cárter de protección (B) (VEASE FIG 9). La tuerca de apriete del disco tiene - Cable prolongador: cable de sección suficiente un roscado con paso a la izquierda.
  • Seite 25: Busqueda De Averias

    • La máquina no funciona Método de corte CAUSAS SOLUCIONES • Cortes rectos (VEASE FIG 14) ≤ 570 mm : el tope de fin de carrera (C) per- Conexión incorrecta o - Comprobar que la mite evitar el trizamiento de los dedos entre cable deteriorado conexión a la alimen- la mesa y el bastidor (VEASE FIG 15).
  • Seite 26 Ajustes Reparaciones Estamos a su entera disposición para • Dado que la máquina ha sido ajustada en nues- asegurarle todas las reparaciones en tros talleres, no es necesario efectuar ningún el plazo más breve posible, y a los ajuste. mejores precios (ver dirección al rever- so).
  • Seite 27: Preface To The Manual

    PREFACE TO THE MANUAL Before leaving our factory every machine passes an exacting inspection programme in which everything is checked minutely. Following the instructions will ensure that your machine gives long service, in normal operating conditions. The user advice and spare parts mentioned in this document are given as an indication, and do not consti- tute an undertaking.
  • Seite 28: Special Instructions

    This symbol indicates that the machine • Tools : Water lubricated diamond is in conformance with the applicable disc diameter 300 mm - diameter European directive. 350xmm (D)- bore 25.4 mm (AL). (Information from your usual sup- plier). SPECIAL INSTRUCTIONS Saw blade Carborundum disc...
  • Seite 29 Inspection-Description of the machine BLOCKING TABLE FOR TRANSPORTATION (SEE FIG 4) • On receiving the machine check its condition. • Always keep it perfectly clean. FOLDING THE FEET (SEE FIG 5) • Check the supply cable lead periodically. • Always keep alert when working. •...
  • Seite 30: Electrical Safety

    - Use the following types of plug, single Fitting the disc phase 2 P + E, or 3xPx+xE / 3xPx+xNx+xE according to the cor- Disconnect the machine by unplugging responding voltage. the supply cable. • Remove the two screw knobs (A) and the pro- tective case (B) (SEE FIG 9).
  • Seite 31: Fault Finding

    Cutting method • The machine does not work CAUSES REMEDIES • Straight cuts (SEE FIG 14) ≤ 570 mm : the stop (C) prevents fingers Not plugged in proper- - Make sure that the being trapped between the table and the ly or cable damaged supply is correctly frame (SEE FIG 15).
  • Seite 32 Adjustments Repairs Contact your supplier who is entirely at • The machine is set before leaving the factory your service to carry out repairs in the and no adjustment is necessary. shortest time at the best possible price. • However, after shocks, loosening of nuts and bolts, or sharp movements when tilting the head, if necessary adjust the stop screws(D) and check the squareness (for straight cuts) .
  • Seite 33: Einleitung Zu Diesem Handbuch

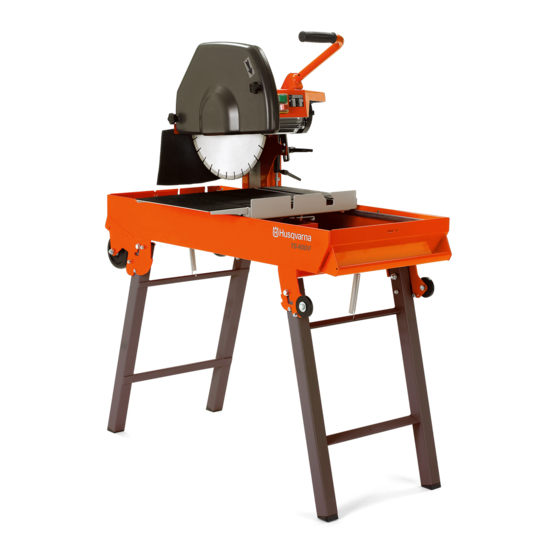
    EINLEITUNG ZU DIESEM HANDBUCH Vor dem Verlassen unseres Werkes hat jede Maschine eine Reihe von Prüfungen erfolgreich bestanden, bei denen die gesamte Anlage bis ins Detail getestet wird. Die genaue Befolgung unserer Anweisungen gewährleistet unter normalen Arbeitsbedingungen Ihrer Maschine lange Lebensdauer. Die in vorliegendem Handbuch aufgeführten Einsatzhinweise und Ersatzteilreferenzen stellen Richtangaben dar, die eine Haftungspflicht unsererseits ausschließen.
  • Seite 34 Dieses Symbol bedeutet, daß die • W e r k z e u g b e s t ü c k u n g : Diamantscheiben zum Naßschneiden Ø Maschine den europäischen Richtlinien 300 mm - 350 mm (D)- Bohrung 25,4 entspricht.
  • Seite 35: Tischblockierung Für Den Transport

    Zustandsüberprüfung - TISCHBLOCKIERUNG FÜR DEN TRANSPORT Beschreibung der Maschine (SIEHE ABB 4) • Bei Erhalt Maschinenzustand prüfen. EINKLAPPEN DER FÜSSE (SIEHE ABB 5) • In sauberem, ordnungsgemäßen Zustand halten. • Stromkabel regelmäßig prüfen. TRANSPORT (SIEHE ABB 6) • Während der Arbeit immer aufmerksam bleiben. •...
  • Seite 36: Elektrische Absicherung

    - Zu verwendende Stecker: Einsetzen der Trennscheibe Monophase, Typ 2 P + Erde, oder 3xPx+xErde / 3xPx+xNx+xErde, je Trennmaschine Netz durch nach gegebener Spannung. Abziehen des Netzsteckers trennen. • Die beiden Handräder (A), anschließend die Schutzhaube (B) abnehmen (SIEHE ABB 9). Achtung, Anzugsmutter - Verlängerungskabel :...
  • Seite 37 Schnittmethode • Die Maschine funktioniert nicht URSACHE BEHEBUNG • Gerade Schnitte (SIEHE ABB 14) ≤ 570 mm : der Endschalteranschlag (C) Mangelhafter - Auf ordnungsgemä-ßen vermeidet ein Einklemmen der Finger zwi- Anschluß oder Kabel E-Anschlußachten schen Tisch und Rahmen (SIEHE ABB 15). beschädigt (Stecker, Verlän-...
  • Seite 38 Einstellungen Reparaturen Die Maschine ist werksseitig voreingestellt und Wir stehen zu Ihrer vollen Verfügung, erfordert keine Nachjustierung. um sämtliche Reparaturarbeiten zu günstigen Preisen und schnellstmögli- • Die Anschlagschraube (D) sollte jedoch nach- ch durchzuführen (siehe Adresse auf gestellt und die Winkelposition überprüft werden der Rückseite).
  • Seite 39: Algemene Veiligheidsvoorschriften

    VOORWOORD Elke machine ondergaat vóór het verlaten van onze fabriek een aantal controlebeurten waarbij alles nauw- keurig gecontroleerd wordt. Indien u onze instructies strikt naleeft, zal uw machine bij normale werkomstandigheden lang meegaan. De gebruiksaanwijzingen en de onderdelen uit deze handleiding worden ter informatie opgegeven en zijn niet bindend.
  • Seite 40 Dit symbol betekent dat de machine • Gereedschap : Diamantschijven voor overeenstemt met de betreffende waterkoeling Ø 300 mm - 350xmm (D) Europese ritchtlijn. - Cilinderdoorsnede 25,4 mm (AL). (Inlichtingen bij uw normale leveran- cier). BIJZONDERE VOORSCHRIFTEN Zaagblad De afkortmachine is zo ontworpen dat een veilige Carbide-schijf en betrouwbare werking mogelijk is, indien ze vol- gens de instructies gebruikt wordt, maar kan toch...
  • Seite 41 Controle -Beschrijving van de machine BLOKKERING TAFEL BIJ VERVOER (ZIE FIG 4) • Controleer de staat van de machine bij de inont- vangstneming. OPVOUWEN POTEN (ZIE FIG 5) • Zorg er steeds voor dat ze perfect schoon blijft. • Controleer regelmatig snoer . TRANSPORT (ZIE FIG 6) •...
  • Seite 42: Electrische Veiligheid

    - Gebruik eenfasige stekkers van het Montage van de schijf type 2 P + aarding, of 3 P + aarding / 3xPx+xN + aarding, in functie van de Haal de stekker van de afkortmachine overeenkomstige spanningen. uit het stopcontact. • Verwijder de twee wieltjes (A) en daarna het vei- ligheidscarter (B) (ZIE FIG 9).
  • Seite 43: Opsporen Van Defecten

    • De machine werkt niet Snijmethode OORZAKEN OPLOSSINGEN • Recht snijden (ZIE FIG 14) ≤ 570 mm : dankzij de aanslag (C) wordt Slechte aansluiting of - Controleer of het snoer vermeden dat vingers tussen de tafel en het beschadigd snoer goed is aangesloten frame geklemd raken (ZIE FIG 15).
  • Seite 44 Regelingen Reparatie Wij staan volledig tot uw beschikking • De machine is reeds in onze werkplaatsen om uw machine zo snel en goedkoop afgesteld en hoeft dus niet meer geregeld te mogelijk te repareren (zie adres op worden. keerzijde). • Bij schokken, het losraken van schroeven en moeren of het ruw hanteren bij het kantelen van de kop, de aanslagschroef (D) bijregelen en de haakse instelling (voor rechtlijnig snijden)
  • Seite 45: Allmänna Säkerhetsföreskrifter

    FÖRORD TILL HANDBOKEN Innan en maskin lämnar vår fabrik får den genomgå en rad kontroller varvid alla detaljer granskas noggrant. Om du alltid följer våra instruktioner kommer din maskin att under normala arbetsförhållanden uppnå en hög liv- slängd. De användningsråd och detaljbilder som ingår i denna handling är att betrakta som upplysningar och inte som bindande åtaganden.Vi påtar oss inget garantiansvar för fel eller försummelser vid handhavandet eller för ska- dor som kan hänföras till leverans, konstruktion eller användning av maskinen.
  • Seite 46: Särskilda Anvisningar

    Symbolen visar att maskinen uppfyller • Verktyg: Diamantskivor för vatten- EU-direktivet. sågning Ø 300 mm - Ø 350 mm (D) - hål 25,4 mm (AL). (Upplysningar läm- nas av närmaste återförsäljare för Diamant Boart/Target) SÄRSKILDA ANVISNINGAR Sågblad Kapsågen är konstruerad för att ge en säker och Carbo-skiva tillförlitlig drift under de användningsförhållanden som framgår av denna bruksanvisning.
  • Seite 47 Kontroll - Beskrivning av maskinen LÅSNING AV BORDET FÖR TRANSPORT (se figur 4) • Kontrollera maskinens tillstånd vid mottagningen. • Se till att maskinen alltid är väl rengjord. HOPFÄLLNING AV FÖTTERNA (se figur 5) • Kontrollera nätkabeln regelbundet. • Var alltid uppmärksam under arbetet. •...
  • Seite 48 - Använd enfas nätuttag av typ 2 poler Montering av skivan + jord eller 3 poler + jord / 3 poler + nolla + jord allt efter spänningen. Stäng av kapsågen genom att dra ur stickproppen. • Lossa de två rattarna (A) och ta bort skyddshöljet (B) (se figur 9).
  • Seite 49 FELSÖKNING Skärmetod Om maskinen inte fungerar normalt, sök då i ta- Raka skär (se figur 14). bellen nedan efter en lösning på de uppkomna - ≤ 570 mm: Ändlägesanslaget (C) förhindrar problemen. att fingrarna fastnar mellan bordet och sta- • Maskinen fungerar inte tivet (se figur 15).
  • Seite 50 Reparationer Inställningar Vi finns alltid till hands för dig för att • Maskinen har ställts in vid vår verkstad och reparera din maskin inom kortast möjliga några ytterligare inställningar behövs inte. tid och till våra bästa priser (adressen finns på baksidan). •...
  • Seite 51 PREFÁCIO DO MANUAL Antes de SAIR da nossa fábrica, cada máquina é submetida a uma série de controles durante os quais tudo é minuciosamente verificado. A estrita observância das nossas instruções garantirá à sua máquina, em condições normais de trabalho, uma grande longevidade.
  • Seite 52: Instruções Especiais

    Este símbolo significa que a máquina é • Ferramentas : Discos diamantados a conforme as normas europeias. água Ø 300 mm - Ø 350 mm (D) - Ø interior 24,5 (AL). Informações disponíveis no seu for- necedor habitual. INSTRUÇÕES ESPECIAIS Folha de Serra Disco Carbo Concebida para assegurar um serviço seguro e...
  • Seite 53 Controlo e descrição da máquina BLOQUEIO MESA PARA TRANSPORTE ( VER FIG 4 ) • Comprovar o estado da máquina no momento da recepção. FECHO DOS PÉS ( VER FIG 5 ) • Conservá-la sempre em bom estado de limpeza •...
  • Seite 54 - Utilizar tomadas de corrente monofá- Montagem do disco sica do tipo 2P+T, ou 3P+T/3P+N+T segundo as tensões correspon- Desligar completamente a máquina, dentes. mesmo da tomada. • Retirar as duas porcas (A) e de seguida o cárter de protecção (B) (VER FIG 9). A porca de aperto do disco tem rosca - EXTENSÃO : Cabo de uma secção apropriada à...
  • Seite 55 Método de corte • Mau funcionamento do máquina CAUSAS SOLUÇÕES • Cortes Rectos(VER FIG 14) ≤ 570 mm : o tope de fim do carro (C) per- Ligação incorrecta ou - Verificar se a ligação mite evitar o despedaçar dos dedos entre a cabo deteriorado à...
  • Seite 56 Ajustes Reparações Estamos ao seu inteiro dispor para • Dado de que a máquina foi ajustada na nossa assegurá-lo de todas as reparações no fábrica, não é necessários fazer nenhum tipo de curto prazo possível, e aos melhores ajuste. preços (ver direcção no verso). •...
  • Seite 59 HUSQVARNA Construction Business Group...
  • Seite 60: Warranty Certificate

    To benefit from the warranty, it is mandatory to return, within eight days after the purchase, the attached warranty certificate Pour avoir droit à la garantie, il est indispensable de Para ter direito à garantia, é indispenável enviar renvoyer dans les huit jours après l’achat, le certificat antes do oitavo dia depois da compra, o certificado de garantie ci-joint, dûment complété.
  • Seite 62 www.husqvarnacp.com 115 03 26-20 2007-01-04...

Diese Anleitung auch für:

Ts350e-02

Inhaltsverzeichnis