Crivit 14119 Bedienungs- Und Sicherheitshinweise
Led-fahrradleuchten-set
Quicklinks
LED BIKE LIGHT SET
LED BIKE LIGHT SET
KOMPLET LAMPEK ROWEROWYCH LED
Operation and Safety Notes
Wskazówki dotyczące obsługi i bezpieczeństwa
LED KERÉKPÁRLÁMPA KÉSZLET
LED-FAHRRADLEUCHTEN-SET
Kezelési és biztonsági utalások
Bedienungs- und Sicherheitshinweise
IAN 270387
Model-No. 14119
Tighten and hook in the rubber tab
11
.
rechargeable battery, thus the headlight. Doing so
Loosen the retaining screw
on the bracket
will void the warranty.
15
9
and adjust to the desired angle.
The headlight
has a battery indicator. If the
6
Then tighten the screw. Tighten the screw hand
indicator lights up red, the rechargeable batteries
tight. To prevent damage, do not use tools for this
are drained. The indicator will light up green whilst
step.
charging. When the rechargeable batteries are
Slide the tail light
into the bracket
until you
ready to be used again, the indicator will extin-
14
9
hear it lock into place.
guish and you can use the headlight
To release the tail light
14
, pull down on the tail
For the included rechargeable batteries to operate
light lock
10
and slide off the tail light
14
.
at full power, please do not charge the battery for less
than 10 hours the first time. Please do not stop charg-
ing sooner, even if the LED is already extinguished.
Inserting batteries into the tail
After this, a charging time of approx. 3.5 hours is
light (see Fig. D)
recommended for rechargeable batteries with
1300 mAh.
Slide the battery cover
off to the back.
16
Insert the batteries into the tail light (2 x AAA
Cleaning and Care
1.5 V). Ensure the correct polarity.
Then reassemble the light.
Never fully immerse the lights. Do not use corrosive
or abrasive cleaning agents. Doing so will damage
Operation
the lights.
Clean the LED bicycle light set with a slightly damp,
Switching on / off
lint-free cloth.
The headlight
6
has three brightnesses.
Disposal
On/Off switch
The packaging is made of environmentally
press once
Power mode (40 Lux) for
friendly materials, which may be disposed of
riding in unlit areas
through your local recycling facilities.
press twice
Standard mode (20 Lux)
for riding in lit areas
Contact your local refuse disposal authority for more
press three times
Eco mode (10 Lux) for
details on how to dispose of your worn-out product.
riding in well lit areas
press four times
off
To help protect the environment, please
dispose of the product properly, not without
household waste, when it has reached the
Charging the headlight (see Fig. E)
end of its useful life. Please contact your local
authority for information on collection points
Remove the rubber cover from the battery charging
and their opening hours.
socket
and connect the USB cable
to the
18
17
battery charging socket
18
.
Defective or used batteries/rechargeable batteries must
Then connect the USB plug of the USB cable
17
to
be recycled according to 2006 / 66 / EC and its
a computer/laptop/standard USB charger with
amendments. Return batteries/rechargeable batteries
5 V DC and 500–1000 mA. Using chargers with
and / or the appliance using the recycling facilities
different specifications can damage the
provided.
pozostawiać dzieci bez nadzoru z materiałem
Nie należy używać baterii alkalicznych razem z
opakowaniowym, ponieważ istnieje ryzyko udusze-
akumulatorem nadającym się do ponownego
nia się wskutek połknięcia elementów opakowania.
ładowania.
Dzieci często nie dostrzegają niebezpieczeństwa.
Nie należy łączyć nowych baterii ze starymi.
Produkt należy trzymać poza zasięgiem dzieci.
Nie wyrzucać zużytych baterii/akumulatorów
Produkt nie jest zabawką!
razem z odpadami domowymi!
Produkt nie jest przeznaczony do użytku przez
Każdy użytkownik jest ustawowo zobowiązany do
osoby (w tym dzieci) o ograniczonej sprawności
prawidłowego usuwania baterii/akumulatorów do
fizycznej, sensorycznej lub umysłowej oraz przez
odpadów!
osoby nieposiadające doświadczeń i/lub wiedzy
OSTROŻNIE! NIEBEZPIECZEŃ-
w zakresie jego obsługi. Chyba że są nadzoro-
STWO WYBUCHU! Baterie/akumula-
wane przez osobę odpowiedzialną za ich bezpie-
tory należy przechowywać w miejscu
czeństwo. Należy pamiętać, że uszkodzenia
niedostępnym dla dzieci, nie należy wrzucać ich
spowodowane niewłaściwym posługiwaniem się
do ognia, rozbierać na części lub powodować
urządzeniem, nieprzestrzeganiem instrukcji obsługi
zwarcia.
lub ingerencją w urządzenie osób nieuprawnio-
W przypadku nieprzestrzegania wskazówek bate-
nych nie podlegają gwarancji.
rie mogą zostać rozładowane poza ich napięcie
W żadnym wypadku nie rozbierać produktu na
końcowe. Istnieje wówczas niebezpieczeństwo
części. Nieprawidłowo wykonane naprawy mogą
wycieku.
być przyczyną istotnych zagrożeń dla użytkow-
W przypadku wystąpienia wycieku z baterii znaj-
nika. Wykonywanie napraw należy zlecać wyłącz-
dujących się w urządzeniu należy je natychmiast
nie specjalistom. Wymiana diod LED jest
wyjąć, aby zapobiec uszkodzeniu urządzenia!
niemożliwa.
W przypadku wystąpienia cieczy z baterii/akumu-
ZAGROŻENIE ŻYCIA I
latorów, należy unikać kontaktu ze skórą, oczami
NIEBEZPIECZEŃSTWO WYPADKU! W razie
oraz błonami śluzowymi. W razie kontaktu z kwa-
użycia niewłaściwej ładowarki reflektor
6
może
sem akumulatorowym, należy natychmiast wypłu-
zostać uszkodzony, nagrzać się lub nawet wybuch-
kać dotknięte miejsce dużą ilością czystej wody i
nąć. W takim wypadku gwarancja wygasa.
niezwłocznie udać się do lekarza.
Nigdy nie ładować ponownie baterii! Niebezpie-
czeństwo wybuchu!
Wskazówki bezpieczeństwa
Wskazówka: Jeśli zaświeci się czerwona
dotyczące baterii/
lampka kontrolna akumulatorów/baterii
akumulatorów
reflektorze
lub tylnym świetle
6
zwłocznie wymienić baterie lub ponownie nałado-
OSTROŻNIE! NIEBEZPIECZEŃ-
wać akumulatory.
STWO WYBUCHU! Nigdy nie
Należy pamiętać, aby po zaświeceniu się wkaź-
ładować ponownie baterii!
nika bateirii lampy nie odpowiadają już przepisom
W przypadku dłuższej przerwy w użytkowaniu
ruchu drogowego (StVZO).
wyjąć baterie z urządzenia.
Podczas wkładania baterii do urządzenia należy
Montaż
zwrócić uwagę na prawidłowe ułożenie biegu-
nów! Jest ona pokazana w komorze na baterie.
Montaż reflektora (patrz rys. A)
W razie potrzeby przed włożeniem baterii oczy-
ścić styki baterii i urządzenia.
Wyczerpane baterie niezwłocznie usunąć z urzą-
Wykręcić śrubę ustalającą
3
dzenia. W przeciwnym razie zwiększa się ryzyko
Umieścić uchwyt
w wybranym miejscu na kie-
1
wycieku elektrolitu!
rownicy. Ewentualnie użyć gum redukcyjnych
Wszystkie baterie należy wymieniać równocześnie.
aby zapewnić optymalne dopasowanie.
A
B
1
2
C
3
D
4 5
6
E
7
8
GB
Environmental damage due to
present at the time of purchase must be reported imme-
incorrect battery/rechargeable
diately after unpacking. Repairs made after the expira-
battery disposal!
tion of the warranty period are subject to payment.
Never dispose of batteries/rechargeable batteries in your
Extent of warranty
household waste. They may contain toxic heavy metals
and are subject to hazardous waste regulations. The
6
.
chemical symbols of the heavy metals are: Cd = cadmium,
The device was manufactured to strict quality guide-
Hg = mercury, Pb = lead. Therefore, dispose of used
lines and diligently inspected prior to shipment. The
batteries/rechargeable batteries through your local
warranty applies to defects in material or manufacture.
collection site.
This warranty does not apply to product parts subject
to regular wear and therefore considered wear parts or
Improper battery disposal destroys valuable resources
damage to fragile parts, e.g. switches, rechargeable
and the hazardous substances in the batteries may pose
batteries, or made from glass. This warranty becomes
a significant danger to the health and environment.
void if the device has been damaged or improperly
Separate collection/disposal of old batteries prevents
used or maintained. Proper use of the product requires
dangers to the health and environment, and valuable
strictly observing all instructions for use. Purposes and
resources regained by recycling.
practices which the operating instructions warn of or
advise against must be avoided without fail. This prod-
uct is only intended for private, non-commercial use.
Warranty
Any incorrect or improper use of the device, use of
force and changes not performed by our authorized
Dear customer,
service branch will void the warranty. Please follow the
This device is covered by a 3-year warranty from the
instructions below to ensure your claim is processed
date of purchase. In the event of product defects, you
quickly:
have legal rights against the retailer of this product.
· Please have your receipt and the product number
Your statutory rights are not limited in any way by our
warranty detailed below.
· Please refer to the type plate or the cover sheet of
· In the event of malfunctions or other defects,
Warranty terms
The warranty period begins on the date of purchase.
· A product determined defective may then be
Please retain the original receipt safely. This documen-
tation is required as the proof of purchase. Should a
defect in material or manufacture occur within three
years from the date of purchase of this product, we will
repair or replace - at our choice - it free of charge. This
warranty is conditional on the defective device and the
receipt of purchase being presented within the three
year warranty period, and that there is a brief written
This and many other manuals, product videos and
description of the nature of the defect and of the date it
software are available for download at
arose. If the defect is covered by our warranty, you will
www.lidl-service.com.
receive the repaired product or a replacement. A repair
or exchange of the device does not extend a new war-
ranty period. The warranty period will not be extended
by repairs made under warranty. This also applies to
replaced and repaired parts. Any damage or defects
GB
Sposób użycia
Ponownie wkręcić śrubę ustalającą
3
.
Przy tym dokręcać śrubę siłą ręki. Nie używać do
Włączanie/ wyłączanie
tego narzędzi, aby uniknąć uszkodzeń.
Aby ustawić optymalny kąt do kierunku jazdy,
poluzować śrubę regulacji kąta
7
śrubokrętem
Reflektor
krzyżowym o 2-3 obroty.
Ustawić żądany kąt i ponownie przykręcić śrubę
regulacji kąta
7
.
jedno wciśnięcie
Wsunąć reflektor
6
w uchwyt
1
, aż zaskoczy w
sposób słyszalny.
Aby go zdjąć, nacisnąć blokadę reflektora
i
8
dwa wciśnięcia
wysunąć reflektor
6
z uchwytu
1
do przodu.
trzy wciśnięcia
Montaż tylnego światła (patrz
rys. B i C)
cztery wciśnięcia
Przymocować uchwyt
9
za pomocą nakładki
gumowejn
na sztycy podsiodłowej lub rurze
11
Ładowanie reflektora
podsiodłowej. Uważać przy tym na to, aby przed
(patrz rys. E)
tylnym światłem
14
nie znajdowały się żadne
elementy.
Napiąć gumową nakładkę
11
i zaczepić ją.
Zdjąć osłonę gumową gniazdka ładowania aku-
Odkręcić śrubę ustalającą
uchwytu
i usta-
mulatora
15
9
wić żądany kąt.
ładowania akumulatora
Następnie ponownie dokręcić śrubę. Przy tym
Następnie połączyć wtyczkę USB kabla USB
dokręcać śrubę siłą ręki. Nie używać do tego
komputerem/laptopem/standardową ładowarką
narzędzi, aby uniknąć uszkodzeń.
USB o mocy 5 V DC i 500–1000 mA. W razie
Wsunąć tylne światło
w uchwyt
, aż zasko-
użycia ładowarek o innych specyfikacjach akumu-
14
9
czy w sposób słyszalny.
lator, a tym samym reflektor mogą zostać uszko-
Aby zdjąć tylne światło
14
, pociągnąć blokadę
dzone. W takim wypadku gwarancja wygasa.
5 13
w
tylnego światła
10
w dół i zdjąć tylne światło
14
.
Reflektor
, należy nie-
wania. Jeśli wskaźnik świeci na czerwono, akumu-
14
latory są rozładowane. W trakcie ładowania
Wkładanie baterii do tylnego
wskaźnik świeci na zielono. Jeśli akumulatory są
światła (patrz rys. D)
ponownie gotowe do pracy, wskaźnik gaśnie i
można korzystać z reflektora
Odsunąć pokrywę komory na baterie
do tyłu.
Aby uzyskać pełną wydajność dołączonych aku-
16
Włożyć baterie w tylne światło (2x AAA 1,5 V).
mulatorów, ładować akumulatory po raz pierwszy
Przy tym zwrócić uwagę na prawidłowe ułożenie
nie krócej niż 10 godzin. Nie należy kończyć pro-
biegunów.
cesu ładowania wcześniej, także jeśli dioda LED
Następnie ponownie złożyć ze sobą inne części
już zgasła. Później zaleca się czas ładowania
lampy.
ok. 3,5 godziny przy akumulatorach o pojemności
1300 mAh.
z uchwytu
1
.
,
2
PL
LED Bike Light Set
9
10
Introduction
Congratulations on the purchase of your new
11
device. In doing so you have chosen a
top-quality product. The instructions for use
are to be considered as part of this product. It contains
important safety, assembly and disposal information.
Before using the product, please familiarise yourself
with all the safety information and instructions for use.
The product must only be used as described and for
12 13
the specified fields of application. If you pass the prod-
uct on to anyone else, please be sure to also include all
14
documentation.
Intended use
15
This product is suitable for lighting the roadway whilst
cycling. The LED Bicycle Light Set is approved as exclu-
sive lighting for all bicycles. Light distribution must not
be impaired by other bicycle parts or luggage. The
product is intended for outdoor use. Any use other than
the aforementioned or any product modification is pro-
hibited and can result in injuries and product damage.
The manufacturer is not liable for damages resulting
16
from improper use. This product is not intended for
commercial use.
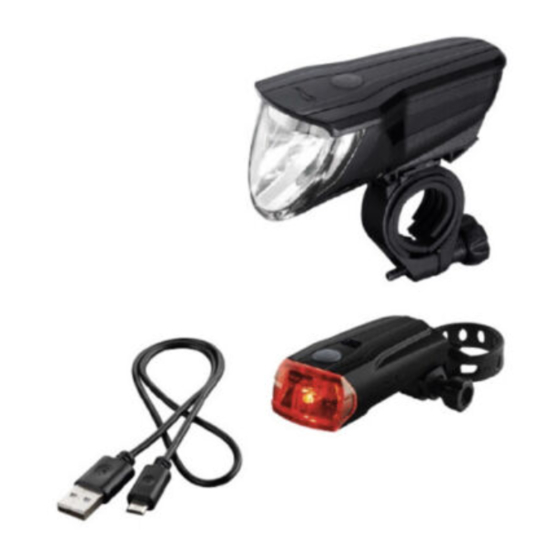
Parts Description
1
Headlight bracket
2
Reducer rubber
Headlight bracket retaining screw
3
Headlight on/off switch
4
5
Headlight battery/rechargeable battery control light
17
6
Headlight
Headlight angle adjustment screw
7
Headlight lock
8
9
Tail light bracket
10
Tail light lock
18
11
Tail light bracket rubber tab
Tail light on/off switch
12
Tail light battery control lamp
13
14
Tail light
GB
KLB GmbH
Diekbree 8
48157 Münster, Germany
Tel: +49 2 51 132 37 57
E-Mail: gb@klb-service.eu
www.klb-service.eu
IAN 270387
ready as your proof of purchase.
these instructions for the product number.
please first contact the following service depart-
ment by phone or e-mail.
returned to the specified service address free of
charge, including the proof of purchase (receipt)
and information about the defect and when it
occurred.
Please note, the service department must be
notified before returning the product!
GB
Czyszczenie i pielęgnacja
Nigdy nie zanurzać całych lamp w wodzie. Nie
stosować do czyszczenia środków do szorowania
6
posiada trzy moce świecenia.
lub żrących substancji. Lampy mogą zostać w ten
sposób uszkodzone.
Zestaw lamp rowerowych LED należy czyścić lekko
Przełącznik WŁ. / WYŁ.
wilgotną, niestrzępiącą się szmatką.
Tryb Power (40 Lux) do
jazdy w nieoświetlonym
otoczeniu
Utylizacja
Tryb standard (20 Lux) do
jazdy w oświetlonym oto-
Opakowanie wykonane jest z materiałów
czeniu
przyjaznych dla środowiska, które można
Tryb Eco (10 Lux) do
przekazać do utylizacji w lokalnym punkcie
jazdy w dobrze oświetlo-
przetwarzania surowców wtórnych.
nym otoczeniu
wyłączenie
Informacje o możliwościach dotyczących wyrzucania
otrzymać można w urzędzie miejskim lub gminnym.
Z uwagi na ochronę środowiska nie wyrzu-
cać urządzenia po zakończeniu eksploatacji
do odpadów domowych, lecz prawidłowo
i połączyć kabel USB
z gniazdem
zutylizować. Informacji o punktach zbiorczych
18
17
.
i ich godzinach otwarcia udziela odpowiedni
18
17
z
urząd.
Uszkodzone lub zużyte baterie muszą być poddane re-
cyklingowi zgodnie z dyrektywą 2006 / 66 / EC i jej
zmianami. Baterie/akumulatory i / lub urządzenie na-
leży pozostawić w lokalnym punkcie zbiórki odpadów.
6
wyposażony jest we wskaźnik łado-
Niewłaściwa utylizacja baterii/aku-
mulatorów stwarza zagrożenie dla
środowiska naturalnego!
.
Baterii/akumulatorów nie należy wyrzucać razem z
6
odpadami domowymi. Mogą one zawierać szkodliwe
metale ciężkie i należy je traktować jak odpady spe-
cjalne. Symbole chemiczne metali ciężkich są następu-
jące: Cd = kadm, Hg = rtęć, Pb = ołów. Dlatego też
zużyte baterie/akumulatory należy przekazywać do
komunalnych punktów gromadzenia odpadów niebez-
piecznych.
W przypadku niewłaściwej utylizacji baterii warto-
ściowe surowce są tracone, a poprzez zawarte w bate-
riach szkodliwe substancje może dojść do poważnego
PL
15
Tail light retaining screw
Always keep the product away from children. This
Tail light battery cover
product is not a toy!
16
USB cable
This product is not intended to be used by persons
17
18
Charging socket
(including children) with impaired physical, sensory
or mental capacity, or lacking experience or knowl-
edge unless supervised by a person responsible for
Scope of delivery
their safety. Please note, damages caused by incor-
rect handling, non-compliance with the operating
1 Headlight
instructions or interference with the device by
1 Tail light
unauthorised individuals are excluded.
1 Headlight bracket
Never take the product apart. Improper repairs
1 Tail light bracket
may result in considerable danger to the user.
2 Batteries AAA
Repairs should only be carried out by specialist
Reducer rubbers
personnel. The LED lights are not replaceable.
1 USB cable
RISK OF LOSS OF LIFE AND
1 Instructions for assembly and use
ACCIDENT! Using the incorrect charger may
cause the headlight
6
to be damaged, overheat
or even explode. Doing so will void the warranty.
Technical Data
Safety advice concerning
Headlight
batteries/rechargeable
Model designation:
XC-195A / LI-1
batteries
Rated output:
1 W
Protection type:
IP44 according to
DIN EN 60529
CAUTION! EXPLOSION HAZARD!
Rechargeable Li-ion battery: 1300 mAh, 3.7 V
Never recharge the batteries!
Tail light
Remove batteries during extended periods of non-use.
Model designation:
XC-117D / D-LED 3
When inserting the battery ensure the polarity is
Rated output:
0.2W
correct! This is shown in the battery compartment.
Protection type:
IP44 according to
If necessary, clean the battery and device contacts
DIN EN 60529
before inserting the battery.
Batteries:
2 x 1.5 V AAA LR03
Remove spent batteries immediately from the
device. There is an increased risk of leaks!
Note: Only use rechargeable 1.2 V batteries or
Always replace all the batteries at the same time.
equivalent 1.5 V alkaline batteries.
Do not mix alkaline batteries and rechargeable
batteries.
Never mix old and new batteries.
Safety instructions
Do not dispose of battery/rechargeable batteries
in household waste!
DANGER TO LIFE
Every consumer is legally obliged to dispose of
AND RISK OF ACCIDENT FOR IN-
batteries/rechargeable batteries in the proper
FANTS AND CHILDREN! Never leave
manner!
children unsupervised with the packing material
CAUTION! EXPLOSION HAZARD!
due to the suffocation hazard posed by swallowing
Keep battery/rechargeable batteries
parts thereof. Children frequently underestimate the
away from children, do not throw batter-
dangers.
ies/rechargeable batteries into fire, do not short-
circuit and do not take apart.
GB
Komplet lampek rowerowych LED
Instrukcja
Gratulujemy zakupu nowego urządzenia.
Zdecydowali się Państwo na zakup produktu
najwyższej jakości. Instrukcja obsługi stanowi
część składową niniejszego produktu. Zawiera ważne
wskazówki dotyczące bezpieczeństwa, montażu oraz
utylizacji. Przed użyciem produktu należy zapoznać się
ze wszystkimi wskazówkami dotyczącymi obsługi i za-
sadami bezpieczeństwa. Produkt należy użytkować w
sposób tu opisany i zgodnie z określonym tu zakresem
zastosowania. Przekazując produkt innej osobie, na-
leży również przekazać wszystkie dokumenty.
Zastosowanie zgodne z
przeznaczeniem
Produkt przeznaczony jest do oświetlania jezdni pod-
czas jazdy na rowerze. Zestaw lamp rowerowych LED
dopuszczony jest dla wszystkich rowerów jako wy-
łączne oświetlenie. Rozkład światła nie może być
zasłaniany przez inne części rowerowe lub bagaż.
Produkt jest przeznaczony do używania na zewnątrz.
Użycie inne niż wyżej opisane lub dokonywanie zmian
produktu nie jest dozwolone i może prowadzić do ob-
rażeń ciała i uszkodzenia produktu. Producent nie po-
nosi odpowiedzialności za szkody powstałe wskutek
niewłaściwego użycia produktu. Produkt nie jest prze-
znaczony do użytku komercyjnego.
Opis części
Uchwyt reflektora
1
2
Gumy redukcyjne
3
Śruba ustalająca uchwytu reflektora
Przełącznik Wł./Wył. reflektora
4
Lampka kontrolna akumulatorów/baterii reflektor
5
6
Reflektor
7
Śruba regulacji kąta reflektora
8
Blokada reflektora
Uchwyt tylnego światła
9
Blokada tylnego światła
10
11
Nakładka gumowa uchwytu tylnego światła
GB
zagrożenia dla zdrowia i środowiska. Dzięki segrego-
np. przełączników, akumulatorów lub wykonanych ze
waniu starych baterii unika się zagrożenia dla zdrowia
szkła. Gwarancja wygasa w razie zawinionego przez
i środowiska, a dzięki recyklingowi odzyskuje się war-
użytkownika uszkodzenia produktu, niewłaściwego
tościowe surowce.
użycia lub konserwacji. W celu właściwego użytkowa-
nia produktu należy przestrzegać wszystkich wskazań
wymienionych w niniejszej instrukcji obsługi. Bezwzględnie
Gwarancja
unikać zastosowania i użytkowania, które wskazano w
niniejszej instrukcji jako niewłaściwe lub niebezpieczne.
Szanowna Klientko, szanowny Kliencie!
Produkt przeznaczony jest wyłącznie do użytku prywat-
Urządzenie objęte jest 3-letnią gwarancją, licząc od
nego, nie zaś do użytku komercyjnego. Gwarancja
daty zakupu. W przypadku wad produktu nabywcy
traci ważność w przypadku niewłaściwego i niezgod-
przysługują ustawowe prawa. Opisane poniżej wa-
nego z przeznaczeniem użytkowania urządzenia,
runki gwarancji nie ograniczają ustawowych praw
użycia siły lub ingerencji dokonywanych poza naszymi
nabywcy urządzenia.
autoryzowanymi punktami serwisowymi. Aby zapewnić
szybkie rozpatrzenie Państwa wniosku, prosimy stoso-
wać się do następujących wskazówek:
Warunki gwarancji
· Przed skontaktowaniem się z działem serwiso-
wym należy przygotować paragon i numer
Okres gwarancji rozpoczyna się z datą zakupu.
artykułu jako dowód zakupu.
Należy zachować oryginalny paragon. Stanowi on do-
· Numer artykułu można znaleźć na tabliczce
wód dokonania zakupu. W przypadku wystąpienia w
znamionowej lub na stronie tytułowej instrukcji.
ciągu trzech lat od daty zakupu wad materiałowych
· W razie wystąpienia jakichkolwiek usterek
lub fabrycznych, dokonujemy – według własnej oceny
w działaniu lub innych wad proszę najpierw skon-
– bezpłatnej naprawy lub wymiany urządzenia. Gwa-
taktować się telefonicznie lub za pomocą poczty
rancja zakłada, że w terminie trzech lat jej obowiązy-
elektronicznej z wymienionym niżej działem ser-
wania uszkodzone urządzenie zostanie przedłożone
wisowym.
wraz z dowodem zakupu (paragon) i krótkim opisem
· Produkt uważany za uszkodzony można następ-
zawierającym informacje na temat usterki i czasu jej
nie odesłać na podany adres działu serwisowego,
wystąpienia. Jeśli niniejsza gwarancja obejmuje daną
dołączając dowód zakupu (paragon) oraz poda-
wadę, zwracamy naprawiony lub nowy produkt. Wraz
jąc rodzaj usterki i datę jej wystąpienia. W takim
z naprawą lub wymianą produktu nie rozpoczyna się
przypadku nie ponoszą Państwo kosztów prze-
nowy okres gwarancji. Okres gwarancji nie ulega wy-
syłki. Proszę pamiętać, że przed wysyłką należy o
dłużeniu o czas trwania usługi gwarancyjnej. Dotyczy
tym koniecznie poinformować dział serwisowy!
to również wymienionych i naprawionych części. Ewen-
tualne szkody i wady stwierdzone w chwili zakupu
Na stronie www.lidl-service.com można pobrać tę
należy zgłosić niezwłocznie po rozpakowaniu urzą-
i wiele innych instrukcji, filmów dotyczących produktów
dzenia. Po upływie okresu gwarancyjnego wszystkie
oraz oprogramowanie.
naprawy będą wykonywane za opłatą.
PL
KLB GmbH
Zakres gwarancji
Diekbree 8
48157 Münster, Niemcy
Urządzenie wyprodukowano zgodnie z wysokimi stan-
Tel: +49 2 51 132 37 57
dardami jakości i poddano skrupulatnej kontroli przed
E-mail: pl@klb-service.eu
wysyłką. Usługa gwarancyjna obejmuje wady materia-
www.klb-service.eu
łowe i fabryczne. Gwarancja nie obejmuje części pro-
IAN 270387
duktu ulegających normalnemu zużyciu, uznawanych
za części zużywalne, oraz uszkodzeń części łamliwych,
PL
Failure to observe this notice may result in deep dis-
charging the batteries. This poses a risk of leaking.
If the batteries have leaked inside the product,
please remove them immediately to prevent prod-
uct damage!
Avoid contact with the skin, eyes and mucous mem-
branes if fluid has leaked from the batteries / re-
chargeable battery. In the event of contact with
battery acid, thoroughly flush the affected area with
clean water and seek immediate medical attention.
Never recharge single-use batteries! Explosion
hazard!
Note: If the red rechargeable battery/battery
control light
5 13
on the headlight
6
or the tail
light
lights up, please replace the batteries or
14
recharge the rechargeable batteries immediately.
Please note, once the battery indicator lights up,
the lights no longer comply with the Road Traffic Act.
Installation
Installing the headlight (see Fig. A)
Unscrew the retaining screw
from the bracket
.
3
1
Position the bracket
1
in the desired location on
the handlebar. If necessary, use the reducer
rubbers
to ensure an optimal fit.
2
Reinstall the retaining screw
.
3
Tighten the screw hand tight. To prevent damage,
do not use tools for this step.
To adjust to the optimal angle to the direction of
travel, loosen the angle adjustment screw
7
2–3 turns using a cross-tip screwdriver.
Adjust to the desired angle and tighten the angle
adjustment screw
7
.
Slide the headlight
into the bracket
until you
6
1
hear it lock into place.
To release, press the headlight lock
8
and slide
the headlight
6
forward out of the bracket
1
.
Installing the tail light
(see Fig. B and C)
Secure the bracket
to the seat post or the rear
9
cross-bar using the rubber tab
. Be sure there
11
are no objects in front of the tail light
14
.
GB
12
Przełącznik Wł./Wył. tylne światło
Lampka kontrolna baterii tylnego światła
13
Tylne światło
14
15
Śruba ustalająca tylnego światła
16
Pokrywa komory na baterie tylnego światła
Kabel USB
17
Gniazdo ładowania akumulatora
18
Zawartość
1 reflektor
1 światło tylne
1 uchwyt reflektora
1 uchwyt tylnego światła
2 baterie AAA
gumy redukcyjne
1 kabel USB
1 instrukcja montażu i obsługi
Dane techniczne
Reflektor
Nazwa typu:
XC-195A / LI-1
Moc znamionowa:
1 W
Rodzaj ochrony:
IP44 zgodnie z
DIN EN 60529
Akumulator litowo-jonowy: 1300 mAh, 3,7 V
Tylne światło
Nazwa typu:
XC-117D / D-LED 3
Moc znamionowa:
0,2 W
Rodzaj ochrony:
IP44 zgodnie z
DIN EN 60529
Baterie:
2 x 1,5 V AAA LR03
Wskazówka: Należy używać wyłącznie akumula-
torów 1,2 V lub porównywalnych baterii alkalicznych
1,5 V.
Wskazówki bezpieczeństwa
NIEBEZPIE-
CZEŃSTWO UTRATY ŻYCIA I
ODNIESIENIA OBRAŻEŃ W WY-
PADKU PRZEZ DZIECI! Nigdy nie należy
PL
PL

Verwandte Anleitungen für Crivit 14119


Inhaltszusammenfassung für Crivit 14119
- Seite 1 Tail light circuit and do not take apart. are no objects in front of the tail light IAN 270387 Model-No. 14119 Komplet lampek rowerowych LED Tighten and hook in the rubber tab rechargeable battery, thus the headlight. Doing so Environmental damage due to present at the time of purchase must be reported imme- Przełącznik Wł./Wył.
- Seite 2 LED kerékpárlámpa készlet A hátsó lámpa összeszerelése Fényszóró töltése (ld. E- ábra) Hátsó lámpa tartójának tartócsavarja A termék nem alkalmas arra, hogy olyan szemé- VIGYÁZAT! ROBBANÁSVESZÉLY! A hibás vagy elhasznált elemeket a 2006 / 66 / EC írásban röviden ismertesse a hibát és a hiba felléptének (ld.