Herunterladen Inhalt Inhalt Diese Seite drucken
Inhaltsverzeichnis

Werbung

Verfügbare Sprachen
  • DE

Verfügbare Sprachen

  • DEUTSCH, seite 1

Werbung

Inhaltsverzeichnis
loading

Inhaltszusammenfassung für auna KR-500

  • Seite 3: Inhaltsverzeichnis

    Sehr geehrter Kunde, wir gratulieren Ihnen zum Erwerb Ihres Geräts. Lesen Sie die folgenden Hinweise sorgfältig durch und befolgen Sie diese, um möglichen Schäden vorzubeugen. Für Schäden, die durch Missachtung der Hinweise und unsachgemäßen Gebrauch entstehen, übernehmen wir keine Haftung. INHALT Technische Daten 4 Sicherheitshinweise 5...
  • Seite 4: Technische Daten

    TECHNISCHE DATEN Artikelnummer 10031477 Stromversorgung Netzgerät Eingang 100-240V ~ 50/60 Hz Ausgang 5,5 V 2,5 A...
  • Seite 5: Sicherheitshinweise

    SICHERHEITSHINWEISE • Lesen Sie vor der Benutzung des Gerätes die Warn- und Sicherheitshinweise. • Bewahren Sie alle Hinweise zum späteren Nachschlagen auf. • Das Gerät darf nicht in der Nähe von Wasser verwendet werden oder mit Feuchtigkeit in Berührung kommen. •...
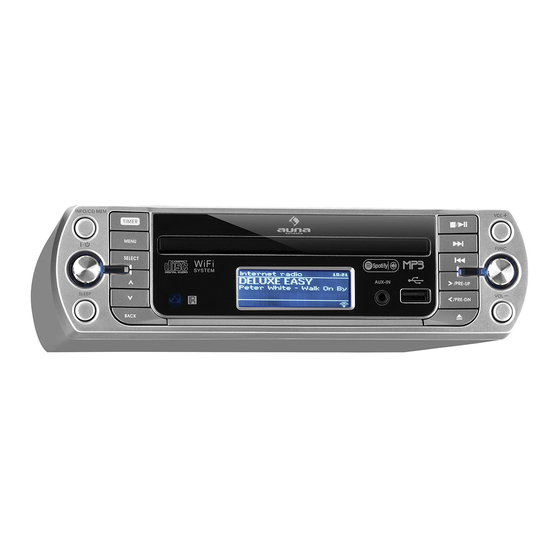
  • Seite 6: Geräteübersicht

    GERÄTEÜBERSICHT...
  • Seite 7 LCD-Anzeige CD-Fach Lautstärke +/- Runter Zurück Menü Info/ CD/ Mem Hoch IR-Sensor Fernbedienung 10 USB-Anschluss AUX-Anschluss 12 Schlaf 13 Ein/Aus/Standby 14 Funktionswahl 15 Nächster Titel/Sendersuchlauf vor 16 Wiedergabe/Pause/Stopp 17 Pre-up/Rechts 18 Timer 19 Pre-down/Links 20 Zurück/ Sendersuchaluf zurück 21 CD-Fach 22 CD-Fach öffnen, schließen 23 Netzkabelanschluss...
  • Seite 8 Fernbedienung SLEEP Aktivieren der Schlaffunktion. FUNC Funktionswahl: Aktivieren von CD/Radio/Aux/BT Einschalten / in Standby schalten   CD/USB: Titel vor/zurück   / CD/USB: Pre Up-Down/ Internetradio: Senderspeicher hoch/runter Left-Right CD-MP3: Ordnerwahl hoch/runter Menü: links/rechts wählen Timer Timer einstellen Hoch/runter Im Menu: hoch und runter blättern Select Im Menü: Auswahl bestätigen...
  • Seite 9: Montage Und Inbetriebnahme

    MONTAGE UND INBETRIEBNAHME Auspacken • Entpacken Sie alle Teile und entfernen Sie das Schutzmaterial. • Schließen Sie das Gerät erst an die Stromversorgung an, nachdem Sie die Spannung der Stromversorgung überprüft haben und nachdem alle anderen Anschlüsse hergestellt werden. • Verdecken Sie nicht die Lüftungsöffnungen und achten Sie darauf, dass mehrere Zentimeter.
  • Seite 10: Optionale Tischaufstellung

    Optionale Tischaufstellung Gummifüße Montageblech Anschluss 1. Schließen Sie das Netzkabel mit dem an eine Steckdose an. Das Gerät geht in den Standby-Betrieb und die LCD-Anzeige leuchtet auf. 2. Wenn das Gerät zum ersten Mal einschaltet, erscheint in der Anzeige "STARTING". 3.
  • Seite 11: Internetradio

    11. Das Passwort für den den W-Lan-Router eingeben. 12. Nachdem Sie das Passwort eingegeben haben OK auswählen und mit SELECT bestätigen. Das Radio verbindet sich mit dem Internet. Nach der erfolgreichen Verbindung erscheint INTERNETRADIO 1. Im Internetradiobetrieb drücken Sie die Tasten Hoch/Runter (8/3), u m die "Senderliste"...
  • Seite 12: Mp3-Wiedergabe

    wieder aufzunehmen. Stopp: drücken, um die Wiedergabe zu beenden. Titel vor/zurück: drücken, um einen Titel vor- oder zurückzuspringen.  MP3-WIEDERGABE 1. Nach dem Durchsuchen des Speichermediums wird die Anzahl der Titel angezeigt. Das Gerät beginnt automatisch mit der Wiedergabe des ersten Titels.
  • Seite 13: Cd-Programmierung

    einen Titel wiederholen alle Titel wiederholen Zufallwiedergabe Bei MP3-Wiedergabe Wiedergabemodus Anzeige im Display einen Titel wiederholen alle Titel wiederholen Titel eines Ordners wiederholen Zufallwiedergabe CD-PROGRAMMIERUNG Bis zu 20 Titel können für die Wiedergabe in einer beliebigen Reihenfolge programmiert werden. Vergessen Sie nicht, vorher die -Taste zu drücken. 1.
  • Seite 14: Usb-Speichermedium Für Mp3-Wiedergabe

    USB-SPEICHERMEDIUM FÜR MP3-WIEDERGABE Anschluss Das Gerät kann MP3-Dateien lesen und wiedergeben, auf einem USB- Speichermedium gespeichert sind. 1. Versetzen Sie das Radio in den Standby-Modus (oder eine andere Betriebsart außer den USB-Betrieb. 2. Stecken Sie einen USB-Stick mit der Vorderseite nach oben in den Anschluss.
  • Seite 15: Weitere Eigenschaften

    WEITERE EIGENSCHAFTEN Schlafmodus Mit dem Schlafmodus schaltet das Radio sich nach einer voreinstellten Zeit 1. Drücken Sie die "Sleep"-Taste, um 15/30/45/60 min zu wählen. Im Display erscheint " z". Nachdem die Zeit abgelaufen ist, geht das Radio automatisch in den Standby-Betrieb. 2.
  • Seite 16: Spotify

    3. Mit ∧/∨ die gewünschte Sprache wählen und mit SELECT bestätigen. Auf Werkseinstellungen zurücksetzen 1. Drücken Sie MENU, dann mit ∧/∨ den Menüeintrag "Systemeinstellungen" wählen und mit SELECT bestätigen. 2. Mit den Tasten ∧/∨ den Eintrag "Werkseinstellung" wählen. 3. Mit </> Ja wählen und mit SELECT bestätigen. AUX-Eingang Schließen Sie das Radio an ein externes Audiogerät an (z.
  • Seite 17 Wichtige Hinweise • Zum Verwenden von Spotify wird ein Spotify premium Account benötigt. • Achten Sie darauf, dass das Gerät so eingestellt ist, dass es auch im Stand-by-Modus oder außerhalb des Netzwerkmodus (FM/AUX IN) mit dem Netzwerk verbunden bleibt. Dadurch kann Spotify auch außerhalb des Netzwerkmodus Daten auf das Gerät streamen.
  • Seite 18: Batteriewechsel Fernbedienung

    BATTERIEWECHSEL FERNBEDIENUNG Das Batteriefach befindet sich auf der unteren Seite der Fernbedienung. 1. Nehmen Sie die Batteriehalterung heraus, indem Sie die Lasche zur Mitte hin drücken und die Halterung herausziehen. 2. Setzen Sie eine neue Knopfzelle (CR2032) mit dem Pluspol nach oben ein.
  • Seite 19: Hinweise Zur Entsorgung

    HINWEISE ZUR ENTSORGUNG Befindet sich die linke Abbildung (durchgestrichene Mülltonne auf Rädern) auf dem Produkt, gilt die Europäische Richtlinie 2012/19/EU. Diese Produkte dürfen nicht mit dem normalen Hausmüll entsorgt werden. Informieren Sie sich über die örtlichen Regelungen zur getrennten Sammlung elektrischer und elektronischer Gerätschaften.
  • Seite 20 Dear Customer, Congratulations on purchasing this equipment. Please read this manual carefully and take care of the following hints on installation and use to avoid technical damages. Any failure caused by ignoring the items and cautions mentioned in the operation and installation instructions are not covered by our warranty and any liability.
  • Seite 21: Technical Data

    TECHNICAL DATA Item number 10031880, 10031894 Power adapter Input 100-240V ~ 50/60 Hz Output 5.5 V 2.5 A...
  • Seite 22: Safety Instructions

    SAFETY INSTRUCTIONS • Read the instructions. All safety instructions and guidelines must be read before start device. • Keep the instructions for future use. • The device must not be used near water or be put in contact with moisture. •...
  • Seite 23: Product Description

    PRODUCT DESCRIPTION...
  • Seite 24 LCD display Volume button Down button Select button Back button Menu button Info/CD mem button Up button Remote sensor 10 USB Socket Aux-in jack 12 Sleep button 13 On/Standby button 14 Function button 15 Skip/Tuning Up button 16 Play/Pause /Stop button 17 Pre-Up/Right button 18 Timer button 19 Pre-down/Left button...
  • Seite 25 Remote Control SLEEP Press to select sleep countdown time FUNC Press to select the different function Press to power on / standby the system   Press to select previous / next tracks at CD/USB mode   / CD/USB: press to start playback / pause mode Press and hold a second go to stop mode Pre Up-Down/ In Internet radio mode : press to select preset memory...
  • Seite 26: Installation And Getting Started

    INSTALLATION AND GETTING STARTED Unpacking • Unpack all parts and remove protective material. • Do not connect the unit to the mains before checking the main voltage and before all other connections have been made. • Do not cover any vents and make sure that there is a space of several centimetres around the unit for ventilation.
  • Seite 27 Connection and getting started 1. Insert the DC plug of provided AC/DC adaptor to the DC jack (23) of the main unit, then connect the AC/DC adaptor to AC outlet. 2. When you first plug the unit into the mains, the display (1) will show “STARTING…”...
  • Seite 28: Internet Radio

    10. Select the Skip WPS by Up/Down button (8/3) then press Select button (4) to confirm 11. Enter the password of the router by Up/Down (8/3), Left/Right (19/17) and Select button (4). 12. Once password entered, select “OK” and press Select button (4) to confirm, unit will start to connect to the internet and connect successfully, display will show “Setup wizard completely”.
  • Seite 29: Playing Compact Disc

    PLAYING COMPACT DISC Getting started 1. Press Function button to select “CD” mode. 2. Push the CD tray open to open the CD tray. 3. Place a CD with the printed side facing up and then close the CD tray. 4.
  • Seite 30 random function, a single track, all the tracks repeat or folder repeat(MP3 only) and random can be played in difference mode as in the table below. Repeat play: You can listen the desired track, folder(for MP3 only) or whole disc repeat by this function Random play: You can listen all the tracks in a random order by this function.
  • Seite 31: Cd Programming

    CD PROGRAMMING Up to 20 tracks can be programmed for disc play in any order. Before use, be sure to press hold second the "stop” button. 1. Set in CD mode & stop the CD playback. 2. Press hold the “ Info/CD MEM ” button and “ program ” will appear on LCD display (1).
  • Seite 32: More Features

    Remarks • The system can detect and read the file under MP3 format only at USB mode but not other music file format. • If connect the system to MP3 player via the USB socket, due to variances in file system format, some MP3 player may not be able to play via the USB socket.
  • Seite 33 C. Multi-room 1. Press Menu Button (6) to System settings mode, press Select button (4) to enter..then press Up/down button (8/3) to select Multi-room, press Select button (4) to enter. 2. Press Up/down button (8/3) to select show Add to group ,press “Select” button(4) to enter.
  • Seite 34: Spotify

    SPOTIFY In Main menu, if Spotify is selected, the screen will appear as below.The unit is compatible with Spotify, allowing the unit to act as wireless speakers controlled by the Spotify App available for iOS, Android smart devices. Spotify 00:00 Waiting for Users Important Notes •...
  • Seite 35: Battery Replacement (Remote Control)

    BATTERY REPLACEMENT (REMOTE CONTROL) The battery compartment is located on the back of the remote control. 1. Remove the battery compartment door by pressing in on the tab and lifting it off. 2. Insert one (1) CR2032 size batteries into the battery compartment following the polarity markings inside the battery compartment.
  • Seite 36: Disposal Considerations

    DISPOSAL CONSIDERATIONS According to the European waste regulation 2012/19/EU this symbol on the product or on its packaging indicates that this product may not be treated as household waste. Instead it should be taken to the appropriate collection point for the recycling of electrical and electronic equipment.
  • Seite 37 Chère cliente, cher client, Toutes nos félicitations pour l’acquisition de ce nouvel appareil. Veuillez lire attentivement les instructions suivantes de branchement et d’utilisation afin d’éviter d’éventuels dommages. Le fabricant ne saurait être tenu pour responsable des dommages dus au non-respect des consignes de sécurité et à...
  • Seite 38: Fiche Technique

    FICHE TECHNIQUE Numéro d'article 10031477 Alimentation de l'adaptateur secteur Entrée 100-240V ~ 50/60 Hz Sortie 5,5 V 2,5 A...
  • Seite 39: Consignes De Sécurité

    CONSIGNES DE SÉCURITÉ • Avant d'utiliser l'appareil, lisez les consignes de sécurité et les avertissements. • Conservez toutes les recommandations pour pouvoir vous y référer ultérieurement. • L'appareil ne doit pas être utilisé à proximité de l'eau ou être au contact de l'humidité.
  • Seite 40: Aperçu De L'appareil

    APERÇU DE L'APPAREIL...
  • Seite 41 Ecran LCD Lecteur CD Volume +/- Retour Menu Info/ CD/ Mem Haut Capteur IR de la télécommande 10 Port USB Prise AUX 12 Mode nuit 13 Marche/arrêt/veille 14 Sélecteur de fonction 15 Titre suivant /recherche de station vers l'avant 16 Lecture/Pause/Stop 17 Pre-up/droite 18 Timer 19 Pre-down/gauche...
  • Seite 42 Télécommande SLEEP Activer la fonction d'arrêt automatique. FUNC Sélecteur de fonction : activer CD/Radio/Aux/BT Mise en marche / en veille   CD/USB : titre précédent /suivant   / CD/USB: Pre Up-Down/ radio Internet: mémorisation de station haut/bas Left-Right CD MP3 : choix du dossier haut/bas Menu : gauche/droite Timer...
  • Seite 43: Montage Et Mise En Service

    MONTAGE ET MISE EN SERVICE Déballage • Déballez tous les éléments et retirez les matériaux de protection. • Branchez l'appareil sur une prise d'alimentation seulement après en avoir contrôlé la tension et après avoir connecté tous les autres branchements. • N'obstruez pas les ouvertures d'aération et veillez à...
  • Seite 44 Montage optionnel sur table Pieds en caoutchouc Plaque de montage Branchement 1. Branchez le câble d'alimentation dans une prise. L'appareil se met en mode veille et l'écran LCD s'allume. 2. Lorsque l'appareil s'allume pour la première fois, l'écran affiche "STARTING". 3.
  • Seite 45: Radio

    confirmez par SELECT. La radio se connecte à Internet. Une fois la connexion établie, l'écran affiche. RADIO 1. En mode radio Internet, appuyez sur les touches haut/bas (8/3) pour choisir la "liste des stations". 2. Choisissez votre "station" avec / et confirmez avec SELECT. 3.
  • Seite 46: Lecture Des Mp3

    Stop : appuyez sur : pour terminer la lecture. Titre suivant/précédent : appuyez sur: pour passer au titre précédent  ou suivant. LECTURE DES MP3 1. Après avoir parcouru le CD, le lecteur affiche le nombre de titres. L'appareil commence automatiquement la lecture du premier titre. 2.
  • Seite 47: Programmation De Cd

    Lecture aléatoire éteint éteint --- Pour la lecture des CD MP3 Mode de lecture Anzeige im Display Répéter un titre Répéter tous les titres Répéter les titres d'un dossier Lecture aléatoire éteint PROGRAMMATION DE CD Vous pouvez programmer une liste de lecture comprenant jusqu'à 20 titres dans l'ordre de votre choix.
  • Seite 48: Support Mémoire Usb Pour Lecture De Mp3

    SUPPORT MÉMOIRE USB POUR LECTURE DE Branchement L'appareil peut lire les fichiers MP3 stockés sur un support mémoire USB. 1. Mettez la radio en mode veille (ou autre mode de fonctionnement hormis le mode USB). 2. Branchez une clé USB avec la face avant vers le haut dans le port. Veillez à...
  • Seite 49: Caractéristiques Supplémentaires

    CARACTÉRISTIQUES SUPPLÉMENTAIRES Mode nuit En mode nuit, la radio s'éteint toute seule au bout d'une durée choisie. 1. Appuyez sur la touche "Sleep " pour choisir une durée parmi 15/30/45/60 mn. L'écran affiche " z". une fois la durée écoulée, la radio passe automatiquement en mode veille.
  • Seite 50: Spotify

    3. Choisissez la langue désirée avec les touches ∧/∨ et confirmez avec SELECT. Réinitialisation aux paramètres d'usine 1. Appuyez sur MENU, puis choisissez l'option "paramètres système" avec les touches ∧/∨ et confirmez avec SELECT. 2. Choisissez "paramètres d'usine" avec les touches ∧/∨. 3.
  • Seite 51 Remarques importantes • Pour utiliser Spotify il vous faut un compte Spotify premium. • Veillez à ce que l'appareil soit réglé de façon à rester connecté au réseau même en veille ou en dehors du mode réseau (FM/AUX IN). Cela permet à Spotify de diffuser en streaming sur l'appareil, même en dehors du mode réseau.
  • Seite 52: Changement Des Piles De La Télécommande

    CHANGEMENT DES PILES DE LA TÉLÉCOMMANDE Le compartiment à piles se trouve sous la télécommande. 1. Retirez le support de pile en appuyant sur la languette du milieu et en tirant le support de la pile. 2. Installez une nouvelle pile bouton (CR2032) avec le pôle plus vers le haut.
  • Seite 53: Conseils Pour Le Recyclage

    CONSEILS POUR LE RECYCLAGE Le pictogramme ci-contre apposé sur le produit signifie que la directive européenne 2012/19/ue s‘applique (poubelle à roues barrée d’une croix). Ces produits ne peuvent être jetés dans les poubelles domestiques courantes. Renseignez-vous concernant les règles appliquées pour la collecte d’appareils électriques et électroniques.
  • Seite 54 Gentile cliente, La ringraziamo per aver acquistato il nostro prodotto. La preghiamo di leggere attentamente le seguenti istruzioni e di seguirle per evitare eventuali danni. Non ci assumiamo alcuna responsabilità per danni derivati da una mancata osservazione delle avvertenze di sicurezza e da un uso improprio del dispositivo.
  • Seite 55: Dati Tecnini

    DATI TECNINI Articolo numero 10031477 Alimentazione Ingresso 100-240V ~ 50/60 Hz Uscita 5,5 V 2,5 A...
  • Seite 56: Avvertenze Di Sicurezza

    AVVERTENZE DI SICUREZZA • Prima di utilizzare il dispositivo leggere le avvertenze di sicurezza. • Conservare le istruzioni per consultazioni future. • Non utilizzare il dispositivo vicino ad acqua. Non esporre il dispositivo a umidità. • Non versare liquidi sul dispositivo poiché possono penetrare nelle aperture.
  • Seite 57: Descrizione Del Prodotto

    DESCRIZIONE DEL PRODOTTO...
  • Seite 58 Display LCD Vano CD Volume + / - Giù Indietro Menu Info / CD / Mem Sensore IR telecomando 10 Porta USB Porta AUX 12 Funzione Sleep 13 On / Off / Standby 14 Selezione funzione 15 Brano successivo / ricerca canali avanti 16 Riproduzione / pausa / stop 17 Pre-up / destra 18 Timer...
  • Seite 59 Telecomando SLEEP Attivare la funzione Sleep FUNC Selezione funzione: attivazione CD/Radio/Aux/BT Accensione / passare in modalità standby   CD/USB: brano avanti/indietro   / CD/USB: Pre Up-Down/ Internet radio: memorizzazione canali su/giù Left-Right CD-MP3: selezione cartella su/giù Menu: selezionare sinistra/destra Timer Impostare il timer Hoch/runter...
  • Seite 60: Montage E Messa In Funzione

    MONTAGE E MESSA IN FUNZIONE Disimballaggio • Disimballare tutti i componenti e rimuovere il materiale protettivo. • Collegare il dispositivo all'alimentazione solo dopo aver controllato la tensione dell'alimentazione e dopo aver effettuato tutti gli altri collegamenti. • Non coprire le aperture di ventilazione e assicurarsi che ci sia spazio libero sufficiente intorno al dispositivo.
  • Seite 61 Optionale Tischaufstellung Gummifüße Montageblech Collegamento 1. Inserire il cavo di alimentazione nella presa. Il dispositivo passa in modalità standby e la spia LCD si accende. 2. Quando si accende il dispositivo per la prima volta, sul display compare "STARTING". 3. Dopo alcuni secondi, il dispositivo avvia la procedura guidata di configurazione.
  • Seite 62: Radio

    RADIO 1. In modalità Internet Radio, premere i tasti su/giù (8/3) per selezionare "Elenco stazioni". 2. Premere / per selezionare "Stazioni" e confermare con SELECT. 3. Utilizzare / per selezionare i metodi di ricerca come "Paesi, generi, ecc" Confermare con SELECT. 4.
  • Seite 63: Riproduzione Mp3

    RIPRODUZIONE MP3 1. Dopo aver esplorato il supporto di memorizzazione, verrà visualizzato il numero di brani. Il dispositivo avvia automaticamente la riproduzione del primo brano. 2. Premere i tasti  e per selezionare la cartella. 3. Utilizzare i tasti per selezionare il brano. ...
  • Seite 64: Programmazione Cd

    Riproduzione MP3 Modalità di riproduzione Spia sul display Ripetere un brano Ripetere tutti i brani Ripetere il brano di una cartella Riproduzione casuale PROGRAMMAZIONE CD È possibile programmare fino a 20 brani in qualsiasi ordine. Non dimenticare di premere prima il tasto . 1.
  • Seite 65: Dispositivo Usb Per La Riproduzione Mp3

    DISPOSITIVO USB PER LA RIPRODUZIONE MP3 Collegamento Il dispositivo può leggere e riprodurre file MP3 memorizzati su un supporto di archiviazione USB. 1. Passare in modalità standby (o in un´altra modalità ad eccezione della modalità USB). 2. Inserire il dispositivo USB nell´apposito attacco con la parte anteriore rivolta verso l'alto.
  • Seite 66: Altre Caratteristiche

    ALTRE CARATTERISTICHE Modalità Sleep La modalità Sleep spegne la radio allo scadere di un tempo predefinito. 1. Premere il tasto "Sleep" per selezionare 15/30/45/60 min. Sul display compare " z". Allo scadere del tempo, la radio entra automaticamente in modalità standby. 2.
  • Seite 67: Spotify

    Ripristino alle impostazioni di fabbrica 1. Premere MENU e selezionare la voce "Impostazioni di sistema" con ∧/∨ e confermare con SELECT. 2. Utilizzare i tasti / per selezionare la voce "Impostazione di fabbrica". 3. Selezionare Sì con </> e confermare con SELECT. Ingresso AUX Collegare la radio ad un dispositivo audio esterno (ad esempio un lettore CD, un lettore MP3, un registratore portatile) tramite l´attacco da 3,5 mm...
  • Seite 68 Note importanti • Per utilizzare Spotify è necessario un account premium Spotify. • Assicurarsi che il dispositivo sia impostato per rimanere connesso alla rete anche in modalità standby o in assenza di modalità di rete (FM / AUX IN). Ciò consente a Spotify di trasmettere dati al dispositivo anche in assenza di modalità...
  • Seite 69: Cambiare La Pila Del Telecommando

    CAMBIARE LA PILA DEL TELECOMMANDO Il vano pila si trova nella parte inferiore del telecomando. 1. Rimuovere il portapila spingendo la linguetta verso il centro ed estraendo il portapila. 2. Inserire una nuova pila (CR2032) con il polo positivo rivolto verso l'alto. 3.
  • Seite 70: Smaltimento

    SMALTIMENTO Se sul prodotto è presente la figura a sinistra (il cassonetto dei rifiuti mobile sbarrato), si applica la direttiva europea 2012/19/UE. Questi prodotti non possono essere smaltiti con i rifiuti normali. Informarsi sulle disposizioni vigenti in merito alla raccolta separata di dispositivi elettrici ed elettronici.
  • Seite 71: Datos Técnicos

    Estimado cliente: Le felicitamos por la adquisición de este producto. Lea atentamente el siguiente manual y siga cuidadosamente las instrucciones de uso con el fin de evitar posibles daños. La empresa no se responsabiliza de los daños ocasionados por un uso indebido del producto o por haber desatendido las indicaciones de seguridad.
  • Seite 72 DATOS TÉCNICOS Número de artículo 10031477 Fuente de alimentación Entrada 100-240V ~ 50/60 Hz Salida 5,5 V 2,5 A...
  • Seite 73: Indicaciones De Seguridad

    INDICACIONES DE SEGURIDAD • Lea todas las indicaciones de uso y seguridad antes de utilizar el aparato. • Conserve este manual de instrucciones para futuras consultas. • No utilice el aparato cerca del agua y no lo exponga a la humedad. •...
  • Seite 74: Vista General Del Aparato

    VISTA GENERAL DEL APARATO...
  • Seite 75 Pantalla LCD Unidad lectora de CD Volumen+/- Botón abajo Atrás Menú Información/CD/Memoria Botón arriba Sensor IR para mando a distancia 10 Conexión USB Conexión AUX 12 SLEEP 13 Encendido/Apagado/Standby 14 Selección de funciones 15 Siguiente pista/Siguiente emisora 16 Reproducir/Pausar/Detener 17 Botón arriba/Derecha 18 Temporizador 19 Botón abajo/Izquierda 20 Pista anterior/Emisora anterior...
  • Seite 76 Mando a distancia SLEEP Activar el temporizador de apagado FUNC Selección de funciones: Activar CD/Radio/Aux/BT Encender el aparato/modo Standby   CD/USB: Pista anterior/siguiente   / CD/USB: Pre Up-Down/ Radio de internet: Emisora almacenada anterior/ Left-Right siguiente CD/MP3: Elegir carpeta arriba/abajo Menú: Elegir izquierda/derecha Timer Configurar el temporizador...
  • Seite 77: Montaje Y Puesta En Funcionamento

    MONTAJE Y PUESTA EN FUNCIONAMENTO Desembalaje • Extraiga todas las piezas y retire el material de protección. • Antes de conectar el aparato a la toma de corriente, compruebe que utilice el voltaje correcto y que haya realizado todas las conexiones. •...
  • Seite 78 Instalación opcional encima de una mesa Patas de goma Placa de montaje Conexión 1. Introduzca el cable de alimentación a la toma de corriente. La radio se pone en modo Standby y la pantalla LCD se ilumina. 2. Al poner el aparato en marcha por primera vez, la pantalla indica «STARTING».
  • Seite 79: Radio

    12. Después de introducir la contraseña, elija OK y confirme pulsando SELECT. La radio se conectará automáticamente a su red. Si se ha establecido correctamente la conexión, aparece el siguiente mensaje RADIO 1. En modo Radio de internet, pulse Arriba/Abajo (8/3) para elegir «Lista de emisoras».
  • Seite 80: Reproducción De Archivos Mp3

    Pista anterior/siguiente: Pulse : para ir a la siguiente pista o a la pista  anterior. REPRODUCCIÓN DE ARCHIVOS MP3 1. Tras reconocer el dispositivo de almacenamiento, en la pantalla aparecerá el número de pistas. El aparato reproduce automáticamente la primera pista.
  • Seite 81: Crear Lista De Reproducción De Cd

    Reproducción aleatoria Modo desactivado Para MP3 Wiedergabemodus Anzeige im Display Repetir una pista Repetir todas las pistas Repetir una carpeta Reproducción aleatoria Modo desactivado CREAR LISTA DE REPRODUCCIÓN DE CD Puede programar el orden de reproducción de hasta 20 pistas. Para ello, pulse .
  • Seite 82: Reproducción Mp3 Desde Dispositivos Usb

    REPRODUCCIÓN MP3 DESDE DISPOSITIVOS Conexión La radio puede reproducir archivos MP3 almacenados en dispositivos de memoria USB. 1. Seleccione el modo Standby (o cualquier otro modo excepto modo USB). 2. Conecte el lápiz USB al puerto correspondiente con la parte frontal mirando hacia arriba.
  • Seite 83: Otras Características

    OTRAS CARACTERÍSTICAS Temporizador de apagado Esta función apaga automáticamente la radio después de transcurrir el tiempo elegido. 1. Pulse el botón «Sleep» para elegir entre 15/30/45/60 minutos. En la pantalla aparecerá " z". Una vez transcurrido el tiempo elegido, la radio entra automáticamente en modo Standby.
  • Seite 84: Spotify

    confirmar. Restablecer las configuraciones por defecto 1. Pulse MENU, elija con los botones ∧/∨ «Configuración» y pulse SELECT para confirmar. 2. Con la ayuda de los botones ∧/∨, elija «Configuración por defecto». 3. Elija con los botones ∧/∨ «Sí» y pulse SELECT para confirmar. Entrada AUX Conecte un dispositivo externo (como reproductores de CD o MP3, grabadoras portátiles, etc.) a la entrada jack de 3,5 mm situada en la parte...
  • Seite 85 Indicaciones importantes • Para poder utilizar Spotify, es necesario disponer de la cuenta Spotify premium. • Asegúrese de que la radio esté conectada a internet incluso en modo Standby o en modo de red (FM/AUX IN). De esta manera, se podrá retransmitir los datos de Spotify incluso estando fuera del modo de red.
  • Seite 86: Cambo De Pilas En El Mando A Distancia

    CAMBO DE PILAS EN EL MANDO A DISTANCIA El compartimento de pilas se encuentra en la parte posterior del mando a distancia. 1. Retire el soporte de pilas presionándolo en el centro y extrayéndolo posteriormente. 2. Coloque una nueva pila de botón (tipo CR2025) con la polaridad + mirando hacia arriba.
  • Seite 87: Indicaciones Sobre La Retirada Del Aparato

    INDICACIONES SOBRE LA RETIRADA DEL APARATO Si el aparato lleva adherida la ilustración de la izquierda (el contenedor de basura tachado), entonces rige la directiva europea 2012/19/UE. Este producto no debe arrojarse a un contenedor de basura común. Infórmese sobre las leyes territoriales que regulan la recogida separada de aparatos eléctricos y electrónicos.

Inhaltsverzeichnis