Herunterladen Inhalt Inhalt Diese Seite drucken
Inhaltsverzeichnis

Werbung

Verfügbare Sprachen
  • DE

Verfügbare Sprachen

  • DEUTSCH, seite 1

Werbung

Inhaltsverzeichnis
loading

Inhaltszusammenfassung für auna KR-400

  • Seite 3: Inhaltsverzeichnis

    Sehr geehrter Kunde, wir gratulieren Ihnen zum Erwerb Ihres Gerätes. Lesen Sie die folgenden Hinweise sorgfältig durch und befolgen Sie diese, um möglichen Schäden vorzubeugen. Für Schäden, die durch Missachtung der Hinweise und unsachgemäßen Gebrauch entstehen, übernehmen wir keine Haftung. INHALT Technische Daten 4 Sicherheitshinweise 5...
  • Seite 4: Technische Daten

    TECHNISCHE DATEN Artikelnummer 10031880, 10031894 Stromversorgung Netzgerät Eingang 220-240V ~ 50/60 Hz Ausgang Audio Ausgangsleistung 2,7 W RMS x 2 (4 Ohm) Frequenzgang 80 Hz - 18.000 Hz UKW-Radio Frequenzbereich 87,5 MHz - 108 MHz Stereo/Mono wählbar Spezifikation V 4.1 Profile A2DP, AVRCP, HSP Reichweite...
  • Seite 5: Sicherheitshinweise

    SICHERHEITSHINWEISE • Lesen Sie vor der Benutzung des Gerätes die Warn- und Sicherheitshinweise. • Bewahren Sie alle Hinweise zum späteren Nachschlagen auf. • Das Gerät darf nicht in der Nähe von Wasser verwendet werden oder mit Feuchtigkeit in Berührung kommen. •...
  • Seite 6: Geräteübersicht
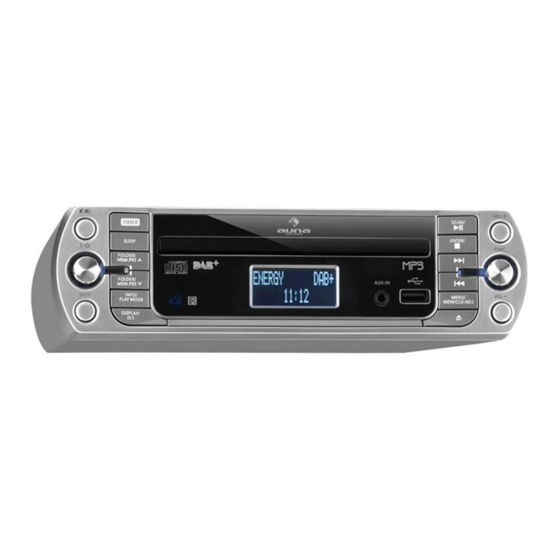
    GERÄTEÜBERSICHT...
  • Seite 7 LCD-Anzeige CD-Fach Lautstärke +/- EQ-Einstellungen Timer Schlafmodus Wiedergabemodus/Info Memory/Uhr stellen Anzeige/ID3 10 nicht verfügbar IR-Sensor für Fernbedienung 12 Aux-In-Eingang 13 CD-Fach öffnen/schließen 14 Ein/Standby 15 Funktionswahl 16 Vor/Sendersuchlauf vor 17 Wiedergabe/Pause /Scan 18 Ordner/Speicher/Hoch 19 Stopp /St-Mono 20 Folder/Pre-Down 21 Zurück/Sendersuchlauf zurück 22 Stumm 23 USB-Eingang 24 Batteriefach...
  • Seite 8 Fernbedienung Einschalten / in Standby schalten   CD: Titel vor/zurück Radio: Sendersuche vor/zurück -10/+10 CD/MP3: 10 Titel zurück/vor Folder/Pre Up-Down Radio: Senderspeicher hoch/runter Play mode/Info CD: Zufallswiedergabe; Wiederholung Radio: Sender-Info Display/ID3 Aktivieren der ID3-Information/Display-Anzeige wechseln Volume -/+ Drücken, um die Lautstärke einzustellen. Function Aktivieren von CD/Radio/Aux/BT Sleep...
  • Seite 9: Montage Und Inbetriebnahme

    MONTAGE UND INBETRIEBNAHME Auspacken • Entpacken Sie alle Teile und entfernen Sie das Schutzmaterial. • Schließen Sie das Gerät erst an die Stromversorgung an, nachdem Sie die Spannung der Stromversorgung überprüft haben und nachdem alle anderen Anschlüsse hergestellt werden. • Verdecken Sie nicht die Lüftungsöffnungen und achten Sie darauf, dass mehrere Zentimeter.
  • Seite 10 Lasche anheben Die Abstandshalter können Sie um das Gehäuse optional anbringen. Wenn Sie diese herauszuziehen nicht verwenden, benutzen Sie die kurzen Schrauben. Montageblech Lange Schrauben (für die Benutzung mit Abstandshaltern Gerät Befestigung mit Montageblech Anschluss 1. Schließen Sie das Netzkabel an eine Steckdose an. Das Gerät geht in den Standby-Betrieb und die LCD-Anzeige leuchtet auf.
  • Seite 11: Radio

    RADIO Sendersuche per Hand 1. Stecken Sie die mitgelieferte Antenne am Antennanschluss ein. Schalten Sie das Gerät am Ein/Aus-Schalter ein. 2. Stellen Sie über die Tasten   gewünschten Sender ein. 3. Regeln Sie die Lautstärke auf das gewünschte Niveau. Automatische Sendersuche 1.
  • Seite 12 Programmspeicherplatz zu bestätigen. 6. Die Schritte 2-6 für die anderen Stationen zu wiederholen. Die Senderspeicher aufrufen 1. Zum Aufrufen der Senderspeicher drücken Sie "Memory/Clk-Adj". 2. Die FOLDER/MEM/PRE-Taste drücken, um den gewünschten Senderspeicher aufzurufen. 3. Mit der Taste "Memory/Clk/Adj" den Senderspeicher bestätigen. •...
  • Seite 13: Wiedergabe Einer Cd

    WIEDERGABE EINER CD Start 1. Die Funktionstaste drücken, um den CD-Betrieb zu wählen. 2. Das CD-Fach mit "Open/Close"-Taste öffnen. 3. Die CD mit der bedruckten Seite oben eingelegen. Das CD-Fach wieder schließen. 4. Die CD wird durchsucht und auf dem Display erscheint die Anzahl der Titel.
  • Seite 14: Cd-Programmierung

    zwischen der Wiederholungs- und Zufallswiedergabe folgendermaßen hin- und herzuzschalten. MIt der Wiederholungsfunktion REPEAT können Sie einen Titel, alle Titel in einem Ordner (bei MP3-Dateien) oder alle Titel einer CD wiederholen. Bei der Zufallswiedergabe RANDOM werden alle Titel jeweils einmal in einer zufälligen Reihenfolge wiedergegeben.
  • Seite 15: Usb-Speichermedium Für Mp3-Wiedergabe

    4. Drücken Sie die "Mem/Clk-Adj"-Taste, um den Titel zu speichern. 5. Wiederholen Sie die Schritte 3 und 4, um weitere Titel hinzuzufügen. 6. Wenn alle gewünschten Titel eingegeben wurden, drücken Sie   , um die CD in der programmierten Reihenfolge der Titel wiederzugeben. 7.
  • Seite 16: Bt-Verbindung Und Wiedergabe

    BT-VERBINDUNG UND WIEDERGABE 1. Die Funktionstaste drücken, um den "BT"-Modus zu wählen. 2. Das Gerät geht den BT-Modus. Im Display blinkt "Pairing". Es bedeutet, dass BT noch nicht mit einem Gerät verbunden ist und sich im Suchmodus befindet. 3. Schalten Sie auf dem Gerät, das Sie verbinden möchten, BT ein und wählen aus der Liste er verfügbaren Geräte "KR400".
  • Seite 17 Hinweise • Das Radio bleibt 6 Sekunden im Einstellmodus. Wenn nach 6 Sekunden keine Taste gedrückt wurde, kehrt das System in den normalen Modus zurück. • Sie können während des Countdowns noch weiter Musik hören. Wenn die Zeit abgelaufen ist, ertönt ein Alarmsignal statt der Musik. Drücken Sie TIMER, um den Timer auszuschalten, bis das Symbol ...
  • Seite 18: Batteriewechsel Fernbedienung

    BATTERIEWECHSEL FERNBEDIENUNG Das Batteriefach befindet sich auf der unteren Seite der Fernbedienung. 1. Nehmen Sie die Batteriehalterung heraus, indem Sie die Lasche zur Mitte hin drücken und die Halterung herausziehen. 2. Setzen Sie eine neue Knopfzelle (CR2032) mit dem Pluspol nach oben ein.
  • Seite 19: Hinweise Zur Entsorgung

    HINWEISE ZUR ENTSORGUNG Befindet sich die linke Abbildung (durchgestrichene Mülltonne auf Rädern) auf dem Produkt, gilt die Europäische Richtlinie 2012/19/EU. Diese Produkte dürfen nicht mit dem normalen Hausmüll entsorgt werden. Informieren Sie sich über die örtlichen Regelungen zur getrennten Sammlung elektrischer und elektronischer Gerätschaften.
  • Seite 20 Dear Customer, Congratulations on purchasing this equipment. Please read this manual carefully and take care of the following hints on installation and use to avoid technical damages. Any failure caused by ignoring the items and cautions mentioned in the operation and installation instructions are not covered by our warranty and any liability.
  • Seite 21: Technical Data

    TECHNICAL DATA Item number 10031880, 10031894 Stromversorgung Netzgerät Eingang 220-240V ~ 50/60 Hz Ausgang Audio Ausgangsleistung 2,7 W RMS x 2 (4 Ohm) Frequenzgang 80 Hz - 18.000 Hz UKW-Radio Frequenzbereich 87,5 MHz - 108 MHz Stereo/Mono wählbar Spezifikation V 4.1 Profile A2DP, AVRCP, HSP Reichweite...
  • Seite 22: Safety Instructions

    SAFETY INSTRUCTIONS • Read the instructions. All safety instructions and guidelines must be read before start device. • Keep the instructions for future use. • The device must not be used near water or be put in contact with moisture. •...
  • Seite 23: Product Description

    PRODUCT DESCRIPTION...
  • Seite 24 LCD display CD tray Volume up/down button Preset EQ button Timer button Sleep button Play Mode/Info button Memory/Clock-Adjust button Display/ID3 button Remote sensor 12 Aux-in jack 13 CD tray open/close button 14 On/Standby button 15 Function button 16 Skip/Tuning Up button 17 Play/Pause /Scan button 18 Folder/Pre-Up button 19 Stop /St-Mono button...
  • Seite 25 Remote Control Press to power on / standby the system   CD: press to select previous / next tracks Radio: Press to step up/down of radio frequency -10/+10 In CD/MP3 mode : skip up/down 10 tracks Folder/Pre Up-Down Radio: press to select preset memory up/down Play mode/Info CD: press to active random/repeat function Radio: see the broadcast station information...
  • Seite 26: Installation And Getting Started

    INSTALLATION AND GETTING STARTED Unpacking • Unpack all parts and remove protective material. • Do not connect the unit to the mains before checking the main voltage and before all other connections have been made. • Do not cover any vents and make sure that there is a space of several centimeters around the unit for ventilation.
  • Seite 27 Connection 1. Plug in the AC cord (26) to the AC outlet. The unit will go to standby mode and the LCD display (1) will light up. 2. Turn on the unit (14), if the LCD display (1) is on with backlighting, it means the power supply is normal.
  • Seite 28: Radio

    switch the system into standby mode for convenience usage. RADIO Manual tuning 1. Plug in the provided DAB/FM tuner antenna to the antenna socket (25) then switch on the unit by On/Standby button (14), then press Function button (15) to select “ FM ” mode. 2.
  • Seite 29 3. Press and hold the Memory/Clock-Adjust button (8) around four second to enable memory state, the preset station will flash on LCD display. 4. Press Folder/ Pre up/down button (18/20) to select the desired station memory for storage. 5. Press Memory/Clock-Adjust button (8) to confirm the preset memory. 6.
  • Seite 30: Playing Compact Disc

    PLAYING COMPACT DISC Getting started 1. Press Function button (15) to select “ CD ” mode. 2. Push the CD tray open (13) to open the CD tray. 3. Place a CD with the printed side facing up and then close the CD tray. 4.
  • Seite 31 decodable - The performance of playing MP3 Disc is various from the quality of recording disc and the method of recording. Furthermore, the searching lead-time for MP3-CD is longer than normal CD due to difference format Repeat/Random mode Press the “ Play Mode ” button (7) during playback to select repeat and random function, a single track, all the tracks repeat or folder repeat(MP3 only) and random can be played in difference mode as in the table below.
  • Seite 32: Cd Programming

    CD PROGRAMMING You can listen the desired track, folder(for MP3 only) or whole disc repeat by this function. 1. Set in CD mode & stop the CD playback. 2. Press the “ Mem/Clk-Adj ” button (8) and “ MEM ” will appear on LCD display (1).
  • Seite 33: Bt Connecting And Playback

    • The system can detect and read the file under MP3 format only at USB mode but not other music file format. • If connect the system to MP3 player via the USB socket, due to variances in file system format, some MP3 player may not be able to play via the USB socket.
  • Seite 34 Cooking timer This system had cooking timer function from 1 to 180 minutes to remind your cooking state by bee tone sound.. 1. Press and hold the “ Timer ” button on the remote control to enter the timer setting mode, the first digits of display and timer icon  will be flashing.
  • Seite 35: Battery Replacement (Remote Control)

    BATTERY REPLACEMENT (REMOTE CONTROL) The battery compartment is located on the back of the remote control. 1. Remove the battery compartment door by pressing in on the tab and lifting it off. 2. Insert one (1) CR2032 size batteries into the battery compartment following the polarity markings inside the battery compartment.
  • Seite 36: Disposal Considerations

    DISPOSAL CONSIDERATIONS According to the European waste regulation 2012/19/EU this symbol on the product or on its packaging indicates that this product may not be treated as household waste. Instead it should be taken to the appropriate collection point for the recycling of electrical and electronic equipment.
  • Seite 37 Chère cliente, cher client, Toutes nos félicitations pour l’acquisition de ce nouvel appareil. Veuillez lire attentivement les instructions suivantes de branchement et d’utilisation afin d’éviter d’éventuels dommages. Le fabricant ne saurait être tenu pour responsable des dommages dus au non-respect des consignes de sécurité et à...
  • Seite 38: Fiche Technique

    FICHE TECHNIQUE Numéro d'article 10031880, 10031894 Alimentation de l'adaptateur secteur Eingang 220-240V ~ 50/60 Hz Ausgang Audio Puissance de sortie 2,7 W RMS x 2 (4 Ohm) Frequenzgang 80 Hz - 18.000 Hz Radio FM Plage de fréquences 87,5 MHz - 108 MHz Stéréo/Mono au choix Spécification...
  • Seite 39: Consignes De Sécurité

    CONSIGNES DE SÉCURITÉ • Avant d'utiliser l'appareil, lisez les consignes de sécurité et les avertissements. • Conservez toutes les recommandations pour pouvoir vous y référer ultérieurement. • L'appareil ne doit pas être utilisé à proximité de l'eau ou être au contact de l'humidité.
  • Seite 40: Aperçu De L'appareil

    APERÇU DE L'APPAREIL...
  • Seite 41 Ecran LCD Lecteur CD Volume +/ Réglages de l'égaliseur Timer Mode nuit Mode de lecture/Info Memory/réglage de l'heure Affichage/ID3 10 Indisponible Capteur IR de la télécommande 12 Entrée Aux-In 13 Ouvrir/fermer le lecteur CD 14 On/Veille 15 Sélecteur de fonctions 16 Avant/recherche de stations avant 17 Lecture/Pause /Scan 18 Dossier/mémoire/haut...
  • Seite 42 Fernbedienung allumer / passer en mode veille   CD : titre suivant/précédent Radio : recherche de station avant/arrière -10/+10 CD/MP3 : 10 titres vers l'avant/l'arrière Folder/Pre Up-Down Radio : mémorisation de stations haut/bas Play mode/Info CD : lecture aléatoire ; répétition Radio : informations sur la station .
  • Seite 43: Montage Et Mise En Service

    MONTAGE ET MISE EN SERVICE Déballage • Déballez tous les éléments et retirez les matériaux de protection. • Branchez l'appareil sur une prise d'alimentation seulement après en avoir contrôlé la tension et après avoir connecté tous les autres branchements. • N'obstruez pas les ouvertures d'aération et veillez à...
  • Seite 44 Soulevez la Les entretoises sont optionnelles. Si languette pour vous ne vous en servez pas, utilisez retirer le boîtier. les vis courtes. Plaque de montage Longues vis (à utiliser avec les entretoises) Appareil Fixation sur la plaque de montage réponse présélectionnée "Yes". Appuyez sur SELECT pour démarrer l'assistant d'installation.
  • Seite 45 touches  et  entre les formats 12 heures et 24 heures. appuyez sur la touche "Mem/Clk-Adj". 3. Les chiffres "0:00" clignotent à l'écran. Réglez les heures avec les touches et . Appuyez sur "Mem/Clk-Adj" pour afficher l'heure exacte. 4. Les troisiième et quatrième chiffres clignotent "00". Appuyez sur  et  pour régler les minutes.
  • Seite 46: Radio

    RADIO Recherche manuelle de stations 1. Branchez l'antenne fournie sur la prise d'antenne. Allumez l'appareil avec le bouton marche/arrêt. 2. Réglez la station souhaitée avec les touches 3. Réglez le volume au niveau souhaité. Recherche automatique de stations 1. Avec la touche de fonction, choisissez FM. 2.
  • Seite 47: Lecture D'un Cd

    Choisir une station mémorisée 1. Pour choisir une station mémorisée, appuyez sur "Memory/Clk-Adj". 2. Appuyez sur la touche FOLDER/MEM/PRE pour choisir la station enregistrée recherchée. 3. Confirmez le choix de la station mémorisée par appui sur "Memory/Clk/ Adj". • Les stations mémorisées sont effacées si l'alimentation est coupée et que vous n'avez pas installé...
  • Seite 48: Lecture Des Mp3

    LECTURE DES MP3 1. Après avoir parcouru le CD, le lecteur affiche le nombre de titres. L'appareil commence automatiquement la lecture du premier titre. 2. Appuyez sur les touches  et pour choisir le dossier. 3. Choisissez le titre avec les touches ...
  • Seite 49: Programmation De Cd

    Pour la lecture des CD MP3 Mode de lecture Affichage à l'écran Répéter un titre Rep1 Répéter tous les titres RepA Répéter les titres d'un dossier RepF Lecture aléatoire Rand éteint PROGRAMMATION DE CD Vous pouvez programmer une liste de lecture comprenant jusqu'à 20 titres dans l'ordre de votre choix.
  • Seite 50: Connexion Bt Et Lecture

    Le branchement d'une clé à l'envers peut endommager l'autoradio. Veillez à ce que la bonne face de la clé soit dirigée vers le haut. 3. Rallumez l'appareil et appuyez sur la touche de fonctions pour choisir le mode USB. Après le branchement, le système commence automatiquement la lecture du support de stockage.
  • Seite 51: Caractéristiques Supplémentaires

    CARACTÉRISTIQUES SUPPLÉMENTAIRES Mode nuit 1. Appuyez sur la touche "Sleep". L’écran affiche "SLP-90". 2. Maintenez cette touche pour régler la minuterie d’arrêt automatique sur l’une des valeurs suivantes dans l’ordre : 90 -> 80 -> --- -> 10 minutes. L’écran affiche l’icône "zZZ".
  • Seite 52: Changement Des Piles De La Télécommande

    Entrée AUX Branchez la radio sur un appareil audio externe (par exemple un lecteur de CD, lecteur MP3, lecteur de cassettes portable) par la prise jack 3,5 mm sur la face avant de l’appareil (câble non fourni). Lorsque le câble est branché, choisissez à l’aide de la touche de fonction le mode AUX.
  • Seite 53: Conseils Pour Le Recyclage

    CONSEILS POUR LE RECYCLAGE Le pictogramme ci-contre apposé sur le produit signifie que la directive européenne 2012/19/UE s‘applique (poubelle à roues barrée d’une croix). Ces produits ne peuvent être jetés dans les poubelles domestiques courantes. Renseignez-vous concernant les règles appliquées pour la collecte d’appareils électriques et électroniques.
  • Seite 54 Gentile cliente, La ringraziamo per aver acquistato il nostro prodotto. La preghiamo di leggere attentamente le seguenti istruzioni e di seguirle per evitare eventuali danni. Non ci assumiamo alcuna responsabilità per danni derivati da una mancata osservazione delle avvertenze di sicurezza e da un uso improprio del dispositivo.
  • Seite 55: Dati Tecnici

    DATI TECNICI Articolo numero 10031880, 10031894 Alimentazione Ingresso 220-240V ~ 50/60 Hz Uscita Audio Potenza in uscita 2,7 W RMS x 2 (4 Ohm) Risposta in frequenza 80 Hz - 18.000 Hz Radio FM Raggio frequenza 87,5 MHz - 108 MHz Stereo/mono Selezionabile Specifica...
  • Seite 56: Avvertenze Di Sicurezza

    AVVERTENZE DI SICUREZZA • Leggere le avvertenze di sicurezza prima di utilizzare il dispositivo. • Conservare le istruzioni per consultazioni future. • Non utilizzare il dispositivo in prossimità di acqua. Non esporre il dispositivo a umidità. • Non versare liquidi sul dispositivo poiché possono penetrare nelle aperture.
  • Seite 57: Descrizione Del Prodotto

    DESCRIZIONE DEL PRODOTTO...
  • Seite 58 Display LCD Vano CD Volume + / - Impostazioni EQ Timer Modalità Sleep Modalità di riproduzione / Info Impostazione memoria / orologio Display / ID3 10 Non disponibile Sensore IR per telecomando 12 Ingresso Aux-In 13 Aprire/chiudere il vano CD 14 On / Standby 15 Selezione funzione 16 Avanti /Ricerca canali in avanti...
  • Seite 59 Telecomando Accensione / passare in standby   CD: brano avanti / indietro Radio: ricerca canali avanti / indietro -10/+10 CD/MP3: 10 brani indietro / avanti Folder/Pre Up-Down Radio: memorizzazione canali su / giù Play mode/Info CD: riproduzione casuale; ripetizione Radio: info canali Display/ID3 Attivare l´informazione ID3 / cambiare...
  • Seite 60: Montaggio E Messa In Funzione

    MONTAGGIO E MESSA IN FUNZIONE Disimballaggio • Disimballare tutti i componenti e rimuovere il materiale protettivo. • Collegare il dispositivo all'alimentazione solo dopo aver controllato la tensione dell'alimentatore e dopo aver effettuato tutti gli altri collegamenti. • Non coprire le aperture di ventilazione e assicurarsi ci sia spazio libero sufficiente intorno al dispositivo.
  • Seite 61 Sollevare la linguetta L´installazione dei distanziatori è per estrarre opzionale. Se non si utilizzano i distanziatori, utilizzare le viti corte. l´alloggiamento. Piastra di montaggio Viti lunghe (da utilizzare con i distanziatori) Dispositivo Fissaggio con piastra di montaggio Collegamento 1. Inserire il cavo di alimentazione nella presa. Il dispositivo passa in modalità...
  • Seite 62: Radio

    RADIO Ricerca manuale delle stazioni 1. Inserire l'antenna in dotazione nell´apposito attacco. Accendere il dispositivo utilizzando l'interruttore on/off. 2. Utilizzare i tasti  et  per impostare la stazione desiderata. 3. Regolare il volume al livello desiderato. Automatische Sendersuche 1. Impostare FM tramite il tasto funzione. 2.
  • Seite 63 Accedere alle stazioni memorizzate 1. Per accedere alle stazioni memorizzate, premere "Memory/Clk-Adj". 2. Premere il tasto FOLDER/MEM/PRE per accedere al canale desiderato. 3. Confermare il canale memorizzato con il tasto "Memory/Clk/Adj". • Le impostazioni predefinite vengono cancellate se si disinserisce la spina dalla presa e se la batteria di emergenza non è...
  • Seite 64: Riproduzione Di Un Cd

    RIPRODUZIONE DI UN CD Avvio 1. Premere il tasto funzione per selezionare la modalità CD. 2. Aprire il vano CD con il tasto "Open/Close". 3. Inserire il CD con il lato stampato rivolto verso l'alto. Chiudere di nuovo il vano CD. 4.
  • Seite 65: Programmazione Cd

    La funzione di ripetizione REPEAT consente di ripetere una traccia, tutte le tracce di una cartella (per i file MP3) o tutte le tracce di un CD. La riproduzione casuale RANDOM riproduce tutte le tracce una volta in ordine casuale. Riproduzione CD Modalità...
  • Seite 66: Dispositivo Usb Per La Riproduzione Mp3

    5. Ripetere i passaggi 3 e 4 per aggiungere altri brani. 6. . Quando sono stati inseriti tutti i brani desiderati, premere   per riprodurre il CD nella sequenza programmata. 7. Terminare la riproduzione con il tasto . Premere nuovamente  per cancellare la memoria.
  • Seite 67: Collegamento Bt E Riproduzione

    COLLEGAMENTO BT E RIPRODUZIONE 1. Premere il tasto funzione per selezionare la modalità "BT". 2. Il dispositivo passa in modalità BT. Il simbolo "Pairing" lampeggia sul display. Ciò significa che il BT non è ancora connesso ad un dispositivo ed è in modalità di ricerca. 3.
  • Seite 68 Note • La radio rimane in modalità di impostazione per 6 secondi. Se dopo 6 secondi non si preme alcun tasto, il sistema ritorna alla modalità normale. • È possibile ascoltare musica durante il conto alla rovescia. Allo scadere del tempo, viene emesso un allarme al posto della musica. Premere TIMER per spegnere il timer finché...
  • Seite 69: Cambiare La Pila Del Telecomando

    CAMBIARE LA PILA DEL TELECOMANDO Il vano pila si trova nella parte inferiore del telecomando. 1. Rimuovere il portapila spingendo la linguetta verso il centro ed estraendo il supporto. 2. Inserire una nuova pila (CR2032) con il polo positivo rivolto verso l'alto. 3.
  • Seite 70: Smalitmento

    SMALITMENTO Se sul prodotto è presente la figura a sinistra (il cassonetto dei rifiuti mobile sbarrato), si applica la direttiva europea 2012/19/UE. Questi prodotti non possono essere smaltiti con i rifiuti normali. Informarsi sulle disposizioni vigenti in merito alla raccolta separata di dispositivi elettrici ed elettronici.
  • Seite 71 Estimado cliente: Le felicitamos por la adquisición de este producto. Lea atentamente el siguiente manual y siga cuidadosamente las instrucciones de uso con el fin de evitar posibles daños. La empresa no se responsabiliza de los daños ocasionados por un uso indebido del producto o por haber desatendido las indicaciones de seguridad.
  • Seite 72: Datos Técnicos

    DATOS TÉCNICOS Número de artículo 10031880, 10031894 Fuente de alimentación Entrada 220-240V ~ 50/60 Hz Salida Audio Potencia de salida 2,7 W RMS x 2 (4 Ohm) Respuesta en frecuencia 80 Hz - 18.000 Hz Radio FM Respuesta de frecuencia 87,5 MHz - 108 MHz Estéreo/Mono elegible...
  • Seite 73: Indicaciones De Seguridad

    INDICACIONES DE SEGURIDAD • Lea todas las indicaciones de uso y seguridad antes de utilizar el aparato. • Conserve este manual de instrucciones para futuras consultas. • • No utilice el aparato cerca del agua y no lo exponga a la humedad. •...
  • Seite 74: Vista General Del Aparato

    VISTA GENERAL DEL APARATO...
  • Seite 75 Pantalla LCD Unidad lectora de CD Volumen+/- Configuraciones EQ Temporizador Temporizador de apagado Modo de reproducción/Información Memoria/Configuración de hora Indicador/ID3 10 No disponible Sensor IR para mando a distancia 12 Entrada auxiliar 13 Abrir/cerrar la unidad lectora de CD 14 Botón de encendido/Standby 15 Selección de funciones 16 Adelante/Siguiente emisora 17 Reproducción/Pausa/Escaneo...
  • Seite 76 Mando a distancia Encender el aparato/modo Standby   CD: Pista anterior/siguiente Radio: Emisora anterior/siguiente -10/+10 CD/MP3: Retroceder/avanzar 10 pistas Folder/Pre Up-Down Radio: Emisora almacenada anterior/siguiente Play mode/Info CD: Reproducción aleatoria; Repetición Radio: Información sobre la emisora Display/ID3 Activar información ID3/Cambiar indicador de pantalla Volume -/+ Aumentar o disminuir el volumen.
  • Seite 77: Montaje Y Puesta En Funcionamiento

    MONTAJE Y PUESTA EN FUNCIONAMIENTO Desembalaje • Extraiga todas las piezas y retire el material de protección. • Antes de conectar el aparato a la toma de corriente, compruebe que utilice el voltaje correcto y que haya realizado todas las conexiones. •...
  • Seite 78 Levante el mecanismo de bloqueo para Puede utilizar los separadores liberar la radio. de forma opcional. Si no los va a utilizar, emplee los tornillos cortos. Placa de montaje Tornillos largos (Para uso con separadores) Aparato Montaje con la placa de montaje Conexión 1.
  • Seite 79: Radio

    RADIO Búsqueda manual de emisoras 1. Monte la antena suministrada en el conector de antena. Pulse el botón ON/OFF para encender la radio. 2. Busque la emisora deseada pulsando los botones  y . 3. Ajuste el volumen con los botones de volumen. Búsqueda automática de emisoras 1.
  • Seite 80 Acceder a las emisoras guardadas 1. Pulse el botón «Memory/Clk-Adj» para acceder a las emisoras almacenadas. 2. Pulse el botón «FOLDER/MEM/PRE» para acceder a la memoria de emisoras deseada 3. Pulse el botón «Memory/Clk-Adj» para confirmar la memoria de emisoras deseada. •...
  • Seite 81: Reproducción De Cd

    REPRODUCCIÓN DE CD Inicio 1. Pulse varias veces el botón Function para seleccionar el modo CD. 2. Pulse el botón «Open/Close» para abrir el compartimento de CD. 3. Introduzca un CD con la parte impresa mirando hacia arriba. Cierre el compartimento de CD.
  • Seite 82: Crear Lista De Reproducción De Cd

    Repetición/Reproducción aleatoria En el modo reproducción, pulse el botón de Reproducción aleatoria/ Repetición para elegir entre los diferentes modos de reproducción. Con la función de repetición REPEAT puede repetir una pista, todas las pistas de una carpeta (solo para archivos MP3) o todas las pistas de un CD. Con la reproducción aleatoria RANDOM reproducirá...
  • Seite 83: Reproducción Mp3 Desde Dispositivos Usb

    2. Pulse el botón «Mem/Clk-Adj». En la pantalla aparecerá «MEM». 3. Elija la pista deseada con los botones  y  . 4. Pulse el botón «Mem/Clk-Adj» para guardar la pista. 5. Repita los pasos 3 y 4 para añadir más pistas. 6.
  • Seite 84: Conexión Y Reproducción Vía Bt

    Retirar dispositivo USB Para retirar el dispositivo de almacenamiento, desconecte la alimentación eléctrica. Retire el dispositivo de almacenamiento de la ranura. CONEXIÓN Y REPRODUCCIÓN VÍA BT 1. Pulse varias veces el botón Function para seleccionar el modo BT. 2. El aparato entra en modo BT. En la pantalla aparecerá parpadeando «Pairing».
  • Seite 85 4. En el siguiente paso, ajuste el volumen de la alarma con los botones de volumen. Pulse otra vez el botón TIMER para iniciar la cuenta atrás. Indicaciones: • La radio permanece durante 6 segundos en modo Ajustes. La radio vuelve al modo habitual si durante 6 segundos no introduce ningún cambio.
  • Seite 86: Cambo De Pilas En El Mando A Distancia

    CAMBO DE PILAS EN EL MANDO A DISTANCIA El compartimento de pilas se encuentra en la parte posterior del mando a distancia. 1. Retire el soporte de pilas presionándolo en el centro y extrayéndolo posteriormente. 2. Coloque una nueva pila de botón (tipo CR2025) con la polaridad + mirando hacia arriba.
  • Seite 87: Indicaciones Para La Retirada Del Aparato

    INDICACIONES PARA LA RETIRADA DEL APARATO Si el aparato lleva adherida la ilustración de la izquierda (el contenedor de basura tachado), entonces rige la directiva europea 2012/19/UE. Este producto no debe arrojarse a un contenedor de basura común. Infórmese sobre las leyes territoriales que regulan la recogida separada de aparatos eléctricos y electrónicos.

Inhaltsverzeichnis