Salus Controls RT510SPE Anleitung
RT510SPE
Installation Guide
Introduction
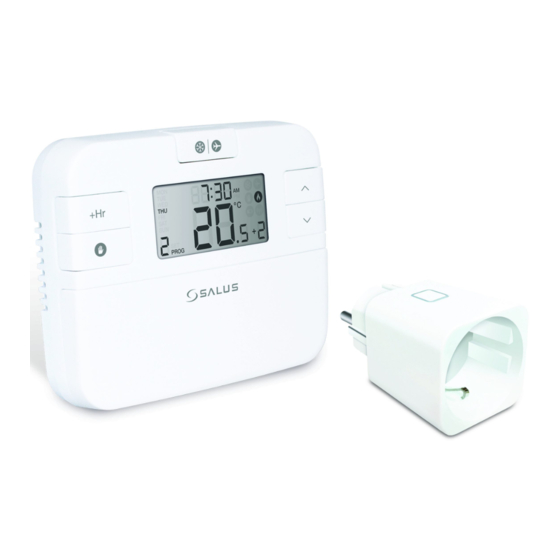
The RT510SPE module will switch your appliance on or off in accordance with the temperature set by you. The
completed RT510SPE series consists of a transmitter - RT510TX thermostat and a Smart Plug SPE868.
Go to www.salus-manuals.com for the full PDF version of the manual.
Product Compliance
This product complies with EMC 2014/30/EU, LVD 2014/35/EU, RED 2014/53/EU and RoHS
2011/65/EU.
Declaration of Conformity on www.saluslegal.com
868.0-868.6MHz; <13dBm
Safety Information
Use in accordance with the regulations. Indoor use only. Keep your equipment completely dry. Disconnect your
equipment before cleaning it with a dry towel.
Einleitung
Der SALUS RT510SPE schaltet Ihrer Heizung an oder aus je nach ihren Heizungseinstellungen. Der RT510iSPE besteht
aus einem Sender - dem RT510TX und einem Zwischenstecker SPE868 (Empfänger).
Auf www.salus-manuals.com erhalten Sie eine komplette Anleitung zu diesem Produkt.
Produktkonformität
Dieses Produkt erfüllt die wesentlichen Anforderungen der EMC 2014/30/EU, LVD 2014/35/EU, RED 2014/53/EU und
RoHS 2011/65/EU. Den Vollständigen Text der EU Komformitätserklärung können Sie auf www.saluslegal.com einsehen.
868.0-868.6MHz; <13dBm
Sicherheitsinformationen
Produkt muss gemäß den gängigen Richtlinien verwendet werden. Nur in Innenräumen verwenden. Halten Sie
ihr Gerät trocken. Trennen Sie ihr gerät vom Strom ehe Sie es mit einem trockenen Tuch reinigen.
Introduction
Le module RT510SPE allumera ou éteindra votre appareil selon la température que vous aurez choisie. La série
RT510SPE complète se compose d'un transmetteur (thermostat RT510TX) et d'une prise intelligente SPE868.
Rendez-vous sur le site www.salus-manuals.com pour la version PDF complète du manuel.
Conformité du produit
Ce produit est conforme à la norme EMC 2014/30/EU, LVD 2014/35/EU, RED 2014/53/EU et RoHS 2011/65/EU. Texte
complet de la déclaration de conformité de l'UE disponible sur le site www.saluslegal.com
868.0-868.6MHz; <13dBm
Utilisation des informations sur la scurité
Conforme aux réglementations. Conçu pour un usage intérieur. Maintenez votre appareil au sec. Débranchez
votre appareil avant de le nettoyer avec un chiffon sec.
Inleiding
De RT510SPE module zal uw apparaat in- of uitschakelen overeenkomstig de door u ingestelde temperatuur. De
complete RT510SPE serie bestaat uit een transmitter - RT510TX thermostaat en een smart plug SPE868.
Download de volledige handleiding als PDF-bestand via www.salus-manuals.com
Productconformiteit
Dit product voldoet aan de richtlijn EMC 2014/30/EU, LVD 2014/35/EU, RED 2014/53/EU en RoHS 2011/65/EU. De
volledige EU-conformiteitsverklaring vindt u op www.saluslegal.com
868.0-868.6MHz; <13dBm
Veiligheidsinformatie
Gebruik in overeenstemming met de voorschriften. Alleen gebruiken in binnenomgevingen. Zorg dat het
apparaat helemaal droog blijft. Ontkoppel uw apparaat voordat u het schoonmaakt met een droge handdoek.
Button Functions
Fonctions de boutton
1
8
1
2
+Hr
3
4
5
6
7
7
6
SELECT
SET
1
Press for frost mode
5
Betätigen für Frostschutz
Appuyez pour le mode antigel
Druk hierop voor vorstmodus
Press 3 sec for holiday mode
2
6
Für 3 Sekunden gedrückt halten für den Urlaubsmodus
Appuyez pendant 3 secondes pour le mode vacances
Druk hier 3 sec op voor vakantiemodus
Increase button
3
7
Erhöhen Taste
Bouton Augmenter
Verhoogknop
Decrease button
4
8
Senken Taste
Bouton Diminuer
Verlaagknop
LCD icons
Icônes de l'écran LCD
Full text of the EU
1
2
3
1
2
3
4
5
6
7
12
1
2
3
Current day of the program
Current time
Current Temperature
Aktueller Tag im Programm
Aktuelle Uhrzeit
Aktuelle Temperatur
Programme du jour actuel
Heure actuelle
Température actuelle
Huidige dag van het programma
Huidige tijd
Huidige temperatuur
5
6
7
Frost Protection
Vacation Mode
Temporary/Permanent Override
Frostschutz
Urlaubsmodus
Kurzfristige/dauerhafte Änderung
Protection contre le gel
Mode vacances
Contournement temporaire/permanent
Vorstbescherming
Vakantiemodus
Tijdelijk/permanent negeren
10
11
9
RF signal
Low battery
Boost Mode
Funk-Signal
Batterieladung niedrig
Boost Modus
Signal RF
Pile faible
Mode Boost
Laag batterijniveau
RF-signaal
Boostmodus
DIP switch settings
Réglages du commutateur DIP
Tasten Funktionen
Knop functies
2
3
Control feature
4
Operation
When TPI is selected on DIP switch № 2,
5
the DIP switch № 1 is functional. You can
TEST / PAIRING
choose the Cycles Per Hour between a
lower comfort level (6CPH) and a higher
comfort level (9CPH).
Press to confirm setting
Regeleigen-
Betätigen um die Einstellung zu bestätigen
schaften
Appuyez pour confirmer le réglage
Bedienung
Wenn TPI mit dem DIP Schalter Nr 2
Druk hierop om de instelling te bevestigen
ausgewählt ist so ist der DIP Schalter Nr.1
aktiv. Sie können die Zyklen je Stunde
zwischen niedriger komfortebene ( 6 Z/h)
Press to select setting
oder höherer Komfortebene wählen.
Betätigen um Einstellungen auszuwählen
Appuyez pour sélectionner le réglage
Druk hierop om de instelling te selecteren
Fonctionnalités
TPI (Proportionnalité Intégrale)
Press to enter/exit permanent override
de régulation
Betätigen um den manuellen Modus zu aktivieren/ deaktivieren
Fonctionne-
Quand TPI est sélectionné sur l'interrupteur
Appuyer pour activer/quitter le contournement permanent
ment
DIP N°2, l'interrupteur N°1 est activable.
Druk op enter/exit permanent override
Vous pouvez choisir le nombre de Cycles
Par Heure entre un niveau de confort bas
Press to enter/exit boost mode
(6CPH) ou un plus haut niveau (9CPH).
Betätigen um den Boost-Modus zu aktivieren /deaktvieren
Appuyer pour activer/quitter le mode boost
Druk hierop om in/uit boostmodus te gaan
Bediening
LED Symbole
In werking
Als TPI is geselecteerd op DIP Switch nr. 2,
dan is DIP Switch nr. 1 functioneel. U kunt
Lcd-pictogrammen
het aantal cycli per uur kiezen tussen laag
comfort (6CPH) en hoog comfort (9CPH).
4
5
6
Smart plug LED indication
7
Indication de la prise intelligente
à LED
8
9
10
11
4
Temperature unit
Temperatur Einheit
Unité de température
Temperatuureenheid
8
Heating Mode ON
Heizungsmodus AN
Mode chauffage allumé
Verwarmingsmodus AAN
12
Program number
Programm Nummer
Numéro de programmation
Nummer van het programma
Einstelllungen der DIP-Schalter
Dipswitch-instellingen
The DIP Switches can be found on the rear of your thermostat.
Die DIP Schalter befinden sich auf der Rückseite ihres Thermostaten.
L'interrupteur DIP se trouve au dos de votre thermostat.
De DIP Switch vindt u op de achterkant van uw thermostaat.
TPI
Span
When Span is selected on DIP
switch № 2, the DIP switch № 1 is
not functional. The temperature
accuracy of your thermostat is set
to ± 0.25 °C.
TPI
Spreizung
Wenn Spreizung mit dem DIP
Schalter Nr 2 gewählt wurde ist
der DIP Schalter Nr1 inaktiv. Die
Temperaturgenauigkeit ist auf +/-
0.25C eingestellt.
Span (Ecart)
Quand Span est selctionné sur
l'interrupteur DIP N°2, l'interrupteur
N°1 n'est pas activable. La précision
de température est réglée sur
+-0,25°C.
TPI
Span
Als u Span kiest op DIP Switch nr. 2,
dan werkt DIP Switch nr. 1 niet. De
accuraatheid van de temperatuur is
dan ca 0,25 C.
Zwischenstecker LED Indikator
Ledindicatie smart plug
Solid Red - paired, smart plug is off
Solid Green - paired, smart plug is on
1.
Pulsating red- waiting for pairing
i
2.
Slow Flash red - overheat protection
3.
Flashing red - safe mode, lost connection
with thermostat and smart plug is off
Flashing Green - in test pairing mode
Flashing Red and Green -fail safe mode, lost
connection with thermostat, smart plug is on
Dauerhaft Rot - verbunden, Stecker ist aus
Dauerhaft Grün - verbunden, Stecker ist an
1.
Pulsierendes Rot - wartend auf Verbindung
2.
Langsam Rot blinkend - Überhitzungsschutz
3.
Rot blinkend - Sicherheitsmodus, Verbindung mit dem
Thermostat verloren und Stecker ist aus.
Grün Blinkend - Test Modus
Grün und Rot blinkend - Sicherheitsmodus, Verbindung mit dem
Thermostat verloren, Stecker ist an
Rouge fixe - apparié, la prise intelligente est éteinte
Vert fixe - apparié, la prise intelligente est allumée
1.
Rouge pulsant - en attente d'appariement
2.
Rouge clignotant lentement - sécurité anti-surchauffe
3.
Rouge clignotant - mode sécurisé, connexion perdue avec
le thermostat et la prise intelligente est éteinte
Vert clignotant - en mode appariement d'essai
Rouge et vert clignotant - échec du mode sécurisé, connexion
perdue avec le thermostat et la prise intelligente est allumée
Vast rood - gekoppeld, smart plug staat uit
Vast groen - gekoppeld, smart plug staat aan
1.
Pulserend rood - wachtend op koppeling
2.
Langzaam knipperend rood-oververhittingsbescherming
3.
Knipperend rood - veilige modus, onderbroken verbinding
met thermostaat en smart plug staat uit
Knipperend groen - in testkoppelingsmodus
Knipperend rood en groen - 'fail-safemodus, onderbroken
verbinding met thermostaat, smart plug staat aan
If the thermostat loses connection with the Smart Plug, the Smart Plug goes into fail safe mode after
22 minutes. In this mode you still can operate your Smart Plug manually (by pressing the button on
the device).
Sollte der Thermostat die Verbindung mit dem Stecker verlieren wird dieser nach 22 Minuten in den
Sicherheitsmodus wechseln. In diesem Modus können Sie den Stecker manuell bedienen (Knopfdruck
auf dem Stecker).
Si le thermostat perd la connexion avec la prise intelligente, la prise intelligente bascule en mode de
sécurité intégrée au bout de 22 minutes. Avec ce mode, vous pouvez quand même faire fonctionner
votre prise intelligente manuellement (en appuyant sur le bouton sur l'appareil).
Als de verbinding tussen de thermostaat en de smart plug onderbroken wordt, gaat de smart plug in
'fail-safe'-modus na 22 minuten. In deze modus kunt u uw smart plug nog steeds handmatig bedienen
(door op de knop van het apparaat te drukken).

Verwandte Anleitungen für Salus Controls RT510SPE


Inhaltszusammenfassung für Salus Controls RT510SPE
- Seite 1 Introduction Druk hierop om in/uit boostmodus te gaan Verlaagknop The RT510SPE module will switch your appliance on or off in accordance with the temperature set by you. The Bediening Span completed RT510SPE series consists of a transmitter - RT510TX thermostat and a Smart Plug SPE868.
- Seite 2 Mettez le thermostat en mode appariement en appuyant sur le bouton appariement Temporary override Utilisez pour sélectionner Week-end/Semaine, appuyez sur pour confirmer Installation - Step 1 Installation – Schritt 1 Kurzfristige Änderung SELECT pendant 3 secondes. Une fois la prise intelligente appariée avec le thermostat, la LED est votre choix.