
Verwandte Anleitungen für BYK haze-gard plus


Inhaltszusammenfassung für BYK haze-gard plus
- Seite 1 Measure what you see. haze-gard plus Operating Instructions Betriebsanleitung Mode d’emploi Instruzioni d’uso A member of Additives & Instruments...
- Seite 2 Cat. No. AT-4725 Cat. No. AT-4726 haze-gard plus Best.-Nr. AT-4725 Best.-Nr. AT-4726 haze-gard plus N° Ref. AT-4725 238 013 796 EDFI 0805 N° Ref. AT-4726 haze-gard plus No di cat. AT-4725 No di cat. AT-4726...
-
Seite 4: Inhaltsverzeichnis
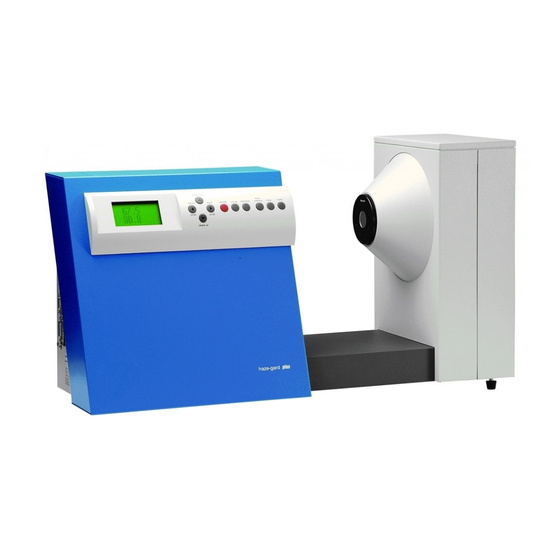
Cat.No. AT-4725 and AT-4726 Table of Contents Safety Information System Description Startup Operation Calibration 5.1 Additional Standards for Monitoring Test Equipment 5.2 Cleaning the Standards 5.3 Changing Calibration Values 5.4 Calibration with Taber Abrasion Holder SET-UP Menu: Setting Instrument Parameters... - Seite 5 LCD-Display Control Panel Haze Port Clarity Port Connection for (RS-232) Foot Switch...
-
Seite 6: Safety Information
1. Safety Information No claims of product liability Only devices that meet the or warrantee can be honored requirements for low - voltage if the device is not operated in safety may be connected to accordance with the operating the RS 232 interface. instructions or the instructions The power supply unit can be on the instrument. - Seite 7 Defects and extraordinary loads dispose of this product together with your household If safe operation can no lon- waste. Please refer to the ger be presumed, shut down information of your local the device and secure it community or contact our against unintended operation.
-
Seite 8: System Description
films, packaging and parts made of plastic driven operation and other transparent materials. -
Seite 9: Startup
3. Startup IMPORTANT NOTES! The instrument chassis is resistant to Please read before you operate the a number of solvents, but cannot be instrument: guaranteed to withstand all The unit has no special environmental chemicals. Use only a soft, damp requirements. - Seite 10 Setting Up Always switch off the unit before plugging in or unplugging the RS-232 various connectors (foot switch, printer cable and power cord). Make sure the voltage setting is correct. Otherwise the instrument will not operate properly or foot- switch safely.
- Seite 11 Power-Up S E L F D I A G N O S T I C L a m p : C h o p p e r : S h u t t e r : V e r s i o n : 1 .
- Seite 12 S T A T U S S T A T U S S T A T I S T I C - M E M O R Y T r a n s m i s s i o n S t d . L a m p S t a t u s 1 0 0 .
- Seite 13 W A R M - U P Only about 2 minutes are needed for warm-up. As soon as the instrument has completed the self-diagnosis and status displays, it immediately goes into the mode that was active at the last shutdown. It is now ready for operation.
-
Seite 14: Operation
4. Operation Select the parameter you want to The specimen must lie flat during measure. measurements. By pressing one of the three Start the measurement by pressing buttons you can either switch bet- the <operate> button or the foot ween parameters (in Continuous switch. - Seite 15 delete last 1 4 . 7 trans- mittance statistic result operate set up reference haze clarity on/off on/off delete all A message on the display will tell you if it is necessary to change measure- ment ports (when multiple parame- Control panel: ters have been selected).
- Seite 16 operate set up reference In the measuring modes, starts Calls up the SET-UP menu Used in Continuous Mode to measurements. (Chapter 6). determine the reference value for total In SET-UP mode, confirms the selec- transmittance (Chapter 8). ted function.
-
Seite 17: Calibration
To calibrate: To ensure accurate calibration, use CAUTION: Make sure the only original standards from calibration standards are clean BYK-Gardner. and free from scratches! Do not touch the reference surface. Protect it against scratching. Even with careful treatment, ambient... - Seite 18 S E T U P M E N U E C a l i b r a t i o n C a l i b r a t i o n C a l i b r a t e Z e r o C a l i b r a t i o n 1 0 0 % C a l i b r a t i o n P r i n t S t a t i s t i c...
- Seite 19 If you have selected a transmittance Note: If fluctuating or obviously wrong values are displayed after C a l i b r a t i o n P l a c e c l a r i t y s t a n d . Section 5.3 and Chapter 9), put the calibration, repeat the calibration.
-
Seite 20: Additional Standards For Monitoring Test Equipment
5.1 Additional Standards for 5.2 Cleaning the Standards Never rub the standard dry! The rubbing action may cause Monitoring Test Equipment scratches from surface dust. Calibration with a dirty or damaged standard may severely affect the To check proper operation of the in- accuracy of measurements. -
Seite 21: Changing Calibration Values
5.3 Changing Calibration Values 5.4 Calibration with Taber Abrasion Holder The values for the calibration standards are stored in the instrument. In automatic calibrati- the Taber Abrasion Holder. on, this data is associated with the Install the Taber Abrasion Holder in respective standards. - Seite 22 C h a n g e C a l V a l u e T S t d = 1 0 0 I n i t i a l i z e I n s t r . I n p u t T r a n s S t d O l d N e w I n p u t C l a r i t y S t d...
-
Seite 23: Set-Up Menu
6. SET-UP Menu: Setting Displays the first SET-UP page. S E T U P M E N U E Instrument Parameters C a l i b r a t e P r i n t S t a t i s t i c P r i n t O n l i n e : o f f delete all C o n t . - Seite 24 When entering numbers: Explanation of Menu Items Adjust Time: Allows you to use the cursor keys to set the internal clock. Calls up the calibration routine (Chapter 5). Display Contrast: Allows you to Change statistic result adjust display contrast, using the left desired Print Statistics: Sends the readings and right cursor keys.
-
Seite 25: Measurement Series And Statistics
7. Measurement Series statistic S T A T I S T I C and Statistics 3 0 . 6 m = 3 0 . 1 s = 0 . 5 on/off 2 0 . 8 m = 2 0 . 3 s = 0 . - Seite 26 In Statistics Mode, measured values delete last result are saved and retained when you switch to a different parameter or turn the instrument off. Saved on/off values can be transferred to a printer or PC via the serial interface. A measurement series that has The last measurement to have been been saved previously can be and off...
- Seite 27 delete all All statistics in the memory are deleted. The delete function affects only the memory area in use for the current parameters.
-
Seite 28: Continuous Mode
8. Continous Mode In the normal measuring mode, individual measurements are T r a n s m i t t a n c e M e a s u r e m e n t started by pressing <operate>. In Continuous Mode, on the other P l e a s e p l a c e hand, measurements are repeated... - Seite 29 After changing a specimen, Statistical evaluations can also be Stand-by Mode: To save the lamp, always be sure to update the re- performed in Continuous Mode. after a certain interval Continuous ference measurement for the new The values measured here are Mode is interrupted and Stand-by specimen before proceeding.
-
Seite 30: Parameters
9. Parameters Appearance of Transparent the greater the amount of scattered Materials light; the distribution of scattered light in space is related to the When a parallel beam of light strikes scatterers’ size distribution. The a transparent specimen, a number of scattering behavior of a specimen effects may result, depending on the will determine its appearance. - Seite 31 Contours may be distorted and seem less distinct. This effect, called clarity, influences the resolution of fine details. Unlike haze, clarity is distance- dependent, and deteriorates as the distance between the specimen and the observed object increases (near/far transparency). Fig. 1 See-through quality Milky/hazy Distored, unsharp...
- Seite 32 Measurement Principle measurement sequence is controlled Standards automatically. A beam strikes the specimen and ASTM D 1003: Standard Test Method enters an integrating sphere for Haze and Luminous Transmittance (Fig. 2). The light, uniformly of Transparent Plastics distributed by the matte white coating on the sphere wall, is ASTM D 1044: Standard Test Method measured by a detector.
- Seite 33 Notes: calibrating the instrument with a readings note the specimen previously measured transmittance thickness, since absorbance and standard (see Section 5.3). This measurement range is auto- scattering increase in direct standard must have a surface matically switched over to a proportion to thickness.
-
Seite 34: Changing Lamps And Fuses
10. Changing Lamps and Changing Lamps rubbing alcohol. Secure the lamp unit with the knurled screw and plug Fuses it back onto the cable. Make sure no CAUTION: Before changing a objects have been left inside the lamp, switch off the instrument, instrument, and then close the unplug it from the power source, cover by slipping it into the guide... - Seite 35 Changing Fuses CAUTION: Before changing a fuse, switch off the instrument and unplug it from the power source. CAUTION: For continued protection against risk of fire replace only with same type and rating of fuse. With a suitable tool (No. 2 screw- driver), remove the fuse holder from the fuse housing (on the left side of the unit).
-
Seite 36: Interface Description
The instrument transmits a 4Fh and sends back a 21h as the acknowledgement signal. disabled, except for the <operate> and <reference> buttons and the haze-gard plus foot switch. 3 TxD RxD 3 Then the instrument status 2 RxD... - Seite 37 Selected language (byte 1) Continuous Mode (byte 5) The instrument acknowledges each 00h = German 00h = No control command with 2 characters 01h = English 01h = Yes (bytes). 02h = French First byte: control command (echo) 03h = Italian Calibration valid (byte 6) Second byte: "!"...
- Seite 38 For values over 99.9, the fourth parameter before activating Following the sequence of the byte is always a blank (20h). The Continuous Mode. selected geometry, values are number of decimal digits matches multiplied by 100 (up to 2 decimal the value appearing on the Online Mode is terminated with 50h places possible) and transmitted instrument display.
-
Seite 39: Technical Specifications
12. Technical Specifications Measuring Repeatability: ± 0.1 units* Geometries: 0°/diffuse Reproducibility: ± 0.4 units* Measuring Measuring Time: 1-6 seconds Aperture: 25.4 mm diameter (depending on mode) Measuring Field: 18.0 mm diameter Statistics Color Sensitivity: Spectral Memory: 7 x 999 conformity to CIE measurements, standard spectral 3 V lithium... - Seite 40 Slo-blo 1.6 A; 250 V (115 V power supply) Operating Temperature: +10°C to +40°C Storage Temperature: 0°C to +50°C Dimensions: 340 x 670 x 240 mm Weight: 18 kg Special Features: Longterm calibration, no warm-up time, automatic measurement range fitting. *Standard deviation Technical modifications may be made without notice.
-
Seite 41: Ordering Guide
13. Ordering Guide Description Cat.No. Optical Cells for Liquids, 50 mm 6180 haze-gard plus (Illuminant C) AT-4725 6181 haze-gard plus (Illuminant A) AT-4726 6182 6183 basic version, consisting of: Transmission Cell Holder 4739 Sample Holder for Films max. thickness of 0,5 mm... -
Seite 42: Error Message
14. Error Messages N o s t a t i s t i c P r i n t e r v a l u e s s t o r e d n o t r e a d y E s c a p e : S E T U P Cause... - Seite 43 R e f . M e a s u r e m e n t o n l y i n M e m o r y C o n t i n u o u s - M o d e I n v a l i d d a t e f u l l Cause...
- Seite 44 O n l i n e M o d e C a l v a l u e s a r e K e y b o a r d i n a c t i v e s e t t o d e f a u l t Cause Cause The RAM and EEPROM contain...
- Seite 46 Best.-Nr. AT-4725 Best.-Nr. AT-4726 238 013 796 EDFI 0805...
- Seite 48 Best.Nr. AT-4725 und AT-4726 Inhaltsverzeichnis Sicherheitshinweise Systembeschreibung Inbetriebnahme Handhabung Kalibration 5.1 Zusatzstandards zur Prüfmittelüberwachung 5.2 Reinigung der Standards 5.3 Kalibrierwerte ändern 5.4 Kalibrierung mit Taber-Abrieb-Halter SET-UP Menü: Einstellen der Geräteparameter Meßreihen und Statistik Dauermessung Die Meßgrößen 10. Lampen- und Sicherungs- wechsel 11.
- Seite 49 LCD-Anzeige Tastenfeld Haze Öffnung Clarity Öffnung wahl Anschlüsse für (RS-232) Fußschalter zur Meßauslösung...
-
Seite 50: Sicherheitshinweise
1. Sicherheitshinweise Es können keine Produkt- Vermeiden Sie andauernde haftungs- und Gewährlei- hohe Luftfeuchtigkeit und Kon- stungsansprüche geltend denswasserbildung gemacht werden, wenn das (siehe technische Daten). Gerät nicht entsprechend den Schützen Sie das Gerät Hinweisen in der Betriebsan- vor Spritzwasser und leitung und am Gerät betrie- Chemikalien. - Seite 51 Anforderungen für Sicher- Vor der Inbetriebnahme ist heitskleinspannung erfüllen. unbedingt zu überprüfen, ob die am Gerät eingestellte Das Gerät darf nur an Steck- Netzspannung an der Netz- dosen mit einwandfreiem eingangskombination mit der Schutzleiter angeschlossen Versorgungsspannung der werden. Bei unzureichender Hausinstallation übereinstimmt.
-
Seite 52: Systembeschreibung
Sie bitte die Bedienungsan- einer schnellen und einfachen leitung und beachten Sie die Bedienung zeichnet es sich durch Sicherheitshinweise. folgende Eigenschaften aus: Das haze-gard plus ist ein statio- große Produkte näres Meßgerät zur Bestimmung des optischen Erscheinungsbildes menügeführte Bedienung von Glas, Folien, Verpackungen und Teilen aus Kunststoff sowie anderen transparenten Materialen. -
Seite 53: Inbetriebnahme
3. Inbetriebnahme Wichtige Hinweise vor der Inbe- Das Gerätegehäuse ist gegen eine triebnahme: Reihe von Lösemitteln beständig, Das Gerät ist auf keine außerge- jedoch kann eine Beständigkeit nicht wöhnlichen Umgebungsbedingun- für alle Chemikalien gewährleistet gen angewiesen, jedoch sollten die werden. Benutzen Sie deshalb zur für elektronische Meßgeräte übli- Reinigung ein weiches feuchtes Tuch. -
Seite 54: Aufstellung
Aufstellung Die Steckverbindungen (Fuß- schalter, Druckerkabel und RS-232 Netzkabel) dürfen nur bei ausge- schaltetem Gerät gekoppelt oder auch wieder getrennt werden ! Für den bestimmungsgemäßen foot- switch und sicheren Gebrauch des Meßgerätes ist die richtige Ein- stellung der Netzspannung T 1,6A 250V (115V) erforderlich! T 1,0A 250V (230V) elle Transportschäden untersuchen... -
Seite 55: Einschalten
Einschalten A U T O D I A G N O S E L a m p e : C h o p p e r : S h u t t e r : V e r s i o n : 1 . - Seite 56 S T A T U S S T A T U S S T A T I S T I K - S P E I C H E R T r a n s m i s s i o n S t d . L a m p e n z u s t a n d 1 0 0 .
- Seite 57 W A R M - U P Kurze Einlaufzeit von ca. 2 Minuten. Sobald das Meßgerät den Selbst- test und die Statusanzeigen abgeschlossen hat, schaltet es in den beim letzten Ausschalten aktiven Meßmodus und ist betriebs- bereit. Bevor nach der ersten Inbetriebnahme mit den Messungen begonnen werden kann, muß...
-
Seite 58: Handhabung
4. Handhabung Gewünschte Meßgröße wählen. Probe muß während der Messung Durch Betätigen einer der drei plan anliegen! Tasten wird die Meßgröße umgeschaltet (im Modus Dauer- Messung auslösen durch Druck der messung) oder zu den bereits Taste <operate> oder Betätigen des angezeigten hinzugefügt. - Seite 59 delete last 1 4 . 7 trans- mittance statistic result operate set up reference haze clarity on/off on/off delete all Wenn ein Wechsel der Meßöffnung erforderlich sein sollte (bei Wahl mehrerer Meßgrößen), werden Sie Das Tastenfeld: durch einen Hinweis in der Anzeige delete last darauf aufmerksam gemacht.
- Seite 60 operate set up reference Im Meßbetrieb zum Auslösen der Aufruf des SET-UP Menüs (Kap. 6). Im Modus Dauermessung Messung. Referenzwert für Gesamt- transmission bestimmen (Kap. 8). Im SET-UP Modus bestätigen der angewählten Funktion.
-
Seite 61: Kalibration
5. Kalibration Aufgrung neuer Technologien und Die Werte der Standards können dem Referenzstrahlprinzip ist sich, selbst bei schonender die Kalibrierung nur noch selten Behandlung, im Laufe der Zeit erforderlich. Als Richtlinie durch Umwelteinflüsse ändern. wird ein Kalibrationsintervall von Daher sollten Sie die Standards zwei Monaten empfohlen. - Seite 62 S E T U P M E N U K A L I B R I E R U N G K A L I B R I E R U N G K a l i b r i e r e n D u n k e l m e s s u n g H e l l m e s s u n g S t a t i s t i k d r u c k e n...
- Seite 63 Anmerkung: Werden nach der abweichender Transmissionswert Kalibration schwankende oder K A L I B R I E R U N G C l a r i t y S t a n d a r d eingetragen (siehe Kapitel 5.3 und offensichtlich falsche Werte ange- 7 5 .
-
Seite 64: Zusatzstandards Zur Prüfmittelüberwachung
5.1 Zusatzstandards zur 5.2 Reinigung der Standards Bei hartnäckiger Verschmutzung kann dem Wasser auch etwas Prüfmittelüberwachung Haushaltsspülmittel zugegeben werden. In destilliertem Wasser Um die korrekte Funktion des Die Meßgenauigkeit wird durch die nachspülen. Mit Druckluft trocknen Meßgerätes zu prüfen, sollten in Kalibrierung mit verschmutzten und Staub oder Fasern wegblasen. -
Seite 65: Kalibrierwerte Ändern
5.3 Kalibrierwerte ändern 5.4 Kalibrierung mit Taber-Abrieb- Hinweis: Beim Arbeiten mit dem Taber- Halter Abrieb-Halter kann nur Haze oder Die Werte der Kalibrierstandards Transmission gemessen werden, sind im Meßgerät gespeichert. Bei der automatischen Kalibrierung Clarity läßt sich aufgrund der ohne Taber-Abrieb-Halter. werden diese Daten dem jeweiligen veränderten optischen Bedingungen Montieren Sie den Taber-Abrieb-... - Seite 66 T . S t d = 1 0 0 K a l i b r i e r s t d . ä n d e r n W E R T E S I C H E R N T r a n s m i s s i o n S t d .
-
Seite 67: Set-Up Menü
6. SET-UP Menü: Die erste SET-UP Seite wird S E T U P M E N U Einstellung K a l i b r i e r e n dargestellt. der Geräteparameter S t a t i s t i k d r u c k e n O n l i n e D r u c k : a u s delete all D a u e r m e s s u n g : a u s... - Seite 68 Bei Zifferneingaben: Erläuterung der einzelnen Menü- Datum ändern: Hier kann mit den punkte Cursortasten das Datum geändert werden. Jahreszahlen vor 1980 werden nicht angenommen. Gewünsch- statistic result Kalibrieren: Aufruf der Kalibrations- te Dezimal- routine (Kap. 5). Uhrzeit ändern: Hier kann mit den stelle Cursortasten die interne Uhr wählen.
-
Seite 69: Meßreihen Und Statistik
7. Meßreihen und Statistik statistic S T A T I S T I K 3 0 . 6 m = 3 0 . 1 s = 0 . 5 on/off 2 0 . 8 m = 2 0 . 3 s = 0 . - Seite 70 Die Meßwerte im Statistik-Modus delete last result werden gespeichert und bleiben bei Umschalten der Meßgrößen oder Abschalten des Geräts erhal- on/off ten. Die gespeicherten Werte können über die serielle Schnittstel- le an einen Drucker oder einen PC Letzte gespeicherte Messung wird übertragen werden.
- Seite 71 delete all Gesamter Statistikspeicher wird gelöscht. Die Löschfunktion bezieht sich nur auf den Speicherbereich der momentan eingestellten Meßgrößen.
-
Seite 72: Dauermessung
8. Dauermessung m normalen Meßbetrieb werden durch Druck von operate einzelne B e s t i m m u n g d e r T r a n s m i s s i o n Messungen ausgelöst. Dagegen werden die Messungen im Modus P r o b e a n Dauermessung permanent wiederholt h a z e - p o r t... - Seite 73 Im Modus Dauermessung kann auch Stand-by Modus: Um die Lampe zu statistische Auswertung vorgenom- schonen, wird „Dauermessung“ men werden. Die hier gemesse- nach einer gewissen Zeit unterbro- nen Werte werden in den gleichen chen und „Stand-by Modus“ er- Speicherbereich geschrieben wie bei scheint im Display.
-
Seite 74: Die Meßgrößen
9. Die Meßgrößen Erscheinungsbild transparenter Als Streuzentren wirken dabei Materialien Teilchen innerhalb des Materials oder Strukturen auf der Oberflä- Wenn eine lichtdurchlässige Probe che. Je mehr Streuzentren vorlie- von gerichtetem Licht beleuchtet gen, um so größer ist der Anteil wird, treten je nach Materialbeschaf- des gestreuten Lichtes, wobei die fenheit verschiedene Effekte auf: räumliche Verteilung von deren... - Seite 75 Bei Kleinwinkelstreuung wird das Licht nur in kleine Winkel abge- lenkt, so daß die Streulichtmenge nur in diesem engen Bereich konzentriert ist. Dadurch werden Konturen verzerrt und erscheinen weniger scharf. Von diesem mit Bildschärfe oder Clarity bezeich- Abb. 1 neten Effekt hängt es ab, wie gut feine Details als scharf getrennt See-through quality Milky/hazy...
- Seite 76 Meßprinzip Der gesamte Meßablauf wird Normen automatisch gesteuert. Ein Lichtbündel trifft auf die Probe ASTM D 1003: und tritt in eine integrierende Kugel Standard Test Method for Haze and ein (Abb. 2). Das von der matt- Luminous Transmittance of Trans- weißen Beschichtung der Kugel- parent Plastics.
- Seite 77 Bemerkungen (Kap. 5.3). Dieser Standard muß die Dicke der Proben beachtet eine ähnliche Oberflächen- werden, da Absorption und Streu- reflexion aufweisen, wie die zu der Meßbereich automatisch auf ung mit der Dicke zunehmen. vermessenden Proben. eine Anzeige mit zwei Dezimal- stellen umgeschaltet.
-
Seite 78: Lampen- Und Sicherungswechsel
10. Lampen- und Lampenwechsel der Lampe nicht mit den Fingern. Fettrückstände brennen auf dem Sicherungswechsel Glas fest! Wenn das Glas verse- Achtung ! Erst Gerät abschalten, hentlich berührt wurde, muß der Netzstecker von der Spannungs- Glaskörper mit Spiritus gesäubert versorgung trennen und Lampe werden. - Seite 79 Sicherungswechsel Achtung ! Erst Gerät abschalten und Netzstecker ziehen, bevor Sie die Sicherung wechseln. Ziehen Sie den Sicherungshalter mit einem geeigneten Werkzeug (Schraubendreher Größe 2) aus dem Netzsteckergehäuse (linke Seite des Geräts). Wechseln Sie die defekte Sicherung gegen eine neue aus. Nur den vorgesehenen Sicherungstyp gemäß...
-
Seite 80: Schnittstellenbeschreibung
11. Schnittstellen- Das Meßgerät ist mit einer seriellen Übertragungsrate und -format Schnittstelle (RS-232) ausgerüstet, beschreibung über die die Gerätesteuerung und Die serielle asynchrone Übertragung Weiterverarbeitung der Meßdaten ist im Meßgerät festgelegt und findet durch einen PC oder die Ausgabe nach folgendem Format statt: auf einem entsprechenden Drucker erfolgen kann. - Seite 81 Für die Bedienung der Meßgeräte- 00h = Deutsch 00h = Nein tastatur vom PC aus gilt folgende 01h = Englisch 01h = Ja Vereinbarung: 02h = Französisch 00h = statistic 03h = Italienisch 01h = delete last 04h = Spanisch 00h = Nein 02h = result 01h = Ja...
- Seite 82 Es werden immer Daten für alle eine 04h (=operate) gesendet Nummer des Statiktikspeichers drei Meßgößen gesendet. Im wurde. In diesem Fall wird nur der entsprechend dem dazugehörenden Statusstring ist die Information über Meßwert der aktuellen Meß geome- Meßmodus (z.B. 06h = T&H&C). Gültigkeit und Reihenfolge der trie (Im Modus „Dauermessung“...
-
Seite 83: Technische Daten
12. Technische Daten Meßgeometrie: 0°/diffus Meßzeit: 1 - 6 Sekunden Meßöffnung: ø 25,4 mm (je nach Modus) Meßfeld: ø 18,0 mm Statistik- Farb- speicher: 7x999 Meßwerte, empfindlichkeit: in spektraler An- batteriegepuffert passung an CIE Lithiumzelle 3 V Normspektralwert- (CR 2450N FH) funktion y Schnittstelle: seriell RS-232,... - Seite 84 Lager- temperatur: 0 °C bis +50 °C Maße: 340 x 670 x 240 mm Gewicht: 18 kg Besonderes: Langzeitkalibration, keine Aufwärmzeit, automatische Meß bereichsan- passung *Standardabweichung Technische Änderungen vorbehalten.
-
Seite 85: Lieferhinweise
13. Lieferhinweise Artikel Best-Nr. Küvetten für Flüssigkeiten, 50 mm haze-gard plus (Lichtart C) AT-4725 haze-gard plus (Lichtart A) AT-4726 Grundversion, bestehend aus: Küvettenhalter AT-4739 Probenhalter für Folien Foliendicke bis 0,5 mm AT-4738 Lampe AT-4736 Standards Zubehör Fußschalter AT-4731 Schnittstellenkabel 9/25 polig SUB-D... -
Seite 86: Fehlermeldungen
14. Fehlermeldungen K e i n e D r u c k e r S t a t i s t i k w e r t e n i c h t b e r e i t v o r h a n d e n A b b r u c h : S E T U P Ursache... - Seite 87 R e f e r e n z m e s s u n g U n g ü l t i g e n u r i m M o d u s S t a t i s t i k s p e i c h e r D a u e r m e s s u n g D a t u m s e i n g a b e i s t v o l l...
- Seite 88 K a l i b r i e r d a t e n O n l i n e M o d u s w e r d e n b e r i c h t i g t T a s t a t u r g e s p e r r t Ursache Ursache...
- Seite 90 N° Réf. AT-4725 N° Réf. AT-4726 238 013 796 EDFI 0805...
- Seite 92 N°Réf. AT-4725 et AT-4726 Table des matières Consignes de sécurité Description du système Démarrage Fonctionnement Etalonnage 5.1 Etalons supplémentaires pour le contrôle par échantillons 5.2 Nettoyage des étalons 5.3 Modification des valeurs d'étalonnage Menu "SET-UP": Selection des paramètres de l'instrument Mesures en série et statistiques...
- Seite 93 affichage LCD clavier porte de haze porte de clarity d‘alimentation connexion pour: (RS-232) commande à pédale...
-
Seite 94: Consignes De Sécurité
1. Consignes de sécurité Avant de mettre l’instrument sous Alignement, remplacement de tension, vérifiez que le réglage de pièces, maintenance et tension est conforme. Le cordon réparation secteur doit être impérativement relié à une prise de sécurité. Lorsque vous ouvrez le capot ou L’utilisation d’une rallonge sans que vous enlevez une pièce, si vous prise de terre vous priverait de cette... - Seite 95 Incidents et surcharges Si vous pensez que l’utilisation de l’instrument n’est plus possible dans les conditions de sécurité requises, mettez celui-ci hors service et protégez-le de toute opération involontaire. Ceci peut se produire dans les circonstances suivantes: endommagé; stockage dans des conditions inadéquates;...
-
Seite 96: Description Du Système
2. Description du système Le haze-gard plus est un Le haze-gard plus établit de instrument fixe conçu pour mesurer nouvelles règles dans le domaine l’aspect optique du verre, de des appareils de mesure de la feuilles, d’emballages et de pièces diaphanéité. -
Seite 97: Démarrage
3. Démarrage Remarques importantes: Veuillez lire attentivement ces dans les orifices de mesure informations avant de vous servir de l’instrument. Bien que le coffrage de l’instrument ait été étudié pour résister à l’action Il n’est pas nécessaire de réserver d’un certain nombre de solvants, la à... - Seite 98 Installation N’oubliez pas de débrancher l’instrument avant de connecter RS-232 ou déconnecter les différents câbles (commande à pédale, câble de l’imprimante, câble de réseau)! Il est impératif de régler foot- switch correctement la tension pour garantir une utilisation conforme et sûre de l’appareil de mesure! T 1,6A 250V (115V) T 1,0A 250V (230V) emballage et vérifiez qu’il n’a pas...
-
Seite 99: Mise Sous Tension
Mise sous tension A U T O D I A G N O S T I Q U E L a m p e : C h o p p e r : S h u t t e r : V e r s i o n : 1 . - Seite 100 S T A T U S M E M O I R E S T A T I S T I Q U E S T A T U S E t a t d e l a l a m p e S t d .
- Seite 101 P R E C H A U F F A G E Temps de démarrage d’environ 2 minutes seulement. Après le test de l’auto-diagnostic et l’affichage du statut, l’instrument se replace dans le dernier mode activé avant la déconnexion de l’unité. Il est prêt à...
-
Seite 102: Fonctionnement
4. Fonctionnement Sélectionnez les valeurs mesurées Pendant le mesurage, l’échantillon désirées. doit rester à plat. Appuyez sur une des trois touches pour modifier la valeur mesurée (en Lancez la procédure de mesurage mode continu) ou pour l’ajouter aux en appuyant sur la touche valeurs déjà... - Seite 103 delete last 1 4 . 7 trans- mittance statistic result operate set up reference haze clarity on/off on/off delete all Un message signalera la nécessité éventuelle de changer d’orifice de mesure (en cas de sélection de Le clavier plusieurs valeurs mesurées). delete last Tenez l’échantillon devant l’autre Touches de curseur...
- Seite 104 operate set up reference Pendant le mesurage, cette touche Sert à appeler le menu "SET-UP" En mode continu, cette touche sert sert à lancer la procédure de (voir Chapitre 6). à déterminer la valeur de référence mesurage. pour la transmission totale (voir En mode "SET-UP", elle sert à...
-
Seite 105: Etalonnage
5. Etalonnage Même en prenant toutes les utilisée et au principe de rayon de précautions d’usage, les valeurs référence, l’étalonnage est rarement des étalons peuvent se dégrader au nécessaire. Nous recommandons fil du temps sous l’influence des d’y procéder à intervalles de deux conditions ambiantes. - Seite 106 M E N U S E T U P E T A L O N N A G E E T A L O N N A G E E t a l o n n a g e M e s u r e d u z e r o M e s u r e d u 1 0 0 % I m p r e s s i o n S t a t .
- Seite 107 Si vous spécifiez une valeur de Remarque: Si l’écran affiche des valeurs variables ou manifestement C a l i b r a t i o n P l a c e c l a r i t y s t a n d . dans le menu "SET UP"...
-
Seite 108: Etalons Supplémentaires Pour Le Contrôle Par Échantillons
5.1 Etalons supplémentaires 5.2 Nettoyage des étalons En cas de taches plus tenaces, ajoutez à l’eau quelques gouttes de pour le contrôle par détergent ménager. Rincez dans L’encrassement ou échantillons l’endommagement des étalons l’eau distillée. Séchez par air risque d’avoir de fortes comprimé... -
Seite 109: Modification Des Valeurs D'étalonnage
5.3 Modification des valeurs d’étalonnage Les valeurs des étalons sont enregistrées dans l’instrument de mesure. Ces données sont affectées à l’étalon en question lors de l’étalonnage automatique. Dans certains cas, il est indispensable d’adapter les données enregistrées à un nouvel étalon, par exemple lorsque l’étalon fourni s’est abîmé... - Seite 110 C h a n g e r E t a l o n n a g e T . S t d = 1 0 0 M E M O R I S E R V A L E U R S D u t r a n s m .
-
Seite 111: Menu "Set-Up": Selection Des Paramètres De L'instrument
6. Menu "SET-UP“: La première page du menu "SET-UP" M E N U S E T U P Sélection des E t a l o n n a g e s’affiche à l’écran. paramètres de I m p r e s s i o n S t a t . I m p r e s s i o n : o f f delete all... - Seite 112 Données de chiffres: Description de chaque fonction Beeper: Une fois la procédure de mesurage terminée, l’instrument émet un signal sonore. Etalonnage: Sert à appeler la Sélec- statistic result procédure d’étalonnage (voir Régler date: Vous pouvez modifier la tionnez la Chapitre 5). date au moyen des touches position curseur.
-
Seite 113: Mesures En Série Et Statistiques
7. Mesures en série et statistic S T A T I S T I Q U E n = statistiques 3 0 . 6 m = 3 0 . 1 s = 0 . 5 on/off 2 0 . 8 m = 2 0 . 3 s = 0 . - Seite 114 Lors des modifications des valeurs delete last result mesurées ou lors de la mise hors tension de l’appareil, les valeurs de mesure du mode statistique sont on/off sauvegardées. Ces données peuvent être transférées sur une imprimante ou sur un PC via Affichez/Eteignez tous les résultats La dernière mesure enregistrée est l’interface série.
- Seite 115 delete all La totalité de la mémoire statistique est effacée. La fonction de suppression n’affecte que la zone de mémoire des paramètres actuelles.
-
Seite 116: Mode Continu
8. Mode continu En mode de mesurage normal, la touche <operate> sert à lancer des M e s u r e d e l a procédures de mesurage uniques. t r a n s m i s s i o n En mode continu, au contraire, les P l a c e r l ʻ... - Seite 117 Si vous changez d’échantillon, Le mode continu permet également Mode d’attente: Pour ne pas n’oubliez pas de mettre à jour la une analyse statistique. Les valeurs endommager la lampe, le mode mesure de référence du nouvel mesurées sont enregistrées dans la continu s’interrompt après un échantillon! même zone mémoire qu’en mode...
-
Seite 118: Les Grandeurs De Mesure
9. Les grandeurs de Aspect de matériaux La dispersion diffuse diminue la transparents qualité de la représentation. Les mesure centres de dispersion, qui sont de Lorsqu’un échantillon transparent petites particules à l’intérieur du est éclairé par une lumière dirigée, matériau ou des structures, divers effets peuvent se produire en agissent sur la surface. - Seite 119 La dispersion petit angle permet de dévier la lumière exclusivement vers un petit angle, de manière à concentrer la quantité de lumière diffusée dans un espace réduit. Cela provoque une distorsion des contours, qui apparaissent dès lors moins clairement. De cet effet Fig.
- Seite 120 Principe de mesurage l’orifice de sortie mesure la netteté. Normes L’ensemble de la procédure de Un faisceau de lumière atteint mesurage est commandé ASTM D 1003: l’échantillon et pénètre dans une automatiquement. Méthode standard de test de voile sphère intégrante (Figure 2). La et de transmission lumineuse des lumière répartie uniformément par plastiques transparents.
- Seite 121 Remarques Les échantillons dispersifs doivent comparaison, vérifiez l’épaisseur toujours être placés à la porte de des échantillons, l’absorption et la haze. Il est recommandé dans ce diffusion augmentant avec cas d’étalonner l’instrument au automatiquement transformée en l’épaisseur. moyen d’un étalon de une indication à...
-
Seite 122: Changement Des Lampes Et Des Fusibles
10. Changement des Changement des lampes Lorsqu’il vous est impossible d’éviter l’ampoule, nettoyez-la avec lampes et des fusibles un peu d’alcool. Fixez l’unité avec la Attention! N’oubliez pas de vis moletée et connectez la fiche au mettre l’instrument hors tension, de débrancher la fiche secteur et vous de n’avoir rien oublié... - Seite 123 Changement des fusibles Attention! N’oubliez pas de mettre l’instrument hors tension et de débrancher la fiche secteur avant de changer le fusible! Retirez le porte-fusible du logement de prise secteur (à gauche de l’instrument) au moyen d’un outil approprié (tournevis n° 2). N’utilisez pas d’autre type de fusible que celui spécifié...
-
Seite 124: Description De L'interface
11. Description de L’appareil de mesure est équipé Taux de transfert et format d’une interface série (RS-232) l’interface permettant le contrôle de Le transfert série des données en l’instrument et le traitement ultérieur mode asynchrone est spécifié dans des données à l’aide d’un PC, ainsi l’instrument de mesure et exécuté... - Seite 125 Les conventions suivantes ont été 00h = allemand 00h = Non prises pour commander le clavier 01h = anglais 01h = Oui de l’instrument de mesure à partir 02h = français du PC: 03h = italien 00h = statistic 04h = espagnol 00h = Non 01h = delete last 01h = Oui...
- Seite 126 ASCII correspondant au ‘f’ En mode continu, la valeur mesurée Lecture d’une mémoire minuscule), puis les valeurs est transférée au PC pour autant statistique 51h (code ASCII mesurées. que celui-ci ait envoyé au préalable correspondant à ‘Q’) permet de Des données sont toujours un 04h (= "operate").
-
Seite 127: Données Techniques
12. Données techniques Géométrie Résolution de mesure: 0°/diffuse écran: 0,01 dans la zone de 0,00 à 9,99 Orifice 0,1 dans la zone de mesure: 25,4 mm de de 10,0 à 99,9 diamètre Répétabilité: + 0,1 unités* Zone de mesure: 18,0 mm de Reproductibilité: + 0,4 unités* diamètre Temps... - Seite 128 Connexions: Dimensions: 340 x 670 x RS-232 : Sub-D à 9 240 mm broches Commande Poids: 18 kg à pédale: Sub-D à 15 broches Particularités: étalonnage à long terme, pas Tension secteur: 230V/50 Hz, de "temps de 115V/60 Hz chauffe", adaptation Puissance automatique de...
-
Seite 129: Liste Des Composants Et Accessoires
13. Liste des Description No Réf. Cuvettes pour liquides, 50 mm composants haze-gard plus (Illuminant C) AT-4725 et accessoires haze-gard plus (Illuminant A) AT-4726 Composants de la version de base: Support pour cuvettes AT-4739 Dispositif de serrage pour échantillons min. de 17 x 10 cm et une épaiss. -
Seite 130: Messages D'erreur
14. Messages d’erreur i l n ʻ e x i s t e n t I m p r i m a n t e p a s d e s v a l e u r s n ʻ e s t p a s p r e t e s t a t i s t i q u e s Cause Cause... - Seite 131 M e s u r e d e l a r e f e r e n c e u n i q u e m e n t M e m o i r e s t a t i s t i q u e D a t e n o n v a l a b l e e i n M o d e C o n t i n u p l e i n e...
- Seite 132 V a l e u r s d e l ʻ e t a l o n - M o d e O n l i n e n a g e s o u t c o r r i g e e s c l a v i e r b l o q u e Cause Cause...
- Seite 134 No di cat. AT-4725 No di cat. AT-4726 238 013 796 EDFI 0805...
- Seite 136 No. di cat. AT-4725 e AT-4726 Indice Informazioni sulla sicurezza Descrizione del sistema Inizializzazione Funzionamento Taratura 5.1 Standard supplementari per il controllo dell’apparecchiatura 5.2 Pulizia degli standard 5.3 Modifica dei valori di taratura Menu SET-UP Impostazione dei parametri dello strumento...
- Seite 137 Display a Pannello di Porta velatura cristalli liquidi controllo Porta clariy Connessione per: (RS-232) Interruttore a pedale...
-
Seite 138: Informazioni Sulla Sicurezza
1. Informazioni sulla Prima di accendere Attenzione! l’apparecchio, assicurarsi che Solo per gli USA: cavo di sicurezza la regolazione del voltaggio sull’apparecchio corrisponda elenco, tipo SVT o SJT, 18 al voltaggio della presa di AWG. Configurazione del corrente. L’apparecchio deve terminale: spina con messa a essere collegato a una presa terra a lamine parallele, tipo... - Seite 139 Regolazioni, sostituzione di di ricambio siano del tipo e componenti, manutenzione e della dimensione indicata. riparazioni. Non ricorrere mai a fusibili revisionati o a cortocircuiti. Rimuovere coperchi o compo- nenti, laddove siano necessari Guasti e condizioni sfavore- attrezzi per farlo, può esporre voli all’utilizzo componenti sotto tensione.
-
Seite 140: Descrizione Del Sistema
2. Descrizione del haze-gard plus è uno haze-gard plus rappresenta strumento stazionario per la un’innovazione nel campo degli sistema misurazione delle caratte- strumenti per la misurazione della ristiche esteriori di vetro, film, trasparenza. Oltre alla sua rapidità e imballaggi e componenti di facilità... - Seite 141 3. Inizializzazione IMPORTANTE! La scocca dell’apparecchio è resistente a numerosi solventi. Tuttavia, non si può garantire che Leggere prima di utilizzare lo resista a tutti i prodotti chimici. Per strumento: la pulizia utilizzare esclusivamente un panno morbido e umido. Si può l’apparecchio non richiede condizi- ricorrere a piccole quantità...
- Seite 142 Impostazioni Spegnere sempre l’apparecchio prima di inserire o estrarre i vari RS-232 connettori (interruttore a pedale, cavo della stampante e cavo di alimentazione). Assicurarsi che il voltaggio sia regolato corretta- mente. In caso contrario, lo foot- switch strumento non potrà funzionare correttamente e in condizioni di sicurezza.
- Seite 143 è al di l’opacità. Accendere l’apparecchio fuori delle tolleranze compare un mediante l’interruttore sul lato messaggio d’errore. sinistro. Sul display compare il logo BYK-Gardner, il numero della versione e una nota sul copyright.
- Seite 144 S T ATO S T A T U S MEMORIA STATISTICA L a m p S t a t u s Standard di trasmittanza 1 0 0 . 0 % 1 0 0 % S p h e r e C o a t i n g Standard di clarity 7 5 .
- Seite 145 R I S C A L D A M E N T O Sono necessari circa due minuti di riscaldamento prima che l’apparecchio sia pronto per l’uso. Una volta completate l’autodiagnosi e la visualizzazione dello stato, l’apparecchio passa automatica- mente alla modalità che era attiva quando è...
- Seite 146 4. Funzionamento tras- aziona- imposta- riferi- mittanca velatura clarity mento mento zione Selezionare il parametro che si Durante le misurazioni il intende misurare. Premendo uno dei campione deve essere disposto tre pulsanti si può passare da un orizzontalmente. parametro all’altro (in Modalità Continua) oppure aggiungere un Iniziare la misurazione premendo il parametro a quelli già...
- Seite 147 delete last 1 4 . 7 trans- mittance statistic result operate set up reference haze clarity on/off on/off delete all Un messaggio visualizzato sul display indica se è necessario cambiare porta di misurazione Pannello die controllo: (quando sono stati selezionati diversi delete last parametri).
- Seite 148 operate set up reference IPremendo questo tasto nelle Premendo questo tasto si richiama Questo tasto viene utilizzato nella modalità di misurazione si inizia una il menu SET-UP (capitolo 6). Modalità Continua per determinare misurazione. Premendolo nella il valore di riferimento per la trasmit- modalità...
- Seite 149 Per garantire la precisione della taratura utilizzare solamente standard originali BYK-Gardner. Non toccare la superficie dello standard di riferimento e proteggerla dai graffi. Per quanto gli standard ven- gano trattati con cura, le condizioni...
- Seite 150 Taratura M E N U I M P O S T A Z I O N I T a r a t u r a Taratura 100% Taratura T a r a t u r a z e r o Stampa statistica C o p i r e l a p o r t a Stampa online:...
- Seite 151 Se è stata selezionata una Nota: se dopo la taratura vengono visualizzati valori oscillanti oppure Taratura SETUP (vedere par. 5.3 e capitolo 9) inequivocabilmente errati ripetere la Posizionare lo standard collocare lo standard appropriato taratura. Questo sintomo indica che la di clarity 75,5 alla porta per la purezza nella porta di opacità.
- Seite 152 Le misurazioni visualizzate devono seguito a un esame visivo o a un e non esercitare eccessiva pressione. rientrare nella gamma specificata errore di misurazione, la BYK-Gardner Assicurarsi che al panno utilizzato per lo standard. In caso contrario, sarà lieta di esaminarli.
- Seite 153 5.3 Modifica dei valori di taratura I valori degli standard di taratura sono memorizzati nell’apparecchio. Nella taratura automatica, questi dati vengono associati ai rispettivi standard. In alcuni casi può essere necessa- rio trasferire i dati memorizzati a un nuovo standard, per esempio se lo standard fornito con l’apparecchio si è...
- Seite 154 Modifica valori di Standard di taratura trasmittanza = 100 Inserire standard di trasmittanza 1 0 0 0 Inserire standard die clarity Salvare valori standard C o n f e r m a r e : O P E R A T E E s c a p e : S E T U P E s c a p e :...
- Seite 155 Menu SET-UP: Compare un mes- saggio di istruzioni M E N U I M P O S T A Z I O N I Impostazione dei Taratura per l’operatore. parametri dello Stampa statistica Stampa online: delete all strumento Modalità continua:on Lingua: Premendo questo E s c a p e :...
- Seite 156 Quando si inseriscono numeri: Spiegazione delle voci di menu Adjust Date [modifica data]: per modificare la data mediante i tasti di Calibrate [taratura]: per richiamare la navigazione. Non vengono accettati routine di taratura (capitolo 5) gli anni precedenti al 1980. Per passare statistic result...
-
Seite 157: Serie Di Misurazioni E Statistiche
7. Serie di misurazioni e statistic S T A T I S T I C statistiche 3 0 . 6 m = 3 0 . 1 s = 0 . 5 on/off 2 0 . 8 m = 2 0 . 3 s = 0 . - Seite 158 Nella Modalità Statistica i valori delete last result misurati vengono salvati e rimangono in memoria quando si passa a un parametro diverso o si on/off spegne l’apparecchio. I valori salvati possono essere trasmessi a una stampante o a un PC mediante Premendo questo tasto si cancella l’interfaccia seriale.
- Seite 159 delete all Premendo questo tasto si cancellano tutte le statistiche contenute nella memoria. La funzione di cancellazione riguarda solamente l’area della memoria utilizzata per i parametri attuali.
- Seite 160 8. Modalità Continua Nella modalità di misurazione nor- male, per avviare una misurazione Misurazione della si deve premere <operate>. Nella Transmittanca Modalità Continua, invece, le Posizionare il misurazioni vengono costantemente campione alla porta ripetute e aggiornate. In questo per la velatura R e a d y : O P E R A T E ampia del campione e avere...
- Seite 161 Dopo aver cambiato campione Le analisi statistiche possono essere Modalità Stand-by: per garantire assicurarsi sempre di aggiornare la eseguite anche in Modalità Continua. I una maggiore durata della lampada, misurazione di riferimento valori misurati in questa modalità ven- trascorso un determinato periodo la per il nuovo campione prima di gono memorizzati nella stessa area di Modalità...
- Seite 162 9. Parametri Aspetto esteriore dei materiali strutture presenti sulla sua trasparenti superficie possono fungere da Aspetto esteriore dei materiali merosi i dispersori, tanto maggiore trasparenti Quando un fascio di luce sarà la quantità di luce dispersa. parallela investe un campione La distribuzione della luce dispersa trasparente, possono originarsi diver- nello spazio è...
- Seite 163 Nella dispersione ad angolo ridotto la luce viene deviata con angoli ridotti, quindi l’intensità della luce si concentra in gamme molto ristrette. I contorni possono essere deformati e apparire meno distinti. Questo effetto si definisce Fig. 1 purezza e influisce sulla risoluzione A.
- Seite 164 Principio di misurazione misura la purezza. L’intera sequenza Standard di misurazione viene gestita in modo ASTM D 1003: metodo standard di Un fascio colpisce il campione ed automatico. esame dell’opacità e della entra in una sfera di integrazione trasmittanza luminosa della plastica (Fig.
- Seite 165 Note: planarità. Oggetti cuneiformi provo- trasmittanza. I campioni con alti cano deflessione della luce. livelli di dispersione devono essere sempre collocati presso la porta velatura. A questo proposito si ma di misurazione viene automati- comparative tenere in considerazi- raccomanda di tarare lo strumento camente convertita alla visualizza- one lo spessore dei campioni, in con uno standard di trasmittanza...
- Seite 166 10. Sostituzione di Sostituzione delle lampade Assicurarsi che non siano rimasti oggetti all’interno dell’apparecchio, lampade e fusibili ATTENZIONE: prima di sosti- quindi chiudere il coperchio tuire una lampada spegnere inserendolo nelle guide dal fondo e l’apparecchio, scollegarlo dalla fissandolo alla scocca dell’appa- rete elettrica e lasciar raffreddare recchio con le due viti.
- Seite 167 Sostituzione dei fusibili ATTENZIONE: prima di sostituire un fusibile spegnere l’apparecchio e scollegarlo dalla rete elettrica. Utilizzando un utensile appropriato (cacciavite n. 2), rimuovere il porta- fusibili dall’alloggiamento (sul lato sinistro dell’apparecchio). Sostituire il fusibile guasto con uno nuovo. Utilizzare solamente fusibili del tipo indicato nelle Specifiche Tecniche (capitolo 12).
-
Seite 168: Descrizione Dell'interfaccia
21h come segnale di conferma. disabilitati, tranne i tasti <opera- te> e <reference> e l’interruttore a pedale. Quindi viene trasmesso lo haze-gard plus stato dell’apparecchio (10 byte) al computer. 3 TxD RxD 3 2 RxD TxD 2... - Seite 169 Per comandare l’apparecchio dal PC 00h = tedesco 00h = No si applicano le seguenti convenzioni: 01h = inglese 01h = Sì 02h = francese 00h = statistics (statistica) 03h = italiano 01h = delete last (cancellare 04h = spagnolo 00h = No ultimo valore) 01h = Sì...
- Seite 170 Se il PC invia all’apparecchio un 4 Se il campione deve essere spostato Lettura di una memoria statistica ( = operate) mentre l’apparecchio dalla porta per l’opacità alla porta si trova in una qualsiasi modalità per la purezza viene inviato un 77h L’invio di un segnale 51h (codice di misurazione, viene iniziata una (codice ASCII per ‘w’...
-
Seite 171: Dati Tecnici
12. Dati tecnici Angoli di Tempo di misurazione: 0°/diffuso misurazione: 1-6 secondi Diaframma di (a seconda della misurazione: diametro 25,4 mm modalità) Campo di misurazione: diametro 18,0 mm Memoria statistica: 7 x 999 misurazioni, Sensibilità batteria ausiliaria al cromatica: conformità spettrale litio 3 V allo standard IEC (CR 2450N FH) - Seite 172 Temperatura di esercizio: da +10°C a +40°C Temperatura di conservazione: da 0°C a 50°C Dimensioni: 340 x 670 x 240 Peso: 18 kg Caratteristiche particolari: Taratura di lunga durata, senza fase di riscaldamento, adeguamento automatico della gamma di misura- zione. *Scostamento tipo I dati tecnici possono subire variazioni senza preavviso.
- Seite 173 13. Guida agli Ordini Descrizione codice art. haze-gard plus (Illuminant C) AT-4725 haze-gard plus (Illuminant A) AT-4726 Supporto per cella di trasmissione AT-4739 versione base, comprendente: Portacampioni per film superiori a a 17 x 10cm, spessore max 0,5 mm AT-4738...
-
Seite 174: Messaggi Di Errore
14. Messaggi di errore S t a m p a n t e N e s s u n v a l o r e n o n p r o n t a s t a t i s t i c o i n m e m o r i a E s c a p e : S E T U P... - Seite 175 M i s u r a z i o n e d i D a t a n o n v a l i d a r i f e r i m e n t o s o l a m e n t M e m o r i a p i e n a i n M o d a l i t à...
- Seite 176 V a l o r i d i t a r a t u r a M o d a l i t à i n L i n e a i m p o s t a t i T a s t i e r a i n a t t i v a d i d e f a u l t Causa...
- Seite 177 Lausitzer Strasse 8 Lausitzer Strasse 8 82538 Geretsried 82538 Geretsried erklären hiermit, dass das Produkt: herewith declare that the product: haze-gard plus haze-gard plus Typ: Type: den folgenden EG-Richtlinien entspricht: complies with the requirements of the following EC directives: 2004/108/EG...
- Seite 178 EU-yhteensopivuusvakuutus - Me, BYK-Gardner GmbH, vakuuttaa, että yllämainitut tuotteet / laitteet on kehitetty, rakennettu ja valmistettu asetettujen EU-direktiivien mukaisesti. Dichiarazione di conformità - Noi, BYK-Gardner GmbH, dichiariamo che i suddetti prodotti / strumenti sono stati sviluppati, construiti et prodotti in conformità con le Direttive EC stabilite.
- Seite 179 BYK-Gardner GmbH BYK-Gardner USA Lausitzer Str. 8 9104 Guilford Road D-82538 Geretsried Columbia, MD 21046 Germany Tel.: 0-800-gardner Phone: 800-343-7721 (0-800-4273637) 301-483-6500 +49-8171-3493-0 Fax: 800-394-8215 Fax: +49-8171-3493-140 301-483-6555 www.byk.com/instruments/...
- Seite 180 238 013 796 EDFI 0805...