Herunterladen Inhalt Inhalt Diese Seite drucken
Inhaltsverzeichnis

Werbung

Verfügbare Sprachen

Verfügbare Sprachen

WT010
Bedienungsanleitung
Mode d'emploi
Istruzioni per l'uso
Operating Instructions

Werbung

Inhaltsverzeichnis
loading

Inhaltszusammenfassung für switel WT010

  • Seite 1 WT010 Bedienungsanleitung Mode d’emploi Istruzioni per l'uso Operating Instructions...
  • Seite 2 WT010 Bedienungsanleitung ________________3 Mode d’emploi ____________________13 Istruzioni per l'uso ________________23 Operating instructions ______________33 Declaration of Conformity __________43...
  • Seite 3: Inhaltsverzeichnis

    - Inhaltsverzeichnis - 1 Wichtige Hinweise ..............4 2 Bedienelemente..............6 3 Inbetriebnahme..............7 Verpackungsinhalt prüfen.................7 Batterien einsetzen ...................7 Gürtelclip entfernen oder anbringen..............7 Griffschalen auswechseln.................8 4 Bedienung ................9 Ein-/Ausschalten der Funkgeräte ..............9 Lautstärkeregelung ...................9 Kanalwahl ......................9 Gespräche zwischen den Funkgeräten............10 Anrufsignal senden ..................10 Reichweite der Funkgeräte................11 Erhöhung der maximalen Reichweite.............11...
  • Seite 4: Wichtige Hinweise

    - Wichtige Hinweise - Wichtige Hinweise Bitte lesen Sie diese Bedienungsanleitung sorgfältig durch. Öffnen Sie das Gerät in keinem Fall selbst und führen Sie keine eigenen Reparaturversuche aus. Bei Gewährleistungsansprüchen wenden Sie sich bitte an Ihren Fachhändler. Batterien Verwenden Sie immer nur Batterien des Typs Alkaline AAA 1,5V. Batterien nicht ins Feuer werfen oder ins Wasser tauchen.
  • Seite 5 - Wichtige Hinweise - Wichtige Sicherheitshinweise Verwenden Sie die Funkgeräte nicht in explosionsgefährdeten Bereichen wie z. B. Brennstofflagern, Sprengbereichen, Chemielagern oder Bereichen in denen Chemikalien oder andere Feststoffe in der Luft vorhanden sind. Befolgen Sie immer alle Hinweisschilder. Bereiche mit Explosionsgefahr sind aber nicht immer deutlich markiert.
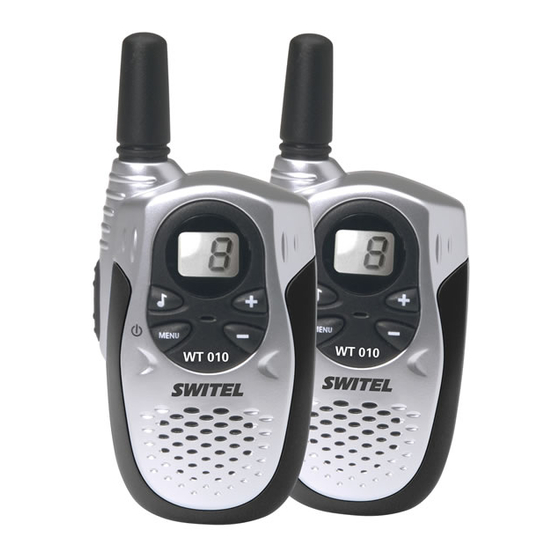
  • Seite 6: Bedienelemente

    - Bedienelemente - Bedienelemente Antenne Display Auswahltaste + Auswahltaste - Menü- und Ein/Aus-Taste Gesprächstaste PTT Ruftaste...
  • Seite 7: Inbetriebnahme

    - Inbetriebnahme - Inbetriebnahme Verpackungsinhalt prüfen Zum Lieferumfang gehören: Zwei Funkgeräte mit Jeweils drei Griffschalen pro Funkgerät Gürtelclip eine Bedienungsanleitung Batterien einsetzen Die benötigten Batterien befinden sich nicht im Lieferumfang. Sie benötigen je Gerät drei Batterien des Typs AAA 1.5V. Bitte verwenden Sie neue hochwertige Alkaline-Batterien.
  • Seite 8: Griffschalen Auswechseln

    - Inbetriebnahme - Griffschalen auswechseln Ihre Funkgeräte wurden mit jeweils drei farbigen Griffschalen ausgeliefert, die Sie bei Bedarf auswechseln können. Um eine Griffschale auszuwechseln, gehen Sie wie folgt vor: Griffschale entfernen Entfernen Sie den Gürtelclip (siehe 3.3) und öffnen Sie das Batteriefach.
  • Seite 9: Bedienung

    - Bedienung - Bedienung Ein-/Ausschalten der Funkgeräte MENU Um ein Funkgerät einzuschalten, halten Sie die Ein/Aus-Taste bis zu einem Signalton gedrückt. Das Display zeigt den aktuell eingestellten Kanal zwischen 1 und 8. MENU Zum Ausschalten des Funkgerätes wieder die Ein/Aus-Taste bis zu einem Signalton gedrückt halten.
  • Seite 10: Gespräche Zwischen Den Funkgeräten

    - Bedienung - Gespräche zwischen den Funkgeräten Um selbst zu sprechen, drücken Sie die Gesprächstaste PTT auf der linken Seite. Halten Sie das Gerät ca. 5 cm vom Mund entfernt und sprechen Sie in normaler Lautstärke. Lassen Sie danach die Gesprächstaste wieder los.
  • Seite 11: Reichweite Der Funkgeräte

    - Bedienung - Reichweite der Funkgeräte Die Funkgeräte haben im Freien eine Reichweite von bis zu 3 km. Diese maximale Reichweite kann durch bestimmte Umstände verringert werden. Bei flachen, offenen Bedingungen erreichen Sie die maximale Reichweite. Befinden sich Gebäude oder Bäume im Signalweg wird die Reichweite verringert.
  • Seite 12: Technische Daten

    - Technische Daten - Technische Daten PMR Kanal Frequenzen (MHz) : Kanal 1: 446,00625 Kanal 5: 446,05625 Kanal 2: 446,01875 Kanal 6: 446,06875 Kanal 3: 446,03125 Kanal 7: 446,08125 Kanal 4: 446,04375 Kanal 8: 446,09375 Kanaltrennung 12.5 kHz Sendeleistung 500mW Audio Ausgang 80dB SPL minimum Batterielebensdauer bei gemischtem Betrieb...
  • Seite 13 - Sommaire - 1 Remarques importantes ............. 14 2 Éléments de commande ............. 16 3 Mise en service..............17 Vérifier le contenu de l’emballage ..............17 Mettre les piles en place.................17 Retirer ou installer le clip-ceinture ..............17 Changer les coques..................18 4 Utilisation ................19 Mise en marche / arrêt des émetteurs-récepteurs.
  • Seite 14: Remarques Importantes

    - Remarques importantes - Remarques importantes Veuillez lire soigneusement ce mode d’emploi en entier. N’ouvrez en aucun cas l’appareil vous-même et ne tentez pas d’effectuer vous-même des réparations. Veuillez vous adresser à votre revendeur en cas de droits découlant de la garantie. Piles Utilisez toujours uniquement des piles de type alcalines AAA 1,5 V.
  • Seite 15 - Remarques importantes - Consignes importantes de sécurité N’utilisez pas le combiné dans des endroits menacés d’explosion tels que par ex. des entrepôts de combustibles, des zones d’explosion, des entrepôts de chimie ou des zones dans lesquelles des produits chimiques ou autres combustibles sont présents dans l’air.
  • Seite 16: Éléments De Commande

    - Éléments de commande - Éléments de commande Antenne Écran Touche de sélection - Touche de menu et marche/arrêt Touche d’appel Touche de sélection + Touche de communication PTT...
  • Seite 17: Mise En Service

    - Mise en service - Mise en service Vérifier le contenu de l’emballage Le contenu de l’emballage : deux émetteurs-récepteurs avec trois coques par émetteur- clip-ceinture récepteur. un mode d’emploi Mettre les piles en place Les piles nécessaires ne sont pas fournies. Vous avez besoin pour chaque appareil de trois piles de type AAA 1,5 V.
  • Seite 18: Changer Les Coques

    - Mise en service - Changer les coques Vos émetteurs-récepteurs ont été livrés chacun avec trois coques en couleur que vous pouvez changer si nécessaire. Procédez de la manière suivante pour remplacer une coque : Retirer la coque Retirez le clip-ceinture (voir 3.3) et ouvrez le compartiment des piles. Retirez de la fixation la coque au point 1 en soulevant avec précaution à...
  • Seite 19: Utilisation

    - Utilisation - Utilisation Mise en marche / arrêt des émetteurs-récepteurs. Pour mettre en marche un émetteur-récepteur, maintenez la touche MENU marche/arrêt enfoncée jusqu’au retentissement d’un signal sonore. L’écran affiche le canal actuellement réglé de 1 à 8. Pour arrêter l’émetteur-récepteur, maintenez à nouveau la touche MENU marche/arrêt enfoncée jusqu’au retentissement d’un signal...
  • Seite 20: Conversations Entre Les Émetteurs-Récepteurs

    - Utilisation - Conversations entre les émetteurs-récepteurs Pour parler vous-même, appuyez sur la touche de communication PTT située sur le côté gauche. Maintenez l’appareil à env. 5 cm de votre bouche et parlez d’une voix normalement forte. Relâchez ensuite la touche de communication.
  • Seite 21: Portée Des Émetteurs-Récepteurs

    - Utilisation - Portée des émetteurs-récepteurs Les émetteurs-récepteurs ont une portée pouvant atteindre 3-5 ?? km dehors. Cette portée maximale peut être réduite dans certaines conditions. Vous obtenez une portée maximale sur un terrain plat et dans un espace ouvert. La portée est réduite si la trajectoire des signaux est entravée par des bâtiments ou des arbres.
  • Seite 22: Caractéristiques Techniques

    - Caractéristiques techniques - Caractéristiques techniques Fréquences de canal PMR (MHz) : Canal 1 : 446,00625 Canal 5 : 446,05625 Canal 2 : 446,01875 Canal 6 : 446,06875 Canal 3 : 446,03125 Canal 7 : 446,08125 Canal 4 : 446,04375 Canal 8 : 446,09375 Séparation de canal 12,5 kHz...
  • Seite 23 - Sommario - 1 Informazioni importanti ............24 2 Elementi di comando ............26 3 Messa in funzione............... 27 Controllare il contenuto dell'imballaggio ............27 Inserimento delle batterie ................27 Applicazione e rimozione del clip della cintura..........27 Cambio delle mascherine ................28 4 Impiego................29 Inserimento e disinserimento delle ricetrasmittenti ........29 Regolazione del volume .................29 Selezione del canale..................29...
  • Seite 24: Informazioni Importanti

    - Informazioni importanti - Informazioni importanti Si prega di leggere attentamente le presenti istruzioni per l'uso. Non aprire in nessun caso l'apparecchio su propria iniziativa, per tentare di effettuare da soli delle riparazioni. Per le richieste di garanzia Vi preghiamo di rivolgerVi al Vostro rivenditore di fiducia.
  • Seite 25 - Informazioni importanti - Importanti informazioni di sicurezza Non utilizzare l'unità portatile in zone esposte al pericolo di deflagrazioni, quali ad esempio magazzini di carburanti, in zone d'abbattimento con esplosivi, magazzini di prodotti chimici oppure ambienti in cui sono presenti prodotti chimici o altre sostanze solide che possano reagire con l'aria.
  • Seite 26: Elementi Di Comando

    - Elementi di comando - Elementi di comando 1. antenna 2. display 3. tasto di selezione – 4. menu e tasto ON/OFF 5. tasto di chiamata 6. tasto di selezione + 7. tasto di conversazione PTT...
  • Seite 27: Messa In Funzione

    - Messa in funzione - Messa in funzione Controllare il contenuto dell'imballaggio La dotazione comprende: due ricetrasmittenti con rispettivamente 3 mascherine per ogni clip a cintura ricetrasmittente istruzioni per l'uso Inserimento delle batterie Le necessarie batterie non sono comprese nella dotazione. Per ciascun apparecchio Vi occorrono rispettivamente 3 batterie del tipo AAA 1.5V.
  • Seite 28: Cambio Delle Mascherine

    - Messa in funzione - Cambio delle mascherine Le ricetrasmittenti vengono rispettivamente fornite con mascherine colorate, che possono essere cambiate all'occorrenza. Per cambiare una mascherina, occorre procedere nel modo seguente: Rimozione della mascherina Rimuovere il clip della cintura (si veda 3.3) e aprire quindi lo scomparto dell batterie.
  • Seite 29: Impiego

    - Impiego - Impiego Inserimento e disinserimento delle ricetrasmittenti MENU Per inserire una ricetrasmittente, mantenere premuto il tasto ON/OFF , fino a sentire un segnale acustico. Sul display viene visualizzato il canale attualmente selezionato da 1 e 8. Per disinserire la ricetrasmittente, mantenere di nuovo premuto il tasto MENU ON/OFF , fino a sentire un segnale acustico.
  • Seite 30: Conversazioni Tra Le Ricetrasmittenti

    - Impiego - Conversazioni tra le ricetrasmittenti Per poter parlare occorre premere il tasto di conversazione PTT situato sulla parte sinistra. Mantenere una distanza di ca. 5 cm dall'apparecchio e parlare a voce normale. Dopodiché rilasciare il tasto di conversazione. L'interlocutore a questo punto sente un segnale acustico (roger beep), non appena rilasciate il tasto di chiamata.
  • Seite 31: Portata Delle Ricetrasmittenti

    - Impiego - Portata delle ricetrasmittenti Le ricetrasmittenti hanno una portata massima di 3-5?? km all'aperto. Questa portata massima può essere ridotta a causa di determinate circostanze. In condizioni piane ed all'aperto si ottengono i migliori risultati e la massima portata. Se nella traiettoria dei segnali dovessero trovarsi degli edifici oppure alberi allora verrà...
  • Seite 32: Dati Tecnici

    - Dati tecnici - Dati tecnici Frequenze canale PMR (MHz) : canale 1: 446,00625 canale 5: 446,05625 canale 2: 446,01875 canale 6: 446,06875 canale 3: 446,03125 canale 7: 446,08125 canale 4: 446,04375 canale 8: 446,09375 Separazione canale 12.5 kHz Potenza di trasmissione 500mW Uscita audio 80dB SPL minimo...
  • Seite 33 - Contents - 1 Important information............34 2 User controls ..............36 3 Setting up ................37 3.1 Check contents of pack............37 3.2 Fitting the batteries..............37 3.3 Removing and fitting the belt clip ..........37 3.4 Changing the moulded grip ............. 38 4 Operation................
  • Seite 34: Important Information

    - Important information - Important information Please read these operating instructions carefully. Under no circumstances open the unit yourself and do not try to carry out your own repairs. For any claims under the warranty, please refer to your dealer. Batteries Please always use only type AAA 1.5V alkaline batteries.
  • Seite 35 - Important information - Important safety information Do not use the handset in areas where there is a risk of explosion, such as fuel stores, blasting areas, chemical stores or areas in which chemicals or other solids are present in the air. Always follow all information signs.
  • Seite 36: User Controls

    - User controls - User controls 1. Aerial 2. Display 3. Selector button + 4. Selector button - 5. Menu and On/Off button 6. Talk button PTT 7. Call button...
  • Seite 37: Setting Up

    - Setting up - Setting up Check contents of pack The following items are supplied: two radios with belt clip three moulded grips for each radio one instruction manual Fitting the batteries The batteries required are not supplied with the unit. For each unit you will require three type AAA 1.5V batteries.
  • Seite 38: Changing The Moulded Grip

    - Setting up - Changing the moulded grip Your radios are each supplied with three coloured moulded grips, which you can change as required. To change the moulded grip, proceed as follows: Removing the grip Remove the belt clip (see 3.3) and open the battery compartment. Now carefully lever the moulded grip out of the fixing at position 1 using a screwdriver.
  • Seite 39: Operation

    - Operation - Operation Switching the radios on and off MENU To switch on the radio, hold the On/Off button pressed until a signal tone sounds. The display will show the currently selected channel between 1 and 8. MENU To switch the radio off, hold the On/Off button pressed once more until a signal tone sounds.
  • Seite 40: Calls Between Radios

    - Operation - Calls between radios To speak yourself, press the PTT talk button on the left-hand side. Hold the unit about 5 cm from your mouth and speak in a normal voice. When you have finished, release the talk button. The person you are speaking to will hear a signal tone (Roger beep) when you have released the talk button.
  • Seite 41: Range Of The Radios

    - Operation - Range of the radios The radios have a range of up to 3 km outdoors. This maximum range can be reduced under certain circumstances. You can achieve maximum range in open, flat conditions. If there are buildings or trees in the signal path then the range will be reduced.
  • Seite 42: Technical Data

    - Technical Data - Technical data PMR channel frequencies (MHz): Channel 1: 446.00625 Channel 5: 446.05625 Channel 2: 446.01875 Channel 6: 446.06875 Channel 3: 446.03125 Channel 7: 446.08125 Channel 4: 446.04375 Channel 8: 446.09375 Channel separation 12.5 kHz Transmitter power 500mW Audio output 80dB SPL minimum...
  • Seite 43: Declaration Of Conformity

    Route d'Englisberg 11 CH-1763 Granges Paccot CE0336 PRODUCT: SWITEL WT010 This product transmits in a non-EU-harmonised frequency band (466.00625 – 446.09375 MHz distribute on 8 channels) and may thus only be used within those countries that permit usage of such equipment.
  • Seite 44 www.switel.com...

Inhaltsverzeichnis