Inhaltszusammenfassung für Silvercrest SWEP 500 A1
Seite 1
RECETOR MUNDIAL SWEP 500 A1 RECETOR MUNDIAL MULTI-BAND RADIO Manual de instruções Operating instructions WELTEMPFÄNGER Bedienungsanleitung IAN 79840...
Seite 2
Antes de começar a ler abra na página com as imagens e, de seguida, familiarize-se com todas as funções do aparelho. Before reading, unfold the page containing the illustrations and familiarise yourself with all functions of the device. Klappen Sie vor dem Lesen die Seite mit den Abbildungen aus und machen Sie sich anschließend mit allen Funktionen des Gerätes vertraut.
ÍNDICE PÁGINA Introdução Utilização correcta Dados técnicos Símbolos utilizados Indicações instrutivas de segurança Elementos de comando Colocação em funcionamento Funções gerais Funções de tempo Horas, data, fuso horário e hora mundial ....13 Seleccionar modo de indicação .
Introdução Parabéns pela compra do seu aparelho novo. Decidiu-se, assim, por um produto de elevada qualidade. O manual de in- struções é constituinte deste produto. Este contém indicações importantes para a segurança, utilização e eliminação. Antes da utilização do produto, famializa-se com todas as indicações de utilização e de segurança.
Seite 6
Consumo de energia: 5 Watt Consumo de energia Standby: aprox. 1 W Temperatura de funcionamento: +5 ~ +40°C Humidade: 5 ~ 80 % (nenhuma condensação) Dimensões (C x A x L): 17,7 x 11 x 3,9 cm Peso do aparelho: aprox.
Dados Gerais Posições de memória : Auscultadores Modelo: E105 Impedância: 32 Ω Tensão característica em banda larga (WBCV): aprox. 110 mV Tensão máxima de saída da saída dos auscultadores: aprox. 65 mV Fonte de alimentação a partir da rede Fabricante: Everway Industries Ltd.
Este símbolo alerta para a não colocação do aparelho em água ou outros líquidos. Este símbolo avisa-o contra lesões auditivas. Nota: Este símbolo representa dicas relativas ao manuseamento do aparelho. Indicações instrutivas de segurança • Este aparelho não se destina a ser utilizado por pessoas (incluindo crianças) com capacidades físicas, sensoriais ou mentais limitadas ou com falta de experiência e/ou conhecimento, a não ser que se encon- trem sob vigilância de uma pessoa responsável pela sua segurança ou...
Perigo devido a choque-eléctrico! • Ligue o aparelho a uma tomada de rede correctamente instalada e ligada à terra. A tensão de rede deve estar de acordo com a indicação existente na placa de identificação do aparelho. • Transformadores ou cabo de rede danificados devem ser substituídos imediatamente por técnicos especializados ou pela assistência ao cliente para evitar perigos.
• Nunca cubra as ranhuras de ventilação do aparelho quando este se encontra em funcionamento. • Não coloque fontes de incêndio abertas, como por ex., velas em cima ou ao lado do aparelho. Perigo de ferimentos • Mantenha as crianças afastadas do cabo de ligação e do aparelho. As crianças subavaliam com muita frequência os perigos que advêm de aparelhos eléctricos.
Indicações relativas à desconexão de rede POWER O botão deste aparelho não desliga o mesmo completamente da corrente. Além disso, o aparelho consome energia no modo Standby. Para desligar o aparelho completamente da corrente, o transformador tem de ser retirado da tomada de rede. Indicações relativas ao manuseio com pilhas O aparelho utiliza pilhas.
Elementos de comando Fig. A Parte dianteira M.0/5 - M.4/9 Botões de memória Visor SNOOZE/SLEEP TIMER Botão (LW/SW/MW/FM) Interruptor de selecção da banda BASS Botão FINE Botão UP/DOWN Botões Vol.+(AL-1)/Vol.-(AL-2) Botões MODE Botão POWER Botão Botão PAGE Botão MEMORY SCAN Botão Colunas Fig.
Colocação em funcionamento Retirar o aparelho da embalagem Remova todo o material de embalagem. Atenção! Nunca deixar crianças pequenas brincar com a película de plástico. Existe o perigo de asfixia! Verificar o volume do fornecimento Certifique-se ao retirar o aparelho da embalagem de que foram fornecidos os seguintes componentes: •...
Seite 14
• Coloque quatro pilhas no compartimento de acordo com a polaridade. • Volte a deslocar a tampa para o compartimento. Caso as pilhas fiquem fracas, isso é indicado no visor pelo símbolo piscar. Em seguida, o aparelho desliga-se. Ligação à rede •...
Funções gerais Bloqueio das teclas Para evitar que as configurações sejam alteradas ao tocar nos botões sem intenção, pode activar um bloqueio dos botões. • Prima e mantenha premido o botão durante cerca de 3 segun- dos com o rádio ligado. No visor aparece a indicação Todos os SNOOZE botões, à...
Horas, data, fuso horário e hora mundial MODE Pode configurar os botões hora, data e fuso horário. Pode também consultar e configurar o Tempo Universal Coordenado, o alarme de data, a recepção de ondas médias, a interrupção da hora de despertar e o MODE modo das horas.
Seite 17
Acertar as horas MODE • Prime uma vez . No visor pisca a hora configurada pela última vez. DOWN • Prima o botão de modo a ajustar a hora em minutos. Mantenha um dos botões premido durante alguns segundos, de modo a configurar as horas em avanço rápido em intervalos de dez minutos.
Seite 18
Regular fuso horário MODE • Prima uma vez mais ou três vezes em . No visor, o fuso horário configurado pisca como abreviatura da respectiva cidade (na primeira colocação em funcionamento UTC); a indicação das horas desaparece. DOWN • Prima no botão para ir para o próximo fuso horário ou para o anterior.
Seite 19
Abreviaturas Dif. r. MEZ Hora de Verão Cidade -10:00 não Honolulu/EUA -9:00 Anchorage/EUA -8:00 Vancouver/Canadá -8:00 Los Angeles/EUA -7:00 Denver/EUA -6:00 Chicago/EUA -6:00 Cidade do México/México -5:00 Nova Iorque/EUA -5:00 Toronto/Canadá -5:00 Montreal/Canadá -4:30 não Caracas/Venezuela -3:00 Rio de Janeiro/Brasil -3:00 não Buenos Aires/Argentina...
Seite 20
*UTC Universal Time Coordinated (isto quer dizer: hora mundial coordenada). O UTC é a hora de referência, da qual são sincronizadas as horas nos fusos horários da terra. Indicar hora mundial MODE • Prima uma vez mais ou quatro vezes de modo a indicar a hora mundial.
Seite 21
Alarme de data especial MODE • Prima o botão uma quinta vez para configurar o alarme da data especial. No visor piscam alternadamente a indicação SDA1 e a data. PAGE • Prima o botão para escolher entre dez alarmes de datas configu- ráveis (SDA1 - SDA 10).
Seleccionar modo de indicação Pode escolher quais os dados a serem indicados no visor, quando o rádio está desligado. O respectivo modo é indicado no visor através do respectivo símbolo. Seleccione o modo de indicação com o rádio desligado premindo FINE repetidamente o botão de acordo com a seguinte tabela:...
Seite 23
Ajustar hora de despertar Pode programar com o seu receptor mundial duas horas de despertar. Função de despertar Símbolo no visor Rádio sons sonoros desligado sem símbolo Vol.+/AL–1 Vol.-/AL–2 • Com o rádio desligado, prima o botão No visor surge a hora de despertar por último configurada e o símbolo para o tipo de alarme.
Seite 24
SNOOZE • Prima o botão para configurar o dia da semana desejado. Para retroceder para a selecção dos dias úteis, fins-de- semana ou semana SNOOZE completa, mantenha novamente premido o botão por breves instantes. MODE • Prima o botão para memorizar a configuração e para voltar ao modo da hora.
Regular interrupção do despertar MODE • Prima o botão 7 vezes, com o rádio desligado. No visor surge a interrupção do despertar regulada (aquando da colocação em funcionamento “SNO 10“). DOWN • Com os botões pode regular a interrupção do despertar para um tempo de 1 a 59 minutos.
Função contagem decrescente A função contagem decrescente está à disposição apenas quando o rádio está desligado. Regular e memorizar a contagem decrescente MEMORY SCAN • Prima e mantenha o botão para aprox. 2 seg., no visor surge a indicação 0.00 D. O D fica intermitente. DOWN •...
Quando o tempo ajustado terminar, soa um sinal de alarme durante um minuto, que aumenta de volume e soa mais alto. MEMORY SCAN • Prima o botão de modo a interromper a contagem decrescente e a sair do modo contagem decrescente. Funcionamento do rádio Ligar/volume POWER...
Função Snooze SNOOZE Pode activar através do botão a função snooze. Pode regular uma hora até 90 minutos em intervalos de 10 minutos, na qual o rádio se deverá desligar. Para isso, desligue primeiramente o rádio. SNOOZE • Prime o botão .
Região Distância de Banda de exploração frequência Amerika 10 kHz 520-1710 kHz Europa 9 kHz 522-1656 kHz Sintonia emissoras Quando uma emissora não é encontrada, é possível melhorar a recepção através de um ajuste preciso. FINE • Durante a localização de emissora, prima o botão no visor surge a indicação FINE.
Funções de memória Memorizar emissoras O receptor universal pode memorizar 400 emissores. De modo a memorizar uma emissora, proceda do seguinte modo: • Ajuste com o interruptor de selecção de bandas a banda de frequên- cia e depois a emissora, que deseja memorizar. •...
Seleccionar emissoras memorizadas • Para seleccionar directamente uma emissora memorizada ajuste a banda de frequência com o interruptor de selecção de bandas na qual se pode encontrar a emissora. PAGE DOWN • Prima o botão e seleccione depois com os botões UP ou uma página de memória (de 00 - 39).
Nota: Tenha em atenção que, ao fazê-lo, a função snooze é activada. SNOOZE Premir botão , até surgir 00 no visor. Limpeza Perigo de vida devido a choque eléctrico: • Desligue o aparelho da rede, antes de o limpar! • Nunca submergir as peças do aparelho em água ou outros líquidos! •...
Eliminar pilhas / baterias As pilhas não podem ser deitadas no lixo doméstico. Cada consumidor é legalmente obrigado a entregar pilhas / baterias num pilhómetro da sua junta de freguesia / ou no comércio. Esta obrigação serve para que as pilhas / baterias possam ser eliminadas de forma ecológica.
Seite 34
A garantia abrange apenas defeitos de material ou de fabrico, não incluindo danos provocados pelo transporte, peças de desgaste ou danos em peças frágeis, por ex. interruptores ou baterias. O produto destina-se apenas ao uso privado e não ao uso comercial. Em caso de utilização incorrecta ou indevida, exercício de força excessiva e de intervenções não efectuadas pelo nosso representante autorizado de assistência técnica, perderá...
Seite 36
GB/MT CONTENTS PAGE Introduction Intended use Technical Data Symbols used Safety information Operating elements Starting up General functions Time functions Time, date, time zone and world time .....45 Select display mode .
GB/MT Introduction Congratulations on the purchase of your new appliance. You have clearly decided in favour of a quality product. These operating instructions are a part of this product. They contain important information in regard to safety, use and disposal. Before using the product, familiarise yourself with all of these operating and safety instructions.
Seite 38
GB/MT Power consumption: 5 watts Power consumption Standby: approx. 1 W Operating temperature: +5 ~ +40°C Humidity: 5 ~ 80% (no condensation) Dimensions (W x H x D): 17.7 x 11 x 3.9 cm Appliance weight: approx. 425 g Power transformer weight: approx.
GB/MT This symbol warns about submersing the appliance in water or other liquids. This symbol warns you about hearing damage. Note: With this symbol you are given tips about interaction with the appliance. Safety information • This device has not been designed for use by people (including children) with restricted physical, sensory or intellectual abilities or lack of expe- rience and/or knowledge, unless they are supervised by a responsible person (for their own safety) or have received instructions on how to...
GB/MT Risk of electric shock! • Connect the mains-power adapter only to correctly installed and earthed mains sockets. Ensure that the rating of the local power supply tallies completely with the details given on the rating plate of the appliance. •...
GB/MT • Never cover the device’s ventilation slots when it is switched on. • Do not place open flames, such as candles, on or near the device. Risk of injury • Keep children away from the connection cable and device. Children frequently underestimate the danger of electrical devices.
GB/MT Information on separating the device from mains power POWER button on this device does not completely separate it from the mains network. In addition, the device uses power when in standby mode. In order to completely separate the device from the mains supply the plug must be removed from the mains socket.
GB/MT Operating elements Fig. A Front panel M.0/5 - M.4/9 Save buttons Display SNOOZE/SLEEP TIMER Button (LW/SW/MW/FM) Waveband selector switch BASS button FINE button UP/DOWN buttons Vol.+(AL-1)/Vol.-(AL-2) buttons MODE button POWER button button PAGE button MEMORY SCAN button Loudspeakers Fig. B Back Stand Aerial...
GB/MT Starting up Unpack the device Remove all packaging materials. Caution! Do not let children play with the plastic film. There is a risk of suffocation. Check the items supplied Whilst unpacking, check that all of the following items are available to you: •...
Seite 46
GB/MT • Replace the cover on the battery compartment. If the batteries become too weak, this is indicated by the symbol blinking in the display. Subsequently, the appliance then switches itself off. Mains connection 6V 600 mA • Connect the plug of the mains adapter to the socket on the side of the device.
GB/MT General functions Key lock In order to prevent changing the settings unintentionally by touching the buttons, you can activate the key lock. • With the radio switched on, press and hold the button for about 3 seconds. On screen, the message flashes.
GB/MT Time, date, time zone and world time MODE You can set the time, date and time zone via the button. You can con- tinue to query and adjust the universal time, the date alarm, the medium- wave reception, alarm time interruption and the hours mode. MODE When you press the button with the radio switched off, the function to be...
GB/MT Setting clock time MODE • Press once. The most recently set time flashes on the screen. DOWN • Press the button to move the time forward or backward at minute intervals. Hold down one of the buttons for a few seconds to move the setting forward or backward quickly at 10 minute intervals.
Seite 50
GB/MT Setting the time zone MODE • Press again or three times. The selected time zone flashes on the screen as the abbreviation for the corresponding city (UTC when first switched on); the time disappears. DOWN • Press the button to move the time zone forward or backward. The following table summarises the city abbreviations for the time zones and time differences.
Seite 51
GB/MT Difference from CET Summer time Short code Town -10:00 Honolulu/USA -9:00 Anchorage/USA -8:00 Vancouver/Canada -8:00 Los Angeles/USA -7:00 Denver/USA -6:00 Chicago/USA -6:00 Mexico City/Mexico -5:00 New York/USA -5:00 Toronto/Canada -5:00 Montreal/Canada -4:30 Caracas/Venezuela -3:00 Rio de Janeiro/Brazil -3:00 Buenos Aires/Argentina UTC* 0:00 Universal Time Coordinated...
Seite 52
GB/MT *UTC Universal Time Coordinated (UTC). UTC is the reference for the times of the various time zones around the world. Show world time MODE • Press again or four times to show the world time. The city abbreviation appears with the corresponding time. DOWN •...
Seite 53
GB/MT Special date alarm MODE • Press the button a fifth time to set the special date alarm. The screen flashes SDA1 and the date in succession. PAGE • Press the button to select one of the ten settable date alarms (SDA1–SDA 10).
GB/MT Select display mode You can select which information is shown on the screen when the radio is switched off. The selected mode is indicated by a corresponding symbol on the screen. When the radio is switched off, select the display mode by repeatedly FINE pressing the button in accordance with the following table:...
GB/MT Setting the alarm time You can set two alarm times in your world receiver. Alarm function Symbol on the screen Radio Acoustic signals Switched off No symbol Vol.+/AL–1 Vol.-/AL–2 • With the radio switched off, press the buttons The screen shows the most recently set alarm time and the symbol for the alarm type.
Seite 56
GB/MT SNOOZE • Press the button to set the desired week day. To go back to selecting week days, weekend or every day, briefly hold SNOOZE down the button again. MODE • Press the button to save the setting and return to the time mode. The setting is also saved if you wait around 15 seconds until the screen returns to displaying the time.
GB/MT Set snooze time MODE • With the radio switched off, press the button seven times. The screen displays the snooze time set (default is SNO 10). DOWN • Use the buttons to set the snooze time to a time between 1 and 59 minutes.
GB/MT Countdown function The countdown function is only available when the radio is switched off. Set and save countdown MEMORY SCAN • Press and hold down the button for around 2 seconds, the screen shows 0.00 D. The D blinks. DOWN •...
GB/MT Radio operation Switching on / volume control POWER • Press the button to switch the radio on. ON will appear briefly on the screen, followed by the current frequency and band selection. Vol.+/AL–1 Vol.–/AL–2 • Press the button to control the volume: Vol.–/AL–2 Button : quieter;...
GB/MT Sleep function SNOOZE You can activate the sleep function via the button. You can set a time of up to 90 minutes in ten-minute steps, after which the radio will auto- matically turn itself off. To do so, first switch the radio off. SNOOZE •...
GB/MT Region Channel Band range spacing Amerika 10 kHz 520-1710 kHz Europa 9 kHz 522-1656 kHz Fine tuning If a station can not be found precisely the fine tuning can be use to improve reception. FINE • During the channel search press the button, the screen shows FINE.
GB/MT Memory functions Save station The world receiver can save 400 radio stations. To store a station, proceed as follows: • Set the frequency range with the frequency selection switch and then the station that you want to save. • Press the button.
Seite 63
GB/MT Selecting a saved station • In order to select a saved station directly, first use the frequency selection switch to select the frequency range where the station is saved. PAGE DOWN • Press the button and then use the buttons to select a memory page (from 00 - 39).
GB/MT Cleaning Risk of injury from electric shock: • Disconnect the device from the mains power before cleaning it! • Never immerse the device’s parts into water or other liquids! • Do not allow liquid to penetrate the housing. Cleaning the housing: Clean the housing surface with a slightly damp cloth.
GB/MT Disposal of batteries Batteries must not be disposed in the household rubbish. Each consumer is obliged by law to bring batteries/rechargeable batteries to a collection point provided by the local authority/council or to retailers. This obligation is so that the batteries can be disposed of in an environmen- tally friendly manner.
Seite 66
GB/MT The warranty covers only claims for material and manufacturing defects, but not for transport damage, for wearing parts or for damage to fragile components, e.g. buttons or batteries. This product is for private use only and is not intended for commercial use. The warranty is void in the case of abusive and improper handling, use of force and internal tampering not carried out by our authorized service branch.
DE/AT/CH Einführung Herzlichen Glückwunsch zum Kauf Ihres neuen Gerätes. Sie haben sich damit für ein hochwertiges Produkt entschieden. Die Bedienungsanleitung ist Bestandteil dieses Produkts. Sie enthält wichtige Hinweise für Sicherheit, Gebrauch und Entsorgung. Machen Sie sich vor der Benutzung des Produkts mit allen Bedien- und Sicherheitshinweisen vertraut.
Seite 70
DE/AT/CH Leistungsaufnahme: 5 Watt Leistungsaufnahme Standby: ca. 1 W Betriebstemperatur: +5 ~ +40°C Feuchtigkeit: 5 ~ 80 % (keine Kondensation) Abmessungen (B x H x T): 17,7 x 11 x 3,9 cm Gewicht Gerät: ca. 425 g Gewicht Netzteil: ca. 185 g Batterien 4x 1,5 V, Typ AA/LR6/Mignon (Nicht im Lieferumfang enthalten) Frequenzbereich Radio:...
DE/AT/CH Allgemein Speicherplätze: Kopfhörer Modell: E105 Impedanz: 32 Ω Breitband-Kennungsspannung (WBCV): ca. 110 mV Kopfhörerausgang maximale Ausgangsspannung: ca. 65 mV Netzteil Hersteller: Everway Industries Ltd. Modell: EW35V600-060A Primär: 230 V ~ 50 Hz / 25 mA Sekundär: 6 V ~ 600 mA / 3,6 VA Verwendete Symbole Dieses Warnsymbol macht Sie darauf aufmerksam, dass hier ein Warnhinweis folgt, der vor folgenden Dingen warnt:...
DE/AT/CH Dieses Symbol warnt vor dem Eintauchen des Gerätes in Wasser oder andere Flüssigkeiten. Dieses Symbol warnt Sie vor Gehörschäden. Hinweis: Bei diesem Symbol werden Ihnen Tipps zum Umgang mit dem Gerät gegeben. Sicherheitshinweise • Dieses Gerät ist nicht dafür bestimmt, durch Personen (einschließlich Kinder) mit eingeschränkten physischen, sensorischen oder geistigen Fähigkeiten oder mangels Erfahrung und/oder mangels Wissen benutzt zu werden, es sei denn, sie werden durch eine für ihre Sicherheit...
DE/AT/CH Gefahr durch elektrischen Schlag! • Schließen Sie das Steckernetzteil nur an eine vorschriftsmäßig installierte und geerdete Netzsteckdose an. Die Netzspannung muss mit den Angaben auf dem Typenschild des Gerätes übereinstimmen. • Lassen Sie beschädigte Steckernetzteile oder Netzkabel sofort von autorisiertem Fachpersonal oder dem Kundenservice austauschen, um Gefährdungen zu vermeiden.
DE/AT/CH • Decken Sie niemals die Lüftungsschlitze des Gerätes ab, wenn es eingeschaltet ist. • Stellen Sie keine offenen Brandquellen, wie z. B. Kerzen auf oder neben das Gerät. Verletzungsgefahr • Halten Sie Kinder von Anschlussleitung und Gerät fern. Kinder unter- schätzen häufig die Gefahren von Elektrogeräten.
Seite 75
DE/AT/CH Hinweis zur Netztrennung POWER Die Taste dieses Gerätes trennt das Gerät nicht vollständig vom Stromnetz. Außerdem nimmt das Gerät im Standby-Betrieb Strom auf. Um das Gerät vollständig vom Netz zu trennen, muss das Steckernetzteil aus der Netzsteckdose gezogen werden. Hinweise zum Umgang mit Batterien Das Gerät verwendet Batterien.
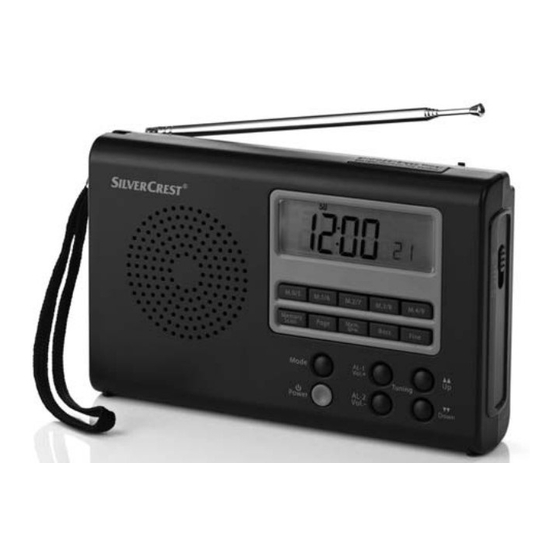
DE/AT/CH Inbetriebnahme Gerät auspacken Entfernen Sie sämtliches Verpackungsmaterial. Achtung! Lassen Sie kleine Kinder nicht mit Folie spielen. Es besteht Erstickungsgefahr! Lieferumfang prüfen Vergewissern Sie sich beim Auspacken, dass folgende Teile mitgeliefert wurden: • Weltempfänger • Netzteil • Kopfhörer • Aufbewahrungstasche •...
Seite 78
DE/AT/CH • Schieben Sie den Deckel wieder auf das Fach. Werden die Batterien zu schwach, so wird dies im Display durch das blin- kende Symbol angezeigt. Anschließend schaltet sich das Gerät ab. Netzanschluss • Schließen Sie den Gerätestecker des Steckernetzteils an die Buchse 6V 600 mA an der Geräteseite an.
DE/AT/CH Allgemeine Funktionen Tastensperre Um zu verhindern, dass durch unabsichtliches Berühren der Tasten Einstel- lungen geändert werden, können Sie eine Tastensperre aktivieren. • Drücken und halten Sie bei eingeschaltetem Radio die Taste für ca. 3 Sekunden. Im Display blinkt die Anzeige .
DE/AT/CH Uhrzeit, Datum, Zeitzone und Weltzeit MODE Sie können über die Taste Uhrzeit, Datum und Zeitzone einstellen. Weiterhin können Sie die Weltzeit, den Datumsalarm, den Mittelwellen- empfang, die Weckzeitunterbrechung, den Stundenmodus abfragen und MODE einstellen. Wenn Sie die Taste bei ausgeschaltetem Radio drücken, blinkt die einzustellende Funktion für ca.
Seite 81
DE/AT/CH Uhrzeit einstellen MODE • Drücken Sie einmal . Im Display blinkt die zuletzt eingestellte Uhrzeit. DOWN • Drücken Sie die Taste bzw. , um die Uhrzeit in Minuten-Schritten vor bzw. zurückzustellen. Halten Sie eine der Tasten ein paar Sekunden gedrückt , um die Zeit im Schnelllauf in Zehn-Minuten-Schritten vor bzw.
Seite 82
DE/AT/CH Zeitzone einstellen MODE • Drücken Sie ein weiteres Mal bzw. dreimal . Im Display blinkt die eingestellte Zeitzone als Kürzel für die zugehörige Stadt (bei der ersten Inbetriebnahme UTC); die Uhrzeit verschwindet. DOWN • Drücken Sie die Taste bzw. , um zur nächsten bzw.
Seite 83
DE/AT/CH Kürzel Diff. z. MEZ Sommerzeit Stadt nein -10:00 Honolulu/USA -9:00 Anchorage/USA -8:00 Vancouver/Kanada -8:00 Los Angeles/USA -7:00 Denver/USA -6:00 Chicago/USA -6:00 Mexico City/Mexico -5:00 New York/USA -5:00 Toronto/Kanada -5:00 Montreal/Kanada nein -4:30 Caracas/Venezuela -3:00 Rio de Janeiro/Brasilien nein -3:00 Buenos Aires/Argentinien nein UTC*...
DE/AT/CH *UTC Universal Time Coordinated (dt.: koordinierte Weltzeit). Die UTC ist die Referenzzeit, von der die Zeiten in den verschiedenen Zeitzonen der Erde abgeleitet werden. Weltzeit anzeigen MODE • Drücken Sie ein weiteres Mal bzw. viermal , um sich die Weltzeit anzeigen zu lassen.
DE/AT/CH Spezieller Datumsalarm MODE • Drücken Sie die Taste ein fünftes Mal, um den speziellen Datums- alarm einzustellen. Im Display blinken abwechselnd die Anzeige SDA1 und das Datum. PAGE • Drücken Sie die Taste , um zwischen zehn einstellbaren Datums- alarmen (SDA1 - SDA 10) zu wählen.
DE/AT/CH Anzeigemodus wählen Sie können wählen, welche Daten im Display angezeigt werden, wenn das Radio ausgeschaltet ist. Der entsprechende Modus wird über entsprechende Symbole im Display angezeigt. Wählen Sie bei ausgeschaltetem Radio den Anzeigemodus durch wieder- FINE holtes Drücken der Taste nach folgender Tabelle aus: Symbol im Display Anzeigemodus CLOCK...
Seite 87
DE/AT/CH Weckzeit einstellen Sie können mit Ihrem Weltempfänger zwei Weckzeiten programmieren. Weckfunktion Symbol im Display Radio Signaltöne Ausgeschaltet kein Symbol Vol.+/AL–1 • Drücken Sie bei ausgeschaltetem Radio die Taste Vol.-/AL–2 (oder ). Im Display erscheint die zuletzt eingestellte Weckzeit und das Symbol für den Typ des Alarms. DOWN •...
Seite 88
DE/AT/CH SNOOZE • Drücken Sie die Taste , um den gewünschten Wochentag einzu- stellen. Um wieder zurück zur Auswahl von Werktagen, Wochenende oder ganzer SNOOZE Woche zu gelangen, halten Sie die Taste erneut kurz gedrückt. MODE • Drücken Sie die Taste , um die Einstellung zu speichern und in den Uhrzeit-Modus zurückzukehren.
DE/AT/CH Weckunterbrechung einstellen MODE • Drücken Sie bei ausgeschaltetem Radio 7x die Taste . Im Display erscheint die eingestellte Weckunterbrechung (bei der Inbetriebnahme SNO 10). DOWN • Mit den Tasten können Sie die Weckunterbrechung auf eine Zeit zwischen 1 und 59 Minuten einstellen. Weckfunktion ausschalten Vol.+/AL–1 Vol.-/AL–2...
DE/AT/CH Countdown-Funktion Die Countdown-Funktion steht nur bei ausgeschaltetem Radio zur Verfügung. Countdown einstellen und speichern MEMORY SCAN • Drücken und halten Sie die Taste für ca. 2 Sek., im Display erscheint die Anzeige 0.00 D. Das D blinkt. DOWN • Drücken Sie die Tasten bzw.
DE/AT/CH Radiobetrieb Einschalten/Lautstärke POWER • Drücken Sie die Taste , um das Radio einzuschalten. Im Display wird kurz ON eingeblendet, anschließend erscheint die aktuell einge- stellte Frequenz mit dem gewählten Band. Vol.+/AL–1 Vol.-/AL–2 • Regeln Sie über die Tasten bzw. die Lautstärke: Vol.-/AL–2 Taste...
DE/AT/CH Schlummerfunktion SNOOZE Über die Taste können Sie auch die Schlummerfunktion aktivieren. Sie können eine Zeit bis zu 90 Minuten in Zehn-Minuten-Schritten einstel- len, nach der sich das Radio automatisch abschalten soll. Schalten Sie das Radio hierzu vorher aus. SNOOZE •...
DE/AT/CH Region Abtastabstand Bandbereich Amerika 10 kHz 520-1710 kHz Europa 9 kHz 522-1656 kHz Senderfeinabstimmung Wenn ein Sender nicht genau gefunden werden kann, ist es möglich, durch eine Feinabstimmung den Empfang zu verbessern. FINE • Drücken Sie während der Sendersuche die Taste , im Display erscheint die Anzeige FINE.
DE/AT/CH Speicherfunktionen Sender speichern Der Weltempfänger kann 400 Sender speichern. Um einen Sender zu speichern gehen Sie wie folgt vor: • Stellen Sie mit dem Bandwahlschalter das Frequenzband und dann den Sender ein, den Sie abspeichern möchten. • Drücken Sie die Taste .
DE/AT/CH Gespeicherten Sender auswählen • Um einen gespeicherten Sender direkt auszuwählen, stellen Sie zunächst mit dem Bandwahlschalter das Frequenzband ein, in dem der Sender zu finden ist. PAGE • Drücken Sie die Taste und wählen Sie dann mit den Tasten bzw.
DE/AT/CH Reinigung Lebensgefahr durch elektrischen Schlag: • Trennen Sie das Gerät vom Stromnetz, bevor Sie es reinigen! • Tauchen Sie die Geräteteile niemals in Wasser oder andere Flüssigkeiten! • Lassen Sie keine Flüssigkeiten in das Gehäuse dringen. Reinigen des Gehäuses: Reinigen Sie die Gehäuseoberfläche mit einem leicht angefeuchteten Tuch.
DE/AT/CH Batterien / Akkus entsorgen Batterien dürfen nicht im Hausmüll entsorgt werden. Jeder Verbraucher ist gesetzlich verpflichtet, Batterien / Akkus bei einer Sammelstelle seiner Gemeinde / seines Stadtteils oder im Handel abzugeben. Diese Verpflichtung dient dazu, dass Batterien / Akkus einer umweltscho- nenden Entsorgung zugeführt werden können.
Seite 98
DE/AT/CH aber für Transportschäden, Verschleißteile oder für Beschädigungen an zerbrechlichen Teilen, z. B. Schalter oder Akkus. Das Produkt ist lediglich für den privaten und nicht für den gewerblichen Gebrauch bestimmt. Bei missbräuchlicher und unsachgemäßer Behandlung, Gewaltanwendung und bei Eingriffen, die nicht von unserer autorisierten Service-Niederlas- sung vorgenommen wurden, erlischt die Garantie.
Seite 99
KOMPERNASS GMBH BURGSTRASSE 21 44867 BOCHUM GERMANY www.kompernass.com Estado das informações · Last Information Update · Stand der Informationen: 01 / 2013 Ident.-No.: SWEP500A1102012-3 IAN 79840...