Herunterladen Inhalt Inhalt Diese Seite drucken
Petsafe PIG20-11041 Gebrauchsanweisung
Vorschau ausblenden Andere Handbücher für PIG20-11041:
Inhaltsverzeichnis

Werbung

Verfügbare Sprachen
  • DE

Verfügbare Sprachen

  • DEUTSCH, seite 127
PIG20-11041
Little Dog Deluxe
In-Ground Fence
Clôture anti-fugue de luxe
In-Ground Fence
pour petits chiens
Deluxe omheiningssysteem met
draad voor kleine honden,
In-Ground Fence
Limitador de zona deluxe
In-Ground Fence
para perros pequeños
Sistema antifuga deluxe
In-Ground Fence
per cani di taglia piccola
Luxus-unterirdisches
Rückhaltesystem mit Draht für
kleine Hunde In-Ground Fence
Bitte lesen Sie die ganze Gebrauchsanleitung vor der Inbetriebnahme aufmerksam durch
avec fi l
con cable
con fi lo
Si prega di leggere attentamente la guida all'uso prima di utilizzare il collare
Manuel d'utilisation et de dressage
Gebruiksaanwijzing en trainingshandleiding
Manual de funcionamiento y de adiestramiento
Manuale di funzionamento e di addestramento
Gebrauchsanweisung und Trainingsanleitung
Please read this entire guide before beginning
Veuillez lire ce manuel en entier avant de commencer
Gelieve deze gids volledig door te lezen voordat u begint
Por favor, lea detenidamente este manual antes de empezar
Operating and Training Guide

Werbung

Inhaltsverzeichnis

Fehlerbehebung

loading

Inhaltszusammenfassung für Petsafe PIG20-11041

  • Seite 1 Operating and Training Guide Manuel d’utilisation et de dressage Gebruiksaanwijzing en trainingshandleiding Manual de funcionamiento y de adiestramiento Manuale di funzionamento e di addestramento Gebrauchsanweisung und Trainingsanleitung PIG20-11041 Little Dog Deluxe In-Ground Fence ™ Clôture anti-fugue de luxe In-Ground Fence avec fi l ™...
  • Seite 2: Important Safety Information

    NOT rely solely upon the system to confine your pet. Radio Systems Corporation shall NOT be liable for any property damage, economic loss or any consequential damages, sustained as a result of any animal crossing the boundary. www.petsafe.net...
  • Seite 3 • You should not make the collar any tighter than is required for good contact. A collar that is too tight will increase the risk of pressure necrosis in the contact area. • Proper training of your pet is essential to the success of the Petsafe Little Dog Deluxe In-Ground ®...
  • Seite 4: Inhaltsverzeichnis

    To get the most protection out of your warranty, please register your product within 30 days at www. petsafe.net. By registering, and keeping your receipt, you will enjoy the product’s full warranty and should you ever need to call the Customer Care Centre we will be able to help you faster. Most importantly, PetSafe will never give or sell your valuable information to anyone.
  • Seite 5: Components

    Bracket Boundary Wire - 150 m (500 ft) Power Adapter Fence Boundary Flags - 50 Transmitter Wire Nuts Battery ® (PetSafe RFA-188) Receiver Collar Gel-filled Test Light Operating and Capsules Tool Training Guide Other Items You May Need • Additional wire and fl ags (PRFA-500) •...
  • Seite 6: How The System Works

    Transmitter Zone Power Light Stimulation Pet Area Level Button Warning Zone Receiver Indicator Light (Bottom) Ground Contact Points Terminal Boundary Width Control Static Stimulation Boundary Wire Zone Terminals Boundary Width Loop Indicator Light Battery Warning Power Zone Module Socket www.petsafe.net...
  • Seite 7: Operating Guide

    • To properly contain your pet, we recommend setting a Boundary Width for the Warning and Static Stimulation Zones to approximately 4 m to 7 m (2 m to 3.5 m on each side of the wire). www.petsafe.net...
  • Seite 8: Sample Layouts

    A Double Loop must be used when you are not establishing the Boundary Zone on all sides of your property. When using a Double Loop, the Boundary Wire must be separated by a minimum of 1.5 m (5 ft) to avoid canceling the signal. Remember that a Double Loop will require twice as much wire. www.petsafe.net...
  • Seite 9: Position The Boundary Wire

    (10 ft) so at 90-degree angles (perpendicularly) ( 90˚ If separating the wire by at least 3 m (10 ft) from a neighbouring containment (10 ft) system’s wire does not reduce the inconsistent signal, contact the Customer Care Centre. www.petsafe.net...
  • Seite 10 Note: When adding Boundary Wire, it must act as a continuous loop. 1180 1870 The table at right indicates the approximate length of Boundary Wire 2800 needed for a square, Single Loop layout. Length will vary due to the 1011 1219 4000 amount of twisted wire and layout used. www.petsafe.net...
  • Seite 11: Connect The Wires To The Fence Transmitter

    For added protection, when unused for long periods of time or prior to thunderstorms, unplug from the wall outlet and disconnect the loop boundary wires. This will prevent damage to the transmitter due to surges. www.petsafe.net...
  • Seite 12: Prepare The Receiver Collar

    To activate the collar, insert the battery module (5A). Using the edge of the Test Light Tool as shown, turn the battery clockwise until the vertical line on the battery is pointed to the “ON” position (5B). If the PetSafe Receiver Collar is not going ®...
  • Seite 13: Function And Response Table

    Control knob. Turn the knob counter clockwise until the alarm sounds and the Loop Indicator (1300 feet to 2400 feet) Light is no longer lit. Turn the knob clockwise and increase by 2 numbers. The alarm should turn OFF and the light should turn ON. www.petsafe.net...
  • Seite 14 If you are satisfi ed that your system is functioning properly, you are ready to start burying the Boundary Wire. If the Receiver Collar did not beep or the Test Light did not fl ash, see the “Troubleshooting” section. www.petsafe.net...
  • Seite 15: Install The Boundary Wire

    For best results, brush away dirt or other debris before patching. • Gravel or Dirt Driveway (7D): Place the Boundary Wire in a PVC pipe or water hose to protect the Boundary Wire before burying. www.petsafe.net...
  • Seite 16: Place The Boundary Flags

    It is important to continue daily checks of the contact area. If redness or sores are found, discontinue use until the skin has fully healed. You may need to trim the hair in the area of the Contact Points. Never shave the dog’s neck; this may lead to a rash or infection. www.petsafe.net...
  • Seite 17 To Re-Thread the Collar Slide Buckle The slide buckle prevents the collar from becoming loose around your pet’s neck. Ridges The ridges must be facing up; the collar will slip if it is not properly threaded. www.petsafe.net...
  • Seite 18: Training Guide

    Put a separate non-metallic collar on your pet’s neck ABOVE the Receiver Collar and attach a lead. Be sure the extra collar does not put pressure on the Contact Points. Have tiny pieces of treats that your pet will fi nd desirable available. Have your pet’s favourite play toy available. www.petsafe.net...
  • Seite 19: Days 2 Thru 4 - Continue Boundary Awareness

    3. If the Receiver Collar is fi tted properly and your pet does not respond to the Static Stimulation, increase the Static Stimulation Level by 1. Watch for slight reactions at fi rst such as ears up, head turned, looking at the ground. 4. Stay at the same fl ag until your pet resists going into the Static Stimulation Zone. www.petsafe.net...
  • Seite 20: Days 5 Thru 8 - Distraction Phase

    Your pet is ready for this step only when he clearly avoids the entire Static Stimulation Zone, regardless of any distractions or temptations. During this step, do not leave your pet unattended. Goal: To give your pet free run of the Pet Area off the lead. Setup: Adjust the Receiver Collar to the permanent setting appropriate for your pet. www.petsafe.net...
  • Seite 21: Days 15 Thru 30 - Pet Monitoring

    To purchase additional accessories for your PetSafe Little Dog Deluxe In-Ground Fence , contact the Customer Care Centre or ® visit our website at to locate a retailer near you. For a listing of Customer Care Centres in your area visit www.petsafe.net. www.petsafe.net...
  • Seite 22: Troubleshooting

    • Remove the fuse door on the back of the Fence Transmitter and change out the fuse with the spare one located in the same area. • If the lights still do not come on, the Fence Transmitter and/or Power Adapter needs to be replaced. Contact the Customer Care Centre. www.petsafe.net...
  • Seite 23: Additional Information

    Disconnect the twisted Boundary Wire from the Boundary Wire terminals on the Fence Transmitter by pressing the red release levers on the connector and pulling the wires free. Insert the two ends of the test loop wire into the Boundary Wire Terminals on the transmitter. Plug the Power Adapter into Fence Transmitter Power Jack. www.petsafe.net...
  • Seite 24: Transmitter Loop Test

    3. Contact the Customer Care Centre for assistance. Wire Break Location Test Please follow these steps in determining where you have a break in your Boundary Wire: 1. Locate your original splice(s) and verify they have a good, solid connection. www.petsafe.net...
  • Seite 25: Battery Disposal

    Customer Care Centre. For a listing of Customer Care Centre telephone numbers, visit our website at www.petsafe.net. Separate collection of spent batteries is required in many regions; check the regulations in your area before discarding spent batteries. Please see page 12 for instructions on how to remove the battery from the product for separate disposal.
  • Seite 26: Terms Of Use And Limitation Of Liability

    Radio Systems Corporation may violate EU R&TTE regulations, could void the user’s authority to operate the equipment, and will void the warranty. Hereby, Radio Systems Corporation, declares that this PIG20-11041 Little Dog Deluxe In-Ground Fence is in compliance with ™...
  • Seite 27: Consignes De Sécurité Importantes

    à l'intérieur des limites voulues, vous NE DEVEZ PAS vous fier uniquement au système pour l'y confiner. Radio Systems Corporation NE SERA responsable d'aucun dégât matériel, perte financière ou dommage secondaire résultant du fait qu'un animal à franchi les limites. www.petsafe.net...
  • Seite 28 • Pour mieux protéger l'émetteur de clôture quand il doit rester inutilisé pendant une période prolongée ou avant des orages électriques, déconnectez les fils de la boucle de limite et débranchez l'adaptateur d'alimentation de la prise. Ceci empêchera que l'émetteur ne soit endommagé en cas de surtensions. www.petsafe.net...
  • Seite 29 Pour bénéfi cier pleinement de votre garantie, veuillez enregistrer votre article dans les 30 jours sur le site www.petsafe.net. Grâce à cet enregistrement et en conservant le reçu, votre produit sera totalement couvert par notre garantie. Si vous avez la moindre question, veuillez contacter notre Service clientèle, nous serons heureux de vous aider.
  • Seite 30: Contenu Du Kit

    Fil d’antenne - 150 m Adaptateur de courant Émetteur de Fanions de délimitation - 50 clôture Connecteurs Pile ® (PetSafe RFA-188) Collier-récepteur Capsules gel Clé multifonctions Manuel d’utilisation et de dressage Autres articles dont vous pourriez avoir besoin • Fils et fanions supplémentaires (PRFA-500) •...
  • Seite 31: Fonctionnement Du Système

    Voyant lumineux du récepteur (Bas) Prise Contacteurs de terre Molette de réglage de la largeur du périmètre Zone de stimulation Bornes d'attache électrostatique du fil d'antenne Largeur du périmètre Voyant de boucle Zone d’avertissement Module Prise pile d'alimen- tation www.petsafe.net...
  • Seite 32: Manuel D'utilisation

    • Arrondissez les coins, avec un rayon de 1 m au minimum, afi n de créer une limite plus uniforme ( ). Évitez les angles serrés car cela provoquerait l'apparition d'écarts dans votre périmètre de délimitation. www.petsafe.net...
  • Seite 33: Exemples De Confi Guration

    Lorsque la zone délimitée ne correspond pas à chaque côté du terrain, vous devez utiliser une boucle double. Dans cette confi guration, l'écart entre le fi l d'antenne de chaque boucle doit être d'au moins 1,5 m afi n d'éviter l'annulation du signal. N'oubliez pas qu'une double boucle exige deux fois plus de fi l. www.petsafe.net...
  • Seite 34: Positionnement Du Fi L D'antenne

    éléments, l'angle d'intersection doit être de 90 degrés (perpendiculaire) ( 90˚ Si un écart d'au moins 3 m par rapport au fi l d'un système de confi nement voisin ne suffi t pas à réduire l'irrégularité du signal, contactez le Service clientèle. www.petsafe.net...
  • Seite 35 Le tableau de droite indique la longueur approximative de fi l 1870 d'antenne requise pour une confi guration en carré à boucle simple. 2800 La longueur varie en fonction de la quantité de fi l torsadé et de la 1011 1219 4000 confi guration choisie. www.petsafe.net...
  • Seite 36: Connexion Des Fi Ls À L'émetteur De Clôture

    Par mesure de sécurité supplémentaire, quand le système doit rester inutilisé pendant une période prolongée ou avant des orages électriques, débranchez-le de la prise secteur et déconnectez les fils d'antenne. Ceci empêchera que l'émetteur ne soit endommagé en cas de surtensions. www.petsafe.net...
  • Seite 37: Préparation Du Collier-Récepteur

    ® détaillants. Contactez le Service clientèle ou consultez notre site web à l’adresse www.petsafe.net pour connaître l’adresse du revendeur le plus proche de chez vous. Fonctionnalité de test de la stimulation électrostatique et de la pile À...
  • Seite 38: Tableau De Fonction Et Réponse

    Tournez la molette dans le sens contraire des aiguilles d'une montre jusqu'à ce que l'alarme se déclenche et que le voyant de boucle s'éteigne. Tournez la molette dans le sens des aiguilles d'une montre et augmentez de 2 unités. L'alarme devrait s'éteindre et le voyant devrait s'allumer. www.petsafe.net...
  • Seite 39 Lorsque vous avez vérifi é que le système fonctionnait de manière satisfaisante, vous pouvez commencer à enterrer le fi l d'antenne. Si le collier-récepteur n'a pas émis d'avertissement sonore ou que la lampe test n'a pas clignoté, reportez-vous à la section « Dépannage ». www.petsafe.net...
  • Seite 40: Installation Du Fi L D'antenne

    • Entrée de garage en gravier ou non revêtue (7D) : Placez le fi l d'antenne dans un tuyau en PVC ou un tuyau d'arrosage pour le protéger avant de l'enfouir. www.petsafe.net...
  • Seite 41: Installation Des Fanions De Délimitation

    Il peut s’avérer nécessaire de couper les poils de votre chien dans zone située autour des contacteurs. Ne rasez jamais le cou de votre chien, car cela risquerait de provoquer des irritations ou une infection. www.petsafe.net...
  • Seite 42 Pour reposer la boucle du collier Boucle coulissante La boucle empêche le collier de se desserrer pendant que l'animal le porte. Rayures Les bords dentelés doivent être dirigés vers le haut ; le collier se desserrera s'il n'est pas correctement enfilé dans la boucle. www.petsafe.net...
  • Seite 43: Guide De Dressage

    Placez un collier distinct, non métallique, sur le cou de votre animal AU-DESSUS du collier-récepteur et attachez une laisse. Vérifiez que le collier supplémentaire ne fasse pas pression sur les contacteurs. Préparez quelques petits morceaux d'aliments dont votre animal est friand. Gardez à portée de main le jouet favori de votre animal. www.petsafe.net...
  • Seite 44: Jours 2 À 4 Inclus - Poursuite De L'apprentissage Des Limites De La Zone Autorisée

    électrostatique d'une unité. Observez les petites réactions initiales de votre animal, par exemple s'il dresse les oreilles, tourne la tête ou dirige son regard vers le sol. 4. Restez au même fanion de délimitation jusqu'à ce que votre animal résiste à l'approche de la Zone de stimulation électrostatique. www.petsafe.net...
  • Seite 45: Jours 5 À 8 - Phase De Distraction

    Pendant cette étape, ne laissez pas votre animal sans surveillance. Objectif : Laisser votre animal parcourir à son gré la zone autorisée sans laisse. Préparatifs : Régler le collier-récepteur au niveau permanent qui convient pour votre animal. www.petsafe.net...
  • Seite 46: Jours 15 À 30 - Surveillance De L'animal

    Au début, il se peut que vous deviez convaincre votre animal de quitter la zone autorisée à l'aide de friandises et de vifs encouragements. Remarque : Vous pouvez aussi porter votre animal hors de la zone autorisée. Félicitations ! Vous avez maintenant terminé avec succès le programme de dressage. www.petsafe.net...
  • Seite 47: Accessoires

    Afin de vous procurer des accessoires supplémentaires pour votre Clôture anti-fugue de luxe In-Ground Fence™ avec fil pour petits chiens, contactez le Service clientèle ou consultez notre site web pour connaître l’adresse du revendeur le plus proche de chez vous. Pour obtenir une liste des centres de service clientèle de votre région, consultez www.petsafe.net. Dépannage Le collier-récepteur n'émet pas...
  • Seite 48: Renseignements Supplémentaires

    3 m de fi l d'antenne, dénudé sur près d'un centimètre à chaque extrémité, pour former une boucle de test. Procédez comme suit pour effectuer le test du système : Enlevez le collier-récepteur de votre chien et vérifi ez qu'il est allumé et contient une pile chargée. www.petsafe.net...
  • Seite 49: Test De La Boucle De L'émetteur

    Si le voyant de boucle est éteint et que l'alarme est activée, c'est que l'émetteur de clôture est défectueux. 3. Contactez le Service clientèle pour recevoir une assistance. www.petsafe.net...
  • Seite 50: Test De Localisation De Rupture De Fi L

    Service clientèle. Pour obtenir une liste des numéros de téléphone du centre de service clientèle, consultez notre site Web, www.petsafe.net. La collecte sélective des piles usagées est exigée dans de nombreux pays ; renseignez-vous sur les réglementations locales en vigueur avant d'éliminer les piles usagées. Reportez-vous à la page 37 qui contient les instructions sur le retrait de la pile afi n de la mettre séparément au rebut.
  • Seite 51: Conditions D'utilisation Et Limitation De Responsabilité

    Radio Systems Corporation déclare par la présente que ce Clôture anti-fugue de luxe In-Ground Fence™ avec fi l pour petits chien PIG20-11041 est conforme aux exigences essentielles et autres dispositions pertinentes de la directive 1999/5/EC. Vous trouverez la déclaration de conformité à l'adresse : http://www.petsafe.net/customercare/eu_docs.php.
  • Seite 52: Belangrijke Veiligheidsinformatie

    NIET uitsluitend op dit systeem vertrouwen om uw huisdier in te sluiten. Radio Systems Corporation is NIET aansprakelijk voor schade aan bezittingen, kosten of vervolgschade die ontstaan doordat een dier de grens overschrijdt. www.petsafe.net...
  • Seite 53 • Zorg voor extra bescherming als de omheiningszender lange tijd niet gebruikt wordt of als er onweer op komst is door de grensdraden los te koppelen en de stroomadaptor uit het stopcontact te halen. Zo kan de zender niet beschadigd raken door overspanning. www.petsafe.net...
  • Seite 54 Om volop van uw garantie te kunnen genieten, verzoeken wij u uw product binnen 30 dagen te registreren via www.petsafe.net. Door deze registratie, samen met het bewaren van uw aankoopbewijs, kunt u van de volledige garantie genieten en kunnen we u, wanneer u het nodig acht contact op te nemen met de klantendienst, sneller helpen.
  • Seite 55: Onderdelen

    Onderdelen Bevestigingsbeugel Grensdraad - 150 m Stroomadaptor Omheiningszender Grensvlaggetjes - 50 Lasdoppen Batterij ® (PetSafe RFA-188) Ontvangerhalsband Met gel gevulde Testlampje Gebruiksaanwijzing capsules en trainingsgids Ander materiaal dat u mogelijk nodig heeft • Extra grensdraad en vlaggetjes (PRFA-500) • Meetlint •...
  • Seite 56: Zo Werkt Het Systeem

    (bovenkant) Grenscontroleschakelaar Statische Omheining correctiezone Zender Stroomverklikkerlampje De toegelaten zone voor Stimulansniveauknop Waar- het huisdier schuwings- zone Indicator- lampje ontvanger (onderkant) Aardings- Contactpunten Grensbreedte aansluiting Controle Grensdraad Statische aansluitingen correctiezone Grens- Breedte Lusverklikkerlampje Batterij- Waarschuwings- Stroom- zone module aansluiting www.petsafe.net...
  • Seite 57: Gebruiksaanwijzing

    • Gebruik altijd geleidelijke bochten met een minimale straal van 1 m om een consistentere grens te vormen ( ). Gebruik geen scherpe bochten, deze veroorzaken gaten in uw grens. www.petsafe.net...
  • Seite 58: Voorbeeldindelingen

    Bij gebruik van een dubbele lus moet er tussen de grensdraden een minimale afstand van 1,5 m zijn om te voorkomen dat het signaal opgeheven wordt. Denk er aan dat voor een dubbele lus twee keer zo veel draad nodig is. www.petsafe.net...
  • Seite 59: Positioneren Van De Grensdraad

    90 graden (loodrecht) ( 90˚ Neem contact op met de klantendienst als het signaal niet verbetert bij gebruik van een afstand van ten minste 3 m tot een naburig afbakeningssysteem. www.petsafe.net...
  • Seite 60 De tabel hiernaast geeft een schatting van de lengte aan grensdraad die nodig 2800 is voor een vierkante indeling met enkele lus. De lengte is afhankelijk van de 1011 1219 4000 hoeveelheid gedraaid draad en de indeling die u gebruikt. www.petsafe.net...
  • Seite 61: De Draden Op De Omheiningszender Aansluiten

    Zorg voor extra bescherming als de omheiningszender lange tijd niet gebruikt wordt of als er onweer op komst is door de grensdraden los te koppelen en de stroomadaptor uit de wandcontactdoos te halen. Zo kan de zender niet beschadigd raken door overspanning. www.petsafe.net...
  • Seite 62: Voorbereiden Van De Ontvangerhalsband

    Een PetSafe -reservebatterij kan in meeste winkels worden aangeschaft. Neem ® contact op met de klantendienst of ga naar onze website op www.petsafe.net om een winkel bij u in de buurt te vinden. Testfunctie voor statische correctiezone en batterijen Als de batterijmodule RFA-188 voor de eerste keer in de ontvanger geïnstalleerd wordt, knippert de rode LED om de huidige instelling van het Stimulansniveau weer te geven (1 tot 5).
  • Seite 63: Tabel Met Functies En Reacties

    (6A) op positie A, B, C, afhankelijk van de totale lengte aan grensdraad die u gebruikt Tot 396 m heeft. Voor de meeste percelen wordt instelling B gebruikt. De volgende tabel geeft de juiste instellingen weer. 396 m tot 731 m www.petsafe.net...
  • Seite 64 (6G). Als u overtuigd bent dat het systeem goed werkt, kunt u de draden gaan begraven. Raadpleeg het hoofdstuk "Problemen oplossen" als de ontvangerhalsband niet is gaan piepen en het testlampje niet is gaan knipperen. www.petsafe.net...
  • Seite 65: De Grensdraad Installeren

    Voor het beste resultaat veegt u vuiligheid en andere resten weg voordat u de gleuf dichtkit. • Oprit van grind of zand (7D): plaats de grensdraad ter bescherming in een PVC-buis of waterslang voordat u hem begraaft. www.petsafe.net...
  • Seite 66: De Grensvlaggetjes Plaatsen

    Het kan nodig zijn de vacht in het gebied van de contactpunten bij te knippen. Scheer de nek van de hond nooit; dit kan leiden tot uitslag of een infectie. www.petsafe.net...
  • Seite 67 De halsband opnieuw samenstellen Schuifgesp De schuifgesp voorkomt dat de halsband te los wordt rond de nek van uw huisdier. Randen De randen moeten naar boven wijzen, de halsband gaat glijden als de gesp er niet correct aan bevestigd is. www.petsafe.net...
  • Seite 68: Trainingsgids

    Plaats een andere, niet-metalen halsband om de nek van uw huisdier BOVEN de ontvangerhalsband en bevestig hier een riem aan. Zorg ervoor dat de extra halsband geen druk op de contactpunten uitoefent. Zorg dat u kleine hapjes voor uw huisdier bij u heeft die hij erg lekker vindt. Houd het favoriete speelgoed van uw huisdier bij de hand. www.petsafe.net...
  • Seite 69: Dag 2 T/M 4 - Doorgaan Met Bewust Worden Van De Grens

    3. Als de ontvangerhalsband goed past en uw huisdier niet reageert op de statische Stimulans, verhoogt u het niveau van de statische Stimulans met 1 stap. Let op minimieme reacties zoals de oren omhoog, de kop gedraaid, naar de grond kijken. 4. Blijf bij hetzelfde vlaggetje totdat uw huisdier tegenwerkt bij het binnengaan van de statische correctiezone. www.petsafe.net...
  • Seite 70: Dag 5 T/M 8 - Afl Eidingsfase

    Uw huisdier is klaar voor deze stap als hij de statische correctiezone duidelijk vermijdt, ongeacht eventuele afl eidingen of verlokkingen. Laat uw huisdier tijdens deze stap niet zonder toezicht. Doel: Uw huisdier los laten lopen in de toegelaten zone. Set-up: Stel de ontvangerhalsband in op de permanente instelling voor uw huisdier. www.petsafe.net...
  • Seite 71: Dag 15 T/M 30 - Uw Huisdier Controleren

    Een lijst met telefoonnummers van de klantendiensten in uw regio vindt u op onze website: www.petsafe.net. www.petsafe.net...
  • Seite 72: Problemen Oplossen

    • Verwijder de zekeringklep aan de achterzijde van de omheiningszender en gebruik de reservezekering die u daar vindt om de zekering te verwisselen. • Als de lampjes nog steeds niet aangaan, moet de omheiningszender en/of stroomadaptor vervangen worden. Neem contact op met de klantendienst. www.petsafe.net...
  • Seite 73: Additionele Informatie

    Stel de statische Stimulans van de ontvangerhalsband in op niveau 5. Verbreek de verbinding tussen de gedraaide grensdraad en de grensdraadaansluitingen op de omheiningszender door de rode lipjes op der aansluiting in te drukken en de draden los te trekken. www.petsafe.net...
  • Seite 74: Zenderlustest

    Als het lusindicatorlampje nog steeds uit is en het alarm aan, is er een probleem met de omheiningszender. 3. Neem contact op met de klantendienst voor ondersteuning. www.petsafe.net...
  • Seite 75: Draadbreuklocatietest

    Voor een lijst van telefoonnummers van de klantendienst bezoekt u onze website: www.petsafe.net. Gescheiden inzameling van gebruikte batterijen is in veel landen verplicht; controleer de plaatselijke voorschriften voor afvoer van gebruikte batterijen. Raadpleeg pagina 62 voor instructies voor het verwijderen van de batterij uit het product voor gescheiden afvoer.
  • Seite 76: Gebruiksvoorwaarden En Beperking Van Aansprakelijkheid

    Hierbij verklaart Radio Systems Corporation dat deze PIG20-11041 Deluxe omheiningssysteem met draad voor kleine honden, In-Ground Fence™ voldoet aan de essentiële vereisten en andere relevante bepalingen van Richtlijn 1999/5/EC.
  • Seite 77: Información De Seguridad Importante

    Radio Systems Corporation NO será responsable de ningún daño ocasionado a la propiedad, pérdidas económicas o cualquier daño consiguiente que se haya producido como resultado de que el animal cruce los límites establecidos. www.petsafe.net...
  • Seite 78 • Para proteger aún más el transmisor de valla cuando no se utilice durante largos periodos de tiempo o antes de una tormenta, desconecte los cables de límites del circuito y desenchufe el adaptador de corriente de la toma eléctrica. Esto evitará los daños al transmisor producidos por las sobrecargas de tensión. www.petsafe.net...
  • Seite 79 Para obtener la mayor protección de su garantía, por favor registre su producto dentro de los 30 días posteriores a la compra en www.petsafe.net. Al registrarse, disfrutará de la garantía plena del producto y si tuviera necesidad de contactar con el Centro de Atención al Cliente, podremos ayudarle con mayor rapidez.
  • Seite 80: Componentes

    Cable de límites - 150 m Adaptador de corriente Transmisor Banderines de límites - 50 de valla Conectores de cable Pila ® (PetSafe RFA-188) Collar receptor Cápsulas llenas Luz de prueba Manual de funcionamiento y de gelatina de adiestramiento Otros artículos que puede necesitar •...
  • Seite 81: Cómo Funciona El Sistema

    Moleta de reglaje de la de tierra amplitud de los límites Zona de Bornes de estimulación conexión para estática Anchura de los cables los límites Luz indicadora de bucle Módulo Zona de Toma de de pila advertencia alimen- tación www.petsafe.net...
  • Seite 82: Manual De Funcionamiento

    • Utilice siempre giros graduales en las esquinas con un radio mínimo de 1 m, para producir un límite más consistente ( ). No utilice ángulos demasiado cerrados puesto que esto causará brechas en el perímetro. www.petsafe.net...
  • Seite 83: Perímetros De Muestra

    Se debe usar un circuito doble cuando no desee establecer la zona límite en todos los lados del terreno. Al utilizar un circuito doble, el cable de límites debe tener una separación de 1,5 m para evitar la cancelación de la señal. Recuerde que un circuito doble requerirá utilizar el doble de cable. www.petsafe.net...
  • Seite 84: Coloque El Cable De Límites

    Si separando el cable a una distancia de al menos 3 m con respecto al cable de un sistema de contención adyacente no reduce la inconsistencia de la señal, póngase en contacto con el Centro de atención al cliente. www.petsafe.net...
  • Seite 85 La tabla de la derecha indica la longitud aproximada del cable de 2800 límites necesaria para un perímetro cuadrado de un solo circuito. 1011 1219 4000 La longitud variará según la cantidad de cable entrelazado y el diseño utilizado. www.petsafe.net...
  • Seite 86: Conecte Los Cables Al Transmisor De Valla

    Para proteger aún más el transmisor de valla cuando no se utilice durante largos periodos de tiempo o antes de una tormenta, desconecte los cables de límites del circuito y desenchufe el adaptador de corriente de la toma eléctrica. Esto evitará los daños al transmisor producidos por las sobrecargas de tensión. www.petsafe.net...
  • Seite 87: Prepare El Collar Receptor

    ® venta. Póngase en contacto con el Centro de atención al cliente o visite nuestro sitio web, www.petsafe.net, para localizar el distribuidor más cercano a usted. Función de estimulación estática y comprobación de la pila Cuando el módulo de la pila RFA-188 se instala por primera vez en el receptor, el indicador luminoso LED rojo indicará el nivel de estimulación actual (1 a 5).
  • Seite 88: Tabla De Funciones Y Reacciones

    (6A) en el nivel A, B, o C dependiendo de la longitud total del cable 396 m a 731m de límites utilizado. El nivel B se utiliza para la mayoría de parcelas. La tabla siguiente le indica el nivel más adecuado para su parcela. www.petsafe.net...
  • Seite 89 Si tiene la certeza de que su sistema funciona correctamente, ya puede comenzar a enterrar el cable de límites. Si el receptor no ha emitido la señal acústica o la luz de prueba no destelló, consulte la sección de "Resolución de problemas". www.petsafe.net...
  • Seite 90: Instale El Cable De Límites

    óptimos, limpie la suciedad y los residuos antes de aplicar el compuesto. • Rampa de acceso al garaje de grava o tierra (7D): coloque el cable de límites en un tubo de PVC o en una manguera de agua para protegerlo antes de enterrarlo. www.petsafe.net...
  • Seite 91: Coloque Los Banderines De Límites

    Si observa enrojecimiento o irritación, deje de utilizar el collar hasta que la piel haya sanado completamente. Quizás tenga que recortar el pelo de la zona de los puntos de contacto. No afeite nunca el cuello del perro, ya que esto podría ocasionar una erupción o una infección. www.petsafe.net...
  • Seite 92 Hebilla deslizante La hebilla deslizante evita que el collar se afloje del cuello de su mascota. Bordes Los dientes de la hebilla deben estar mirando hacia arriba. El collar se aflojará si no está correctamente acoplado a la hebilla. www.petsafe.net...
  • Seite 93: Manual De Adiestramiento

    Ponga un collar metálico adicional en el cuello de su mascota POR ENCIMA del collar receptor y engánchelo a una correa larga. Asegúrese de que el collar adicional no ejerza presión sobre los puntos de contacto. Tenga preparados pequeños pedazos de golosinas que le gusten a su mascota. Tenga a mano el juguete favorito de su mascota. www.petsafe.net...
  • Seite 94: Días 2 A 4 - Continuación Del Proceso De Reconocimiento De Límites

    Esté atento ante las reacciones más leves de su mascota, tales como el levantamiento de las orejas, los giros de la cabeza, o mirar hacia el suelo. 4. Permanezca en el mismo banderín hasta que su mascota se resista a entrar en la Zona de estimulación estática. www.petsafe.net...
  • Seite 95: Días 5 A 8 - Fase De Distracción

    Durante este paso, no deje a su mascota desatendida. Objetivo: Permitir que su mascota corra libremente por la zona autorizada sin correa. Confi guración: Ajuste el collar receptor al nivel permanente adecuado para su mascota. www.petsafe.net...
  • Seite 96: Días 15 A 30 - Supervisión De La Mascota

    Al principio es posible que tenga que convencer a su mascota de que abandone la zona autorizada por medio de golosinas y abundantes elogios. Nota: también puede sacar a su mascota de la zona autorizada llevándola en brazos. ¡Felicidades! Acaba de completar con éxito el programa de adiestramiento. www.petsafe.net...
  • Seite 97: Accesorios

    Centro de atención al cliente o visite nuestro sitio web para encontrar una tienda minorista próxima a usted. Para obtener un listado de los números de teléfono de los centros de atención al cliente de su zona visite nuestro sitio web en www.petsafe.net. Resolución de problemas El collar receptor no emite •...
  • Seite 98: Información Adicional

    Necesitará una porción de cable de límites de 3 m con 1 cm de la funda aislante pelada en ambos extremos, para utilizarlo como cable de comprobación del circuito. Siga los pasos a continuación para realizar la comprobación del sistema: Retire el collar receptor de su perro y asegúrese de que esté encendido y tenga instalada una pila cargada. www.petsafe.net...
  • Seite 99: Comprobación Del Circuito Transmisor

    Realice una comprobación visual para ver si el cable está dañado en el punto de entrada a la casa. Si no se observa ningún daño, realice la comprobación de localización de roturas del cable para localizar y corregir la rotura del cable en su circuito de límites. www.petsafe.net...
  • Seite 100: Localización De Roturas Del Cable

    Centro de atención al cliente. Para obtener un listado de los números de teléfono de los Centros de atención al cliente visite nuestro sitio web en www.petsafe.net. En muchas regiones del mundo, las pilas gastadas deben recogerse por separado. Compruebe las normas vigentes en su país antes de deshacerse de las pilas gastadas. Consulte la página 87 para ver instrucciones sobre cómo retirar la pila del producto y desecharla por separado.
  • Seite 101: Condiciones De Uso Y Limitación De Responsabilidad

    Radio Systems Corporation pueden infringir la normativa R&TTE de la UE, podrían anular la autoridad del usuario para usar el equipo y anularán la garantía. Por el presente documento, Radio Systems Corporation, declara que su sistema PIG20-11041 Limitador de zona deluxe In- Ground Fence con cable para perros pequeños cumple con los requisitos esenciales y con las demás provisiones relevantes de...
  • Seite 102: Importanti Informazioni Per La Sicurezza

    è opportuno NON affidarsi unicamente al sistema per contenerlo. Radio Systems Corporation DECLINA qualunque responsabilità per danni materiali, perdite economiche o qualunque danno conseguente, subito in seguito alla fuga dell'animale dall'area delimitata. www.petsafe.net...
  • Seite 103 • Per proteggere maggiormente il trasmettitore in lunghi periodi di inutilizzo, o al sopraggiungere di un temporale, scollegare i fili dell'antenna del perimetro e staccare la spina dell'adattatore di corrente dalla presa, onde evitare i danni al trasmettitore dovuti a sovracorrenti temporanee. www.petsafe.net...
  • Seite 104 Soprattutto, PetSafe si impegna a non vendere né a consegnare mai a nessuno i vostri preziosi ® dati personali. Il testo completo della garanzia si trova sul nostro sito web all’indirizzo www.petsafe.net. Indice Componenti ............................105 Altro materiale eventualmente occorrente ....................105 Come funziona il sistema ........................106...
  • Seite 105: Componenti

    Filo d'antenna - 150 m Adattatore di corrente Trasmettitore Bandierine - 50 Cappellotti Batteria ® (PetSafe RFA-188) Collare ricevitore Capsule di gel Chiave Manuale di funzionamento e multiuso di addestramento Altro materiale eventualmente occorrente • Fili e bandierine supplementari (PRFA-500) •...
  • Seite 106: Come Funziona Il Sistema

    (In basso) Presa Punti di contatto di terra Manopola di regolazione della larghezza del perimetro Zona di Presa per i morsetti stimolazione statica Larghezza della delimitazione Indicatore luminoso Modulo Zona Spinotto di circuito chiuso batteria di avvertimento www.petsafe.net...
  • Seite 107: Guida Operativa

    • Non creare spigoli vivi in corrispondenza degli angoli con un raggio di curvatura minimo di 1 m per ottenere un perimetro più uniforme ( ). Gli spigoli vivi possono creare vuoti nel perimetro. www.petsafe.net...
  • Seite 108: Esempi Di Confi Gurazione

    Quando si utilizza un doppio perimetro, è necessario mantenere il fi lo d'antenna a una distanza minima di 1,5 m per evitare di sopprimere il segnale. Ricordare che la confi gurazione a doppio perimetro richiede il doppio della quantità di fi lo. www.petsafe.net...
  • Seite 109: Posizionamento Del Fi Lo D'antenna

    90 gradi (in perpendicolare) ( 90˚ Se la separazione del fi lo d'antenna di almeno 3 m dal fi lo di un sistema di contenimento vicino non riduce l'instabilità del segnale, rivolgersi al Centro di assistenza clienti. www.petsafe.net...
  • Seite 110 La tabella a destra indica la lunghezza di fi lo d'antenna approssimativa 2800 necessaria per formare un quadrato nella confi gurazione con singolo 1011 1219 4000 perimetro. La lunghezza varia a seconda della quantità del fi lo attorcigliato usato e del tipo confi gurazione adottato. www.petsafe.net...
  • Seite 111: Collegamento Dei Fi Li Al Trasmettitore

    Per maggiore protezione, in lunghi periodi di inutilizzo o al sopraggiungere di un temporale, scollegare i fili dell'antenna del perimetro e staccare la spina dell'adattatore di corrente dalla presa. Questo evita i danni al trasmettitore dovuti a sovracorrenti temporanee. www.petsafe.net...
  • Seite 112: Preparazione Del Collare Ricevitore

    Rivolgersi al Centro di assistenza clienti o ® visitare il nostro sito web all'indirizzo www.petsafe.net per informazioni sui rivenditori della propria zona. Stimolazione statica e funzione di prova della batteria Quando il modulo di batteria RFA-188 viene installato per la prima volta nel ricevitore, il LED rosso lampeggia secondo il livello di stimolazione (1 a 5) impostato in quel momento.
  • Seite 113: Tabella Delle Funzioni E Delle Reazioni

    Fino a 396 m sull'impostazione A, B o C in base alla lunghezza totale del fi lo d'antenna utilizzato. 396 m a 731 m L'impostazione B viene utilizzata per la maggior parte delle proprietà. La tavola che segue indica l'impostazione appropriata. www.petsafe.net...
  • Seite 114 Se si è soddisfatti del funzionamento del sistema, è possibile a questo punto iniziare ad interrare il fi lo d'antenna. Se il collare ricevitore non emette segnali acustici o la chiave multiuso non lampeggia, consultare la sezione "Risoluzione dei problemi". www.petsafe.net...
  • Seite 115: Installazione Del Fi Lo D'antenna

    • Vialetti in ghiaia o terra battuta (7D): installare il fi lo d'antenna in un tubo in PVC o fl essibile per proteggere il fi lo prima di eseguire l'interramento. www.petsafe.net...
  • Seite 116: Posizionamento Delle Bandierine

    È comunque importante continuare a controllare quotidianamente la zona di contatto. Se si notano arrossamenti o escoriazioni, interrompere l’uso fino alla completa guarigione della cute. Può essere necessario accorciare il pelo nell’area dei punti di contatto. Non radere mai il collo del cane per evitare di causare arrossamenti o infezioni. www.petsafe.net...
  • Seite 117 Per re-infilare il collare Fibbia a scorrimento La fibbia a scorrimento evita l'allentamento del collare intorno al collo dell'animale. Rilievi I rilievi devono essere rivolti verso l'alto; il collare scivola se non è infilato correttamente. www.petsafe.net...
  • Seite 118: Guida All'addestramento

    Applicare sul collo dell'animale un altro collare non metallico, posizionandolo PIÙ IN ALTO del collare ricevitore, e fi ssarvi il guinzaglio. Verificare che il secondo collare non eserciti pressione sui punti di contatto. Premunirsi di bocconcini che piacciono all'animale. Tenere a portata di mano il giocattolo preferito dell'animale. www.petsafe.net...
  • Seite 119: Giorni 2 - 4 - Continuare Con Il Riconoscimento Delle Bandierine

    1 livello. Osservare prima se l'animale ha leggere reazioni: se raddrizza le orecchie, volta la testa o guarda il suolo. 4. Restare presso stessa bandierina fi nché l'animale non resiste alla tentazione di andare nella Zona di stimolazione statica. www.petsafe.net...
  • Seite 120: Giorni 5 - 8 - Fase Di Distrazione

    Iniziare con questa fase dell'addestramento solo se il cane evita accuratamente l'intera Zona di stimolazione statica, indipendentemente da eventuali distrazioni o tentazioni. In questa fase non lasciare mai l'animale incustodito. Obiettivo: Addestrare l'animale a rimanere libero nella zona autorizzata senza guinzaglio. Preparazione: Impostare il collare ricevitore sull'impostazione fi ssa appropriata per il cane. www.petsafe.net...
  • Seite 121: Giorni 15 - 30 - Monitoraggio Dell'animale

    Per acquistare ulteriori accessori per il Sistema antifuga deluxe In-Ground Fence™ con filo per cani di taglia piccola, contattare il Centro di assistenza clienti o visitare il nostro sito per trovare il rivenditore più vicino. Per un elenco dei Centri di assistenza della propria zona, visitare www.petsafe.net. www.petsafe.net...
  • Seite 122: Risoluzione Dei Problemi

    • Rimuovere lo sportello del fusibile sul retro del trasmettitore e sostituire il fusibile con quello di scorta ubicato nella stessa area. • Se gli indicatori luminosi continuano a non accendersi, è necessario sostituire il trasmettitore e/o l'adattatore. Contattare il Centro di assistenza clienti. www.petsafe.net...
  • Seite 123: Ulteriori Informazioni

    Impostare il selettore della lunghezza del fi lo su B. Impostare il livello di stimolazione statica sul collare ricevitore al livello 5. Scollegare il fi lo d'antenna intrecciato dai suoi terminali sul trasmettitore, premendo le levette di rilascio rosse sul connettore e tirando per staccare i fi li. www.petsafe.net...
  • Seite 124: Prova Del Circuito Del Trasmettitore

    Se la spia dell'indicatore di circuito chiuso è ancora spenta e l'allarme è attivo, c'è un problema del trasmettitore. 3. Rivolgersi al Centro di assistenza clienti. www.petsafe.net...
  • Seite 125: Prova Di Individuazione Della Rottura Del Fi Lo

    Centri di assistenza clienti. Per trovare l'elenco dei numeri di telefono dei Centri di assistenza clienti della propria zona, visitare il sito web www.petsafe.net. In molti paesi è obbligatorio raccogliere separatamente le batterie esaurite; controllare le norme in vigore nella propria zona prima di smaltire le batterie esaurite. Per le istruzioni su come rimuovere la batteria dal prodotto per smaltirla separatamente, vedere a pagina 112.
  • Seite 126: Limitazione Di Responsabilità E Condizioni Di Utilizzo

    Radio Systems Corporation possono violare le disposizioni europee R&TTE, possono annullare il diritto dell'utilizzatore a usare l'apparecchiatura e rendere nulla la garanzia. Con il presente documento Radio Systems Corporation, dichiara che questo sistema PIG20-11041 Sistema antifuga deluxe In-Ground Fence con fi lo per cani di taglia piccola è...
  • Seite 127: Wichtige Sicherheitsinformation

    Überschreiten der Grenzen gehindert wird, sollten Sie sich NICHT allein darauf verlassen, dass dieses System ihr Haustier sicher eingrenzt. Die Radio Systems Corporation übernimmt KEINE Haftung für Sachschäden, wirtschaftliche Verluste oder Folgeschäden, die daraus resultieren, dass ein Tier die Grenzen überschreitet. www.petsafe.net...
  • Seite 128 • Seien Sie vorsichtig, wenn Sie den Rasen mähen oder trimmen, damit die Drahtschleife nicht durchgeschnitten wird. • Zum zusätzlichen Schutz der Sendeeinheit, wenn diese für längere Zeit nicht verwendet wird oder vor Gewittern, die Antennendrahtschleife trennen und den Netzadapter aus der Steckdose ziehen. Dies verhindert Schäden an der Sendeeinheit infolge von Stromstößen. www.petsafe.net...
  • Seite 129 Um den größten Schutz für Ihre Garantie zu erhalten, registrieren Sie bitte Ihr Produkt innerhalb von 30 Tagen auf www.petsafe.net. Wenn Sie es registrieren und Ihre Quittung behalten, können Sie die volle Garantieleistung für das Produkt in Anspruch nehmen und sollten Sie den Kundendienst je kontaktieren müssen, können wir Ihnen viel schneller helfen.
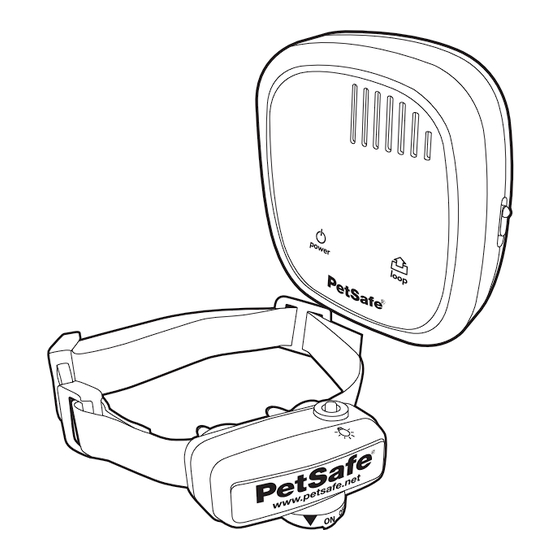
  • Seite 130: Komponenten

    Komponenten Befestigungsbügel Antennendraht - 150 m Netzadapter Sendeeinheit Begrenzungsfähnchen - 50 Kabelverbinder Batterie ® (PetSafe RFA-188) Empfängerhalsband Gelgefüllte Kapseln Testleuchte Gebrauchsanweisung und Trainingsanleitung Anderes Material, das Sie eventuell benötigen • Extra Antennendraht und Fähnchen (PRFA-500) • Maßband • Kleiner Kreuzschlitzschraubendreher •...
  • Seite 131: So Funktioniert Das System

    Sendeeinheit Empfängerhalsband Statische (Oben) Eingrenzungskontrollschalter Stimulationzone Sendegerät Betriebsstromleuchte Erlaubter Stimulationstufentaste Aufenthaltsbreich für das Haustier Warnzone Kontrollleuchte des Empfängers (Unten) Erdungs- Kontaktpunkte anschluss Einstellknopf für die Begrenzungstiefe Antennendraht- Statische anschlüsse Stimulationszone Begrenzungstiefe Kontrollleuchte der Schleife Batterie- Steck- Warnzone modul dose www.petsafe.net...
  • Seite 132: Gebrauchsanweisung

    Rückseite dieser Anleitung fi nden Sie ein Raster zur Planung Ihrer Anordnung. • Verwenden Sie immer graduelle Kurven an den Ecken mit einem Radius von mindestens 1 m, um so eine einheitlichere Eingrenzung herzustellen ( ). Verwenden Sie keine scharfen Kurven, da dies zu Zwischenräumen in der Eingrenzung führt. www.petsafe.net...
  • Seite 133: Anordnungsbeispiele

    Begrenzungsbereich errichten. Wenn Sie eine doppelte Schleife verwenden, muss der Antennendraht mit einem Abstand von mindestens 1,5 m verlegt werden, um eine Aufhebung des Signals zu vermeiden. Denken Sie daran, dass eine doppelte Schleife doppelt so viel Draht verlangt. www.petsafe.net...
  • Seite 134: Antennendraht Positionieren

    Winkel von 90 Grad geschehen (senkrecht). ( 90˚ Wenn Sie den Antennendraht mindestens 3 m vom Draht eines benachbarten Sicherheitssystems entfernt verlegen und das uneinheitliche Signal damit nicht reduziert wird, kontaktieren Sie bitte den Kundendienst. www.petsafe.net...
  • Seite 135: Den Antennendraht Drehen Und Anschließen

    Die Tabelle rechts gibt die ungefähre Länge des Antennendrahts an, die 2800 für eine quadratische Anordnung mit einzelner Schleife benötigt wird. Die 1011 1219 4000 Länge wird abhängig von der Menge an verdrehtem Draht und von der verwendeten Anordnung unterschiedlich sein. www.petsafe.net...
  • Seite 136: Drähte An Die Sendeeinheit Anschließen

    Risiko, dass Ihr Hund entkommt. Sie müssen den GFCI oder RCD zurücksetzen, um das System wieder einzuschalten. Zum zusätzlichen Schutz, bei Nichtverwendung über längere Zeit oder vor Gewittern aus der Wandsteckdose ziehen und die Antennendrahtschleife trennen. Dies verhindert Schäden an der Sendeeinheit infolge von Stromstößen. www.petsafe.net...
  • Seite 137: Empfängerhalsband Vorbereiten

    Ersatzbatterie erhalten Sie bei vielen Händlern. Kontaktieren Sie den Kundendienst oder besuchen Sie unsere ® Website auf www.petsafe.net, um einen Einzelhandel in Ihrer Gegend zu fi nden. Statische Stimulation- und Batterietest-Funktion Nach der ersten Installation des RFA-188 Batteriemoduls im Empfänger leuchtet die rote LED-Anzeige auf und zeigt die eingestellte Stimulationstufe (1 bis 5) an.
  • Seite 138: Verhinderung Von Zu Langem Verweilen

    Um die automatische Durchlaufverhinderungs-Funktion am besten auszunutzen, sollte sich die Bis zu 396 m Begrenzungstiefe über mindestens 1,8 m bis 3 m auf jeder Seite des Antennendrahts erstrecken (Gesamtbegrenzungstiefe von 3,7 m bis 6 m). 396 m bis 731 m www.petsafe.net...
  • Seite 139 Ton abgeben und die Testleuchte sollte heller aufl euchten, sobald Sie den Durchlaufbereich betreten (6G). Wenn Sie sichergestellt haben, dass Ihr System richtig funktioniert, können Sie beginnen den Antennendraht unterirdisch zu verlegen.Sollte das Empfängerhalsband keinen Piepton abgegeben oder die Testleuchte nicht geblinkt haben, sehen Sie bitte den Abschnitt „Fehlerbehebung“ ein. www.petsafe.net...
  • Seite 140: Antennendraht Installieren

    Sie diese mit einer geeigneten wasserfesten Dichtungsmasse. Für optimale Ergebnisse den Schmutz oder sonstige Fremdpartikel vor dem Einsetzen wegbürsten. • Kies- oder unbefestigte Einfahrt (7D): Platzieren Sie den Antennendraht in ein PVC-Rohr oder in einen Schlauch als Schutz, bevor Sie den Antennendraht unterirdisch verlegen. www.petsafe.net...
  • Seite 141: Begrenzungsfähnchen Platzieren

    Tag zu überprüfen. Wenn Sie Röte oder Wundstellen vorfinden, die Verwendung absetzen, bis die Haut vollständig geheilt ist. Sie müssen die Haare im Bereich der Kontaktpunkte vielleicht kurz schneiden. Rasieren Sie niemals den Hals des Hundes; das könnte einen Ausschlag oder eine Infektion zur Folge haben. www.petsafe.net...
  • Seite 142: Halsband Wieder Einfädeln

    Sie das Ende des Halsbands, indem Sie eine Flamme entlang dem ausgefransten Ende bewegen. Halsband wieder einfädeln Verschiebbare Schnalle Die Gleitschnalle verhindert, dass sich das Halsband um den Hals Ihres Haustiers lockert. Rillen Die Rillen müssen nach oben zeigen; das Halsband wird verrutschen, wenn es nicht richtig eingefädelt ist. www.petsafe.net...
  • Seite 143: Trainingsanleitung

    Legen Sie ein separates, nicht metallisches Halsband an den Hals Ihres Haustiers ÜBER das Empfängerhalsband und befestigen Sie eine Hundeleine daran. Stellen Sie sicher, dass das zusätzliche Halsband keinen Druck auf die Kontaktpunkte ausübt. Halten Sie kleine Snackstückchen bereit, die Ihr Haustier sehr gerne hat. Halten Sie das Lieblingsspielzeug Ihres Haustiers bereit. www.petsafe.net...
  • Seite 144: Tage 2 Bis 4 - Weiter Mit Der Wahrnehmung Der Begrenzungsfähnchen

    Stimulation um 1 Stufe. Achten Sie zuerst auf kleine Reaktionen wie aufgestellte Ohren, gedrehten Kopf, auf den Boden gerichteten Blick. 4. Bleiben Sie bei dem gleichen Begrenzungsfähnchen, bis Ihr Haustier sich dagegen wehrt, in die Statische Stimulationszone zu gehen. www.petsafe.net...
  • Seite 145: Tage 5 Bis 8 - Ablenkungsphase

    Ablenkungen oder Verlockungen. Lassen Sie Ihr Haustier bei diesem Schritt nicht unbeaufsichtigt. Ziel: Ihrem Haustier freien Lauf ohne Hundeleine im Haustier-Auslaufbereich geben. Einstellungen: Stellen Sie die statische Stimulationstufe auf dem Empfängerhalsband auf die permanente Einstellung ein, die für Ihr Haustier angemessen ist. www.petsafe.net...
  • Seite 146: Tage 15 Bis 30 - Haustierüberwachung

    Hundeleine, nur an dieser Stelle und nur mit einer Person. Am Anfang müssen Sie Ihr Haustier eventuell mit einem Snack und viel Lob dazu überreden, den Haustier-Auslaufbereich zu verlassen. Hinweis: Sie können Ihr Haustier auch aus dem Haustier-Auslaufbereich tragen. Herzlichen Glückwunsch! Jetzt haben Sie das Trainingsprogramm erfolgreich abgeschlossen. www.petsafe.net...
  • Seite 147: Zubehör

    Um weiteres Zubehör für Ihr Luxus-unterirdisches Rückhaltesystem mit Draht für kleine Hunde In-Ground Fence™ zu kaufen, kontaktieren Sie den Kundendienst oder besuchen Sie unsere Website auf www.petsafe.net, um einen Einzelhandel in Ihrer Gegend zu finden. Für eine Liste der Kundendienstzentren in Ihrer Nähe besuchen Sie bitte www.petsafe.net.
  • Seite 148: Weitere Informationen

    Anleitung behandelt wurden. Als Testschleifendraht benötigen Sie ein 3 m langes Stück Antennendraht, von dessen Enden je 1 cm Isolierung entfernt wurden. Befolgen Sie die folgenden Schritte, um einen Systemtest durchzuführen: Nehmen Sie Ihrem Hund das Empfängerhalsband ab und vergewissern Sie sich, dass es eingeschaltet und eine www.petsafe.net...
  • Seite 149: Sendeeinheit-Schleifentest

    2. Führen Sie beide Enden der 3 m langen Drahtschleife in die Begrenzungsschleifenanschlüsse und überprüfen Sie erneut die Kontrollleuchte der Schleife und den Alarm der Sendeeinheit. a. Wenn die Kontrollleuchte der Schleife grün und der Alarm aus ist, dann liegt ein Problem mit dem Antennendraht vor. www.petsafe.net...
  • Seite 150: Lokalisieren Einer Bruchstelle Im Antennendraht

    Batterie, die Sie über den Kundendienst bekommen. Für eine Liste der Telefonnummern des Kundendienstes besuchen Sie bitte unsere Website auf www.petsafe.net. In vielen Regionen ist die separate Sammlung von verbrauchten Batterien erforderlich; prüfen Sie die Bestimmungen in Ihrer Gegend, bevor Sie verbrauchte Batterien wegwerfen. Siehe bitte Seite 137 für Anleitungen zum Herausnehmen der Batterie aus dem Produkt für die separate Entsorgung.
  • Seite 151: Nutzungsbedingungen Und Haftungsbeschränkung

    Ausrüstung, die nicht von Radio Systems Corporation genehmigt wurden, könnten die EU R&TTE-Richtlinien verletzen, die Autorisierung des Benutzers die Ausrüstung zu betreiben annullieren und die Garantie ungültig machen. Die Radio Systems Corporation erklärt hiermit, dass dieser PIG20-11041 Luxus-unterirdisches Rückhaltesystem mit Draht für kleine Hunde In-Ground Fence konform mit den wesentlichen Anforderungen und anderen relevanten Vorkehrungen der Richtlinie ™...
  • Seite 152: Layout Grid

    Layout Grid / Schéma d’installation / Indelingsraster Esquena de instalación / Schema di montaggio Gestaltungsraster Radio Systems Corporation 10427 PetSafe Way Knoxville, TN 37932 USA (865) 777-5404 www.petsafe.net Protected by US Patents 6,538,617; 7,541,937; D531,117. 400-802-19/3 ©2012 Radio Systems Corporation...

Inhaltsverzeichnis