Herunterladen Inhalt Inhalt Diese Seite drucken
Inhaltsverzeichnis

Werbung

Verfügbare Sprachen
  • DE

Verfügbare Sprachen

  • DEUTSCH, seite 152
Operating and Training Guide
Manuel d'utilisation et de dressage
Gebruiksaanwijzing en trainingshandleiding
Manual de funcionamiento y de adiestramiento
Manuale di funzionamento e di addestramento
Gebrauchsanweisung und Trainingsanleitung
PIG19-15394
In-Ground Fence
System
Clôture anti-fugue avec fil
Omheiningssysteem met draad
Limitador de zona con cable
Sistema antifuga con filo
Rückhaltesystem mit Draht
Please read this entire guide before beginning.
Veuillez lire ce manuel en entier avant de commencer.
Gelieve deze gids volledig door te lezen voordat u begint.
Por favor, lea detenidamente este manual antes de empezar.
Leggere attentamente la guida all'uso prima di utilizzare.
Bitte lesen Sie die ganze Gebrauchsanleitung aufmerksam durch, ehe Sie beginnen.

Werbung

Inhaltsverzeichnis
loading

Inhaltszusammenfassung für Petsafe PIG19-15394

  • Seite 1 Operating and Training Guide Manuel d’utilisation et de dressage Gebruiksaanwijzing en trainingshandleiding Manual de funcionamiento y de adiestramiento Manuale di funzionamento e di addestramento Gebrauchsanweisung und Trainingsanleitung PIG19-15394 In-Ground Fence System ™ Clôture anti-fugue avec fil Omheiningssysteem met draad Limitador de zona con cable Sistema antifuga con filo Rückhaltesystem mit Draht...
  • Seite 2: Important Safety Information

    Hereinafter Radio Systems Corporation, Radio Systems PetSafe Europe Ltd., Radio Systems Australia Pty Ltd. and any other affiliate or Brand of Radio Systems Corporation may be referred to collectively as “We” or “Us.” IMPORTANT SAFETY INFORMATION Explanation of Attention Words and Symbols used in this guide This is the safety alert symbol.
  • Seite 3 • You should not make the collar any tighter than is required for good contact. A collar that is too tight will increase the risk of pressure necrosis in the contact area. • Proper training of your pet is essential to the success of the PetSafe In-Ground Fence System.
  • Seite 4: Inhaltsverzeichnis

    To get the most protection out of your warranty, please register your product within 30 days at www.petsafe.net. By registering and keeping your receipt, you will enjoy the product’s full warranty and should you ever need to call the Customer Care Centre, we will be able to help you faster.
  • Seite 5: Components

    • Gel-filled Capsules • Additional wire nuts • Waterproofing compound (e.g. silicone caulk) • PVC pipe or hose pipe • Circular saw with masonry blade • Staple gun • Non-metallic collar and lead Fence installation and training help: www.petsafe.net www.petsafe.net...
  • Seite 6: How The System Works

    Collar issues a warning tone. If he proceeds further, he receives a safe but startling Static Stimulation. While harmless, the stimulation will persuade him to stay in the containment area you’ve established. Boundary flags are a temporary visual aid for your pet; remove them after training. This PetSafe In-Ground Fence System has been proven safe, comfortable, and effective ®...
  • Seite 7: Operating Guide

    To prevent fires and electrical hazards, install the Fence Transmitter in buildings that are in accordance with state and local electrical codes. Risk of Electric Shock. Use the Fence Transmitter indoors in a dry location only. www.petsafe.net...
  • Seite 8: Lay Out The System

    Sample Layouts Sample 1: Perimeter Loop (Single Loop) The Perimeter Loop is the most common layout. This will allow your pet to freely and safely roam your entire property (2C). It can also protect flower gardens and landscaping (2D). www.petsafe.net...
  • Seite 9 C to D, D to E, E to F, make a U-turn and follow your path all the way back to A, keeping the wire separated 1.5 m. Twist the wire from A back to the Fence Transmitter. See the “Install the Boundary Wire” section for more information on attaching the wire to a fence. www.petsafe.net...
  • Seite 10: Position The Boundary Wire

    Pull the wire taut. The drill enables you to twist the wire quickly. Twist the Boundary Wire 30 times per metre to cancel the signal. Once you have completed your boundary layout, insert the twisted wire into the transmitter. www.petsafe.net...
  • Seite 11 The table at right indicates the approximate length of Boundary Wire needed for a square, Single Loop layout. Length will vary due to the amount of twisted wire and layout used. Remember that a Double Loop will require twice as much wire. www.petsafe.net...
  • Seite 12: Connect The Wires To The Fence Transmitter

    For added protection for the Fence Transmitter when unused for long periods of time or prior to thunderstorms, disconnect the Loop Boundary Wires and unplug the Power Adaptor from the outlet. This will prevent damage to the Transmitter due to surges. www.petsafe.net...
  • Seite 13: Prepare The Receiver Collar

    (RFA-67D-11) can be found at many retailers. Contact the Customer Care Centre or visit our ® web site at www.petsafe.net to locate a retailer near you. To Set the Static Stimulation Level Read all steps before attempting to set the Static Stimulation Level.
  • Seite 14 Low Static Stimulation Timid 3 Flashes Medium Static Stimulation Timid or Average 4 Flashes Medium High Static Stimulation Average or High Energy 5 Flashes High Static Stimulation High Energy Flashes once every Indicates Low Battery 4 to 5 seconds www.petsafe.net...
  • Seite 15: Set The Boundary Width And Test The Receiver Collar

    Test Light Contacts of the Receiver Collar (6B, 6C). Hold the Receiver Collar at your dog’s neck height with the Contact Points pointing up (6D) and the PetSafe ® logo facing the Boundary Wire. Slowly walk toward the Boundary Wire until you hear the warning tone (6E).
  • Seite 16: Install The Boundary Wire

    2. Place the Boundary Wire into the trench maintaining some slack to allow it to expand and contract with temperature variations. 3. Use a blunt tool such as a wooden paint stick to push the Boundary Wire into the trench. Be careful not to damage the Boundary Wire insulation. www.petsafe.net...
  • Seite 17: To Attach The Boundary Wire To An Existing Fence

    For best results, brush away dirt or other debris before patching. • Gravel or Dirt Driveway (7D): Place the Boundary Wire in a PVC pipe or water hose to protect the Boundary Wire before burying. www.petsafe.net...
  • Seite 18: Place The Boundary Flags

    The Boundary Flags are visual reminders for your pet of where the Warning Zone is located. 1. Place the Test Light contacts on the Contact Points and hold the Receiver Collar at your pet’s neck height with the PetSafe logo facing the Boundary Wire. ® Boundary Wire 2.
  • Seite 19 1. Make sure that the battery is not installed in the Receiver Collar. 2. Start with your pet standing comfortably (9A). 3. Place the Receiver Collar on your pet so that the PetSafe logo is facing your pet’s chin. ®...
  • Seite 20: Training Guide

    Training Guide Be Patient With Your Pet Important: Proper training of your pet is essential to the success of the PetSafe In-Ground Fence System. ® ™ Read this section completely before beginning to train your pet. Remember that the PetSafe In-Ground ®...
  • Seite 21 3. If the Receiver Collar is fitted properly and your pet does not respond to the Static Stimulation, increase the Static Stimulation Level by 1. Watch for slight reactions at first such as ears up, head turned, looking at the ground. 4. Stay at the same flag until your pet resists going into the Static Stimulation Zone. www.petsafe.net...
  • Seite 22 2. Walk around the garden and play with your pet, staying within the Pet Area at all times. 3. Preoccupy yourself with another task in the garden while watching your pet. 4. Should your pet escape, take the Receiver Collar off and lead him back into the Pet Area. www.petsafe.net...
  • Seite 23: Taking Your Pet Out Of The Pet Area

    Congratulations! You have now successfully completed the training program. Accessories To purchase additional accessories for your PetSafe In-Ground Fence System, visit our website at www.petsafe.net to locate a ® ™ retailer near you and for a listing of Customer Care Centre telephone numbers in your area.
  • Seite 24 2 Flashes Low Static Stimulation Timid 3 Flashes Medium Static Stimulation Timid or Average 4 Flashes Medium High Static Stimulation Average or High Energy 5 Flashes High Static Stimulation High Energy Flashes once every Low Battery 4 to 5 seconds www.petsafe.net...
  • Seite 25: Function And Response Table

    To activate the collar, insert the battery module (A). Using the edge of the Test Light Tool as shown, turn the battery clockwise until the vertical line on the battery is pointed to the “ON” position (B). If the PetSafe Receiver ®...
  • Seite 26: Frequently Asked Questions

    No. The Static Stimulation is produced by the Contact Points on the Receiver Collar your pet wears, not the Boundary Wire. I have a small pet and a Yes. Since the PetSafe In-Ground Fence System provides Static Stimulation, it is safe ®...
  • Seite 27: Troubleshooting

    • Perform the “System Test” (page 28) to determine if the Fence Transmitter needs to loop alarm is sounding. be replaced. • If the Fence Transmitter is functioning properly, you have a break in your Boundary Wire. See the “Wire Break Location” section in this guide. www.petsafe.net...
  • Seite 28: Additional Information

    • The system should only be used with healthy pets who are over 6 months of age. Contact your veterinarian if you have concerns about the medical condition of your pet (medication, pregnant, heart conditions, etc.). • The PetSafe In-Ground Fence System is for residential use only.
  • Seite 29: Wire Break Location Test

    Be sure to check both halves of your entire loop. 9. Replace the damaged Boundary Wire with new Boundary Wire. 10. Reconnect the Boundary Wire to the Transmitter. 11. Check the Loop Indicator Light. If the Loop Indicator Light is on, test the system with the Receiver Collar. www.petsafe.net...
  • Seite 30: Terms Of Use And Limitation Of Liability

    Radio Systems Corporation may violate EU R&TTE regulations, could void the user’s authority to operate the equipment, and will void the warranty. Hereby, Radio Systems Corporation, declares that the PIG19-15394 is in compliance with the essential requirements and other relevant provisions of Directive 1999/5/EC.
  • Seite 31: Important Recycling Advice

    Customer Care Centre. Europe – Radio Systems PetSafe Europe Ltd., 2nd Floor, Elgee Building, Market Square, Dundalk, Co. Louth, A91 YR9X Ireland Canada – Radio Systems Corporation, 10427 PetSafe Way, Knoxville, TN 37932 USA Australia/New Zealand –...
  • Seite 32: Consignes De Sécurité Importantes

    Ci-après, « Nous » peut renvoyer collectivement à Radio Systems Corporation, Radio Systems PetSafe Europe Ltd., Radio Systems Australia Pty Ltd., ainsi qu'à toute autre filiale ou marque de Radio Systems Corporation. CONSIGNES DE SÉCURITÉ IMPORTANTES Description des Termes et Symboles Utilisés dans ce Manuel Ce symbole est une alerte de sécurité.
  • Seite 33 • Un bon dressage de votre animal est essentiel au bon fonctionnement du système Basic In-Ground Fence . PetSafe . Lors des 2 premières semaines de dressage, n'utilisez pas le dispositif de dressage ™...
  • Seite 34 Pour bénéficier pleinement de votre garantie, veuillez enregistrer votre article sous 30 jours sur le site www.petsafe.net. En enregistrant votre produit et en conservant votre reçu, vous bénéficierez d'une garantie complète et d'une réponse plus rapide de la part du service clientèle.
  • Seite 35: Contenu Du Kit

    • Produit d’étanchéité (ex : silicone) • Tuyau en PVC ou tuyau d'arrosage • Scie circulaire avec lame à béton • Pistolet agrafeur • Collier et laisse non métalliques Installation de la clôture et aide au dressage : www.petsafe.net www.petsafe.net...
  • Seite 36: Fonctionnement Du Système

    Cette stimulation ne lui fera pas mal mais le convaincra de rester dans la zone anti-fugue que vous avez établie. Les fanions de délimitation sont une aide visuelle temporaire pour votre animal ; retirez-les après le dressage. La clôture anti-fugue avec fil In-Ground Fence PetSafe est prouvée sûre, confortable et efficace pour les animaux de plus de 3,6 kg. ™...
  • Seite 37: Manuel D'utilisation

    Pour éviter les risques d'incendie ou de chocs électriques, installez l'émetteur de clôture dans un bâtiment conforme aux codes locaux et régionaux relatifs à l'électricité. Risque de choc électrique. Utilisez l'émetteur de clôture à l'intérieur, dans un endroit sec exclusivement. www.petsafe.net...
  • Seite 38: Mise En Place Du Système

    (boucle simple). La boucle de périmètre est la configuration la plus commune. Elle permet à votre animal de se déplacer librement et en toute sécurité dans toute votre propriété (2C). Elle permet aussi de protéger les jardins fleuris et l'aménagement paysager (2D). www.petsafe.net...
  • Seite 39 A, en vous assurant que les fils demeurent à une distance d'au moins 1,5 m. Torsadez le fil de A jusqu'à l'émetteur de clôture. Reportez-vous à la rubrique « Installation du fil d'antenne » pour plus d'informations sur la fixation du câble à la clôture. www.petsafe.net...
  • Seite 40: Positionnement Du Fil D'antenne

    Tirez la partie tendue du fil. La perceuse vous permet de torsader le fil rapidement. Torsadez le fil d'antenne 30 fois par mètre de longueur pour annuler le signal. Une fois que la configuration du périmètre est déterminée, insérez le fil torsadé dans l'émetteur. www.petsafe.net...
  • Seite 41 à boucle simple. La longueur varie en fonction de la quantité de fil torsadé et de la configuration utilisée. N'oubliez pas qu'une configuration en boucle double nécessite une longueur de câble deux fois plus importante. www.petsafe.net...
  • Seite 42: Connexion Des Fils À L'émetteur De Clôture

    Pour une meilleure protection de l'émetteur de clôture, s'il n'est pas utilisé pendant longtemps ou avant un orage, déconnectez les fils d'antenne de boucle et débranchez l'adaptateur de la prise. Cela permettra de prévenir tout dommage causé à l'émetteur par des surtensions. www.petsafe.net...
  • Seite 43: Préparation Du Collier-Récepteur

    (RFA-67D-11) de rechange chez de nombreux revendeurs. Contactez notre service ® clientèle ou consultez notre site internet, www.petsafe.net, pour obtenir l'adresse du revendeur le plus proche. Réglage du niveau de stimulation électrostatique Lisez toutes les étapes qui suivent avant de régler le niveau de stimulation électrostatique.
  • Seite 44 3 clignotements Stimulation électrostatique moyenne Timide ou neutre Stimulation électrostatique 4 clignotements Énergie moyenne ou forte moyenne/forte 5 clignotements Stimulation électrostatique forte Énergie forte Clignote 1 fois toutes les Indique que la batterie est faible 4 à 5 secondes www.petsafe.net...
  • Seite 45: Réglage De La Largeur Du Périmètre Et Test Du Collier-Récepteur

    6. Placez les contacteurs de la clé multifonctions sur ceux du collier-récepteur (6B, 6C). Tenez le collier-récepteur à la hauteur du cou de votre chien, les contacteurs dirigés vers le haut (6D) et le logo PetSafe dirigé vers le fil d'antenne. ®...
  • Seite 46: Installation Du Fil D'antenne

    2. Placez le fil d'antenne dans la tranchée, en laissant un peu de mou pour que le fil puisse se détendre ou se contracter selon les variations de température. 3. Utilisez un objet non tranchant, tel qu'un bâton, pour enfoncer le fil d'antenne dans la tranchée. Faites attention à ne pas endommager l'isolation du fil d'antenne. www.petsafe.net...
  • Seite 47 à l'aide d'une brosse avant d'appliquer l'enduit. • Allées de garage de gravier ou de terre (7D) : insérez le fil d'antenne dans un tuyau en PVC ou un tuyau d'arrosage pour le protéger avant de l'enfouir. www.petsafe.net...
  • Seite 48: Installation Des Fanions De Délimitation

    1. Placez les contacts de la clé multifonction sur les contacteurs et tenez le collier-récepteur à la hauteur d'antenne du cou de votre animal, et le logo PetSafe dirigé vers ® le fil d'antenne. 2. Marchez vers la zone d'avertissement jusqu'à ce que le collier-récepteur émette un signal sonore (8A).
  • Seite 49 1. Assurez-vous qu'il n'y a pas de batterie dans le collier-récepteur. 2. Commencez par faire tenir votre animal debout, confortablement (9A). 3. Mettez le collier-récepteur au cou de votre animal de manière à ce que le logo PetSafe ® soit orienté vers son menton. Centrez les contacteurs en dessous du cou de votre animal, en contact avec la peau.
  • Seite 50: Manuel De Dressage

    Soyez patient(e) avec votre animal Important : un bon dressage de votre animal est essentiel au bon fonctionnement du système de clôture anti-fugue avec fil In-Ground Fence PetSafe . Lisez l'intégralité de cette section avant de commencer à ™ ®...
  • Seite 51 Guettez l'apparition de légères réactions au début, comme le redressement des oreilles, la tête qui tourne et le regard qui se porte au sol. 4. Retournez près du même fanion jusqu'à ce que votre animal résiste lorsque vous l'emmenez vers la zone de stimulation électrostatique. www.petsafe.net...
  • Seite 52: Jours 5 À 8 - Phase De Distraction

    2. Marchez dans le jardin avec votre animal et jouez avec lui, en restant en permanence dans la zone autorisée. 3. Consacrez-vous à une autre tâche dans le jardin tout en surveillant votre animal du coin de l'œil. 4. Si votre animal s'échappe, enlevez-lui le collier-récepteur et ramenez-le dans la zone autorisée. www.petsafe.net...
  • Seite 53: Accessoires

    Pour vous procurer des accessoires supplémentaires pour votre clôture anti-fugue avec fil In-Ground Fence PetSafe , consultez ™ ® notre site internet, www.petsafe.net, afin de trouver un revendeur près de chez vous et obtenir les numéros de téléphone du service clientèle de votre région. www.petsafe.net...
  • Seite 54 Stimulation électrostatique faible Timide 3 clignotements Stimulation électrostatique moyenne Timide ou neutre 4 clignotements Stimulation électrostatique moyenne/forte Énergie moyenne ou forte 5 clignotements Stimulation électrostatique forte Énergie forte Clignote 1 fois toutes Batterie faible les 4 à 5 secondes www.petsafe.net...
  • Seite 55 Pour activer le collier, insérez le module de batterie (A). À l'aide de la bordure de la clé multifonctions, comme indiqué, tournez la batterie en sens antihoraire, jusqu'à ce que la ligne verticale de la batterie soit pointée sur la position « ON » (MARCHE) (B). Si le collier-récepteur PetSafe n'est ®...
  • Seite 56: Questions Fréquemment Posées

    Questions fréquemment posées Est-ce que le système Oui. La clôture anti-fugue avec fil In-Ground Fence PetSafe fonctionne dans les jardins d'une ™ ® fonctionnera dans superficie maximale de 160 hectares. Il peut être nécessaire de se procurer des kits de fil et de mon jardin ? fanions supplémentaires.
  • Seite 57: Dépannage

    • Exécutez un « test du système » (page 58) pour vérifier s'il est nécessaire de remplacer l'émetteur de clôture. • Si l'émetteur de clôture fonctionne correctement, cela signifie que votre fil d'antenne est rompu. Voir la section « Test de localisation de rupture de câble » de ce guide. www.petsafe.net...
  • Seite 58: Informations Supplémentaires

    • Ce système ne doit être utilisé qu’avec des animaux en bonne santé, âgés de plus de 6 mois. Contactez votre vétérinaire si vous êtes préoccupé(e) quant à l'état de santé de votre animal (traitement médical, gestation, santé cardiaque, etc.). • La clôture anti-fugue avec fil In-Ground Fence PetSafe est réservée à un usage résidentiel. ™...
  • Seite 59: Test De Localisation De Rupture De Fil

    9. Remplacez le fil d'antenne endommagé par un nouveau. 10. Reconnectez le fil d'antenne à l'émetteur. 11. Contrôlez le voyant de boucle. Si le voyant de boucle est allumé, testez le système à l'aide du collier-récepteur. www.petsafe.net...
  • Seite 60: Conditions D'utilisation Et Limitation De Responsabilité

    R&TTE européennes et annuler l'autorisation de l'utilisateur à faire fonctionner l'appareil, et annulera la garantie. Par la présente, Radio Systems Corporation, déclare que le dispositif PIG19-15394 est conforme aux exigences fondamentales et autres provisions applicables de la directive 1999/5/EC.
  • Seite 61: Élimination Des Batteries Usagées

    Service clientèle. Europe - Radio Systems PetSafe Europe Ltd., 2nd Floor, Elgee Building, Market Square, Dundalk, Co. Louth, A91 YR9X Ireland Canada – Radio Systems Corporation, 10427 PetSafe Way, Knoxville, TN 37932 USA...
  • Seite 62: Belangrijke Veiligheidsinformatie

    Hierna kunnen Radio Systems Corporation, Radio Systems PetSafe Europe Ltd., Radio Systems Australia Pty Ltd. en andere aangesloten ondernemingen of merken van Radio Systems Corporation gezamenlijk “Wij” of “Ons” worden genoemd. BELANGRIJKE VEILIGHEIDSINFORMATIE Uitleg van in deze handleiding gebruikte belangrijke woorden en symbolen Dit is het symbool voor een veiligheidswaarschuwing.
  • Seite 63 • Maak de halsband niet strakker dan nodig voor een goed contact. Een halsband die te strak zit, zorgt voor een verhoogd risico van druknecrose in het contactgebied. • Een goede training van uw huisdier is belangrijk voor het succes van het PetSafe ®...
  • Seite 64 De garantie biedt u de meeste bescherming als u uw product binnen 30 dagen registreert op www.petsafe.net. Door te registeren en uw aankoopbon te bewaren, hebt u volledige garantie op het product en zijn wij in staat u sneller te helpen, mocht u ooit een keer genoodzaakt zijn de klantenservice te bellen.
  • Seite 65: Onderdelen

    • Tape voor elektrische isolatie • Met gel gevulde capsules • Extra lasdoppen • Waterdicht afdichtingsmiddel (bijvoorbeeld siliconenkit) • Pvc-pijp of slang • Cirkelzaag met betonzaagblad • Nietpistool • Niet-metalen halsband en riem Installatie van omheining en traininghulp: www.petsafe.net www.petsafe.net...
  • Seite 66: Zo Werkt Het Systeem

    Grensvlaggetjes zijn een tijdelijk visueel hulpmiddel voor uw huisdier; de vlaggetjes kunnen na de training worden weggehaald. Het is bewezen dat dit PetSafe Omheiningssysteem met draad In-Ground Fence veilig, comfortabel en effectief ®...
  • Seite 67: Gebruiksaanwijzing

    Om brand en elektrische gevaren te voorkomen installeert u de omheiningszender in gebouwen die in overeenstemming zijn met provinciale en lokale elektronormen. Risico van elektrische schokken. Gebruik de omheiningszender binnenshuis en alleen op een droge plaats. www.petsafe.net...
  • Seite 68: Het Systeem Indelen

    Voorbeeldindelingen Voorbeeld 1: omtreklus (enkele lus) De omtreklus is de meest voorkomende indeling. Hierdoor kan uw huisdier zich vrij en veilig bewegen over uw gehele perceel (2C). Ook kunnen bloemenborders en tuinarchitectuur beschermd worden (2D). www.petsafe.net...
  • Seite 69 A, waarbij de draad 1,5 m gescheiden blijft. Twist de draad vanaf A terug naar de omheiningszender. Raadpleeg het hoofdstuk "De grensdraad installeren" voor meer informatie over het bevestigen van de draad aan een hek. www.petsafe.net...
  • Seite 70: De Grensdraad Positioneren

    Maak het uiteinde van de draden vast aan iets dat vast staat en voer het andere einde in een boormachine in. Trek de draad strak. Met de boormachine kunt u snel twisten. Twist de grensdraad 30 maal per meter om het signaal te annuleren. Nadat u klaar bent met de lay-out van de grens, plaatst u de getwiste draad in de zender. www.petsafe.net...
  • Seite 71: In Te Sluiten Gebied Benodigde Draadlengte, Bij Benadering Ar

    In de tabel aan de rechterzijde vindt u de lengte (bij benadering) grensdraad die nodig is voor een vierkante, enkele lusindeling. De lengte kan verschillen, afhankelijk van de hoeveelheid getwist draad en de indeling die wordt gebruikt. Denk eraan dat voor een dubbele lus twee keer zoveel draad nodig is. www.petsafe.net...
  • Seite 72: De Draden Aansluiten Op De Omheiningszender

    Voor meer bescherming van de omheiningszender wanneer deze lange tijd niet wordt gebruikt of voorafgaand aan onweersbuien moet u de lusgrensdraad loskoppelen en de stroomadapter uit het stopcontact halen. Zo wordt schade aan de zender door stootspanningen voorkomen. www.petsafe.net...
  • Seite 73: De Ontvangerhalsband Klaarmaken

    (RFA-67D-11) vindt u bij vele winkels. Neem contact op met de klantenservice of ga naar onze ® website op www.petsafe.net om een winkel bij u in de buurt te vinden. Het statische stimulatieniveau instellen Lees alle stappen voordat u probeert het statische stimulatieniveau in te stellen.
  • Seite 74 Middelmatige statische stimulatie Timide of gemiddeld 4 keer knipperen Middelmatige tot hoge statische stimulatie Gemiddeld of hoog-energiek 5 keer knipperen Hoge statische stimulatie Hoog-energiek Knippert om de 4 tot 5 Geef aan dat de batterij bijna leeg is. seconden een keer www.petsafe.net...
  • Seite 75: De Grensbreedte Instellen En De Ontvangershalsband Testen

    6. Plaats de contacten van het testlampje op de contactpunten van de ontvangerhalsband (6B, 6C). Houd de ontvangerhalsband ter hoogte van de hals van uw huisdier met de contactpunten omhoog gericht (6D) en het PetSafe ® logo in de richting van de grensdraad. Loop langzaam naar het grensdraad totdat u het waarschuwingsgeluidssignaal hoort (6E).
  • Seite 76: De Grensdraad Installeren

    2. Plaats de grensdraad in de geul en zorg dat er wat speling is zodat de draad kan uitzetten en krimpen met de weerswisselingen. 3. Gebruik een stomp instrument zoals een houten verfstok om de grensdraad in de geul te duwen. Wees voorzichtig zodat u de isolatie van de grensdraad niet beschadigt. www.petsafe.net...
  • Seite 77 • Oprit van kiezel of grind (7D): plaats de grensdraad in een pvc-pijp of een stuk tuinslang om de grensdraad te beschermen, voor deze ingegraven wordt. www.petsafe.net...
  • Seite 78: De Grensvlaggetjes Plaatsen

    1. Plaats de contactpunten voor het testlampje op de contactpunten en houd de ontvangerhalsband ter hoogte van de hals van uw huisdier met het PetSafe ® Grensdraad logo in de richting van de grensdraad.
  • Seite 79 Volg de onderstaande stappen om de pasvorm van de halsband aan te passen: 1. Zorg dat de batterij niet in de ontvangerhalsband is geplaatst. 2. Start met uw hond in een comfortabele staande houding (9A). 3. Plaats de ontvangerhalsband om uw huisdier zodat het PetSafe logo naar de kin van ®...
  • Seite 80: Trainingshandleiding

    Trainingshandleiding Wees geduldig met uw huisdier Belangrijk: een goede training van uw huisdier is belangrijk voor het succes van het PetSafe ® Omheiningssysteem met draad In-Ground Fence . Lees dit hoofdstuk helemaal door voordat u aan de ™ training van uw huisdier begint. Onthoud dat het PetSafe Omheiningssysteem met draad In-Ground ®...
  • Seite 81 3. Als de ontvangerhalsband goed past en als uw huisdier niet reageert op de statische stimulatie, verhoog het statische stimulatieniveau met 1. Controleer eerst op kleine reacties zoals oren omhoog, hoofd gedraaid, naar de grond kijken. 4. Blijf bij hetzelfde vlaggetje totdat uw huisdier de statische correctiezone niet meer wil betreden. www.petsafe.net...
  • Seite 82 3. Kijk naar uw huisdier terwijl u een ander klusje in de tuin uitvoert. 4. Als uw huisdier ontsnapt, doe dan de ontvangerhalsband af en leid het dier terug naar de vrije ruimte voor het huisdier. www.petsafe.net...
  • Seite 83: Uw Huisdier Uit De Vrije Ruimte Voor Het Huisdier Halen

    Als u extra accessoires wilt aanschaffen voor uw PetSafe Omheiningssysteem met draad In-Ground Fence bezoekt u onze ® ™ website op www.petsafe.net om een verkooppunt in de buurt te vinden of een lijst met telefoonnummers van de klantenservice in uw regio. www.petsafe.net...
  • Seite 84 3 keer knipperen Middelmatige statische stimulatie Timide of gemiddeld 4 keer knipperen Middelmatige tot hoge statische stimulatie Gemiddeld of hoog-energiek 5 keer knipperen Hoge statische stimulatie Hoog-energiek Knippert om de 4 tot Batterij bijna leeg 5 seconden een keer www.petsafe.net...
  • Seite 85 Neem contact op met onze klantenservice of ga naar onze website op ® www.petsafe.net om een verkoper in uw buurt te vinden. Functie voor statische stimulatie en batterijtest Wanneer de RFA-188 batterijmodule voor het eerst in de ontvangerhalsband wordt geplaatst, knippert het rode ledlampje de actuele instelling voor het stimulatieniveau (1 tot en met 5).
  • Seite 86: Veelgestelde Vragen

    Veelgestelde vragen Werkt het in mijn tuin? Ja. Het PetSafe Omheiningssysteem met draad In-Ground Fence werkt in tuinen tot ® ™ 4 hectaren. Het kan zijn dat extra kits met grensdraad en -vlaggetjes nodig zijn. Deze worden apart verkocht. Doet het zeer bij Nee.
  • Seite 87: Probleemoplossing

    • Voer de “systeemtest” uit (pagina 88) om te bepalen of de omheiningszender moet omheiningszender piept. worden vervangen. • Als de omheiningszender goed werkt, zit er een breuk in uw grensdraad. Zie het hoofdstuk “Locatie van breuk in draad” in deze handleiding. www.petsafe.net...
  • Seite 88: Aanvullende Informatie

    • Het systeem mag alleen gebruikt worden bij gezonde huisdieren die ouder zijn dan 6 maanden. Neem contact op met uw dierenarts als u vragen hebt over de medische toestand van uw huisdier (medicatie, zwangerschap, hartaandoeningen, etc.). • Het PetSafe Omheiningssysteem met draad In-Ground Fence is alleen bedoeld voor huiselijk gebruik.
  • Seite 89: Test Voor Lokaliseren Van Draadbreuk

    Om zeker te zijn, controleert u beide helften van de gehele lus. 9. Vervang de beschadigde grensdraad met nieuwe grensdraad. 10. Sluit de grensdraad opnieuw aan op de zender. 11. Controleer het luscontrolelicht. Als het luscontrolelicht aangaat, test dan het systeem met de ontvangerhalsband. www.petsafe.net...
  • Seite 90: Gebruiksvoorwaarden En Beperking Van Aansprakelijkheid

    Radio Systems Corporation behoudt zich het recht voor om de voorwaarden, bepalingen en kennisgevingen voor dit product van tijd tot tijd te wijzigen. Indien u voorafgaand aan het gebruik van dit product over dergelijke wijzigingen bent geïnformeerd, zijn deze wijzigingen bindend alsof zij hierin opgenomen waren. www.petsafe.net...
  • Seite 91: Conformiteit

    EU R&TTE-richtlijnen, kunnen leiden tot het niet toestaan van het gebruik van de apparatuur en het nietig verklaren van de garantie. Bij deze verklaart de Radio Systems Corporation, dat de PIG19-15394 in overeenstemming is met de essentiële vereisten en andere relevante voorwaarden van Richtlijn 1999/5/EC.
  • Seite 92: Información De Seguridad Importante

    De ahora en adelante podemos hacer referencia a Radio Systems Corporation, Radio Systems PetSafe Europe Ltd., Radio Systems Australia Pty Ltd. y cualquier otra filial o marca de Radio Systems Corporation colectivamente como “Nosotros” o “A nosotros”. INFORMACIÓN DE SEGURIDAD IMPORTANTE Explicación de las palabras de atención y símbolos utilizados en esta guía...
  • Seite 93 Este limitador de zona con cable In-Ground Fence de PetSafe no es un impedimento definitivo. ™ ® Este sistema está diseñado como medio de disuasión, para hacer recordar a las mascotas mediante estimulación estática que deben permanecer dentro de los límites establecidos. Es importante reforzar el adiestramiento de la mascota de forma periódica.
  • Seite 94 Para aprovechar al máximo la protección de su garantía, registre su producto antes de que transcurran 30 días a partir de la compra en www.petsafe.net. Al registrarse y conservar su recibo de compra, disfrutará de la garantía plena del producto y, si tuviera necesidad de contactar con el centro de atención al cliente, podremos ayudarle con mayor rapidez.
  • Seite 95: Componentes

    • Conectores de cable adicionales • Compuesto impermeabilizante (ej: silicona) • Tubo de PVC o manguera • Sierra circular con disco de albañilería • Pistola grapadora • Correa y collar no metálicos Instalación de la valla y ayuda para el adiestramiento: www.petsafe.net www.petsafe.net...
  • Seite 96: Cómo Funciona El Sistema

    Los banderines son una ayuda visual temporal para su mascota; retírelos tras adiestrarle. Este limitador de zona con cable In-Ground Fence ™ PetSafe ha resultado ser seguro, cómodo y eficaz para mascotas de más de 3,6 kg. ®...
  • Seite 97: Manual De Funcionamiento

    Para evitar incendios y accidentes eléctricos, instale el transmisor de valla en edificaciones que cumplan los códigos de electricidad locales y estatales. Riesgo de descarga eléctrica. Utilice el transmisor de valla solamente bajo techo y en lugares secos. www.petsafe.net...
  • Seite 98: Distribución Del Sistema

    Ejemplo 1: bucle de perímetro (bucle simple); el bucle de perímetro es la distribución más frecuente. Esto permite a la mascota deambular libremente de manera segura por todo el terreno (2C). También puede proteger jardines con flores y parterres (2D). www.petsafe.net...
  • Seite 99 U y continúe hasta regresar a A, manteniendo una separación de 1,5 m entre los cables. Retuerza el cable desde A nuevamente hasta el transmisor de valla. Encontrará más información sobre cómo fijar el cable a la valla en la sección “Instalación del cable de antena”. www.petsafe.net...
  • Seite 100: Tendido Del Cable De Antena

    Tense el cable. La taladradora le permite retorcer el cable rápidamente. Retuerza el cable de antena 30 veces por metro para anular la señal. Después de haber terminado de distribuir los límites, inserte el cable trenzado en el transmisor. www.petsafe.net...
  • Seite 101 La longitud dependerá de la cantidad de cable trenzado y de la distribución que se utilice. Tenga en cuenta que un bucle doble requerirá un cable del doble de longitud. www.petsafe.net...
  • Seite 102: Conectar Los Cables Al Transmisor De Valla

    Para mayor protección, si no utiliza el transmisor de valla durante períodos prolongados o antes de tormentas eléctricas, desconecte los cables de antena del bucle y desenchufe el adaptador de corriente del enchufe. Esto evitará daños al transmisor producidos por sobrecargas de tensión. www.petsafe.net...
  • Seite 103: Prepare El Collar Receptor

    Podrá encontrar una batería de repuesto PetSafe (RFA-67D-11) en muchas tiendas ® minoristas. Póngase en contacto con el centro de atención al cliente o visite nuestro sitio web, www.petsafe.net, para encontrar una tienda minorista en su zona. Aumentar el nivel de estimulación estática Lea todos los pasos antes de intentar configurar el nivel de estimulación estática.
  • Seite 104: Tabla De Funciones Y Reacciones

    Estimulación estática baja Tímido 3 destellos Estimulación estática media Tímido o normal 4 destellos Estimulación estática media-alta Normal o muy activo 5 destellos Estimulación estática alta Muy activo Destella una vez cada Indica batería con poca carga 4 o 5 segundos www.petsafe.net...
  • Seite 105: Ajuste De La Amplitud De Los Límites Y Prueba Del Collar Receptor

    (6B, 6C). Sostenga el collar receptor a la altura del cuello de su perro, con los puntos de contacto orientados hacia arriba (6D) y el logotipo PetSafe orientado hacia el cable de antena. ®...
  • Seite 106: Instalación Del Cable De Antena

    2. Coloque el cable de antena en la zanja, dejándolo con cierta flojedad para que se dilate y contraiga según las variaciones de temperatura. 3. Use una herramienta de punta roma, como una estaca de madera, para introducir el cable de antena en la zanja. Tenga cuidado de no dañar el aislamiento del cable de antena. www.petsafe.net...
  • Seite 107 óptimos, antes de cubrir la junta, barra toda la suciedad y los escombros. • Entradas de garaje de grava o tierra (7D): coloque el cable de antena en un tubo de PVC o una manguera de jardín para protegerlo antes de soterrarlo. www.petsafe.net...
  • Seite 108: Colocación De Los Banderines

    1. Coloque los contactos de la llave multiusos en los puntos de contacto y sostenga el collar receptor a la altura del cuello de su perro, con el logotipo PetSafe ® Cable de antena orientado hacia el cable de antena.
  • Seite 109 1. Asegúrese de que el collar receptor no tenga las baterías instaladas. 2. Empiece haciendo que el perro se mantenga de pie de forma cómoda (9A). 3. Coloque el collar receptor a la mascota de manera que el logotipo PetSafe quede ®...
  • Seite 110: Manual De Adiestramiento

    Sea paciente con su mascota Importante: El adiestramiento correcto de su mascota es esencial para el éxito del limitador de zona con cable In-Ground Fence de PetSafe . Lea toda esta sección antes de comenzar a adiestrar la mascota. Este ™...
  • Seite 111 Preste atención a las reacciones más leves de su mascota, tales como levantar las orejas, los giros de la cabeza o mirar hacia el suelo. 4. Permanezca en el mismo banderín hasta que la mascota se resista a ingresar a la zona de estimulación estática. www.petsafe.net...
  • Seite 112: Días 5 A 8 - Fase De Distracción

    2. Camine por el jardín y juegue con la mascota, permaneciendo todo el tiempo en la zona autorizada. 3. Entreténgase con otra tarea en el jardín mientras observa a su mascota. 4. Si la mascota se escapa, quítele el collar receptor y llévela nuevamente a la zona autorizada. www.petsafe.net...
  • Seite 113: Accesorios

    Para comprar más accesorios para su limitador de zona con cable In-Ground Fence de PetSafe , visite nuestra página web ™ ® www.petsafe.net para encontrar una tienda minorista cerca de usted o para encontrar un listado de los números de teléfono del centro de atención al cliente de su zona. www.petsafe.net...
  • Seite 114: Preparación Del Collar Receptor

    Estimulación estática baja Tímido 3 destellos Estimulación estática media Tímido o normal 4 destellos Estimulación estática media-alta Normal o muy activo 5 destellos Estimulación estática alta Muy activo Destella una vez cada Batería con poca carga 4 o 5 segundos www.petsafe.net...
  • Seite 115 Contacte con nuestro centro de atención al ® cliente en www.petsafe.net para localizar una tienda cerca de usted. Estimulación estática y función de prueba de batería Cuando el módulo de batería RFA-188 se instala por primera vez en el collar receptor, el indicador luminoso LED rojo hará...
  • Seite 116: Preguntas Frecuentes

    Preguntas frecuentes ¿Funcionará en mi jardín? Sí. El limitador de zona con cable In-Ground Fence de PetSafe funciona en jardines de ™ ® hasta 160 hectáreas. Puede comprar más cable y banderines si los necesita. Estos se venden por separado.
  • Seite 117: Resolución De Problemas

    • Si el transmisor de valla funciona correctamente, el cable de antena está roto. Consulte en transmisor de valla. este manual la sección “Prueba para localizar roturas del cable”. www.petsafe.net...
  • Seite 118: Información Adicional

    • El sistema solo debe utilizarse con mascotas sanas de más de 6 meses de edad. Consulte a su veterinario si tiene dudas sobre el estado de salud de su mascota (medicinas, preñez, trastornos cardiacos, etc.). • El limitador de zona con cable In-Ground Fence de PetSafe solo es para uso residencial. ™...
  • Seite 119: Prueba Para Identificar Dónde Está Cortado El Cable

    Si no está seguro de si este producto es apropiado para su mascota, consulte con su veterinario o un adiestrador certificado antes de usarlo. El uso correcto incluye, sin limitación, la revisión de este manual de funcionamiento y de cualquier declaración de seguridad. www.petsafe.net...
  • Seite 120: Conformidad

    220 mAH; sustitúyala únicamente por unas equivalentes disponibles en el centro de atención al cliente. Para obtener un listado de los números de teléfono de los centros de atención al cliente de su zona, visite nuestro sitio web en www.petsafe.net.
  • Seite 121: Importanti Informazioni Di Sicurezza

    Di seguito Radio Systems Corporation, Radio Systems PetSafe Europe Ltd., Radio Systems Australia Pty Ltd. e qualunque altra affiliata o marchio di Radio Systems Corporation possono essere indicati collettivamente con “Noi”. IMPORTANTI INFORMAZIONI DI SICUREZZA Spiegazione dei termini e dei simboli di attenzione utilizzati in questa guida Questo è...
  • Seite 122 Il presente Sistema antifuga con filo In-Ground Fence PetSafe non è una barriera solida. Il sistema è ™ ® ideato per agire quale deterrente per ricordare agli animali domestici, mediante stimolazione statica, di rimanere nei confini stabiliti. È importante ripetere l'addestramento dell'animale su base regolare. È...
  • Seite 123 Per usufruire della massima copertura della nostra garanzia, è necessario registrare il prodotto entro 30 giorni sul sito www.petsafe.net. La registrazione e la conservazione della ricevuta consentono di usufruire della totale garanzia sul prodotto e, in caso di necessità, di un più rapido intervento da parte del Centro assistenza clienti. È importante sottolineare che i dati sensibili dell'utente non verranno mai ceduti né...
  • Seite 124: Componenti

    • Capsule riempite con gel • Connettori aggiuntivi • Composto impermeabilizzante (es. silicone) • Tubo in PVC o tubo flessibile • Sega circolare con lama per mattoni • Pistola graffatrice • Collare e guinzaglio non metallici Installazione della recinzione e guida all'addestramento: www.petsafe.net www.petsafe.net...
  • Seite 125: Come Funziona Il Sistema

    La stimolazione non è dannosa per l'animale, ma lo convincerà a rimanere nell'area di contenimento stabilita. Le bandierine costituiscono un ausilio visivo temporaneo per l'animale, ed è possibile rimuoverle dopo l'addestramento. Il presente Sistema antifuga con filo In-Ground Fence PetSafe si è dimostrato ™...
  • Seite 126: Guida All'uso

    Per prevenire incendi e pericoli di natura elettrica, installare il trasmettitore in edifici che siano in linea con le normative statali e locali. Rischio di scosse elettriche. Utilizzare il trasmettitore all'interno solo in un luogo asciutto. www.petsafe.net...
  • Seite 127: Disposizione Del Sistema

    Esempio 1: Anello perimetrale (singolo perimetro) L'anello perimetrale costituisce la disposizione più comune. Ciò consentirà all'animale di muoversi liberamente e in tutta sicurezza per l'intera proprietà (2C). Esso può inoltre proteggere i giardini fioriti e gli elementi di paesaggistica (2D). www.petsafe.net...
  • Seite 128 A, mantenendo il filo separato per una distanza di 1,5 m. Riportare il filo attorcigliato da A nuovamente al trasmettitore. Vedere la sezione "Installazione del filo di delimitazione" per maggiore informazioni sul collegamento del filo a una recinzione. www.petsafe.net...
  • Seite 129: Posizionamento Del Filo Di Delimitazione

    Tendere il filo. Il trapano consente di attorcigliare il filo rapidamente. Attorcigliare il filo di delimitazione 30 volte per metro per annullare il segnale. Una volta completata la disposizione perimetrale, inserire il filo attorcigliato nel trasmettitore. www.petsafe.net...
  • Seite 130 La tabella sulla destra indica la lunghezza approssimativa del filo di delimitazione necessario per una disposizione a singolo perimetro, di forma quadrata. La lunghezza varierà a causa della quantità di filo attorcigliato e della disposizione utilizzata. È bene ricordare che un doppio perimetro richiederà il doppio del filo. www.petsafe.net...
  • Seite 131: Collegamento Dei Fili Al Trasmettitore

    Per una maggiore protezione del trasmettitore, in caso di lunghi periodi di mancato utilizzo o prima di temporali, scollegare i fili di delimitazione dell'anello perimetrale e scollegare l'adattatore dall'alimentazione. Ciò eviterà danni da sovratensione relativi al trasmettitore. www.petsafe.net...
  • Seite 132: Preparare Il Collare Ricevitore

    (RFA-67D-11) presso molti rivenditori. Contattare il Centro assistenza clienti ® o visitare il nostro sito web all'indirizzo www.petsafe.net per individuare un rivenditore in zona. Per impostare il livello di stimolazione statico Leggere tutte le fasi prima di tentare di impostare il livello di stimolazione statica.
  • Seite 133 Timido 3 flash Media stimolazione statica Timido o nella media Mediamente o molto 4 flash Stimolazione statica medio-alta esuberante 5 flash Stimolazione statica alta Molto esuberante Lampeggiamento (flash) Indica che la batteria è scarica ogni 4 - 5 secondi www.petsafe.net...
  • Seite 134: Impostazione Della Larghezza Della Delimitazione E Test Del Collare Ricevitore

    6. Posizionare i contatti relativi alla chiave multiusi sui punti di contatto del collare ricevitore (6B, 6C). Mantenere il collare ricevitore all'altezza del collo dell'animale con i punti di contatto rivolti verso l'alto (6D) e il logo PetSafe rivolto ®...
  • Seite 135: Installazione Del Filo Di Delimitazione

    2. Posizionare il filo di delimitazione nel canale ricavato mantenendo un po' di lasco per consentire al filo di espandersi e contrarsi in base alle variazioni di temperatura. 3. Utilizzare uno strumento smusso come un bastoncino in legno per esercitare pressione sul filo di delimitazione e posarlo nel canale. Prestare a attenzione a non danneggiare il filo di delimitazione. www.petsafe.net...
  • Seite 136 • Vialetto di accesso in sterrato o ghiaia (7D): posizionare il filo di delimitazione in un tubo in PVC o in un tubo flessibile per proteggere il filo stesso prima di interrarlo. www.petsafe.net...
  • Seite 137: Posizionamento Delle Bandierine

    1. Posizionare i contatti della chiave multiusi sui punti di contatto e mantenere il collare ricevitore in corrispondenza dell'altezza del collo Filo di delimitazione dell'animale con il logo PetSafe rivolto verso il filo ® di delimitazione. 2. Procedere verso la zona di avvertimento fino a quando il collare ricevitore emette un segnale sonoro (8A).
  • Seite 138 1. Verificare che la batteria non sia installata nel collare ricevitore. 2. Assicurarsi che il cane sia in piedi e sia comodo (9A). 3. Posizionare il collare ricevitore sul collo del cane di modo che il logo PetSafe sia rivolto ®...
  • Seite 139: Manuale Di Addestramento

    Manuale di addestramento È importante essere paziente con il proprio cane Importante: un corretto addestramento dell'animale è essenziale per il successo del Sistema antifuga con filo In-Ground Fence PetSafe . Leggere questa sezione completamente prima di iniziare l'addestramento ™ ®...
  • Seite 140 4. Ripetere questa procedura in corrispondenza della stessa bandierina finché l'animale persiste ad entrare nella zona di stimolazione statica. 5. Lo scopo è padroneggiare 3-4 bandierine per sessione. Rendere l'addestramento DIVERTENTE! Premiare l'animale se ritorna indietro rapidamente o se oppone resistenza nel procedere verso la zona di stimolazione statica. www.petsafe.net...
  • Seite 141 1 unità. Osservare prima eventuali reazioni leggere, come ad esempio le orecchie alzate, la testa ruotata, lo sguardo rivolto verso il basso. 4. Rimanere in corrispondenza della stessa bandierina finché l'animale persiste ad entrare nella zona di stimolazione statica. www.petsafe.net...
  • Seite 142 2. Passeggiare per il giardino e giocare con l'animale, rimanendo sempre nella zona autorizzata. 3. Occuparsi di altre attività nel giardino tenendo d'occhio il cane. 4. Nel caso l'animale dovesse scappare, togliere il collare ricevitore all'animale e ricondurlo nella zona autorizzata. www.petsafe.net...
  • Seite 143: Accessori

    Per acquistare ulteriori accessori per il Sistema antifuga con filo In-Ground Fence PetSafe , visitare il nostro sito Web, ™ ® all'indirizzo www.petsafe.net, e individuare il rivenditore più vicino, oppure consultare l'elenco dei numeri di telefono del Centro di assistenza clienti per la propria area. www.petsafe.net...
  • Seite 144 Bassa stimolazione statica Timido 3 flash Media stimolazione statica Timido o nella media 4 flash Stimolazione statica medio-alta Mediamente o molto esuberante 5 flash Stimolazione statica alta Molto esuberante Lampeggiamento (flash) Livello batteria basso ogni 4 - 5 secondi www.petsafe.net...
  • Seite 145 NON tentare di tagliare la batteria o di aprirla facendo leva. Assicurarsi di smaltire la batteria in modo corretto. Le batterie sostitutive PetSafe sono reperibili presso molti rivenditori. Visitare il nostro sito all'indirizzo www.petsafe.net o ® rivolgersi al nostro Centro di assistenza clienti per trovare un rivenditore nella propria zona.
  • Seite 146: Domande Frequenti

    Domande frequenti Funzionerà nel mio Sì. Il Sistema antifuga con filo In-Ground Fence PetSafe funziona in giardini fino a 400 acri. È ™ ® giardino? possibile che sia necessario acquistare filo aggiuntivo e kit bandierine. Essi sono venduti separatamente. Ferirà o farà male al mio No.
  • Seite 147: Individuazione E Risoluzione Dei Guasti

    • Eseguire il "Test del sistema" (a pagina 148) per determinare se sia necessario sostituire il trasmettitore. emette segnali sonori. • Se il trasmettitore funziona correttamente, vi deve essere una rottura del filo di delimitazione. Consultare la sezione "Individuazione della rottura del filo" della presente guida. www.petsafe.net...
  • Seite 148: Informazioni Aggiuntive

    (farmaci, gravidanza, condizioni cardiache, ecc.). • Il Sistema antifuga con filo In-Ground Fence PetSafe® è solo per uso residenziale. ™ • La stimolazione statica ha lo scopo di ottenere l'attenzione dell'animale, ma non è dannoso. È ideato per sorprenderlo, non per punirlo.
  • Seite 149: Esecuzione Del Test Per Individuare La Posizione Della Rottura Del Filo

    9. Sostituire il filo di delimitazione danneggiato con un nuovo filo. 10. Ricollegare il filo di delimitazione al trasmettitore. 11. Controllare l'indicatore luminoso di circuito chiuso. Se l'Indicatore luminoso di circuito chiuso è acceso, testare il sistema con il collare ricevitore. www.petsafe.net...
  • Seite 150: Limitazione Di Responsabilità E Condizioni Di Utilizzo

    Radio Systems Corporation si riserva il diritto di modificare in qualsiasi momento condizioni generali e note che regolano l'uso di questo prodotto. La notifica all'utilizzatore di dette modifiche, prima che egli utilizzi questo prodotto, le rende vincolanti parimenti a quelle qui espressamente indicate. www.petsafe.net...
  • Seite 151: Conformità

    Questo prodotto è coperto da una garanzia limitata del produttore. Informazioni esaurienti sulla garanzia di questo prodotto e le sue condizioni sono disponibili sul sito Web www.petsafe.net e/o possono essere richieste al Centro assistenza clienti di zona. • Radio Systems PetSafe Europe Ltd. 2nd Floor, Elgee Building, Market Square, Dundalk, Co. Louth, A91 YR9X Ireland...
  • Seite 152: Wichtige Sicherheitsinformation

    Im Folgenden bezieht sich „wir“ oder „uns“ auf Radio Systems Corporation, Radio Systems PetSafe Europe Ltd., Radio Systems Australia Pty Ltd. und jegliche anderen Tochtergesellschaften oder Marken von Radio Systems Corporation. WICHTIGE SICHERHEITSINFORMATION Erklärung der in dieser Anleitung verwendeten Warnhinweise und Symbole Das ist das Sicherheitswarnsymbol.
  • Seite 153 Dieses Unterirdisches Rückhaltesystem mit Draht PetSafe In-Ground Fence ist keine massive Barriere. ® ™ Dieses System ist als Abschreckung vorgesehen, um Haustiere durch einen statischen Reizimpuls daran zu erinnern, innerhalb der festgelegten Grenzen zu bleiben. Es ist wichtig, dass Sie das Training mit Ihrem Haustier regelmäßig durchführen.
  • Seite 154 Damit Sie den maximalen Schutz aus Ihrer Garantie erhalten, registrieren Sie bitte Ihr Produkt innerhalb von 30 Tagen auf www.petsafe.net. Indem Sie Ihr Produkt anmelden und die Quittung aufbewahren, können Sie alle Vorzüge der Garantie nutzen und erhalten bei einem eventuellen Anruf der Kundenbetreuung schneller Hilfe. Ganz wichtig: Ihre Daten werden nicht an andere weitergegeben oder verkauft.
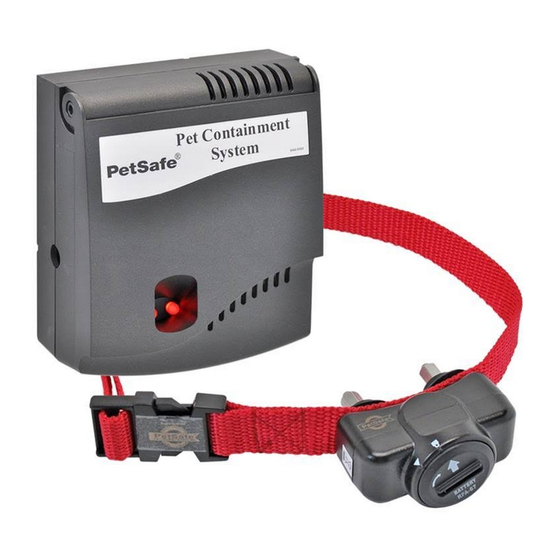
  • Seite 155: Bestandteile

    • Abisolierzange • Schere • Feuerzeug • Isolierband • Gelgefüllte Kapseln • Zusätzliche Kabelverbinder • Dichtungsmasse (z.B. Silikon) • PVC-Rohr oder -Schlauchleitung • Kreissäge mit Sägeblatt für Beton • Klammergerät • Leder- oder Nylonhalsband und -leine Zauninstallation und Trainingshilfe: www.petsafe.net www.petsafe.net...
  • Seite 156: So Funktioniert Das System

    Reizimpuls. Der Reizimpuls ist harmlos, bringt ihn jedoch dazu, innerhalb des Bereichs zu bleiben, den Sie festgelegt haben. Begrenzungsfähnchen sind eine vorübergehende visuelle Hilfe für Ihren Hund; entfernen Sie sie nach dem Training. Dieses Unterirdisches Rückhaltesystem mit Draht PetSafe In-Ground Fence hat sich als sicher, komfortabel und ®...
  • Seite 157: Gebrauchsanweisung

    Zeit beschädigt wird und brechen kann. Um Feuer und Stromschläge zu vermeiden, installieren Sie den Transmitter nur in Gebäuden, die den staatlichen und lokalen elektrischen Vorschriften entsprechen. Stromschlaggefahr. Verwenden Sie den Transmitter nur in Innenräumen an einem trockenen Ort. www.petsafe.net...
  • Seite 158: Systementwurf

    Entwurf in Betracht. Musterentwürfe Beispiel 1: Einfachschleife (einfach verlegter Draht) Die Einfachschleife ist das häufigste Layout. Damit kann Ihr Haustier frei und sicher auf Ihrem gesamten Grundstück umherlaufen (2C). Blumenbeete und gestaltete Gartenbereiche können damit auch geschützt werden (2D). www.petsafe.net...
  • Seite 159: Beispiel 4 (2G): Nur Vordere Grundstücksgrenze (Doppeltes Layout)

    Kehrtwendung und folgen Sie Ihrem ganzen Weg zurück zu A, und achten Sie dabei auf den Abstand von 1,5 m bei der Hin- und Rückführung. Verdrillen Sie den Draht von A wieder zurück zum Transmitter. Mehr Informationen zur Befestigung des Drahts an einem Zaun befinden sich im Abschnitt „Verlegen des Begrenzungsdrahts“. www.petsafe.net...
  • Seite 160: Positionieren Des Begrenzungsdrahts

    Sie das andere Ende in einen elektrischen Bohrer. Ziehen Sie den Draht, bis er straff ist. Mit dem Bohrer können Sie den Draht schnell verdrillen. Verdrillen Sie den Begrenzungsdraht 30 Mal pro Meter, um das Signal auszuschalten. Sobald der Grenzentwurf fertig ist, führen Sie den verdrillten Draht in den Transmitter ein. www.petsafe.net...
  • Seite 161: Spleißen Oder Reparieren Des Begrenzungsdrahts

    Begrenzungsdrahts an, der für ein rechteckiges Layout für einfach verlegten Draht erforderlich ist. Die Länge variiert je nach der Menge an gedrilltem Draht und je nach Layout. Denken Sie daran, dass ein doppeltes Layout zweimal so viel Draht erfordert. www.petsafe.net...
  • Seite 162: Verbinden Der Drähte Mit Dem Transmitter

    Sie müssen die RCD oder den GFCI dann zurücksetzen, um das System wieder mit Strom zu versorgen. Um den Transmitter zu schützen, wenn er für längere Zeit nicht verwendet wird, oder kurz vor Gewittern, trennen Sie die Begrenzungsdrähte und nehmen Sie den Stromadapter aus der Steckdose. Somit wird eine Beschädigung des Transmitters durch Spannungsstöße vermieden. www.petsafe.net...
  • Seite 163: Inbetriebnahme Des Empfängerhalsbands

    Ersatzbatterie (RFA-67D-11) erhalten Sie bei vielen Einzelhändlern. Wenden Sie sich an die Kundenbetreuung ® oder besuchen Sie unsere Website auf www.petsafe.net, um einen Einzelhändler in Ihrer Nähe zu finden. Einstellen der statischen Reizimpulsstufe Lesen Sie alle Schritte durch, bevor Sie die statische Reizimpulsstufe einstellen.
  • Seite 164: Maßnahme Gegen Verweilen An Einem Ort

    Blinkt 3 x Mittlerer statischer Reizimpuls Scheu oder weniger scheu Blinkt 4 x Mittelhoher statischer Reizimpuls Durchschnittlich oder sehr lebhaft Blinkt 5 x Hoher statischer Reizimpuls Sehr lebhaft Blinkt 1 x alle 4 bis Zeigt niedrigen Batteriestand an 5 Sekunden www.petsafe.net...
  • Seite 165: Einrichten Der Sicherheitszone Und Testen Des Empfängerhalsbands

    Sie das Empfängerhalsband auf Höhe des Halses Ihres Hundes so, dass die Kontaktstifte nach oben zeigen (6D) und das PetSafe® Logo zum Begrenzungsdraht hin zeigt. Gehen Sie langsam zum Begrenzungsdraht, bis Sie den Warnton hören (6E). Wenn Sie den Warnton hören, haben...
  • Seite 166: Installieren Des Begrenzungsdrahts

    2. Platzieren Sie den Begrenzungsdraht im Graben und ziehen Sie ihn dabei nicht straff, damit er sich infolge von Temperaturschwankungen ausdehnen und wieder zusammenziehen kann. 3. Verwenden Sie ein stumpfes Werkzeug wie z. B. einen hölzernen Lackstift, um den Begrenzungsdraht in den Graben zu schieben. Achten Sie darauf, die Isolierung des Begrenzungsdrahts nicht zu beschädigen. www.petsafe.net...
  • Seite 167: Anbringen Eines Begrenzungsdrahts An Einem Existierenden Zaun

    Verbindung. Um optimale Ergebnisse zu erzielen, bürsten Sie Schmutz oder andere Ablagerungen vor dem Füllen weg. • Einfahrt mit Kies oder Erde (7D): Platzieren Sie den Begrenzungsdraht zum Schutz in einem PVC-Rohr oder Wasserschlauch, bevor Sie ihn eingraben. www.petsafe.net...
  • Seite 168: Platzieren Der Begrenzungsfähnchen

    1. Platzieren Sie die Kontakte der Testleuchte an den Kontaktstiften und halten Sie das Empfängerhalsband in Höhe des Nackens Ihres Hundes und so, dass das Begrenzungs- draht PetSafe Logo zum Begrenzungsdraht hinzeigt. ® 2. Gehen Sie auf die Warnzone zu, bis das Empfängerhalsband piepst (8A).
  • Seite 169: Halsband Wieder Einfädeln

    1. Stellen Sie sicher, dass die Batterie nicht im Empfängerhalsband installiert ist. 2. Achten Sie darauf, dass Ihr Hund bequem steht, wenn Sie anfangen (9A). 3. Platzieren Sie das Empfängerhalsband so an Ihrem Hund, dass das PetSafe Logo zum ®...
  • Seite 170: Trainingsanleitung

    Trainingsanleitung Seien Sie geduldig mit Ihrem Haustier Wichtig: Ein ordnungsgemäßes Training Ihres Haustiers ist wesentlich für den Erfolg des Unterirdisches Rückhaltesystem mit Draht PetSafe In-Ground Fence . Lesen Sie diesen Abschnitt vollständig ® ™ durch, bevor Sie anfangen, Ihr Haustier zu trainieren. Denken Sie daran, dass das Unterirdisches Rückhaltesystem mit Draht PetSafe...
  • Seite 171: Tag 2 Bis 4 - Weiteres Training Zur Vergegenwärtigung Der Grenze

    Reizimpulsstufe um eine Stufe. Achten Sie auf zunächst auf leichte Reaktionen wie Aufstellen der Ohren, Drehen des Kopfes, Schauen auf den Boden. 4. Bleiben Sie bei demselben Begrenzungsfähnchen, bis Ihr Haustier sich weigert, die statische Reizimpulszone zu betreten. www.petsafe.net...
  • Seite 172 7. Falls Ihr Hund nicht auf den statischen Reizimpuls reagiert, vergewissern Sie sich gemäß Schritt 9, dass das Empfängerhalsband ordnungsgemäß sitzt. 8. Wenn das Empfängerhalsband ordnungsgemäß sitzt und Ihr Hund nicht auf den statischen Reizimpuls reagiert, erhöhen Sie die statische Reizimpulsstufe um eine Stufe. www.petsafe.net...
  • Seite 173: Herausbringen Ihres Hundes Aus Dem Aufenthaltsbereich

    Zum Kauf weiteren Zubehörs für Ihr Unterirdisches Rückhaltesystem mit Draht PetSafe In-Ground Fence besuchen Sie unsere ® ™ Website auf www.petsafe.net, um einen Händler in Ihrer Nähe ausfindig zu machen und für eine Liste an Telefonnummern der Kundenbetreuung in Ihrer Gegend. www.petsafe.net...
  • Seite 174: Statischer Reizimpuls Und Batterietest-Funktion

    Scheu Blinkt 3 x Mittlerer statischer Reizimpuls Scheu oder weniger scheu Blinkt 4 x Mittelhoher statischer Reizimpuls Durchschnittlich oder sehr lebhaft Blinkt 5 x Hoher statischer Reizimpuls Sehr lebhaft Blinkt 1 x alle 4 bis 5 Sekunden Niedriger Batteriestand www.petsafe.net...
  • Seite 175: Add-A-Dog ® Empfängerhalsband Für Kleine Hunde

    (A). Drehen Sie die Batterie mithilfe des Randes der Testleuchte im Uhrzeigersinn, bis die senkrechte Linie an der Batterie auf die Stellung „ON“ (EIN) zeigt, wie abgebildet (B). Falls das PetSafe ® Empfängerhalsband nicht sofort am Hund verwendet wird, lassen Sie es in der Stellung „OFF“...
  • Seite 176: Häufig Gestellte Fragen

    Können meine Kinder Nein. Der statische Reizimpuls wird durch die Kontaktstifte am Empfängerhalsband, das Ihr Hund trägt, verletzt werden? erzeugt, nicht am Begrenzungsdraht. Ich habe einen kleinen Ja. Da das Unterirdisches Rückhaltesystem mit Draht PetSafe In-Ground Fence einen statischen ® ™...
  • Seite 177: Mögliche Probleme Und Lösungen

    • Führen Sie den „Systemtest“ durch (Seite 178), um zu bestimmen, ob der Transmitter aus und der Transmitter- ausgetauscht werden muss. schleifenalarm ertönt. • Falls der Transmitter ordnungsgemäß funktioniert, liegt eine Unterbrechung in Ihrem Begrenzungsdraht vor. Lesen Sie den Abschnitt „Drahtunterbrechung“ in dieser Gebrauchsanweisung. www.petsafe.net...
  • Seite 178: Zusätzliche Informationen

    • Das System sollte nur mit gesunden Haustieren, die älter als 6 Monate sind, verwendet werden. Wenden Sie sich an Ihren Tierarzt, falls Sie Bedenken bezüglich des Gesundheitszustands Ihres Haustiers haben (Medikamente, Trächtigkeit, Herzkrankheiten, etc.). • Das PetSafe In-Ground Fence System ist nur für die Nutzung zu Hause bestimmt.
  • Seite 179: Drahtunterbrechungssuche

    9. Ersetzen Sie den beschädigten Begrenzungsdraht durch einen neuen Begrenzungsdraht. 10. Schließen Sie den Begrenzungsdraht wieder am Transmitter an. 11. Überprüfen Sie die Kontrollleuchte für den Begrenzungsdraht. Falls die Kontrollleuchte für den Begrenzungsdraht an ist, testen Sie das System mit dem Empfängerhalsband. www.petsafe.net...
  • Seite 180: Nutzungsbedingungen Und Haftungsbeschränkung

    Radio Systems Corporation behält sich das Recht vor, an den Bestimmungen, Bedingungen und Hinweisen, denen dieses Produkt unterliegt, gelegentliche Änderungen vorzunehmen. Wurden Sie über derartige Änderungen vor Gebrauch des Produkts in Kenntnis gesetzt, sind diese in der gleichen Form bindend, als wären sie im vorliegenden Dokument enthalten. www.petsafe.net...
  • Seite 181: Konformität

    Dieses Produkt besitzt eine eingeschränkte Herstellergarantie. Alle Einzelheiten zu der für dieses Produkt geltenden Garantie und ihren Bestimmungen erhalten Sie auf www.petsafe.net und / oder bei Ihrer Kundenbetreuung vor Ort. • Radio Systems PetSafe Europe Ltd., 2nd Floor, Elgee Building, Market Square, Dundalk, Co. Louth, A91 YR9X Ireland www.petsafe.net...
  • Seite 182 www.petsafe.net...
  • Seite 183 Mounting Template Layout Grid Esquema de instalación Schéma d’installation Schema di montaggio Gabarit de montage Indelingsraster Layout montagesjabloon Plantilla de montaje Dima di montaggio Montageschablone 7.62 cm...
  • Seite 184 Per ulteriori informazioni sulla nostra estesa gamma di prodotti comprendente sistemi antifuga, soluzioni per l’addestramento, controllo dell’abbaio, porte per animali domestici, i prodotti della linea salute e benessere, gestione dei rifiuti e gioco e prova, visitare: www.petsafe.net. PetSafe Produkte sind darauf ausgelegt, die Beziehung zwischen Ihnen und Ihrem Haustier ®...

Inhaltsverzeichnis