Herunterladen Inhalt Inhalt Diese Seite drucken
Nice E Mat ST Installierungs-Und Gebrauchsanleitungen Und Hinweise

Nice E Mat ST Installierungs-Und Gebrauchsanleitungen Und Hinweise

Era mat t
Vorschau ausblenden Andere Handbücher für E Mat ST:
Inhaltsverzeichnis

Werbung

Verfügbare Sprachen
  • DE

Verfügbare Sprachen

  • DEUTSCH, seite 82
Era Mat T
Tubular motor
Types: E Mat ST, E Mat MT, E Mat LT
EN -
Instructions and warnings for installation and use
IT -
Istruzioni ed avvertenze per l'installazione e l'uso
FR -
Instructions et avertissements pour l'installation et l'utilisation
ES -
Instrucciones y advertencias para la instalación y el uso
DE -
Installierungs-und Gebrauchsanleitungen und Hinweise
PL -
Instrukcje i ostrzeżenia do instalacji i użytkowania
NL -
Aanwijzingen en aanbevelingen voor installatie en gebruik

Werbung

Inhaltsverzeichnis
loading

Inhaltszusammenfassung für Nice E Mat ST

  • Seite 1 Era Mat T Tubular motor Types: E Mat ST, E Mat MT, E Mat LT EN - Instructions and warnings for installation and use IT - Istruzioni ed avvertenze per l’installazione e l’uso FR - Instructions et avertissements pour l’installation et l’utilisation ES - Instrucciones y advertencias para la instalación y el uso...
  • Seite 2: Electrical Connections

    Quick start guide Note for reading this Guide • In this Quick Start Guide, the numbering of the figures is separate and does not correspond to the numbering cited in Era Mat T tubular motor for the complete manual. • This guide does not substitute the complete manual.
  • Seite 3 (see fig. 5); • Attention! – It is important to follow these instructions to ensure safety. • it can be programmed via radio, with a portable transmitter or with a Nice hand- Therefore, read this manual carefully before beginning work.
  • Seite 4: First Power Up

    Warning! – Before starting, carefully read the warnings under sections 1.1 and 3.1. Incorrect installation could cause severe physical injury. To assemble and install the motor, refer to fig. 3. Moreover, consult the Nice product catalogue or go to www.niceforyou.com to choose the crown of the limit switch (fig.
  • Seite 5 5.3.1 - Compatible transmitters completion of the procedure, each key will be combined with a command according Consult the Nice product catalogue or go to www.niceforyou.com to find the Nice to the following diagram. devices compatible with the radio receiver built into the motor.
  • Seite 6 5.4 - Transmitter to the used for programming procedures • The programming procedures can be performed exclusively with a Nice transmitter having at least the following keys s, n, t. • The programming procedures must be performed exclusively with a transmitter memorised in “Mode I”...
  • Seite 7 Adjustment of the limit switch heights and intermediate heights 5.6 - Manual adjustment of upper limit switch height (“0”) and lower height (“1”) Warning: – This procedure overwrites previously adjusted heights with the new heights using this same procedure. – Every time the motor is powered, 2 movements are performed if at least one transmitter and the limit switch heights are not in the memory. 5.6.1 - To adjust the UPPER limit switch (“0”) Before starting the procedure, bring the awning to the midpoint of its stroke.
  • Seite 8 5.7 - Semiautomatic programming of the limit switches WARNING! – This programming applies to awnings which have the box, thus with retainer in the Upper limit switch “0”. The same procedure also applies when the retainer is in the Lower limit switch “1”. Warnings: –...
  • Seite 9 5.8 - Automatic programming of both limit switches WARNING! – This programming is intended for awnings with retainer lock on both the limit switches (“0” and “1”). Warnings: – This procedure overwrites previously adjusted heights with the new heights using this same procedure. –...
  • Seite 10 Programs and accessory adjustments 5.10 - Memorising a SECOND (third, fourth, etc.) transmitter To perform these procedures you must have a transmitter (“old”) already memorised. 5.10.1 - Memorising a second transmitter “Mode I” Warning! – This procedure memorises the new transmitter in “Mode I”, regardless of the Mode in which the old to transmitter was memorised. 01.
  • Seite 11 5.11 - Memorisation of a climate sensor connected via radio To perform the procedure you must have a transmitter (“old”) already memorised in “Mode 1”. 01. (on the climate sensor) Keep the yellow key pressed for 10 seconds and then release it (in this case the motor does not perform any movement). 02.
  • Seite 12 5.13 - “FRT” Function: automatic tensioning of the canvas when opening awnings that are not fitted with a mechanism to lock the awning when opening This function is useful to eliminate the unsightly depression of the canvas that may form when the awning is open. It is activated by programming position “2” near the limit switch “1”.
  • Seite 13 5.14 - “FTA” Function: tensioning the canvas when open awnings fitted with a manual hooking and unhooking mechanism of the awning when opening This function is useful to eliminate the unsightly depression of the canvas that may form when the awning is open. The function may be used exclusively in awnings that let you lock the canvas in the open position through a mechanism manually attachable and detachable by the user (e.g.
  • Seite 14 5.15 - “FTC” Function: tensioning the canvas when open awnings fitted with an auto- matic hooking and unhooking mechanism of the awning when opening This function is useful to eliminate the unsightly depression of the canvas that may form when the awning is open. The function may used exclusively in awnings which allow the locking of the canvas when open, through an automatic hooking/unhooking mechanism located in the limit switch “1”...
  • Seite 15 5.16 - Total or partial deletion of memory This procedure allows you to choose under point 05 the data that you want to delete. 5.16.1 - Procedure performed with a transmitter memorised in “Mode I” 01. Keep the n key pressed and wait for the motor to perform 2 movements. Upon completion, release the key. 02.
  • Seite 16: Optional Accessories

    5.17 - Locking and unlocking the memory This procedure allows you to lock or unlock the memory to prevent accidental memorisation of other transmitters not included in the system. 01. Keep the n key pressed and wait for the motor to perform 2 movements. Upon completion, release the key. 02.
  • Seite 17 • The climate sensors must not be considered as devices to increase the safety of the awning when it rains or there is strong wind. Nice declines all liability for any material damages that occur due to atmospheric events not detected by the sensors.
  • Seite 18 sunrise daytime dusk night-time Klux set threshold light value: e.g. intensity 30Klux over-threshold momentary drops in light, within the hysteresis values hysteresis drops in light, within the under-threshold values under-threshold hysteresis threshold: positioned automatically at half the set thresh- old value “1”...
  • Seite 19 3. The awning is automatically closed by the system. 4. After a few minutes (it continues raining...) the user commands the opening of the awning. 5. After 15 minutes from the opening (it continues raining...) the awning is closed automatically by the system. 6.
  • Seite 20 sec. sec. x 1 = 5 Klux x 1 = 5 Klux x 2 = 10 Klux x 2 = 10 Klux x 3 = 15 Klux x 3 = 15 Klux x 4 = 30 Klux x 4 = 30 Klux sec.
  • Seite 21 This can happen if the awning is near the Upper limit switch (“0”). In this case you Nice S.p.A. hereby declares that the products: E Mat ST(...), E Mat MT(...), E must lower the awning a little bit and give the Raise command again.
  • Seite 22: Collegamenti Elettrici

    Guida rapida Nota alla consultazione • In questa Guida rapida la numerazione delle figu- re è autonoma e non corrisponde alla nu merazione citata nel testo del Era Mat T motore tubolare per Manuale completo. • Questa guida non sostituisce il Manuale completo. tende da sole 1 - Collegamenti elettrici - rif.
  • Seite 23: Descrizione Del Prodotto Edestinazione D'uso

    PER LA SICUREZZA • è compatibile con tutta l’elettronica di comando di Nice (trasmettitori e sensori cli- matici) che adotta il sistema radio NRC; • può essere comandato via radio o via cavo, utilizzando vari accessori opzionali, non •...
  • Seite 24: Prima Accensione

    Per assemblare e installare il motore fare riferimento alla fig. 3. Inoltre consultare il • La regolazione dei finecorsa deve essere fatta dopo aver installato il motore nella catalogo dei prodotti Nice o il sito www.niceforyou.com per scegliere la co rona del tenda e averlo collegato all’alimentazione.
  • Seite 25 Consultare il catalogo dei prodotti Nice oppure il sito www.niceforyou.com per cono- do il seguente schema: scere i dispositivi di comando Nice compatibili con il ricevitore radio integrato nel - tasto s (oppure tasto 1): sarà abbinato al comando di Salita motore.
  • Seite 26 • Le procedure di programmazione possono essere eseguite esclusivamen- te con un trasmettitore Nice dotato almeno dei tasti s, n, t. • Le procedure di programmazione devono essere eseguite esclusivamente con un trasmettitore memorizzato in “Modo I” (paragrafo 5.5 o 5.10.1).
  • Seite 27 Regolazione delle quote di finecorsa e di quelle intermedie 5.6 - Regolazione manuale delle quote del finecorsa Alto (“0”) e Basso (“1”) Avvertenza: – Questa procedura permette anche di sovrascrivere le nuove quote su eventuali quote regolate in precedenza con questa stessa procedura. –...
  • Seite 28 5.7 - Programmazione semiautomatica dei finecorsa ATTENZIONE! – Questa programmazione è destinata alle tende da sole che hanno il cassonetto, quindi con battuta nel finecorsa Alto “0”. La stessa procedura è applicabile anche quando la battuta è nel finecorsa Basso “1”. Avvertenze: –...
  • Seite 29 5.8 - Programmazione automatica di entrambi i finecorsa ATTENZIONE! – Questa programmazione è destinata alle tende da sole con blocco in battuta su entrambi i finecorsa (“0” e “1”). Avvertenze: – Questa procedura sovrascrive le nuove quote su eventuali quote regolate in precedenza con questa stessa procedura. –...
  • Seite 30 Programmazioni e regolazioni accessorie 5.10 - Memorizzazione di un SECONDO (terzo, quarto, ecc.) trasmettitore Per eseguire le procedure è necessario avere a disposizione un trasmettitore già memorizzato (“vecchio”). 5.10.1 - Memorizzazione di un secondo trasmettitore in “Modo I” Attenzione! – La procedura memorizza il nuovo trasmettitore in “Modo I”, indipendentemente dal Modo in cui è memorizzato il vecchio trasmettitore. 01.
  • Seite 31 5.11 - Memorizzazione di un sensore climatico collegato via radio Per eseguire la procedura è necessario avere a disposizione un trasmettitore memorizzato in “Modo I” (“vecchio”). 01. (sul sensore climatico) Mantenere premuto il tasto giallo per 10 secondi e poi rilasciarlo (in questo caso il motore non esegue nessun movimento). 02.
  • Seite 32 5.13 - Funzione “FRT”: tensionamento automatico del telo in apertura per tende che non sono provviste di meccanismo per bloccare la tenda in apertura Questa funzione è utile per eliminare gli antiestetici avvallamenti del telo che possono formarsi quando la tenda è aperta. Si attiva programmando una posizione “2”...
  • Seite 33 5.14 - Funzione “FTA”: tensionamento del telo in apertura per tende provviste di mec- canismo manuale di aggancio e sgancio della tenda in apertura Questa funzione è utile per eliminare gli antiestetici avvallamenti del telo che possono formarsi quando la tenda è aperta. La funzione può essere utilizzata esclusivamente nelle tende che consentono di bloccare il telo nella posizione di apertura mediante un meccanismo inseribile e disinseribile manualmente dal- l’utente (ad esempio, i catenaccioli presenti nelle tende a capanno, nelle tende a rullo con ganci, nelle tende a braccio retto, ecc).
  • Seite 34 5.15 - Funzione “FTC”: tensionamento del telo in apertura per tende provviste di mec- canismo automatico di aggancio e sgancio della tenda in apertura Questa funzione è utile per eliminare gli antiestetici avvallamenti del telo che possono formarsi quando la tenda è aperta. La funzione può essere utilizzata esclusivamente nelle tende che consentono di bloccare il telo in apertura, mediante un meccanismo di aggancio/sgancio automatico collocato nel finecorsa “1”...
  • Seite 35 5.16 - Cancellazione totale o parziale della memoria Questa procedura permette di scegliere al punto 05 i dati che si desidera cancellare. 5.16.1 - Procedura eseguita con un trasmettitore memorizzato in “Modo I” 01. Mantenere premuto il tasto n e attendere che il motore esegua 2 movimenti. Alla fine rilasciare il tasto. 02.
  • Seite 36: Accessori Opzionali

    5.17 - Blocco o sblocco della memoria Questa procedura permette di bloccare o sbloccare la memoria del motore per impedire la memorizzazione accidentale di altri trasmettitori non previsti nel- l’impianto. 01. Mantenere premuto il tasto n e attendere che il motore esegua 2 movimenti. Alla fine rilasciare il tasto. 02.
  • Seite 37 6.3 in questo manuale istruzione. • I sensori climatici non devono essere considerati dispositivi per aumentare lo stato di sicurezza della tenda in presenza della pioggia o del vento forte. Nice declina ogni responsabilità per danni materiali verificatisi a causa di eventi atmosferici non rilevati dai sensori.
  • Seite 38 alba giorno tramonto notte Klux valore di soglia intensità impostato: es. luminosa 30Klux sopra-soglia cali momentanei di lumi- nosità, entro i valori di isteresi isteresi cali di luminosità entro i valori di sotto-soglia sotto-soglia soglia di isteresi: posizionata au- tomaticamente a metà del valore di soglia impostato “1”...
  • Seite 39 3. La tenda viene chiusa automaticamente dal sistema. 4. Dopo qualche minuto (continua a piovere...) l’utente comanda l’apertura della tenda. 5. Dopo 15 minuti dall’apertura (continua a piovere...) la tenda viene chiusa automaticamente dal sistema. 6. Smette di piovere. 7. Non piove più da almeno 15 minuti: l’utente comanda di nuovo l’apertura della tenda. 8.
  • Seite 40 sec. sec. x 1 = 5 Klux x 1 = 5 Klux x 2 = 10 Klux x 2 = 10 Klux x 3 = 15 Klux x 3 = 15 Klux FINE x 4 = 30 Klux x 4 = 30 Klux sec.
  • Seite 41 Questo può succedere se la tenda si trova in vicinanza del finecorsa Alto (“0”). In questo caso occorre prima far scendere la tenda per un breve tratto e poi dare di Con la presente, Nice S.p.A. dichiara che i prodotti: E Mat ST(...), E Mat nuovo il comando di salita.
  • Seite 42: Branchements Électriques

    Guide rapide Note pour la consultation • Dans ce guide rapide la numérotation de figure est autonome et ne correspond pas à la numération indiquée dans le manuel Era Mat T Moteur tubulaire complet. • Ce guide ne remplace pas le manuel complet pour stores 1 - Branchements électriques...
  • Seite 43: Description Du Produit Et Application

    GÉNÉRALES POUR LA SECURITE course ; • il est compatible avec toute l’électronique de commande de Nice (émetteur et cap- teurs climatiques) adoptant le système radio NRC ; • Attention ! – Instructions importantes pour la sécurité : conserver ces ins- •...
  • Seite 44: Premiere Mise En Service

    Pour l’assemblage du moteur se référer à la fig. 3. Consulter en outre le catalogue 5.1 - Recommandations des produits Nice ou le site www.niceforyou.com pour choisir la couronne de fin de • Le réglage des fins de course doit être fait après avoir installé le moteur dans le course (fig.
  • Seite 45 Consulter le catalogue produit Nice ou visiter www.niceforyou.com pour connaître commande déterminée, selon le schéma suivant :. les dispositifs de commande de Nice compatibles avec le récepteur radio intégré - la touche s (ou la touche 1) : sera associée à la commande de montée dans le moteur.
  • Seite 46: Mémorisation Du Premier Émetteur

    • Les procédures de programmation peuvent être effectuées exclusivement au moyen d’un émetteur Nice doté au moins des touches s, n, t. • Les procédures de programmation doivent être effectuées exclusivement avec un émetteur mémorisé en « Mode I » (paragraphe 5.5 ou 5.10.1).
  • Seite 47 Réglage des cotes de fin de course et intermédiaires 5.6 - Réglage manuel des cotes du fin de course haut (« 0 ») et bas (« 1 ») Avertissement : – Cette procédure permet également d’imposer les nouvelles cotes sur les cotes éventuellement réglées précédemment par cette même procédure. –...
  • Seite 48 5.7 - Programmation semi-automatique des fins de course ATTENTION ! – Cette programmation est destinée aux stores munis d’un coffre donc avec une butée au niveau du fin de course haut « 0 ». Les même procédure peut s’appliquer quand la butée se trouve dans le fin de course bas « 1 ». Recommandations : –...
  • Seite 49 5.8 - Programmation automatique des deux fins de course ATTENTION ! – Cette programmation est destinée aux stores avec des butées sur les deux fins de course (« 0 » et « 1 »). Recommandations – Cette procédure permet également d’imposer les nouvelles cotes sur les cotes éventuellement réglées précédemment par cette même procédure. –...
  • Seite 50 Programmations et réglages des accessoires 5.10 - Mémorisation d’un SECOND (troisième, quatrième, etc.) émetteur Pour effectuer les procédures il est nécessaire de pouvoir disposer d’un émetteur déjà mémorisé (« vieux »). 5.10.1 - Mémorisation d’un second émetteur en « Mode I » Attention ! –...
  • Seite 51 5.11 - Mémorisation d’un capteur climatique relié par radio Pour effectuer la procédure il faut disposer d’un émetteur mémorisé en « Mode I » (« vieux »). 01. (sur le capteur climatique) Maintenir appuyée la touche jaune pendant 10 secondes et la relâcher (dans ce cas le moteur n’effectue aucun mouvement). 02.
  • Seite 52 5.13 - Fonction « FRT » : tensionnement automatique de la toile en ouverture pour des stores qui ne sont pas pourvus de mécanisme pour bloquer la toile en ouverture Cette fonction est utile pour éliminer les dépressions inesthétiques qui peuvent se former quand le store est ouvert. Elle s’active en programmant une position «...
  • Seite 53 5.14 - Fonction « FTA » : tensionnement de la toile en ouverture pour des stores pourvus de mécanismes manuels de blocage et déblocage de la toile en ouverture Cette fonction est utile pour éliminer les dépressions inesthétiques qui peuvent se former quand le store est ouvert. La fonction ne peut être utilisée que pour les stores qui permette de bloquer la toile en position d’ouverture par le biais d’un mécanisme à...
  • Seite 54 5.15 - Fonction « FTC » : tensionnement de la toile en ouverture pour des stores avec mécanismes automatiques d’accrochage / décrochage de la toile en ouverture Cette fonction est utile pour éliminer les dépressions inesthétiques qui peuvent se former quand le store est ouvert. La fonction ne peut être utilisée que pour les stores qui permettent de bloquer la toile en position d’ouverture par le biais d’un mécanisme d’accrochage/décrochage automatique placé...
  • Seite 55 5.16 - Effacement total ou partiel de la mémoire Cette procédure permet de choisir dans le point 05 les données que l’on souhaite effacer. 5.16.1 - Procédure effectuée avec un émetteur mémorisé en « Mode I » 01. Maintenir appuyée la touche n et attendre que le moteur effectue 2 mouvements. A la fin relâcher la touche. 02.
  • Seite 56: Accessoires Optionnels

    5.17 - Blocage et déblocage de la mémoire Cette procédure permet de bloquer ou de débloquer la mémoire du moteur pour empêcher la mémorisation accidentelle d’autres émetteurs non prévus dans l’installation. 01. Maintenir appuyée la touche n et attendre que le moteur effectue 2 mouvements. A la fin relâcher la touche. 02.
  • Seite 57 6.4 et 6.3 dans ce manuel d’instructions. • Les capteurs climatiques ne doivent pas être considérés des dispositifs augmentant le niveau de sécurité du store en présence de pluie ou de vent fort. Nice décline toute responsabilité pour des dommages causés par des évènements atmosphériques non détectés par les capteurs 6.2.1 - Définitions et conventions...
  • Seite 58 aube jour crépuscule nuit Klux valeur de seuil intensité imposée : ex. lumineuse 30Klux au-dessus seuil diminution momentanée de la luminosité entre les hystérésis valeurs d’hystérésis diminution de la lumino- sité entre les valeurs de sous-seuil seuil d’hystérésis : positionné sous-seuil automatiquement à...
  • Seite 59 Exemple : 1. Le store est ouvert. 2. Il commence à pleuvoir... 3. Le store est fermé automatiquement par le système. 4. Après quelques minutes (il continue de pleuvoir...) l’utilisateur commande l’ouverture du store. 5. 15 minutes après l’ouverture (il continue de pleuvoir...) le store est fermé automatiquement par le système. 6.
  • Seite 60 Après environ 10 secondes, le moteur effectue un certain nombre de mouvements égal niveau de protection choisi. Note – Si cela n’a pas lieu annuler la procédure. De cette façon le réglage se termine sans changer le niveau prédéfini en usine 04.
  • Seite 61: Recommandations Pour L'utilisation

    Ceci peut se produire si le store se trouve près de la fin de course Haut (« 0 ») Dans ce cas il faut d’abord faire descendre le store sur une courte distance et Avec cela, Nice SpA déclare que les produits E Mat ST(...), E Mat MT(...), E redonner à nouveau la commande de montée Mat LT(...) sont conformes aux exigences essentielles et aux autres disposi-...
  • Seite 62: Conexiones Eléctricas

    Guía rápida Nota para consultar • En esta guía rápida, la numeración de las figuras es independiente y, por tanto, no se corresponde con la numeración citada Era Mat T motor tubular para en el texto del manual completo. • Esta guía no sustituye el manual completo.
  • Seite 63: Descripción Del Producto Yuso Previsto

    GENERALES DE SEGURIDAD • Es compatible con toda la electrónica de control de Nice (transmisores y sensores climáticos) que incorpora el sistema de radio NRC. • Se puede controlar a través de transmisiones de radio o por cable mediante la uti- •...
  • Seite 64: Primer Encendido

    Para montar e instalar el motor, consulte la fig. 3. Además, puede consultar el catá- 5.1 - Advertencias generales logo de productos de Nice o visitar el sitio www.niceforyou.com para seleccionar la • Los ajustes de los topes deben realizarse después de haber instalado el motor en corona del tope (fig.
  • Seite 65 5.3.1 - Transmisores compatibles modificar la asociación entre los comandos y los botones. Al finalizar el procedi- Consulte el catálogo de productos de Nice o visite el sitio www.niceforyou.com para miento, cada botón se asociará a un comando determinado, en función del...
  • Seite 66 • Los procedimientos de programación solo pueden realizarse con un transmisor Nice dotado al menos de los pulsadores s, n y t. • Los procedimientos de programación deben realizarse exclusivamente con un transmisor memorizado en “Modo I” (apartado 5.5 o 5.10.1).
  • Seite 67 Ajuste de las cotas de los topes y de las intermedias 5.6 - Ajuste manual de las cotas de los topes Alto (“0”) y Bajo (“1”) Advertencia: – Este procedimiento también permite sobrescribir las cotas que se hayan podido regular anteriormente con este mismo procedimiento con las nuevas cotas. –...
  • Seite 68 5.7 - Programación semiautomática de los topes ¡ATENCIÓN! – Esta programación está pensada para los toldos con cajón que, por lo tanto, se recogen hasta el tope Alto “0”. No obstante, se aplica el mismo procedimiento cuando se abate hasta en el tope Bajo “1”. Advertencias: –...
  • Seite 69 5.8 - Programación automática de los dos topes ¡ATENCIÓN! – Esta programación está pensada para los toldos que incorporan un bloqueo de extensión entre ambos topes (“0” y “1”). Advertencias: – Este procedimiento sobrescribe las cotas que se hayan podido regular anteriormente con este mismo procedimiento con las nuevas cotas. –...
  • Seite 70 Programación y ajuste opcionales 5.10 - Memorización de un SEGUNDO transmisor (o tercero, cuarto, etc.) Para llevar a cabo los procedimientos, es necesario que ya haya un transmisor memorizado (“anterior”). 5.10.1 - Memorización de un segundo transmisor en “Modo I” ¡Atención! –...
  • Seite 71 5.11 - Memorización de un sensor climático conectado por radio Para llevar a cabo el procedimiento, es necesario que ya haya un transmisor memorizado en “Modo I” (“anterior”). 01. (en el sensor climático) Mantenga pulsado el botón amarillo durante 10 segundos y, a continuación, suéltelo (en este caso, el motor no efectúa ningún movimiento). 02.
  • Seite 72 5.13 - Función “FRT”: tensado automático de la lona en la maniobra de apertura para los toldos que no están provistos de ningún mecanismo para bloquear el toldo al abrirlo Esta función resulta de utilidad para eliminar los abombamientos antiestéticos que pueden formarse en la lona cuando el toldo está abierto. La función se activa mediante la programación de una posición “2”...
  • Seite 73 5.14 - Función “FTA”: tensado de la lona en la maniobra de apertura para toldos provis- tos de mecanismo manual de enganche y desenganche del toldo al abrirlo Esta función resulta de utilidad para eliminar los abombamientos antiestéticos que pueden formarse en la lona cuando el toldo está abierto. La función se puede utilizar únicamente en los toldos que permiten bloquear la lona en la posición de apertura a través de un mecanismo que el usuario puede accionar o quitar de forma manual (por ejemplo, los cierres de seguridad existentes en los toldos veranda, en los toldos enrollables con ganchos, en los toldos de brazo recto, etc.).
  • Seite 74 5.15 - Función “FTC”: tensado de la lona en la maniobra de apertura para toldos provis- tos de mecanismo automático de enganche y desenganche del toldo al abrirlo Esta función resulta de utilidad para eliminar los abombamientos antiestéticos que pueden formarse en la lona cuando el toldo está abierto. La función se puede utilizar únicamente en los toldos que permiten bloquear la lona en la maniobra de apertura mediante un mecanismo automático de enganche y des- enganche colocado en el tope “1”...
  • Seite 75 5.16 - Borrado total o parcial de la memoria Este procedimiento permite seleccionar en el punto 05 los datos que desea borrar. 5.16.1 - Procedimiento desarrollado con un transmisor memorizado en “Modo I” 01. Mantenga pulsado el botón n y espere a que el motor efectúe 2 movimientos. Cuando finalice el movimiento, suelte el botón. 02.
  • Seite 76: Accesorios Opcionales

    5.17 - Bloqueo y desbloqueo de la memoria Este procedimiento permite bloquear o desbloquear la memoria del motor para impedir la memorización accidental de otros transmisores no previstos en el sistema. 01. Mantenga pulsado el botón n y espere a que el motor efectúe 2 movimientos. Cuando finalice el movimiento, suelte el botón. 02.
  • Seite 77 • Los sensores climáticos no deben considerarse como dispositivos destinados a aumentar la seguridad del toldo frente a condiciones climáticas de lluvia o viento fuerte. Nice declina cualquier responsabilidad por daños materiales verificados a causa de condiciones atmosféricas no detectadas por los sensores.
  • Seite 78 alba día ocaso noche Klux valor configurado intensidad para el umbral: de la luz ej., 30 Klux superior al umbral reducciones momentáne- as de luz, dentro de los histéresis valores de histéresis reducciones de luz dentro de los valores inferiores al inferior al umbral umbral de histéresis: posiciona- umbral...
  • Seite 79 Ejemplo: 1. El toldo está abierto. 2. Empieza a llover... 3. El sistema cierra el toldo automáticamente. 4. Después de unos minutos (sigue lloviendo...), el usuario ejecuta el comando de apertura del toldo. 5. Transcurridos 15 minutos desde que se abre el toldo (sigue lloviendo...), el sistema cierra el toldo automáticamente. 6.
  • Seite 80 Después de 10 segundos, el motor efectúa una serie de movimientos que coinciden con el número del nivel elegido. Nota – De no ser así, anule el procedimiento. De este modo, el ajuste termina sin cambiar el nivel configurado de fábrica. 04.
  • Seite 81 – Todas las características técnicas indicadas se refieren a una temperatura ambien- te de 20 °C (±5 °C). – Nice S.p.a. se reserva el derecho de hacer cambios en el producto siempre que lo q Suministrando alimentación a una fase eléctrica, el motor no se mueve: estime oportuno, pero manteniendo en todo momento la misma funcionalidad y el Excluyendo la posibilidad de que la protección térmica esté...
  • Seite 82: Komplettes Löschen Des Speichers

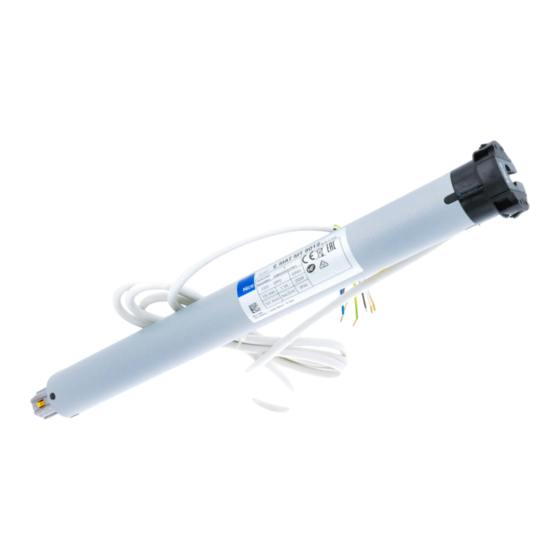
    Kurzanleitung Hinweis • In dieser Schnellanleitung ist die Nummerierung der Abbildungen eigen- ständig und entspricht nicht der im Text des vollständigen Handbuchs aufgeführten Era Mat T Rohrförmiger Motor Nummerierung. • Diese Schnellanleitung ersetzt nicht das ausführliche Handbuch. für Markisen 1 - Elektrische Anschlüsse - siehe Kapitel 4 Kabel Farbe Anschluss...
  • Seite 83: Produktbeschreibung Und Einsatz

    SICHTSMASSNAHMEN FÜR DIE SICHERHEIT die die elektronische Kontrolle der Bewegung und die Genauigkeit der Endschalter gewährleistet; • ist kompatibel mit der gesamten Steuerelektronik Nice (Sender und Klimasenso- • Achtung! – Wichtige Sicherheitsanweisungen: Bewahren Sie diese Hinwei- ren), die das Funksystem NRC anwendet;...
  • Seite 84 Taste hat man 60 Sekunden Zeit, um die nächste für das Verfahren vorge- die gewünschten Modelle zu wählen, lesen Sie im Produktkatalog Nice auf der Web- sehene Taste zu drücken; nach dem Ablaufen dieser Zeit führt der Motor 6 Bewe- seite www.niceforyou.com nach.
  • Seite 85: Übersicht Der Sender

    Für die Speicherung der Tasten eines Senders können zwei untereinander alternative 5.3.1 - Kompatible Sender Modalitäten verwendet werden; diese werden bezeichnet mit: „Modus I” und Lesen Sie im Katalog der Produkte Nice oder auf der Homepage www.niceforyou.com „Modus II”. nach, welche Steuervorrichtungen Nice mit dem im Motor integrierten Funkempfänger kompatibel sind.
  • Seite 86: Sender Zum Einsatz Für Die Programmierungs- Verfahren

    5.4 - Sender zum Einsatz für die Programmierungs- verfahren • Die Programmierungsverfahren können nur mit einem Sender Nice ausge- führt werden, der mindestens über die Tasten s, n, t verfügt. • Die Programmierungsverfahren können nur mit einem im „Modus I“ gespeicherten Sender ausgeführt werden (Paragraph 5.5 oder 5.10.1).
  • Seite 87: Manuelle Einstellung Der Endschalterhöhen Oben („0") Und Unten („1")

    Einstellung der Höhen der Endschalter und der Zwischenpositionen 5.6 - Manuelle Einstellung der Endschalterhöhen Oben („0“) und Unten („1“) Hinweis: – Dieses Verfahren überschreibt die eventuell vorher mit demselben Verfahren eingestellten Höhen mit den neuen Höhen. – Jedes Mal, wenn der Motor mit Strom versorgt wird und in seinem Speicher nicht mindestens ein Transmitter und die Höhen der Endschalter vorhanden sind, werden 2 Bewegungen ausgeführt.
  • Seite 88: Halbautomatische Programmierung Der Endschalter

    5.7 - Halbautomatische Programmierung der Endschalter ACHTUNG! – Diese Programmierung ist für Markisen mit Kasten, d.h. mit Anschlag am oberen Endschalter „0“ bestimmt. Dasselbe Verfahren kann auch angewendet werden, wenn der Anschlag am unteren Endschalter „1“ vor- handen ist. Hinweise: –...
  • Seite 89: Automatische Programmierung Beider Endschalter

    5.8 - Automatische Programmierung beider Endschalter ACHTUNG! – Diese Programmierung ist für Markisen mit Blockierung am Anschlag beider Endschalter („0“ und „1“) bestimmt. Hinweise: – Dieses Verfahren überschreibt die eventuell vorher mit demselben Verfahren eingestellten Höhen mit den neuen Höhen. –...
  • Seite 90: Speichern Eines Zweiten (Dritten, Vierten, Usw.) Senders

    Programmierungen und Einstellungen der Zubehörteile 5.10 - Speichern eines ZWEITEN (dritten, vierten, usw.) Senders Zur Ausführung der Verfahren muss ein bereits gespeicherter („alter“) Sender zur Verfügung stehen. 5.10.1 - Speichern eines zweiten Senders im „Modus I“ Achtung! – Das Verfahren speichert den neuen Sender im „Modus I“, unabhängig davon, in welchem Modus der alte Sender gespeichert wurde. 01.
  • Seite 91: Speicherung Eines Über Funk Angeschlossenen Klimasensors

    5.11 - Speicherung eines über Funk angeschlossenen Klimasensors Zur Ausführung des Verfahrens muss ein bereits im „Modus I“ gespeicherter Sender zur Verfügung stehen. 01. (am Klimasensor) Halten Sie die gelbe Taste für 10 Sekunden gedrückt und lassen Sie sie danach los (auf diese Weise führt der Motor keine Bewegung aus). 02.
  • Seite 92 5.13 - Funktion „FRT“: Automatische Spannung des Stoffes beim Öffnen für Markisen, die nicht mit einem Mechanismus versehen sind, um die offene Markise zu blockieren. Diese Funktion ist nützlich, um unästhetische Wellen des Stoffes zu verhindern, die bei offener Markise auftreten können. Sie wird aktiviert, indem man eine Position „2“...
  • Seite 93 5.14 - Funktion „FTA“: Spannung des Stoffes beim Öffnen, für Markisen mit manuellem Ein- und Aushakmechanismus der offenen Markise Diese Funktion ist nützlich, um unästhetische Wellen des Stoffes zu verhindern, die bei offener Markise auftreten können. Die Funktion kann nur für Markisen benutzt werden, die erlauben, den Stoff in der geöffneten Position mit einem manuellen Ein- und Aushakmechanimus zu blockieren (z.B.
  • Seite 94 5.15 - Funktion „FTC“: Spannung des Stoffes beim Öffnen, für Markisen mit automati- schem Ein- und Aushakmechanismus der offenen Markise Diese Funktion ist nützlich, um unästhetische Wellen des Stoffes zu verhindern, die bei offener Markise auftreten können. Die Funktion kann nur bei Markisen benutzt werden, die erlauben, dass der Stoff beim Öffnen mit einem automatischen Ein- und Aushakmechanismus am Endschalter „1“...
  • Seite 95: Teilweises Oder Vollständiges Löschen Des Speichers

    5.16 - Teilweises oder vollständiges Löschen des Speichers Dieses Verfahren ermöglicht, unter Punkt 05 die Daten auszuwählen, die man löschen möchte. 5.16.1 - Ausführung des Verfahrens mit einem im „Modus I“ gespeicherten Sender 01. Halten Sie die Taste n gedrückt, und warten Sie, bis der Motor 2 Bewegungen ausführt. Am Ende lassen Sie die Taste los. 02.
  • Seite 96: Sperre Oder Freigabe Des Speichers

    5.17 - Sperre oder Freigabe des Speichers Dieses Verfahren erlaubt den Speicher des Motors zu blockieren bzw. freizugeben, um eine zufällige Speicherung von anderen nicht für die Anlage vorgese- henen Sender zu vermeiden. 01. Halten Sie die Taste n gedrückt, und warten Sie, bis der Motor 2 Bewegungen ausführt. Am Ende lassen Sie die Taste los. 02.
  • Seite 97: Klimasensoren Für Wind, Sonne, Regen

    6.4 und 6.3 in dieser Bedienungsanleitung. • Die Klimasensoren sind keine Vorrichtungen, um die Sicherheit der Markise bei Regen oder starken Wind zu erhöhen. Nice entzieht sich jeglicher Haftung bei Materialschä- den, die auf nicht von den Sensoren erfasste Witterungsereignisse zurückzuführen sind.
  • Seite 98 Sonnenaufgang Sonnenuntergang Nacht Klux Eingestellter Grenzwert: z.B. Lichtintensität 30Klux über Grenzwert kurze Verringerung der Lichtintensität innerhalb Hysterese der Hysteresewerte Verringerung der Lichtin- tensität innerhalb der Wer- unter Grenzwert Hysteresegrenze: automatisch te unter dem Grenzwert auf der Hälfte des eingestellten Grenzwertes positioniert “1”...
  • Seite 99: Einstellung Der Empfindlichkeitsstufe Des Windsensors

    Beispiel: 1. Die Markise ist offen. 2. Es beginnt zu regnen... 3. Die Markise wird automatisch vom System geschlossen. 4. Nach einigen Minuten (es regnet weiter...) befiehlt der Benutzer das Öffnen der Markise. 5. 15 Minuten nach dem Öffnen (es regnet noch immer...) wird die Markise automatisch vom System geschlossen. 6.
  • Seite 100 Nach circa 10 Sekunden führt der Motor eine Anzahl von Bewegungen aus, die der Zahl der gewählten Stufe entsprechen. Anmerkung – Wenn dies nicht erfolgt, annullieren Sie das Verfahren. Auf diese Weise endet die Einstellung ohne die werkseitig eingestellte Stufe zu verändern. 04.
  • Seite 101: Hinweise Für Den Täglichen Gebrauch Des Automatismus

    CE-Konformitätserklärung q Beim Befehl des Hochfahrens startet der Motor nicht: Hiermit erklärt Nice S.p.A., dass die Produkte: E Mat ST(...), E Mat MT(...), E Dies kann passieren wenn sich die Markise in der Nähe des Endschalters Oben Mat LT (...) mit den wesentlichen Anforderungen und den weiteren zugehöri- („0“) befindet.
  • Seite 102 Instrukcja skrócona Uwaga dotycząca korzystania z instrukcji • Numeracja rysunków zamieszczonych w niniej- szej instrukcji nie jest taka sama jak numeracja rysunków zamieszczonych w kompletnej Era Mat T silnik rurowy do instrukcji obsługi. • Niniejsza instrukcja nie zastępuje kompletnej instrukcji obsługi. markiz 1 - Podłączenia elektryczne - patrz rozdział...
  • Seite 103 DOTYCZĄCE BEZPIECZEŃSTWA • jest kompatybilne z całym elektronicznym sprzętem sterującym firmy Nice (nadajniki i czujniki klimatyczne), w których zastosowany został system łączności radiowej NRC; • może być sterowane za pomocą fal radiowych lub zwykłego kabla, po zastosowa- •...
  • Seite 104: Podłączenia Elektryczne

    W celu wykonania montażu i podłączenia silnika należy posłużyć się rys. 3. Ponadto 5.1 - Ogólne zalecenia należy zapoznać się z katalogiem produktów firmy Nice lub stroną www.niceforyou.com, • Regulację krańcówek należy wykonywać po zainstalowaniu silnika na rolecie i pod- w celu dobrania adaptera (rys.
  • Seite 105 Konfigurację przycisków na nadajniku można przeprowadzić na dwa różne sposoby, określone jako: „Tryb I” i „Tryb II”. W celu zapoznania się z urządzeniami sterującymi firmy Nice kompatybilnymi z odbiornikiem radiowym wbudowanym w silnik, należy zaznajomić się z katalogiem • „TRYB I” – Tryb ten powoduje automatyczne przypisanie wszystkich poleceń...
  • Seite 106 5.4 - Nadajnik, który należy wykorzystać do proce- dury programowania • Procedury programowania mogą być wykonywane wyłącznie przy użyciu nadajnika Nice, wyposażonego w przynajmniej przyciski s, n, t. • Procedury programowania należy wykonywać wyłącznie przy użyciu nadajnika skonfigurowanego w „Trybie I” (punkt 5.5 lub 5.10.1).
  • Seite 107 Regulacja parametrów krańcówek i wysokości pośrednich 5.6 - Regulacja ręczna wysokości górnej („0”) i dolnej („1”) krańcówki Ostrzeżenie: – Procedura ta pozwala również zastąpić nowymi parametrami ewentualne parametry zapisane uprzednio przy użyciu tej samej procedury. – Za każdym razem, kiedy silnik zostaje zasilony, jeżeli w jego pamięci nie występuje przynajmniej jeden nadajnik oraz nie są ustalone wysokości krańcówek, wykonywane są...
  • Seite 108 5.7 - Programowanie półautomatyczne krańcówek UWAGA! – Programowanie to przeznaczone jest do markiz wyposażonych w skrzynkę, a zatem przy zamknięciu koniec markizy znajduje się w wysokim położeniu krańcówki „0”. Tę samą procedurę można zastosować również wtedy, gdy koniec markizy znajduje się w niskim położeniu krańcówki „1”. Ostrzeżenie: –...
  • Seite 109 5.8 - Programowanie automatyczne obydwu krańcówek UWAGA! Programowanie to przeznaczone jest do markiz z blokadą na końcowym położeniu obydwu krańcówek („0” i „1”). Ostrzeżenie: – Procedura ta powoduje zastąpienie nowymi parametrami ewentualnych parametrów zapisanych uprzednio przy użyciu tej samej procedury. –...
  • Seite 110 Dodatkowe programowanie i regulacje 5.10 - Konfiguracja DRUGIEGO (trzeciego, czwartego itp.) nadajnika Aby wykonać te procedury, należy dysponować już skonfigurowanym nadajnikiem („starym”). 5.10.1 - Konfiguracja drugiego nadajnika w „Trybie I” Uwaga! – Procedura powoduje konfigurację nowego nadajnika w „Trybie I”, niezależnie od trybu, w którym został skonfigurowany stary nadajnik. 01.
  • Seite 111 5.11 - Konfiguracja klimatycznego czujnika radiowego W celu wykonania tej procedury konieczne jest dysponowanie nadajnikiem już skonfigurowanym w „Trybie I” („starym”). 01. (Na czujniku klimatycznym). Przytrzymać wciśnięty żółty przycisk przez 10 sekund, a następnie zwolnić go (w tym przypadku silnik nie wykona żadnego manewru). 02.
  • Seite 112 5.13 - Funkcja „FRT”: automatyczne naprężenie tkaniny podczas otwierania markiz, które nie są wyposażone w mechanizm blokowania markizy podczas otwierania Funkcja ta służy do eliminowania nieestetycznych zagłębień tkaniny, które mogą tworzyć się, kiedy markiza jest otwarta. Uruchamia się ją, ustawiając pozycję „2”...
  • Seite 113 5.14 - Funkcja „FTA”: naprężenie rozpostartej tkaniny dla markiz wyposażonych w ręczny mechanizm zaczepiania i odczepiania otwartej markizy Funkcja ta służy do eliminowania nieestetycznych zagłębień tkaniny, które mogą tworzyć się, kiedy markiza jest otwarta. Tej funkcji można używać w marki- zach pozwalających zablokować...
  • Seite 114 5.15 - Funkcja „FTC”: naprężenie rozpostartej tkaniny dla markiz wyposażonych w automatyczny mechanizm zaczepiania i odczepiania otwartej markizy Funkcja ta służy do eliminowania nieestetycznych zagłębień tkaniny, które mogą tworzyć się, kiedy markiza jest otwarta. Tej funkcji można używać wyłącznie w przypadku markiz pozwalających na blokowanie tkaniny podczas otwarcia markizy, za pomocą mechanizmu automatycznego zaczepiania, umieszczone- go w krańcówce „1”...
  • Seite 115 5.16 - Całkowite lub częściowe kasowanie pamięci Procedura ta umożliwia wybranie w punkcie 05 danych, które mają zostać skasowane. 5.16.1 - Procedura wykonywana za pomocą nadajnika skonfigurowanego w „Trybie I” 01. Przytrzymać przycisk n i zaczekać, aż silnik wykona 2 manewry. Następnie zwolnić przycisk. 02.
  • Seite 116: Urządzenia Dodatkowe

    5.17 - Blokowanie i odblokowywanie pamięci Procedura ta umożliwia zablokowanie i odblokowanie pamięci siłownika w celu uniemożliwienia wykonania przypadkowego wczytania innych nadajników występujących w instalacji. 01. Przytrzymać przycisk n i zaczekać, aż silnik wykona 2 manewry. Następnie zwolnić przycisk. 02. Przytrzymać przycisk s i zaczekać, aż silnik wykona 3 manewry. Następnie zwolnić przycisk. 03.
  • Seite 117 • Czujniki klimatyczne nie powinny być uważane za urządzenia, które zwiększają bezpieczeństwo markiz w czasie deszczu lub silnego wiatru. Firma Nice nie ponosi żadnej odpowiedzialności za straty materialne powstałe w wyniku działania czynników atmosferycznych, które nie zostały wykryte przez czujniki.
  • Seite 118 świt dzień zmierzch Klux ustalona war- intensywność światła tość progowa: słonecznego np. 30 klx powyżej wartości progowej chwilowe zmniejszanie się intensywności światła w histereza zakresie wartości histerezy zmniejszanie się intensyw- poniżej wartości progowej ności światła w zakresie próg histerezy: wyznaczony auto- wartości poniżej progowej matycznie pośrodku ustalonej war- tości progowej...
  • Seite 119 Przykład: 1. Markiza jest otwarta. 2. Zaczyna padać deszcz... 3. Markiza zostaje automatycznie zamknięta przez system. 4. Po kilku minutach (nadal pada deszcz...) użytkownik wydaje polecenie otwarcia markizy. 5. Po 15 minutach od otwarcia (nadal pada deszcz...) markiza zostaje automatycznie zamknięta przez system. 6.
  • Seite 120 4 naciśnięc = 30 klx 5 naciśnięć = 45 klx Po około 10 sekundach silnik wykonuje liczbę manewrów odpowiadającą numerowi wybranego poziomu. Wskazówka – Jeżeli to nie następuje, należy anulować pro- cedurę. W ten sposób regulacja zostaje zakończona bez zmiany ustawionego fabrycznie poziomu. 04.
  • Seite 121 (pomoc w rozwiązywaniu problemów) – Wszystkie podane dane techniczne dotyczą temperatury otoczenia 20 °C (± 5 °C). – Nice S.p.a. zastrzega sobie prawo do wprowadzania zmian w produkcie w dowol- nym momencie. Tym niemniej spółka gwarantuje zachowanie takich samych funkcji i q Po podłączeniu zasilania do jednej fazy elektrycznej silnik nie włącza się:...
  • Seite 122: Elektrische Aansluitingen

    Snelgids Opmerking met betrekking tot raadpleging • In deze Snelgids wordt een autonome numme- ring van de afbeeldingen gehanteerd, die niet overeenkomt met de nummering in de tekst Era Mat T buismotor voor van de volledige handleiding. • Deze gids is geen vervanging van de volledige handleiding.
  • Seite 123 • is compatibel met alle besturingselektronica van Nice (zenders en klimaatsensoren) • Let op! – Belangrijke instructies voor de veiligheid: bewaar deze handlei- die gebruikmaakt van het NRC-radiosysteem;...
  • Seite 124: Elektrische Aansluitingen En Eerste Inschakeling

    60 seconden om de volgende toets in te drukken die van de gewenste modellen raadpleegt u de Nice-productcatalogus, die ook aanwe- door de procedure voorzien is,; anders zal de motor bij het verlopen van de tijdslimiet 6 zig is op de website www.niceforyou.com.
  • Seite 125 Raadpleeg de Nice-productcatalogus of de website www.niceforyou.com voor infor- elke toets aan een specifieke instructie gekoppeld, op basis van het volgende sche- matie over de Nice-bedieningsinrichtingen die compatibel zijn met de radio-ontvan- ger die in de motor is ingebouwd. - toets s (of toets 1): wordt gekoppeld aan de instructie voor Omhoog - toets n (of toets 2): wordt gekoppeld aan de instructie voor Stoppen 5.3.2 - Hiërarchie van de geheugenopslag van de zenders...
  • Seite 126 • De programmeringsprocedures mogen alleen worden uitgevoerd met een Nice-zender die ten minste is voorzien van de toetsen s, n en t. • De programmeringsprocedures mogen alleen worden uitgevoerd met een zender die in “Modus I” in het geheugen is opgeslagen (paragraaf 5.5 of 5.10.1).
  • Seite 127 Afstelling van de hoogten voor de eindaanslagen en tussenliggende hoogten 5.6 - Handmatige afstelling van de hoogten voor de eindaanslagen Boven (“0”) en Onder (“1”) Waarschuwing: – Met deze procedure is het teven mogelijk eventuele hoogten die al eerder zijn afgesteld via dezelfde procedure met nieuwe hoogten te overschrijven. –...
  • Seite 128 5.7 - Semi-automatische programmering van de eindaanslagen LET OP! – Deze programmering is bedoeld voor zonneschermen met behuizing, waarbij dus sprake is van botsing tegen de eindaanslag Boven “0”. Dezelfde procedure is van ook van toepassing in geval van botsing tegen eindaan- slag Onder “1”.
  • Seite 129 5.8 - Automatische programmering van beide eindaanslagen LET OP! – Deze programmering is bedoeld voor zonneschermen met behuizing, waarbij dus sprake is van botsing tegen beide eindaanslagen (“0” en “1”). Waarschuwingen: – Met deze procedure overschrijven de nieuwe hoogten eventuele hoogten die al eerder zijn afgesteld via dezelfde procedure. –...
  • Seite 130 Programmering en afstelling van accessoires 5.10 - Geheugenopslag van een TWEEDE (of derde, vierde, enzovoort) zender Voor de uitvoering van de procedures moet u beschikken over een zender die al in het geheugen is opgeslagen (“oud”). 5.10.1 - Geheugenopslag van een tweede zender in “Modus I” Let op! –...
  • Seite 131 5.11 - Geheugenopslag van een draadloos aangesloten klimaatsensor Voor de uitvoering van de procedure moet u beschikken over een zender die in het geheugen is opgeslagen via “Modus I” (“oud”). 01. (op de nieuwe zender) Houd de gele toets gedurende 10 seconden ingedrukt en laat deze vervolgens los (in dit geval voert de motor geen beweging uit). 02.
  • Seite 132 5.13 - Functie “FRT”: automatische aanspanning van het doek bij opening voor scher- men die niet zijn uitgerust met een mechanisme dat het scherm bij opening blokkeert Deze functie dient ter eliminatie van lelijke verzakkingen in het doek die zich kunnen vormen wanneer het scherm wordt geopend. De functie wordt geacti- veerd door stand “2”...
  • Seite 133 5.14 - Functie “FTA”: automatische aanspanning van het doek bij opening voor scher- men die niet zijn uitgerust met een handmatig mechanisme voor het vast- en loshaken van het scherm bij opening Deze functie dient ter eliminatie van lelijke verzakkingen in het doek die zich kunnen vormen wanneer het scherm wordt geopend. De functie kan alleen wor- den gebruikt bij schermen waarbij blokkering van het doek op de openingsstand mogelijk is via een mechanisme dat handmatig door de gebruiker geplaatst en verwijderd kan worden (bijvoorbeeld de vergrendelingen die aanwezig zijn bij schermen met luifel, bij rolschermen met haken, bij uitvalschermen, enzovoort).
  • Seite 134 5.15 - Functie “FTAC”: aanspanning van het doek bij opening voor schermen die niet zijn uitgerust met een automatisch mechanisme voor het vast- en loshaken van het scherm bij opening Deze functie dient ter eliminatie van lelijke verzakkingen in het doek die zich kunnen vormen wanneer het scherm wordt geopend. De functie kan alleen wor- den gebruikt bij schermen waarbij blokkering van het doek bij opening mogelijk is via een mechanisme voor automatisch vast- en loshaken dat zich bij eind- aanslag “1”...
  • Seite 135 5.16 - Het geheugen volledig of gedeeltelijk wissen Bij deze procedure kunt u bij punt 05 aangeven welke gegevens u wilt wissen. 5.16.1 - Procedure uitgevoerd met een zender die in het geheugen is opgeslagen in “Modus I” 01. Houd de toets n ingedrukt en wacht tot de motor 2 bewegingen heeft uitgevoerd. Laat ten slotte de toets los. 02.
  • Seite 136: Optionele Accessoires

    5.17 - Vergrendeling of ontgrendeling van het geheugen Via deze procedure kunt u het geheugen van de motor vergrendelen of ontgrendelen, om ervoor te zorgen dat er geen andere zenders, die niet voorzien zijn voor de inrichting, onbedoeld in het geheugen worden opgeslagen. 01.
  • Seite 137 • De klimaatsensoren kunnen niet worden beschouwd als inrichtingen ter verhoging van de veiligheid van het scherm in geval van zware regen of wind. Nice wijst elke aan- sprakelijkheid voor materiële schade ten gevolge van atmosferische condities die niet door de sensoren gedetecteerd worden, van de hand.
  • Seite 138 zonsopkomst overdag zonsondergang nacht Klux ingestelde drem- intensiteit pelwaarde: bij- van licht voorbeeld 30Klux boven drempel tijdelijke dalingen van de intensiteit van het licht, binnen hysterese de waarden voor hysterese dalingen van de intensiteit van het licht, onder de onder drempel drempel voor hysterese: auto- drempelwaarde matisch ingesteld op de helft van...
  • Seite 139 Voorbeeld: 1. Het scherm is open. 2. Het begint te regenen... 3. Het scherm wordt automatisch door het systeem gesloten. 4. Na enkele minuten (het regent nog steeds) geeft de gebruiker een instructie voor het openen van het scherm. 5. Na 15 minuten vanaf het moment van openen (het regent nog steeds) wordt het scherm automatisch door het systeem gesloten. 6.
  • Seite 140 4 maal drukken = 30 Klux 5 maal drukken = 45 Klux Na ongeveer 10 seconden voert de motor een aantal bewegingen uit, dat gelijk is aan het gekozen niveau. Opmerking – Als dit niet gebeurt, annuleert u de procedure. Op deze wijze wordt de afstelling beëindigd zonder dat het in de fabriek ingestelde niveau wordt gewijzigd.
  • Seite 141 (probleemoplossingsgids) peratuur van 20°C (± 5°C). – Nice behoudt zich het recht voor om op elk willekeurig moment wijzigingen in het product door te voeren die het bedrijf noodzakelijk acht, waarbij echter hetzelfde q Bij inschakeling van de voeding voor een elektrische fase beweegt de beoogde gebruik en dezelfde functionaliteit gehandhaafd blijven.
  • Seite 142 - Appendix - Appendice - Appendice - Apéndice - Anhang - Załącznik - Bijlage...
  • Seite 143 230V 230V 10 mm...
  • Seite 144 Nice SpA Oderzo TV Italia www.niceforyou.com info@niceforyou.com...

Diese Anleitung auch für:

E mat mtE mat lt

Inhaltsverzeichnis