Regin OPTIGO OP10 Bedienungsanleitung
Vorschau ausblenden
Andere Handbücher für OPTIGO OP10:
Inhaltsverzeichnis
Verfügbare Sprachen
Verfügbare Sprachen
Quicklinks
INSTRUCTION
EN
OPTIGO OP10, OP10-230
i
Read this instruction before installation
and wiring of the product
Consult documentation in all cases where this symbol
is used, in order to find out the nature of the potential
hazards and any actions to be taken
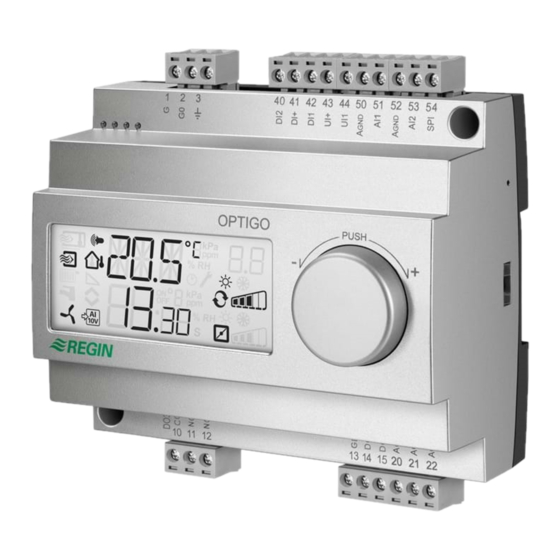
Controller with display
Optigo OP10 is a pre-programmed, configurable controller. It has
10 inputs/outputs and can be configured to control temperature
(ventilation control with heating and cooling), water-heated radiator
heating with outdoor temperature dependent control-curve or
domestic hot water control.
From revision R20, it is possible to connect an external setpoint
device. The device can be used for control modes 1-4.
OP10 is available in two versions, OP10 with 24 V AC supply voltage
and OP10-230 with 230 V AC supply voltage.
All configuration and normal handling is done using the display and
the knob on the front.
Technical data
Supply voltage
OP10-230
230 V AC +10/-15%, 50/60 Hz
OP10
24 V AC ±15%, 50/60 Hz
Power consumption
6 VA
Ambient temperature
0...50°C
Ambient humidity
Max. 95% RH
Storage temperature
-20...70°C
Display
Numeric / graphic. Background
illumination.
Inputs
Refer to connection illustrations and table
below
Terminal blocks
Disconnectable, so-called lift type for cable
cross-section 2.5 mm
Protection class
IP20
Material, casing
Polycarbonate, PC
Weight
OP10-230
370 g incl. terminals
OP10
215 g incl. terminals
Dimensions
122 x 120 x 64 mm (WxHxD incl. terminals)
Overvoltage category
3
Pollution degree
2
Inputs
AI
Resolution: 10 bit A/D
AI1
PT1000-sensor, range 5...80°C
AI2
PT1000-sensor, range -30...+50°C
SPI
PT1000 setpoint device, range 0...40°C
UI
AI
PT1000, range 0...80°C
or DI
Closing potential-free contact
A
Reference for AI
GND
UI+
Reference for UI
DI
Closing potential-free contact
DI+
Reference for DI
Outputs
AO
0...10 V DC; 8 bit D/A short-circuit protected
DO1 and DO2
(OP10)
Triac controlled, 24 V AC, 0.5 A continuous (connected
to G0)
DO1 and DO2
(OP10-230)
Triac controlled, 24 V AC, 0.16 A continuous with
internal trafo (connected to G0)
DO3
Change-over (SPDT) relay 230 V AC, 1000 VA
GDO
Reference for DO1 and DO2. 24 V AC output
OPTIGO OP10
Setpoint values
Supply air
Cascade control, room
Radiator circuit control
(only when using
a room sensor)
External setpoint
Domestic hot water
Neutral zone
P-band
I-time
D-factor
P-band cascade
2
Min. at cascade
Max. at cascade
Damper min. limit
Start of outdoor compens.
Outdoor compensation
at -20°C outdoor temp.
Supply temperature
(water-heated radiator
heating)
at -20°C outdoor temp.
at 20°C outdoor temp.
Frost protection
SP. Shutdown mode
Actuating time,
3-point actuator
Installation
OP10-230 must be installed in a casing (DIN-casing or similar) where
it can be used without risk of electric shock and where it fulfills the
demands for the LVD-standard. See the section Installation in the
"Optigo OP10 Manual", which can be downloaded from www.regin.se.
Disconnection
The controller PO10-230 shall be connected to a switch or circuit
breaker in the building installation. This switch shall be in close prox-
imity to the controller and within easy reach of the operator, and shall
be marked as the disconnecting device for the equipment.
Temperature
Factory setting
10...80°C
21°C
10...50°C
21°C
10...40°C
21°C
0...40°C
10...80°C
55°C
0...10°C
1°C
0...99°C
15°C
0...990 s
60 s
0...99
0
0.5...99°C
15°C
0...99°C
15°C
0...99°C
25°C
0...99 %
10 %
-30...50°C
10°C
-10...10°C
5°C
0...99°C
60°C
0...99°C
20°C
7°C (fixed)
25°C (fixed)
10...300 s
120 s
1
Inhaltsverzeichnis

Verwandte Anleitungen für Regin OPTIGO OP10


Inhaltszusammenfassung für Regin OPTIGO OP10
-
Seite 17: Regler Mit Display
Regler mit Display Abschnitt Installation im “Optigo OP10 Benutzerhandbuch”, welches Referenz für DI unter www.regincontrols.de heruntergeladen werden kann. Optigo OP10 ist ein vorprogrammierter, konfigurierbarer Regler. Er Ausgänge verfügt über 10 Ein-/Ausgänge und kann für die Temperaturregelung Netztrennung 0…10 V DC; 8 bit D/A kurzschlussgeschützt (Lüftungsregelung mit Heizen und Kühlen), Heizkreis mit witterungs-... -
Seite 18: Brauchwarmwasserregelung
Ventilatorausgang ”folgen”, d.h. wird der Ausgang geschlossen, muss AO1 und AO2 auf dem Sollwert gehalten. Ein PI Regelkreis wird auch der Eingang geschlossen sein. verwendet. Der Fühler muss an AI1 angeschlossen sein, selbst wenn nur ein Raumfühler verwendet wird. OPTIGO OP10... -
Seite 19: Das Display-Menüsystem
D-Faktor 10-Sekunden-Menü befinden sich sämtliche Konfigurationsmenüs. In einigen Fällen werden durch bestimmte Eingaben in einem Menü Hinweis: Um das 10-Sekunden-Menü zu erreichen, muss der Regler nicht alle weiteren Menüs gezeigt. bei Drücken den Drehknopfs das Basismenüdisplay anzeigen. OPTIGO OP10... -
Seite 20: Witterungsgeführte Regelung
Für weitere Informationen über das Konfigurationsmenü im Drücken des Knopfes wird hier das Uhren- und Zeitplanmenü verlassen Uhrzeigersinn drehen. Das Basismenü erscheint erneut. 10-Sekunden-Menü, siehe das “Optigo OP10 Handbuch”. Das Hand- und das Basisdisplay wieder angezeigt. buch kann unter www.regincontrols.de heruntergeladen werden. -
Seite 21: Zurücksetzen Auf Werkseinstellungen
DO1 kann nicht als Alarmausgang verwendet werden, wenn die 3-Punkt- wert wird durch Drehen des Knopfes im Uhrzeigersinn angezeigt. Regelung gewählt wurde. Für weitere Informationen zur Alarmbehandlung, siehe “Optigo OP10 Handbuch”. Das Handbuch kann unter www.regincontrols.de herunterge- laden werden. Displaysymbole...