Buffalo HD-WLU3R1 Benutzerhandbuch
Vorschau ausblenden
Andere Handbücher für HD-WLU3R1:
- Handbuch (18 Seiten) ,
- Benutzerhandbuch (153 Seiten)
Inhaltsverzeichnis
Verfügbare Sprachen
Verfügbare Sprachen
EN
USB Hard Drive
HD-WLU3R1
User Manual
Layout ..............................................3
Recommended Usage .....................5
Formatting .......................................9
Maintenance ..................................10
Software .........................................35
Specifications ................................37
1
2
3
4
5
6
Kapitel
Inhaltsverzeichnis
Fehlerbehebung

Verwandte Anleitungen für Buffalo HD-WLU3R1


Inhaltszusammenfassung für Buffalo HD-WLU3R1
- Seite 39 USB-Festplatte HD-WLU3R1 Benutzerhandbuch Layout ..........3 Empfohlene Verwendung ....5 Formatierung ........9 Instandhaltung ......10 Software .........35 Technische Daten ......37...
- Seite 40 Inhalt Layout............3 LEDs.und.Anschlüsse................ 3 Ein-/Ausschalten................4 Empfohlene.Verwendung......5 Warnung................... 5 Bereitstellung.der.DriveStation.aufheben........7 Für Windows ......................7 Für Mac ........................8 Formatieren..........9 VORSICHT..................9 Instandhaltung........10 Backup.................... 10 Bedeutung der Datensicherung ................. 10 Speichermedien für Backups ................
- Seite 41 Software..........35 Installation.der.Software.auf.einem.Windows-PC......35 Optionale.Software................. 36 TurboPC ........................36 TurboCopy ....................... 36 Backup Utility ......................36 RAMDISK Utility ...................... 36 Buffalo Tools Launcher ..................36 eco Manager ......................36 SecureLockMobile ....................36 NovaBackup ......................36 Technische.Daten........37 Technische.Daten................37...
-
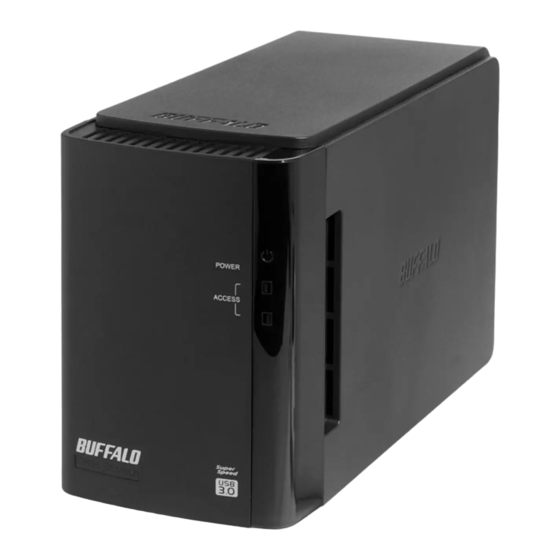
Seite 42: Layout
Layout LEDs und Anschlüsse ① Strom-LED Vorderseite Eingeschaltet: blau RAID-Instandhaltung: violett ② Zugriffs-LEDs ① Diese LEDs zeigen den Status der eingebauten Festplatten an. Die obere LED zeigt den Status von Festplatte 1 und die untere LED den Status von Festplatte 2 an. ②... -
Seite 43: Ein-/Ausschalten
Ein-/Ausschalten Mit dem Strommodus AUTO schaltet sich die DriveStation automatisch mit Ihrem Computer ein und aus, wobei die DriveStation aber auch manuell ausgeschaltet werden kann. Strommodus Dadurch wird der Strom ein- und ausgeschaltet. Auto: Die DriveStation wird zusammen mit Ihrem Computer ein- und ausgeschaltet. -
Seite 44: Empfohlene.verwendung
Empfohlene Verwendung Warnung Um eine Beschädigung Ihrer Daten zu vermeiden, befolgen Sie diese Sicherheitsanweisungen: Konfigurieren Sie das Gerät niemals als Ziel für virtuellen Speicher. Bei blinkender Zugriffs-LED sollten folgende Vorgänge niemals durchgeführt werden: • Entfernen der Kabel • Ausschalten Ihres Computers •... - Seite 45 Windows Server 2003 SP1 oder höher können Sie Arrays mit einer Größe von über 2 TB nutzen. • Enthält Ihre Anti-Virus-Software oder eine andere Sicherheitssoftware eine Software-Firewall, müssen Sie die RAID-Utility (C:\Program Files\BUFFALO\HD-xLU3\RaidUtility.exe) als Ausnahme in die Firewall eintragen. Bei der in Windows enthaltenen Software-Firewall ist das nicht erforderlich. Weitere Informationen darüber, wie Sie Ihrer Software-Firewall eine Ausnahme hinzufügen, erhalten Sie bei...
-
Seite 46: Bereitstellung.der.drivestation.aufheben
• Wird das RAID-Utility ausgeführt, wird unter Umständen ein Fehler angezeigt und die DriveStation kann dann evtl. nicht entfernt werden. In diesem Fall beenden Sie das RAID-Utility, bevor Sie die oben gezeigten Schritte durchführen. Um das RAID-Utility vom Startmenü aus zu beenden, wählen Sie [Alle Programme]-[BUFFALO]-[HD-xLU3]- [RAID Utility[EXIT (Beenden)]]. HD-WLU3 Benutzerhandbuch... -
Seite 47: Für Mac
Für Mac Ziehen Sie das DriveStation-Symbol in den Mülleimer, um die Bereitstellung des Laufwerks aufzuheben. Hinweis: Haben Sie auf der DriveStation mehrere Partitionen erstellt, müssen Sie die Bereitstellung der einzelnen Partitionen aufheben, bevor Sie das Laufwerk entfernen. Die DriveStation kann jetzt sicher von Ihrem Mac entfernt werden. HD-WLU3 Benutzerhandbuch... -
Seite 48: Formatieren
Formatieren VORSICHT NTFS ist für die Verwendung mit modernen Windows-Computern geeignet. Informationen über die Aufteilung der DriveStation in mehrere Partitionen finden Sie unter "Formatieren/Instandhaltung" auf Ihrer Navigator-CD. Wird die DriveStation an eine TeraStation angeschlossen, ist ein mit Linux kompatibles Format erforderlich. Weitere Informationen finden Sie im Benutzerhandbuch der TeraStation. -
Seite 49: Instandhaltung
Instandhaltung Backup Bedeutung der Datensicherung Der Vorgang des Kopierens von Daten auf externe Speichermedien zum Schutz wichtiger und auf einer Festplatte gespeicherten Daten nennt man "Backup". Auf Festplatten mit einer hohen Kapazität wird täglich ein hohes Datenvolumen gespeichert. Der Verlust von Daten aufgrund von Unfällen, menschlichen Fehlern oder eines unerwarteten Ereignisses, kann in einem Geschäftsbetrieb zu beträchtlichen Verlusten führen. -
Seite 50: Fehlerüberprüfung.(Scandisk)
Fehlerüberprüfung (Scandisk) Windows verfügt über ein Programm, das Laufwerke auf Fehler hin überprüft und diese behebt. Um einen zuverlässigen Betrieb sicherzustellen, wird eine regelmäßige Überprüfung des Laufwerks empfohlen. Hinweise: • Weitere Informationen über Scandisk finden Sie in der Windows-Hilfe. • D as Mac OS enthält kein Programm für die Fehlerüberprüfung der Festplatte. Für eine Überprüfung der Festplatte auf einem Macintosh müssen Programme von Fremdanbietern verwendet werden. -
Seite 51: Erstellung.von.raid-Arrays
Erstellung von RAID-Arrays Die 2 internen Festplatten der DriveStation können als ein RAID-Array konfiguriert und somit als Einzelplatte angesprochen werden. Das RAID-Array kann außerdem anhand der folgenden Vorgehensweisen zurückgesetzt und ein Rebuild durchgeführt werden. Hinweise für die Erstellung eines RAID-Arrays •... -
Seite 52: Span-Modus (Ermöglicht Die Verwendung Einer Hochkapazitätsfestplatte)
■ Span-Modus (ermöglicht die Verwendung einer Hochkapazitätsfestplatte) In diesem Modus werden alle 2 Festplatten in einem großen Einzellaufwerk zusammengefasst, wobei die Kapazität der Summe der 2 Einzellaufwerke entspricht. Da die Daten ohne Verteilung auf die Festplatten gespeichert werden, liegt die Zugriffsgeschwindigkeit in etwa bei der eines Einzellaufwerks. Der Span- Modus stellt keinen Mechanismus für den Schutz von Daten bereit. -
Seite 53: Raid 1-Modus (Ermöglicht Die Sichere Speicherung Von Daten)
■ RAID 1-Modus (ermöglicht die sichere Speicherung von Daten) Festplatten werden in gespiegelten Paaren kombiniert. Der nutzbare Speicherplatz entspricht der Kapazität einer einzelnen Festplatte. Alle Daten werden gleichzeitig auf einer einzelnen Festplatte geschrieben. Fällt eine Festplatte eines Paares aus, können alle Daten durch Austausch des Laufwerks wiederhergestellt werden. -
Seite 54: Normalmodus (Ermöglicht Die Verwendung Als 2 Festplatten)
■ Normalmodus (ermöglicht die Verwendung als 2 Festplatten) In diesem Modus werden die Festplatten ohne die Erstellung eines RAID-Arrays verwendet. Die DriveStation wird als 2 Festplatten erkannt und die verschiedenen Daten können auf den einzelnen Festplatten gespeichert werden. • Beispiel für eine Festplattenkonfiguration Konfiguration mit HD-WL2TU3R1: Erkannt als zwei 1 TB Festplatten Daten Daten... -
Seite 55: Installation Des Raid-Utility
Installation des RAID-Utility Das Dienstprogramm wird für die Erstellung eines RAID-Arrays verwendet. Ist das RAID-Utility nicht installiert, installieren Sie es anhand der folgenden Anweisungen. Hinweis: Ist das RAID-Utility bereits installiert, könnend die folgenden Anweisungen ignoriert werden. ■ Windows Legen Sie die Utility-CD in den Computer ein. DriveNavigator wird gestartet. -
Seite 56: Erstellung Eines Raid-Arrays
Geben Sie das Kennwort ein und klicken Sie auf [OK]. Vorsicht Sollten Sie das Kennwort vergessen haben, kann das RAID-Array nicht erstellt werden. Bitte wenden Sie sich an das Buffalo Support Center. ① Geben Sie das Kennwort ein (20 oder weniger alphanumerische Zeichen). - Seite 57 Wählen Sie den RAID-Array, das erstellt werden soll, und klicken Sie auf [Next (Weiter)]. ① Wählen Sie das zu erstellende RAID- Array. ② Klicken Sie auf [Next (Weiter)]. Wählen Sie das Formatierungssystem (nur bei Windows 7/Vista/XP). ① Wählen Sie das Formatierungssystem. ②...
- Seite 58 Sobald "Check again that there is no important data on the target drive. Are you sure you want to proceed? (Prüfen Sie noch einmal, ob sich auf dem Ziellaufwerk wichtige Daten befinden. Möchten Sie wirklich fortfahren?)" angezeigt wird, klicken Sie auf [Yes (Ja)]. Die Erstellung des RAID-Array wird gestartet.
-
Seite 59: Rebuild Oder Zurücksetzen Eines Raid-Arrays
Rebuild oder Zurücksetzen eines RAID-Arrays Für das Rebuild eines RAID-Arrays oder zur Änderung Ihres RAID-Modus gehen Sie anhand der Beschreibung in "Rebuild eines RAID-Arrays" vor. Festlegung eines Kennworts für die RAID-Erstellung Sie können das RAID-Array durch ein Kennwort schützen. Wurde ein Kennwort konfiguriert, muss es bei einer Änderung des RAID-Arrays eingegeben werden. - Seite 60 Klicken Sie auf [Config (Konfigurieren)] und dann auf [Set Password (Kennwort festlegen)]. Klicken Sie auf [Config (Konfigurieren)] und wählen Sie dann [Set Password (Kennwort festlegen)]. Bei bereits festgelegtem RAID-Passwort Wurde bereits ein RAID-Kennwort festgelegt, geben Sie es ein und klicken auf [OK]. Hinweis: Sollten Sie das RAID-Kennwort vergessen haben, kann das RAID-Array nicht geändert werden.
-
Seite 61: E-Mail-Benachrichtigung.(Nur.für.windows)
E-Mail-Benachrichtigung (nur für Windows) Das RAID-Utility kann Sie bei bestimmten Ereignissen per E-Mail benachrichtigen. Sie können das anhand der folgenden Schritte konfigurieren. Hinweis: Das folgende Beispiel zeigt Windows 7. Ihre Bildschirmabbildungen können leicht abweichen. Klicken Sie mit der rechten Maustaste auf das Symbol in der Taskleiste und wählen Sie [Option (Optionen)]. - Seite 62 Beim Auftreten eines der folgenden Ereignisse wird eine E-Mail an die angegebenen Adressen gesendet. ・ Festplattenfehler ・ Lüfterausfall ・ Überhitzung der Festplatte ・ Meldung über Festplattenaustausch ・ Fehler während RAID-Instandhaltungsarbeit Die Konfiguration der E-Mail-Benachrichtigung ist jetzt abgeschlossen. Hinweis: Im Modus Erweitert können Sie auswählen, bei welchen Ereignissen eine E-Mail- Benachrichtigung gesendet wird.
-
Seite 63: Meldungsanzeige.(Nur.für.windows)
Meldungsanzeige (nur für Windows) Das RAID-Utility kann Meldungen wie folgt anzeigen. Die Funktion zur Meldungsanzeige wird wie folgendermaßen eingestellt. Hinweis: Die Bildschirmabbildungen können je nach eingesetztem Betriebssystem abweichen. Klicken Sie mit der rechten Maustaste auf das Symbol in der Taskleiste und wählen Sie [Option (Optionen)]. -
Seite 64: Protokollaufzeichnung.(Nur.für.windows)
Protokollaufzeichnung (nur für Windows) Die Datei "RaidUtility.(*1).(*2).log" wird automatisch in dem Ordner erstellt, in dem das RAID-Utility installiert wurde (das Standard-Installationsverzeichnis lautet C:\Program Files\BUFFALO\HD-xLU3). *1: Eine Zahl für das Datum wird eingefügt. *2: Die Zahlen 0 bis 9 werden eingefügt. -
Seite 65: Raid-Instandhaltungsarbeit.(Nur.für.windows)
RAID-Instandhaltungsarbeit (nur für Windows) Im RAID-Utility kann die Funktion RAID-Instandhaltungsarbeit so eingestellt werden, dass regelmäßig auf Fehler aufgrund defekter Sektoren überprüft werden und diese automatisch behoben werden sollen. Die Funktion RAID-Instandhaltungsarbeit wird wie folgendermaßen eingestellt. Hinweis: Die Bildschirmabbildungen können je nach eingesetztem Betriebssystem abweichen. Klicken Sie mit der rechten Maustaste auf das Symbol in der Taskleiste und wählen Sie [Option (Optionen)]. -
Seite 66: Überprüfung Der Details Von Drivestation Und Festplatte
Hinweise: Die RAID-Instandhaltung wird unter folgenden Bedingungen nicht ausgeführt. ・ Wenn während der letzten RAID-Instandhaltung ein Fehler aufgetreten ist ・ Während des Rebuilds ・ Wenn bereits eine RAID-Instandhaltung ausgeführt wird Ausführungszeitplan für die RAID-Instandhaltung Die verfügbaren Einstellungen für den Ausführungszeitplan der RAID-Instandhaltung werden unten gezeigt. -
Seite 67: Raid-Modus-Taste
RAID-Modus-Taste Der RAID-Modus kann mithilfe der RAID-Modus-Taste geändert werden, die sich an der Rückseite der DriveStation befindet. RAID-Modus-Taste Rückansicht Ändern des RAID-Modus Vorsicht Wenn der RAID-Modus geändert wird, werden alle auf der DriveStation gespeicherten Daten gelöscht. Wenn es sich um wichtige Daten handelt, sollten Sie die Daten unbedingt auf einem Computer oder einem anderen Gerät sichern, bevor Sie die nachfolgend beschriebenen Schritte durchführen. -
Seite 68: Überprüfen Des Raid-Modus
Halten Sie die RAID-Modus-Taste fünf Sekunden lang gedrückt. Es ertönt ein einzelner Piepton, die Zugriffs-LED erlischt, und die Netz-LED blinkt violett, wenn die DriveStation in einen anderen RAID-Modus wechselt. Vorsicht Während die Netz-LED violett blinkt, dürfen Sie die DriveStation weder abschalten noch vom Netz trennen. -
Seite 69: Problembehandlung
ー wiederholende Beseitigen des Staubs nicht beheben lässt, ist der Lüfter Pieptöne möglicherweise defekt. Wenden Sie sich an das Buffalo Technology Support Center. Eine Festplatte hat sich überhitzt. Überprüfen Sie, ob der Lüfter an der Rückseite läuft. Wenn der Lüfter nicht läuft, müssen Sie die DriveStation ausschalten und überprüfen, ob sich im Lüfter Staub... - Seite 70 In der Festplatte ist ein Fehler aufgetreten. Wechseln Ein ca. drei Sie die Festplatte aus, deren Zugriffs-LED leuchtet. Eine Zugriffs-LED Sekunden langer Wenn sich das Problem durch einen Festplattenwechsel leuchtet rot Piepton nicht beheben lässt, überprüfen Sie, ob die Festplatte ordnungsgemäß...
-
Seite 71: Austausch.von.festplatten
Wenn Sie eine Festplatte in diesem Gerät austauschen müssen, erwerben Sie eine neue interne Festplatte von Buffalo, die über die gleiche Kapazität verfügt wie die ausgefallene Festplatte. Ersetzen Sie eine ausgefallene Festplatte nicht durch eine Festplatte, die bereits in einem anderen Produkt oder einem Computer verwendet wurde. -
Seite 72: Austauschen Einer Festplatte
Austauschen einer Festplatte Die Vorgehensweise zum Entfernen einer Festplatte ist unten dargestellt. Führen Sie den Vorgang nach Entfernen der Festplatte in umgekehrter Reihenfolge durch, um eine neue Festplatte zu installieren. Schalten Sie das Gerät aus und entfernen Sie alle verbundenen Kabel. ▲AUTO ▼OFF Drücken Sie in die Einbuchtung auf der linken Seite (von vorne gesehen) und... - Seite 73 Ziehen Sie die ausgefallene Festplatte aus dem Gerät heraus. Setzen Sie eine neue Festplatte in das Gerät ein, bis sie einrastet. Setzen Sie die Frontabdeckung wieder auf, indem Sie den hervorstehenden Teil der Frontabdeckung mit dem Schlitz am Hauptgerät in eine Linie bringen. Schließen Sie die abgesteckten Kabel wieder an und schalten Sie das Gerät ein.
-
Seite 74: Software
Software Installation der Software auf einem Windows-PC Legen Sie die DriveNavigator-CD in das Laufwerk Ihres Computers. DriveNavigator wird automatisch gestartet. Wenn unter Windows die Meldung „Do you want to allow the following program to make changes to this computer? (Möchten Sie zulassen, dass durch das folgende Programm Änderungen an diesem Computer vorgenommen werden?)“... -
Seite 75: Optionale.software
Die Software verwendet einen Teil Ihres Speichers als virtuelle Festplatte. Buffalo Tools Launcher Über Buffalo Tools Launcher können Sie die Software-Utilities von Buffalo auf einfache Weise starten. Klicken Sie einfach auf ein Symbol, um das gewünschte Buffalo-Programm oder -Dienstprogramm zu starten. -
Seite 76: Technische.daten
Technische Daten Technische Daten ※ Aktuelle Informationen und Produkte finden Sie unter www.buffalotech.com. Schnittstelle Übertragungsgeschwindigkeit Max. 5 Gbit/s (USB 3.0) * Max. 480 MBit/s (USB 2.0) Max. 12 MBit/s (USB 1.1) Werkseinstellungen NTFS, RAID 1 Äußere Abmessungen 86 x 127 x 204 mm (exklusive abstehender Teile) Stromverbrauch 36 W (max.)