
Verwandte Anleitungen für Cameo CLPST64TRI3W


Inhaltszusammenfassung für Cameo CLPST64TRI3W
- Seite 1 USER´S MANUAL BEDIENUNGSANLEITUNG MANUEL D´UTILISATION MANUAL DE USUARIO INSTRUKCJA OBSŁUGI MANUALE D‘USO STUDIO PAR 64 CAN 3W TRI LED CAN CLPST64TRI3W...
- Seite 2 Thank you for choosing Cameo Light! We have designed this product to give you reliable operation over many years. Please, take a few moments to read these instructions carefully, as we want you to enjoy your new Cameo Light products quickly and to the fullest.
- Seite 3 STUDIO PAR 64 CAN 3W TRI LED CAN CLPST64TRI3W...
-
Seite 4: Preventive Measures
• If your product fails to function correctly, discontinue use immediately. Pack the unit securely (preferably in the original packing material), and return it to your Cameo dealer for service. • Only use fuses of same type and rating. -
Seite 5: Operating Determinations
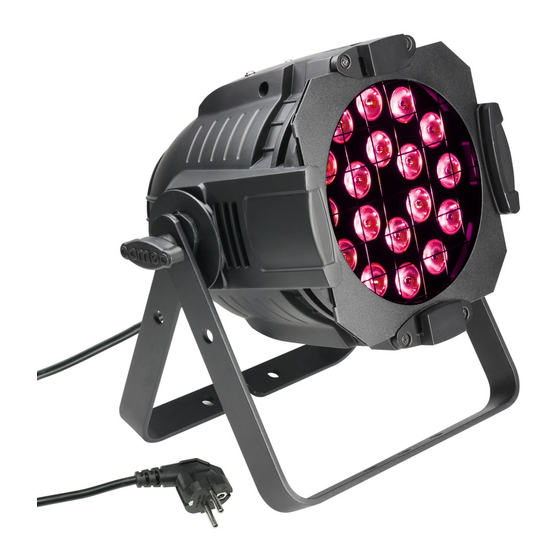
SAFETY: OPERATING DETERMINATIONS If this equipment is operated in any other way, than those described in this manual, the product may suffer damage and the warranty becomes void. Incorrect operation may lead to danger e.g.: short-circuit, burns, electric shocks, lamp failure etc. Do not endanger your own safety and the safety of others! Incorrect installation or use can cause serious damage to people and property. - Seite 6 INTRODUCTION: STUDIO PAR 64 CAN (CLPST64TRI3W) • 6-channel DMX • Individual control of Red, Green and Blue LEDs FEATURES • 18 TRI colour LEDss • Ultra Bright 400Hz flicker free 3W TRI LEDs • Sound control via internal microphone • Colour change speed and strobe effect adjustable via control panel •...
-
Seite 7: Back Panel
BACK PANEL:... -
Seite 8: Mode Selection
MODE SELECTION: STATIC COLOUR MODE Press the “MODE” button to select the Static Colour Mode. “C000”, then press the “ENTER” button to choose one of the static colours using the “UP” and “DOWN” buttons. The “C1” represents Red, “C2” = Green, “C3” = Blue and “CF”... - Seite 9 MODE SELECTION: COLOUR JUMPING MODE Press the mode button to select the Colour Jumping Mode.Press ENTER ( 2. digit blinks ) to select RGB or 7 Colour by using UP and DOWN buttons. Press ENTER ( first 3. and then 4. digit blinks ) again to adjust jumping speed ( 00-99 ) by using UP and DOWN buttons.
- Seite 10 MODE SELECTION: COLOUR FADING MODE Press the mode button to select Colour Fading Mode. Press ENTER ( 2. digit blinks ) to select RGB or 7 Colour by using UP and DOWN but- tons. Press ENTER ( first 3. and then 4. digit blinks ) again to adjust jumping speed ( 00-99 ) by using UP and DOWN buttons.
-
Seite 11: Sound Control Mode
MODE SELECTION: SOUND CONTROL MODE Press the mode button to select Sound Control Mode. The unit will then run via the built in microphone. Press Enter ( 2. digit blinks ) to select RGB or 7 Colour by using UP and DOWN buttons. Press ENTER ( first 3. and then 4. - Seite 12 DMX CONTROL MODE: CHANNEL VALUE FUNCTION 000 - 255 Master dimmer (0-100 %) 000 - 255 RED (0-100%) 000 - 255 GREEN (0-100%) 000 - 255 BLUE (0-100%) 000 - 004 No function 005 - 084 Colour macro 085 - 169 Colour ( speed ) 170 - 255 Colour fade...
-
Seite 13: Dmx Linking
DMX LINKING: DMX-512 DMX (Digital Multiplex) is a universal protocol used as a form of communication between intelligent fixtures and controllers. A DMX controller sends DMX data instructions from the controller to the fixture. DMX data are sent as serial data that travel from fixture to fixture via the “DATA IN“ and “DATA OUT” XLR terminals located on all DMX fixtures (most controllers only have a “DATA OUT”... - Seite 14 DMX CABLES: NOTICE: • Be sure to follow figures 2 & 3 when making your own cables. Do not connect the cable’s shield conductor to the ground lug or allow the shield conductor to come in contact with the XLR’s outer casing. Grounding the shield could cause a short circuit and erratic behaviour.
-
Seite 15: Specifications
SPECIFICATIONS: STUDIO PAR 64 CAN WEIGHT & DIMENSIONS (WITHOUT BRACKET) Depth 255 mm Width 230 mm Height 220 mm Weight 4.6 kg Beam angle 25 ° POWER Power consumption 60 W AC input 100 V AC - 250 V AC . 60Hz - 50Hz FUSE Main 20 mm Glass 0.5 A Fast Blow... -
Seite 16: Manufacturer´s Declarations
MANUFACTURER´S DECLARATIONS: LIMITED WARRANTY This Limited Warranty applies to the Adam Hall, LD Systems, Defender, Palmer, Cameo and Eminence branded products. The statutory warranty rights towards the seller are not affected by this guarantee. In fact, it justifies, additional independent warranty claims towards Adam Hall. -
Seite 17: Limitation Of Liability
MANUFACTURER´S DECLARATIONS: LIMITATION OF LIABILITY If your Adam Hall branded hardware product fails to work as warranted above, your sole and exclusive remedy shall be repair or replacement. Adam Halls’ maximum liability under this limited warranty is expressly limited to the lesser of the price you have paid for the product or the cost of repair or replacement of any hardware components that malfunction in conditions of normal use. -
Seite 18: Weee-Declaration
MANUFACTURER´S DECLARATIONS: WEEE-DECLARATION Your LD-Systems product was developed and manufactured with high quality materials and components wich can be recycled and/or reused. This symbol indicates that electrical and electronic equipment must be disposed of separately from normal waste at the end of its operational lifetime. Please dispose of this product by bringing it to your local collection point or recycling centre for such equipment. - Seite 20 Wir freuen uns, dass Sie sich für ein Produkt von Cameo Light entschieden haben! Dieses Gerät wurde unter hohen Qualitätsanforderungen entwickelt und gefertigt, um viele Jahre einen reibungslosen Betrieb zu gewährleisten. Bitte lesen Sie diese Bedienungsanleitung sorgfältig, damit Sie Ihren neuen Scheinwerfer von Cameo Light schnell optimal einsetzen können.
- Seite 21 STUDIO PAR 64 CAN 3W TRI-LED-STRAHLER CLPST64TRI3W...
-
Seite 22: Sicherheitshinweise
Gerät so lange ausgeschaltet, bis es Zimmertemperatur erreicht hat. • Schalten Sie das Gerät bei Funktionsstörungen sofort aus, verpacken es sorgfältig (vorzugsweise in der Origi- nalverpackung) und übergeben es Ihrem Cameo-Fachhändler zur Überprüfung und/oder Reparatur. • Ersetzen Sie Sicherungen ausschließlich durch Sicherungen gleichen Typs und gleichen Nennwerts. -
Seite 23: Bestimmungsgemässer Betrieb
SICHERHEIT: BESTIMMUNGSGEMÄSSER BETRIEB Verwenden Sie dieses Gerät ausschließlich wie in dieser Bedienungsanleitung beschrieben. Nicht bestim- mungsgemäßer Betrieb kann das Gerät beschädigen und führt zum Garantieverlust. Darüber hinaus kann es bei nicht bestimmungsgemäßem Betrieb zu Gefahren durch Kurzschluss, Verbrennun- gen, elektrischen Schlag, Lampendefekt etc. kommen. Gefährden Sie nicht Ihre Sicherheit und die Sicherheit anderer! Falsche Installation oder Verwendung kann ernsthafte Schäden für Menschen und Geräte nach sich ziehen. - Seite 24 EINFÜHRUNG: STUDIO PAR 64 CAN (CLPST64TRI3W) • 6-Kanal-DMX-Steuerung • Separate Steuerung der roten, grünen und blauen LEDs FEATURES • 18 TRI-Color-LEDs • Ultra-leuchtstarke, flackerfreie 3W-TRI-LEDs (400 • Musiksteuerung über eingebautes Mikrofon • Farbwechselgeschwindigkeit und Stroboskopeffekt über Bedienpanel steuerbar • Multicolor-Farbwechsel •...
- Seite 25 RÜCKSEITE:...
-
Seite 26: Auswahl Betriebsart
AUSWAHL BETRIEBSART: STATISCHE FARBE Drücken Sie die MODE-Taste, um die Betriebsart "Statische Farbe" auszuwählen ("C000"). Bestätigen Sie mit ENTER, und wählen Sie anschließend mittels der Tasten UP und DOWN die gewünschte Farbe aus ("C1" = Rot, "C2" = Grün, "C3" = Blau, “CF” = Stroboskopeffekt). Drücken Sie erneut die ENTER-Taste (es blinkt die 3., danach die 4. - Seite 27 AUSWAHL BETRIEBSART: FARBWECHSEL Drücken Sie die MODE-Taste, und wählen Sie das gewünschte Farbwechselprogramm. Bestätigen Sie mit ENTER (2. Ziffer blinkt), und wählen Sie anschließend mittels der Tasten UP und DOWN den RGB- oder den 7-Farben-Modus aus. Drücken Sie erneut die ENTER-Taste (es blinkt die 3., danach die 4.
- Seite 28 AUSWAHL BETRIEBSART: ÜBERBLENDEN Drücken Sie die MODE-Taste, und wählen Sie die Betriebsart "Überblenden" aus. Bestätigen Sie mit ENTER (2. Ziffer blinkt), und wählen Sie anschließend mittels der Tasten UP und DOWN den RGB- oder den 7-Farben-Modus aus. Drücken Sie erneut die ENTER-Taste (es blinkt die 3., danach die 4.
-
Seite 29: Slave-Modus
AUSWAHL BETRIEBSART: MUSIKSTEUERUNG Drücken Sie die MODE-Taste, und wählen Sie die Betriebsart "Musiksteuerung" aus. Der Scheinwerfer wird nun über das integrierte Mikrofon gesteuert. Bestätigen Sie mit ENTER (2. Ziffer blinkt), und wählen Sie anschließend mittels der Tasten UP und DOWN den RGB- oder den 7-Farben-Modus aus. -
Seite 30: Dmx-Steuerung
DMX-STEUERUNG: KANAL WERT FUNKTION 000 - 255 Master-Dimmer (0-100%) 000 - 255 ROT (0-100%) 000 - 255 GRÜN (0-100%) 000 - 255 BLAU (0-100%) 000 - 004 Keine Funktion zugewiesen 005 - 084 Farb(wechsel)-Makro 085 - 169 Farbwechsel (Geschwindigkeit) 170 - 255 Überblenden 000 - 255 Stroboskop (Geschwindigkeit) -
Seite 31: Dmx-Verbindung
DMX-VERBINDUNG: DMX-512 DMX (Digital Multiplex) ist die Bezeichnung für ein universelles Übertragungsprotokoll, das der Kommunikation zwischen entsprechenden Geräten und Controllern dient. Ein DMX-Controller sendet DMX-Daten an das/die angeschlossene(n) DMX-Gerät(e). Die DMX-Datenübertragung erfolgt stets als serieller Datenstrom, der über die an jedem DMX-fähigen Gerät vorhandenen "DATA IN"- und "DATA OUT"- Anschlüsse (XLR-Steckverbinder) von einem angeschlossenen Gerät an das nächste weitergeleitet wird. - Seite 32 DMX-KABEL: HINWEIS: • Beachten Sie bei der Anfertigung eigener Kabel unbedingt die Abbildungen 2 und 3. Verbinden Sie auf keinen Fall die Abschirmung des Kabels mit dem Massekontakt des Steckers, und achten Sie darauf, dass die Abschirmung nicht mit dem XLR-Steckergehäuse in Kontakt kommt. Hat die Abschirmung Massekontakt, kann dies zu Kurzschlüssen und Systemfehlern führen.
-
Seite 33: Technische Daten
TECHNISCHE DATEN: STUDIO PAR 64 CAN — GEWICHT & ABMESSUNGEN (OHNE HALTERUNG) Tiefe 255 mm Breite 230 mm Höhe 220 mm Gewicht 4,6 kg Abstrahlwinkel 25 ° ELEKTRISCHE DATEN Leistungsaufnahme 60 W Stromversorgung 110 V – 250 V AC, 60 Hz – 50 Hz SICHERUNG Hauptsicherung 0,5 A flink (20-mm-Glasrohrsicherung) -
Seite 34: Herstellererklärungen
HERSTELLERERKLÄRUNGEN: GARANTIEBESTIMMUNGEN Diese Garantie erstreckt sich auf die Marken Adam Hall, LD Systems, Defender, Palmer, Cameo und Eminence. Die gesetzlichen Gewährleistungsrechte gegenüber dem Verkäufer werden von dieser Garantie nicht berührt. Viel- mehr begründet diese Garantie zusätzliche selbständige Ansprüche gegenüber Adam Hall. -
Seite 35: Haftungsbeschränkung
HERSTELLERERKLÄRUNGEN: HAFTUNGSBESCHRÄNKUNG Wenn das unter der Marke Adam Hall vertriebene Produkt nicht entsprechend der obigen Garantie funktioniert, besteht Ihr alleiniger und ausschließlicher Anspruch aus dieser Garantie in der Reparatur oder dem Ersatz. Weitergehende Gewährleistungsansprüche bleiben hiervon unberührt. Die maximale Haftung von Adam Hall im Rahmen dieser Garantie ist ausdrückliche beschränkt auf den jeweils niedrigeren Betrag, der sich entweder aus dem Kaufpreis für das Produkt oder aus den Reparatur- bzw. -
Seite 36: Batterien Und Akkus
HERSTELLERERKLÄRUNGEN: WEEE-DEKLARATION Ihr LD-Systems Produkt wurde unter der Verwendung hochwertiger Materialien und Komponenten die wiedever- wertet oder wieder verwendet werden können hergestellt. Dieses Symbol weist darauf hin, dass elektronische Geräte nicht im normalen Hausmüll entsorgt werden dürfen. Entsorgen Sie dieses Gerät bitte fachgerecht bei einer entsprechenden Stelle für Elektromüll und helfen Sie dabei unsere Umwelt zu schützen. - Seite 38 Nous avons conçu ce produit en vue d'une fiabilité optimale pendant des années. Veuillez prendre quelques instants pour lire attentivement ces instructions - cela vous permettra d'utiliser plus rapidement et de façon optimale votre nouveau produit Cameo Light. Pour plus d'informations sur Cameo Light, visitez notre site Web, WWW.CAMEOLIGHT.COM...
- Seite 39 STUDIO PAR 64 CAN CAN LED 3W TRI CLPST64TRI3W...
-
Seite 40: Mesures Préventives
Laissez l'appareil hors tension jusqu'à ce qu'il se soit mis à la température du local. • Si votre appareil semble ne pas fonctionner correctement, débranchez-le immédiatement. Emballez-le soigneusement (de préférence en utilisant le carton original) et renvoyez-le à votre revendeur Cameo pour réparation. -
Seite 41: Conseils D'utilisation
SÉCURITÉ : CONSEILS D'UTILISATION Si l'appareil est utilisé d'une façon différente de celle décrite dans ce manuel utilisateur, le produit peut subir des dommages, et la garantie sera annulée. Une utilisation incorrecte peut provoquer des dangers, par exemple : court-circuit, brûlures, électrocution, défail- lance de la lampe, etc. - Seite 42 INTRODUCTION : STUDIO PAR 64 CAN (CLPST64TRI3W) • DMX 6 canaux • Contrôle séparé des LED rouges, vertes et bleues CARACTÉRISTIQUES • 18 LED couleur TRI • LED TRI, 3 W, ultra-brillantes, 400 Hz, sans flicker (scintillement) • Commande par le son, grâce à un microphone intégré...
-
Seite 43: Panneau Arrière
PANNEAU ARRIÈRE :... -
Seite 44: Sélection De Mode
SÉLECTION DE MODE : MODE COULEUR STATIQUE : Appuyez sur la touche "MODE" pour sélectionner le mode Static Colour. La mention "C000" apparaît alors. Appuyez ensuite sur la touche "ENTER" pour choisir une des couleurs statiques au moyen des touches "HAUT" et "BAS”. - Seite 45 SÉLECTION DE MODE : MODE SAUT DE COULEUR Appuyez sur le bouton Mode pour sélectionner le mode de saut de couleur. Appuyez sur ENTER (le deuxième chiffre clignote) afin de sélectionner RGB ou 7 Couleurs, via les touches Haut et Bas. Appuyez de nouveau sur ENTER (le 3è...
- Seite 46 SÉLECTION DE MODE : MODE SAUT DE COULEUR Appuyez sur la touche Mode pour sélectionner le mode de contrôle par le son. Appuyez sur ENTER (le 2è chiffre se met à clignoter) puis sélectionnez RGB ou 7 Couleurs via les touches Haut/Bas. Appuyez de nouveau sur ENTER (le 3è...
- Seite 47 SÉLECTION DE MODE : MODE CONTRÔLE PAR LE SON Appuyez sur la touche Mode pour sélectionner le mode de contrôle par le son. L'appareil est alors contrôlé par le son capté par son microphone intégré. Appuyez sur ENTER (le 2è chiffre clignote) pour sélectionner RGB ou 7 Couleurs, via les touches Haut et Bas.
- Seite 48 MODE DE CONTRÔLE DMX : CANAL VALEUR FONCTION CANAL 1 000 - 255 Dimmer Master (de 0 à 100%) CANAL 2 000 - 255 ROUGE (de 0 à 100%) CANAL 3 000 - 255 VERT (de 0 à 100%) CANAL 4 000 - 255 BLEU (de 0 à...
- Seite 49 COUPLAGE DMX : DMX-512 Le DMX (abréviation de Digital Multiplex) est un protocole de communication universel, utilisé entre contrôleurs et appareils d'éclairage. Un contrôleur DMX envoie des données DMX (des instructions) à l'appareil d'éclairage à contrôler. Les données DMX sont envoyées en série, et passent d'un appareil au suivant via les connecteurs XLR "DATA IN"...
- Seite 50 CÂBLES DMX : ATTENTION : • Si vous fabriquez vos câbles vous-même, conformez-vous aux figures 2 et 3. Ne reliez pas le blindage du câble à l'ergot de masse, et ne laissez pas le blindage entrer en contact avec l'extérieur du connecteur XLR. Mettre le blindage à...
-
Seite 51: Caractéristiques
CARACTÉRISTIQUES: STUDIO PAR 64 CAN POIDS & DIMENSIONS (SANS SUPPORT) Profondeur 255 mm Largeur 230 mm Hauteur 220 mm Poids 4,6 kg Angle du faisceau lumineux 25 ° PUISSANCE Consommation 60 W Alimentation secteur 100 V AC - 250 V AC, 60 - 50 Hz FUSIBLE Secteur Verre 20 mm 0,5 A rapide... -
Seite 52: Garantie Limitée
DECLARATIONS DU FABRICANT: GARANTIE LIMITÉE: Cette garantie limitée s’applique aux produits de la marque Adam Hall, LD Systems, Defender, Palmer, Cameo et Eminence. Les droits inhérents à la garantie légale vis-à-vis du revendeur ne sont pas affectés par cette garantie. En fait elle justifie d’une garantie supplémentaire indépendante auprès de la société... -
Seite 53: Declaration De Conformite Ce
DECLARATIONS DU FABRICANT: LIMITATION OF LIABILITY Si votre produit Adam Hall devait ne pas fonctionner correctement, votre seul et unique dédommagement sera la réparation du produit ou son remplacement. La responsabilité maximale imputable à Adam Hall dans le cadre de cette garantie limitée se limite au montant le plus bas. Ce montant découle du prix d’achat du produit ou bien du coût de la réparation ou des pièces de remplacement qui sont tombés en panne dans des conditions d’utilisation normales. - Seite 54 DECLARATIONS DU FABRICANT: DECLARATION WEEE Votre produit LD-Systems a été développé et fabriqué avec des matériaux et des composants de haute qualité, qui peuvent être recyclés et/ou réutilisés. Ce symbole indique que les appareils électriques et électroniques, à la fin de leur durée de vie opérationnelle, doivent être gérés séparément des déchets ordinaires. Veuillez apporter ce produit au point de collecte ou centre de recyclage local prévu pour de tels appareils.
- Seite 56 ¡Gracias por elegir Cameo Light! Este producto se ha diseñado para ofrecer una fiabilidad y durabilidad óptimas. Le rogamos que lea atentamente estas instrucciones para familiarizarse rápidamente con este producto Cameo Light y aprovechar al máximo todas las funciones. Si desea obtener más información sobre Cameo Light, visite nuestro sitio web WWW.CAMEOLIGHT.COM...
- Seite 57 STUDIO PAR 64 CAN FOCO LED TRICOLOR 3W CLPST64TRI3W...
-
Seite 58: Medidas De Seguridad
• Si el equipo no funciona correctamente, deje de utilizarlo. Envuelva el equipo perfectamente protegido dentro de una caja (utilice preferentemente el embalaje original) y devuélvalo a su distribuidor Cameo para su repar- ación. -
Seite 59: Condiciones De Funcionamiento
SEGURIDAD: CONDICIONES DE FUNCIONAMIENTO La utilización de este equipo de manera diferente a la que se describe en este manual podría causar daños en el producto y anular la garantía. De hecho, un funcionamiento incorrecto puede provocar cortocircuitos, quemaduras, descargas eléctricas, fallo del foco, etc. - Seite 60 INTRODUCCIÓN: STUDIO PAR 64 CAN (CLPST64TRI3W) • DMX de 6 canales • Control individual de los LEDs rojos, verdes y azules CARACTERÍSTICAS • 18 LEDs tricolor • LEDs ultrabrillantes tricolor de 3 W, 400 Hz sin parpadeo • Control por sonido mediante micrófono interno •...
-
Seite 61: Panel Posterior
PANEL POSTERIOR:... -
Seite 62: Selección Del Modo
SELECCIÓN DEL MODO: MODO COLOR FIJO: Pulse el botón MODE para seleccionar el modo de color fijo. Cuando aparezca “C000” en la pantalla, pulse el botón “ENTER” y seleccione uno de los colores fijos mediante los botones UP (arriba) y DOWN (abajo). Seleccione “C1”... - Seite 63 SELECCIÓN DEL MODO: MODO CAMBIO DE COLOR Pulse el botón MODE para seleccionar la función de cambio de color.Pulse ENTER (el segundo dígito parpadea) y seleccione RGB o 7 colores mediante los botones UP (arriba) o DOWN (abajo). Pulse ENTER de nuevo (el tercer dígito y luego el cuarto parpadean) y seleccione la velocidad de cambio de color (de 00 a 99) mediante los botones UP (arriba) y DOWN (abajo).
- Seite 64 SELECCIÓN DEL MODO: MODO ATENUACIÓN DEL COLOR (FADE) Pulse el botón MODE para seleccionar el modo de Atenuación del color. Pulse ENTER (el segundo dígito parpadea) y seleccione RGB o 7 colores mediante los botones UP (arriba) y DOWN (abajo). Pulse ENTER de nuevo (el tercer dígito y luego el cuarto parpadean) y seleccione la velocidad de cambio de color (de 00 a 99) mediante los botones UP (arriba) y DOWN (abajo).
- Seite 65 SELECCIÓN DEL MODO: MODO ACTIVACIÓN POR SONIDO Pulse el botón MODE para seleccionar el modo de Activación por sonido. El equipo se activará a través del sonido mediante el micrófono incorporado. Pulse Enter (el segundo dígito parpadea) y seleccione RGB o 7 colores mediante los botones UP (arriba) y DOWN (abajo). Pulse ENTER de nuevo (el tercer dígito y luego el cuarto parpadean) y seleccione la velocidad de cambio de color (de 00 a 99) mediante los botones UP (arriba) y DOWN (abajo).
- Seite 66 MODO CONTROL DMX: CHANNEL VALOR FUNCIÓN 000-255 Atenuador Maestro (0-100 %) 000-255 ROJO (0-100%) 000-255 VERDE (0-100%) 000-255 AZUL (0-100%) 000-004 Sin función 005-084 Mezcla de colores con macro 085-169 Velocidad de cambio de color 170-255 Atenuación del color 000-255 Velocidad del estrobo...
-
Seite 67: Conexión Dmx
CONEXIÓN DMX: DMX-512 DMX (Digital Multiplex) es un protocolo universal utilizado como medio de comunicación entre equipos inteligentes y controladores. Un controlador DMX envía instrucciones de datos DMX al equipo. Los datos DMX se envían como datos serie que se transmiten de equipo a equipo a través de los conectores XLR "DATA IN”... - Seite 68 CABLES DMX: NOTA: • Siga las instrucciones de las figuras 2 y 3 cuando fabrique sus propios cables. No conecte la malla del cable a la toma de tierra ni permita que la malla entre en contacto con la carcasa externa del XLR. La puesta a tierra de la malla puede causar un cortocircuito y un funcionamiento inestable del equipo.
-
Seite 69: Características Técnicas
CARACTERÍSTICAS TÉCNICAS: PESO Y DIMENSIONES DEL STUDIO PAR 64 CAN (SIN SOPORTE) Fondo 255 mm Ancho 230 mm Altura 220 mm Peso 4,6 kg Ángulo de proyección 25° ALIMENTACIÓN ELÉCTRICA Consumo 60 W Tensión de alterna 100 V AC - 250 V AC. 50 Hz - 60 Hz FUSIBLE Tipo 20 mm de vidrio y 0,5 A de acción rápida... -
Seite 70: Declaración Del Fabricante
DECLARACIÓN DEL FABRICANTE: GARANTÍA LIMITADA Esta garantía limitada se aplica a los productos de la marca Adam Hall, LD Systems, Defender, Palmer, Cameo y Eminence. No afecta a los derechos de garantía legal que asume el vendedor. De hecho, le concede al usuario derechos adicionales ante Adam Hall, independientes de la garantía legal. -
Seite 71: Limitación De Responsabilidad
DECLARACIÓN DEL FABRICANTE: LIMITACIÓN DE RESPONSABILIDAD Si su producto Adam Hall no funciona de acuerdo con las garantías mencionadas arriba, tendrá derecho exclusi- vamente a la reparación o sustitución del mismo. La responsabilidad máxima de Adam Hall en virtud de los tér- minos de esta garantía está... - Seite 72 DECLARACIÓN DEL FABRICANTE: DECLARACIÓN SOBRE WEEE Este producto LD-Systems se ha desarrollado y fabricado con materiales y componentes de alta calidad que se pueden reciclar o reutilizar. Este símbolo indica que los equipos eléctricos y electrónicos deben separarse del resto de residuos comunes al final de su vida útil. Para desechar este producto, llévelo al punto de recogida municipal o al centro de reciclaje específico para este tipo de equipos.
- Seite 74 Zaprojektowaliśmy ten produkt tak, aby działał niezawodnie przez wiele lat. Prosimy o dokładne zapoznanie się z niniejszą instrukcją, ponieważ chcemy, abyś szybko mógł cieszyć się w pełni swoim nowym produktem Cemeo Light. Więcej informacji o marce Cameo Light znajduje się na naszej stronie internetowej WWW.CAMEOLIGHT.COM...
- Seite 75 LAMPA STUDIO PAR 64 CAN 3 W TRI LED CAN CLPST64TRI3W...
-
Seite 76: Środki Ostrożności
• Jeśli produkt działa nieprawidłowo, natychmiast zaprzestań jego użytkowania. Należy zapakować urządzenie w sposób zapewniający bezpieczeństwo (najlepiej w oryginalne opakowanie) i przekazać je sprzedawcy urządzeń Cameo w celu przeprowadzenia serwisu. • Używaj wyłącznie bezpieczników tego samego typu i o tej samej wartości znamionowej. - Seite 77 BEZPIECZEŃSTWO: ZALECENIA ZWIĄZANE Z OBSŁUGĄ URZĄDZENIA W przypadku obsługi urządzenia w jakikolwiek inny sposób, niż opisany w niniejszej instrukcji, produkt może ulec uszkodzeniu, zaś gwarancja ulegnie unieważnieniu. Niewłaściwe użytkowanie urządzenia może doprowadzić do sytuacji niebezpiecznych np. zwarcia instalacji elektrycznej, oparzeń, porażenia prądem, uszkodzenia lampy itd. Nie narażać...
- Seite 78 WSTĘP: REFLEKTOR STUDIO PAR 64 CAN (CLPST64TRI3W) • 6-kanałowa funkcja DMX • Niezależne sterowanie diodami czerwonymi, zielonymi i niebieskimi WŁAŚCIWOŚCI • 18 trójkolorowych diod LED • Trójkolorowe diody LED 3 W, 400 Hz o bardzo wysokiej jasności, brak migotania • Sterowanie dźwiękiem z użyciem wbudowanego mikrofonu •...
-
Seite 79: Panel Tylny
PANEL TYLNY:... -
Seite 80: Wybór Trybu
WYBÓR TRYBU: TRYB KOLORU STATYCZNEGO: Przyciskiem „MODE” wybrać tryb statycznego koloru. Po wybraniu „C000” naciśnij przycisk „ENTER”, aby następnie za pomocą przycisków „UP” i „DOWN” wybrać jeden ze statycznych kolorów. „C1” oznacza kolor czerwony, „C2” = zielony, „C3” = niebieski, a „CF” = stroboskop. Wciśnij ponownie „ENTER”... - Seite 81 WYBÓR TRYBU: TRYB ZMIANY KOLORÓW Przyciskiem „Mode” wybierz tryb zmiany kolorów. Wciśnij „ENTER” (2. cyfra zamiga) i za pomocą przycisków „UP” i „DOWN” wybierz tryb RGB lub 7 Colour. Wciśnij ponownie „ENTER” (zamiga najpierw 3. cyfra, a następnie 4. cyfra), aby za pomocą przycisków „UP” i „DOWN”...
- Seite 82 WYBÓR TRYBU: TRYB ZANIKANIA KOLORÓW Przyciskiem „Mode” wybierz Tryb zanikania kolorów. Wciśnij przycisk „ENTER” (2. cyfra zamiga) i za pomocą przycisków „UP” i „DOWN” wybierz tryb RGB lub 7 Colour. Wciśnij ponownie „ENTER” (zamiga najpierw 3. cyfra, a następnie 4. cyfra), aby za pomocą przycisków „UP”...
- Seite 83 WYBÓR TRYBU: TRYB DŹWIĘKOWY Przyciskiem „Mode” wybierz tryb sterowania dźwiękiem. Urządzenie będzie wówczas sterowane za pomocą wbudowanego mikrofonu. Wciśnij „ENTER” (2. cyfra zamiga) i za pomocą przycisków „UP” i „DOWN” wybierz tryb RGB lub 7 Colour. Wciśnij ponownie „ENTER” (zamiga najpierw 3. cyfra, a następnie 4. cyfra), aby za pomocą przycisków „UP”...
- Seite 84 TRYB STEROWANIA DMX: KANAŁ WARTOŚĆ FUNKCJA 000 – 255 Ściemniacz główny (0 – 100%) 000 – 255 CZERWONY (0 – 100%) 000 – 255 ZIELONY (0 – 100%) 000 – 255 NIEBIESKI (0 – 100%) 000 – 004 Niewykorzystane 005 – 084 Efekt colour macro 085 – 169 Kolor (szybkość) 170 – 255 Efekt zanikania kolorów 000 – 255 Stroboskop (szybkość)
- Seite 85 POŁĄCZENIE DMX: DMX-512 DMX (Digital Multiplex – multipleks cyfrowy) jest uniwersalnym protokołem wykorzystywanym do komunikacji pomiędzy inteligentnymi urządzeniami i sterownikami. Sterownik DMX wysyła instrukcje danych DMX do urządzenia. Dane DMX są przesyłane pomiędzy urządzeniami jako dane szeregowe poprzez złącza XLR „DATA IN” i „DATA OUT”, znajdujące się we wszystkich urządzeniach DMX (większość sterowników jest wyposażona tylko w złącze wyjściowe DATA OUT).
- Seite 86 KABLE DMX: UWAGA: • Wykonując własne kable, postępuj zgodnie z rys. 2 i 3. Nie podłączaj ekranu kabla do zacisku uziemienia ani nie pozwól, by ekran ten stykał się z zewnętrzną obudową złącza XLR. Uziemienie ekranu może spowodować zwarcie i nieprawidłowe zachowanie się urządzeń. wspólne Wyjście DMX-512 Wejście DMX-512...
- Seite 87 SPECYFIKACJA: STUDIO PAR 64 CAN: CIĘŻAR I WYMIARY (BEZ UCHWYTU) Głębokość 255 mm Szerokość 230 mm Wysokość 220 mm Waga 4,6 kg Kąt wiązki 25° ZASILANIE Pobór mocy 60 W Parametry wejściowe 100 V AC - 250 V AC, 60 Hz – 50 Hz BEZPIECZNIK Główny Bezpiecznik szybki 20 mm, szkło, 0,5 A STEROWANIE I PROGRAMOWANIE...
-
Seite 88: Deklaracje Producenta
DEKLARACJE PRODUCENTA: OGRANICZONA GWARANCJA Ta Ograniczona Gwarancja dotyczy produktów marek Adam Hall, LD Systems, Defender, Palmer, Cameo oraz Eminence. Niniejsza gwarancja nie wpływa na prawa gwarancyjne wynikające z przepisów lokalnych. Jest to dodatkowa, niezależna gwarancja ze strony firmy Adam Hall. -
Seite 89: Ograniczenie Odpowiedzialności
DEKLARACJE PRODUCENTA: OGRANICZENIE ODPOWIEDZIALNOŚCI Jeśli Twój produkt Adam Hall nie działa prawidłowo, wskazanym i wyłącznym rozwiązaniem jest naprawa lub wymiana. Maksymalna odpowiedzialność firmy Adam Hall w związku z niniejszą gwarancją ogranicza się maksymalnie do kwoty równej cenie zakupu produktu lub kosztom naprawy lub wymiany komponentów sprzętowych, które uległy uszkodzeniu lub nie działają... -
Seite 90: Baterie I Akumulatory
DEKLARACJE PRODUCENTA: DEKLARACJA-WEEE Twój produkt LD Systems został zaprojektowany i wykonany z wysokiej jakości materiałów i komponentów, które można poddać recyklingowi i/lub użyć ponownie. Ten symbol oznacza, że sprzęt elektryczny i elektroniczny należy składować osobno od normalnych odpadów po zakończeniu użytkowania. Prosimy, przekaż... - Seite 92 Questo prodotto è stato progettato per garantire un funzionamento affidabile per molti anni. La invitiamo a dedicare un po' del suo tempo per leggere con attenzione le presenti istruzioni affinché possa sfruttare al meglio e rapidamente il suo nuovo prodotto Cameo Light. Per maggiori informazioni su Cameo Light visiti il sito WWW.CAMEOLIGHT.COM...
- Seite 93 STUDIO PAR 64 CAN LED CAN TRI DA 3 W CLPST64TRI3W...
-
Seite 94: Misure Precauzionali
• Se il dispositivo non funziona correttamente, interrompere immediatamente l'utilizzo. Imballare l'unità in modo sicuro, utilizzando preferibilmente l'imballo originale, e inviarlo al proprio rivenditore Cameo per l'assistenza. • Utilizzare esclusivamente fusibili dello stesso tipo e potenza. -
Seite 95: Condizioni Di Funzionamento
SICUREZZA: CONDIZIONI DI FUNZIONAMENTO Nel caso in cui il dispositivo venga utilizzato in modo diverso da quanto previsto nel presente manuale, il prodotto potrebbe subire danni e la garanzia decadrà. Un utilizzo improprio potrebbe causare pericoli come ad esempio corto circuiti, ustioni, scosse elettriche, guasti alle lampade, ecc. - Seite 96 INTRODUZIONE: STUDIO PAR 64 CAN (CLPST64TRI3W) • DMX a 6 canali • Controllo individuale dei LED rossi, verdi e blu CARATTERISTICHE • 18 LED TRI colorati • LED TRI 3W flicker free da 400Hz ultra luminosi • Controllo del suono tramite microfono interno •...
-
Seite 97: Pannello Posteriore
PANNELLO POSTERIORE:... -
Seite 98: Selezione Delle Modalità
SELEZIONE DELLE MODALITÀ: MODALITÀ COLORE FISSO Premere il tasto "MODE" per selezionare la modalità colore fisso. Apparirà "C000", quindi premere il tasto "ENTER" per scegliere uno dei colori statici utilizzando i tasti "UP" e "DOWN". "C1" corrisponde al rosso, "C2" al verde, "C3"... - Seite 99 SELEZIONE DELLE MODALITÀ: MODALITÀ COLORI CANGIANTI Premere il pulsante MODE per selezionare la Modalità Colori Cangianti. Premere ENTER (la seconda cifra lampeggia) per selezionare RGB o 7 Colori utilizzando i pulsanti UP e DOWN. Premere nuovamente ENTER (la prima, la terza ed infine la quarta cifra lampeggiano) per regolare la velocità...
- Seite 100 SELEZIONE DELLE MODALITÀ: MODALITÀ COLORI IN DISSOLVENZA Premere il pulsante mode per selezionare la modalità colori in dissolvenza. Premere ENTER (la seconda cifra lampeggia) per selezionare RGB o 7 Colori utilizzando i pulsanti UP e DOWN. Premere nuovamente ENTER (la prima, la terza ed infine la quarta cifra lampeggiano) per regolare la velocità...
- Seite 101 SELEZIONE DELLE MODALITÀ: MODALITÀ CONTROLLO DEL SUONO Premere il pulsante mode per selezionare la modalità controllo del suono. Il funzionamento avverrà tramite il microfono integrato. Premere Enter (la seconda cifra lampeggia) per selezionare RGB o 7 Colori utilizzando i pulsanti UP e DOWN. Premere nuovamente ENTER (la prima, la terza ed infine la quarta cifra lampeggiano) per regolare la velocità...
- Seite 102 MODALITÀ DI CONTROLLO DMX: CANALE VALORE FUNZIONE 000 - 255 Varialuce master (dimmer) (0-100%) 000 - 255 ROSSO (0-100%) 000 - 255 VERDE (0-100%) 000 - 255 BLU (0-100%) 000 - 004 Nessuna funzione 005 - 084 Colori macro 085 - 169 Colori (velocità) 170 - 255 Colori in dissolvenza...
-
Seite 103: Collegamento Dmx
COLLEGAMENTO DMX: DMX-512 Il DMX (Digital Multiplex) è un protocollo universale, utilizzato come mezzo di comunicazione tra dispositivi intelligenti e unità di controllo. L'unità di controllo DMX trasferisce i dati DMX contenenti le istruzioni dall'unità di controllo agli apparecchi. I dati DMX vengono inviati in serie e viaggiano da un apparecchio all'altro tramite i connettori XLR di ingresso e di uscita dei dati presenti su tutte le apparecchiature DMX (la maggior parte delle unità... - Seite 104 CAVI DMX: N.B.: • Assicurarsi di seguire le istruzioni riportate nelle figure 2 e 3 quando si procede alla fabbricazione dei propri cavi. Non collegare il conduttore schermato del cavo al capocorda di messa a terra ed evitare che il conduttore schermato venga a contatto con il rivestimento esterno del connettore XLR.
- Seite 105 SPECIFICHE: PESO E DIMENSIONI STUDIO PAR 64 CAN (SENZA SUPPORTO) Profondità 255 mm Larghezza 230 mm Altezza 220 mm Peso 4,6 kg Angolo del fascio 25° ALIMENTAZIONE Assorbimento di corrente 60 W CA in ingresso 100 V AC - 250 V AC, 60Hz - 50Hz FUSIBILE Main vetro 20 mm 0,5 A Fast Blow...
-
Seite 106: Dichiarazioni Del Produttore
GARANZIA DEL PRODUTTORE Le seguenti condizioni di garanzia si applicano ai prodotti dei marchi Adam Hall, LD Systems, LD Premium, Defender, Palmer, Cameo e Eminence. La presente dichiarazione di garanzia non influisce sui diritti di garanzia del produttore previsti dalla legge, ma estende ulteriormente tali diritti anche nei confronti della ditta Adam Hall. -
Seite 107: Limitazionedi Responsabilità
DICHIARAZIONI DEL PRODUTTORE: LIMITAZIONEDI RESPONSABILITÀ Nel caso in cui, durante il periodo di garanzia, i prodotti hardware Adam Hall presentino difetti di materiale o di lavorazione (in base alla dichiarazione di garanzia precedente), il solo ed unico diritto del cliente previsto dalla presente garanzia è... - Seite 108 DICHIARAZIONI DEL PRODUTTORE: DICHIARAZIONE RAEE Il prodotto LD Systems acquistato è stato realizzato tramite l'utilizzo di materiali e componenti di qualità che pos- sono essere riciclati o riutilizzati. Questo simbolo indica che gli apparecchi elettronici non vanno smaltiti assieme ai normali rifiuti domestici indifferenziati. Si prega di smaltire questo apparecchio a norma di legge presso un punto di raccolta per rifiuti elettronici contribuendo così...
- Seite 112 WWW.CAMEOLIGHT.COM Adam Hall GmbH | Daimlerstrasse 9 | 61267 Neu-Anspach | Germany Tel. +49(0)6081/9419-0 | Fax +49(0)6081/9419-1000 web : www.adamhall.com | e-mail : mail@adamhall.com...