Herunterladen Inhalt Inhalt Diese Seite drucken
IMG STAGE LINE DSM-260 Bedienungsanleitung

IMG STAGE LINE DSM-260 Bedienungsanleitung

Digitales lautsprecher - managementsystem
Inhaltsverzeichnis

Werbung

Verfügbare Sprachen

Verfügbare Sprachen

DIGITALES LAUTSPRECHER -
MANAGEMENTSYSTEM
DIGITAL SPEAKER MANAGEMENT SYSTEM
SISTEMA DIGITALE DI MANAGEMENT PER ALTOPARLANTI
DSM-260
INKLUSIVE BEILAGE FÜR
SUPPLEMENT INCLUDED FOR
INCLUSO SUPPLEMENTO PER
DSM-260LAN
BEDIENUNGSANLEITUNG • INSTRUCTION MANUAL • ISTRUZIONI PER L'USO
VEILIGHEIDSVOORSCHRIFTEN • SIKKERHEDSOPLYSNINGER
SÄKERHETSFÖRESKRIFTER • TURVALLISUUDESTA
Best.-Nr. 25.3280
Best.-Nr. 25.4980

Werbung

Inhaltsverzeichnis
loading

Inhaltszusammenfassung für IMG STAGE LINE DSM-260

  • Seite 1 DIGITALES LAUTSPRECHER - MANAGEMENTSYSTEM DIGITAL SPEAKER MANAGEMENT SYSTEM SISTEMA DIGITALE DI MANAGEMENT PER ALTOPARLANTI DSM-260 Best.-Nr. 25.3280 INKLUSIVE BEILAGE FÜR SUPPLEMENT INCLUDED FOR INCLUSO SUPPLEMENTO PER DSM-260LAN Best.-Nr. 25.4980 BEDIENUNGSANLEITUNG • INSTRUCTION MANUAL • ISTRUZIONI PER L’USO VEILIGHEIDSVOORSCHRIFTEN • SIKKERHEDSOPLYSNINGER...
  • Seite 2: Pc-Software Installieren

    Taste ESC (5) abbrechen. managementsystem 6) Bei der Steuerung über die Ethernet-Schnittstelle muss für jedes Das DSM-260LAN ist eine Variante des DSM-260. Es ist im Gegen- Gerät eine eigene IP-Adresse festgelegt werden. satz zum DSM-260 mit einer Ethernet-Schnittstelle anstatt der RS- Den Drehknopf PM1 nach rechts drehen, sodass die IP-Adresse 485-Schnittstelle ausgestattet.
  • Seite 3: System Lock

    2) Unter „Communication Port“ die ge - Hinweis: Das Trennen oder Verbinden ist nicht möglich, solange noch das Konfigurati- wünschte Schnittstelle („USB“ oder onsfenster (z. B. wie Abb. 11 in der Anleitung zum DSM-260) des Gerätes geöffnet ist. „TCP/ IP“) wählen. 6.3.3 Konfigurationsfenster öffnen 3) Wird „USB“...
  • Seite 4: Installing The Pc Software

    5) Press the button ENTER to confirm your selection or press the button ESC (5) to cancel the procedure. The DSM-260LAN is a variant system of the DSM-260. Unlike the 6) For control via the Ethernet interface, a separate IP address must DSM-260, the DSM-260LAN is equipped with an Ethernet interface be defined for each unit.
  • Seite 5 Note: It is not possible to connect or disconnect a data connection as long as the config - 3) If “USB” is selected (as in fig. H), the uration window (e. g. such as shown in fig. 11 of the instruction manual for the DSM-260) serial interface that simulates the driver of a unit is open.
  • Seite 6: Installare Il Software Per Il Pc

    Girare a destra la manopola PM1, in modo che sia visualizzato Il DSM-260LAN è una variante del DSM-260. Contrariamente al lʼindirizzo IP, p. es.: DSM-260 è equipaggiato con un interfaccia Ethernet al posto del - IP = 192.168.000.101 * lʼinterfaccia RS-485. Per il funzionamento vedere le istruzioni del DSM-260 tenendo conto delle seguenti differenze: Il primo numero sta lampeggiando.
  • Seite 7 “TCP/ IP”) N. B.: Staccare o collegare non è possibile mentre la finestra di configurazione (p. es. come in fig. 11 nelle istruzioni del DSM-260) dellʼapparecchio è ancora aperta. 3) Se si sceglie “USB” (come in fig. H), alla voce “COM Select” si deve scegliere 6.3.3 Aprire la finestra di configurazione...
  • Seite 8 DIGITALES LAUTSPRECHER - MANAGEMENTSYSTEM DIGITAL SPEAKER MANAGEMENT SYSTEM SISTEMA DIGITALE DI MANAGEMENT PER ALTOPARLANTI DSM-260 Best.-Nr. 25.3280 BEDIENUNGSANLEITUNG • INSTRUCTION MANUAL • ISTRUZIONI PER L’USO VEILIGHEIDSVOORSCHRIFTEN • SIKKERHEDSOPLYSNINGER SÄKERHETSFÖRESKRIFTER • TURVALLISUUDESTA...
  • Seite 9 Il testo italiano inizia a pagina 40. Før du tænder … Innan du slår på enheten … Vi håber, du bliver glad for dit nye “img Stage Line” pro- Vi önskar dig mycket glädje med din nya “img Stage Line” dukt. Læs sikkerhedsanvisningerne nøje før ibrugtag- produkt.
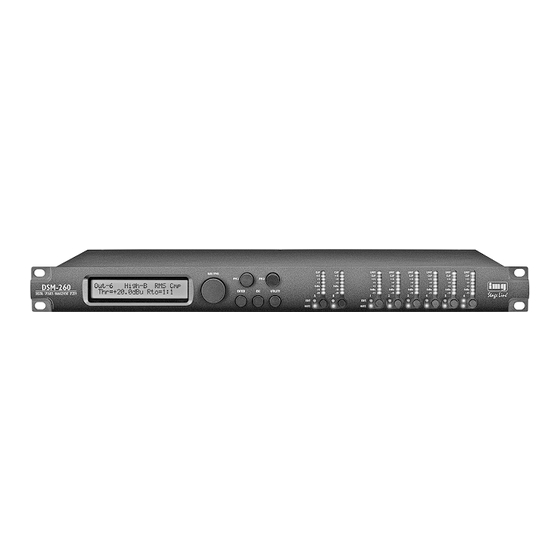
  • Seite 10 Œ 2 3 4 8 9 10  17 18 20 21 Ž...
  • Seite 11: Inhaltsverzeichnis

    Auf der ausklappbaren Seite 3 finden Sie Inhalt alle beschriebenen Bedienelemente und An - Übersicht der Bedienelemente und Fernbedienung über einen Computer 13 schlüsse. Anschlüsse ..... . 4 PC-Software installieren .
  • Seite 12: Rückseite

    Tuch, niemals Wasser oder Signalmasse mit Gehäusemasse verbunden Chemikalien. Das DSM-260 ist für die Montage in einem Rack LIFT (482 mm / 19″) vorgesehen, kann aber auch als Wird das Gerät zweckentfremdet, nicht richtig Signalmasse und Gehäusemasse getrennt frei stehendes Gerät verwendet werden.
  • Seite 13: Computer

    5.2.4 Einheit für Signalverzögerung 5.2 Grundeinstellung (System Utilities) Please Wait..Die Signale aller Ein- und Ausgänge können Die Einstellung des DSM-260 erfolgt über ein Changing Xover individuell verzögert werden. Dies ist z. B. sinn- Menü im Display (1). Der Aufruf des Menüs für Die Ausgänge sind nun entsprechend der...
  • Seite 14: Überblendung Bei Wertänderungen

    Die aktuelle Einstellung wird angezeigt, z. B. Zum Anzeigen der Version der Firmware Um Einstellungen für beide Eingänge gemein- ƊDelay = 100.1040ms (Betriebssoftware des DSM-260): sam durchzuführen, kann zu dem bereits Dabei hängt es vom Untermenü „Delay Units“ angewählten Eingang der andere zusätzlich 1) Mit der Taste UTILITY (6) das Menü...
  • Seite 15: Bypass

    5.3.4.1 Bypass ten Verstärkung/ Ab schwächung; die Steilheit drücken. In der unteren Zeile des Displays beträgt 12 dB/ Oktave. erscheint jetzt z. B.: Mit dieser Funktion kann nur das gewählte Filter umgangen werden. Ƃ Lo-Shelv_Q ƊEdit Frequ = 1000Hz (Low Shelving Filter Q) Symmetrisches Tiefenfilter mit Kuhschwanz - 1) Einen Eingang mit seiner Taste (10) anwäh- Die Frequenz kann jetzt gezielt mit den Dreh-...
  • Seite 16: Eingangssignal Wählen (Source)

    nen geändert werden, um z. B. auf den Ort der Lautsprecher hinzuweisen. 1) Einen Ausgang mit seiner Taste (10) anwäh- len. 2) Mit dem Drehknopf NAV/ PM1 den Menü- Name punkt anwählen und mit der Taste ENTER bestätigen. Der aktuelle Name wird angezeigt, z.
  • Seite 17: Hochpass- Und Tiefpassfilter

    5.4.5 Hochpass- und Tiefpassfilter 5) Bei den Filtercharakteristiken „Custom...“ zur Peaking_Eq Zusätzlich zum Filtertyp ( Einstellung der zusätzlichen Parameter mit wird oben rechts ein Symbol für dessen Cha- Jeder Ausgang verfügt über Hochpass- und Tief- Ƅ dem Drehknopf NAV/ PM1 das Einzelfilter rakteristik angezeigt ( passfilter, die in Kombination primär die Funktion Filt1...
  • Seite 18: Filterparameter Ändern

    ƅ All Pass_1 lässt sich dort die durch den Kompressor verur- 5.4.9 Pegelbegrenzung (Limiter) (All Pass Filter 1) sachte Pegelreduzierung anstelle des Aus- Allpassfilter mit konstantem Amplituden-Fre- Der Limiter dient zur schnellen Begrenzung des gangspegels darstellen ( Kap. 5.4.11). quenzgang und einer Phasendrehung von Signals auf einen eingestellten Pegel.
  • Seite 19: Led-Anzeige (Vu-Meter)

    Ausgang wieder abwäh- System Utilities Es wird angezeigt. Durch die flexiblen Konfigurationsmöglichkei- len. ten des DSM-260 kann z. B. ein Ausgang, der 2) Mit dem Drehknopf NAV/ PM1 (2) den Menü- für die Ansteuerung eines Hochtonlautspre- punkt Security Utilities wählen 5.5 Konfigurationsspeicher...
  • Seite 20: Sperrung Aufheben

    (Gerät nicht gesperrt) Über die mitgelieferte Computer-Software kann wählen und mit der Taste ENTER bestätigen. das DSM-260 fernbedient werden. Wie über das 4) Mit dem Drehknopf PM2 (3) die Einstellung 4) Zum Verlassen des Untermenüs die Taste Menü des Gerätes lassen sich alle Einstellungen ändern auf:...
  • Seite 21: Pc-Software Starten

    Das Symbol zeigt die Stumm- zeigt und das Starten des Steuerprogramms schaltung eines Kanals. ohne Verbindung zu einem DSM-260 (Demo- Durch Klicken auf die Funktionsblöcke in den Modus) angeboten. dargestellten Signalverarbeitungsketten wird auf Durch Klicken auf „Ja“ startet das Pro- Falls es zu Konflikten mit anderen Geräten...
  • Seite 22: Ansicht „Delays

    6.4.2 Ansicht „Delays“ Diese Ansicht ( Abb. 12) bietet eine Übersicht für die Verzögerungseinstellungen aller Ein- und Ausgänge. Zusätzlich werden auch hier die Zuordnungen der Ausgänge zu den Eingängen als Linien dargestellt. Zur Änderung der Verzögerungswerte auf die Pfeile neben den Eingabefeldern klicken: Eine grobe Einstellung mit den Pfeilen über „Adj“, eine Feineinstellung mit den Pfeilen über „Fine“...
  • Seite 23: Klangregelung

    6.4.5 Ansicht eines Ausgangskanals Diese Ansicht ( Abb. 17) bietet eine über- sichtliche Darstellung für alle Parameter des jeweiligen Ausgangs. Bei der Änderung der Werte ist zur Vereinfachung der Eingabe gleicher Werte für mehrere Ausgänge auch eine Kopp- lung der Ausgänge möglich ( Kap.
  • Seite 24: Klangregelung

    „Slope“ die Filtercharakeristik wählen oder „Bypass“, wenn das Filter nicht genutzt wer- den soll (Näheres zur Filtercharakteristik Kap. 5.4.5). 3) Für die Filtercharakteristiken „Custom...“ zur Einstellung der zusätzlichen Parameter auf eine der beiden Schaltflächen „Edit“ klicken. Das Fenster „Edit custom filter High / Low Pass...“...
  • Seite 25: Verstärkung

    Wird gerade die Ansicht für die Zuordnung der Ausgänge zu den Eingängen einen bestimmten Ausgang ( Abb. 17) voreingestellt. Soll das DSM-260 als Frequenz - gezeigt, auch die Schaltfläche für diesen weiche genutzt werden, müssen vor dem Ein- ⑳...
  • Seite 26: Verwaltung Der Konfigurationen

    Computer gespeichert Durch die flexiblen Konfigurationsmöglichkei- Lautsprecherkonstellation über- werden oder sie können z. B. modifiziert und in ten des DSM-260 kann z. B. ein Ausgang, der einstimmt. das Gerät zurückübertragen werden. Zudem für die Ansteuerung eines Hochtonlautspre- Durch die flexiblen Konfigurationsmöglichkei- können bis zu 64 Konfigurationen als Projekt...
  • Seite 27: Konfigurationen Als Projekt Verwalten

    Project list, are you sure?“ das Vorhaben 6.9.5.5 Projekt aus dem Gerät laden bestätigen oder den Vorgang abbrechen. Um den gesamten Konfigurationsspeicher des DSM-260 als Projekt in den Computer zu laden: 8) Vor dem Schließen des Fensters „Store Pro- ject“ unbedingt...
  • Seite 28: Gerät Mit Passwort Sperren

    Zur Vermeidung von Brummstörungen durch Frequenzbereich: ..20 – 20 000 Hz im Fenster „Password“ ( Abb. 26) mit der Masseschleifen ist das DSM-260 mit zwei Mas- ±1 dB linken Schaltfläche das Gerät sperren oder setrennschaltern ausgestattet.
  • Seite 29: Overview Of The Operating Elements And Connections

    All operating elements and connections de - Contents scribed can be found on the fold-out page 3. Overview of the Operating Elements Remote Operation via a Computer . . 31 and Connections ....22 Installing the PC software .
  • Seite 30: Rear Side

    Prior to connecting or changing existing connec- to 6 as XLR jacks 3. The wire which is coloured brown must be tions switch off the DSM-260 and the units to be connected to the terminal which is marked connected. 23 Balanced audio signal inputs INPUT 1 and 2 with the letter L or coloured red.
  • Seite 31: Amplifier

    5.2 Basic setting (System Utilities) To spare the user the trouble of calculating The DSM-260 is adjusted via a menu in the dis- The outputs are now assigned to the inputs the delay time of the sound, the delay can alter- play (1).
  • Seite 32: Fading Over In Case Of Value Changes

    (10). 5.2.6 Displaying the firmware version To display the version of the firmware (operating software of the DSM-260): 1) Call the menu with the button UTILITY (6). System Utilities is shown.
  • Seite 33: Bypass

    5.3.4.1 Bypass The level at the adjustable cut-off frequency 4) Adjust the frequency with the rotary knob is 3 dB below/above the adjusted gain/atten- NAV/ PM1. A change is effective immediately. This function allows to bypass the selected filter. uation; the slope is 12 dB / octave. For faster frequency changes, press the but- 1) Select an input with its button (10).
  • Seite 34: Selecting The Input Signal (Source)

    2) Use the rotary knob NAV/ PM1 to select the Name menu item and confirm with the button ENTER. The present name is shown, e.g. ƊName = Low-A The first character of the name flashes. 3) Use the rotary knob PM2 to change the flash- ing character.
  • Seite 35: High Pass And Low Pass Filters

    5.4.5 High pass filter and low pass filter 5) To adjust the additional parameters for the fil- Input-A EQ-1 Ƅ ter characteristics “Custom…” use the rotary ƊByp=Off Type=Peaking_Eq Each output has a high pass filter and a low pass knob NAV/PM1 to select the individual filter filter which as a combination primarily achieve Peaking_Eq In addition to the filter type (...
  • Seite 36: Changing Filter Parameters

    ƀ HighPass_Q compressor is shown by the LED LIMIT of the 5.4.9 Level limitation (Limiter) (High Pass Filter Q) output indication (12). In addition, it is possible to high pass filter with variable quality factor The limiter allows to quickly limit the signal to an show the level reduction caused by the com- adjusted level.
  • Seite 37: Led Indication (Vu-Meter)

    Show Parameter 3) Confirm the menu item selected first. of the DSM-260, e. g. an output configured for with the button ENTER. controlling a tweeter may become the bass fre- 4) Use the rotary knob PM2 (3) to define if the quency output after loading another configura- 5.5 Configuration memory...
  • Seite 38: Unlocking The Unit

    Computer 4) To exit the submenu, press the button ESC. Password : Disable The DSM-260 may be remotely operated via the (unit not locked) 5.6.3 Locking the unit with a password supplied computer software. All adjustments can...
  • Seite 39: Starting The Pc Software

    Click the functional blocks in the signal pro- start of the control programme without con- cessing chains presented to switch over to a nection to a DSM-260 (Demo mode) is view in which the respective adjustment may be offered. changed.
  • Seite 40: View "Delays

    6.4.2 View “Delays” This view ( fig. 12) offers an overview of the delay adjustments of all inputs and outputs. In addition, the assignments of the outputs to the inputs are shown as lines. To change the delay values, click the arrows next to the input fields: Make a coarse adjust- ment with the arrows above “Adj”, a fine adjust- ment with the arrows above “Fine”.
  • Seite 41: Sound Control

    6.4.5 View of an output channel This view ( fig. 17) offers a clearly arranged presentation for all parameters of the correspon- ding output. When changing the values, it is pos- sible to link the output channels to facilitate the input of the same values for several output chan- nels ( chapter 6.4.6).
  • Seite 42: Sound Control

    2) To adjust the low pass filter, enter the cut-off frequency in the field “Frequency [Hz]” under “Low Pass filter” and from the list “Slope” select the filter characteristic or “Bypass” if the filter is not to be used (details about the fil- ter characteristic chapter 5.4.5).
  • Seite 43: Gain

    To link the outputs: preadjusted. For using the DSM-260 as a 1) At the lower edge of the window under “Out- crossover network, always adapt the filters to the put Linked” click the buttons of all outputs...
  • Seite 44: Administration Of The Configurations

    Prior to loading a configuration in speaker constellation connected. be read from the memory of the DSM-260 and any case check if it corresponds to be saved on the computer or they can e. g. be...
  • Seite 45: As A Project

    Up to 64 configurations (i. e. all memory loca- locked against accidental misadjustment. This is 1) Click the button “Store Project”. The window tions of the DSM-260) may be combined as proj- also possible via the control programme: “Store Project” opens ( fig.
  • Seite 46: Locking The Unit With A Password

    To separate the connection between the PC Frequency Range: ..20 – 20 000 Hz window “Password” ( fig. 26), lock the unit software and a DSM-260, click the following but- ±1 dB with the left button or unlock it. ton.
  • Seite 47: Elementi Di Comando E Collegamenti

    A pagina 3, se aperta completamente, Indice vedrete tutti gli elementi di comando e i col- Elementi di comando e collegamenti 40 6.1.1 Installare il driver USB ... . 49 legamenti descritti.
  • Seite 48: Lato Posteriore

    Per la riparazione rivolgersi sempre ad unʼof- 16 Sezionatore di massa MAIN per i contatti ficina competente. Il DSM-260 è previsto per il montaggio in un rack audio: (482 mm / 19″), ma può essere usato anche Staccare il cavo rete afferrando la spina, come apparecchio sistemato liberamente.
  • Seite 49: Collegamento Alla Rete

    3. stati. Se il DSM-260 deve essere usato come fil- mare con il tasto ENTER. tro di frequenza, prima dellʼimpiego si devono 4) Con la manopola PM2 (3) decidere se i valori 5.2.1 Configurazione campione...
  • Seite 50: Visualizzare La Versione Del Firmware

    5.2.6 Visualizzare la versione del firmware Per visualizzare la versione del firmware (sistema operativo del DSM-260): 1) Con il tasto UTILITY (6) aprire il menù. System Utilities Si vede 2) Per aprire questo sottomenù premere il tasto ENTER (4).
  • Seite 51: Bypass

    5.3.4.1 Bypass Con la frequenza di taglio regolabile, il livello Per poter effettuare più velocemente notevoli è di 3 dB sotto / sopra il guadagno / lʼattenua- modifiche di frequenza, premere il tasto Con questa funzione si può escludere solo il fil- zione impostati;...
  • Seite 52: Scegliere Il Segnale Dʼingresso (Source)

    2) Con la manopola NAV/ PM1 scegliere la voce Name del menù e confermare con il tasto ENTER. Sarà visualizzato il nome attuale, p. es. ƊName = Low-A Il primo carattere del nome lampeggia. 3) Con la manopola PM2 modificare il carattere lampeggiante.
  • Seite 53: Filtri Passa-Alto E Passa-Basso

    5.4.5 Filtri passa-alto e passa-basso 5) Nelle caratteristiche dei filtri “Custom...”, per Peaking_Eq Oltre al tipo del filtro ( ), in alto lʼimpostazione dei parametri supplementari, a destra è visualizzato un simbolo per la sua Ogni uscita dispone di filtri passa-alto e di filtri Ƅ...
  • Seite 54: Modificare I Parametri Dei Filtri

    ƅ All Pass_2 2) Le impostazioni del compressore sono suddi- 5.4.9 Limitazione del livello (Limiter) (All Pass Filter 2) RMS Cmp. visi fra tre voci del menù Con la Filtro all-pass con risposta in frequenza con Il limiter serve per effettuare una rapida limita- manopola NAV/ PM1 sceglierne il primo e ampiezza costante e con sfasamento di 180°...
  • Seite 55: Indicazione Con Led (Vu-Meter)

    Vu-Meter del menù e confermare con il [Enter] to Overwrite (indicazione: Per cancellare dalla memoria del DSM-260 una tasto ENTER. con il tasto ENTER (oppure interrompere la configurazione non più necessaria: Sarà visualizzata lʼimpostazione attuale, procedura con il tasto ESC).
  • Seite 56: Annullare Il Blocco

    Lock Unit Tramite il software per computer in dotazione è Password : Disable 2) Premere il tasto ENTER (4). possibile il telecomando del DSM-260. Come (apparecchio non bloccato) Lock : 3) Con la manopola PM2 (3) scegliere per mezzo del menù dellʼapparecchio, si pos- 4) Con la manopola PM2 (3) cambiare lʼimpo-...
  • Seite 57: Avviare Il Software Per Pc

    è messo su muto. offerto lʻavvio del programma di gestione Cliccando sui blocchi funzionali nelle catene senza collegamento ad un DSM-260 (modo di elaborazione, si passa alla visualizzazione Demo). che permette la modifica della relativa imposta- Cliccando su “Si”, il programma si avvia...
  • Seite 58: Visualizzazione "Delays

    6.4.2 Visualizzazione “Delays” Questa visualizzazione ( Fig. 12) offre una panoramica sulle impostazioni del ritardo di tutte le uscite e di tutti gli ingressi. In più, anche qui le assegnazioni fra uscite ed ingressi sono rappre- sentate come linee. Per modificare i valori di ritardo, cliccare sulle frecce vicino ai campi dʼinput: eseguire unʼimpostazione grossolana con le frecce sopra “Adj”, e un ʻimpostazione fine con le frecce sopra...
  • Seite 59: Regolazione Toni

    6.4.5 Visualizzazione di un canale dʼuscita Questa visualizzazione ( Fig. 17) offre una chiara panoramica di tutti i parametri della rela- tiva uscita. Modificando i valori, per semplificare la digitazione di valori uguali per più uscite, è possibile anche un accoppiamento delle uscite Cap.
  • Seite 60: Regolazione Toni

    2) Per impostare il filtro passa-basso, con “Low Pass filter” digitare la frequenza di taglio nel campo “Frequency [Hz]” e dallʼelenco “Slope” scegliere la caratteristica del filtro, oppure “Bypass”, se il filtro non deve essere usato (per i particolari sulla caratteristica dei filtri Cap.
  • Seite 61: Guadagno

    Linked” cliccare sui pulsanti di tutte le uscite i zione delle uscite agli ingressi sono preimpo- cui parametri devono essere impostati nello stati. Se il DSM-260 deve essere usato come fil- stesso modo. Se si vede in quel momento la ⑳...
  • Seite 62: Gestione Della Configurazione

    ATTENZIONE Prima di caricare una configura- ria del DSM-260 per essere memorizzate su un collegati. zione, controllare assolutamente computer, oppure possono essere modificate e Grazie alle possibilità flessibili di configura- se la stessa è compatibile con la essere riportate nellʼapparecchio.
  • Seite 63: Gestire Le Configurazioni Come Progetto

    “Delete from Project List”. Nella finestra Per caricare lʼintera memoria delle configura- “Delete Program from the Project list, are you zioni del DSM-260 come progetto in un compu- sure?” che si apre confermare lʼintenzione o ter: interrompere la procedura.
  • Seite 64: Bloccare Lʼapparecchio Con Una Password

    Per escludere ronzii in seguito ad anelli di Gamma passante: ..20 – 20 000 Hz 1) Dopo la digitazione della password corretta massa, il DSM-260 è equipaggiato con due ±1 dB nella finestra “Password” ( Fig.
  • Seite 65: Veiligheidsvoorschriften

    Lees aandachtig de onderstaande veiligheids- voorschriften, alvorens het toestel in gebruik te ne men. Mocht u bijkomende informatie over de bediening van het toestel nodig hebben, lees dan de En gelse tekst van deze hand lei ding. Veiligheidsvoorschriften Dit apparaat is in overeenstemming met alle ver- 2.
  • Seite 66: Säkerhetsföreskrifter

    Läs igenom säkerhetsföreskrifterna innan enhe- ten tas i bruk. Ytterligare information återfinns på övriga språk i manualen. Säkerhetsföreskrifter Enheten uppfyller samtliga Eu-direktiv och har Rengör endast med en mjuk och torr trasa, därför försett med symbolen an vänd aldrig kemikalier eller vatten vid ren- göring.
  • Seite 67 ® MONACOR INTERNATIONAL GmbH & Co. KG • Zum Falsch 36 • 28307 Bremen • Germany © Copyright by MONACOR INTERNATIONAL. All rights reserved. A-1224.99.02.09.2011...

Inhaltsverzeichnis