WolfVision VZ-27plus Bedienungsanleitung
Vorschau ausblenden
Andere Handbücher für VZ-27plus:
- Bedienungsanleitung (2 Seiten) ,
- Bedienungsanleitung (25 Seiten)

Verwandte Anleitungen für WolfVision VZ-27plus


Inhaltszusammenfassung für WolfVision VZ-27plus
- Seite 19 Inspections, tests and evaluation according to UL 60950. CSA 22.22-60950 Inspections, tests and evaluation according the CB-Scheme Das professionelle WolfVision Visualizer-System wurde von WolfVision in Österreich entwickelt. Patente (Auszug): US 5027219, FRG 3833908, CH 678576. Gedruckt in Österreich, September 2005...
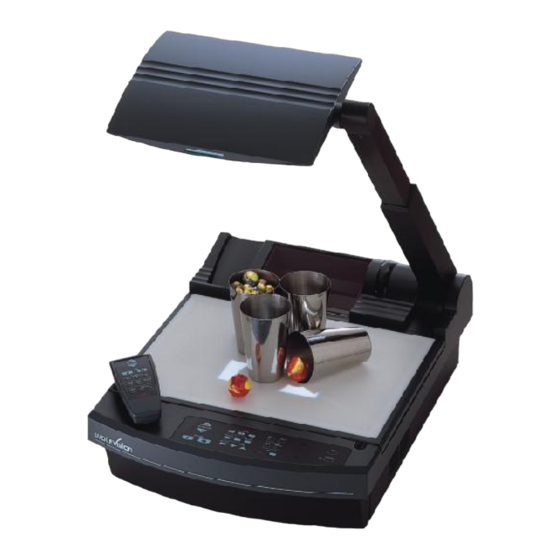
- Seite 20 #1 Arm #2 unterer Spiegel (Umlenkspiegel) #3 oberer Spiegel (Abtastkopf) #4 Bedienfeld #5 Synchronisiertes Lichtfeld (Oberlicht) #6 Fernbedienung #7 Lüftung, Abluft #8 Lüftung, Zuluft #9 Arbeitsplatte mit eingebauter Lichtbox (abnehmbar) #10 Anschlüsse an der Rückseite (siehe Seite 11 und 12) #11 Abdeckung für Lampenwechsler unter der abnehmbaren Lichtbox (siehe Seite 10)
-
Seite 21: Funktionsweise Des Visualizers
Arbeitsfläche immer wenn der Anwender den Zoombereich der Kamera ändert. Das Abtast- und Beleuchtungssystem ist ein weltweit eingetragenes Patent von WolfVision. INBETRIEBNAHME DES VISUALIZERS 1. Netzkabel am Gerät (#35) anstecken und am Netz anschließen. 2. Wenn Sie einen Kontroll-Monitor anschließen möchten, verwenden Sie bitte folgende Anschlüsse: Computer Monitor: Preview RGB Ausgang (#39) Video Monitor: Y/C (S-Video) Ausgang (#43) oder Composite Video Ausgang (#44). -
Seite 22: Arbeiten Auf Der Arbeitsfläche
LIGHT-Taste (#21) abgeschaltet werden um nur mit Raumlicht arbeiten zu können. ARBEITEN AUSSERHALB DER ARBEITSFLÄCHE Um mit dem WolfVision Visualizer 3-dimensionale Gegenstände zu zeigen, legen Sie diese einfach auf die Arbeitsfläche und regeln ZOOM und FOKUS wie beschrieben. Der Gegenstand kann aufgrund eines WolfVision-Spezialobjektives eine Höhe von bis zu 25cm haben. -
Seite 23: Auto Iris / Manuelle Iris
Daher ist es nicht notwendig die FOCUS-Tasten (#19) zu verwenden wenn nur mit flachen Objekten (Texte, Fotos, etc.) gearbeitet wird. Darüber hinaus ist es aufgrund der extrem hohen Tiefenschärfe der WolfVision Visualizer nur sehr selten notwendig, die Bildschärfe (Fokus) nachzustellen. -
Seite 24: Arbeiten Mit Overheadfolien
LICHTBOX / LASERPOSITIONIERPUNKT Die LIGHT-Taste (#21) schaltet um zwischen: "Oberlicht" (mit synchronisiertem Lichtfeld) "Lichtbox" mit Laserpositionierpunkt "Licht aus" Laser- positionier- Die Lichtbox sollte für dunkle, durchsichtige Vorlagen, wie z.B. punkt Röntgenbilder und Dias verwendet werden. Der Gebrauch der Lichtbox hat den Nachteil, dass das synchronisierte Lichtfeld des Oberlichtes nicht mehr den Aufnahmebereich der eingebauten Kamera angibt. - Seite 25 Monitor. Der neue Weißabgleich wird automatisch registriert und bleibt auch nach Ausschalten der Hauptstromversorgung erhalten. PRESET FUNKTION WolfVision Visualizer bieten die Möglichkeit drei fixe Einstellungen für die folgenden Funktionen zu speichern: Zoom, Fokus, Iris, Text, Makro, Weißabgleich, Spiegelposition*, Positiv/Negativ und Schwarz/Weiß. Mit den 3 PRESET-Tasten (#14) kann die jeweilige Einstellung gespeichert und abgerufen werden.
-
Seite 26: Usb-Anschluss
Die Software ist voll Twain kompatibel. Der USB 2.0 Anschluss ist auch voll kompatibel zu USB 1.1 (geringere Geschwindigkeit). Das USB-Programm von WolfVision befindet sich auf der mitgelieferten CD-ROM. Auf der WolfVision Homepage finden Sie möglicherweise unter www.wolfvision.com/support schon eine neuere Version von diesem Programm als Gratis-Download. -
Seite 27: Negativ, Negativ/Blau Und Schwarz/Weiss
ON-SCREEN MENÜ / ON-SCREEN HILFE Für normale Standard Verwendung des WolfVision Visualizers ist es nicht nötig im On-Screen Menü Einstellungen vorzunehmen. Unerfahrene Anwender sollten hier keine Änderungen durchführen. Durch Drücken der MENU-Taste (#23) für 1 Sekunde erscheint das On-Screen Menü. In diesem Menü... -
Seite 28: Infrarot-Fernbedienung
INFRAROT FERNBEDIENUNG Bitte beachten Sie, dass eine IR-Fernbedienung nur bis zu einer gewissen Distanz zum Gerät einsetzbar ist. Gegenstände, welche die Sichtverbindung zwischen Fernbedienung und Visualizer verstellen, sowie schwache Batterien beeinträchtigen die Steuerung. Wenn der Visualizer nur noch aus nächster Nähe bzw. überhaupt nicht mehr zu steuern ist, müssen meist nur die Batterien ersetzt werden. - Seite 29 ANSCHLÜSSE FUSE T3,15A Video PREVIEW RS-232 EXTERN IN S-VIDEO #33 Hauptnetzschalter #39 PREVIEW RGB Ausgang für Vorschau-Monitor #34 Sicherung (siehe Seite 13) #40 RGB Ausgang 15-Pol (siehe unten) #35 Netzanschluss #41 EXTERNER Eingang für Computer (siehe Seite 8) #36 DVI Ausgang (siehe unten und Seite 13) #42 RGB Ausgang BNC-Stecker (siehe unten) #37 USB Anschluss (siehe Seite 8) #43 PAL/NTSC S-Video (Y/C) Ausgang (siehe Setie 12)
-
Seite 30: Pal / Ntsc Video Ausgang
Spezielle Hinweise zur Widescreen Unterstützung Widescreen wird ab Firmware Version 1.20a unterstützt (Ältere Geräte benötigen möglicherweise ein Firmware Update hierfür). Bitte beachten Sie, dass die Widescreen Unterstützung zur 100%igen Kompatibilität zu allen auf dem Markt erhältlichen Bildschirmen / Projektoren entwickelt wurde. Das Original- Bildformat der Visualizer Kameras ist jedoch 4:3. -
Seite 31: Sicherungen Wechseln
Gerätes sich nur wenig auf die Bildqualität auswirkt, da er sich außerhalb des Schärfe- bereiches befindet. Der obere Spiegel (#3) muss jedoch immer sauber gehalten werden! Den Spiegel sanft mit dem mitgeliefertem WolfVision Reinigungstuch säubern. Normalerweise reicht eine Trockenreinigung (ggf. zusammen mit Anhauchen) (Falls nicht, so benutzen Sie bitte einen speziellen Optikreiniger!) Bitte beachten: Schalten Sie das Gerät vor Beginn der Reinigung aus, damit auch der Laserpositionier-... -
Seite 32: Technische Daten
Ugradebare Firmware ja (Updates downloadbar von www.wolfvision.com) inkludiert auf der CD-ROM (für Windows 98/ME/2000/XP und Macintosh, Twain kompatibel, USB Software mögliche Formate: TIF, JPG und BMP, Updates verfügbar auf www.wolfvision.com) Lichtquelle Standard Halogen-Lamp (12V/100W), 3200 Kelvin (konstantes Lichtspektrum) Automatischer Lampenwechsler... - Seite 33 TRANSPORT WICHTIG Mirror protection Um Transportschäden am Spiegel zu verhindern, ist es sehr wichtig, dass der mitgelieferte Spiegelschutz beim Transport immer verwendet wird. Falls er nicht mehr vorhanden ist, legen Sie ersatzweise unbedingt weiches Material zwischen Spiegel und Arbeitsfläche !!! Bitte vergewissern Sie sich, dass Sie den Visualizer genau nach nachstehender Anleitung in die mitgelieferte Box einpacken.
- Seite 34 FERNBEDIENUNG: ZOOM MIRROR PRESETS IMAGE TURN BEDIENFELD AM VISUALIZER: FOCUS IRIS EXT/INT LIGHT TEXT EXT / INT MEMORY FREEZE WHITE HELP MENU POWER CODES Presets speichern: Drücken Sie eine der PRESET-Tasten (#14) für 2 Sekunden. Bilder speichern: Drücken Sie eine der MEMORY-Tasten (#31) für 2 Sekunden (auf der Fernbedienung). Durch Drücken der FREEZE-Taste (#17) für 2 Sekunden, wird ein Bild im nächsten freien Bildspeicher (1-9) gespeichert.
- Seite 36 E-Mail to technical support: support@wolfvision.com American distribution: WolfVision USA East Inc., 3950 Shackleford Road, Suite 450, Duluth (near Atlanta), GA 30096 / USA Tel. (770) 931-6802 and 1-877-873WOLF, Fax: (770) 931-6906, E-Mail: usa.east@wolfvision.net WolfVision Inc., 1601 Bayshore Highway, Suite 302, Burlingame, CA 94010 / USA Toll free: (800) 356-WOLF, Tel: (650) 648-0002 Fax: (650) 648-0009 , E-Mail: usa.west@wolfvision.net...