urmet domus 1093 Bedienungsanleitung
Vorschau ausblenden
Andere Handbücher für 1093:
- Gebrauchsanleitung (128 Seiten) ,
- Bedienungsanleitung (104 Seiten) ,
- Schnellanleitung (58 Seiten)

Verwandte Anleitungen für urmet domus 1093


Inhaltszusammenfassung für urmet domus 1093
- Seite 1 Mod. 1093 DS1093-027 DVR 4 CH H.264 MIT VGA-ANSCHLUSS Typ 1093/004 H.264 4CH WITH VGA DVR REF. 1093/004 BEDIENUNGSANLEITUNG INSTRUCTIONS...
-
Seite 2: Inhaltsverzeichnis
DEUTSCH INHALT ALLGEMEINE INFORMATIONEN ......................4 PRODUKTBESCHREIBUNG ....................4 1.1.1 ALLGEMEINE MERKMALE..........................4 ÖFFNEN DER VERPACKUNG....................4 1.2.1 VERPACKUNGSINHALT ..........................4 WARNHINWEISE........................5 1.3.1 STROMVERSORGUNG..........................5 1.3.2 SICHERHEITSHINWEISE..........................5 1.3.3 VORSICHTSMASSNAHMEN BEI DER INSTALLATION................5 1.3.4 REINIGUNG DES GERÄTS ..........................5 1.3.5 FESTPLATTE (HARD DISK) ........................... - Seite 3 LOGIN NETVIEWER ......................35 HAUPTANSICHT DES NETVIEWER..................35 7.3.1 MENÜ ................................36 7.3.1.1 Live................................36 7.3.1.2 Replay .................................36 7.3.1.3 Setup ................................36 7.3.1.4 Informationen ..............................38 7.3.1.5 Logout .................................38 7.3.2 PTZ KONTROLLE ............................38 7.3.3 LIVE KONTROLLFUNKTIONEN ........................38 NACHTRAG; ACTIVE X INSTALLATION ................39 DS1093-027...
-
Seite 4: Allgemeine Informationen
Heben Sie diese Gebrauchsanleitung sorgfältig und an einem leicht zugänglichen Ort auf, damit Sie sie bei Bedarf umgehend konsultieren zu können. PRODUKTBESCHREIBUNG Der Urmet Domus 1093/004, Baureihe DVR DVS, ist ein digitaler Triplex-Videorecorder mit Ethernet-Schnittstelle, mit dem die Bilder mehrerer Kameras auf der internen Festplatte aufgezeichnet und gleichzeitig "live" oder als Einzelkamera-Aufzeichnung am Monitor wiedergegeben werden können. -
Seite 5: Warnhinweise
Im Reparaturfall sollten Sie alle wichtigen Daten abspeichern, bevor Sie das Gerät zum Kundendienst bringen. URMET Domus S.p.A. übernimmt keinerlei Haftung für den eventuellen Verlust gespeicherter Daten. Der Einbau einer zusätzlichen Festplatte darf ggf. nur durch einen qualifizierten Fachmann oder nach Rücksprache mit dem Kundendienst erfolgen. -
Seite 6: Bildaufzeichnungen
Schäden haftbar gemacht werden. Führen Sie vor Inbetriebnahme des Geräts eine Probeaufzeichnung durch, um zu überprüfen, ob die Aufzeichnung fehlerfrei erfolgt. Beachten Sie, dass URMET Domus S.p.A bei Verlusten oder Schäden, die auf eine falsche Überwachungseinstellung, Fehlbedienung, unsachgemäßen Betrieb oder Fehlfunktion des Geräts zurückzuführen sind, nicht für den eventuellen Verlust gespeicherter Daten haftbar gemacht werden kann. -
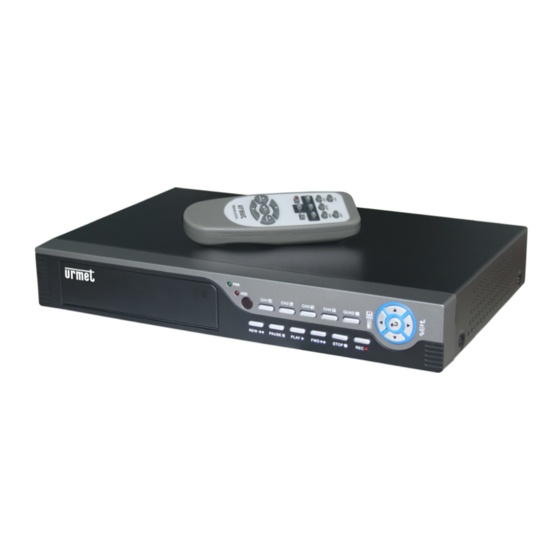
Seite 7: Gerätebeschreibung
GERÄTEBESCHREIBUNG FRONTSEITE Geschlossene Klappe H.264 4CH Digital Video Recorder BEDIEN- BESCHREIBUNG /ANZEIGEELEMENT Power LED: Zeigt an, dass das Gerät mit einer Spannung versorgt wird. HDD LED: Zeigt an, dass die Festplatte im Einsatz ist (schreiben/lesen). IR-Sensor: IR-Empfänger für die von der Fernbedienung übertragenen IR-Signale. Taste CH1: Die Taste zeigt im Live-, Play- und Recordmodus die Bilder der Kamera 1 im Vollbildmodus an. - Seite 8 Taste ▼: Die Taste verschiebt im Konfigurationsmenü den Cursor nach unten. Taste ◄ MENU/ESC: Die Taste gestattet den Zugriff und das Verlassen des Konfigurationsmenüs. ↵: Taste .Die Taste gestattet den Zugriff auf das Pop-Up-Menü. Geöffnete Klappe Um die Frontklappe zu öffnen, muss ein leichter Druck auf das Symbol "▲” ausgeübt werden. PARTICOLARE DESCRIZIONE Lade der ausziehbaren Festplatte: Die Lade enthält das Videobildspeichermedium.
-
Seite 9: Rückseite
RÜCKSEITE PARTICOLARE DESCRIZIONE Schalter zum Ein- / Ausschalten. Netzstecker: Den in der Lieferung enthaltenen Adapter für die Versorgung des verwenden. BNC-Verbindung Videoausgang: BNC-Verbinder an den der Monitor angeschlossen wird. BNC-Verbindung Videoeingang Kanal 1 / 2 / 3 / 4: BNC-Verbinder an den die Kameras angeschlossen werden (Wellenwiderstand 75 Ω). - Seite 10 USB-Port: USB-Anschluss der in der Lieferung enthaltenen Maus. RCA-Audioeingang: Steckbuchse für den Anschluss der Audioquellen 1-4 (RCA) RCA-Audioausgang: Audioausgang für den Anschluss an z. B Monitore (RCA) Klemmleiste RS485/Sensor/Alarm • Pin 1: RS-485- • Pin 2: RS-485+ • Pin 3-4: Eingangssensor 1 (Polarität programmierbar) •...
-
Seite 11: Ir-Fernbedienung
IR-FERNBEDIENUNG Die Fernbedienung des Gerätes ist so ausgelegt, dass eine maximale Stabilität und optimale Funktionalität gewährleistet werden kann, bei ihrer Benutzung müssen jedoch einige Vorsichtsmaßnahmen beachtet werden. So sollte man vermeiden: Sie Regen auszusetzen, Flüssigkeiten auf die Tastatur zu gießen oder sie ins Wasser fallen zu lassen. Starke Stöße oder das Herunterfallen auf harte Oberflächen. -
Seite 12: Mausfunktionen
MAUSFUNKTIONEN 1 - Linke Maustaste 2 - Mittlere Taste / Scroll-Taste 3 - Rechte Maustaste Abbildung 1: Maus und Maussteuertasten (Beispieldarstellung) Im gesicherten Modus wird nach Zugriff auf das Hauptmenü and nach Auswahl eines Untermenüs, das Login-Menü angezeigt; Im ungesicherten Modus gelangt man ohne Passwortabfrage direkt in ein Untermenü. -
Seite 13: Systemstart Dvr
SYSTEMSTART DVR EINSCHALTEN Betätigen des Schalters auf der Rückseite des Gerätes. Die LED auf der Vorderseite des Gerätes beginnt zu leuchten und folgendes Startbild erscheint auf dem Monitor Das System bootet und startet die Initialisierung. HAUPTBILDSCHIRM Nach Beendigung der Syteminitialisierung erscheint die Hauptansicht auf dem Monitor. -
Seite 14: Konfiguration Des Dvr
KONFIGURATION DES DVR POPUP MENÜBILD Nach der Systeminitialisierung, öffnet sich durch Betätigung der rechten Maustaste die Ansicht des Pop Up Menüs. Jetzt können die Parameter für das Hauptmenü, Videosuche, PTZ, Aufzeichnungsstart, Aufzeichnungsstopp und die Navigation nach erfolgreicher PTZ Angaben usw. eingestellt werden. STRUKTUR HAUPTMENÜ... -
Seite 15: Hauptmenü
HAUPTMENÜ Nach Betätigung der rechten Maustaste wird das Pop Up Menü auf dem Bildschirm dargestellt. Durch Auswahl des Menüpunktes [Haupt Menü] öffnet sich die Ansicht des Hauptmenüs. Bei Nutzung der Taste MENU auf der Frontseite des DVR gelangt man ebenfalls in diese Ansicht, wenn die Tastatur weiter genutzt wird, können durch die Tasten FWD und REW die Untermenüpunkte aufgerufen und durch die Taste EDIT ausgewählt werden. -
Seite 16: Privat Zone
PRIVAT ZONE Privat Zonen (bis zu 4 Bereiche pro Kanal) können über die Auswahl ON/OFF freigegeben oder gesperrt werden. Es besteht die Möglichkeit für alle 4 Kameras bis zu je 4 Privatzonen einzurichten. Über das Auwahlfeld “EINSTELLUNG” werden die Zonen dann in Größe und in der Positionierung eingerichtet. -
Seite 17: Aufnahmeeinstellungen
4.2.2 AUFNAHMEEINSTELLUNGEN Klicke [HAUPTMENÜ] [AUFNAHME] um ins Menü [EINSTELLUNG FILM] zu gelangen (siehe Abb.) Funktionen: 1: Das Feld [AUFN. ART] erlaubt die Aufnahme 24h, durch Bewegung oder nach Zeitplan. 2: Das Feld [AUFNAHME GRÖSSE] gibt die maximale Länge des aufzuzeichnenden Videos an (15, 30, 45, 60 min). Das Menü... -
Seite 18: Einstellungen Netzwerk
4.2.3 EINSTELLUNGEN NETZWERK Klicke [HAUPTMENÜ] [NETZWERK] um ins Menü [EINSTELLUNG NETZWERK] zu gelangen (siehe Abb.) Nach Einstellung des Netzwerkmodus – wie DHCP, PPPoE, Vergabe der statischen Eingaben und Einstellung der Web-Ports kann der DVR über das Netzwerk aufgerufen werden. Bei Auswahl DHCP, empfängt der DVR seine IP-Adresse automatisch aus dem Netzwerk. Bei Auswahl von PPPoE, sollten die Angaben zu Ports, PPPoE Name und Passwort vorhanden sein (Zugangsdaten erhalten Sie von Ihrem Internet-Provider). -
Seite 19: Suche Video
Wird der Zugriff des DVR über das Internet beötigt, sollte der Videoport an der öffentlichen Adresse des DVR eingestellt werden. 4.2.4 SUCHE VIDEO Klicke [HAUPTMENÜ] [SUCHE VIDEO] um ins Menü [SUCHE VIDEO] zu gelangen. Suche einer Aufnahme: Wenn ein spezifisches Datum eingegeben und mit dem Feld [SUCHE] bestätigt wurde, zeigt die Suchmaske alle gefundenen Aufzeichnungen an. -
Seite 20: Multimedia Player
Sicherung einer aufgezeichneten Videodatei Wird die Sicherung einer aufgezeichneten Videodatei gewünscht, muss diese ausgewählt und durch Betätigen des Feldes [SICHERUNG] auf dem Datenträger gespeichert werden. Wenn die Sicherung beendet ist erfolgt ein Hinweis. Bitte auf das Feld [OK] drücken und die Sicherung ist abgeschlossen. Erklärung: •... - Seite 21 (2).Durch anklicken des Menüfeldes am unteren Bildrand, erscheint die Funktionsleiste des Multimedia Players: Datum: Datumsanzeige der Aufzeichnung des Videos auf rechter Seite der Funktionsleiste . (24H) Aufzeichnungszeit: Unter dem Datum befindet sich die Stundenanzeige der wiedergegebenen Videodatei. 0~60 Minuten, Aufzeichnungszeit: Der grüne Balken zeigt die Minutenanzeige der wiedergegebenen Videodatei an. Befehlsfelder Wiedergabe vorwärts Alle Fenster...
-
Seite 22: Gerätemanagement
5. Audioeinstellungen (Die Einstellungen stehen erst nach Neustart des Multimedia Players zur Verfügung). Setting Audio Channel Setting Normal Video Bar. Auswahl des Kanals welcher wiedergegeben werden soll Auswahl The cannel has sound data und mit OK betätigen Nach erfolgreicher Einstellung kann, wenn das Video abgespielt wird, der Ton zeitgleich mit dem Video wiedergegeben werden. 4.2.6 GERÄTEMANAGEMENT Die Optionen im Gerätemanagement beinhalten HDD Management,... -
Seite 23: Einstellungen Alarm
4.2.6.2 Einstellungen Alarm Klicke [Hauptmenü Geräte Management ALARM] um ins Menü [EINSTELLUNGEN ALARM] zu gelangen. UNTERSCHEIDUNG ALARMSIGNALISIERUNG Es besteht die Möglichkeit jedes Ereignis zu aktivieren oder zu deaktivieren (Bewegungserkennung, Alarmeingang, Video- Signalverlust, HDD Voll oder HDD Fehler) und folgende Signaltypen zu zuweisen: •... -
Seite 24: Einstellung E-Mail
4.2.6.3 Einstellung E-Mail (zum Senden einer E-Mail wenn eine Bewegungserkennung ausgelöst wurde) Anklicken des Feldes [E-MAIL] und [EIN] auswählen SSL – ist ein Security Link Transport Protokoll. Sie können damit Ihre Kommunikationsinformationen (inkl. der E-Mail) verschlüsseln, um einen Schutz gegen Hacker beim Öffnen der E-Mail oder der Informatioen und gegebenenfalls Ihres Passwortes zu gewährleisten. -
Seite 25: Einstellung Ptz
4.2.6.4 Einstellung PTZ Durch Auswahl [Hauptmenü Verwaltung Gerät PTZ] kann jeder Kanal mit dem PTZ-Protokoll (Pelco-D oder Pelco-P), der Baud Rate (1200, 2400, 4800, 9600), dem Stop Bit (1, 2), dem Parity Check (None, Odd, Even Mark Space), dem Address Code and dem Status der Navigation angepasst werden. - Seite 26 3. Auswahl des Speicherortes und anklicken des Feldes [Install] (rot markiert in Abb. 3) um die Installation zu starten (siehe Fortschrittanzeige in Abb. 4). Abb. 6 Abb. 5 Abb. 4 4. Nach erfolgreicher Installation, anklicken des Feldes mit dem Namen QQeye (rot markiert in Abb. 5) um das Programm zu starten.
- Seite 27 Beim Zugriff über ein Mobiltelefon mit dem Betriebssystem Symbian bitte wie folgt vorgehen: 1. Installation am Mobiltelefon Als erstes benötigen sie das Programm für das Mobiltelefon, welches auf der CD die dem DVR beiliegt abgespeichert ist. Kopieren Sie die Datei “QQeye.SISX” auf das Mobiltelefon. 2.
- Seite 28 Open Abb.10 Abb.12 Abb. 11 Default Access Point: Auswahl der Verbindung auf den Zugriffspunkt. Werkseinstellung GPRS-Verbindung Server Address: Öffentliche IP-Adresse von dem der DVR verwaltet wird (z. B.Routeradresse). Server Port: Entspricht dem Port des DVR im Untermenü MOBILTELEFON, dieser wird zum Weiterleiten an den DVR benötigt, Einstellungsbereich zwischen 1024 and 65535, Werkeinstellung ist 18600.
-
Seite 29: Bewegungserfassung
4.2.6.7 Bewegungserfassung Anklicken [Hauptmenü Verwaltung Gerät BEWEGUNG] um in das Menü der Aufzeichnung bei Bewegung [Bewegungserkennung] zu gelangen. Die Bewegungserkennung beinhaltet drei Bereiche, Kanal Status, Sensibilität und Einstellung Zone. Kanal STATUS: Diese Option ermöglicht die Freigabe der Bewegungserkennung für jeden Kanal. SENSIBILITÄT: Diese Option ermöglicht die Einstellung der Sensibiltät der Bewegungserkennung mit den Werten von 1 bis 4, wobei 4 die größtmögliche Sensibiltät darstellt... -
Seite 30: Video
Ist das Passwort “EIN”, kann ein Nutzer-Passwort und das Administrator- Passwort festgelegt werden. Die Passwortabfrage unterstützt bis zu 6 Zeichen. BEACHTEN: Der DVR kann maximal 2 Nutzerpasswörter verwalten Das Standard-Administratorpasswort ist: 123456. 4.2.7.3 Video Anklicken [Hauptmenü System VIDEO] um die Einstellungen für die VGA-Auflösung und die des Videosystems vorzunehmen. -
Seite 31: Blockierung Menü
BLOCKIERUNG MENÜ Als ein Sicherheitsmerkmal wird nach Aktivierung der Passwortabfrage der Zugriff auf das Hauptmenü [Blockierung Menü] nur über die Eingabe der Geräte-ID und des Administrator-Passwortes gewährt. . ERLÄUTERUNG: Der Nutzer besitzt nur die Rechte für den Zugriff auf die Videosuche, aber der Administrator hat volle Rechte über das gesamte Hauptmenü. -
Seite 32: Aufnahme Starten
AUFNAHME STARTEN Zum Starten einer manuellen Aufzeichnung das Feld [AUFNAHME STARTEN] anklicken. AUFNAHME STOPPEN Zum Stoppen einer manuellen Aufzeichnung das Feld [AUFNAHME STOPPEN] anklicken. START/STOPP FUNKTION NAVIGATION Die Navigation führt einen Ablauf von Presets beim am DVR angeschlossenen Speed Dome (oder PTZ-Kamera) aus. Über das Pop-Up Menü... -
Seite 33: Verschiedenes
VERSCHIEDENES ENTFERNEN DER AUSZIEHBAREN LADE DER FESTPLATTE Im Fall des Entfernens der ausziehbaren Lade der Festplatte wie folgt vorgehen. Ausschalten des DVR. Den Schlüssel im Schloss der Lade gegen den Uhrzeigersinn drehen (Position “geöffnet”). chiuso aperto Offen Geschlossen Die entsprechende Öffnung mit der Angabe “PULL” verwenden, um durch Ziehen die Festplatte aus ihrem Sitz zu lösen. BEACHTEN Vor dem Entfernen der Festplatte muss, um deren Beschädigung zu vermeiden, sichergestellt sein, dass sich diese nicht in Gebrauch befindet. -
Seite 34: Eigenschaften (Format Pal)
EIGENSCHAFTEN (FORMAT PAL) Bezeichnung Technische Daten Kompressionsalgrythmus Video: H.264 / Audio: 8kHz*16bit ADPCM Eingang/Ausgang Video 4-Kanäle BNC Eingang / 2-Kanäle BNC Ausgang Eingang/Ausgang Audio 4-Kanäle RCA Eingang / 1-Kanal RCA Ausgang Auflösung Bildvorschau D1: 704×576 Bildfrequenz Einzelkanal: 25 fps Aufnahmeauflösung CIF(352*288), HD1(704*288), D1 (704*576) 25 fps@D1, 50 fps@HD1, 100 fps@CIF Bildfrequenz Aufnahme... -
Seite 35: Nutzung Des Netviewer
NUTZUNG DES NETVIEWER DOWNLOAD PLUG-INS UND INSTALLATION Öffnen des Internet Explorers und Eingabe der IP Adresse, z. B. http://172.18.6.202. BEACHTEN: Wird das ActiveX Plug in nicht korrekt installiert, bitte die Sicherheitsstufen des IE oder die der Firewall anpassen (siehe Nachtrag: ActiveX Installation, Abschnitt 7.4 ). Gegebenenfalls die Netzwerkkonfiguration des DVR kontrollieren. -
Seite 36: Menü
7.3.1 MENÜ Die Menüspalte enthält die Registerkarten[LIVE] Menü, [REPLAY] Menü, [SETUP] Menü und [LOGOUT] Menü. 7.3.1.1 Live Nach erfolgreichem Login, zeigt der Netviewer die LIVE-Anzeige (Abb. 6.3). 7.3.1.2 Replay Diese Option gestattet Fernaufruf Videoaufzeichnungen am DVR. Als Erstes den Tag auswählen, dann Kanal, Typ und Suchen; als Zweites ein Ereignis aus der Dateiliste durch ein Doppleklick auswählen, Bitte... - Seite 37 Alarm Durch Auswahl Menüs [ALARM] wird Übersicht Alarmeinstellungen dargestellt (Abb. 6.7). In diesem Menü können folgende Einstellungen vorgenommen werden: - Ein-/Ausgangsalarm für jeden Kanal - Alarm Bewegerkennung - Aufzeichnung Berwegungserkennung - Sensibilität Bewegungserkennung - Alarm Videoverlust - Alarm Festplattenspeicher - Alarmausgangszeit usw.
-
Seite 38: Informationen
Einstellungen Nach Auswahl des Menüpunktes [SETTING] erscheint folgendes Untermenü (Abb. 6.11). Anklicken des Feldes […] um den Speicherpfad für die Videodateien und Einzelbilddateien festzulegen. Das Untermenü gestattet die Einstellungen für die Internet-Bandbreite, die Passwortvergabe und die der Sommerzeit. BEACHTEN: • Der Netviewer kann max. -
Seite 39: Nachtrag; Active X Installation
NACHTRAG; ACTIVE X INSTALLATION Vor der Verbindung an den Fern-PC muss die Schutzkonfiguration anhand des folgenden Vorgangs erfolgen: Den Browser Internet Explorer durch Doppelklick auf das Symbol öffnen. Es erscheint die folgende Ansicht (oder in jedem Fall die programmierte Startseite). Doppelklicken auf das Symbol Es erscheint die Ansicht “Eigenschaften von Internet“... - Seite 40 Es erscheint die folgende Ansicht. Die IP-Adresse des Geräts (kann durch Betätigen der Taste “F2” auf der Fronttafel des Geräts eingeblendet werden) im Feld “Diese Website zur Zone hinzüfügen” hinzufügen. Klicken Sie auf den Punkt “Hinzufügen”. Es erscheint die folgende Ansicht zur Bestätigung. ACHTUNG: Die Option “Für Sites dieser Zone ist eine Severüberpüfung (https:) erforderlich”...
- Seite 41 ENGLISH TABLE OF CONTENTS General information ..........................43 Product description......................... 43 1.1.1 General features ............................. 43 Opening the box ........................43 1.2.1 Contents of the box............................43 Warnings ..........................44 1.3.1 Power ................................44 1.3.2 Safety precautions ............................44 1.3.3 Installation precautions ..........................
- Seite 42 Main interface of Netviewer....................72 7.3.1 Menu column..............................74 7.3.1.1 Live................................74 7.3.1.2 Replay ................................74 7.3.1.3 Setup ................................74 7.3.1.4 Log out ................................76 7.3.2 PTZ Control..............................76 7.3.3 Live Play Control ............................. 76 Appendix: Active X installation........................77 DS1093-027...
-
Seite 43: General Information
Keep this manual at hand so that you can refer to it when needed. PRODUCT DESCRIPTION The URMET Domus S.p.A. product is a digital video recorder capable of recording from several cameras to internal hard disk and viewing the content on a PC via a USB port. -
Seite 44: Warnings
7.7.7 PRIVACY AND COPYRIGHT The 1093/004 digital video recorder is a device for CCTV systems. Recording of images is subject to the laws in force in your country. Recording of images protected by copyright is forbidden. Product users shall be responsible for checking and respecting all local rules and regulations concerning monitoring and recording video signals. -
Seite 45: Description Of The Parts
DESCRIPTION OF THE PARTS FRONT PANEL Closed flap H.264 4CH Digital Video Recorder PART DESCRIPTION Power LED: This indicates that the device is powered. HDD LED: This indicates that the hard disk is in use. IR sensor: Receives the IR signals from the remote control. CH1 button: this button displays the pictures of camera 1 full screen. - Seite 46 ▼ button: In configuration menu, shifts the cursor downwards. ◄ MENU/ESC button: This is used to access/quit the configuration menu and to return to the previous menus. ↵ button .his is used to access the pop-up menu. Flap open Press lightly at “▲” to open the front flap. PART DESCRIPTION Extractable HD tray: It contains the image storage medium.
-
Seite 47: Rear Panel
REAR PANEL PART DESCRIPTION Power on/off switch. Power socket: Use the adapter provided to power the device. Video output BNC sockets: These connectors are used to connect the monitor. BNC video channel 1 / 2 / 3 / 4 input connector: These connectors are used to connect the cameras. - Seite 48 USB Port: port for connecting a USB mouse Audio input: these are used to connect the audio channels 1-4 (RCA) Audio output RCA sockets: these are used to connect the audio autput (RCA) RS485/Sensor/Alarm port Pin 1: RS-485A Pin 2: RS-485B Pin 3-4: Sensor 1 input Pin 5-6: Sensor 2 input Pin 7-8: Sensor 3 input...
-
Seite 49: Ir Remote Control
IR REMOTE CONTROL Although the remote control handset supplied with the appliance is designed to be as robust and practical to use as possible, please handle with the due care and attention. Do not: expose to rain, spill any liquids on the keypad or drop in water subject to violent knocks or drop on hard surfaces expose to sunlight introduce obstacles between the remote control and the appliance while using the remote control. -
Seite 50: Batteries
Mouse Operation In menu lock mode, Enter into pop-up menu and clicking any sub menu to pop up Log-in window; on menu unlock mode, enter into pop-up menu, and then clicking left key to enter into any sub menu directly. After entering main menu, clicking left key could enter into any sub menu;... -
Seite 51: Dvr Boot Up
DVR BOOT UP POWER ON AND OFF Press on the back of the unit. The LED on the front panel will light up. The following will appear on the monitor. The system will boot-up and start initializing. MAIN INTERFACE After finishing system initialization the system will enter into main interface. Picture is the main interface displayed by system, which is showing no video input status. -
Seite 52: Dvr Configuration
10 DVR CONFIGURATION POP UP MENU After finishing system initialization, click right key of mouse on main interface mode to enter into Pop-up Menu. Now you could proceed parameter setting and operate for Main Menu, Menu Lock, Video Search, PTZ, Start record, Stop Record and also operate for Start Cruise after successful PTZ parameter setting etc. -
Seite 53: Main Menu
10.2 MAIN MENU After clicking right button of mouse, pop-up menu will be displayed on the screen. You can click [main menu] button on pop-up menu to enter into Main menu interface. You can also use the Menu button on the front panel to bring up the window, when using the front panel buttons use the FWD and REW button to move in the menu, and the SEL button to select the icon. -
Seite 54: Record Setup
10.2.2 RECORD SETUP Click [Main Menu] [Record] to enter into [Record Setup] menu (Shown as Picture) Functions: 1:The [Rec Mode] button allows you to setup recording 24 hours, on motion, or on a set schedule. 2:[PACK time] indicates maximum continuous time length of recorded files (15, 30, 45, 60 min). -
Seite 55: Network Set
10.2.3 NETWORK SET Enter into [Main Menu Network Set] to proceed network set: After selecting network mode - such as DHCP, PPPOE and static allocation and setup web port, you could visit DVR remotely via network. When selecting DHCP, DHCP server will allocate DVR IP address automatically. When selecting PPPoE, you need to input user and password provided by ISP supplier and set up web port (details please refer to the below picture) -
Seite 56: Recording Search
If you need to visit DVR via Internet, you should setup the video port at the public address of the DVR 10.2.4 RECORDING SEARCH Click [Main menu search] to enter into [Video Search] menu Searched playback: If you input specific date and click [Search], you will find all the recordings for that day. -
Seite 57: Multi Player
Recording File Backup If you want to backup one recording from the file list, you just select the recording and click [Backup] button. When the backup is completed you will be notified. Please click [OK] button to save your backup. Explanation: Backup file will be in H264 format, you can convert it to AVI format using the Multimedia Player program that comes with the DVR or through the net-viewer program, so you can use any player which supports AVI format. - Seite 58 2. Click pop-up menu button on the bottom of multimedia player and [Play- ] button, then the backup file will be played on the according channel. 3. The Menu brief on the bottom of multimedia player: Date: recording date for the current backup file shown as right corner; 24H recording time: lies under [Date] menu.
-
Seite 59: Device Management
5. Refer to below for [Audio on] setting procedure. (Setting parameter will be available after re-starting multimedia player after [Audio on] set up.) Setting Audio channel setting Normal video Bar Select the channel you want to playback the audio Select the channel has audio files Apply OK After successfully setting the above, when you playback the current channel, you can open the channel’s audio function at... -
Seite 60: Alarm Set
Alarm Set 10.2.6.2 Click [Main Menu Device Alarm] to enter into [Alarm setup] menu to setup Alarm warnings. I/O STATUS: Options include NO (Normal-open), NC (Normal-close) and OFF. Set to “Normal-open” if you use external sensor alarms that are normally opened, set to “Normal-close” if you use external sensor alarms that are normally closed, set to “off”... -
Seite 61: Email Alarm Notification
10.2.6.3 Email Alarm Notification (to send notice to email account when motion alarm is triggered) Click the [Email setup] menu to enter into its sub menu Selezionare il menu [Email setup] per entrare nel suo sottomenu. SSL: is a security link transport protocol. You can encrypt your communication info (including your email) using SSL to prevent hackers from monitoring your email or communication info and even your password Please set SSL to “On”... -
Seite 62: Ptz Setup
10.2.6.4 PTZ setup Enter into [Main menu Device PTZ Setup] to select the channel you want to control and set PTZ protocol (Pelco-D or Pelco-P), Baud Rate (1200, 2400, 4800, 9600), Stop bit (1, 2), Parity Check (None, Odd, Even Mark Space), Address Code and Cruise status respectively. Please note the above mentioned channel settings must match the settings of the PTZ camera. - Seite 63 3. Choose storage location and click [Install] button (red box in Pic 3) to start the installation (please refer to display in Pic 4 below) Pic 6 Pic 5 Pic 4 4. After installation finishes, click the icon named QQeye (red box in Pic 5) to run the program. This will display the program screen in Pic 6.
- Seite 64 When accessing from a mobile phone with Symbian operating system, use the following procedure: 1. Installation on the mobile First you need to install the program that is included on the CD that comes with the DVR by copying the “QQeye.CAB” file to the mobile phone.
- Seite 65 Open Pic 10 Pic 11 Pic 12 Default Access Point: Input the access point. System default for the access point is GPRS connection. Server Address: Input the public IP address of the router the DVR is attached to (refer to section 5.2.3 Network Setup on page 14 of the product manual).
-
Seite 66: Motion Detection
10.2.6.7 Motion Detection Click [Main Device Motion] to enter into the [Motion Detection] menu to setup motion detection recording. The [Motion detection] Menu has three sections, including Channel Status, Sensitivity and Motion area. Channel STATUS: This option allow you enable motion detection on any channel. SENSITIVITY: This option allows you to set sensitivity level of motion detection from 1 to 4 with 4 being the most sensitive MD AREA: This option allows you to select the area you want to be sensitive to... -
Seite 67: Video Setup
When you set Password Enabled to “ON”, you can setup a user password and administrator password respectively. The password supports up to 6 characters NOTE: The defualt Password is: 123456. 10.2.7.3 Video Setup Click [Main Menu System VIDEO] to setup Video, here you can set VGA Resolution and Camera system: PAL, NTSC 4.2.7.4 Languages Enter into [System Language] menu to select the language you want to use on... -
Seite 68: Menu Lock
10.3 MENU LOCK As a system safety feature you can click [Menu Lock] menu to lock menu when leaving the DVR. If you want to login to the DVR, you would input device code and password. Explanation: User only has the authority to search recordings, but Administrator has full authority over Main Menu operations 10.4 VIDEO SEARCH Click pop-up menu video search to enter into [Video Search] menu you search files and playback recordings. -
Seite 69: Start Recording
10.6 START RECORDING I f you want to start recording, click [ Rec ] button to start manual recording 10.7 STOP RECORDING If you want to stop manual recording, click [Stop Record.] menu or [Stop] button. 10.8 START/STOP CRUISE Cruise function performs a sequenze of Presets on the Speed Dome (or PTZ device) connected to the DVR. You cant start and stop this function by the pop-up menu. -
Seite 70: Miscellaneous
11 MISCELLANEOUS 11.1 REMOVING THE EXTRACTABLE HARD DISK DRAWER Proceed as follows to remove the extractable hard disk drawer. Switch off the DVR. Insert and turn the key on the hard disk tray (“open” position). chiuso aperto open close Pull on the specific seat with the word “PULL” to extract the hard disk from its seat. IMPORTANT NOTE Make sure the hard disk is not in use before removing it to prevent damage. -
Seite 71: Specifications (Pal Format)
12 SPECIFICATIONS (PAL FORMAT) Item Specifications Video System NTSC / PAL Compression Format Video: H.264 / Audio: 8kHz*16bit ADPCM Video Output 4-CH BNC Input/ 2-CH BNC Output / 1-VGA output Audio I/O 4-CH RCA audio Input / 2-CH RCA audio Output Display Resolution D1: 704×576 (PAL) Frame rate... -
Seite 72: Use Of Netviewer
16 USE OF NETVIEWER 16.1 PLUG-INS DOWNLOAD AND INSTALLATION Open IE browser and input IP address and web port of DVR, such as http://172.18.6.202:80/. Reminder: If the plug-in is not successfully downloaded, please check if your browser’s safety level or firewall setting (see Appendix: ActiveX installation). - Seite 73 16.4 MENU COLUMN (SECTION 1 ON PICTURE 6-3) 16.5 PTZ CONTROL (NUMBERS 2, 3, 4 ON PICTURE 6-3) 16.6 LIVE PLAY CONTROL (NUMBERS 6 THROUGH 10 ON PICTURE 6-3) DS1093-027...
-
Seite 74: Menu Column
16.6.1 MENU COLUMN Menu column includes [Live] menu, [Replay] menu and [Setup] menu and [Logout] menu. 16.6.1.1 Live After Logging-in to system, system will enter into Live display (shown as Picture 6-3). 16.6.1.2 Replay This option allows you to playback recordings remotely. First select the day, channel and type and proceed searching and refreshing;... - Seite 75 ② Alarm Click [Alarm] menu to enter into its sub menu (shown as Picture 6-7). You can set I/O alarm for every channel, motion detection alarm, motion recording, motion trace, motion sensitivity, video loss alarm, HDD not enough space alarm, HDD not found alarm and alarm output time etc. For details on setup method please refer to section 5.2.5.2.
-
Seite 76: Log Out
⑥ Host Info Click [Host Info.] to enter into the sub menu (shown as Picture 6-12). Here you can check Usage rate of HDD, available recording time, software version and MAC address. Picture 6-12 16.6.1.4 Log out Log out of the system. 16.6.2 PTZ CONTROL The PTZ controls and the Cruise function are performed in the same way they are performed on the DVR. -
Seite 77: Appendix: Active X Installation
APPENDIX: ACTIVE X INSTALLATION Configure security as follows before connecting to a remote PC. Open Internet Explorer by double clicking on The following page (or the home page) will appear. Double click on The “Properties - Internet Security” window will appear. Select “Trusted sites”... - Seite 78 Add the IP address of the device (to display the address, press “F2” on the front panel of the device) in the “Add this website to the zone” field. Click on “Add”. The following confirmation screen will appear. IMPORTANT NOTE Do not check “Requie server verification (https) for all sites in this zone.
- Seite 79 DS1093-027...
- Seite 80 Prodotto in Cina su specifica URMET Domus DS1093-027 Made in China to URMET Domus specification SEDE FILIALI URMET DOMUS S.p.A. 20151 MILANO – V. Gallarate 218 10154 TORINO (ITALY) Tel. 02.380.111.75 - Fax 02.380.111.80 VIA BOLOGNA 188/C 00043 CIAMPINO (ROMA) V. L.Einaudi 17/19A Telef.