SSS Siedle S 851-0 Inbetriebnahmeanweisungen
Vorschau ausblenden
Andere Handbücher für S 851-0:
- Inbetriebnahmeanleitung (64 Seiten) ,
- Produktinformation (29 Seiten) ,
- Benutzerhandbuch (24 Seiten)
Inhaltsverzeichnis
Werbung
Verfügbare Sprachen
Verfügbare Sprachen
Werbung
Kapitel
Inhaltsverzeichnis

Verwandte Anleitungen für SSS Siedle S 851-0


Inhaltszusammenfassung für SSS Siedle S 851-0
- Seite 1 Inbetriebnahmeanleitung Siedle Scope Scope Mobilteil Smart Gateway Mini Siedle App für Smart Gateway Mini Commissioning instruction Siedle Scope Scope cordless handset Smart Gateway Mini S 851-0 Siedle app for SZM 851-0 Smart Gateway Mini SGM 650-0...
- Seite 2 Ergänzend zu diesem Dokument Som komplettering till detta finden Sie die jeweils aktuelle dokument finns alltid den aktuella Ausgabe der gesamten Dokumen utgåvan av hela dokumentationen i tation im Downloadbereich unter nedladdningszonen under www.siedle.com www.siedle.com In addition to this document, you De forma complementaria a este will find the current valid issue of the documento encontrará...
-
Seite 3: Inhaltsverzeichnis
Deutsch Inhalt Siedle Scope – Das Eine für alles Register – Tastenbelegung Funktionen Sicherheitshinweise Register – Zusätzliche Funktionen 23 AppTeilnehmer anmelden Achtung Register – App AppTeilnehmer abmelden und löschen Elektrische Spannung XMLKonfigurationsdatei exportieren Automatische Bildspeicherung AkkuSicherheit Basisstation/Smart Gateway Mini Rechtliche Hinweise Medizinische Geräte/ konfigurieren Einrichtungen... -
Seite 4: Siedle Scope - Das Eine Für Alles
Siedle Scope Das Eine für alles – Eine neue Freiheit Das schnurlose Festnetztelefon Das Smart Gateway Mini SGM 6500 Siedle Scope vereint die Welten der Als Festnetztelefon eingesetzt bietet entspricht der Basisstation S 8510. audiovisuellen Türkommunikation Scope: Für den Betrieb des SGM 6500 ist und der FestnetzTelefonie, es ist •... -
Seite 5: Sicherheitshinweise
Sicherheitshinweise Achtung Akku-Sicherheit Medizinische Geräte/ Lesen und beachten Sie die Sicher Einrichtungen heitshinweise und Inhalte folgender mitgelieferter Dokumente vor der ersten Verwendung von Siedle • Beachten Sie die folgenden Hin Scope: weise, anderenfalls kann es zu • Verwenden Sie persönliche medizi •... -
Seite 6: Hinweise
Sicherheitshinweise Hinweise Rechtliche Hinweise Kontakt mit Flüssigkeiten • Verwenden Sie im Mobilteil nur • Bei starkem Kontakt oder • Aufnahmen von Personen, den OriginalSiedleAkku. die unwissentlich fotografiert Verunreinigung mit Flüssigkeiten • Die heutigen Möbel sind mit einer wurden, dürfen nicht veröffentlicht (z. B. -
Seite 7: Vorbereitung
Vorbereitung Schritt für Schritt durch die Inbetriebnahme- • Um den vollen Funktionsumfang Inbetriebnahme Voraussetzungen erfüllen von Siedle Scope, Smart Gateway 1 Auf den kommenden Seiten • Die Daten der Türsprechanlage Mini und Siedle App für Smart führen wir Sie durch die nachfol mit Siedle Scope werden über den Gateway Mini innerhalb der genden InbetriebnahmeSchritte:... -
Seite 8: Produktinformation Und
Vorbereitung Produktinformation und Die Inbetriebnahme eines Siedle Beachten Sie immer die Inbetriebnahmeanleitung lesen ScopeMobilteils in ein bestehendes Sicherheitshinweise! Lesen Sie die Produktinformation SiedleScopeSystem kann wahl und die Inbetriebnahmeanleitung, weise mit oder ohne PC/Laptop bevor Sie mit der Inbetriebnahme durchgeführt werden. von Siedle Scope/Smart Gateway Für die Inbetriebnahme eines Mini beginnen. -
Seite 9: Zubehör Für Die Inbetriebnahme Bereitstellen
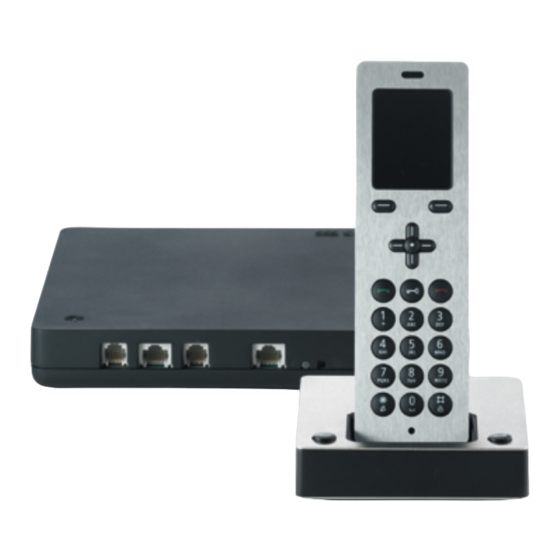
Inbetriebnahme bereit. Die Inbetriebnahme eines Siedle ScopeMobilteils (SZM 8510) in ein bestehendes SiedleScopeSystem, kann wahlweise mit oder ohne PC/ Laptop durchgeführt werden. Lieferumfang S 851-0 Lieferumfang SGM 650-0 Lieferumfang SZM 851-0 Benötigtes Zubehör Benötigtes Zubehör Benötigtes Zubehör • PC/Laptop zur Inbetriebnahme •... -
Seite 10: Lieferumfang Auf Vollständigkeit Prüfen
Vorbereitung Lieferumfang auf Vollständigkeit prüfen Lieferumfang S 851-0 Lieferumfang SGM 650-0 Lieferumfang SZM 851-0 In-Home In-Home Prog. Prog. Line Line Power Power • Siedle Scope Mobilteil mit Akku • Basisstation mit Steckernetzteil • Siedle Scope Mobilteil (LiIonen 3,7 V) • Anschlusskabel TAE/RJ11 SZM 851…... -
Seite 11: Mobilteil Aufladen
Mobilteil aufladen Ladeschale für Scope Mobilteil Verwenden Sie im Mobilteil nur den Auf der Ladeschale befinden sich OriginalSiedleAkku. 2 Tasten: Die Lade und Betriebszeiten • Linke Taste mit Mundsymbol: sind abhängig von der Nutzung von Siedle Scope sowie von der Kapazität und Alter des Akkus. Ruf annehmen/beenden im Ladezeiten: Freisprechmodus... -
Seite 12: Basisstation Montieren Und Anschließen
Vorbereitung Basisstation montieren und Wenn Sie Siedle Scope/ Status-LED an der Basisstation anschließen Smart Gateway Mini mit der An der Basisstation/Smart Gateway Programmierung Plug+Play in den Mini befindet sich eine Status-LED, • Der Montageort der Basisstation sollte möglichst zentral im In-Home-Bus einbinden wollen, die den jeweiligen Gerätezustand Gebäude liegen, um eine optimale darf die Basisstation zum jetzigen... -
Seite 13: Pc/Laptop Vorbereiten
PC/Laptop vorbereiten Direkte LAN-Verbindung LAN-Verbindung über ein beste- Hinweise: zwischen PC/Notebook und hendes Netzwerk (Router/WLAN- • Die Basisstation wird im Basisstation. Router/Managed Switch/Server) Auslieferungszustand mit aktivem mit aktivem DHCP-Server. DHCPClient ausgeliefert und for dert eine Netzwerkadresse vom DHCPServer (Router/WLANRouter/ Managed Switch/Server) an, sobald eine Netzwerkverbindung besteht. - Seite 14 Vorbereitung LAN-Verbindung über ein beste- Vorgehensweise: hendes Netzwerk (Router/WLAN- 1 Die Netzwerkeinstellungen der Router/Managed Switch/Server) Basisstation befinden sich im Aus mit festen IP-Adressen (inaktivem lieferungszustand (DHCPClient DHCP-Server). aktiv). 2 Schließen Sie den PC per Netzwerkkabel an der Buchse LAN der Basisstation an. 3 Öffnen Sie den Firefox...
-
Seite 15: In-Home-Bus-System Konfigurieren
In-Home-Bus-System konfigurieren Programmierung Wichtige Hinweise vor der Damit Sie die Türsprechanlage Programmierung nutzen können, muss im • Die gesamte Installation muss fertig gestellt sein. Bei Plug+Play InHomeBus zumindest ein Türruf programmiert werden. Programmierung dürfen die Gehäuse Die Daten der Türsprechanlage der BusInnengeräte noch nicht geschlossen sein. -
Seite 16: Grundfunktionen
In-Home-Bus-System konfigurieren Programmierung nicht verfügbar Funktionsumfang (InHomeBus) •// Plug+PlayProgrammierung in Abhängigkeit von der Program /•/ Manuelle Programmierung mierung. //• PCProgrammierung (XML > Siedle Scope) Grundfunktionen S 851-… SGM 650-… + App Türruf •/•/• •/•/• Etagenruf Türöffnertaste Lichttaste Rufabschaltung + Anzeige (Nach Installation in Funktion) Anwahl letzte Tür /•/•... -
Seite 17: Manuelle Programmierung
Manuelle Programmierung Detaillierte Informationen finden Sie im Systemhandbuch In-Home-Bus: Video. In-Home Prog. 4 Sek. 1 Programmiermodus einschalten. 2 An der Türstation die Licht/ 3 Prog.Taste an der Basisstation Am BNG/BVNG 650… die Taste Programmiertaste 4 Sekunden für 4 Sekunden drücken. Danach Prog.Mode kurz drücken. Die gedrückt halten. -
Seite 18: Programmierung - Plug+Play
In-Home-Bus-System konfigurieren Programmierung – Plug+Play Voraussetzungen für Plug+Play: Detaillierte Informationen Die Plug+PlayProgrammierung • Plug+PlayProgrammierung ist nur finden Sie im Systemhandbuch bietet die Möglichkeit, eine möglich mit neuen BusInnenge In-Home-Bus: Video. InHomeBusAnlage ohne räten, neuem BusTürlautsprecher Programmierkenntnisse in BTLM 65004/BTLE 05003, Bus Betrieb zu nehmen. Die gesamte TastenModule BTM 65001, 02, Installation aller Teilnehmer muss 03, 04, BRMA 05001 und Bus... - Seite 19 Vorgehensweise bei Plug+Play: Bei Smart Gateway Mini/Siedle Scope darf die Basisstation nicht mit dem InHomeBus verbunden sein. Das Aufsetzen des BusTelefons entspricht dem Verbinden der Smart Gateway Mini/Siedle Scope Basisstation bei der Plug+Play Programmierung. In-Home Prog. Line Power 1 Plug+PlayMode am BNG/ 2 Verbinden Sie alle Innengeräte 3 Plug+PlayMode am BNG/ BVNG 650…...
-
Seite 20: Programmierung Mit Pc
In-Home-Bus-System konfigurieren Programmierung mit PC Mit der BusProgrammierSoftware BPS 650… kann die gesamte Funktion einer InHomeAnlage über einen WindowsPC program miert werden. Für den Anschluss des PC an die InHomeInstallation ist das ProgrammierInterface PRI 602… USB und das Zubehör BusVersorgung ZBVG 650… erfor derlich. Das ZBVG 650… wird inner halb einer Anlage einmal in einem BNG/BVNG 650…... -
Seite 21: Konfiguration Von Siedle Scope
Konfiguration von Siedle Scope Konfiguration von Siedle Scope Vorgehensweise: 11 Klicken Sie auf Schreiben, wenn Name: Name der InHomeBus 1 Verbinden Sie den PC/Laptop die Konfiguration durchgeführt und Komponente die an Geräten mit per USBKabel mit dem Program- gespeichert ist. Es öffnet sich ein Displays angezeigt wird mierinterface. -
Seite 22: Register - Tastenbelegung
Konfiguration von Siedle Scope Register – Tastenbelegung... -
Seite 23: Register - Zusätzliche Funktionen
Register – Zusätzliche Funktionen... -
Seite 24: Register - App
Konfiguration von Siedle Scope Register – App... -
Seite 25: Xmlkonfigurationsdatei Exportieren
XML-Konfigurationsdatei expor- Vorgehensweise: 4 Wählen Sie einen Speicherort tieren 1 Klicken Sie auf den Reiter auf dem PC/Laptop. Übertragung. 5 Vergeben Sie einen Dateinamen Die vorgenommene Konfiguration muss über die BPS 650… in Form 2 Klicken Sie auf die Schaltfläche (z. B. Siedle Scope Konfiguration). einer XMLDatei gespeichert und speichern…, um die Konfiguration 6 Wählen Sie als Dateityp Scope2... -
Seite 26: Basisstation/Smart Gateway Mini Konfigurieren
Basisstation/Smart Gateway Mini konfigurieren Allgemeine Hinweise Vorgehensweise: Die Konfiguration der Basisstation 1 Anmelden als Administrator kann über folgende Wege erfolgen: 2 System aktualisieren Direkte LANVerbindung zwischen 3 Passwort ändern PC/Notebook und Basisstation > 4 Netzwerkeinstellungen ändern Teilkonfiguration möglich. Kein 5 Datum und Uhrzeit einstellen 6 InHomeBusKonfiguration in Systemupdate möglich da keine Internetverbindung besteht. -
Seite 27: Anmelden Als Administrator
Anmelden als Administrator Vorgehensweise: 5 Geben Sie das zugehörige 1 Schließen Sie den PC per Passwort ein (Standard: admin). 6 Wählen Sie gegebenenfalls eine Netzwerkkabel an der Buchse LAN der Basisstation an. andere Sprache. 2 Öffnen Sie den Firefox 7 Klicken Sie auf Anmelden. Webbrowser und geben Sie die 8 Die Administrator... - Seite 28 Basisstation/Smart Gateway Mini konfigurieren Anmelden als Administrator Wenn Sie einen anderen Webbrowser als Mozilla Firefox verwenden, kann es zu Darstellungsfehlern kommen.
-
Seite 29: System Aktualisieren
System aktualisieren Vorgehensweise: 6 Ist eine höhere Versionsnummer Die Systemaktualisierung ist nur 1 Klicken Sie auf Update. vorhanden, wählen Sie die neuere möglich, wenn Sie die Basisstation/ 2 Das Menü Update wird angezeigt. Softwareversion aus und spei- Smart Gateway Mini an einen 3 Klicken Sie auf Download. - Seite 30 Basisstation/Smart Gateway Mini konfigurieren System aktualisieren Vorgehensweise: 7 Klicken Sie auf die Schaltfläche 1 Klicken Sie auf Auswählen. Update um die Systemaktuali 2 Es öffnet sich die Seite Datei hoch sierung zu starten. laden im Webbrowser. 8 Es erscheint eine Bestätigungs 3 Wählen Sie die entpackte meldung zum UpdateVorgang.
-
Seite 31: Administrator - Passwort Ändern
Administrator – Passwort ändern Vorgehensweise: Sie können das Passwort nur für 1 Melden Sie sich erneut als Administrator an der Basisstation die Bedienoberfläche ändern, in der Sie sich angemeldet haben: Anmeldung als Administrator 2 Geben Sie den Benutzernamen (admin) -> Administrator- admin ein. - Seite 32 Basisstation/Smart Gateway Mini konfigurieren Administrator – Passwort ändern Vorgehensweise: 6 Klicken Sie auf Passwort ändern. 7 Das Menü Passwort ändern wird angezeigt. 8 Geben Sie das alte Passwort ein. 9 Geben Sie das neue Passwort ein. 10 Wiederholen Sie die Eingabe für das neue Passwort.
-
Seite 33: Netzwerkeinstellungen Ändern
Netzwerkeinstellungen ändern Vorgehensweise: Im Auslieferungszustand ist DHCP 1 Klicken Sie auf Netzwerk. aktiviert. Im DHCPModus bekommt 2 Die Netzwerkeinstellungen werden die Basisstation alle Netzwerkeinstel angezeigt. lungen vom Router/Managed 3 Klicken Sie auf die quadratische Switch zugeteilt. Alle Änderungen Schaltfläche bei DHCP. 4 Die Netzwerkeinstellungen sind der Netzwerkeinstellungen wirken sich auf die Erreichbarkeit der... -
Seite 34: Datum Und Uhrzeit Einstellen
Basisstation/Smart Gateway Mini konfigurieren Datum und Uhrzeit einstellen Vorgehensweise: Die Basisstation kann Datum und 1 Klicken Sie auf Datum/Uhrzeit. Uhrzeit automatisch über den 2 Das Menü Datum/Uhrzeit wird Netzwerkrouter synchronisieren, angezeigt. wenn eine Netzwerkverbindung 3 Klicken Sie auf die quadratische besteht. -
Seite 35: In-Home-Bus-Konfiguration In
In-Home-Bus-Konfiguration in Vorgehensweise: 6 Die ausgewählte XMLKonfi Basisstation einlesen. 1 Klicken Sie auf In-Home-Bus. gurationsdatei wird im Menü 2 Das Menü InHomeBus wird InHomeBus angezeigt. angezeigt. 7 Klicken Sie auf Update, um die 3 Klicken Sie auf Auswählen. InHomeBusKonfiguration in die 4 Das Fenster Datei hochladen Basisstation/Smart Gateway zu über... -
Seite 36: Pin Ändern
Basisstation/Smart Gateway Mini konfigurieren PIN ändern Vorgehensweise: 1 Klicken Sie auf DECT > Basisstation. 2 Das Menü Basisstation wird ange zeigt. 3 Geben Sie eine neue 4-stellige PIN ein. 4 Klicken Sie auf Übernehmen. 5 Die Anmeldung eines Mobilteils ist nur noch mit der neuen PIN möglich. -
Seite 37: Telefonieeinstellungen
Telefonieeinstellungen Bitte beachten Sie, dass falsche Ist die Basisstation/Smart Gateway Einstellungen im Menü Telefonie Mini an eine Telefonanlage ange dazu führen können, dass Sie schlossen, müssen Sie eventuell keine externen Telefonate verschiedene Einstellungen in der führen können! Ist die Basisstation Basisstation/Smart Gateway Mini direkt mit dem Festnetzanschluss vornehmen, um einen reibungslosen... - Seite 38 Basisstation/Smart Gateway Mini konfigurieren Telefonieeinstellungen Vorgehensweise: 1 Klicken Sie auf die gewünschte Einstellung (z. B. Flashzeit). 2 Ändern Sie die Einstellungen. 3 Klicken Sie auf Übernehmen. 4 Wenn die Änderungen erfolgreich übernommen wurde, erscheint eine Bestätigungsmeldung.
-
Seite 39: App-Teilnehmer Anlegen
App-Teilnehmer anlegen Vorgehensweise: 9 Melden Sie die App auf dem Sie können bis zu 4 AppTeilnehmer 1 Klicken Sie auf Siedle App. Mobiltelefon mit den Teilnehmer 2 Das Menü Siedle App wird ange anmelden und verwalten. Daten an. zeigt. 10 Wenn Sie mehrere AppTeil 3 Klicken Sie auf einen Teilnehmer nehmer anmelden wollen, wieder... -
Seite 40: Abmelden
Basisstation/Smart Gateway Mini konfigurieren Abmelden Vorgehensweise: Wenn Sie einen anderen 1 Klicken Sie auf Abmelden. 2 Sie wurden von der Basisstation Webbrowser als Mozilla Firefox verwenden, kann es zu abgemeldet und befinden sich auf Darstellungsfehlern kommen. der AnmeldeSeite. -
Seite 41: Benutzer - Passwort Ändern
Benutzer - Passwort ändern Vorgehensweise: Sie können das Passwort nur für die 1 Melden Sie sich als Benutzer an Bedienoberfläche ändern, in der Sie der Basisstation an. sich angemeldet haben: 2 Geben Sie den Benutzernamen Anmeldung als Benutzer (user) > user ein. - Seite 42 Basisstation/Smart Gateway Mini konfigurieren Benutzer – Passwort ändern Vorgehensweise: Sie können das Passwort nur für die 1 Klicken Sie auf Passwort ändern. Bedienoberfläche ändern, in der Sie sich angemeldet haben: 2 Das Menü Passwort ändern wird Anmeldung als Benutzer (user) > angezeigt.
-
Seite 43: Abmelden
Abmelden Vorgehensweise: Wenn Sie einen anderen 1 Klicken Sie auf Abmelden. 2 Sie wurden von der Basisstation Webbrowser als Mozilla Firefox verwenden, kann es zu abgemeldet und befinden sich auf Darstellungsfehlern kommen. der AnmeldeSeite. -
Seite 44: Werkseinstellung
Basisstation/Smart Gateway Mini konfigurieren Werkseinstellung Vorgehensweise: Die Basisstation muss während des 1 Stecken Sie das Patchkabel für den Resets weiterhin mit Strom versorgt InHomeBus an der Basissation aus. bleiben, anderenfalls kann der Reset 2 Drücken Sie Taste Prog. an der nicht korrekt durchgeführt werden! Basisstation (z. B. -
Seite 45: Mobilteile Erste Schritte
Mobilteile Erste Schritte – Mobilteil einschalten Mobilteil einschalten Um das Mobilteil einzuschalten, drücken Sie die BeendenTaste (rotes Hörersymbol) etwa 1 Sekunde lang. Wenn es länger als 2 Minuten im Ruhezustand ist, aktiviert das Mobilteil selbstständig den Strom sparmodus. Das Display erlischt. Ein ausgeschaltetes Mobilteil schaltet sich selbst ein, sobald es in die Lade... -
Seite 46: Startbildschirm
Mobilteile Erste Schritte – Startbildschirm Vom Startbildschirm aus können Sie Display-Navigation über die NavigierenTasten die ein zelnen Untermenüs öffnen. 12:30 • Mit der Navigieren-Taste oben Mobilteil 1 Mo 27.04.2015 öffnen Sie das Menü Türrufbilder. • Mit der Navigieren-Taste rechts öffnen Sie das Hauptmenü. •... -
Seite 47: Mobilteil An Der Basisstation Anmelden
Mobilteil an der Basisstation Vorgehensweise: anmelden 1 Trennen Sie die Basisstation kurz ..vom Stromnetz und schließen Sie (Möglichkeit 1) sie wieder an. 2 Sobald die StatusLED an der Basisstation grün blinkt, haben Sie ca. 2 Minuten Zeit, das Scope Startbildschirm Mobilteil anzumelden. -
Seite 48: Anmelden Mit Einem Bereits
Mobilteile Erste Schritte – Anmelden mit einem bereits Vorgehensweise: angemeldeten Mobilteil 1 Halten Sie beide Mobilteile (Möglichkeit 2) betriebsbereit. System 12:30 2 Um den Anmeldemodus mit Mobilteil 2 Mo 27.04.2015 einem Mobilteil zu aktivieren, ver wenden Sie bitte ein bereits ange Eco-Modus Ein meldetes Scope Mobilteil. -
Seite 49: Anmelden Über Die Browser
Anmelden über die browser- Vorgehensweise: basierte Bedien-Oberfläche der 1 Melden Sie sich als Admini- Basisstation strator (admin/admin) an der (Möglichkeit 3) Basisstation an. 2 Klicken Sie auf DECT > Basisstation. 3 Vergeben Sie eine neue 4-stel- lige PIN-Nummer und merken Sie sich diese. -
Seite 50: Mobilteil Abmelden
Mobilteile Erste Schritte – Mobilteil abmelden Alle Mobilteile, die an der Basisstation angemeldet wurden, müssen über die browser- basierte Bedien-Oberfläche der Basisstation abgemeldet werden, um nicht mehr als interne Teilnehmer angezeigt zu werden. Wird ein angemeldetes Mobilteil ausgeschaltet, defekt, oder aus dem Empfangsbereich der Basisstation/ DECTRepeater entnommen, wird es weiterhin als interner Teilnehmer... -
Seite 51: Datum Und Uhrzeit Einstellen
Datum und Uhrzeit einstellen Datum und Uhrzeit sind erforderlich, um ein und ausgehende Rufe in der Rufliste sowie Bilder im Bildspeicher System 12:30 mit der korrekten Zeit angezeigt zu Mobilteil 1 Mo 27.04.2015 Startbildschirm bekommen. • Mit den Navigieren-Tasten (oben/unten) wechseln Sie Sprache Hauptmenü... - Seite 52 Mobilteile Erste Schritte – • Mit den Navigieren-Tasten (oben/unten) wechseln Sie zwi schen den Zeilen. Datum / Uhrzeit 12:30 • Mit dem linken Softkey Mobilteil 1 Mo 27.04.2015 (Zurück), können Sie die Eingabe abbrechen und in die vorherige Ansicht Datum wechseln. Uhrzeit Vorgehensweise: Stunden...
-
Seite 53: Siedle App Für Smart Gateway Mini
Siedle App für Smart Gateway Mini Allgemeines Die Basisstation von Scope ist zugleich ein IPGateway. Ein LAN Anschluss stellt die Verbindung in das IPNetzwerk her. Im lokalen WLAN werden die Signale der Türkommunikation an die Siedle App für Smart Gateway Mini wei tergeleitet. -
Seite 54: Funktionen
Siedle App für Smart Gateway Mini Funktionen Umschaltung Hoch und Die Siedle App für Smart Gateway Querformat für Video (iPhone) Mini macht das iPhone oder Umschaltung Hoch und iPad zur mobilen Erweiterung Querformat für gesamte App (iPad) einer InHomeTürsprechanlage Systemvoraussetzungen: von Siedle. -
Seite 55: App-Teilnehmer Anmelden
App-Teilnehmer anmelden Vorgehensweise: 9 Das iPhone/iPad verbindet sich 1 Installieren Sie die Siedle App Bevor Sie die Siedle App für Smart mit der Basisstation. Konnte die für Smart Gateway Mini auf dem Gateway Mini an der Basisstation Verbindung zur Basisstation her anmelden können, müssen Sie entsprechende Gerät (iPhone bzw. -
Seite 56: App-Teilnehmer Abmelden
Siedle App für Smart Gateway Mini App-Teilnehmer abmelden Vorgehensweise: Verwenden Sie ein iPhone/iPad kurz und löschen 1 Öffnen Sie die Siedle App für oder langfristig (Reparatur, Verkauf, Smart Gateway Mini. Austausch) nicht mehr mit der Siedle 2 Öffnen Sie das Menü App für Smart Gateway Mini, dein... -
Seite 57: Automatische Bildspeicherung
Automatische Bildspeicherung Für die Videoübertragung ist eine WLANVerbindung mit ausreichender Übertragungsgeschwindigkeit zur Basisstation notwendig. Von jeder Person, die an der Video Sprechanlage einen Türruf absetzt (klingelt), wird automatisch ein Bild gespeichert. Jeder Türruf wird im Menü Türruf bilder in einer Türrufliste mit Datum und Uhrzeit dokumentiert. -
Seite 58: Abschlussarbeiten
Abschlussarbeiten Vollständige Funktionsprüfung Vereinfachte Hinweise Damit Sie die Türsprechanlage EG-Konformitätserklärung Dieses Gerät wird in verschiedenen nutzen können, müssen im Ländervarianten/Ländervarianten InHomeBus zumindest die Der Hersteller: S. Siedle & Söhne Kombinationen produziert. Grundfunktionen „Türruf“, „Tür Telefon- u. Telegrafenwerke OHG Länderspezifische technische öffnen“... -
Seite 59: Index
Index AAModul IntercomFunktionen Ruf beenden InHomeBus Abmelden 40, 43, 50 Schützen Sie Ihr Eigentum IPAdresse Adressbereich Service Konfiguration von AkkuSicherheit Sicherheitshinweise 5, 53 Siedle Scope 21, 35 Amtskennziffer SiedleScopeKonfiguration Konfiguration von Anmeldemodus Smart Gateway Mini Smart Gateway Mini konfigurieren Anmelden Konfigurationsdatei exportieren Standardgateway Anruf annehmen... - Seite 120 S. Siedle & Söhne © 2014/03.17 Telefon- und Telegrafenwerke OHG Printed in Germany Best. Nr. 200048882-01 Postfach 1155 78113 Furtwangen Bregstraße 1 78120 Furtwangen Telefon +49 7723 63-0 Telefax +49 7723 63-300 www.siedle.de info@siedle.de...