Herunterladen Inhalt Inhalt Diese Seite drucken
Technaxx TX-50 Bedienungsanleitung
Vorschau ausblenden Andere Handbücher für TX-50:

Werbung

Verfügbare Sprachen
  • DE

Verfügbare Sprachen

  • DEUTSCH, seite 30
Additional Bullet & Dome Camera
for Midi Security Kit PRO FullHD 1080P TX-51
for Maxi Security Kit PRO FullHD 1080P TX-50
User Manual
Table of Contents
1
1.1
1.2
1.3
2
3
4
4.1
4.2
5
6
7
7.1
7.2
8

Inhaltsverzeichnis

1
1.1
1.2
1.3
2
3
®
Technaxx
3
3
3
4
6
7
9
9
10
11
12
14
14
15
16
17
17
17
18
21
22
1

Werbung

Inhaltsverzeichnis
loading

Inhaltszusammenfassung für Technaxx TX-50

  • Seite 1: Inhaltsverzeichnis

    ® Technaxx Additional Bullet & Dome Camera for Midi Security Kit PRO FullHD 1080P TX-51 for Maxi Security Kit PRO FullHD 1080P TX-50 User Manual Table of Contents General Introduction Overview Functions Specifications of the BULLET and DOME camera Framework & Dimensions & Structure Bullet Camera...
  • Seite 2 Menü Bullet Kamera Einstellungen Hinweis Rahmen & Maße & Struktur Dome Kamera Installation Dome Kamera Menü Dome Kamera Einstellungen Hinweis Wichtige Sicherheitshinweise & Warnungen Appendix / Anhang Linux License / Linux Lizenz...
  • Seite 3: General Introduction

    General Introduction 1.1 Overview This series megapixel HD camera conforms to the HDCVI standard. It supports video signal high-speed long distance transmission without any delay. It can be controlled by the DVR conforming to the HDCVI. 1.2 Functions HDCVI Specification: HDCVI(High Definition Composite Video Interface) is an over- coaxial –cable HD video transmission standard.
  • Seite 4: Specifications Of The Bullet And Dome Camera

    Weight / Dimensions: 550 g / (L) 21,3 x (W) 8,0 × (H) 7,2 cm Package Contents: Bullet camera for Midi Security Kit PRO FullHD 1080P TX-50 & Maxi Security Kit PRO FullHD 1080P TX-51, 1x BNC 18.3m video cable, 3x screws and 3x dowels, User Manual Features &...
  • Seite 5 Indoor and outdoor installation: wall mount / ceiling mount Weight / Dimensions: 450 g / Φ 12.2 × (H) 8.9 cm Package Contents: Dome Camera for Midi Security Kit PRO FullHD 1080P TX-50 & Maxi Security Kit PRO FullHD 1080P TX-51, 1x BNC 18.3m video cable, 3x screws...
  • Seite 6: Framework & Dimensions & Structure Bullet Camera

    2 Dimensions (unit is mm) & Structure Bullet Camera When the standard definition/high definition switch control cable is short circuit, system outputs standard definition video. Otherwise, when the circuit is open, system outputs the high definition video.
  • Seite 7: Installation Bullet Camera

    3 Installation Bullet Camera for TX-50 & TX-51 Important: Make sure the installation surface can min support the 3x the weight of the camera and the bracket. If you drill a hole in the wall, make sure that power cables, electrical cords and/or pipelines are not damaged.
  • Seite 8 Step 2: Unscrew the M3 x 20 and M3 x 5 screws on the bracket in the direction, adjust the camera to an exact location which needs to be monitored by rotating the bracket and camera body, then secure the bolts. Step 3: Connect the video output port of the device cable to the HDCVI DVR, and connect the power port of the device cable to the power.
  • Seite 9: Menu Bullet Camera

    4. Menu 4.1 Settings NOTE: The following operation and interfaces for reference only. Refer to the HDCVI series DVR user’s manual for detailed information. After connected the camera to the HDCVI series DVR, from Main Menu -> Setting -> System -> PTZ, you need to set control mode as HDCVI and the protocol as DH-SD1. Click Save button to save current setup.
  • Seite 10: Note

    Click Iris “+” to open menu or confirm current operation. Click Iris “-” to realize auto focus. Click up/down button to view all the items on the left pane of the following list. Click left/right button to set the corresponding values on the right pane of the following list. If there is “...
  • Seite 11: Framework & Dimensions & Structue Dome Camera

    Dimensions (unit is mm) & Structure Dome Camera When the standard definition/high definition switch control cable is short circuit, system outputs standard definition video. Otherwise, when the circuit is open, system outputs the high definition video.
  • Seite 12: Installation Dome Camera

    6 Installation Dome Camera for TX-50 & TX-51 Important: Make sure the installation surface can min support the 3x the weight of the camera and the bracket. If you drill a hole in the wall, make sure that power cables, electrical cords and/or pipelines are not damaged.
  • Seite 13 Step 2: Use inner hex wrench to remove the three case locking screws and then remove the dome enclosure. Step 3: Adjust the pedestal position according to the cable exit mode (ceiling/side). Pull the cable through the cable side exit at the installation surface and the pedestal (skip this step if you want to use ceiling exit mode).
  • Seite 14: Menu Dome Camera

    7 Menu 7.1 Settings NOTE: The following operation and interfaces for reference only. Refer to the HDCVI series DVR user’s manual for detailed information. After connected the camera to the HDCVI series DVR, from Main Menu -> Setting -> System -> PTZ, you need to set control mode as HDCVI and the protocol as DH-SD1. Click Save button to save current setup.
  • Seite 15: Note

    Click Iris “+” to open menu or confirm current operation. Click Iris “-” to realize auto focus. Click up/down button to view all the items on the left pane of the following list. Click left/right button to set the corresponding values on the right pane of the list. If there is “...
  • Seite 16: Important Safeguards & Warnings

    8 Important Safeguards & Warnings 8.1 Electrical safety: All installation and operation here should conform to your local electrical safety codes. The power shall conform to the requirement in the SELV (Safety Extra Low Voltage) and the Limited power source is rated 12V DC (24V AC) in the IEC60950-1.
  • Seite 17: Bedienungsanleitung

    ® Technaxx Zusatzkamera Bullet & Dome für Midi Sicherheits-Kit PRO FullHD 1080P TX-51 für Maxi Sicherheits-Kit PRO FullHD 1080P TX-50 Bedienungsanleitung 1 Allgemeine Anweisungen 1.1 Übersicht Diese Serien-Megapixel-HD-Kamera entspricht der HDCVI-Norm. Sie unterstützt Videosignalübertragung mit hoher Geschwindigkeit und großer Entfernung ohne Verzögerung.
  • Seite 18: Spezifikationen Der Bullet Und Dome Kamera

    ICR: Die IR Schnittentfernung ist, um die IR-Beleuchtung bei Tag zu filtern und dann den allgemeinen Filter bei Nacht automatisch zu schalten. Diese Funktion ermöglicht, dass die Kamera die hohe Empfindlichkeit ausgibt und das Video klar macht. Smart IR-Technologie: Der Sensor steuert die IR-Beleuchtung ein/aus über die Kombinationsarbeit der Hardware und der Software, die die automatische IR Beleuchtungskompensation gemäß...
  • Seite 19 Installation Innen- und Aussenbereich: Wandmontage Gewicht / Maße: 550 g / (L) 21,3 × (B) 8,0 x (H) 7,2 cm Verpackungsinhalt: Bullet Kamera zum Midi Security Kit PRO FullHD 1080P TX-50 & Maxi Security Kit PRO FullHD 1080P TX-51, 1x BNC 18,3m Videokabel, 3x Schrauben und 3x Dübel, Bedienungsanleitung...
  • Seite 20 Verpackungsinhalt: Dome Kamera für Midi Security Kit PRO FullHD 1080P TX-50 & Maxi Security Kit PRO FullHD 1080P TX-51, 1x BNC 18,3m Videokabel, 3x Schrauben und 3x Dübel, Bedienungsanleitung Dieses Gerät ist konform mit den Anforderungen der Normen gemäß Richtlinie R&TTE 1999/5/EG.
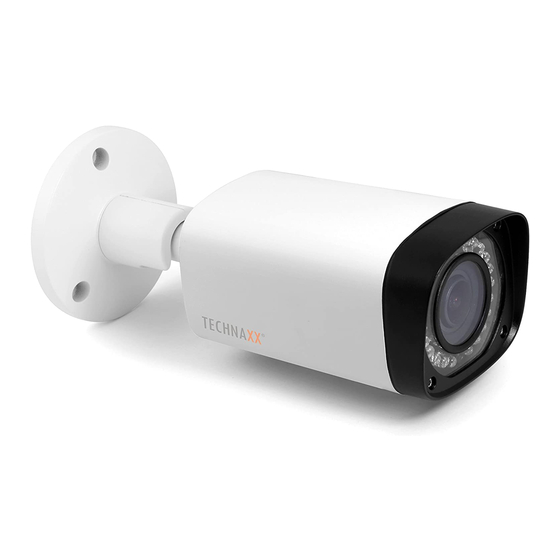
  • Seite 21: Rahmen & Maße & Struktur Bullet Kamera

    2 Maße (Einheit ist mm) & Struktur Bullet Kamera für Kit TX-50 & TX-51 Wenn das Standardauflösungs-/Hochauflösungsschalter-Steuerkabel kurzgeschlossen ist, gibt das System ein Standardauflösungsvideo aus. Ansonsten, wenn der Stromkreis geöffnet ist, gibt das System das Hochauflösungsvideo aus. Power Port = Stromanschluss...
  • Seite 22: Installation Bullet Kamera

    3 Installation Bullet Kamera für TX-50 & TX-51 Wichtig: Stellen Sie sicher, dass die Installationsoberfläche min. das 3-fache des Gewichts der Kamera und der Befestigung stützen kann. Wenn Sie ein Loch in die Wand bohren, stellen Sie sicher, dass Stromkabel, elektrische Stecker und/oder Rohrleitungen nicht beschädigt sind.
  • Seite 23 Schritt 2: Lösen Sie die M3 x 20 Schrauben (= Bolt) und M3 x 5 Schrauben (= Bolt) auf der Befestigung in der angezeigten Richtung, richten Sie die Kamera an einen genauen Standort aus, der durch die Drehung der Befestigung und des Kameragehäuses überwacht werden muss, sichern Sie dann die Schrauben.
  • Seite 24: Menü Bullet Kamera

    4. Menu 4.1 Einstellungen HINWEIS: Die folgenden Vorgänge und Schnittstellen sind nur zur Referenz. Siehe HDCVI Serie DVR Benutzerhandbuch für detaillierte Information. Nach Verbindung der Kamera mit der HDCVI Serie DVR, vom Hauptmenu -> Setting -> System -> PTZ, müssen Sie den Kontrollmodus als HDCVI einstellen und das Protokoll als DH-SD1.
  • Seite 25: Hinweis

    4.2 Hinweis Helligkeit Es dient zur Anpassung der Monitorfenster-Helligkeit. Der Wert reicht von 0 bis 100. Der Standardwert ist 50. Je größer die Zahl ist, desto heller ist das Video. Wenn Sie den Wert hier einsetzen, wird der helle Abschnitt und der dunkle Abschnitt des Videos dementsprechend angepasst.
  • Seite 26: Maße (Einheit Ist Mm) & Struktur Dome Kamera

    Maße (Einheit ist mm) & Struktur Dome Kamera Video Port Videoanschluss Light Blocking Cover Lichtundurchlässige Abdeckung Power Port Stromanschluss Case Gehäuse HD/SD HD/SD Pedestal Fuß Switch Cable Schalterkabel Wenn das Standardauflösungs-/Hochauflösungsschalter-Steuerkabel kurzgeschlossen ist, gibt das System ein Standardauflösungsvideo aus. Ansonsten, wenn der Stromkreis geöffnet ist, gibt das System das Hochauflösungsvideo aus.
  • Seite 27: Installation Dome Kamera

    6 Installation Dome Kamera für TX-50 & TX-51 Wichtig: Stellen Sie sicher, dass die Installationsoberfläche min. das 3-fache des Gewichts der Kamera und der Befestigung stützen kann. Wenn Sie ein Loch in die Wand bohren, stellen Sie sicher, dass Stromkabel, elektrische Stecker und/oder Rohrleitungen nicht beschädigt sind.
  • Seite 28 Schritt 1: Nehmen Sie den Installationspositionsplan aus dem Zubehörbeutel und legen Sie Ihn dann auf die Oberfläche der Decke oder der Wand gemäß der Kabelausgangsposition. Machen Sie drei Löcher gemäß des Installationspositionsplan und nehmen Sie dann drei Spreizdübel aus dem Zubehörbeutel und stecken Sie sie in die Löcher, die Sie gerade gemacht haben.
  • Seite 29 Ceiling or Wall Decke oder Wand Ceiling or Wall Decke oder Wand Installation Installationspositionsplan Module Bracket Modulbefestigung Position Map Horizontal Bottom Case Untere Rotating Horizontaler drehbarer Component Gehäusekomponente Adjustment Field Anpassungsfeldwinkel Angle Module Modulkomponente Camera Module Kameramodul Component Vertical Rotating Cover Vertikaler drehbarer Abdeckungskomponente...
  • Seite 30: Menü Dome Kamera

    7 Menu 7.1 Einstellungen HINWEIS: Die folgenden Vorgänge und Schnittstellen sind nur zur Referenz. Siehe HDCVI Serie DVR Benutzerhandbuch für detaillierte Information. Nach Verbindung der Kamera mit der HDCVI Serie DVR, vom Hauptmenu -> Setting -> System -> PTZ, müssen Sie den Kontrollmodus als HDCVI einstellen und das Protokoll als DH-SD1.
  • Seite 31: Hinweis

    7.2 Hinweis Helligkeit Es dient zur Anpassung der Monitorfenster-Helligkeit. Der Wert reicht von 0 bis 100. Der Standardwert ist 50. Je größer die Zahl ist, desto heller ist das Video. Wenn Sie den Wert hier einsetzen, wird der helle Abschnitt und der dunkle Abschnitt des Videos dementsprechend angepasst.
  • Seite 32: Wichtige Sicherheitshinweise & Warnungen

    8 Wichtige Sicherheitshinweise & Warnungen 4.1 Elektrische Sicherheit: Alle Installationen/Vorgänge hier sollten Ihren lokalen elektrischen Sicherheitscodes entsprechen. Der Strom sollte den Anforderungen in der SELV (Sicherheitsklein-spannung) übereinstimmen und die Stromquelle mit begrenzter Leistung ist mit 12V DC (24V AC) in der IEC60950-1 eingestuft. Wir übernehmen keine Haftung oder Verantwortung für alle Brände oder Stromschläge, die durch falsche Handhabung oder Installation verursacht werden.
  • Seite 33 Dieses Gerät ist konform mit den Anforderungen der Normen gemäß Richtlinie R&TTE 1999/5/EG. Hier finden Sie die Konformitätserklärung: www.technaxx.de/ (in der unteren Leiste unter “Konformitätserklärung”). Vor dem ersten Gebrauch lesen Sie die Bedienungsanleitung sorgfältig durch. Telefonnummer für den technischen Service: 01805 012643 (14 Cent/Minute aus dem deutschen Festnetz und 42 Cent/Minute aus Mobilfunknetzen).
  • Seite 34: Appendix / Anhang

    FRANCĄIS Fonctions Spécification HDCVI : HDCVI (Interface vidéo composite haute définition) est un câble coaxial normal de transmission de vidéo HD. La technologie génère deux formats vidéo HD par un balayage progressif. ICR : Le retrait de coupe de l'IR sert à filtrer la luminosité de l'IR le jour, et à basculer automatiquement sur la position générale la nuit.
  • Seite 35 ESPAÑOL Funciones Especificaciones HDCVI: HDCVI (High Definition Composite Video Interface, Interfaz de vídeo compuesto en alta definición) es un estándar de transmisión de vídeo HD a través de cable coaxial. La tecnología produce dos formatos de vídeo HD por exploración progresiva. ICR: El filtro de eliminación de IR es para filtrar la luz de IR durante el día y para cambiar automáticamente al filtro general por la noche.
  • Seite 36 NEDERLANDSE Functies HDCVI Specificaties: HDCVI(High Definition Composite Video Interface) is een standaard voor het versturen van HD video via een coax-kabel. Deze technologie geeft twee HD videoformaten weer via progressieve scanning. ICR: Het IR-afkapfilter filtert overdag het IR licht uit, en schakelt 's nachts automatisch over op het algemene filter.
  • Seite 37 Poids / Dimensions: 550 g / (Lo) 21,3 x (La) 8,0 × (H) 7,2 cm Contenu de la livraison: Bullet caméra pour Midi Security Kit PRO FullHD 1080P TX-50 & Maxi Security Kit PRO FullHD 1080P TX-51, 1x BNC 18,3m câble vidéo, 3x vis et 3x chevilles, Manuel d’utilisation Particularités &...
  • Seite 38 Poids / Dimensions: 450 g / Φ 12,2 × (H) 8,9 cm Contenu de la livraison: Dôme Caméra pour Midi Security Kit PRO FullHD 1080P TX-50 & Maxi Security Kit PRO FullHD 1080P TX-51, 1x BNC 18,3m câble vidéo, 3x vis et 3x chevilles, Manuel d’utilisation...
  • Seite 39 Cet appareil est conforme aux conditions des normes référencées de la Directive R&TTE 1999/5/CE. Veuillez trouver ici la Déclaration de Conformité: www.technaxx.de/ (sur la barre inférieure “Konformitätserklärung”). Avant la première utilisation, lisez attentivement le manuel d’utilisation. No. de téléphone pour le support technique: 01805 012643 (14 centimes/minute d’une ligne fixe Allemagne et 42 centimes/minute des réseaux mobiles).
  • Seite 40 Peso / Dimensioni: 550 g / (Lu) 21,3 x (La) 8,0 x (A) 7,2 cm Contenuto della confezione: Bullet camera per Midi Security Kit PRO FullHD 1080P TX-50 & Maxi Security Kit PRO FullHD 1080P TX-51, 1x BNC 18,3m cavo video, 3x viti e 3x tasselli, Manuale dell'utente Particularità...
  • Seite 41 Peso / Dimensioni: 450 g / Φ 12,2 × (A) 8,9 cm Contenuto della confezione: Dome camera per Midi Security Kit PRO FullHD 1080P TX-50 & Maxi Security Kit PRO FullHD 1080P TX-51, 1x BNC 18,3m cavo video, 3x viti e 3x tasselli, Manuale dell'utente Questo dispositivo aderisce agli standard richiesti ai sensi della Direttiva R&TTE...
  • Seite 42 Peso / Dimensioni: 550 g / (Lu) 21,3 x (La) 8,0 x (A) 7,2 cm Contenido del paquete: Bullet cámara para Midi Security Kit PRO FullHD 1080P TX-50 & Maxi Security Kit PRO FullHD 1080P TX-51, 1x BNC 18,3m cable vídeo, 3x tornillos y 3x clavijas, Manual de usuario Descripción &...
  • Seite 43 Peso / Dimensiones: 450 g / Φ 12,2 × (Al) 8,9 cm Contenido del paquete: Dome cámara para Midi Security Kit PRO FullHD 1080P TX-50 & Maxi Security Kit PRO FullHD 1080P TX-51, 1x BNC 18,3m cable vídeo, 3x tornillos y 3x clavijas, Manual de usuario Este dispositivo cumple con los requisitos de las normativas a las que hace referencia la Directiva R&TTE 1999/5/CE.
  • Seite 44 Migawka elektroniczna: 1/3 Sek. ~ 1/100000 Sek. (PAL) 1-kanałowe wyjście wideo BNC HDCVI wysokiej jakości & wyjście wideo CVBS standardowa rozdzielczość BLC (kontrola podświetlinea): automatycznie IR światła jest aktywna tylko do nagrán wideo w trybie nocnym Redukcja szumów 2D/3D Kolor lub Czarny/Biały: do wyboru Kąt widzenia w poziomie: 105.5°...
  • Seite 45 Deklarację zgodności odnajdziesz stronie: www.technaxx.de/ (w pasku na dole "Konformitätserklärung"). Przed pierwszym użyciem urządzenia należy dokładnie przeczytać instrukcję obsługi. Numer telefonu do wsparcia technicznego: 01805 012643 (14 centów/minuta z niemieckiego telefonu stacjonarnego i 42 centów/minuta z sieci komórkowych). Email: support@technaxx.de Wskazówki...
  • Seite 46 Herstel heldere en contrastrijke video Ondersteunt IR functie met IR-LED-bereik max. 15m Beschermingklasse IP66 (stof- en spatwaterdicht) Video framerate: 25/30/50/60 fps @ 720P & 25/30 fps @ 1080p Min Lichtsterkte: 0,05 Lux @ F1.2 (AGC AAN), 0 Lux met IR ingeschakeld Elektronische sluiter: 1/3 Sek.
  • Seite 47 Gewicht / Afmetingen: 450 g / Φ 12,2 × (H) 8,9 cm Inhoud verpakking: Dome camera voor Midi Security Kit PRO FullHD 1080P TX-50 & Maxi Security Kit PRO FullHD 1080P TX-51, 1x BNC 18,3m videokabel, 3x schroeven en 3x pluggen, Gebruikersaanwijzing Dit product is in overeenstemming met de voorschriften die zijn vermeld in Richtlijn R&TTE 1999/5/EC.
  • Seite 48 Hmotnost / Rozměry: 550 g / (D) 21,3 x (Š) 8,0 x (V) 7,2 cm Obsah balení: Bullet camera pro Midi Security Kit PRO FullHD 1080P TX-50 & Maxi Security Kit PRO FullHD 1080P TX-51, 1x BNC 18,3m video kabel, 3x šrouby a 3x hmoždinky, Návod k obsluze...
  • Seite 49 Instalace vnitřní a venkovní: montáž na stěnu / montáž na strop Hmotnost / Rozměry: 450 g / Φ 12,2 × (V) 8,9 cm Obsah balení: Dome camera pro Midi Security Kit PRO FullHD 1080P TX-50 & Maxi Security Kit PRO FullHD 1080P TX-51, 1x BNC 18,3m video kabel, 3x šrouby a 3x hmoždinky, Návod k obsluze...
  • Seite 50: Gnu General Public License

    You may obtain a complete machine-readable copy of the source code for the above mentioned software under the terms of GPL v2 without charge except for the cost of media, shipping, and handling, upon written request to Technaxx GmbH & Co. KG, Kruppstraße 105, 60388 Frankfurt am Main, Germany.
  • Seite 51: Terms And Conditions For Copying, Distribution And Modification

    TERMS AND CONDITIONS FOR COPYING, DISTRIBUTION AND MODIFICATION 0. This License applies to any program or other work which contains a notice placed by the copyright holder saying it may be distributed under the terms of this General Public License. The "Program", below, refers to any such program or work, and a "work based on the Program"...
  • Seite 52 3. You may copy and distribute the Program (or a work based on it, under Section 2) in object code or executable form under the terms of Sections 1 and 2 above provided that you also do one of the following: a) Accompany it with the complete corresponding machine-readable source code, which must be distributed under the terms of Sections 1 and 2 above on a medium customarily used for software...
  • Seite 53: End Of Terms And Conditions

    It is not the purpose of this section to induce you to infringe any patents or other property right claims or to contest validity of any such claims; this section has the sole purpose of protecting the integrity of the free software distribution system, which is implemented by public license practices.
  • Seite 54: How To Apply These Terms To Your New Programs

    HOW TO APPLY THESE TERMS TO YOUR NEW PROGRAMS (1) If you develop a new program, and you want it to be of the greatest possible use to the public, the best way to achieve this is to make it free software which everyone can redistribute and change under these terms.

Diese Anleitung auch für:

Tx-51

Inhaltsverzeichnis