Midland G7 XT Anleitung
Duoband - handfunkgerät
Vorschau ausblenden
Andere Handbücher für G7 XT:
- Anleitung (3 Seiten) ,
- Bedienungsanleitung (2 Seiten)
Midland G7 XT
2.2 Avvertenze
!
BATTERIE - Osservate tutte le precauzioni sull'utilizzo delle batterie descritte nel cap. 4.1
Ricetrasmettitore Dual Band PMR/LPD
!
NON APRITE LA RADIO PER NESSUN MOTIVO, la meccanica ed elettronica di precisione
di cui é composto l'apparato richiede esperienza e strumentazione; per lo stesso motivo
1. INTRODUZIONE
non va assolutamente riallineata la radio, che é già stata tarata in fabbrica per le massime
L'apparato Midland G7 XT grazie all'utilizzo delle tecnologie più avanzate in campo di
prestazioni. L'apertura del ricetrasmettitore da parte di personale non autorizzato farà
radiocomunicazione ed alla sua robusta struttura meccanica è decisamente la soluzione più affidabile
decadere automaticamente la garanzia.
ed ideale per la gestione professionale di team di lavoro, per la comunicazione con più persone
!
Non utilizzate alcool, solventi o abrasivi per pulire l'apparecchio. Utilizzate solo un panno
all'interno di cantieri, di edifici, nelle manifestazioni sportive, spettacoli, fiere ed alberghi. Estremamente
morbido e pulito leggermente inumidito con acqua. Nei casi più tenaci utilizzate un blando
comodo e completo, opera su due bande di frequenza LPD e PMR; dotato di tutte le principali funzioni
detergente.
dei ricetrasmettitori più all'avanguardia Midland G7 XT garantisce massima efficacia ed affidabilità. Il
display retroilluminato permette di utilizzare il ricetrasmettitore anche in condizioni di scarsa luce, la
3. DESCRIZIONE DELLE PARTI
funzione Auto Power Save economizza automaticamente il consumo delle batterie fino al 50%, mentre
3.1 Display
la posizione centrale dei tasti di comando consente un veloce e pratico utilizzo del ricetrasmettitore.
Il vostro ricetrasmettitore utilizza un display LCD (a cristalli
liquidi) per informarvi costantemente del suo stato operativo. I
Copertura riferita alla banda PMR
simboli ed i parametri che possono apparire di volta in volta sono
Le prestazioni dei ricetrasmettitori dipendono dalle condizioni ambientali ed atmosferiche. Fattori am-
i seguenti:
bientali quali alture, edifici, alberi, fogliame possono diminuire la copertura. Le prestazioni ottimali si
1. VOX - Indica l'attivazione della funzione VOX;
ottengono in campo aperto mentre la portata si potrà ridurre, per esempio all'interno di un'automobile
2. TX - Compare quando state trasmettendo (pulsante PTT
o di un edificio. Tipicamente la copertura in città, in presenza di edifici è di 1 o 2 Km. In campo aperto,
premuto);
ma con presenza di alberi, case, fogliame, la copertura è di 4-6 Km. In campo aperto, a vista e senza
3.
Il simbolo del lucchetto indica che avete attivato il blocco
nessun tipo di interferenza, come per esempio in montagna, la copertura può essere anche superiore
della tastiera.
ai 12 Km.
4. CANALE - Queste due grandi cifre indicano il canale selezionato (P1-P8 PMR, 1-69 LPD).
5.
Il simbolo della batteria vi avvisa quando il pacco batteria o le batterie AA stanno per
Queste sono le caratteristiche principali del vostro ricetrasmettitore:
scaricarsi;
•
Ricetrasmettitore Dual Band LPD/PMR
6.
Indica l'attivazione della funzione Vibra-Call;
•
Funzione VIBRACALL
7. H (High) / L(Low)- indica la selezione della bassa o dell'alta potenza di trasmissione (Banda
•
Display a cristalli liquidi retroilluminato
PMR).
•
Indicatore batteria scarica
8. RX - (canale occupato): appare sul display quando il ricetrasmettitore sta ricevendo un segnale.
•
Auto power save: circuito automatico di economizzazione batterie
9. Toni CTCSS - queste due piccole cifre indicano il codice del tono CTCSS selezionato (1 - 38).
•
38 toni CTCSS in TX e RX
•
Tasto CALL di chiamata, con 5 toni selezionabili
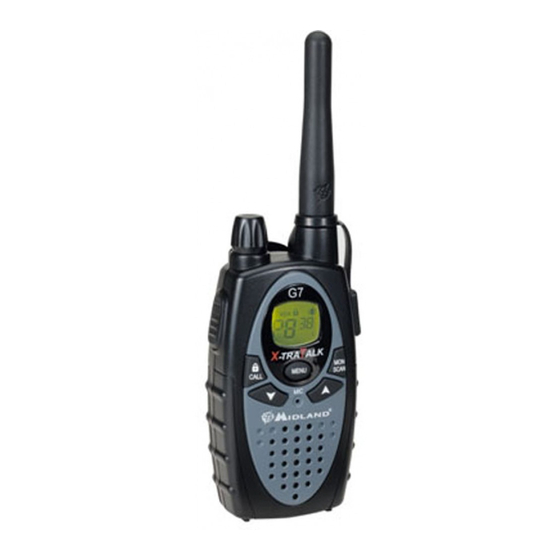
3.2 Radio
•
Regolazione squelch automatico
Fate riferimento al'immagine a fianco per localizzare le varie
•
Pulsanti per la selezione dei canali
parti dell'apparecchio:
•
Funzione SCAN
10. Manopola VOLUME - Accende/spegne l'apparecchio e
•
Blocco tastiera per evitare pressioni accidentali sui tasti
regola il volume audio di ricezione.
•
Selezione alta/bassa potenza (Banda PMR)
11. Pulsante PTT (premere per parlare) - La pressione di
•
Roger Beep disinseribile
questo pulsante, porta l'apparecchio in trasmissione
•
VOX per comunicazioni a mani libere
12. Pulsante CALL/
- Serve ad inviare un segnale di chiamata
•
Presa a 2 Pin per microfono esterno / altoparlante esterno / ricarica batterie
sul canale selezionato, oppure tenendolo premuto per circa
Nota: il costruttore, nell'impegno di migliorare costantemente la qualità del prodotto, si riserva la
5 secondi si attiva la funzione blocco tastiera.
facoltà di variarne le caratteristiche senza preavviso.
13. MICROFONO Integrato - In questo punto è ubicato il
microfono per la trasmissione.
14. ALTOPARLANTE Integrato - In questo punto è ubicato
2. INNANZITUTTO... LA SICUREZZA!
l'altoparlante per la ricezione.
2.1 Simbologia utilizzata
15. ANTENNA - Serve a ricevere e trasmettere i segnali radio.
Per una lettura rapida e razionale abbiamo utilizzato simboli che evidenziano situazioni di massima
16. Presa ALTOPARLANTE/MICROFONO (sotto la protezione)
attenzione, consigli pratici o semplici informazioni.
- Consente il collegamento a dispositivi esterni (cuffie,
!
Le note come queste, riportate con il punto esclamativo, evidenziano una descrizione
microfoni ecc.)
della massima importanza riguardante interventi tecnici, condizioni pericolose, avvertenze
17. Pulsante MENU - La pressione di questo pulsante, porta
di sicurezza, consigli e/o informazioni della massima importanza. La loro inosservanza
l'apparecchio nel MENU .
potrebbe causare seri problemi e/o danni e/o lesioni personali.
18. Pulsante MONITOR/SCAN - Premendo brevemente questo
Le note come queste, contrassegnate con il foglietto di promemoria, costituiscono consigli pratici di
pulsante si attiva la funzione SCAN, scansione dei canali.
rilievo che suggeriamo di seguire per ottenere le migliori prestazioni dall'apparecchio.
Tenendo premuto per circa 2 secondi lo stesso pulsante si accede alla funzione MON, che esclude
Midland G7 XT
2.2 Warnings
!
BATTERIES - Strictly follow all the directions and warnings on the batteries stated at chapter
Dual band PMR/LPD transceiver
4.1
!
Do not open the radio for any reason! The radio's precision mechanics and electronics
1. INTRODUCTION
require experience and specialized equipment; for the same reason, the radio should under
Combing the latest technology in radio communication along with a sturdy mechanical frame, the
no circumstances be realigned as it has already been calibrated for maximum performance.
Midland G7 XT makes the ideal and effective solution for both the professionals who need to stay in
Unauthorized opening of the transceiver will void the warranty.
!
Do not use detergents, alcohol, solvents, or abrasives to clean the equipment. Just use a
touch with colleagues (construction sites, buildings, hotels, trade fairs, shows) or with leisure users
that just want to keep up with friends and family. Its robust frame, ease of use and simple design mean
soft, clean cloth. If the radio is very dirty, slightly dampen the cloth with a mixture of water
that it is ideal for use in any activity. The Midland G7 XT is extremely practical and operates on both
and a neutral soap.
PMR446 and LPD bands (please see chart in user guide for restrictions on use).
The Midland G7 XT incorporates all the functions that you would expect to see on the latest and most
advanced two way radio transceivers and guarantees reliability and maximum efficiency. Other key
3. IDENTIFYING THE PARTS
features include an LCD backlit display, a Vibrating call alert feature for use in high-noise areas and an
3.1 Display
auto power save function which reduces battery consumption by up to 50%. All of the features on this
Your Midland G7 XT keeps you constantly updated about its operational status through a Liquid
outstanding radio are easily accessible thanks to the centrally mounted controls.
Crystal Display (LCD). The symbols and their corresponding parameters that may appear, according
to the operational status of the device, are described as follows:
Coverage (referred to PMR frequency band)
1. VOX - Activation of VOX function.
The maximum range depends on terrain condition and is obtained during use in an open space.
2. TX- during transmission (PTT pressed).
The only limitation to maximum possible range are environmental factors such as blockage caused
3.
This symbol appears when the keypad lock is activated.
by trees, buildings, or other obstructions. Inside a car or a metallic constructions, the range can be
4. CHANNEL - These two large digits indicate the channel
reduced. Normally the coverage in the city, with buidings or other obstructions is about 1 or 2 Km. In
selected (P1~P8 PMR, 1~69 LPD).
open space but with obstructions like trees, leafs or houses the maximum possible range is about 4-6
5.
It warns you of the battery pack / AA batteries low
Km. In open space, without obstructions and in sight, like for example in mountain, the coverage can
charge.
be more than 12 Km.
6.
Vibra-Call function activated.
7. H (High) / L(Low) - shows the high or low power selection (PMR band).
Main functions
8. RX - (busy channel): appears on the display when the transceiver is receiving a signal.
•
Dual Band LPD/PMR transceiver
9. CTCSS tones - these 2 small digits indicate the selected CTCSS tone (1 - 38).
•
VIBRACALL function
•
LCD display with backlight
3.2 Radio
•
Low battery indicator
Refer to this picture to identify the various parts of the device:
•
Auto power save: automatic current economy circuit
10. VOLUME knob - On/off switch for the device and adjusts
•
38 CTCSS tones in TX and RX
volume of reception.
•
CALL button with 5 tones selectable
11. PTT button (push to talk) - Press this button to transmit.
•
Automatic squelch adjustment
12. CALL/
button - to send a call on the selected channel. If
•
Buttons for the channel selection
you keep it pressed for about 5 seconds, the keypad lock is
•
SCAN function
activated.
•
Keypad lock
13. Built-in MICROPHONE - Here is where sound is picked up by
•
Hi/low power selection (PMR band)
the microphone.
•
Roger Beep on/off
14. Built-in SPEAKER - Here is where the speaker is housed.
•
VOX for hands-free communications
15. ANTENNA - Receives and transmits radio signals.
•
2 Pin jack for ext. mike / ext. speaker / battery recharge
16. SPK/MIC socket (under protective cover) - To connect to
NOTE: The manufacturer, with its effort to constantly improve product quality, reserves the right to
external audio devices (headphones, microphone etc.) and to
change characteristics and features without prior notice.
the battery charger.
17. MENU button - Press this button to display the device's
2. ABOVE ALL....SAFETY!
menu.
2.1 Simbols used
18. MONITOR/SCAN button- Press this button once to activate
For ease and convenience of use, this manual uses symbols to highlight urgent situations, practical
SCAN (scanning of channels). Keep the same button pressed
advice, and general information.
for about 2 seconds to activate MON function. This function
!
Exclamation marks such as this one indicate a crucial description regarding technical
temporarily cuts off Squelch (for weak signals).
repairs, dangerous conditions, safety warnings, advice, and/or other important information.
19. Scroll buttons
/
- Press these buttons to change setting
Ignoring these symbols may result in serious problems and/or damage and/or personal
within the MENU.
injury.
Notes such as this one indicate practical advice that we suggest be followed for the optimal
performance of the equipment
M
Midland G7 XT
...
Transceptor pmr446/LPD
1. INTRODUCCIÓN
Combinando las últimas tecnologías en radiocomunicación junto a un robusto chasis, el Midland G7
XT es la solución ideal y efectiva tanto para los profesionales que tienen que estar en contacto con sus
compañeros (obras, hoteles, ferias, eventos deportivos, etc.) como para el usuario que sólo necesita hablar
con su familia o amigos. Un chasis robusto, facilidad de uso y un diseño efectivo lo convierten en ideal para
usarlo en cualquier actividad. El Midland G7 XT es extremadamente práctico y trabaja en las dos bandas
de uso libre: pmr446 y LPD (revise el cuadro de restricciones al uso que acompaña al presente manual).
El Midland G7 XT aúna a las funciones que cabría esperar en equipos de última generación, fiabilidad y
máxima eficacia.
Entre otras características incluye display iluminado, Vibra-Call (alerta de llamada por vibración) para su uso
en ambientes ruidosos y ahorro de baterías automático, el cual reduce el consumo hasta un 50%.
Todas las funciones de este equipo son fácilmente accesibles gracias a la posición central de los mandos.
Alcance (referido a la banda de frecuencias de pmr446)
El máximo alcance se obtiene utilizando los equipos al aire libre y dependiendo de las características
del terreno. Factores ambientales como árboles, edificios y otros obstáculos pueden hacer que dismi-
nuya el rango de cobertura. Así mismo dentro de un coche o bajo estructuras metálicas, el alcance
puede disminuir. Normalmente la cobertura en la ciudad, con edificios y otros obstáculos es entre 1 y 2
Km. En espacios abiertos con algún tipo de obstáculo, el alcance puede estar entre 4-6 Km. y, sin nin-
gún tipo de obstáculo, por ejemplo entre dos montes, al alcance podría ser superior a los 12 Km.
Características principales:
•
Transceptor Doble Banda pmr446/LPD
•
Función de vibración - Vibra-Call
•
Display LCD retroiluminado
•
Indicador de batería baja
•
Ahorro de baterías automático
•
38 subtonos CTCSS en TX y RX
•
Tecla de llamada "CALL" con 5 tonos seleccionables
•
Squelch de ajuste automático
•
Teclas de selección de canal
•
Función SCAN
•
Bloqueo de teclado
•
Selección de potencia alta/baja (banda PMR)
•
Roger Beep on/off
•
VOX control para comunicación manos libres
•
Conector 2 Pin para micro-altavoz externo y toma de carga de baterías.
Sólo para el uso del equipo en España: la banda autorizada para libre uso en España es, a fecha de
la edición del presente manual, la de pmr44
temporaneamente lo Squelch per ricevere anche i segnali estremamente deboli.
le istruzioni di FIGURA 1. Per fissare nuovamente la clip all'apparecchio, posizionatela nell'apposita
19. Pulsanti
/
- servono a variare le impostazioni all'interno del MENU.
scanalatura, posta sul retro del ricetrasmettitore, e fatela scorrere finche non udirete scattare il fermo.
4.4 Rimozione/fissaggio del pacco batteria
4. PREPARAZIONE
4.4.a Rimozione
Prima di utilizzare il vostro ricetrasmettitore, dovete innanzitutto accertarvi che la confezione contenga:
1) Rimuovete la clip da cintura come spiegato nel
2 ricetrasmettitori; caricabatteria doppio da tavolo; adattatore da muro; 2 pacchi batterie da 800m
par. 4.3;
A/h NiMH; la clip da cintura; il manuale d'istruzioni. Se qualche parte dovesse mancare o risultare
2) Aprire il vano batterie come mostrato in FIG. 2;
danneggiata, contattate immediatamente il vostro fornitore.
3) Rimuovete il pacco batteria dall'apparecchio;
4) Ripristinate in sede la clip da cintura.
4.1 Ricarica del pacco batteria
Il pacco batterie in dotazione é del tipo Ni-MH da 6V e deve essere caricato quando è inserito nel
4.4.b Fissaggio
ricetrasmettitore; sono necessarie 12 -14 ore per una carica completa.
1) Rimuovete la clip da cintura come spiegato nel
Per caricare il pacco batterie:
par. 4.3;
1) Inserite la spina del cavo di ricarica in una presa di alimentazione di rete CA e l'altra estremità nella
2) Inserite il pacco batteria nell'apposito vano
presa della vaschetta di ricarica.
dell'apparecchio.
2) Inserite il ricetrasmettitore nella vaschetta in modo che si innesti saldamente al suo interno.
3) Ripristinate in sede la clip da cintura.
3) Al termine della carica, estraete il ricetrasmettitore dalla vaschetta e scollegate la spina del cavo di
ricarica dalla presa di alimentazione di rete CA.
5.OPERAZIONI DI BASE
FIGURA 1
!
Non sovraccaricate le batterie! Quando le batterie sono completamente cariche, il processo
5.1 Accensione/spegnimento
di carica non si blocca automaticamente. Non dimenticate quindi di staccare al più presto il
Per accendere il ricetrasmettitore, ruotate la manopola VOLUME[10] in senso orario sino a che sentite
ricetrasmettitore dal caricabatteria non appena é trascorso il tempo necessario, diversamente
uno scatto meccanico: si accenderà il display LCD che effettuerà un Auto-Test e successivamente si
potreste danneggiare le batterie e/o il ricetrasmettitore.
udiranno 3 Beep di tonalità diversa. Per spegnere il ricetrasmettitore, ruotate la manopola in senso
!
Non cercate di caricare batterie alcaline o comunque batterie non ricaricabili. Accertatevi che
antiorario fino a sentire nuovamente lo scatto meccanico: il display LCD si spegnerà e verranno emessi
nel vano batterie dell'apparecchio, con il caricabatterie collegato, siano inserite esclusivamente
3 Beep di tonalità diversa.
batterie ricaricabili NI-MH del tipo consigliato! E' molto pericoloso tentare di ricaricare batterie
di altro tipo (ad esempio alcaline o al manganese). Batterie non idonee possono perdere
5.2 Regolazione volume
liquido, esplodere o anche bruciare e causare gravi danni!
Portate la manopola VOLUME[10] a metà corsa e non appena ricevete un segnale regolate il volume
!
L'utilizzo di un caricabatterie non originale puó causare danni al vostro apparecchio o causare
ad un livello confortevole. Se non ricevete segnali, potete utilizzare il pulsante MON/SCAN [18] descritto
esplosioni e lesioni personali.
nel par. 5.4.
!
Non gettate mai le batterie nel fuoco, né avvicinatele a sorgenti di calore: possono causare
esplosioni e lesioni personali. Smaltite le batterie esclusivamente seguendo le normative
5.3 Trasmissione e ricezione
locali.
Il pulsante PTT [11] si trova sulla parte superiore del lato sinistro del vostro Midland G7 XT. Per
!
Non mescolate assieme batterie vecchie e nuove e/o di tipo diverso e/o utilizzate in modo
trasmettere:
diverso.
1) Assicuratevi che sul canale selezionato nessun altro stia parlando;
2) Tenete premuto stabilmente il pulsante PTT [11]: sul display compare TX[2];
4.2 Effetto memoria delle batterie ricaricabili
3) Attendete una frazione di secondo e parlate con tono normale a circa 5 cm di distanza in direzione del
Le batterie ricaricabili Ni-MH (Nickel-metal-idrato) sono virtualmente prive di quello che viene chiamato
microfono del ricetrasmettitore;
"Effetto Memoria". Quest'ultimo si manifesta con una drastica diminuzione dell'autonomia d'uso
4) Quando avete terminato, rilasciate il pulsante PTT [11]: scomparirà TX [2]dal display;
dell'apparecchio e viene innescato se, sistematicamente, ricaricate le batterie prima di averlo scaricato
5) Quando l'apparecchio é in ricezione (pulsante PTT [11] rilasciato) riceverete automaticamente
del tutto e/o non le caricate completamente. Per evitare il manifestarsi dell'effetto memoria:
qualsiasi comunicazione, durante la ricezione di un segnale verrà visualizzato sul Display RX [8];
•
Quando possibile, ricaricate il pacco batteria solo dopo averlo scaricato completamente (fino a che
Durante le operazioni di trasmissione e ricezione cercate di mantenere l'antenna il più possibile in
l'apparecchio si spegne con il normale uso)
posizione verticale e di fare in modo che non abbia ostacoli nella direzione della vostra controparte.
•
Non scollegate il caricabatterie prima del tempo necessario ad effettuare una carica completa.
•
Scaricate e caricate a fondo il vostro pacco batterie almeno due volte al mese. In ogni caso, la
5.4 Pulsante MON (Monitor)
soluzione migliore per evitare l'effetto memoria é quella di utilizzare a rotazione due pacchi batterie:
Il pulsante Monitor consente di escludere temporaneamente lo squelch per ascoltare eventuali segnali
uno in uso e l'altro di scorta. Per eliminare l'effetto memoria basta semplicemente effettuare tre o
estremamente deboli che non riescono ad aprirlo stabilmente. In questo modo eviterete di sentire la
quattro cicli di scarica/carica profonda.
comunicazione spezzettata. Per attivare la funzione Monitor, premete e tenete premuto per circa
L'effetto memoria non va confuso con la normale vita delle batterie che é mediamente di circa 300-
2 secondi il pulsante MON/SCAN [18] per ascoltare tutto il traffico radio sul canale selezionato. Per
400 cicli di carica/scarica. E' normale che l'autonomia operativa si riduca quando le batterie stanno
disattivare questa funzione premere per circa 2 secondi il tasto MON/SCAN [18].
raggiungendo il termine del ciclo di vita, in questo caso sostituite le batterie.
5.5 Scansione di tutti i canali
4.3 Rimozione/fissaggio della clip da cintura
Midland G7 XT può ricercare automaticamente segnali su tutti i canali delle bande PMR/LPD
La clip posteriore di serie vi permette di fissare facilmente il ricetrasmettitore alla cintura. Tuttavia questa
effettuandone la "scansione", cioè selezionandoli rapidamente in sequenza. Quando viene rilevato un
va rimossa nel caso in cui dobbiate rimuovere il pacco batterie. Per rimuovere la clip da cintura seguite
segnale, la scansione si arresta su di esso. Una volta trovata la comunicazione desiderata ci basterà
4. PREPARING THE TRANSCEIVER
3) Remove the battery pack;
Make sure the following items are supplied in the package before you start using your transceiver:
4) Replace the battery cover and fix the belt clip.
2 transceivers; double desktop charger; wall adaptor; 2 battery packs, 800m A/h NiMH; belt clip;
4.4.b Installation
operational manual.
1) Remove the belt clip as explained in paragraph
If any of the above is missing or damaged contact your supplier immediately.
4.3;
4.1 Battery pack recharge
2) Insert the battery pack into the battery
The supplied battery pack is 6V NiMH type and must be recharged without taking it out of the transceiver;
compartment;
3) Replace the battery cover and fix the belt clip.
it takes 12 -14 hours to fully recharge.
To recharge the battery pack:
1. Connect the socket of the wall adaptor to a mains power socket and insert the jack of the wall adaptor
5.BASIC OPERATION
into the desktop charger plug.
2. Place your transceiver into the cradle of the desktop charger.
5.1 Turning on/off
3. When charging is complete take the transceiver out of the cradle and detach the socket of the wall
To turn on the transceiver, turn the VOLUME
adaptor from the mains.
[10] knob clockwise until you hear it clicks: the
!
Do not overcharge the batteries! When these are fully charged the charging process does
LCD display will light up and do an Auto-Test.
Picture 1
not stop automatically. Do not forget therefore, to remove the transceiver from the charger as
Subsequently you will hear 3 beeps of different
soon as the batteries are charged.
tones.
!
Do not try to charge alkaline batteries or non rechargeable batteries. Make sure that when
To turn off the transceiver, turn the knob counter-clockwise until you hear another click. The LCD display
you charge the radio, only rechargeable NI-MH batteries should be contained in the battery
will turn off and subsequently you will hear 3 beeps of different tones.
compartment! It is very dangerous attempting to recharge other types of batteries (for example
alkaline or manganese batteries). Batteries which are not suitable to be recharged may leak,
5.2 Volume control
explode or even burn and cause damage!
Turn the knob VOLUME[10] to about half way and adjust it to a comfortable level as soon as you receive
!
Using a different battery charger other than the one specified can cause damage to your device
a signal. If you do not receive a signal you can use the button MON/SCAN [18] described at par. 5.4.
or may even cause explosions and personal injuries.
!
Do not throw batteries into fire or place them near heat as this may cause explosions or personal
5.3 Transmission and reception
injuries. Dispose of the batteries according to procedures set out by local regulations.
The button PTT [11] is located on the top left side of the device. To transmit:
!
Do not mix old and new batteries or batteries of different types or batteries which have been
1) Make sure that no one else is currently talking on the selected channel;
used in different manners.
2) Keep button PTT [11] firmly pressed: TX [2]will appear on the display;
3) Before you start talking wait for a fraction of a second then speak normally, in the direction of the
4.2 Memory effect of rechargeable batteries
microphone, and hold the device at a distance of about 5 cm.
Rechargeable NiMH (Nickel-Metal-Hydrate) batteries are affected by what is known as the "memory
4) When you have finished, release the PTT [11]: TX [2]will disappear from the display;
effect". This phenomenon is associated with a drastic reduction of battery autonomy and is triggered if
5) When the radio is in reception mode (PTT [11] not pressed) you will automatically receive any
the batteries are regularly charged before being fully discharged and/or are not completely recharged.
communication (RX [8] displayed).
To avoid the memory effect:
During transmission and reception try, as far as possible, to keep the antenna in vertical position and
•
When possible, recharge the batteries only when they are completely discharged (until the device
to avoid obstacles towards the direction of the other party.
turns itself off during normal use)
•
Do not disconnect the battery charger before the time indicated for a full battery charge.
5.4 MON button (Monitor)
•
Discharge and recharge your batteries completely at least twice a month. In any case, the best
The Monitor button is for temporarily excluding (opening) the squelch, in order to listen to signals that
solution for avoiding the memory effect is to use in turn two battery sets: one in use, and the other
are too weak to keep the squelch permanently opened. By excluding the squelch you will avoid listening
as a spare set. The memory effect can be easily eliminated by completely discharging/charging the
the communication "chopped" by the squelch. In order to activate the Monitor function, so as to listen to
batteries 3 or 4 times.
all traffic on the selected channel, keep pressed the MON/SCAN [18] button for about 2 seconds. Keep
The memory effect should not be confused with the normal battery life, which is 300-400 cycles
pressed the button MON/SCAN [18] for about 2 seconds to disable this function.
of charge/discharge on average. It is completely normal for operating duty to decrease when the
batteries have reached the end of their life; at this point, you will need to substitute the batteries.
5.5 Scanning all channels
Midland G7 XT can automatically search for signals throughout the PMR/LPD bands by scanning, i.e.
4.3 Installing and removing the belt clip
selecting the channels in rapid sequence. When a signal is detected, the scanning pauses on that channel
With the belt clip you can easily attach the transceiver to your belt. The clip however, must be removed in
and you can transmit by pushing PTT [11] . If you press PTT [11] during scanning you can transmit on the
order to install or change the batteries. To remove the belt clip follow the indication of picture 1. To fix the
channel from which the scanning started. The scroll buttons
clip back to the device slot it in the guides at the back of the transceiver until it clicks into place.
of scanning (from lower channels to higher ones or vice versa) and therefore to skip communications
which are of no interest.
4.4 Installing/removing the battery pack
Press briefly the button MON/SCAN [18] to start scanning.
4.4.a Removal
If you want to stop it, press again MON/SCAN [18]. Your transceiver will go back to the channel from
1) Remove the belt clip as explained in paragraph 4.3;
which the scanning originally started.
2) Open the battery compartment as shown in picture 2;
premere il tasto PTT [11] per poter comunicare. La pressione del tasto PTT [11] durante la scansione
Per farlo, premete 3 volte il pulsante MENU[17] apparirà sul Display Pr, utilizzando i tasti
selezionare L[7], premere PTT [11] per confermare, oppure attendere 5 secondi. Se volete trasmettere
ci permetterà di trasmettere sul canale da cui siamo partiti a scansionare la banda. I tasti
/
[19]
ci permettono di invertire il senso di scansione e di evitare l'ascolto di canali con comunicazioni non
a lunga distanza, premete nuovamente i tasti in sequenza e selezionare H[7]. Con le batterie in buone
desiderate.
condizioni, l'alta potenza é di 500 mW, mentre quella bassa é di 10mW.
Per eseguire la scansione dei canali, premere brevemente il pulsante MON/SCAN [18]: Midland G7 XT
Durante la trasmissione, un basso livello batteria influirà notevolmente sulle prestazioni del vostro
inizia ad eseguire la scansione dei canali. Per fermare la scansione, premete nuovamente il pulsante
ricetrasmettitore.
MON/SCAN [18], il vostro ricetrasmettitore tornerà sul canale da cui abbiamo fatto partire la scansione.
6.4 Funzione VOX
5.6 Illuminazione del display
Midland G7 XT consente conversazioni a mani libere tramite il dispositivo VOX. La sensibilità del VOX è
Se l'illuminazione ambientale non é sufficiente a farvi leggere bene il display, premendo il pulsante
regolabile su 2 livelli. La funzione VOX è attivabile con o senza accessori. Per attivare la funzione VOX,
MENU[17] lo illuminerete per circa 5 secondi.
premete 4 volte il pulsante MENU[17] nella banda PMR apparirà sul display VOX[1], utilizzando i tasti
L'illuminazione del display assorbe energia supplementare dalle batterie. Cercate di farne un uso
/
[19] selezionare:
moderato.
• Of: Disattivato;
• 1: 1° Livello (Bassa sensibilità);
• 2: 2° Livello (Alta sensibilità);
5.7 Blocco tastiera
premere PTT [11] per confermare, oppure attendere 5 secondi.
Mantenere premuto il tasto CALL/ [12] per circa 5 secondi. Il simbolo che appare sul display [3] indica
Per disattivare la funzione VOX seguire le indicazioni sopra riportate selezionando la voce oF.
la sua attivazione. Solo i tasti PTT [11] e CALL/ [12] rimangono attivi. Per la disattivazione, premere e
tenere premuto nuovamente il tasto CALL/ [12] per circa 5 secondi.
6.5 Funzione Vibra-Call
FIGURA 2
Midland G7 XT è dotato del dispositivo "Vibra-Call", ovvero la possibilità di attivare il vibratore interno al
5.8 Power Save
momento della ricezione del "TONO DI CHIAMATA".
Il dispositivo Automatico di risparmio batterie consente di ridurre i consumi fino al 50%; se la radio non
Per attivare ciò occorre eseguire le seguenti istruzioni:
riceve alcun segnale per più di 7 secondi la funzione viene attivata automaticamente.
1. Premere 5 volte il tasto MENU[17] nella banda PMR, finché il display mostra
Quando le batterie sono scariche, apparirà sul Display l'icona
[5]: occorre sostituire le batterie al più
2. Premendo i tasti
presto (se a secco) o provvedere alla ricarica del pacco batteria.
3. Confermare premendo il tasto PTT [11] oppure attendere 5 secondi.
In questo modo tutte le volte che viene ricevuto il tono di chiamata Midland G7 XT vibrerà.
6.Tasto MENU
Questa funzione inibirà la possibilità di udire il tono di chiamata.
6.1 Selezione di un canale
Premete 1 volta il tasto MENU[17], sul Display inizierà a lampeggiare il N° del canale [4], utilizzando
6.6 Funzione ROGER BEEP (Tonalità di conferma fine conversazione)
i tasti
/
[19] fare scorrere i canali PMR e poi quelli LPD, sino a selezionare il canale desiderato.
Al rilascio del tasto PTT [11], quindi alla fine di ogni trasmissione, viene emessa una tonalità, che indica
Premere PTT [11] per confermare, oppure attendere 5 secondi.
al vostro interlocutore che può iniziare a parlare. Nel Midland G7 XT questa funzione è disattivata di
Fate riferimento alla tabella delle frequenze del cap. 9.
default.
1. Premere 6 volte il tasto MENU[17] nella banda PMR, finché sul display compare " rb oF";
6.2 Selezione dei toni CTCSS
2. Con i tasti
Midland G7 XT può ricevere in due modalità:
3. Premere il tasto PTT [11], oppure attendere 5 secondi per confermare la programmazione.
a) Traffico Aperto: In questo caso sentirete tutte le conversazioni selezionate sul canale selezionato;
Il Roger Beep adesso è attivato.
b) Modalità di gruppo CTCSS: I toni CTCSS funzionano come una sorta di codice di accesso e vi
consentono di comunicare solo con quegli utenti che hanno il Vs. stesso canale e codice. La radio
6.7 Funzione CALL
rimarrà silenziata fino al ricevimento del corretto tono CTCSS.
Midland G7 XT ha la possibilità di inviare 5 diversi toni di chiamata. Per inviarla occorre premere il tasto
CALL/ [12]. I toni possono essere selezionati nel seguente modo:
Procedimento per l'attivazione dei 38 toni CTCSS in RX e TX:
1. Premere 7 volte il tasto MENU[17] nella banda PMR, finché il display mostra "CA 1".
1. Accendere l'apparato.
2. Premendo il tasto
2. Sezionare il canale desiderato.
3. Confermare premendo PTT [11] oppure attendere 5 secondi.
3. Premere 2 volte il tasto MENU[17] finché il Display mostra il canale con il codice del tono CTCSS [9]
In questo modo tutte le volte che viene inviato un tono di chiamata verrà utilizzata quella determinata
lampeggiante a destra ("of" condizione di default).
suoneria.
4. Selezionare il tono CTCSS desiderato premendo i tasti
/
[19].
Se è attiva anche la funzione Vibracall (Vedi 6.5) il tono chi chiamata non verrà udito.
5. Per confermare l'impostazione, premere il tasto PTT [11] oppure attendere circa 5 secondi.
Se non si vuole operare con alcun tono CTCSS:
6.8 Funzione Dual Watch
1. Premere 2 volte il tasto MENU[17] finché il Display mostra il canale desiderato ed il codice del tono
Questa funzione permette di monitorare costantemente 2 canali a scelta. Procedimento:
CTCSS [9] lampeggiante a destra;
1. Posizionarsi su uno dei 2 canali che si desidera monitorare.
2. Selezionare "of" tramite i tasti
/
[19].
2. Premere 9 volte il tasto MENU[17] nella banda PMR affinché il display mostra "TX oF RX".
3. Con i tasti
6.3 Selezione dell'alta e bassa potenza di trasmissione (Banda PMR)
4. Premere il tasto PTT [11] oppure attendere 5 secondi per conferma.
La fase di trasmissione é quella che assorbe maggiore energia dalle batterie. Per prolungare l'autonomia,
Per interrompere il Dual Watch, premere il tasto MON/SCAN [18].
potete selezionare la bassa potenza di trasmissione quando dovete trasmettere a breve distanza.
5.6 Display backlight
A low battery level during transmission will reduce the performance of your device.
If there is insufficient light to read the display you can press the MENU [17] button to switch the display
back light on for about 5 seconds.
6.4 VOX function
Switching the backlight on the display adds an additional drain on the batteries. Try to make a
Midland G7 XT enables hands free conversations through VOX function. The sensitivity of VOX function
moderate use of this.
can be adjusted in 2 different levels. You can enable VOX function with or without accessories.
To activate VOX function press the MENU [17] button 4 times in the PMR band and VOX [1] will appear
5.7 Keypad lock
on the display.
Keep pressed CALL/
[12] for about 5 seconds and
[3] will be displayed as confirmation. Only PTT
Use the scroll
[11] and CALL/
[12] remain active. To disable this function, keep pressed again CALL/
[12] for 5
• OFF:
seconds approx.
• 1:
• 2:
5.8 Power Save
Press PTT [11] to confirm or wait for 5 seconds.
The battery power saving feature enables a reduction in the consumption of up to 50%; power saving
To disable the VOX function follow the instructions above and select option oF.
comes on automatically when the transceiver does not receive any signal for more than 7 seconds. When
the batteries are discharged, the icon
[5] appears on the display: replace the batteries or recharge
6.5 Vibra-Call function
Picture 2
the battery pack.
Midland G7 XT is equipped with the "Vibra-Call" feature, which provides a silent alert for incoming calls.
To activate it, follow these steps:
1. In the PMR band, press the MENU [17] button for 5 times, until the display shows
6.MENU button
2. Use the
3. Push PTT [11] to confirm or wait for 5 seconds.
6.1 Channel selection
Everytime Midland G7 XT receives a call, it will vibrate.
Press once the MENU [17] button. The number of the channel [4] will start flashing on the display. Press
the scroll buttons
/
[19] to scroll up or down the PMR and then LPD channels till you select the
When the Vibracall function is enabled, the call tone won't be heard.
desired channel. Press the PTT [11] button to confirm, or wait for 5 seconds.
Refer to the table of frequencies of Chapter 9.
6.6 ROGER BEEP (End transmission tone)
Every time you end transmission (PTT [11] released), Midland G7 XT gives out a sound that indicates to
6.2 CTCSS tones selection
the other party that s/he can start talking. This function is factory disabled. To activate it:
1) Press six times the MENU [17] button in the PMR band until the display shows "rb oF";
Midland G7 XT can receive in two modes:
a) Open traffic: in this case you will hear any communication transmitted on the selected channel;
2) Using the scroll buttons
b) Group mode CTCSS: CTCSS tones are access keys that allow you to receive only messages
3) To confirm the roger beep activation, press PTT [11] button or wait for 5 seconds.
coming from parties using the same channel and code. The speaker will remain muted until the
correct CTCSS tone is received.
6.7 CALL function
Midland G7 XT can send 5 different call tones. To send this audio signal to other users, press the
CALL/
[12] key.
To activate 1 of 38 different CTCSS tones in RX and TX
1. Turn on the radio.
To select the call tones:
2. Select the desired channel.
1. Push the MENU [17] button 7 times in the PMR band, until the display shows "CA 1".
3. Press twice MENU [17] until the Display shows the channel with the CTCSS tone [9] flashing on the
2. By pushing
right ("of" default condition).
3. Confirm by pressing the PTT [11] key or wait for 5 seconds.
4. Select the desired CTCSS tone by pushing the
/
[19] controls.
Now, each time your Midland G7 XT sends out a tone call, it will beep with the selected melody.
5. To confirm the setting, press the PTT [11] key or wait for approximately 5 seconds.
If the Vibracall function is activated (See par. 6.5), the call tone won't be heard.
To deactivate CTCSS tones
If you want to operate with no CTCSS code:
6.8 Dual Watch function
1. Press twice the MENU [17] key until the display shows the desired channel and the CTCSS [9] tone
This function allows the monitoring of 2 channels of your choice. Procedure:
blinking on the right.
1. Select one of the 2 channels you want to monitor.
2. Select "of" with
/
[19] buttons.
2. Press 9 times the MENU [17] button in the PMR band until the display shows "TX oF RX".
3. With the
6.3 Choosing high or low transmission power (PMR band)
4. Push the PTT [11] key or wait for 5 seconds for confirmation.
Batteries are drained more quickly during transmission. In order to extend the battery life you can select
To disable the function, press the MON/SCAN [18] button.
the low power when transmitting over short distances.
/
[19] allow you to change the direction
Procedure:
6.9 Keypad beep
1) Press the MENU [17] button for 3 times and Pr will be displayed.
To deactivate the keypad beep, follow these steps:
2) Select L [7] using the scroll buttons
/
[19].
1. Press for 8 times the MENU [17] button in the PMR band, until "bP on" is displayed.
3) Press PTT [11] to confirm, or wait for 5 seconds.
2. Use the
If you want to transmit a longer distance repeat the above procedure to select the high power. At step
3. Confirm by pushing the PTT [11] or wait for 5 seconds.
2 select H [7]. When the batteries are in good conditions, high power is 500mW, whereas low power is
Now you won't hear any beep at the pressure of any button.
10mW.
/
[19]
6.9 Beep Tastiera
Nel caso si desideri escludere la suoneria dei tasti alla loro pressione è possibile farlo operando nel
seguente modo:
1. Premere 8 volte il tasto MENU[17] nella banda PMR, finché il display mostra "bP on".
2. Premendo i tasti
/
[19] fare in modo che il display mostri "bP of".
3. Confermare premendo il tasto PTT [11] oppure attendere 5 secondi.
In questo modo tutte le volte che si preme un tasto non si sentirà alcun suono.
7. SOLUZIONE DEI PROBLEMI
Il vostro Midland G7 XT dovrebbe garantirvi anni di perfetto funzionamento. Se tuttavia presentasse
dei problemi, consultate questo capitolo prima di rivolgervi al centro assistenza della vostra zona.
7.1 Azzeramento delle impostazioni (Reset)
Se il vostro ricetrasmettitore presentasse qualche malfunzionamento logico (simboli incongruenti
sul display, blocco delle funzioni ecc.), potrebbe non trattarsi di un guasto vero e proprio, ma di un
problema causato da altri fattori esterni, ad esempio di un'impostazione errata indotta da qualche
disturbo proveniente dalla rete elettrica durante la ricarica delle batterie. In questo caso, potete
ripristinare il ricetrasmettitore sulle condizioni di fabbrica cancellandone le memorie ed azzerandone
le impostazioni:
1) Spegnete il ricetrasmettitore;
2) Togliete le batterie per circa 60 secondi (Cap.4.4)
[6];
Prima di effettuare il reset, suggeriamo di prendere nota di tutte le impostazioni eseguite, in quanto
/
[19] si può inibire o attivare la funzione (on: Attiva oF: Disattiva);
verranno cancellate.
8 SPECIFICHE TECNICHE
Canali .................................................................................................................... 1~8 PMR, 1~69 LPD
Generazione delle frequenze ..................................................................................... sintetizzatore PLL
Copertura di frequenza ..................................................................446.00625 ÷ 446.09375MHz (PMR)
/
[19] selezionare "on" e sul Display comparirà" rb on";
Passo Canalizzazione .......................................................................... 12.5 KHz (PMR); 25 KHz (LPD)
Alimentazione ................................................................................................................. 6+/- 10% VCC
Temperatura operativa..................................................................................................... da -20° a +55°
Dimensioni (senza antenna) .........................................................................58 (L)x 122 (A)x34 (P) mm
Peso (senza batterie) .................................................................................................................... 123gr
Ciclo di funzionamento ........................................................................... TX 5%, RX 5%, stand-by 90%
8.1 Trasmettitore
/
[19] si possono udire le 5 melodie preimpostate;
Potenza di uscita ...................................................................................... 10 o 500 mW (Selezionabile)
Tipo di modulazione .......................................................................................................................... FM
Reiezione Spurie ........................................................................................... rispetta le normative ETSI
8.2 Ricevitore
Sensibilità a 12dB Sinad.............................................................................................................. 0,35µV
Reiezione canali adiacenti .............................................................................................................. 70dB
Potenza di uscita audio ...........................................................................................300mW a 10% THD
Frequenze intermedie.................................................................................... 1°:21,4 MHz ; 2°:450 KHz
/
[19] selezionare il secondo canale che si desidera monitorare.
Presa per microfono esterno e ricarica..................................................................... jack stereo 2,5 mm
Presa per altoparlante esterno ................................................................................. jack mono 3.5 mm
Le specifiche sono soggette a modifica senza preavviso.
7. TROUBLESHOOTING
Your Midland G7 XT is designed to provide you with years of optimal performance. If for some reason
problems arise, refer to this chapter before contacting a service centre in your region.
7.1 Reset
If your transceiver experiences a logical malfunction (improper symbols on the display, blocking of
functions, etc.), it may not be experiencing a true failure, but rather a problem caused by external factors.
/
[19] buttons to select:
For example, it may have an incorrect setting brought on by a noise or spikes in the electrical system
Disabled;
during battery recharging. In such cases, you can reset the transceiver to its factory-programmed
1
st
Level (low sensitivity);
settings, by resetting all parameters:
2
nd
Level (high sensitivity);
1) Turn off the transceiver
2) Remove the batteries for about 60 seconds (Par.4.4)
Before you go ahead with the reset, we recommend that you take note of all the setting you have
carried out as they will be deleted.
8 TECHNICAL SPECIFICATIONS
[6];
/
[19] buttons to disable or enable this feature (on: enables, oF:disables);
Channels ............................................................................................................... 1~8 PMR, 1~69 LPD
Frequency range ...........................................................................446.00625 ÷ 446.09375MHz (PMR)
.................................................................................................................433.075 ÷ 434.775MHz (LPD)
Channel spacing ................................................................................... 12.5 KHz (PMR); 25 KHz (LPD)
Power supply .....................................................................................................................6+/- 10% Vdc
Temperature ............................................................................................................. from -20° to +55°C
Dimensions (w/o batteries) .......................................................................... 58 (L)x 122 (H)x34 (D) mm
Weight (w/o batteries) .................................................................................................................... 123gr
Duty cycle ............................................................................................... TX 5%, RX 5%, stand-by 90%
/
[19] select "on" and "rb on" will be displayed;
8.1 Transmitter
Output power ................................................................................................10 or 500 mW (Selectable)
Modulation ......................................................................................................................................... FM
Spurious rejection ....................................................................................... within European legal terms
8.2 Receiver
Sensitivity @ 12dB Sinad ............................................................................................................ 0,35µV
/
[19] you will hear the 5 pre-set melodies.
Adjacent channel rejection ............................................................................................................. 70dB
Audio output power................................................................................................300mW @ 10% THD
Intermediate frequencies .......................................................................... 1st :21,4 MHz ; 2nd:450 KHz
Jack for ext.mike and recharge ....................................................................................... stereo 2,5 mm
Jack for ext. speaker ........................................................................................................ mono 3.5 mm
Specifications are subject to change without notice.
/
[19] button select the second channel to monitor.
/
[19] buttons until the display shows "bP of".
9 TABELLA DELLE FREQUENZE
Canali PMR446
Canale
Frequenza RX/TX (MHz)
Canale
Frequenza RX/TX (MHz)
P1
446.00625
P5
446.05625
P2
446.01875
P6
446.06875
P3
446.03125
P7
446.08125
P4
446.04375
P8
446.09375
Canali LPD
Frequenza RX/TX
Frequenza RX/TX
Frequenza RX/TX
Canale
Canale
Canale
(MHz)
(MHz)
(MHz)
1
433.0750
25
433.6750
49
434.2750
2
433.1000
26
433.7000
50
434.3000
2
433.1250
27
433.7250
51
434.3250
4
433.1500
28
433.7500
52
434.3500
5
433.1750
29
433.7750
53
434.3750
6
433.2000
30
433.8000
54
434.4000
7
433.2250
31
433.8250
55
434.4250
8
433.2500
32
433.8500
56
434.4500
9
433.2750
33
433.8750
57
434.4750
10
433.3000
34
433.9000
58
434.5000
11
433.3250
35
433.9250
59
434.5250
12
433.3500
36
433.9500
60
434.5500
13
433.3750
37
433.9750
61
434.5750
14
433.4000
38
434.0000
62
434.6000
15
433.4250
39
434.0250
63
434.6250
16
433.4500
40
434.0500
64
434.6500
17
433.4750
41
434.0750
65
434.6750
18
433.5000
42
434.1000
66
434.7000
19
433.5250
43
434.1250
67
434.7250
20
433.5500
44
434.1500
68
434.7500
433.075 - 434.775MHz (LPD)
21
433.5750
45
434.1750
69
434.7750
22
433.6000
46
434.2000
23
433.6250
47
434.2250
24
433.6500
48
434.2500
Con la presente, CTE International dichiara che l'apparato è conforme ai requisiti essenziali
della direttiva RTTE 1999/5/CE; la dichiarazione di conformità è consultabile sul sito internet
www.midlandradio.eu
9 FREQUENCY CHART
PMR446 channels
Channel
Frequency RX/TX (MHz)
Channel
Frequency RX/TX (MHz)
P1
446.00625
P5
446.05625
P2
446.01875
P6
446.06875
P3
446.03125
P7
446.08125
P4
446.04375
P8
446.09375
LPD channels
Frequency RX/TX
Frequency RX/TX
Frequency RX/TX
Channel
Channel
Channel
(MHz)
(MHz)
(MHz)
1
433.0750
25
433.6750
49
434.2750
2
433.1000
26
433.7000
50
434.3000
2
433.1250
27
433.7250
51
434.3250
4
433.1500
28
433.7500
52
434.3500
5
433.1750
29
433.7750
53
434.3750
6
433.2000
30
433.8000
54
434.4000
7
433.2250
31
433.8250
55
434.4250
8
433.2500
32
433.8500
56
434.4500
9
433.2750
33
433.8750
57
434.4750
10
433.3000
34
433.9000
58
434.5000
11
433.3250
35
433.9250
59
434.5250
12
433.3500
36
433.9500
60
434.5500
13
433.3750
37
433.9750
61
434.5750
14
433.4000
38
434.0000
62
434.6000
15
433.4250
39
434.0250
63
434.6250
16
433.4500
40
434.0500
64
434.6500
17
433.4750
41
434.0750
65
434.6750
18
433.5000
42
434.1000
66
434.7000
19
433.5250
43
434.1250
67
434.7250
20
433.5500
44
434.1500
68
434.7500
21
433.5750
45
434.1750
69
434.7750
22
433.6000
46
434.2000
23
433.6250
47
434.2250
24
433.6500
48
434.2500
CTE International herewith declares that the product complies with the essential requirements
of EC Directive 99/05/EC; the declaration of conformity of the device can be consulted onto
www.midlandradio.eu

Verwandte Anleitungen für Midland G7 XT


Inhaltszusammenfassung für Midland G7 XT
- Seite 1 Disabled; during battery recharging. In such cases, you can reset the transceiver to its factory-programmed that it is ideal for use in any activity. The Midland G7 XT is extremely practical and operates on both and a neutral soap. To recharge the battery pack: seconds approx.
- Seite 2 Issu de la dernière technologie en radiocommunication et pourvu d’un boîtier robuste, le portatif Midland BATTERIES - Veuillez scrupuleusement suivre les indications et mise en garde sur G7 XT est la solution idéale et efficace pour les professionnels désireux de rester en contact avec les l’utilisation des batteries au chapitre 4.1.