Herunterladen Inhalt Inhalt Diese Seite drucken
Cameo ROTOFEVER CLRF Bedienungsanleitung

Cameo ROTOFEVER CLRF Bedienungsanleitung

Rotating led mirror ball emulator
Inhaltsverzeichnis

Werbung

Verfügbare Sprachen
  • DE

Verfügbare Sprachen

  • DEUTSCH, seite 12
USER´S MANUAL
BEDIENUNGSANLEITUNG
MANUEL D`UTILISATION
MANUAL DE USUARIO
INSTRUKCJA OBSŁUGI
MANUALE D' USO
ROTOFEVER
ROTATING LED MIRROR BALL EMULATOR
CLRF

Werbung

Inhaltsverzeichnis
loading

Inhaltszusammenfassung für Cameo ROTOFEVER CLRF

  • Seite 1 USER´S MANUAL BEDIENUNGSANLEITUNG MANUEL D`UTILISATION MANUAL DE USUARIO INSTRUKCJA OBSŁUGI MANUALE D‘ USO ROTOFEVER ROTATING LED MIRROR BALL EMULATOR CLRF...
  • Seite 2: Inhaltsverzeichnis

    CONTENTS / INHALTSVERZEICHNIS / CONTENU / CONTENIDO / TREŚĆ / CONTENUTO ENGLISH ESPAÑOL PREVENTIVE MEASURES MEDIDAS DE SEGURIDAD 30-31 INTRODUCTION INTRODUCCIÓN CONNECTIONS, OPERATING AND DISPLAY ELEMENTS CONEXIONES, ELEMENTOS DE MANEJO Y ELEMENTOS OPERATION DE VISUALIZACIÓN 32-33 IR REMOTE CONTROL FUNCIONAMIENTO 33-35 INSTALLATION AND MOUNTING MANDO A DISTANCIA POR INFRARROJOS...
  • Seite 3: English

    We have designed this product to operate reliably over many years. Please read this User‘s Manual carefully, so that you can begin making optimum use of your Cameo Light product quickly. Learn more about Cameo Light on our website WWW.CAMEOLIGHT.COM.
  • Seite 4: Introduction

    37. Mains cables for powering several devices must have a core diameter of at least 1.5 mm². In the EU, cables must comply with H05VV-F, or similar. Suitable cables are available from Adam Hall. These cables can be used to connect multiple devices to an additional device via the Power OUT and Power IN sockets.
  • Seite 5: Connections, Operating And Display Elements

    IMPORTANT: Replace the fuse only with a fuse of the same type and value. In the event of repeated fuse failure, please contact an authorised service centre. POWER OUT IEC power output socket. Facilitates power supply to other CAMEO lights. Ensure that the total current consumption of all connected devices does not exceed the value specified on the device in amperes (A). DMX IN 3-pin male XLR socket for connection to a DMX control device (e.g.
  • Seite 6: Operation

    DMX LED The LED lights up as soon as the DMX control mode is enabled. SOUND LED The LED lights up as soon as the sound control mode is enabled. AUTO LED The LED lights up as soon as the automatic control mode is enabled. SLAVE LED The LED lights up as soon as the slave mode is enabled.
  • Seite 7: Device Settings

    "ModE", confirm by pressing ENTER, then use UP and DOWN again to select the submenu item "SLAV" (the display LED "SLAVE” will light up) and confirm by pressing ENTER. Connect the slave and master unit (same model) with a DMX cable (master = DMX OUT, slave = DMX IN) and enable one of the standalone modes on the master unit (automatic control, sound control or static programme).
  • Seite 8: Device Information

    diSP Display shutdown = Display shuts down after approx. 30 seconds of inactivity = Display shutdown disabled FAiL In the event of hoLd = Last command is retained interruption of DMX signal bLAc = Activates blackout rESt Reset to factory settings (Reset) = Do not carry out reset = Carry out reset Soun...
  • Seite 9: Ir Remote Control

    IR REMOTE CONTROL Aim the infrared remote control directly at one of the infrared sensors installed on the front and back of the lamp. The maximum range is approximately 8 metres. In DMX and slave modes, the remote control is deactivated.
  • Seite 10: Dmx Technology

    DMX TECHNOLOGY DMX-512 DMX (Digital Multiplex) is the designation for a universal transmission protocol for communications between corresponding devices and controllers. A DMX controller sends DMX data to the connected DMX device(s). The DMX data is always transmitted as a serial data stream that is forwarded from one connected device to the next via the "DMX IN"...
  • Seite 11: Technical Data

    TECHNICAL DATA Model name: CLRF Product type: LED effect Type: LED ball Colour spectrum: RGBWA+UV No. of LEDs: 5 LEDs (3 segments controllable via DMX) LED type: 12 W 6-in-1 LED DMX input: 3-pin male XLR DMX output: 3-pin female XLR DMX mode: 3-channel, 12-channel, 23-channel DMX functions:...
  • Seite 12: Deutsch

    Dieses Gerät wurde unter hohen Qualitätsanforderungen entwickelt und gefertigt, um viele Jahre einen reibungslosen Betrieb zu gewährleisten. Bitte lesen Sie diese Bedienungsanleitung sorgfältig, damit Sie Ihr neues Produkt von Cameo Light schnell und optimal einsetzen können. Weitere Informationen über Cameo Light erhalten Sie auf unserer Website WWW.CAMEOLIGHT.COM.
  • Seite 13: Einführung

    37. Netzleitungen zur Spannungsversorgung mehrerer Geräte müssen mindestens 1,5 mm² Aderquerschnitt aufweisen. In der EU müssen die Leitungen H05VV-F, oder gleichartig, entsprechen. Geeignete Leitungen werden von Adam Hall angeboten. Mit diesen Leitungen können Sie mehrere Geräte über den Power out Anschluss mit dem Power IN Anschluss eines weiteren Gerätes verbinden. Beachten Sie, dass die gesamte Stromaufnahme aller angeschlossenen Geräte den vorgegebenen Wert nicht überschreitet (Aufdruck auf dem Gerät).
  • Seite 14: Anschlüsse, Bedien- Und Anzeigeelemente

    Sicherung wiederholt auslösen, wenden Sie sich bitte an ein autorisiertes Servicezentrum. POWER OUT IEC Netzausgangsbuchse. Dient der Netzversorgung weiterer CAMEO Scheinwerfer. Achten Sie darauf, dass die gesamte Stromaufnahme aller angeschlossenen Geräte den auf dem Gerät in Ampere (A) angegebenen Wert nicht überschreitet.
  • Seite 15: Bedienung

    DMX LED Die LED leuchtet, sobald die Betriebsart für die DMX-Steuerung aktiviert ist. SOUND LED Die LED leuchtet, sobald die Betriebsart für die Musiksteuerung aktiviert ist. AUTO LED Die LED leuchtet, sobald die Betriebsart automatische Steuerung aktiviert ist. SLAVE LED Die LED leuchtet, sobald die Slave-Betriebsart aktiviert ist.
  • Seite 16: Betriebsart Automatische Steuerung

    SLAVE-BETRIEBSART Drücken Sie die MODE-Taste so oft, bis Sie zur obersten Menüebene gelangen (Addr, chAn, ModE, SEt, inFo). Wählen Sie nun mit Hilfe der Tasten UP und DOWN den Menüpunkt „ModE“ aus, drücken auf ENTER und wählen abermals mit Hilfe der Tasten UP und DOWN den Untermenüpunkt „SLAV“ aus (Anzeige-LED „SLAVE“...
  • Seite 17: Geräteeinstellungen

    GERÄTEEINSTELLUNGEN Drücken Sie die MODE-Taste so oft, bis Sie zur obersten Menüebene gelangen (Addr, chAn, ModE, SEt, inFo). Wählen Sie nun mit Hilfe der Tasten UP und DOWN den Menüpunkt “SEt” aus, drücken auf ENTER und wählen abermals mit Hilfe der Tasten UP und DOWN den gewünschten Untermenüpunkt aus, bestätigen mit ENTER und nehmen die Einstellung nach Wunsch vor (bestätigen mit ENTER).
  • Seite 18: Ir Fernbedienung

    IR FERNBEDIENUNG Richten Sie die Infrarot-Fernbedienung in Sichtverbindung direkt auf einen der auf der Vorder- und Rückseite des Strahlers verbauten Infrarot-Sensoren. Die maximale Reichweite beträgt ca. 8 Meter. In der DMX- und der Slave-Betriebsart sind die Funktionen der Fernbedienung deaktiviert. Die ON/OFF-Taste dient dazu, die LEDs des Rotofever ab- zuschalten und die Rotation zu stoppen, unabhängig davon, Blackout...
  • Seite 19: Dmx Technik

    DMX TECHNIK DMX-512 DMX (Digital Multiplex) ist die Bezeichnung für ein universelles Übertragungsprotokoll für die Kommunikation zwischen entsprechenden Geräten und Controllern. Ein DMX-Controller sendet DMX-Daten an das/die angeschlossene(n) DMX-Gerät(e). Die DMX-Datenübertragung erfolgt stets als serieller Datenstrom, der über die an jedem DMX-fähigen Gerät vorhandenen DMX IN- und DMX OUT-Anschlüsse (XLR-Steckverbinder) von einem angeschlossenen Gerät an das nächste weitergeleitet wird, wobei die maximale Anzahl der Geräte 32 nicht überschreiten darf.
  • Seite 20: Technische Daten

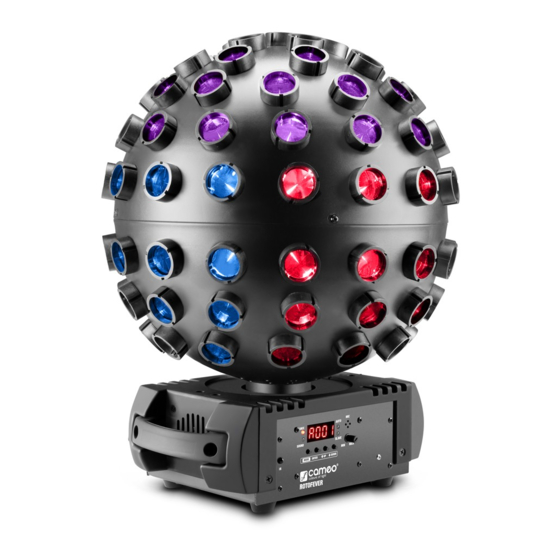
    TECHNISCHE DATEN Modellbezeichnung: CLRF Produktart: LED-Effekt Typ: LED Ball Farbspektrum: RGBWA+UV LED Anzahl: 5 LEDs (3 Segmente über DMX ansteuerbar) LED Typ: 12W 6 in 1 LED DMX-Eingang: 3-Pol XLR männlich DMX-Ausgang: 3-Pol XLR weiblich DMX-Modus: 3-Kanal, 12-Kanal, 23-Kanal DMX Funktionen: Rotationsrichtung, Rotationsgeschwindigkeit, RGBWA+UV, Farbmakros, Auto-Programme, musikgesteuerte Programme, Stroboskop Standalone Funktionen:...
  • Seite 21: Francais

    Cet appareil a été développé et fabriqué en appliquant des exigences de qualité très élevées: il garantit des années de fonctionnement sans problème.Veuillez lire attentivement ce Manuel Utilisateur : vous apprendrez rapidement à utiliser votre appareil Cameo Light de façon optimale.
  • Seite 22: Introduction

    (environnement chargé de poussière, de nicotine, brouillard, etc.), faire réviser et nettoyer l’appareil régulièrement par un professionnel qualifié (non compris dans les prestations de garantie) pour éviter toute surchauffe et tout dysfonctionnement. 36. Respecter une distance minimale de 0,5 m avec les matières inflammables. 37.
  • Seite 23: Raccordements, Éléments De Commande Et D'affichage

    SORTIE D’ALIMENTATION Embase de renvoi secteur au format CEI. Permet d’alimenter d’autres projecteurs CAMEO. S’assurer que la consommation totale de tous les appareils connectés ne dépasse pas la valeur en ampères (A) indiquée sur l’appareil.
  • Seite 24: Touches De Commande

    LED DMX La LED s’allume dès que le mode de pilotage DMX est activé. LED SOUND La LED s’allume dès que le mode de pilotage par la musique est activé. LED AUTO La LED s’allume dès que le mode de pilotage automatique est activé. LED SLAVE La LED s’allume dès que le mode Slave (esclave) est activé.
  • Seite 25: Mode Slave

    MODE SLAVE Appuyer plusieurs fois sur la touche MODE, jusqu'à ce que vous soyez revenu au niveau le plus haut du menu (Addr,chAn, ModE, SEt, inFo). Sélectionner à présent l’option de menu « ModE » à l’aide des touches UP et DOWN, appuyer sur ENTER puis sélectionner le sous-menu « SLAV »...
  • Seite 26: Paramètres De L'appareil

    PARAMÈTRES DE L’APPAREIL Appuyer plusieurs fois sur la touche MODE, jusqu'à ce que vous soyez revenu au niveau le plus haut du menu (Addr,chAn, ModE, SEt, inFo). Sélectionner à présent l’option de menu « SEt » à l’aide des touches UP et DOWN, appuyer sur ENTER puis sélectionner à nouveau l’option de sous-menu de votre choix à...
  • Seite 27: Pilotage Par Télécommande Infrarouge

    PILOTAGE PAR TÉLÉCOMMANDE INFRAROUGE Diriger la télécommande infrarouge, en contact visuel direct, vers l’un des capteurs infrarouges situés sur la face et la face arrière du projecteur. La portée maximale est d'environ 8 mètres. En mode DMX et Slave, les fonctions de pilotage par télécommande infrarouge sont désactivées. Appuyer sur la touche ON/OFF pour désactiver les LED du rotofever et interrompre la rotation quel que soit le mode Blackout...
  • Seite 28: Technique Dmx

    TECHNIQUE DMX DMX-512 Le terme DMX (Digital Multiplex) désigne un protocole de transport universel permettant la communication entre des appareils et des contrôleurs à ce format. Un contrôleur DMX envoie des données DMX aux appareils DMX qui lui sont connectés. Les données DMX sont transportées sous forme d'un flux série, renvoyé...
  • Seite 29: Caractéristiques Techniques

    CARACTÉRISTIQUES TECHNIQUES Désignation du modèle : CLRF Type de produit : Projecteur multi-effets à LED Type : Bille à LED Spectre de couleurs : RGBWA+UV Nombre de LED : 5 LED (3 segments pilotables via DMX) Type de LED : LED 6 en 1 12 W Entrée DMX : Embase XLR mâle à 3 broches Sortie DMX : Embase XLR femelle à...
  • Seite 30: Español

    Este equipo está diseñado y fabricado con los estándares de calidad más exigentes, para garantizar un correcto funcionamiento durante muchos años.Lea atentamente este manual de usuario para poder aprovechar rápidamente toda la funcionalidad de su nuevo producto de Cameo Light. Más información sobre Cameo Light en la web WWW.CAMEOLIGHT.COM. MEDIDAS DE SEGURIDAD 1.
  • Seite 31: Introducción

    34. El equipo solo puede instalarse si no está bajo tensión (separación del conector de la red eléctrica). 35. El polvo y otros depósitos acumulados en el interior del equipo pueden dañarlo. El equipo debe ser sometido a operaciones de mantenimiento o limpieza periódicas en función de las condiciones ambientales (polvo, nicotina, niebla, etc.) por personal especializado (de lo contrario, se perderá...
  • Seite 32: Conexiones, Elementos De Manejo Y Elementos De Visualización

    POWER OUT Conector hembra de salida de red IEC. Sirve para alimentar otros focos Cameo. Compruebe que el consumo de corriente total de todos los equipos conectados no supere el valor en amperios (A) indicado en el equipo.
  • Seite 33: Funcionamiento

    LED DMX El LED se enciende cuando se activa el modo operativo de control DMX. LED DE SONIDO El LED se enciende cuando se activa el modo operativo de control por sonido. LED AUTO El LED se enciende cuando se activa el modo operativo de control automático. LED ESCLAVO El LED se enciende cuando se activa el funcionamiento en modo esclavo.
  • Seite 34: Modo Esclavo

    MODO ESCLAVO Pulse el botón MODE varias veces hasta acceder al nivel de menú superior (Addr, chAn, ModE, SEt, inFo). A continuación, utilice los botones UP y DOWN para seleccionar la opción de menú «ModE», pulse ENTER y vuelva a utilizar los botones UP y DOWN para seleccionar la opción de submenú...
  • Seite 35: Configuración Del Equipo

    CONFIGURACIÓN DEL EQUIPO Pulse el botón MODE varias veces hasta acceder al nivel de menú superior (Addr, chAn, ModE, SEt, inFo). A continuación, utilice los botones UP y DOWN para seleccionar la opción de menú «SEt», pulse ENTER y vuelva a utilizar los botones UP y DOWN para seleccionar la opción de submenú...
  • Seite 36: Mando A Distancia Por Infrarrojos

    MANDO A DISTANCIA POR INFRARROJOS Oriente el mando a distancia por infrarrojos de manera que esté en la línea de visión directa con la parte delantera o trasera de los sensores de infrarrojos incorporados en el foco. El rango de alcance máximo es de unos 8 metros.
  • Seite 37: Tecnología Dmx

    TECNOLOGÍA DMX DMX512 DMX (Digital Multiplex) es el nombre de un protocolo universal utilizado como medio de comunicación entre dispositivos y controladores. El controlador DMX envía datos DMX a los equipos DMX conectados. Los datos DMX se envían como datos serie que se transmiten de equipo a equipo a través de los conectores XLR «DMX IN»...
  • Seite 38: Datos Técnicos

    DATOS TÉCNICOS Denominación de modelo: CLRF Clase de producto: Efecto LED Tipo: LED Ball Espectro cromático: RGBWA+UV Número de LED: 5 LED (3 segmentos con control DMX) Tipo de LED: LED 6 en 1 de 12 W Entrada DMX: XLR macho de 3 pines Salida DMX: XLR hembra de 3 pines Modo DMX:...
  • Seite 39: Polski

    To urządzenie zostało zaprojektowane i wyprodukowane przy zastosowaniu najwyższych kryteriów jakościowych w celu zapewnienia wieloletniej bezawaryjnej eksploatacji. Proszę starannie przeczytać niniejszą instrukcję obsługi, aby móc jak najszybciej zacząć użytkować ten produkt marki Cameo Light. Więcej informacji na temat Cameo Light znajdą Państwo na naszej stronie internetowej pod adresem WWW.CAMEOLIGHT.COM.
  • Seite 40: Wprowadzenie

    35. Kurz i inne osady dostające się do wnętrza urządzenia mogą je uszkodzić. W zależności od warunków otoczenia (kurz, nikotyna, mgła itp.) urządzenie musi być regularnie poddawane czynnościom konserwacyjnym lub czyszczone przez wykwalifikowany personel (usługa nieobjęta gwarancją), w celu niedopuszczenia do przegrzania lub uszkodzenia. 36.
  • Seite 41: Przyłącza, Elementy Obsługowe I Wskaźniki

    WAŻNA WSKAZÓWKA: Bezpiecznik wymieniać wyłącznie na bezpiecznik tego samego typu i o tej samej wartości. Jeżeli bezpiecznik zadziała wielokrotnie, proszę zwrócić się do autoryzowanego centrum serwisowego. POWER OUT Wyjście zasilania IEC. Źródło zasilania dla dodatkowych reflektorów CAMEO. Całkowity pobór prądu wszystkich podłączonych urządzeń nie może przekroczyć wartości w amperach (A) podanej na urządzeniu. DMX IN 3-pinowe złącze męskie XLR do podłączenia kontrolera DMX (np.
  • Seite 42: Obsługa

    DMX LED: Ta dioda LED zapala się po włączeniu trybu sterowania DMX. SOUND LED: Ta dioda LED zapala się po włączeniu trybu sterowania muzyką. AUTO LED: Ta dioda LED zapala się po włączeniu trybu sterowania automatycznego. SLAVE LED Ta dioda LED zapala się po włączeniu trybu slave. PRZYCISKI OBSŁUGI MODE: Naciśnięcie przycisku MODE powoduje przejście o jeden poziom menu w górę.
  • Seite 43 TRYB DZIAŁANIA SLAVE Należy naciskać przycisk MODE aż do momentu przejścia do najwyższego poziomu menu (Addr, chAn, ModE, SEt, inFo). Za pomocą przy- cisków UP i DOWN należy wybrać opcję menu „ModE” i potwierdzić wybór przyciskiem ENTER. Następnie za pomocą przycisków UP oraz DOWN wybrać...
  • Seite 44: Ustawienia Urządzenia

    GREEN BLUE WHITE ENTER ENTER ENTER ENTER ENTER ENTER UP/DOWN UP/DOWN UP/DOWN UP/DOWN UP/DOWN UP/DOWN AMBER ROTATION ROT. SPEED ENTER ENTER ENTER ENTER UP/DOWN UP/DOWN UP/DOWN USTAWIENIA URZĄDZENIA Należy naciskać przycisk MODE aż do momentu przejścia do najwyższego poziomu menu (Addr, chAn, ModE, SEt, inFo). Za pomocą przycisków UP i DOWN wybrać...
  • Seite 45: Pilot Na Podczerwień

    PILOT NA PODCZERWIEŃ Skieruj pilota na podczerwień bezpośrednio na jeden z czujników podczerwieni zainstalowanych z przodu i z tyłu reflektora. Maksymalny zasięg wynosi ok. 8 metrów. W trybie pracy DMX oraz slave sterowanie pilotem jest nieaktywne. Przycisk ON/OFF służy do wyłączania wszystkich diod Rotofever i zatrzymywania obrotów niezależnie od tego, Blackout który tryb sterowania pilotem został...
  • Seite 46: Technika Dmx

    TECHNIKA DMX DMX-512 DMX (Digital Multiplex) to nazwa uniwersalnego protokołu transmisji do komunikacji między odpowiednimi urządzeniami a kontrolerami. Kontroler DMX wysyła dane DMX do podłączonych urządzeń DMX. Transmisja danych DMX następuje zawsze w formie szeregowego strumienia danych, który jest przekazywany z jednego urządzenia do następnego przez znajdujące się...
  • Seite 47: Dane Techniczne

    DANE TECHNICZNE Oznaczenie modelu: CLRF Rodzaj produktu: Efekt LED Typ: LED Ball Spektrum kolorów: RGBWA+UV Liczba diod LED: 5 diod LED (3 segmenty sterowane przez DMX) Typ diod LED: 12 W 6w1 LED Wejście DMX: 3-pinowe złącze męskie XLR Wyjście DMX: 3-pinowe złącze żeńskie XLR Tryb DMX: 3-kanałowy, 12-kanałowy, 23-kanałowy...
  • Seite 48: Italiano

    Questo dispositivo è stato sviluppato e prodotto in conformità con elevati standard qualitativi che ne garantiscono il regolare funzionamento per molti anni. Leggete attentamente questo manuale d‘uso per utilizzare al meglio il vostro nuovo prodotto Cameo Light. Per maggiori informazioni su Cameo Light consultare la nostra pagina Web WWW.CAMEOLIGHT.COM.
  • Seite 49: Introduzione

    (senza garanzia, interventi a carico del proprietario) per evitare surriscaldamento e malfunzionamenti. 36. La distanza dai materiali infiammabili deve essere di almeno 0,5 m. 37. I cavi di rete utilizzati per l’alimentazione elettrica di più dispositivi devono avere una sezione di almeno 1,5 mm². I cavi impiegati nell’Unione Europea devono essere di tipo H05VV-F o simile.
  • Seite 50: Connessioni, Elementi Di Comando Evisualizzazione

    NOTA IMPORTANTE: sostituire il fusibile solo con un altro dello stesso tipo e con gli stessi valori. Se il fusibile continua a scattare, rivolgersi a un centro assistenza autorizzato. POWER OUT Presa di uscita IEC. Serve per l'alimentazione di altri proiettori Cameo. Assicurarsi che il consumo totale di tutti i dispositivi collegati non superi il valore in ampere (A) indicato sull'apparecchio. DMX IN Presa XLR maschio a 3 poli per il collegamento di un dispositivo di controllo DMX (ad esempio un mixer DMX).
  • Seite 51: Utilizzo

    LED DMX Il LED lampeggia non appena la modalità di funzionamento del controller DMX viene attivata. LED SOUND Il LED si accende non appena viene attivata la modalità di funzionamento Comando tramite musica. LED AUTO Il LED si accende non appena viene attivata la modalità di funzionamento Comando automatico. LED SLAVE Il LED lampeggia non appena la modalità...
  • Seite 52 MODALITÀ DI FUNZIONAMENTO SLAVE Premere il tasto MODE ripetutamente, finché non si accede al livello di menu più alto (Addr, chAn, ModE, Set, inFo). Con i tasti UP e DOWN, selezionare la voce di menu "ModE", premere ENTER e selezionare, sempre con UP e DOWN, il sottomenu "SLAV" (l'indicatore LED "SLAVE" si illumina), quindi confermare con ENTER.
  • Seite 53: Impostazioni Del Dispositivo

    IMPOSTAZIONI DEL DISPOSITIVO Premere il tasto MODE ripetutamente, finché non si accede al livello di menu più alto (Addr, chAn, ModE, Set, inFo). Con i tasti UP e DOWN, selezionare la voce di menu "ModE", premere ENTER e selezionare, sempre con UP e DOWN, il sottomenu desiderato, quindi confermare con ENTER e impostare secondo necessità...
  • Seite 54: Telecomando A Infrarossi

    TELECOMANDO A INFRAROSSI Indirizzare il telecomando a infrarossi direttamente verso i sensori a infrarossi presenti sul pannello fron- tale e posteriore del proiettore. La portata massima è pari a circa 8 metri. Nella modalità di funzionamento DMX e slave, le funzioni del telecomando sono disattivate. Con il tasto ON/OFF è...
  • Seite 55: Tecnologia Dmx

    TECNOLOGIA DMX DMX512 DMX (Digital Multiplex) è la sigla di un protocollo di trasmissione universale per la comunicazione tra dispositivi e controller. Un controller DMX invia dati DMX ai dispositivi DMX collegati. I dati DMX vengono sempre trasmessi come flusso di dati seriale, che viene inoltrato da un dispositivo collegato al successivo attraverso le connessioni (connettori XLR) DMX IN e DMX OUT presenti per ogni dispositivo DMX compatibile, per un massimo di 32 dispositivi.
  • Seite 56: Dati Tecnici

    DATI TECNICI Nome del modello: CLRF Tipologia di prodotto: Effetto LED Tipo: palla LED Spettro cromatico: RGBWA+UV Numero di LED: 5 LED (3 segmenti comandabili tramite DMX) Tipo di LED: LED 6 in a 1 a 12W Ingresso DMX: XLR maschio a 3 poli Uscita DMX: XLR femmina a 3 poli Modalità...
  • Seite 57: Dmx Control

    DMX CONTROL / DMX STEUERUNG / PILOTAGE DMX / CONTROL DMX / STEROWANIE DMX / CONTROLLO DMX 3 CH Mode Function Values no function clockwise pan rotation (fast to slow) Endless Pan rotation no movement counter clockwise pan rotation (slow to fast) No function Auto Program 01 unicolour Auto Program 02 unicolour...
  • Seite 58 Colour Macros Colour off Amber Yellow warm Yellow Green Turquoise Cyan Blue Colour Macro Lavender (override RGBWAUV) Mauve & Colour Jumping & Colour Fading Magenta Pink Warm White White Cold White Colour Jumping Stop Colour Jumping Speed slow -> fast / Colour 1 ->...
  • Seite 60 WWW.CAMEOLIGHT.COM Adam Hall GmbH | Adam-Hall-Str. 1 | 61267 Neu-Anspach | Germany Tel. +49(0)6081/9419-0 | Fax +49(0)6081/9419-1000 web : www.adamhall.com | e-mail : mail@adamhall.com REV: 02...

Inhaltsverzeichnis