Herunterladen Inhalt Inhalt Diese Seite drucken
Inhaltsverzeichnis

Werbung

Verfügbare Sprachen
  • DE

Verfügbare Sprachen

  • DEUTSCH, seite 3
5....-05-ES 2612 + P, CZ
02.09.2003 9:09 Uhr
Seite 1
Bedienungsanleitung/Garantie
Instrucciones de servicio/Garantía • Manual de instruções/Garantia
Istruzioni per l'uso/Garanzia • Instruction Manual/Guarantee
Instrukcja obsługi/Gwarancja • Návod k použití/Záruka
Espressoautomat
Máquina para hacer espresso • Máquina para bicas
Macchinetta automatica per espresso • Espresso Machine
Automat do kawy espresso • Espressoautomat
ES 2612

Werbung

Inhaltsverzeichnis
loading

Inhaltszusammenfassung für Clatronic ES 2612

  • Seite 1 5..-05-ES 2612 + P, CZ 02.09.2003 9:09 Uhr Seite 1 Bedienungsanleitung/Garantie Instrucciones de servicio/Garantía • Manual de instruções/Garantia Istruzioni per l’uso/Garanzia • Instruction Manual/Guarantee Instrukcja obsługi/Gwarancja • Návod k použití/Záruka Espressoautomat Máquina para hacer espresso • Máquina para bicas Macchinetta automatica per espresso • Espresso Machine Automat do kawy espresso •...
  • Seite 2: Inhaltsverzeichnis

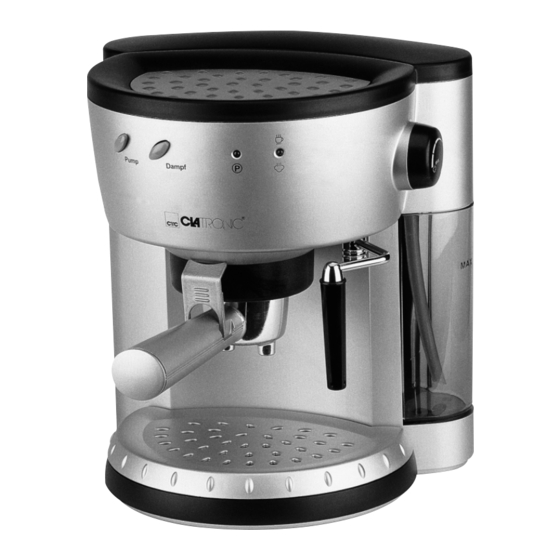
    5..-05-ES 2612 + P, CZ 02.09.2003 9:09 Uhr Seite 2 Inhalt Indice • Índice • Indice • Contents • Spis treści • Obsah Übersicht Bedienelemente ......Seite Bedienungsanleitung .
  • Seite 3 5..-05-ES 2612 + P, CZ 02.09.2003 9:09 Uhr Seite 3 Beschreibung der Bedienelemente und der Zusatzteile 1. Pumpen Taste 10. Siphonrohr 2. Dampf Taste 11. Abtropfwanne 3. Bereitschaftsleuchte 12. Abdeckung für Abtropfwanne 4. Dampfleuchte 13. Filterhalter 5. Beleuchteter Ein/Aus-Schalter 14. Filter 6.
  • Seite 4: Allgemeine Sicherheitshinweise

    5..-05-ES 2612 + P, CZ 02.09.2003 9:09 Uhr Seite 4 Allgemeine Sicherheitshinweise • Lesen Sie vor Inbetriebnahme dieses Gerätes die Bedienungsanleitung sehr sorgfältig durch und bewahren Sie diese inkl. Garantieschein, Kassenbon und nach Möglichkeit den Karton mit Innenverpackung gut auf.
  • Seite 5: Vor Dem Ersten Gebrauch

    5..-05-ES 2612 + P, CZ 02.09.2003 9:09 Uhr Seite 5 Vor dem ersten Gebrauch • Packen Sie die Espresso Maschine vorsichtig aus. Entnehmen Sie alles Zubehör und Verpackungsmaterial. Reinigen Sie das Zubehör (einschl. Filter, Filterhalter, Messlöffel, Wassertank) mit milden Reinigungsmitteln in lauwarmem Wasser.
  • Seite 6: Zubereitung Von Espresso

    5..-05-ES 2612 + P, CZ 02.09.2003 9:09 Uhr Seite 6 3. Drücken Sie dann die Pumpen Taste. Wasser wird vom Brühkopf zur Dampfdüse geleitet. Lassen Sie das Wasser mindestens eine bis zwei Minuten durch die Dampfdüse fließen. 4. Lösen Sie nach der Belüftung durch die Dampfdüse die Pumpen Taste und dre- hen Sie den Dampfkontrollschalter im Uhrzeigersinn, um das Dampfventil voll- ständig zu schließen.
  • Seite 7: Zubereitung Von Cappuccino

    5..-05-ES 2612 + P, CZ 02.09.2003 9:09 Uhr Seite 7 Zubereitung von Cappuccino Wollen Sie für Cappuccino Milch zum Schäumen bringen, verfahren Sie wie folgt: Bereiten Sie zuerst Espresso zu wie oben beschrieben. Achten Sie darauf, dass das Dampfventil geschlossen ist.
  • Seite 8: Erzeugung Von Dampf

    5..-05-ES 2612 + P, CZ 02.09.2003 9:09 Uhr Seite 8 Bereitschaftsleuchte erlöschen, lösen Sie die Pumpen Taste. Warten Sie bis die Bereitschaftsleuchte aufleuchtet. Erzeugung von Dampf • Mit der Dampffunktion können Sie ebenso Flüssigkeiten, wie Tee, Suppe usw. erhitzen. •...
  • Seite 9: Hilfreiche Hinweise

    5..-05-ES 2612 + P, CZ 02.09.2003 9:09 Uhr Seite 9 • Das Gerät bitte niemals unter fließendes Wasser halten oder in Wasser eintau- chen. Alle Gehäuseteile einschließlich des Brühkopfes, sollten nur mit einem feuchten Tuch gereinigt werden. Verwenden Sie bitte keine Lösungsmittel, scharfe Reinigungsmittel oder Scheuermittel.
  • Seite 10 5..-05-ES 2612 + P, CZ 02.09.2003 9:09 Uhr Seite 10 Problem Mögliche Ursache Die Maschine arbeitet • Der Ein/Aus-Schalter ist nicht eingeschaltet nicht oder die Schalter- • Der Netzstecker ist nicht in der Steckdose leuchte geht nicht an Wasser oder Espresso •...
  • Seite 11: Garantie

    5..-05-ES 2612 + P, CZ 02.09.2003 9:09 Uhr Seite 11 Auf dem Kaffee ist kein • Die Tassen und die Espressomaschine wurden Crema nicht vorgewärmt. „Crema” ist ein leichter • Es wurde eine ungeeignete Espressokaffeemarke brauner Schaum oben verwendet auf dem Espresso der •...
  • Seite 12: Service Für Unsere Haushaltsartikel

    5..-05-ES 2612 + P, CZ 02.09.2003 9:09 Uhr Seite 12 Service für unsere Service für unsere Haushaltsartikel Unterhaltungselektronik Verschleißteile für Haushaltsartikel Verschleißteile und Ersatzteile für (soweit diese nicht vom Fachmann unsere Unterhaltungselektronik (soweit ausgewechselt werden müssen), diese nicht vom Fachmann ausge- Ersatzkannen, Staubsaugerfilterbeutel wechselt werden müssen) wie z.
  • Seite 13: Indicaciones Generales De Seguridad

    5..-05-ES 2612 + P, CZ 02.09.2003 9:09 Uhr Seite 13 Indicaciones generales de seguridad • Antes de la puesta en servicio de este aparato lea detenidamente el manual de instrucciones y guarde este bien incluido la garantía, el recibo de pago y si es posible también el cartón de embalaje con el embalaje interior.
  • Seite 14: Antes Del Primer Uso

    5..-05-ES 2612 + P, CZ 02.09.2003 9:09 Uhr Seite 14 Descripción de los elementos de mando y de los elementos adicionales 1. Tecla de bombeo 9. Tobera de vapor 2. Tecla de vapor 10. Tubo de sifón 3. Lámpara de retorno 11.
  • Seite 15 5..-05-ES 2612 + P, CZ 02.09.2003 9:09 Uhr Seite 15 4. En caso de que no pase aguar por la pieza de cocción (quizás haya burbujas de aire en el sistema), suelte la tecla de bombeo para parar la bombona.
  • Seite 16: Preparación De Cappuccino

    5..-05-ES 2612 + P, CZ 02.09.2003 9:09 Uhr Seite 16 Para apartar la palanca, girela de la derecha a la izquierda. ¡Cuidado hay pre- sión! Para retirar los polvos de café utilizados, mantenga el filtro, utilizando la palanca especial en la empuñadura en su posición. Voltee el portafiltro y quite el café...
  • Seite 17 5..-05-ES 2612 + P, CZ 02.09.2003 9:09 Uhr Seite 17 • Si espera hasta que se haya secado la leche, es más difícil de quitarla. Enjuague la tobera de vapor por la noche en agua, para ablandar la capa de leche.
  • Seite 18: Descalcificación

    5..-05-ES 2612 + P, CZ 02.09.2003 9:09 Uhr Seite 18 Limpieza • Antes de cada limpieza retire por favor la clavija de la caja de enchufe y deje enfríar la máquina. • Nunca ponga la máquina debajo de agua corriente o la sumerja en agua. Todas las piezas de la carcasa incluída la pieza de cocción se deberían limpiar sola-...
  • Seite 19 5..-05-ES 2612 + P, CZ 02.09.2003 9:09 Uhr Seite 19 Problemas Posibles causas La máquina no trabaja o • El interruptor de conexión/desconexión no está la lámpara del interruptor conectado. no se conecta • La clavija de red no está en la caja de enchufe.
  • Seite 20: Garantia

    5..-05-ES 2612 + P, CZ 02.09.2003 9:09 Uhr Seite 20 No hay crema sobre el • Las tazas y la máquina de hacer espresso no se café han precalentado. “Crema“ es una ligera • Se ha utilizado una marca de espresso inapropia- espuma marrón sobre el...
  • Seite 21: Después De La Garantía

    5..-05-ES 2612 + P, CZ 02.09.2003 9:09 Uhr Seite 21 limpieza, mantenimiento o el recambio de piezas de desgaste no recaen en la garantía e irán al cargo del cliente! En caso de intervención ajena se expira la garantía. Después de la garantía Después de haber expirado la garantía se pueden realizar las reparaciones por el...
  • Seite 22: Instruções Gerais De Segurança

    5..-05-ES 2612 + P, CZ 02.09.2003 9:09 Uhr Seite 22 Instruções gerais de segurança • Antes de pôr este aparelho a funcionar, leia muito atentamente as instruções de emprego e guarde-as muito bem, juntamente com o talão de garantia, o talão de compra e, tanto quanto possível, a embalagem com os elementos inte-...
  • Seite 23: Antes Da Primeira Utilização

    5..-05-ES 2612 + P, CZ 02.09.2003 9:09 Uhr Seite 23 • Faça atenção que o suporte do filtro esteja bem fechado durante o funcio- namento, porque este aparelho trabalha sob pressão. • Só encha o depósito com água. Não utilize nenhum outro liquido! Descrição dos elementos de funcionamento e das peças acessórias...
  • Seite 24 5..-05-ES 2612 + P, CZ 02.09.2003 9:09 Uhr Seite 24 Arejamento através da cabeça de escaldamento 1. Encha o depósito de água com água fria e fresca. Coloque um recipiente debaixo da cabeça de escaldamento com o suporte de filtro colocado.
  • Seite 25: Preparação De Cappuccino

    5..-05-ES 2612 + P, CZ 02.09.2003 9:09 Uhr Seite 25 5. Coloque o suporte do filtro na cabeça de escaldamento e gire a asa na direcção “LOCK” ( em estado fechado encontra-se a asa de suporte de filtro no centro do aparelho).
  • Seite 26 5..-05-ES 2612 + P, CZ 02.09.2003 9:09 Uhr Seite 26 8. Retire com uma colher a espuma do espresso. Junte a este leite liquido. Um Cappuccino é composto em geral de um terço de café, um terço de leite quen- te e um terço de leite em espuma.
  • Seite 27 5..-05-ES 2612 + P, CZ 02.09.2003 9:09 Uhr Seite 27 • Balance a tubeira de vapor para fora e ponha por baixo um recipiente de rece- bimento resistente ao calor. Então gire lentamente o botão de controle de vapor em sentido contrário dos ponteiros do relógio para abrir completamente a vál- vula de vapor.
  • Seite 28 5..-05-ES 2612 + P, CZ 02.09.2003 9:09 Uhr Seite 28 • Enxague o sistema depois de cada utilização com água fresca e fria. Além disso para aquecer préviamente o sistema antes da utilização é muito impor- tante que se faça uma ventilação após cada uso afim de reduzir a acumulação de restos de café...
  • Seite 29: Garantía

    5..-05-ES 2612 + P, CZ 02.09.2003 9:09 Uhr Seite 29 Não sai nenhum café • O disco de escaldamento está entupido (para Espresso limpar leve a máquina ao Serviço de clientela mais próximo). • Na máquina de Espresso formaram-se incru- stações.
  • Seite 30 5..-05-ES 2612 + P, CZ 02.09.2003 9:09 Uhr Seite 30 O talão de compra consistirá prova desta garantia. Sem o mesmo, não será pos- sível proceder-se a qualquer troca ou reparação grátis. Em caso de garantia, entregue o aparelho completo, juntamente com o talão de compra, na loja onde o mesmo foi comprado.
  • Seite 31: Norme Di Sicurezza Generali

    5..-05-ES 2612 + P, CZ 02.09.2003 9:09 Uhr Seite 31 Norme di sicurezza generali • Prima di mettere in funzione questo apparecchio, leggere molto attentamente le istruzioni per l’uso e conservarle con cura unitamente al certificato di garanzia, allo scontrino e, se possibile, alla scatola di cartone con la confezione interna.
  • Seite 32: Prima Del Primo Uso

    5..-05-ES 2612 + P, CZ 02.09.2003 9:09 Uhr Seite 32 • Fare attenzione che durante il funzionamento il supporto del filtro (7) sia inserito correttamente e ben chiuso, dato che questo apparecchio lavora sotto pressione. • Mettere solo acqua nel serbatoio. Non usare altri liquidi! Descrizione dei comandi e dei pezzi supplementari 1.
  • Seite 33: Preparazione Dell'espresso

    5..-05-ES 2612 + P, CZ 02.09.2003 9:09 Uhr Seite 33 3. Lasciar scorrere l’acqua per almeno uno - due minuti attraverso la testina di bol- litura e poi rilasciare il tasto di azionamento della pompa per bloccare l’acqua. 4. Se l’acqua non esce dalla testina di bollitura (eventuali bolle d’aria nel sistema), rilasciare il tasto di azionamento della pompa per fermare la pompa.
  • Seite 34: Preparazione Del Cappuccino

    5..-05-ES 2612 + P, CZ 02.09.2003 9:09 Uhr Seite 34 Dopo la bollitura attendere per alcuni secondi prima di togliere il supporto del filtro. Girare il manico del supporto del filtro da destra verso sinistra per staccar- lo. Attenzione alla pressione! Per rimuovere la polvere di caffè usata, tenere il filtro nella sua posizione servendosi della speciale leva sul manico.
  • Seite 35: Produzione Di Acqua Calda

    5..-05-ES 2612 + P, CZ 02.09.2003 9:09 Uhr Seite 35 • Quando il latte si è seccato, diventa difficile toglierlo. Mettere il tubicino del vapore in ammollo durante la notte per ammorbidire le croste di latte. Mettere un recipiente resistente al vapore pieno d’acqua sotto l’ugello ed aprire la valvo- la vapore.
  • Seite 36: Consigli Utili

    5..-05-ES 2612 + P, CZ 02.09.2003 9:09 Uhr Seite 36 Pulizia • Prima di ogni operazione di pulizia staccare la spina e lasciar raffreddare l’ap- parecchio. • Non tenere mai l’apparecchio sotto l’acqua corrente né immergerlo in acqua. Pulire tutte le parti della scatola, compresa la testina di bollitura, solo con un panno umido.
  • Seite 37 5..-05-ES 2612 + P, CZ 02.09.2003 9:09 Uhr Seite 37 Problemi Possibili cause L’apparecchio non funzio- • Il selettore On/Off non è acceso na o l’indicatore di • La spina non è nella presa funzione non si accende L’acqua o l’espresso •...
  • Seite 38: Garanzia

    5..-05-ES 2612 + P, CZ 02.09.2003 9:09 Uhr Seite 38 Sul caffè non c'è crema • Le tazzine e l’apparecchio per l’espresso non La „crema“ è un sottile sono stati preriscaldati strato di schiuma di color • È stata usata una marca di caffè non adatta.
  • Seite 39: Dopo La Garanzia

    5..-05-ES 2612 + P, CZ 02.09.2003 9:09 Uhr Seite 39 Dopo la garanzia Al termine della garanzia le riparazioni possono essere eseguite dietro pagamento dal corrispettivo negozio specializzato o servizio riparazioni.
  • Seite 40: General Safety Instructions

    5..-05-ES 2612 + P, CZ 02.09.2003 9:09 Uhr Seite 40 General Safety Instructions • Read the operating instructions carefully before putting the appliance into ope- ration and keep the instructions including the warranty, the receipt and, if possi- ble, the box with the internal packing.
  • Seite 41: Before The First Use

    5..-05-ES 2612 + P, CZ 02.09.2003 9:09 Uhr Seite 41 Description of User Elements and Accessories 1. Pump button 10. Siphon Tube Steam button 11. Drip Tray 3. Standby Indicator 12. Drip Tray Cover 4. Steam lamp 13. Filter Holder 5.
  • Seite 42: Making Espresso

    5..-05-ES 2612 + P, CZ 02.09.2003 9:09 Uhr Seite 42 2. Swing the steam valve outwards and place a jug under the valve. After swit- ching the equipment on and opening the steam control switch please turn the knob counter clock wise. This opens the steam valve entirely.
  • Seite 43 5..-05-ES 2612 + P, CZ 02.09.2003 9:09 Uhr Seite 43 2. Swing the steam valve outwards. This way you are able to place the jug (please use a heat resistant jug) comfortably under the valve. Hint: Place an empty jug...
  • Seite 44: Helpful Hints

    5..-05-ES 2612 + P, CZ 02.09.2003 9:09 Uhr Seite 44 Producing hot water It is also very easy to produce tea or other liquids. • Please check whether there is enough fresh water in the tank. Press the pump button to refill the water supply. As soon as the water flows through the brew head release the pump button and wait until the readiness lamp lights up.
  • Seite 45 5..-05-ES 2612 + P, CZ 02.09.2003 9:09 Uhr Seite 45 • After each use of the appliance rinse the system with fresh cold water. Additionally to preheating the system ventilation after each use is playing a major role. This reduces the collection of coffee grain in the brew head.
  • Seite 46: Guarantee

    5..-05-ES 2612 + P, CZ 02.09.2003 9:09 Uhr Seite 46 Coffee runs to fast • Coffee too coarse or not pressed firm enough • There is no coffee in the filter Coffee is to strong or it • Coffee too fine or pressed to firm takes very long •...
  • Seite 47: After The Expiry Of The Guarantee

    5..-05-ES 2612 + P, CZ 02.09.2003 9:09 Uhr Seite 47 Defects to consumables or parts subject to wearing (e.g. motor pistons, kneading blades, drive shafts, spare remote control, spare toothbrushes, saw blades, etc.) as well as cleaning, maintenance or the replacement of said parts are not covered by the guarantee and hence are to be paid! The guarantee lapses in case of unauthorized tampering.
  • Seite 48: Ogólne Wskazówki Bezpieczeństwa

    5..-05-ES 2612 + P, CZ 02.09.2003 9:09 Uhr Seite 48 Ogólne wskazówki bezpieczeństwa • Przed uruchomieniem urządzenia proszę bardzo dokładnie przeczytać instrukcję obsługi.Proszę zachować ją wraz z kartą gwarancyjną, parago- nem i w miarę możliwości również kartonem z opakowaniem wewnętrznym.
  • Seite 49: Przed Pierwszym Użyciem

    5..-05-ES 2612 + P, CZ 02.09.2003 9:09 Uhr Seite 49 • Aby upewnić się, czy z poprzedniego procesu zaparzania nie utrzymało się resztkowe ciśnienie pary, należy odczekać kilka minut, aby urządzenie uległo schłodzeniu, a następnie powoli obrócić mocowanie filtra (7) w kie- runku „OTWARTE“.
  • Seite 50: Przygotowywanie Kawy Espresso

    5..-05-ES 2612 + P, CZ 02.09.2003 9:09 Uhr Seite 50 było nalewanie do niego wody z dzbanka (np. w przypadku, gdy urządzenie pracuje). Napowietrzanie poprzez zaparzacz 1. Proszę napełnić zbiornik czystą zimną wodą. Proszę ustawić zbiornik pod zaparzaczem z nałożonym pojemnikiem na filtr.
  • Seite 51: Przygotowywanie Cappuccino

    5..-05-ES 2612 + P, CZ 02.09.2003 9:09 Uhr Seite 51 4. Proszę włożyć filtr do pojemnika na filtr. Do filtra wsypać jedną do dwóch pełnych miarek kawy. Następnie kawę należy równomiernie rozłożyć i lekko docisnąć za pomocą miarki lub łyżeczki dociskającej oraz ostrożnie usunąć...
  • Seite 52 5..-05-ES 2612 + P, CZ 02.09.2003 9:09 Uhr Seite 52 żądaną objętość można dalej je podgrzewać umieszczając dyszę parową na samym dnie naczynia. Proszę nie doprowadzić mleka do gotowania, gdyż wtedy piana zaniknie. 7. Proszę przekręcić przełącznik kontrolny pary w kierunku wskazówek zegara w celu zamknięcia zaworu parowego.
  • Seite 53 5..-05-ES 2612 + P, CZ 02.09.2003 9:09 Uhr Seite 53 Wytwarzanie gorącej wody Równie prosto można przygotować herbatę, gorące płyny lub rosół. • Proszę skontrolować, czy w zbiorniku znajduje się świeża zimna woda. Proszę wcisnąć przycisk „pompa” w celu uzupełnienia systemu zaopatrzenia w wodę.
  • Seite 54: Pomocne Wskazówki

    5..-05-ES 2612 + P, CZ 02.09.2003 9:09 Uhr Seite 54 dyszę parową, aż do momentu, gdy nie będzie wyczuwalny zapach środka odkamieniającego. Pomocne wskazówki • Ponieważ ciepło utrzymuje aromat zalecamy podawanie kawy espresso i cappuccino we wstępnie podgrzanych filiżankach. Woda filtrowana i źródlana poprawia smak kawy. Proszę nie używać do par- zenia kawy wody destylowanej.
  • Seite 55 5..-05-ES 2612 + P, CZ 02.09.2003 9:09 Uhr Seite 55 Pompa wydaje głośne • W zbiorniku brak jest wody dźwięki • Zbiornik z wodą został niewłaściwie włożony • Rura syfonu została zagięta lub nie znajduje się w zbiorniku na wodę...
  • Seite 56: Gwarancja

    5..-05-ES 2612 + P, CZ 02.09.2003 9:09 Uhr Seite 56 WARUNKI GWARANCJI Przyznajemy 24 miesięcy gwarancji na produkt licząc od daty zakupu. W tym okresie będziemy bezpłatnie usuwać w terminie 14 dni od daty dostarcze- nia wadliwego sprzętu z kartą gwarancyjną do miejsca zakupu wszystkie uszko- dzenia powstałe w tym urządzeniu na skutek wady materiałów lub wadliwego...
  • Seite 57: Všeobecné Bezpečnostní Pokyny

    5..-05-ES 2612 + P, CZ 02.09.2003 9:09 Uhr Seite 57 Všeobecné bezpečnostní pokyny • Před uvedením tohoto přístroje do provozu si velmi pozorně přečtěte návod k obsluze a tento návod spolu se záručním listem, pokladním blokem a podle možností i s obalem a vnitřním vybavením obalu dobře uschovejte.
  • Seite 58: Před Prvním Použitím

    5..-05-ES 2612 + P, CZ 02.09.2003 9:09 Uhr Seite 58 Ovládací prvky a přídavné díly 1 Tlačítko čerpadla 9 Parní tryska 2 Tlačítko páry 10 Sifonová trubka 3 Svítilna indikující připravenost k 11 Odkapávací vanička provozu 12 Kryt na odkapávací vaničku 4 Svítilna indikující...
  • Seite 59 5..-05-ES 2612 + P, CZ 02.09.2003 9:09 Uhr Seite 59 Odvzdušnění pomocí parní trysky 1. Ujistěte se, že v nádržce na vodu je čerstvá studená voda. 2. Vyklopte parní trysku směrem ven a postavte pod ni nějakou vhodnou nádo- bu. Po zapnutí přístroje otočte regulátorem páry proti směru pohybu hodi- nových ručiček až...
  • Seite 60: Příprava Cappuccina

    5..-05-ES 2612 + P, CZ 02.09.2003 9:09 Uhr Seite 60 espreso, vložte do misky pro kávu opět kávový prášek, vyčkejte, až se svítil- na indikující připravenost k provozu rozsvítí a proveďte spaření znovu tak, jak je popsáno výše. Příprava cappuccina Chcete-li si napěnit mléko pro přípravu cappuccina, postupujte takto:...
  • Seite 61: Příprava Horké Vody

    5..-05-ES 2612 + P, CZ 02.09.2003 9:09 Uhr Seite 61 ce a svítilna pro indikaci připravenosti k provozu a svítilna pro indikaci přípravy páry zhasnou, uvolněte tlačítko čerpadla. Vyčkejte, až se svítilna pro indikaci připravenosti k provozu rozsvítí. Výroba páry •...
  • Seite 62: Užitečné Rady

    5..-05-ES 2612 + P, CZ 02.09.2003 9:09 Uhr Seite 62 čistící prostředky. Nádržka na vodu, odkapávací vanička, kryt odkapávací vaničky, filtr a držák filtru lze mýt v teplé mycí lázni. Jestliže dojde k ucpání perforace filtru, vyčistěte jej měkkým kartáčkem.
  • Seite 63 5..-05-ES 2612 + P, CZ 02.09.2003 9:09 Uhr Seite 63 Problém Možná příčina Přístroj nepracuje nebo • Přepínač Zapnuto/Vypnuto (EIN/AUS) není se svítilna ve spínači zapnutý nerozsvítí • Zástrčka není zastrčena do zásuvky Voda nebo espreso • Držák filtru nebyl správně vložen nebo nebyl vytéká...
  • Seite 64: Záruka

    5..-05-ES 2612 + P, CZ 02.09.2003 9:09 Uhr Seite 64 Na kávě není žádná • Šálky a přístroj na přípravu espresa nebyly “crema” předehřány. “Crema” je nahnědlá • Byla použita nevhodná káva. pěna nahoře na espre- • Káva pro přípravu espresa není čerstvá.
  • Seite 65 5..-05-ES 2612 + P, CZ 02.09.2003 9:09 Uhr Seite 65 Po uplynutí záruky Po uplynutí záruční doby je možno za úplatu provést opravy v příslušném odborném obchodě nebo opravně.
  • Seite 66: Technische Daten

    5..-05-ES 2612 + P, CZ 02.09.2003 9:09 Uhr Seite 66 Technische Daten Modell: ES 2612 Bemessungsspannung/-frequenz: 230 V, 50 Hz Leistungsaufnahme: 1150 Watt Ι Schutzklasse: Füllmenge: 1,4 l Dieses Gerät wurde nach allen zutreffenden, aktuellen CE-Richtlinien geprüft, wie z.B. elektromagnetische Verträglichkeit und...

Inhaltsverzeichnis