Herunterladen Inhalt Inhalt Diese Seite drucken

Werbung

Verfügbare Sprachen

Verfügbare Sprachen

EN
INSTALLATION AND USER GUIDE
IT
INSTALLAZIONE E GUIDA UTENTE
NL
INSTALLATIE- EN GEBRUIKERSHANDLEIDING
DE
MONTAGE- UND BEDIENUNGSANLEITUNG
Central Unit « WIFI »
1
2-9
10-17
18-25
26-34

Werbung

Inhaltsverzeichnis
loading

Inhaltszusammenfassung für Watts WIFI

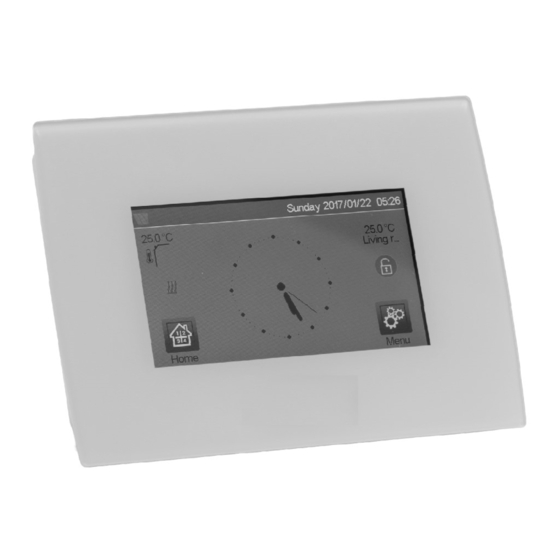
  • Seite 1 Central Unit « WIFI » INSTALLATION AND USER GUIDE INSTALLAZIONE E GUIDA UTENTE 10-17 INSTALLATIE- EN GEBRUIKERSHANDLEIDING 18-25 MONTAGE- UND BEDIENUNGSANLEITUNG 26-34...
  • Seite 2 (0-5V) (sold separately) • Back up Battery operation of 1 hour maximum • You may have to use a Watts RF repeater if you want to • RF Communication only with WATTS® Vision® devices (up to extend the RF range.
  • Seite 3 Set the time and the date manualy or automatically. If you select auto, you have to set the time zone (UTC) and the device is CABLE getting the time from internet (WIFI connection is mandatory). ON/OFF Set your language - see MAIN MENU section...
  • Seite 4 3 CREATE YOUR HOUSE HYDRAULIC SYSTEM PAIRING If your installation has a number of separate hydraulic circuits containing their own pumps or boilers, you may want to drive long press on each pump/boiler separately from specific heating receivers or thermostatic actuator(s). With smartvision you can create and You now need to “create”...
  • Seite 5: Installation Types

    INSTALLATION TYPES 5 SET UP REMOTE CONTROL (HEATING/COOLING) 1 Connect the central unit to your WiFi network: To do this; Type 1 : Go to installation menu (long press) Choose WiFi settings Choose Research Networks (searches for your wifi) Choose your WiFi from the list...
  • Seite 6 ① Device type choice (heating/cooling, lighting, On/Off). These buttons are only displayed if one device type is installed in the room PROGRAMMING YOUR DEVICES (colored if active). ② Room changing. • Auto Mode : In this mode, the room temperature will ③...
  • Seite 7 ON/OFF DEVICES MANAGEMENT LIGHTING DEVICES MANAGEMENT Press on in the main screen and on Press on in the main screen and press on ① Device type choice (heating/cooling, lighting, On/Off). These ① Device type choice (heating/cooling, lighting, On/Off). These buttons are only displayed if one device type is installed in the buttons are only displayed if one device type is installed in the room (colored if active).
  • Seite 8 - Default screen (Home, Clock, Disabled) - Screen cleaner. - Factory default user (interface). ⑥ WIFI menu. Reading button (refreshment). The Internet Access password allows to link your central unit to your Internet account (See below) for a remote control of your system through the Internet or Smart Phone.
  • Seite 9 Configuration requesting a registration on a web page is not supported. WIFI Status: 0/2 : Central unit not connected to the wifi router and server 1/2 : Central unit connected to the Wifi router 2/2: Central unit connected to the wifi router and to the server...
  • Seite 10 • Per ampliare l'intervallo RF potrebbe essere necessario • Funzionamento a batteria per una durata massima di 1 ora. utilizzare un ripetitore RF Watts. • Comunicazione RF solo con dispositivi WATTS® Vision® (fino a 40m interno, ampliabile con ripetitore). CARATTERISTICHE TECNICHE •...
  • Seite 11: Installazione

    Se si seleziona la modalità AUTO è necessario impostare la zona fascia oraria (UTC), l’unità rileverà l’ora CAVO corrente da internet (sarò necessaria una connessione WIFI). ON/OFF Impostare la lingua - vedi all’interno del Menu Principale (pag.16) Collegare la centralina con il cavo (5 V, 1 A), quindi montare il supporto e collocare l'interruttore in posizione ON.
  • Seite 12 3 CREAZIONE DI UNA CASA ASSOCIAZIONE IMPIANTI IDRAULICI Se l'impianto ha elementi idraulici, potrebbe essere necessario comandare pompe o caldaie. Con Smartvision è possibile pressione lunga comandare fino a quattro circuiti idraulici. E, per ognuno di essi, È necessario “creare” la propria casa – una lista di stanze dove è...
  • Seite 13: Controllo Remoto

    Osservare il conteggio alla rovescia dell'unità da 120 a zero; In questa configurazione : Accertarsi che la centralina sia collegata alla rete WiFi con un • Associare prima il termostato (master - configurato come indirizzo IP (stato WiFi dovrebbe essere 1/2);...
  • Seite 14 ① Scelta del tipo di dispositivo (riscaldamento/raffreddamento, PROGRAMMAZIONE UNITA’ CENTRALE illuminazione, On/Off). Questi pulsanti appaiono se nella stanza è installato un dispositivo di questo tipo (se attivo è colorato). ② Modifica della stanza. • Modalità Auto : In questa modalità, la temperatura della ③...
  • Seite 15 GESTIONE DEI DISPOSITIVI DI GESTIONE DEI DISPOSITIVI ILLUMINAZIONE ON/OFF Premere nella schermata principale e premere su Premere nella schermata principale e premere su ① Scelta del tipo di dispositivo (riscaldamento/raffreddamento, ① Scelta del tipo di dispositivo (riscaldamento/raffreddamento, illuminazione, On/Off). Questi pulsanti appaiono se nella stanza illuminazione, On/Off).
  • Seite 16: Menu Principale

    - Schermata predefinita (Home, Orologio, Disabilitato) - Pulizia dello schermo. - Ripristino Parametrri di fabbrica (interfaccia). ⑥ Menu WIFI. Pulsante Lettura (aggiornamento). La password di accesso a Internet permette di collegare la centralina al proprio account Internet (vedi sotto) per controllare il sistema da remoto via Internet o smartphone.
  • Seite 17 Vedi sezione Creazione di una casa. Stato WiFi: Associazione radio 0/2: Centralina non collegata al router WiFi e al server Vedi sezione Associazione radio. 1/2: Centralina collegata al router WiFi 2/2: Centralina collegata al router WiFi e al server (è...
  • Seite 18 • • Werking op batterijen indien volledig opgeladen (max. 1uur) Men kan een Watt RF-verstreker gebruiken als men het RF- • RF Communicatie enkel met WATTS® Vision® apparaten (tot bereik wilt verlengen 40m intern, uitbreidbaar met versterker) • In staat om max.4 hoofdcircuits met een speciale pomp of...
  • Seite 19 (UTC) instellen en het toestel krijgt AAN/UIT de tijd van internet (WIFI-verbinding is verplicht). Sluit de centrale unit aan op de mini USB kabel (5V, 1A) en monteer vervolgens de voetsteun erop en zet de schakelaar op Stel uw taal in - zie HOOFDMENU.
  • Seite 20 3 – HUIS AANMAKEN HYDRAULISCHE SYSTEMEN KOPPELEN Als uw installatie hydraulische elementen heeft, kan het zijn dat u pompen of ketels moet aansturen. Met smartvision kunt u tot druk lang op en met 4 hydraulische circuits direct aansturen. En voor elk van deze circuits kan er een RF-apparaat voor afstandsbediening U moet nu uw huis "creëren"...
  • Seite 21 SOORTEN INSTALLATIE 5 INSTALEER AFSTANDSBEDIENING (VERWARMEN/KOELEN) 1. Sluit de central aan op uw WiFi-netwerk: om dit te doen; Type 1 : Ga naar installatiemenu (lang drukken) Kies WiFi instellingen Kies zoeken naar netwerken (zoekt naar je WiFi) Kies je WiFi uit de lijst...
  • Seite 22 apparaat-type in de kamer is geïnstalleerd (gekleurd indien PROGRAMMEREN VAN UW APPARATEN actief). • Automatische modus : ②Kamer veranderen. In deze modus volgt de kamertemperatuur het geselecteerde programma. U kunt tussen ③Huidige modus, druk op dit icoon om in het menu te gaan waar u bestaande programma's kiezen of u kunt een nieuwe aanmaken de huidige bedrijfsmodus kunt wijzigen.
  • Seite 23 BEHEER VAN VERLICHTINGSAPPARATEN BEHEER VAN AAN/UIT APPARATEN Druk op in het hoofdscherm en druk op Druk op in het hoofdscherm en druk op ①Keuze type apparaat (verwarmen/koelen, verlichting, ①Keuze type apparaat (verwarmen/koelen, verlichting, Aan/Uit). Deze knoppen worden alleen getoond als één type Aan/Uit).
  • Seite 24 - Standaard scherm (Thuis, Klok, Uitgeschakeld) - Schermreiniger. - Fabrieksinstellingen gebruiker (interface). ⑥ WIFI menu. Leesknop (verversing). Met het wachtwoord voor internettoegang kunt u uw centrale unit verbinden met uw internet-account (zie hierna) voor het op afstand bedienen van uw systeem via internet of uw smartphone.
  • Seite 25 Plaats dezelfde SD-kaart in centrale 2 en start het U kunt de setpoint voor vorstbeveiliging instellen klonen. als referentie voor de hele installatie. Na het klonen, moet u de Wifi en de taal opnieuw Instellingen verwarming. configureren U kunt setpoint-limieten (min/max) vastzetten per zone en de offset die is toegewezen aan apparaten die de regeling van de vloersensor verzorgen.
  • Seite 26: Kompatible Geräte

    Mini USB (5V,1A), Netzteil und Kabel nicht im Lieferumfang • Batteriebetrieb für max. 1 Stunde (nur zur Konfiguration) • Gegebenenfalls Verwendung eines Funk-Repeaters um die • Funk-Kommunikation mit WATTS® Vision® Geräten Reichweite zu vergrößern. • (bis zu 40 m Übertragungsbereich, erweiterbar mit Repeater) •...
  • Seite 27: Montage Und Anschluss

    BENUTZER EINSTELLUNGEN KABEL Stellen Sie die Uhrzeit und das Datum manuell oder automatisch EIN/AUS ein. Falls Auto gewählt wird, muss die Zeitzone (UTC) ausgewählt werden damit das Gerät die aktuelle Zeit online bzw. aus Internet bezieht. (Voraussetzung: Internetverbindung über WIFI besteht).
  • Seite 28: Funk-Paarung Der Geräte

    ③ Löschen des Raums. anzusteuern, sobald Heiz- oder Kühlbedarf an wenigstens einer Zone besteht. Mit WATTS® Vision® können bis zu 4 solcher Einrichtungen FUNK-PAARUNG DER GERÄTE über die Funktion „Hydraulikkreis“ geschaltet werden. Jede dieser 4 möglichen Schaltungen kann über einen Einzel- •...
  • Seite 29: Anlagen Typen (Heizen/Kühlen)

    Die Taste 5 Sekunden gedrückt halten. Sie befinden sich im Konfigurationsmenü des Gerätes. Wählen Sie das Menü “HC”. Sie haben 2 Auswahlmöglichkeiten: „Elektro“ und „Hydraulik“, Wählen Sie „Hydraulik“ und drücken danach Nun können Sie den Hydraulikkreis wählen, welchen Sie mit diesem Raum (Zone) verknüpfen wollen (z.
  • Seite 30: Fernbedienung Einrichten

    Sie ein Passwort. gesperrt ist). ⑧ Raumbezeichnung bzw. Name der Zone. Oder laden Sie die WATTS® Vision® App aus dem App Store ⑨ Schnellzugriff auf einen anderen Raum (Raumliste erscheint). oder Google Play auf Ihr Smartphone oder Tablet herunter. Hier können Sie ebenfalls ein Benutzerkonto erstellen.
  • Seite 31: Geräte Programmieren

    Wählen Sie die Tage aus, für die Sie dasselbe Programm • Betriebsart Frostschutz wünschen (im Beispiel Mittwoch, Donnerstag und Freitag). : regelt den Raum (Zone) auf Frostschutztemperatur. Mit den Pfeiltasten wählen Sie die Uhrzeit, bei Frostschutz-Sollwert welcher Sie die Programmierung starten. Wert anpassen: Verwenden Sie die Taste Komfort , um den Zeitraum...
  • Seite 32: Ein / Aus Geräte Management

    WIFI Menü. WIFI Einstellungen Aktualisieren-Taste. Der Paarungsschlüssel (twinning code) ermöglicht es, Ihre Zentraleinheit mit Ihrem WATTS® Vision® Benutzerkonto (siehe unten) für eine Fernbedienung Ihres Systems über das Internet oder Smartphone zu verbinden. Anmerkung: Warten Sie bei der ersten Verwendung oder beim ①...
  • Seite 33 Löschen eines Gerätes WiFi-Status: Eine Geräteart (Heizen, Licht, EIN/AUS, Externer Sensor, 0/2: Die Zentraleinheit ist nicht mit einem WiFi Router und Hydraulikkreis) auswählen, anschließend Gerät aus Liste dem Server verbunden. auswählen und löschen. 1/2: Die Zentraleinheit ist mit einem WiFi Router verbunden.
  • Seite 34 Karten ist nicht möglich! Bestätigen Sie die Prozedur durch Drücken von Bitte warten Sie das vollständige Ende des Updates ab (bei Zentraleinheiten mit WiFi Funktion muss das WiFi Symbol im Hauptmenü aktiv sein) bevor Sie die Micro SD-Karte aus dem Zentralregler entfernen.
  • Seite 40 PPLIMW15398Ab...

Inhaltsverzeichnis