Kessel Staufix SWA Anleitung Für Einbau, Bedienung Und Wartung
Vorschau ausblenden
Andere Handbücher für Staufix SWA:
- Anleitung für einbau, bedienung und wartung (12 Seiten) ,
- Anleitung für einbau, bedienung und wartung (16 Seiten)
Inhaltsverzeichnis
Verfügbare Sprachen
Verfügbare Sprachen
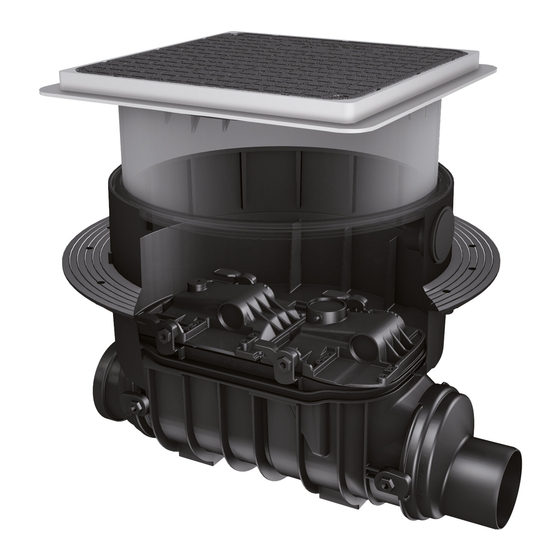
KESSEL - Rückstauverschluss Staufix SWA für fäkalienfreies Abwasser
ANLEITUNG FÜR EINBAU, BEDIENUNG UND WARTUNG
KESSEL-Reinigungsrohr Controlfix
Installation
Inbetriebnahme
der Anlage wurde durchgeführt von Ihrem Fachbetrieb:
Name/Unterschrift
Datum
Produktvorteile
Für fäkalienfreies Abwasser
Zum Einbau in durchgehende Rohrleitungen
Bei Rückstau selbsttätig schließende Klappen
(variantenabhängig)
Optimale Rohrreinigung
Stufenlose Anpassung an den Bodenbelag durch teleskopisch
höhenverstellbares, drehbares und neigbares Aufsatzstück
Umrüstbar zum Fäkalien-Rückstauautomat
oder Rückstaupumpanlage Pumpfix F
freier Rohrquerschnitt
Einfache Wartung
DIN EN 13564 Typ 2
Einweisung
Ort
Stempel Fachbetrieb
Änderungsstand: 02/2017
Sachnummer:
010-841
Techn. Änderungen vorbehalten
LGA
Landesgewerbeamt Bayern
Bauart
Bauart
Bauart
geprüft
geprü ü ft ft
gepr
und überwacht
und ü ü berwacht
und
berwacht
Kapitel
Inhaltsverzeichnis

Verwandte Anleitungen für Kessel Staufix SWA


Inhaltszusammenfassung für Kessel Staufix SWA
- Seite 1 KESSEL - Rückstauverschluss Staufix SWA für fäkalienfreies Abwasser ANLEITUNG FÜR EINBAU, BEDIENUNG UND WARTUNG KESSEL-Reinigungsrohr Controlfix Produktvorteile Für fäkalienfreies Abwasser Zum Einbau in durchgehende Rohrleitungen Bei Rückstau selbsttätig schließende Klappen (variantenabhängig) Optimale Rohrreinigung Stufenlose Anpassung an den Bodenbelag durch teleskopisch höhenverstellbares, drehbares und neigbares Aufsatzstück...
-
Seite 2: Inhaltsverzeichnis
Inhaltsverzeichnis Verwendung..................Seite Anlagenbeschreibung ............... Seite 1. Allgemein Lieferumfang..................Seite Allgemeine Hinweise ................ Seite Einbau in die Bodenplatte ..............Seite 2. Einbau Vertiefter Einbau in die Bodenplatte..........Seite Einbau in eine freiliegende Abwasserleitung ........Seite Einbau in drückendes Wasser ............Seite Funktionsprüfung nach DIN EN 13564 .......... -
Seite 3: Verwendung Staufix Swa
1.2 Verwendung Controlfix Das KESSEL-Reinigungsrohr dient als Grund- körper für den KESSEL-Rückstauverschluss 1.1 Verwendung Staufix SWA Staufix SWA. Die folgende Einbau- und Instal- Der KESSEL-Rückstauverschluss Staufix lationsanleitung gilt hier entsprechend. Da SWA ist für durchgehende Ab wasserleitungen hier keine Rückstaueinsätze eingebaut sind, bestimmt, in denen fäkalienfreies Abwasser... -
Seite 4: Allgemeine Hinweise
2. Einbau verschluss das Abwasser von oben nicht mehr in den Kanal abfließen Es ist nach DIN EN 12056 nicht zulässig, alle Ablaufstellen eines Gebäu- kann, sondern nach dem Prinzip der kommunizierenden Röhren zuerst Allgemeine Hinweise zum Einbau von Rückstausicherungen des - auch die oberhalb der Rückstauebene (Straßenoberkante) - über aus den am tiefsten installierten Ablaufstellen unterhalb der Rückstaue- Rückstauverschlüsse abzusichern, da beim geschlossenen Rückstau-... - Seite 5 Grundwasserbeständigkeit beträgt 2 m. ➤ Kabelleerrohr vorsehen für spätere Bodenplatte (Best.Nr. 73100.10 S/X, 73125.10 2.1 KESSEL-Staufix SWA zum Einbau in die S/X, 73150.10 S/X, 73200.10 S/X). Gilt entspre- Nachrüstung. Sollte das Kabelleerrohr im chend auch für den Einbau Controlfix. Der Aufsatzstück installiert werden, muss die-...
-
Seite 6: Einbau In Die Bodenplatte
2. Einbau Die zweite Lippendichtung muss in der Ab- bei dünneren Fliesen geeignet, da ei ne Bei Verwendung eines Verlängerungs- deckplatte angebracht werden. Dabei ist zu Aufspachtelung auf die erforderliche Hö he stückes ( Art. Nr. 83070) ist darauf zu ach- beachten, dass Dichtlippe und Zentriernase durchgeführt werden kann. - Seite 7 Gegenflansch ei ne Dichtungsbahn einge- klemmt und mit den bei liegenden Schrau- ben verschraubt. Bei Einbau in eine was- Einbaubeispiel „Schwarze Wanne“ Einbaubeispiel „Weiße Wanne“ serdichte weiße Wanne bietet KESSEL zu- sätzlich eine passende Dichtungsbahn aus Naturkautschuk NK/SBR an, bei welcher Fliesen Fliesen...
-
Seite 8: Funktionsprüfung Nach Din En13564
3. Inbetriebnahme ➁ Funktionsprüfung nach DIN EN13564 Den Notverschluss (3) mit dem Hand hebel verschließen. Die Verschlussschraube R “ (1) am Deckel ent fernen und den Trichter (2) anschrauben. Klarwasser einfüllen, bis eine Prüfdruckhö he von 10 cm erreicht ist. Verschluss- Die Wasserspiegelhöhe (= Prüfdruckhöhe) im Trichter ist schraube R1/2”... -
Seite 9: Inspektion
4. Inspektion und Wartung 4.1 Inspektion Der Rückstauverschluss ist einmal monatlich vom Betreiber oder dessen Beauftragten zu inspizieren. Dabei ist der Notverschluss zu überprüfen, indem er mehrmalig geöffnet und geschlos- sen wird. Bitte beachten Sie, dass nach Beendigung der Inspektion der Notverschluss geöffnet sein muss! Abb. - Seite 10 4. Inspektion und Wartung Der Rückstauverschluss muss mindestens halbjährlich durch einen Sachkundigen gewar- tet werden. Während der Wartung darf der Rückstauverschluss nicht mit Abwasser beauf- schlagt werden. Notverschluss Dabei ist folgendes durchzuführen: Betrieb ① Entfernen von Schmutz und Ablagerungen ② Prüfen von Dichtungen und Dichtflächen auf einwandfreien Zustand;...
-
Seite 11: Montage Der Beiden Deckel
4. Inspektion und Wartung 4.2.1 Montage der beiden Deckel (siehe Abb. 11, 12) Deckel je auf einer Seite einführen, die andere Seite nach unten drücken und mit Verriegelungshebeln verschliessen. alle 4 Verschlusshebel verriegeln Abb. 11 Abb. 12 2017/02 010-841... -
Seite 12: Ersatzteile
5. Ersatzteile SWA zum Einbau in die freiliegende Abwasserleitung Pos. Bezeichnung Art.Nr. Schutzhaube 83031 Deckel Zulaufseite 80013 Dichtungsset I 70318 Einschiebeteil + Klappe für Premium RV 80041 Klappenhalter 680101 Übergangsstück frei 83032 Muffe inkl. Dichtung DN 100 83085 DN 125 83086 DN 150 83087 DN 200... - Seite 13 5. Ersatzteile SWA zum Einbau in die Bodenplatte Pos Bezeichnung Art Nr Abdeckplatte steingrau, befliesbar mit Dichtung 83052 Dichtung für Abdeckplatte 680025 Aufsatzstück 83061 Profillippendichtung bis Bj. 06/2014 680026 Profillippendichtung ab Bj. 07/2014 680150 Deckel Zulaufseite 80013 Dichtungsset I 70318 Einschiebeteil + Klappe für Premium RV 80041 Klappenhalter 680101...
- Seite 14 2017/02 010-841...
- Seite 15 2017/02 010-841...
- Seite 16 Notizen 2017/02 010-841...
- Seite 30 2017/02 010-841...
- Seite 31 2017/02 010-841...
- Seite 32 Notes 2017/02 010-841...
- Seite 46 2017/02 010-841...
- Seite 47 2017/02 010-841...
- Seite 48 Notes 2017/02 010-841...
- Seite 62 2017/02 010 841...
- Seite 63 2017/02 010 841...
- Seite 64 Notes 2017/02 010 841...
- Seite 78 2017/02 010-841...
- Seite 79 2017/02 010-841...
- Seite 80 Notes 2017/02 010-841...
- Seite 94 2017/02 010-841...
- Seite 95 2017/02 010-841...
- Seite 96 Notes 2017/02 010-841...