Herunterladen Diese Seite drucken

Miditech MIDI THRU 4/ FILTER Bedienungsanleitung

4 fach midi thru signalverteiler box mit integriertem midi filter

Werbung

Verfügbare Sprachen

Verfügbare Sprachen

miditech
MIDI THRU 4/ FILTER
4 fach MIDI THRU Signalverteiler Box
mit integriertem MIDI Filter
1 x MIDI Input, 4 x MIDI THRU
LED für MIDI In signal
Panic Button
8 DIP switches für Filtersetups
Programmierbar über MIDI Keyboard oder PC Editor
MIDI powered am MIDI In
eMail:
info@miditech.de
Internet:
www.miditech.de
1

Werbung

loading

Inhaltszusammenfassung für Miditech MIDI THRU 4/ FILTER

  • Seite 1 MIDI THRU 4/ FILTER 4 fach MIDI THRU Signalverteiler Box mit integriertem MIDI Filter 1 x MIDI Input, 4 x MIDI THRU LED für MIDI In signal Panic Button 8 DIP switches für Filtersetups Programmierbar über MIDI Keyboard oder PC Editor...
  • Seite 2 Bedienungsanleitung Vielen Dank, das Sie sich für den Miditech MIDI THRU 4/FILTER entschieden haben. Mit der MIDI THRU 4/FILTER Box können Sie mit einfachster Installation an eine MIDI Tastaturen oder MIDI Keyboard bis zu 4 MIDI Expander und Keyboards anschliessen. Dabei wird das eingehende MIDI Signal bis zu 4 x auf angeschlossene MIDI Geräte verteilt.
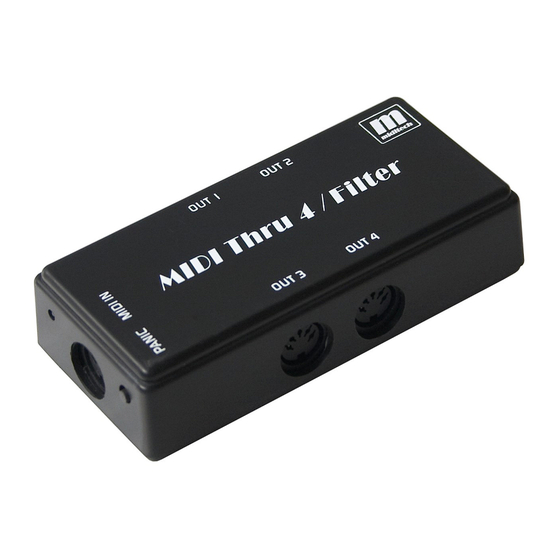
  • Seite 3 Unterseite Das Gehäuse des MIDI THRU 4/FILTER ist eindeutig beschriftet! Sie finden an der Frontseite den MIDI Eingang, auf den beiden nebenan liegenden Seiten je 2 MIDI Thru Ports. Hier können Sie mit Standard MIDI Kabeln Ihre Expander oder MIDI Geräte anschliessen. Auf der Unterseite finden Sie die 8 DIP Switches, mit denen Sie verschiedene MIDI Filter und Funktionen an oder abschalten können.
  • Seite 4: Funktionsbeschreibung Der Dip Switches

    Funktionsbeschreibung der DIP Switches Die Switches sind folgendermassen beschriftet: 1. Channel 2. Transpose 3. Velocity 4. Program 5. Controller 6. Pitch bend / After touch 7.System 8. Real Switch 1: MIDI Channel Wenn dieser Schalter auf ON steht, wirkt das vorher programmierte MIDI Channel Mapping.
  • Seite 5 Switch 3: Velocity Wenn dieser Schalter auf OFF steht, gibt die Miditech MIDI THRU 4/FILTER Box die Möglichkeit, die Velocity, also Dynamik der Tastur abzuschalten. Jeder Ton wird dann mit der MIDI velocity 100 weitergegeben, egal wie leicht oder fest man auf der Klaviatur spielt.
  • Seite 6 Ein weiterer Druck auf PANIC ist erforderlich, um eine Programmierung zu übernehmen! (Diese bleibt bis zu einem Reset auch im ausgeschalteten Zustand erhalten und gespeichert.) Danach kehrt die Miditech MIDI THRU 4/ FILTER Box zurück in den "Work Mode". Wird das stromführende MIDI Kabel vorzeitig getrennt, wird die Programmierung nicht übernommen und die Miditech...
  • Seite 7 Alle eingestellten Controller können gleichzeitig resettet werden, indem Sie beim Einstecken des stromführenden MIDI IN Kabels die PANIC Taste 10 Sekunden lang gedrückt halten. Eine dauerhaft leuchtende LED zeigt den Reset der Miditech MIDI THRU 4/Filter Box an. Dann ist sie wieder im Werkszustand.
  • Seite 8 H5 – Kanal 10 C6 – Kanal 11 C#6 – Kanal 12 D6 – Kanal 13 D#6 – Kanal 14 E6 – Kanal 15 F6 – Kanal 16 (ausserhalb dieser Tasten wird der Midi Kanal auf 1 gesetzt) 3. Drücken Sie danach kurz den PANIC Button. Danach startet das System im "Work Mode".
  • Seite 9 3. Danach spielen Sie auf der Klaviatur C5, diese Taste entspricht Transpose = 0 ! Die weiteren Tasten nach oben entsprechen weiteren Transpose Stufen mit jeweils einem Halbtonschritt. Z.B.: C#5 – Transpose +1 D5 – Transpose +2 D#5 - Transpose +3 usw.
  • Seite 10 2. Setzen Sie jetzt nur Switch 3 auf ON 3. Danach spielen Sie auf der Klaviatur einen Ton – dessen Velocity/Dynamik Wert wird als Wert in Velocity OFF Modus gesetzt. Also wenn Sie volle Lautstärke spielen, wird der Wert im Velocity OFF Modus auf 128 gesetzt. Das heisst, es wird jeder Ton immer auf die volle Lautstärke gesetzt.
  • Seite 11 6 = (CC10) pan 7 = (CC11) expression 8 = (CC64) damper pedal 9 = (CC65) portamento ON/OFF 10 = (CC66) sostenuto pedal 11 = (CC67) soft pedal 12 = (CC80) reverb program 13 = (CC81) chorus program 14 = (CC91) reverb level 15 = (CC93) chorus level 16 = (CC120) all sound off 17 = (CC121) reset all controller...
  • Seite 12 System im "Work Mode". Alle neuen Settings werden im Chip gespeichert, sie gehen auch ohne Strom nicht verloren. Beim Neustart werden sie wieder geladen. Ein Firmware-Systemupdate der Miditech MIDI THRU 4/FILTER Box ist mit dem PC Editor und einem USB MIDI...
  • Seite 13 Interface möglich. Für Windows bieten wir einen Software Editor für unsere Tools an: Sie finden diesen zum Download auf unserer Homepage www.miditech.de...
  • Seite 14 Das Verwenden des Windows MIDI THRU Tools Editors: 1. Verbinden Sie den MIDI Input des Miditech MIDI THRU 4/ FILTER zu einem Windows Computer mit einem USB MIDI Interface, das auch MIDI konform den Strom liefert oder benutzen Sie unser "MIDI POWER" Gerät zur Stromversorgung.
  • Seite 15 MIDI THRU 4/ FILTER MIDI THRU box with integrated MIDI filter functions 1 x MIDI Input, 4 x MIDI THRU LED for MIDI In signal Panic Button 8 DIP switches for Filtersetups MIDI powererd on MIDI In eMail: info@miditech.de Internet: www.miditech.de...
  • Seite 16 Owners manual Many thanks for buying our Miditech MIDI THRU 4/FILTER box. With this little MIDI Tool, the MIDI THRU 4/FILTER box, you can easily play with one keyboard up to 4 MIDI expanders or MIDI devices. You can connect up to 4 MIDI keyboards or MIDI hardware to one masterkeyboard.
  • Seite 17 the MIDI THRU 4/FILTER box you will find the 4 MIDI TRHU ports. On the bottom, there are the 8 DIP switches for making filter settings. The settings always will be stored in the box and loaded at the next restart automatically. The MIDI THRU 4/FILTER box is full MIDI powered, and gets its power from the MIDI masterkeyboard, which is connected at the MIDI Input.
  • Seite 18 running.The LED flash once when received MIDI IN. If not filtered, the MIDI IN message send to the four MIDI OUT. The DIP Switch definition: 1. Channel 2. Transpose 3. Velocity 4. Program 5. Controller 6. Pitch bend / After touch 7.System 8.
  • Seite 19 Switch 3: Velocity On/Off How to turn on/off velocity: Set switch 3 to ON, note with velocity Set switch 3 to OFF, note with fixed velocity If at ON position, any NOTE ON event should change to specified velocity. (fixed velocity). Switch 4: Program How to filter program changes: Set switch 4 to ON, all program change and bank select are...
  • Seite 20 E.g.. Current CC Filter Mode is 10, it’s filter CC number is 7. If MIDI IN a CC7, it should not send MIDI OUT, but other CC event allow to send MIDI OUT. Switch 6: Pitch Bend How to filter pitch bend or after touch: Set switch 6 to ON, pitch bend of after touch are disabled Set switch 6 to OFF, don't filter pitch bend and after touch E.g.
  • Seite 21 E.g. If filter SysEx mode is specified SysEx, the table is 41H, 00H, 42H, 12H, 40H, (all Roland GS SysEx start from these bytes) If MIDI IN a GS Reset SysEx: F0H, 41H, 00H, 42H, 12H, 40H, 00H, 7FH, 00H, 00H, F7H, it match the filter table, should not send MIDI OUT.
  • Seite 22 "Setup mode" and "Work mode" To setup the MIDI THRU 4 /FILTER, you must enter the "setup mode". Hold down and press the PANIC button minimum 5 Seconds while plugging the MIDI In to power the system. The LED flashes, to show that you are now in "setup mode"...
  • Seite 23 How to re-map the MIDI channel: 1. Hold down and press the PANIC button minimum 5 Seconds while plugging the MIDI In to power the system. The LED flashes, to show that you are now in "setup mode" . 2. Set switch 1 to ON, all MIDI message should modify the channel as preset channel.
  • Seite 24 How to set transpose preset: 1. Hold down and press the PANIC button minimum 5 Seconds while plugging the MIDI In to power the system. The LED flashes, to show that you are now in "setup mode" . 2. Set switch 2 to ON 3.
  • Seite 25 2. Set switch 3 to ON, all MIDI message should modify the channel as preset channel. If switch 1 is OFF, don't modify channel 3. Press keyboard, the velocity is used for velocity OFF mode, (the default value is 100), e.g. press the key with hardest velocity, then when velocity off mode, all note with the max velocity.
  • Seite 26 For the filter one CC table: 1 = (CC0) Bank Select 2 = (CC1) modulation wheel 3 = (CC2) breath 4 = (CC75 portamento time 5 = (CC7) volume 6 = (CC10) pan 7 = (CC11) expression 8 = (CC64) damper pedal 9 = (CC65) portamento ON/OFF 10 = (CC66) sostenuto pedal 11 = (CC67) soft pedal...
  • Seite 27 flashes, to show that you are now in "setup mode" . 2. Set switch 6 to ON 3. Press keyboard, a white key is for set filter Pitch Bend, a black key is for filter Aftertouch, if you press both white and black keys, filter both.
  • Seite 28 should not send MIDI OUT. But another SysEx, F0H, 01H, 02H, 03H, F7H, should not been filtered and send MIDI OUT. If you choose to filter both, the MIDI THRU 4 / Filter filters any MIDI System and Common event. (F0H, F1H, F2H, F3H, F6H) 4.
  • Seite 29 With the PC editor software you are able to handle all above settings, update the system via a USB to MIDI cable. 1. Connect the MIDI Input of the Miditech MIDI THRU 4/ FILTER to computer via MIDI. Use a normal USB MIDI Interface, which can power the MIDI THRU 4 / FILTER, or use our product "MIDI POWER"...
  • Seite 30 2. Install and running software “MIDI Filter 4.exe” 3. Make your user settings. 4. Click “Device” to select the MIDI device, for an USB-MIDI interface, the name normally is on Windows XP “USB Audio Device”, on Windows 7 or 8, the device drivers name. 5.
  • Seite 31 Default Settings The device comes out from the factory with default settings, and when you press the PANIC button for over 10 seconds, it also reset as this default settings. The PC editor with the default setting when running. Or could load the file MIDI Channel 1 (range :1 to 16) Note Transpose 0 (range: -11 to 11) Note Velocity 100 (range 1 to 127)
  • Seite 32: Important Safety Instructions

    2. Retain Instructions – The safety instructions and owner's manual should be retained for future reference. 3. Heed Warnings – All warnings on your Miditech product and in the Owner'sManual should be followed. 4. Follow Instructions – All operating and use instructions should be followed.