Bauer T4 Bedienungsanleitung
Verfügbare Sprachen
Verfügbare Sprachen

Verwandte Anleitungen für Bauer T4


Inhaltszusammenfassung für Bauer T4
- Seite 1 BAUER Bedienungsanleitung Instruction Manual Mode d'emploi Instrucciones para eI uso...
- Seite 2 Robert Bosch Elektronik und Photokino GmbH Berlin •Stuttgart 7000 Stuttgart-Untertürkheim • Postfach 109 • Tel. (0711) 33631...
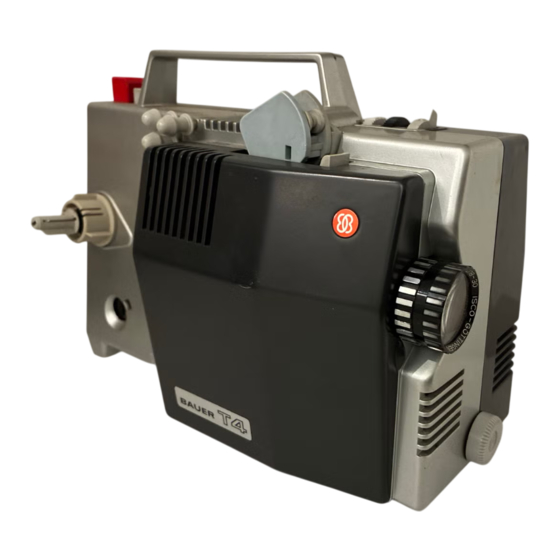
- Seite 3 0-—+--+IJ BAUER...
- Seite 5 Seiten Deutsch Beim Lesen der Bedienungsanleitung bitte die erste und die Ietzte Umschlagseite herausklappen. Pages 10—14 English When reading these instructions, please open the first and the last cover leaf for better guidance and understanding. Pages 16—21 Frangais déplier la premiére et Ia derniére page de Mode d'emploi: couverture.
-
Seite 6: Vorbereitungen
Vorbereitungen Deutsch Netzanschluß Projektor-Schutzhaube abnehmen. Netzspan- nung mit Hilfe einer Münze am Spannungs- wähler O einstellen: Wahlweise für 110, 130. 220 / 230 Oder 240 / 250 V, 50 Hz Wechsel- strom. Netzkabel an Buchse @ anschließen. Für besonders Eilige hier die wichtigsten Filmformat wählen Bedienungselemente... - Seite 7 Vorführung Projektor aufstellen Filmspulen Geråt auf eine feste Unterlage stellen (Pro- Für den automatischen Filmstopp am Ende jektionstisch o. dgl.) — die Projektor-Schutz- der Vorführung muß das Film-Ende fest am haube kann dabei als Untersatz dienen. Kern der vollen Filmspule fixiert sein. Ver- Ausrichten des Projektionslichtstrahls kann...
- Seite 8 Bildschärfe und Bildstrich einstellen Automatische Filmeinfädelung Objektiv @ nach rechts Oder links drehen. Zuerst die BAUER-Leerspule ganz nach hin- bis das projizierte Bild optimal scharf er- ten. dann die volle Filmspule vorne auf die scheint. Beim Vario-Objektiv nur am hinteren Spulenachse O aufsetzen (siehe Bild A).
-
Seite 9: Ende Der Vorführung
Wird das Filmandruckstück abgehoben und Ende der Vorführung der Transportgreifer ist nicht mehr im Ein- griff. Der Film kann nun durch Drehungder Film rückspulen ablaufenden Spule nach links in der ge- 1st das Film-Ende fest Kern Film- wünschten Länge von Hand zurückgedreht spule fixiert. -
Seite 10: Pflege Und Wartung
Ihren Fachhändler ist werksseitig justiert. Oder nächste BAUER-Kundendienst- stelle. Pflege und Wartung Die Pflege des Projektors beschränkt sich auf die Sauberhaltung des Gerätes, beson- ders der Teile. mit denen der Film in Berüh- rung kommt. Bildfenster und Filmbahn sind zur Reinigung leicht zugänglich: Gerät aus-... - Seite 11 Kundendienststellen in Deutschland 6 Frankfurt/M., Hamburger Allee 47. I Berlin 20. Zitadellenweg Telefon (0611) 77 8226 / 77 2561 Telefon (0311) 89048 19/20 2 Hamburg-Altona. Ing. Max Henkel. Eifflerstraße 1. Telefon (0411) 43966 7 Stuttgart-Untertürkheim, Beim Inselkraftwerk Telefon (0711) 3363235 3 Hannover.
- Seite 12 Preparations English Mains connection Remove projector cover. Set voltage control @ according to local power supply with the aid of a coin: Selection 110. 130. 220/ Here are the most important operational ele- 230. 240/250 v. 50 cycles, A.C. Plug mains mentS —...
- Seite 13 The showing How to set up the projector Reels Put the projector on a firm support (projec- The projector is designed for automatic film tion table or the like). You may use the pro- stop at the end of the film. For this purpose. jector cover as a stand.
- Seite 14 18 fps (standard running speed) to 9 fps (slow motion). and vice versa. Automatic threading First put the empty BAUER take-up reel on the spindle @ and then put the full supply reel on top of it (see fig A). The beginning of Focusing and frameline adjustment the film must ponit to the right;...
- Seite 15 Scene repetition and interruption End of performance of showing For repeating a scene, stop the feed reel by hand: This will cause the lever @ to snap Rewinding to the left and lift off the pressure pad. As a consequence the claw is no longer engaged. The projector will stop automatically...
- Seite 16 Insert the new lamp (8v/50W, interior-re- jector. turn it in to your nearest BAUER Ser- flector type, bayonet base) and seat it by vice Station or to your dealer. turning it clockwise. The lamp socket is fac- tory-adjusted.
- Seite 18 Préparatifs Franqais Branchement sur le réseau Retirer Ie capot protecteur du projecteur. A I'aide d'une piéce de monnaie placer Ie sélecteur de tension @ sur la tension de réseau ad hoc. Suivant Ie cas 110, 130, Pour Ies personnes pressées, voici Ies ma- 220/230 ou 240/250 V.
- Seite 19 I m po r tan t: Lorsque Ie film est monté Projection sur l'appareil, le bouton moleté @ ne doit en aucun cas étre déplacél Bobines de film Mise en place du projecteur Placer rappareil sur une base solide (table Pour que I'arrét automatique du film se fasse de projection ou autre du méme genre).
- Seite 20 Introduction automatique du film Tout d' abord placer Ia bobine vide réceptrice 9 im/sec. (ralenti). BAUER vers I'arriére. puis placer Ia bobine pleine débitrice I'avant sur I'axe de bobine Réglage de Ia netteté d'image et de Ia ligne @ (voir ill. A). L•amorce du film doit étre å...
- Seite 21 Interruption dans Ia projection avec Ia vis. Replacer Ie support de pression du film (pour cela la touche @ doit se Pour Ia répétition dune courte scene: trouver en position supérieure). Retenir avec Ia main Ia bobine film marche — Ie levier @ est décliqueté vers Ia gauche et de ce fait Ia piéce-presseur film est relevée et la griffe de transport Nest Fin de la projection...
- Seite 22 son couloir ainsi que de la piéce de guidage Entretien et soins O. Maintenant, Ia fin du film (comme dé- montré sur rill. D) pourra étre amenée au- dessus du goujon @ et entre Ies galets @ jusqu'å la bobine vide et étre fixée au noyau de ladite bobine.
- Seite 23 Si vous aviez des doutes sur Ie bon fonc- tionnement de votre projecteur, veuillez dans ce cas vous adresser au service aprés-vente BAUER Ie plus proche de votre domicile. Toutes modifications réservées.
- Seite 24 Preparaciones Espaöol Conexiön a Ia red Quitar la tapa protectora. Ajustar eI selector O mediante una moneda al voltaje de Ia red existente: 110, 130, 220/230 0 240/250 vol- tios. corriente alterna de 50 Hz. Enchufar cordön de Ia red al clavijero O. Para IOS que tienen prisa, aqui IOS mandos mås importantes del proyector: Ajustar...
- Seite 25 La proyecciön Carretes Instalar eI proyector Para Ia parada automatica de Ia pelicula al fin de Ia proyecciön. debe sujetar firmemente Colocar el proyector sobre un soporte firme el fin de Ia pelicula en el nücleo del carrete (por ejemplo: mesa de proyecciön); Ia tapa cargado.
- Seite 26 Ajustar Ia velocidad Enhebrado automåtico Con eI conmutador O se puede (también durante Ia proyecciån) ajustar Ias siguientes velocidades: Colocar eI carrete de recepciön enteramente 18 imågenes por segundo (velocidad normal) hacia atrås sobre eI eje O, y luego. eI car- 9 imågenes por segundo (efecto de acciön rete cargado por delante en el mismo eje retardada).
- Seite 27 presiön (para ello Ia tecla @ debe estar en Interrumpir Ia proyecci6n su posiciÖn superior). Para repetir una escena: Parar eI carrete cargado mediante Ia mano: la pieza de presiön estå levantada y la garra Fin de la proyecciön ya no estå enganchada. Ahora se puede re- Rebobinado bobinar a mano Ia pelicula...
- Seite 28 Cuidado y entretenimiento entre Ios rodillos @ y O hasta el carrete vacio y sujetarlo en el nücleo del mismo. EI cuidado del proyector se limita a man- Rebobinado como descrito antes (primera- mente oprimir Ia tecla O.) tener limpio eI aparato, especialmente partes tienen...
- Seite 30 8 699 970 046 - 808 deutsch • english • franqais • espaöol Printed in Germany • Imprimé en Allemagne par M. Münzenmayer. Stuttgart...