VEVOR K2E01005 Bedienungsanleitung
Hundepflegewanne
Inhaltsverzeichnis
Verfügbare Sprachen
Verfügbare Sprachen
Technical Support and E-Warranty Certificate www.vevor.com/support
DOG GROOMING TUB
MODEL: K2E01005 / K2E01006
We continue to be committed to provide you tools with competitive price.
"Save Half", "Half Price" or any other similar expressions used by us only
represents an estimate of savings you might benefit from buying certain tools
with us compared to the major top brands and does not necessarily mean to cover
all categories of tools offered by us. You are kindly reminded to verify carefully
when you are placing an order with us if you are actually Saving
Half in comparison with the top major brands.
Inhaltsverzeichnis

Verwandte Anleitungen für VEVOR K2E01005


Inhaltszusammenfassung für VEVOR K2E01005
- Seite 1 Technical Support and E-Warranty Certificate www.vevor.com/support DOG GROOMING TUB MODEL: K2E01005 / K2E01006 We continue to be committed to provide you tools with competitive price. "Save Half", "Half Price" or any other similar expressions used by us only represents an estimate of savings you might benefit from buying certain tools with us compared to the major top brands and does not necessarily mean to cover all categories of tools offered by us.
- Seite 2 This is the original instruction, please read all manual instructions carefully before operating. VEVOR reserves a clear interpretation of our user manual. The appearance of the product shall be subject to the product you received. Please forgive us that we won't inform you again if there are any technology or software updates on our product.
-
Seite 3: Important Safeguards
IMPORTANT SAFEGUARDS WARNING: Read and understand this entire manual before operating or servicing this product. Failure to follow these warnings and instructions can cause personal injury or damage to valuable property. Avoid children using grooming tub. And this product is not a toy. Do not allow children to play. -
Seite 4: Preparations Before Installation
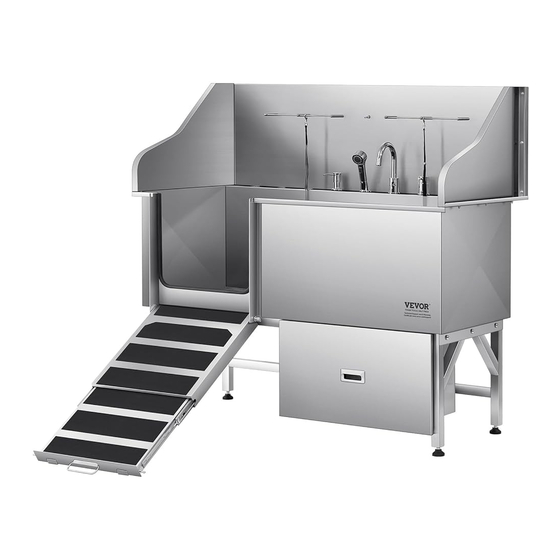
PREPARATIONS BEFORE INSTALLATION 1.Recommended Tools: Phillips screwdriver, M4 wrench, Spirit level, 2.Necessary safety equipment: Gloves, goggles. Caution: Before installing the product, wear gloves and goggles to avoid possible physical damage during installation. INSTRUCTIONS Thank you very much for choosing this pet bathtub. Please read all the instructions before using it. - Seite 5 1 set 1 set 1 set 1 pc 10: Faucet 11: Soap 12: Sealing 9: Shower switch Dispenser tape 1 set 4 pcs 6 pcs (M8) 6 pcs (M8) 14: Adjustable 13: Strainer 15: Washer 16: Washer foot 4 pcs 16 pcs 6 pcs (M8*50mm) 6 pcs (M8)
-
Seite 6: Installation Steps
2 pcs 1 set 2 pcs 1 pair 25: Through hole 26: Plastic Floor 28: Plastic 27: Sling hanging column Grate Rack Gloves 1 pc 1 pc 1 pair 1 pc 31: Nylon 29: Comb 30: Licking tray 32: Wiper Gloves 1 pc 2 pcs... - Seite 7 ① Install the adjustable feet to the H rack. Caution: Ensure that the depth of adjustable feet is not less than 12mm and try to make the four adjustable feet screw in the same depth. Please tighten the spare nut during the installation and adjust it later.
- Seite 8 Install the strainer, ensure ④ that the sealing ring is free of dislocation and wrinkles. Caution: When installing, please pay attention to whether the sealing ring is placed correctly, avoid water leakage due to incorrect seal installation. And check whether the transparent cover of the drain is tightened.
- Seite 9 Put the water filter plate to ⑦ the tub. Install the h anging rod. ⑧ Install the Faucet, Shower ⑨ base, Faucet switch and Soap Dispenser * Please refer to the faucet installation instructions to install the faucet Caution: Please determine whether to install adapter according to the actual water pipe specifications.
-
Seite 10: Dimensions And Parameters
DIMENSIONS AND PARAMETERS Left Door Right Door - 9 -... - Seite 11 N.W. Model# L(mm) H(mm) H1(mm) H2(mm) W(mm) (kg) K2E01005 1552 1468 79.7 K2E01006 1552 1468 79.7 Volume Loading Capacity Recommended pet Model# (CBM) (lbs) (in) K2E01005 1.11 L x W x H: 59 x 27 x 45 K2E01006 1.11 L x W x H: 59 x 27 x 45 OPERATION 1.Make sure the water pipe connection is complete and the water is flowing...
-
Seite 12: Care Instructions
disassembly like a nut, it can be easily cleaned, and be careful not to leave the seal ring when installing it back. CARE INSTRUCTIONS Don't put the bathtub on an uneven surface. Don’t drop or mistreat the bathtub. Don’t overload the scale. This will permanently damage it! COMMON MALFUNCTIONS If the faucet leaks, please check whether the waterproof rubber plug is installed. - Seite 13 pets such as cats and dogs. • DO NOT use it with pets that exceed this product’s weight capacity, whose predisposition becomes violent upon contact with water, or whose physiological features preclude safe regular bathing (e.g., chinchilla rat). • NEVER use this bathtub for humans, especially children, or allow them to play on or with it.
- Seite 14 telephones should be at least 6′7″ (2 m) away from this bathtub at all times. In particular, never bring a chargingcell phone near the bathtub and never allow any electrical device to be placed or used in such a way that it might fall into the water under any circumstance.
- Seite 15 heat and humidity. • The water temperature should be close to your pet’s body temperature. Water that is either too cold or too hot will cause discomfort, may irritate your pet’s skin, and may even cause injury or illness.Before use, learn about the appropriate water temperatures for bathing your pet.For best results, set your water heater’s maximum temperature accordingly if possible.If adding preheated water, make sure it is within the temperature...
- Seite 16 Technical Support and E-Warranty Certificate www.vevor.com/support...
- Seite 17 Machine Translated by Google Assistance t echnique e t c ertificat d e g arantie é lectronique w ww.vevor.com/support BAIGNOIRE D E T OILETTAGE P OUR C HIENS MODÈLE : K 2E01005 / K 2E01006 Nous c ontinuons à n ous e ngager à v ous f ournir d es o utils à d es p rix c ompétitifs.
- Seite 18 Assistance t echnique e t c ertificat d e g arantie électronique w ww.vevor.com/support Il s 'agit d e l a n otice d 'utilisation d 'origine. V euillez l ire a ttentivement t outes l es ...
- Seite 19 Machine Translated by Google MESURES D E S ÉCURITÉ I MPORTANTES AVERTISSEMENT : L isez e t c omprenez l 'intégralité d e c e m anuel a vant l'utilisation o u l 'entretien d e c e p roduit. L e n onrespect d e c es i nstructions les ...
-
Seite 20: Préparations A Vant L 'Installation
Machine Translated by Google PRÉPARATIONS A VANT L 'INSTALLATION 1. O utils r ecommandés : Tournevis c ruciforme, c lé M 4, n iveau à b ulle, 2 . É quipement d e s écurité nécessaire : Gants, l unettes. Attention : A vant d 'installer l e p roduit, p ortez d es g ants e t d es l unettes d e p rotection p our é viter dommages ... - Seite 21 Machine Translated by Google 1 e nsemble 1 e nsemble 1 e nsemble 1 p ièce 10 : R obinet 11 : S avon 12 : S cellement 9 : D ouche changer Distributeur ruban a dhésif 4 p ièces 6 p ièces ( M8) 6 ...
-
Seite 22: Étapes D 'Installation
Machine Translated by Google 2 p ièces 2 p ièces 1 p aire 1 e nsemble 26 : S ol e n p lastique 28 : P lastique 25 : T rou t raversant 27 : F ronde Grille d e c uisson Gants colonne ... - Seite 23 Machine Translated by Google I nstallez l es p ieds r églables p our le r ack H . Attention : A ssurezvous q ue l e la p rofondeur d es p ieds r églables n 'est p as moins ...
- Seite 24 Machine Translated by Google I nstallez l a c répine, a ssurezvous que l a b ague d 'étanchéité e st e xempte d e luxation e t r ides. Attention : L ors d e l 'installation, veuillez f aire a ttention à si ...
- Seite 25 Machine Translated by Google 7. P lacez l a p laque f iltrante à e au d ans la b aignoire. I nstallez l a t ige d e s uspension. I nstallez l e r obinet, l a b ase d e douche, ...
- Seite 26 Machine Translated by Google DIMENSIONS E T P ARAMÈTRES Porte d e g auche Porte d e d roite 9 ...
- Seite 27 Machine Translated by Google NordOuest Modèle n ° L (mm) H (mm) H 1(mm) H 2(mm) L (mm) (kg) K2E01005 1 552 1468 79,7 K2E01006 1 552 1468 79,7 Volume Capacité d e c hargement Animal d e c ompagnie r ecommandé...
-
Seite 28: Informations De Sécurité
Machine Translated by Google démontage c omme u n é crou, i l p eut ê tre f acilement n ettoyé, e t a ttention à n e p as l aisser la b ague d 'étanchéité l ors d e s a r éinstallation. CONSEILS ... - Seite 29 Machine Translated by Google animaux d omestiques t els q ue l es c hats et l es c hiens. • N E P AS l 'utiliser a vec d es a nimaux q ui d épassent l a c apacité d e p oids d e c e p roduit, dont ...
- Seite 30 Machine Translated by Google les t éléphones d oivent ê tre à a u m oins 6 ′7″ ( 2 m ) d e c ette b aignoire à t out m oment. En p articulier, n 'apportez j amais u n t éléphone p ortable e n c harge à p roximité d e l a b aignoire e t n e permettre ...
- Seite 31 Machine Translated by Google chaleur e t h umidité. • L a température d e l 'eau d oit ê tre p roche d e l a t empérature c orporelle d e v otre a nimal. Une e au t rop f roide o u t rop c haude p eut p rovoquer u ne g êne e t u ne i rritation. la ...
- Seite 32 Machine Translated by Google Assistance t echnique e t c ertificat d e g arantie électronique w ww.vevor.com/support...
- Seite 33 Machine Translated by Google Technischer Support und E-Garantie-Zertifikat www.vevor.com/support Hundepflegewanne MODELL: K2E01005 / K2E01006 Wir sind weiterhin bestrebt, Ihnen Werkzeuge zu wettbewerbsfähigen Preisen anzubieten. „Sparen Sie die Hälfte“, „Halber Preis“ oder ähnliche Ausdrücke stellen lediglich eine Schätzung der Ersparnis dar, die Sie beim Kauf bestimmter Werkzeuge bei uns im Vergleich zu den großen Top-Marken erzielen können, und decken nicht unbedingt alle von uns angebotenen...
- Seite 34 Dies ist die Originalanleitung. Bitte lesen Sie alle Anweisungen sorgfältig durch, bevor Sie das Gerät in Betrieb nehmen. VEVOR behält sich eine klare Auslegung unserer Bedienungsanleitung vor. Das Erscheinungsbild des Produkts richtet sich nach dem Produkt, das Sie erhalten haben.
-
Seite 35: Wichtige Sicherheitshinweise
Machine Translated by Google WICHTIGE SICHERHEITSHINWEISE WARNUNG: Lesen und verstehen Sie dieses Handbuch vollständig, bevor Sie Betrieb oder Wartung dieses Produkts. Die Nichtbeachtung dieser Warnungen und Anweisungen können zu Verletzungen oder Schäden an wertvollem Eigentum. ÿ Vermeiden Sie die Nutzung der Pflegewanne durch Kinder. Dieses Produkt ist kein Spielzeug. Nicht Lassen Sie Kinder nicht spielen. - Seite 36 Machine Translated by Google VORBEREITUNGEN VOR DER INSTALLATION 1.Empfohlene Werkzeuge: Kreuzschlitzschraubendreher, M4-Schraubenschlüssel, Wasserwaage, 2.Notwendige Sicherheitsausrüstung: Handschuhe, Schutzbrille. Achtung: Tragen Sie vor der Installation des Produkts Handschuhe und eine Schutzbrille, um mögliche physische Schäden während der Installation. ANWEISUNGEN Vielen Dank, dass Sie sich für diese Haustierbadewanne entschieden haben. Bitte lesen Sie alle Anweisungen, bevor Sie sie verwenden.
- Seite 37 Machine Translated by Google 1 Satz 1 Satz 1 Satz 1 Stck. 10: Wasserhahn 11: Seife 12: Versiegelung 9: Dusche schalten Spender Band 1 Satz 4 Stck. 6 Stück (M8) 6 Stück (M8) 14: Einstellbar 13: Sieb 15: Unterlegscheibe 16: Unterlegscheibe Fuß...
-
Seite 38: Installationsschritte
Machine Translated by Google 1 Satz 2 Stck. 2 Stck. 1 Paar 26: Kunststoffboden 28: Plastik Durchgangsloch 27: Schlinge Rostgestell Handschuhe Hängesäule 1 Paar 1 Stck. 1 Stck. 1 Stck. 31: Nylon 29: Kamm 30: Lecktablett 32: Wischer Handschuhe 2 Stck. 1 Stck. -
Seite 39: Linke Türhalterung
Machine Translated by Google ÿ Montieren Sie die verstellbaren Füße, um das H-Rack. Achtung: Stellen Sie sicher, dass die Die Tiefe der verstellbaren Füße ist nicht weniger als 12 mm und versuchen Sie machen die vier verstellbaren Füße Schraube in gleicher Tiefe einschrauben. Bitte ziehen Sie die Ersatzmutter fest während der Installation und Passen Sie es später an. - Seite 40 Machine Translated by Google ÿ Installieren Sie das Sieb und achten Sie darauf dass der Dichtring frei von Verrenkungen und Falten. Achtung: Achten Sie bei der Installation auf ob der Dichtring richtig platziert, vermeiden Sie Wasser Undichtigkeit durch falsche Abdichtung Installation.
- Seite 41 Machine Translated by Google ÿ Legen Sie die Wasserfilterplatte in die Wanne. ÿ Installieren Sie die Aufhängestange. ÿ Installieren Sie den Wasserhahn, die Duschwanne, den Wasserhahnschalter und die Seifenschale Spender Beachten Sie zur Installation des Wasserhahns die Installationsanweisungen. Achtung: Bitte entscheiden Sie, ob der Adapter entsprechend den tatsächlichen Wasserleitungsspezifikationen installiert werden m - 8 -...
-
Seite 42: Linke Tür
Machine Translated by Google ABMESSUNGEN UND PARAMETER Linke Tür Rechte Tür - 9 -... -
Seite 43: Betrieb
Machine Translated by Google Modellnr. L (mm) H (mm) H1 (mm) H2 (mm) B (mm) (kg) K2E01005 1552 1468 79,7 K2E01006 1552 1468 79,7 Volumen Ladekapazität Empfohlenes Haustier Modell# (CBM) (In) (Pfund) K2E01005 1.11 L x B x H: 59 x 27 x 45 1.11... -
Seite 44: Pflegehinweise
Machine Translated by Google Demontage wie eine Mutter, es kann leicht gereinigt werden, und achten Sie darauf, nicht zu verlassen den Dichtungsring beim Wiedereinbau. PFLEGEHINWEISE Stellen Sie die Badewanne nicht auf eine unebene Fläche. Lassen Sie die Badewanne nicht fallen und behandeln Sie sie nicht falsch. Überladen Sie die Waage nicht. - Seite 45 Machine Translated by Google Haustiere wie Katzen und Hunde. • Verwenden Sie es NICHT bei Haustieren, deren Gewichtskapazität das Produkt übersteigt, deren Veranlagung bei Kontakt mit Wasser gewalttätig wird oder deren physiologische Merkmale verhindern ein sicheres regelmäßiges Baden (z. B. Chinchilla-Ratte). • Verwenden Sie diese Badewanne NIEMALS für Menschen, insbesondere Kinder, oder lassen Sie sie Spielen Sie darauf oder damit.
-
Seite 46: Sicherheitshinweise Zur Hitze
Machine Translated by Google Telefone sollten immer mindestens 2 m von dieser Badewanne entfernt sein. Insbesondere sollten Sie niemals ein aufladendes Mobiltelefon in die Nähe der Badewanne bringen und niemals Erlauben Sie nicht, dass elektrische Geräte so aufgestellt oder verwendet werden, dass sie unter keinen Umständen ins Wasser fallen. - Seite 47 Machine Translated by Google Hitze und Feuchtigkeit. • Die Wassertemperatur sollte nahe der Körpertemperatur Ihres Haustiers liegen. Zu kaltes oder zu heißes Wasser verursacht Beschwerden, kann reizen die Haut Ihres Haustieres und kann sogar Verletzungen oder Krankheiten verursachen. Informieren Sie sich vor der Verwendung über die geeigneten Wassertemperaturen zum Baden Ihres Haustieres.Für beste Ergebnisse, stellen Sie die maximale Temperatur Ihres Warmwasserbereiters entsprechend ein, wenn Wenn Sie vorgewärmtes Wasser hinzufügen, achten Sie darauf, dass es innerhalb der Temperatur liegt...
- Seite 48 Machine Translated by Google Technischer Support und E-Garantie-Zertifikat www.vevor.com/support...
- Seite 49 Machine Translated by Google Supporto tecnico e certificato di garanzia elettronica www.vevor.com/support VASCA PER TOELETTATURA CANI MODELLO: K2E01005 / K2E01006 Continuiamo a impegnarci per fornirvi strumenti a prezzi competitivi. "Risparmia la metà", "Metà prezzo" o qualsiasi altra espressione simile da noi...
- Seite 50 Questa è l'istruzione originale, si prega di leggere attentamente tutte le istruzioni del manuale prima di utilizzare. VEVOR si riserva una chiara interpretazione del nostro manuale utente. L'aspetto del prodotto sarà soggetto al prodotto ricevuto. Vi preghiamo di perdonarci se non vi informeremo di nuovo se ci sono aggiornamenti tecnologici o software sul nostro prodotto.
-
Seite 51: Importanti Misure Di Sicurezza
Machine Translated by Google IMPORTANTI MISURE DI SICUREZZA ATTENZIONE: leggere e comprendere l'intero manuale prima funzionamento o la manutenzione di questo prodotto. La mancata osservanza di queste le avvertenze e le istruzioni possono causare lesioni personali o danni a beni di valore. ÿ Evitare che i bambini utilizzino la vasca per la toelettatura. -
Seite 52: Preparativi Prima Dell'installazione
Machine Translated by Google PREPARATIVI PRIMA DELL'INSTALLAZIONE 1. Strumenti consigliati: Cacciavite a croce, chiave M4, livella a bolla, 2. Attrezzatura di sicurezza necessaria: Guanti, occhiali protettivi. Attenzione: prima di installare il prodotto, indossare guanti e occhiali protettivi per evitare possibili danni fisici durante l'installazione. ISTRUZIONI Grazie mille per aver scelto questa vasca per animali domestici. - Seite 53 Machine Translated by Google 1 set 1 set 1 set 1 pz. 10: Rubinetto 11: Sapone 12: Sigillatura 9: Doccia interruttore Distributore nastro 1 set 4 pezzi 6 pezzi (M8) 6 pezzi (M8) 14: Regolabile 13: Colino 15: Rondella 16: Rondella piede 4 pezzi 16 pezzi...
- Seite 54 Machine Translated by Google 1 set 2 pezzi 2 pezzi 1 paio 28: Plastica 26: Pavimento in plastica 25: Foro passante 27: Fionda Guanti Griglia per griglia colonna sospesa 1 pz. 1 pz. 1 paio 1 pz. 31: Nylon 29: Pettine 30: Vassoio per leccare 32: Tergicristallo Guanti...
- Seite 55 Machine Translated by Google ÿ Installare i piedini regolabili per il rack H. Attenzione: assicurarsi che il la profondità dei piedini regolabili non è meno di 12 mm e provare a realizzare i quattro piedini regolabili avvitare alla stessa profondità. Si prega di stringere il dado di ricambio durante l'installazione e modificarlo in seguito.
- Seite 56 Machine Translated by Google ÿ Installare il filtro, assicurarsi che l'anello di tenuta sia privo di dislocazione e rughe. Attenzione: durante l'installazione, prestare attenzione a se l'anello di tenuta è posizionato correttamente, evitare l'acqua perdita dovuta a guarnizione non corretta installazione.
- Seite 57 Machine Translated by Google ÿ Posizionare la piastra del filtro dell'acqua nella vasca. ÿ Installare l' asta di sospensione. ÿ Installare il rubinetto, la base della doccia, l'interruttore del rubinetto e il sapone Distributore Per installare il rubinetto, fare riferimento alle istruzioni di installazione. Attenzione: determinare se installare l'adattatore in base alle specifiche effettive...
- Seite 58 Machine Translated by Google DIMENSIONI E PARAMETRI Porta sinistra Porta destra - 9 -...
- Seite 59 Machine Translated by Google Nord-Ovest Modello n. L(mm) H(mm) H1(mm) H2(mm) W(mm) (kg) K2E01005 1552 1468 79.7 K2E01006 1552 1468 79.7 Volume Capacità di carico Animale domestico consigliato Modello# (CBM) (In) (libbre) K2E01005 1.11 Lunghezza x larghezza x altezza: 59 x 27 x 45 K2E01006 1.11...
-
Seite 60: Istruzioni Per La Cura
Machine Translated by Google smontabile come un dado, si pulisce facilmente, e fare attenzione a non lasciare l'anello di tenuta quando lo si rimonta. ISTRUZIONI PER LA CURA Non posizionare la vasca da bagno su una superficie irregolare. Non far cadere o maltrattare la vasca da bagno. Non sovraccaricare la bilancia. - Seite 61 Machine Translated by Google animali domestici come cani e gatti. • NON utilizzarlo con animali domestici che superano la capacità di peso di questo prodotto, la cui predisposizione diventa violenta al contatto con l'acqua o la cui caratteristiche fisiologiche impediscono un bagno regolare sicuro (ad esempio, ratto cincillà). • NON utilizzare MAI questa vasca da bagno per gli esseri umani, in particolare i bambini, o consentire loro di giocare su o con essa.
- Seite 62 Machine Translated by Google i telefoni devono essere sempre posizionati ad almeno 2 metri di distanza dalla vasca da bagno. In particolare, non portare mai un telefono cellulare in carica vicino alla vasca da bagno e non consentire che qualsiasi dispositivo elettrico venga posizionato o utilizzato in modo tale che possa cadere in acqua in nessuna circostanza.
- Seite 63 Machine Translated by Google calore e umidità. • La temperatura dell'acqua dovrebbe essere vicina alla temperatura corporea del tuo animale domestico. L'acqua troppo fredda o troppo calda può causare disagio e irritare la pelle del tuo animale domestico e potrebbe anche causare lesioni o malattie. Prima dell'uso, impara sulle temperature appropriate dell'acqua per fare il bagno al tuo animale domestico.
- Seite 64 Machine Translated by Google Supporto tecnico e certificato di garanzia elettronica www.vevor.com/support...
- Seite 65 Machine Translated by Google Soporte t écnico y c ertificado d e g arantía e lectrónica w ww.vevor.com/support BAÑERA D E P ELUQUERÍA P ARA P ERROS MODELO: K 2E01005 / K 2E01006 Seguimos c omprometidos a b rindarle h erramientas a p recios c ompetitivos.
- Seite 66 Soporte t écnico y c ertificado d e g arantía electrónica w ww.vevor.com/support Estas s on l as i nstrucciones o riginales, l ea a tentamente t odas l as i nstrucciones d el m anual ...
- Seite 67 Machine Translated by Google MEDIDAS D E S EGURIDAD I MPORTANTES ADVERTENCIA: L ea y c omprenda t odo e ste m anual a ntes d e operar o d ar s ervicio a e ste p roducto. E l i ncumplimiento d e e stas Las ...
- Seite 68 Machine Translated by Google PREPARATIVOS A NTES D E L A I NSTALACIÓN 1. H erramientas r ecomendadas: Destornillador P hillips, l lave M 4, n ivel d e b urbuja, 2 . E quipo de s eguridad n ecesario: Guantes, ...
- Seite 69 Machine Translated by Google 1 j uego 1 j uego 1 j uego 1 p ieza 10: G rifo 11: J abón 12: S ellado 9: D ucha cambiar Dispensador cinta 1 j uego 4 p iezas 6 p iezas ( M8) 6 ...
-
Seite 70: Pasos D E I Nstalación
Machine Translated by Google 1 j uego 1 p ar 2 p iezas 2 p iezas 28: P lástico 26: P iso d e p lástico 25: A gujero p asante 27: H onda Guantes Rejilla d e r ejilla columna ... - Seite 71 Machine Translated by Google I nstale l os p ies a justables e n el e stante H . Precaución: A segúrese d e q ue e l La p rofundidad d e l os p ies a justables n o e s Menos ...
- Seite 72 Machine Translated by Google I nstale e l f iltro, a segúrese que e l a nillo d e s ellado e sté l ibre d e dislocación y a rrugas. Precaución: A l i nstalar, p reste atención ...
- Seite 73 Machine Translated by Google C oloque l a p laca d el f iltro d e a gua e n l a tina. I nstale l a b arra p ara c olgar. I nstale e l g rifo, l a b ase d e l a d ucha, e l interruptor ...
- Seite 74 Machine Translated by Google DIMENSIONES Y P ARÁMETROS Puerta i zquierda Puerta d erecha 9 ...
- Seite 75 Machine Translated by Google noroeste Modelo n .° L ( mm) H ( mm) H 1 ( mm) H 2 ( mm) W ( mm) (kilogramos) K2E01005 1 552 1468 79.7 K2E01006 1 552 1468 79.7 Volumen Mascota ...
-
Seite 76: Información De Seguridad
Machine Translated by Google Desmontaje c omo u na t uerca, s e p uede l impiar f ácilmente y t enga c uidado d e n o d ejar el a nillo d e s ello a l i nstalarlo n uevamente. INSTRUCCIONES ... - Seite 77 Machine Translated by Google mascotas c omo g atos y p erros. • N O l o use c on m ascotas q ue e xcedan l a c apacidad d e p eso d e e ste p roducto, c uya p redisposición s e vuelva ...
- Seite 78 Machine Translated by Google Los t eléfonos d eben e star a l m enos a 6 ′7″ ( 2 m ) d e d istancia d e e sta b añera e n t odo m omento. En p articular, n unca a cerques u n t eléfono c elular e n c arga a l a b añera y n unca permitir ...
- Seite 79 Machine Translated by Google calor y h umedad. • L a temperatura d el a gua d ebe s er c ercana a l a t emperatura c orporal d e s u m ascota. El a gua d emasiado f ría o d emasiado c aliente c ausará m olestias y p uede i rritar. la ...
- Seite 80 Machine Translated by Google Soporte t écnico y c ertificado d e g arantía electrónica w ww.vevor.com/support...
- Seite 81 Machine Translated by Google Wsparcie techniczne i certyfikat gwarancji elektronicznej www.vevor.com/support WANNA DO PIELĘGNACJI PSÓW MODEL: K2E01005 / K2E01006 Nadal staramy się oferować Państwu narzędzia w konkurencyjnych cenach. „Oszczędź połowę”, „Połowa ceny” lub inne podobne wyrażenia używane przez nas stanowią jedynie szacunkowe oszczędności, jakie możesz uzyskać, kupując u nas określone narzędzia w porównaniu z głównymi markami i niekoniecznie oznaczają...
- Seite 82 To jest oryginalna instrukcja, przed użyciem należy uważnie przeczytać wszystkie instrukcje. VEVOR zastrzega sobie jasną interpretację naszej instrukcji obsługi. Wygląd produktu będzie zależał od produktu, który otrzymałeś. Prosimy o wybaczenie, że nie poinformujemy Cię ponownie, jeśli w naszym produkcie pojawią się jakiekolwiek aktualizacje technologiczne lub oprogramowania.
- Seite 83 Machine Translated by Google WAŻNE ZABEZPIECZENIA OSTRZEŻENIE: Przed przystąpieniem do użytkowania należy przeczytać i zrozumieć całą instrukcję. obsługi lub serwisowania tego produktu. Nieprzestrzeganie tych ostrzeżenia i instrukcje mogą spowodować obrażenia ciała lub uszkodzenia cennego mienia. Unikaj korzystania z wanny pielęgnacyjnej przez dzieci. Produkt ten nie jest zabawką. Nie pozwalaj dzieciom na zabawę.
- Seite 84 Machine Translated by Google PRZYGOTOWANIA PRZED INSTALACJĄ 1. Zalecane narzędzia: Wkrętak krzyżakowy, klucz M4, poziomica, 2. Niezbędny sprzęt bezpieczeństwa: Rękawice, gogle. Ostrzeżenie: Przed instalacją produktu należy założyć rękawice i okulary ochronne, aby uniknąć możliwe uszkodzenia fizyczne podczas instalacji. INSTRUKCJE Dziękujemy bardzo za wybranie tej wanny dla zwierząt. Przeczytaj proszę wszystkie instrukcje przed użyciem.
- Seite 85 Machine Translated by Google 1 szt. 1 zestaw 1 zestaw 1 zestaw 10: Kran 11: Mydło 12: Uszczelnienie 9: Prysznic Szafarka przełącznik taśma 4 szt. 6 szt. (M8) 6 szt. (M8) 1 zestaw 14: Regulowany 13: Sitko 15: Pralka 16: Pralka stopa 4 szt.
- Seite 86 Machine Translated by Google 2 szt. 2 szt. 1 para 1 zestaw 28: Plastik 26: Podłoga plastikowa 25: Otwór przelotowy 27: Proca Ruszt Rękawice kolumna wisząca 1 szt. 1 szt. 1 para 1 szt. 31: Nylon 29: Grzebień 30: Tacka do wylizywania 32: Wycieraczka Rękawice 1 szt.
- Seite 87 Machine Translated by Google Zamontuj regulowane nóżki, aby stojak H. Uwaga: Upewnij się, że głębokość regulowanych nóżek nie jest mniej niż 12 mm i spróbuj zrób cztery regulowane nóżki wkręcić na taką samą głębokość. Proszę dokręcić nakrętkę zapasową podczas instalacji i dostosuj to później.
- Seite 88 Machine Translated by Google Zainstaluj filtr siatkowy, upewnij się, że pierścień uszczelniający jest wolny od zwichnięcia i zmarszczki. Ostrzeżenie: Podczas instalacji należy zwrócić uwagę na: czy pierścień uszczelniający jest prawidłowo umieszczone, unikaj wody wyciek spowodowany nieprawidłowym uszczelnieniem instalacja. I sprawdź czy przezroczysta okładka odpływ jest dokręcony.
- Seite 89 Machine Translated by Google Umieść płytkę filtra wody w wannie. Zainstaluj drążek do zawieszania. Zainstaluj kran, podstawę prysznica, przełącznik kranu i mydło Szafarka Przed zamontowaniem kranu zapoznaj się z instrukcją montażu kranu. Uwaga: Przed zamontowaniem adaptera należy wziąć pod uwagę faktyczne parametry rury wodociągowej.
- Seite 90 Machine Translated by Google WYMIARY I PARAMETRY Drzwi lewe Prawe drzwi - 9 -...
-
Seite 91: Konserwacja
Machine Translated by Google Północny Zachód Nr modelu Dł. (mm) Wys. (mm) Wys. 1 (mm) Wys. 2 (mm) Szer. (mm) (kg) K2E01005 1552 1468 79,7 K2E01006 1552 1468 79,7 Polecany zwierzak Ładowność Model# (funty) (CBM-owa) K2E01005 1.11 Dł. x szer. x wys.: 59 x 27 x 45 K2E01006 1.11... -
Seite 92: Instrukcja Pielęgnacji
Machine Translated by Google demontaż jak nakrętka, można go łatwo wyczyścić, uważaj, żeby go nie zostawić pierścień uszczelniający podczas jego ponownego montażu. INSTRUKCJA PIELĘGNACJI Nie stawiaj wanny na nierównej powierzchni. Nie upuszczaj wanny i nie traktuj jej niewłaściwie. Nie przeciążaj wagi. To ją trwale uszkodzi! TYPOWE AWARIE Jeśli kran przecieka, sprawdź, czy gumowy korek jest wodoodporny. - Seite 93 Machine Translated by Google zwierzęta domowe, takie jak koty i psy. • NIE stosować u zwierząt domowych, których waga przekracza dopuszczalną dla tego produktu, których predyspozycje stają się agresywne w kontakcie z wodą lub których cechy fizjologiczne uniemożliwiają bezpieczne regularne kąpiele (np. szczur szynszylowy). • NIGDY nie używaj tej wanny dla ludzi, zwłaszcza dzieci, ani nie pozwalaj im na kąpiel.
- Seite 94 Machine Translated by Google telefony powinny znajdować się w odległości co najmniej 2 m (6'7") od wanny. W szczególności nigdy nie zbliżaj się do wanny, w której znajduje się ładowany telefon komórkowy, ani nie zezwalać na umieszczanie lub używanie jakiegokolwiek urządzenia elektrycznego w sposób, który mógłby wpaść...
- Seite 95 Machine Translated by Google ciepło i wilgotność. • Temperatura wody powinna być zbliżona do temperatury ciała Twojego pupila. Woda zbyt zimna lub zbyt gorąca może powodować dyskomfort i podrażnienie skórę Twojego pupila, a nawet może spowodować obrażenia lub chorobę. Przed użyciem zapoznaj się z o odpowiedniej temperaturze wody do kąpieli Twojego pupila.
- Seite 96 Machine Translated by Google Wsparcie techniczne i certyfikat gwarancji elektronicznej www.vevor.com/support...
- Seite 97 Machine Translated by Google Technische ondersteuning en e-garantiecertificaat www.vevor.com/support HONDENVERZORGINGSBAD MODEL: K2E01005 / K2E01006 Wij streven er voortdurend naar om u gereedschappen tegen concurrerende prijzen te leveren. "Save Half", "Half Price" of andere soortgelijke uitdrukkingen die wij gebruiken, geven alleen een schatting weer van de besparingen die u kunt behalen door bepaalde gereedschappen bij ons te kopen in vergelijking met de grote topmerken en betekent niet noodzakelijkerwijs dat alle categorieën...
- Seite 98 Dit is de originele instructie, lees alle handleidingen zorgvuldig door voordat u het product gebruikt. VEVOR behoudt zich een duidelijke interpretatie van onze gebruikershandleiding voor. Het uiterlijk van het product is afhankelijk van het product dat u hebt ontvangen. Vergeef ons dat we u niet opnieuw zullen informeren als er technologie- of software-updates voor ons product zijn.
- Seite 99 Machine Translated by Google BELANGRIJKE VEILIGHEIDSMAATREGELEN WAARSCHUWING: Lees en begrijp deze hele handleiding voordat u het bedienen of onderhouden van dit product. Het niet naleven van deze waarschuwingen en instructies kunnen persoonlijk letsel of schade aan waardevolle eigendommen. ÿ Vermijd dat kinderen de verzorgingskuip gebruiken. En dit product is geen speelgoed. Gebruik geen Laat kinderen spelen.
-
Seite 100: Voorbereidingen Voor De Installatie
Machine Translated by Google VOORBEREIDINGEN VOOR DE INSTALLATIE 1. Aanbevolen hulpmiddelen: Kruiskopschroevendraaier, M4-sleutel, Waterpas, 2. Noodzakelijke veiligheidsvoorzieningen: Handschoenen, veiligheidsbril. Let op: draag handschoenen en een veiligheidsbril voordat u het product installeert om letsel te voorkomen. mogelijke fysieke schade tijdens de installatie. INSTRUCTIES Hartelijk dank voor het kiezen van dit huisdierbad. - Seite 101 Machine Translated by Google 1 set 1 set 1 set 1 stuk 10: Kraan 11: Zeep 12: Afdichten 9: Douchen schakelaar Uitgiftepunt plakband 1 set 4 stuks 6 stuks (M8) 6 stuks (M8) 14: Verstelbaar 15: Ring 16: Ring 13: Zeef voet 4 stuks 16 stuks...
-
Seite 102: Installatiestappen
Machine Translated by Google 1 set 2 stuks 2 stuks 1 paar 26: Kunststof vloer 28: Kunststof 25: Doorlopend gat 27: Slinger Roosterrek Handschoenen hangende kolom 1 stuk 1 stuk 1 paar 1 stuk 31: Nylon 29: Kam 30: Likbak 32: Ruitenwisser Handschoenen 1 stuk... - Seite 103 Machine Translated by Google ÿ Installeer de verstelbare voeten om het H-rek. Let op: Zorg ervoor dat de diepte van de verstelbare voeten is niet minder dan 12 mm en probeer maak de vier verstelbare poten Schroef dezelfde diepte in. Draai de reservemoer vast tijdens de installatie en Pas het later aan.
- Seite 104 Machine Translated by Google ÿ Installeer de zeef, zorg ervoor dat de afdichtring vrij is van ontwrichting en rimpels. Let op: Let bij de installatie op: of de afdichtring is correct geplaatst, vermijd water lekkage door verkeerde afdichting installatie. En controleer of de transparante afdekking van de afvoer is vastgedraaid.
- Seite 105 Machine Translated by Google ÿ Plaats de waterfilterplaat in de kuip. ÿ Installeer de ophangstang. ÿ Installeer de kraan, douchebak, kraanschakelaar en zeep Uitgiftepunt Raadpleeg de installatie- instructies voor de kraan om de kraan te installeren . Let op: bepaal of u de adapter moet installeren op basis van de werkelijke specificaties van de waterleiding.
- Seite 106 Machine Translated by Google AFMETINGEN EN PARAMETERS Linker deur Rechter deur - 9 -...
- Seite 107 Machine Translated by Google Modelnr. L(mm) H(mm) H1(mm) H2(mm) B(mm) (kg) K2E01005 1552 1468 79.7 K2E01006 1552 1468 79.7 Volume Laadvermogen Aanbevolen huisdier Model# (CBM) (in) (pond) K2E01005 1.11 L x B x H: 59 x 27 x 45 K2E01006 1.11...
-
Seite 108: Onderhoudsinstructies
Machine Translated by Google demontage als een moer, het kan gemakkelijk worden schoongemaakt, en wees voorzichtig om niet de afdichtring bij het terugplaatsen. ONDERHOUDSINSTRUCTIES Plaats het bad niet op een oneffen ondergrond. Laat het bad niet vallen en behandel het niet verkeerd. Overbelast de weegschaal niet. - Seite 109 Machine Translated by Google huisdieren zoals katten en honden. • GEBRUIK het NIET bij huisdieren die het draagvermogen van dit product overschrijden, die een heftige neiging hebben bij contact met water, of die fysiologische kenmerken staan veilig regelmatig baden in de weg (bijv. chinchilla rat). • Gebruik dit bad NOOIT voor mensen, vooral kinderen, en laat ze niet in bad gaan.
- Seite 110 Machine Translated by Google Telefoons moeten te allen tijde op een afstand van minimaal 2 meter van dit bad worden geplaatst. Breng in het bijzonder nooit een opladende mobiele telefoon in de buurt van het bad en toestaan dat een elektrisch apparaat op een zodanige manier wordt geplaatst of gebruikt dat het onder geen enkele omstandigheid in het water vallen.
- Seite 111 Machine Translated by Google warmte en vochtigheid. • De watertemperatuur moet ongeveer gelijk zijn aan de lichaamstemperatuur van uw huisdier. Water dat te koud of te warm is, kan ongemak veroorzaken en irritatie veroorzaken de huid van uw huisdier en kan zelfs letsel of ziekte veroorzaken.Leer voor gebruik over de juiste watertemperaturen voor het wassen van uw huisdier.Voor het beste resultaten, stel de maximale temperatuur van uw boiler dienovereenkomstig in als mogelijk.
- Seite 112 Machine Translated by Google Technische ondersteuning en e- garantiecertificaat www.vevor.com/support...
- Seite 113 Machine Translated by Google Teknisk support och e-garanticertifikat www.vevor.com/support HUNDTRÄMNINGSBAKA MODELL: K2E01005 / K2E01006 Vi fortsätter att vara engagerade i att ge dig verktyg till konkurrenskraftiga priser. "Spara halva", "halva priset" eller andra liknande uttryck som används av oss representerar bara en uppskattning av besparingar du kan dra nytta av att köpa vissa verktyg hos oss jämfört med de stora toppmärkena och betyder inte nödvändigtvis att täcka...
- Seite 114 Detta är den ursprungliga instruktionen, läs alla instruktioner noggrant innan du använder den. VEVOR reserverar sig för en tydlig tolkning av vår användarmanual. Utseendet på produkten är beroende av den produkt du fått. Ursäkta oss att vi inte kommer att informera dig igen om det finns någon teknik eller mjukvaruuppdateringar på...
-
Seite 115: Viktiga Säkerhetsåtgärder
Machine Translated by Google VIKTIGA SÄKERHETSÅTGÄRDER VARNING: Läs och förstå hela denna manual innan använda eller serva denna produkt. Underlåtenhet att följa dessa varningar och instruktioner kan orsaka personskada eller skada på värdefull egendom. ÿ Undvik att barn använder grooming badkar. Och den här produkten är inte en leksak. Gör inte det låta barn leka. - Seite 116 Machine Translated by Google FÖRBEREDELSER INNAN INSTALLATION 1.Rekommenderade verktyg: Stjärnskruvmejsel, M4 skiftnyckel, Vattenpass, 2. Nödvändig säkerhetsutrustning: Handskar, skyddsglasögon. Varning: Innan du installerar produkten, använd handskar och skyddsglasögon för att undvika eventuell fysisk skada under installationen. INSTRUKTIONER Tack så mycket för att du valde detta husdjursbadkar. Vänligen läs alla instruktioner innan du använder den.
- Seite 117 Machine Translated by Google 1 set 1 set 1 set 1 st 10: Kran 11: Tvål 12: Tätning 9: Dusch växla Dispenser tejpa 1 set 4 st 6 st (M8) 6 st (M8) 14: Justerbar 13: Sil 15: Bricka 16: Bricka 4 st 16 st 6 st (M8*50mm)
- Seite 118 Machine Translated by Google 1 set 2 st 2 st 1 par 28: Plast 26: Plastgolv 25: Genomgående hål 27: Sling Gallerställ Handskar hängande kolumn 1 st 1 st 1 par 1 st 31: Nylon 29: Kam 30: Slickbricka 32: Torkare Handskar 1 st 2 st...
- Seite 119 Machine Translated by Google ÿ Montera de justerbara fötterna på H-stället. Varning: Se till att djup av justerbara fötter är inte mindre än 12 mm och försök gör de fyra justerbara fötterna skruva i samma djup. Vänligen dra åt reservmuttern under installationen och justera det senare.
- Seite 120 Machine Translated by Google ÿ Installera silen, se till som tätningsringen är fri från luxation och rynkor. Varning: Var uppmärksam vid installation om tätningsringen är placerad på rätt sätt, undvik vatten läckage på grund av felaktig tätning installation. Och kolla om det genomskinliga locket av avloppet är åtdraget.
- Seite 121 Machine Translated by Google ÿ Sätt vattenfilterplattan i badkaret. ÿ Montera hängstången. ÿ Installera kran, duschbas, kranbrytare och tvål Dispenser Se installationsanvisningarna för kranen för att installera kranen. Varning: Bestäm om du ska installera adaptern enligt de faktiska specifikationerna för vattenröret.
- Seite 122 Machine Translated by Google DIMENSIONER OCH PARAMETRAR Vänster dörr Höger dörr - 9 -...
-
Seite 123: Underhåll
Machine Translated by Google Modell# L(mm) H(mm) H1(mm) H2(mm) B(mm) (kg) K2E01005 1552 1468 79,7 K2E01006 1552 1468 79,7 Volym Lastkapacitet Rekommenderat husdjur Modell# (CBM) (lbs) K2E01005 1.11 L x B x H: 59 x 27 x 45 K2E01006 1.11... -
Seite 124: Vanliga Fel
Machine Translated by Google demontering som en mutter, kan den lätt rengöras, och var noga med att inte lämna tätningsringen när den monteras tillbaka. SKÖTSELINSTRUKTIONER Ställ inte badkaret på en ojämn yta. Tappa eller misshandla inte badkaret. Överbelasta inte vågen. Detta kommer att skada den permanent! VANLIGA FEL Om kranen läcker, kontrollera om den vattentäta gummipluggen är installerat. - Seite 125 Machine Translated by Google husdjur som katter och hundar. • ANVÄND den INTE med husdjur som överstiger denna produkts viktkapacitet, vars anlag blir våldsamt vid kontakt med vatten, eller vars fysiologiska egenskaper utesluter säkert regelbundet bad (t.ex. chinchillaråtta). • Använd ALDRIG detta badkar för människor, speciellt barn, eller låt dem göra det spela på...
- Seite 126 Machine Translated by Google telefoner bör alltid vara minst 2 m (6ÿ7ÿ) från detta badkar. I synnerhet, ta aldrig med en laddningsmobil nära badkaret och aldrig tillåt någon elektrisk anordning att placeras eller användas på ett sådant sätt att den kan falla i vattnet under alla omständigheter.
- Seite 127 Machine Translated by Google värme och fuktighet. • Vattentemperaturen bör vara nära ditt husdjurs kroppstemperatur. Vatten som är antingen för kallt eller för varmt kommer att orsaka obehag, kan irritera ditt husdjurs hud och kan till och med orsaka skada eller sjukdom. Lär dig innan du använder det om lämpliga vattentemperaturer för att bada ditt husdjur.
- Seite 128 Machine Translated by Google Teknisk support och e-garanticertifikat www.vevor.com/support...