VEVOR 1104 Bedienungsanleitung
Lkw-nutzgepäckträger
Inhaltsverzeichnis
Verfügbare Sprachen
Verfügbare Sprachen
Technical Support and E-Warranty Certificate www.vevor.com/support
TRUCK UTILITY RACKS
Model: 1104
We continue to be committed to provide you tools with competitive price.
"Save Half", "Half Price" or any other similar expressions used by us only
represents an estimate of savings you might benefit from buying certain tools
with us compared to the major top brands and does not necessarily mean to cover
all categories of tools offered by us. You are kindly reminded to verify carefully
when you are placing an order with us if you are actually Saving
Half in comparison with the top major brands
Inhaltsverzeichnis

Verwandte Anleitungen für VEVOR 1104


Inhaltszusammenfassung für VEVOR 1104
- Seite 1 Technical Support and E-Warranty Certificate www.vevor.com/support TRUCK UTILITY RACKS Model: 1104 We continue to be committed to provide you tools with competitive price. "Save Half", "Half Price" or any other similar expressions used by us only represents an estimate of savings you might benefit from buying certain tools with us compared to the major top brands and does not necessarily mean to cover all categories of tools offered by us.
- Seite 2 This is the original instruction, please read all manual instructions carefully before operating. VEVOR reserves a clear interpretation of our user manual. The appearance of the product shall be subject to the product you received. Please forgive us that we won't inform you again if there are any technology or software updates on our product.
-
Seite 3: Safety Precautions
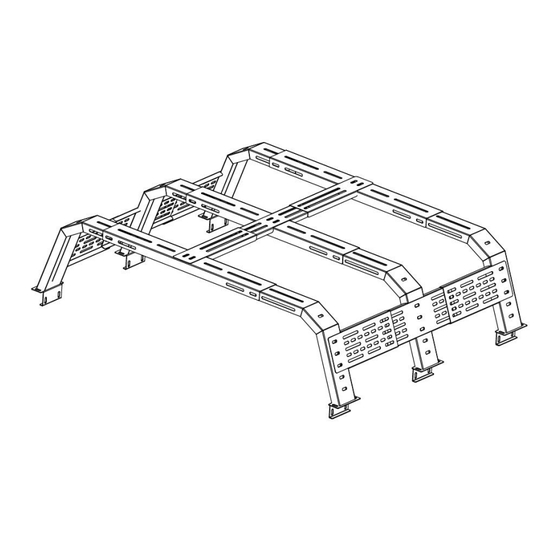
SAFETY PRECAUTIONS Read and understand this entire manual before assembling, installing, operating, or servicing this product.Failure to follow these warnings and instructions can cause death, personal injury or damage to valuable property. Adhere to all Department of Transportation (D.O.T) requirements when ... - Seite 4 SPECIFICATIONS Model Series 1104 Maximum Weight Capacity(lbs) 53.3-64.2 Range of length adjustment(inch) 54.3-68.3 Range of width adjustment (inch) PARTS LIST AND ASSEMBLY DIAGRAM Part Description Picture Cross Bar Support Leg - 3 -...
-
Seite 5: Product Description
Up Connect Plate Up Support Plate Side Connect Plate Side Support Plate M10*20 Bolts M10*35 Bolts M10 Nut Bracket Hex Key PRODUCT DESCRIPTION step 1 measure the truck bed length Assembly the cross bar and support leg together by 8 pcs M10*25 bolts and nuts, as below, do not tighten the bolts. - Seite 6 Step 2 Assembly the Up connect plate and support plate, by using 10 pcs M10*25 bolts and nuts. Step 3 Assembly the side connect plate and the side support plate together, using 20 pcs M10*25 bolts and nuts, on both side, as below.
- Seite 7 Step 4 Assembly the truck bed rack on the truck bed(need help) Step 5 Assembly the truck bed rack on the truck bed. Do tighten all the bolts Two situations. - 6 -...
- Seite 8 Mark and drill holes on the truck bed. Align holes and fix the truck bed rack on the the truck bed by 2 pcs M10*35 bolts, as below, and repeat the other legs. Technical Support and E-Warranty Certificate www.vevor.com/support - 7 -...
- Seite 9 Machine Translated by Google Assistance t echnique e t c ertificat d e g arantie é lectronique w ww.vevor.com/support SUPPORTS U TILITAIRES P OUR C AMION Modèle: 1 104 Nous c ontinuons à n ous e ngager à v ous f ournir d es o utils à d es p rix c ompétitifs.
- Seite 10 Assistance t echnique e t c ertificat d e g arantie électronique w ww.vevor.com/support Il s 'agit d e l a n otice d 'utilisation d 'origine. V euillez l ire a ttentivement t outes l es i nstructions d u ...
-
Seite 11: Précautions De Sécurité
Machine Translated by Google PRÉCAUTIONS D E S ÉCURITÉ L isez e t c omprenez l 'intégralité d e c e m anuel a vant d 'assembler, d 'installer, d 'utiliser o u d 'entretenir c e produit. L e n onrespect d e c es a vertissements et ... - Seite 12 Machine Translated by Google CARACTÉRISTIQUES Série d e m odèles 1104 Capacité d e p oids m aximale ( lb) 53,364,2 Plage d e r églage d e l a l ongueur ( pouces) 54,368,3 Plage d e r églage d e l a l argeur ( pouces) LISTE ...
- Seite 13 Machine Translated by Google Plaque d e c onnexion v ers l e h aut Plaque d e s upport v ers l e h aut Plaque d e c onnexion l atérale Plaque d e s upport l atérale Boulons ...
- Seite 14 Machine Translated by Google Étape 2 A ssemblez l a p laque d e c onnexion s upérieure e t l a p laque d e s upport, e n utilisant 1 0 b oulons e t é crous M 10*25. Étape ...
- Seite 15 Machine Translated by Google Étape 4 A ssemblez l e s upport d e p lateau d e c amion s ur l e p lateau d e c amion ( besoin d 'aide) Étape 5 Assemblez l e s upport d e b enne s ur l a b enne. S errez t ous l es b oulons. D eux s ituations. ...
- Seite 16 à l 'aide d e 2 b oulons M 10*35, c omme c idessous, et r épétez l es autres p ieds. Assistance t echnique e t c ertificat d e g arantie é lectronique www.vevor.com/support 7 ...
-
Seite 17: Lkw-Nutzgepäckträger
Machine Translated by Google Technischer Support und E-Garantie-Zertifikat www.vevor.com/support LKW-NUTZGEPÄCKTRÄGER Modell: 1104 Wir sind weiterhin bestrebt, Ihnen Werkzeuge zu wettbewerbsfähigen Preisen anzubieten. „Sparen Sie die Hälfte“, „Halber Preis“ oder andere ähnliche Ausdrücke, die wir verwenden, stellen nur eine Schätzung der Ersparnis dar, die Sie beim Kauf bestimmter Werkzeuge bei uns im Vergleich zu den großen Topmarken erzielen können, und decken nicht unbedingt alle von uns... - Seite 18 Dies ist die Originalanleitung. Bitte lesen Sie alle Anweisungen sorgfältig durch, bevor Sie das Gerät in Betrieb nehmen. VEVOR behält sich eine klare Auslegung unserer Bedienungsanleitung vor. Das Erscheinungsbild des Produkts richtet sich nach dem Produkt, das Sie erhalten haben.
-
Seite 19: Sicherheitsvorkehrungen
Machine Translated by Google SICHERHEITSVORKEHRUNGEN ÿ Lesen Sie das gesamte Handbuch sorgfältig durch, bevor Sie mit der Montage, Installation, Bedienung oder Wartung dieses Produkts beginnen. Bei Nichtbeachtung dieser Warnungen und Anweisungen können zu Tod, Verletzungen oder Schäden am wertvolles Eigentum. ÿ... -
Seite 20: Teileliste Und Montagedarf
Machine Translated by Google Spezifikationen Modellreihe 1104 Maximale Gewichtskapazität (lbs) 53,3-64,2 Längenverstellbereich (Zoll) 54,3-68,3 Breitenverstellbereich (Zoll) TEILELISTE UND MONTAGEDARF Teil Bild Beschreibung Menge Querstrebe Stützbein - 3 -... -
Seite 21: Produktbeschreibung
Machine Translated by Google Up-Verbindungsplatte Stützplatte nach oben Seitliche Verbindungsplatte Seitliche Stützplatte M10*20 Schrauben M10*35 Schrauben M10 Mutter Klammer Inbusschlüssel PRODUKTBESCHREIBUNG Schritt 1 Messen Sie die Länge der Ladefläche Montieren Sie die Querstrebe und das Stützbein mit 8 Stück M10*25 Schrauben und Muttern, wie unten, die Schrauben nicht festziehen. - Seite 22 Machine Translated by Google Schritt 2: Montieren Sie die obere Verbindungsplatte und die Stützplatte mit 10 M10*25- Schrauben und -Muttern. Schritt 3: Montieren Sie die seitliche Verbindungsplatte und die seitliche Stützplatte mit 20 M10*25-Schrauben und Muttern auf beiden Seiten, wie unten dargestellt. Heben Sie die Gepäckträgerbaugruppe auf die Ladefläche (Sie benötigen Hilfe), richten Sie sie aus und ziehen Sie alle Schrauben und Muttern fest.
- Seite 23 Machine Translated by Google Schritt 4 Montage des Ladeflächenträgers auf der Ladefläche (Hilfe erforderlich) Schritt 5: Montieren Sie den Ladeflächenträger auf der Ladefläche. Ziehen Sie alle Schrauben fest. Zwei Situationen. - 6 -...
- Seite 24 Markieren und bohren Sie Löcher auf der Ladefläche. Richten Sie die Löcher aus und befestigen Sie das Ladeflächengestell mit zwei M10*35-Schrauben auf der Ladefläche, wie unten dargestellt. Wiederholen Sie dies mit den anderen Beinen. Technischer Support und E-Garantie-Zertifikat www.vevor.com/ support - 7 -...
- Seite 25 Machine Translated by Google Supporto tecnico e certificato di garanzia elettronica www.vevor.com/support PORTAPACCHI PER CAMION Modello: 1104 Continuiamo a impegnarci per fornirvi strumenti a prezzi competitivi. "Risparmia la metà", "Metà prezzo" o qualsiasi altra espressione simile da noi utilizzata rappresenta solo una stima del risparmio che potresti ottenere acquistando determinati utensili con noi rispetto ai principali marchi principali e non significa necessariamente coprire tutte le categorie di utensili da noi offerti.
- Seite 26 Questa è l'istruzione originale, si prega di leggere attentamente tutte le istruzioni del manuale prima di utilizzare. VEVOR si riserva una chiara interpretazione del nostro manuale utente. L'aspetto del prodotto sarà soggetto al prodotto ricevuto. Vi preghiamo di perdonarci se non vi informeremo di nuovo se ci sono aggiornamenti tecnologici o software sul nostro prodotto.
-
Seite 27: Precauzioni Di Sicurezza
Machine Translated by Google PRECAUZIONI DI SICUREZZA ÿ Leggere e comprendere l'intero manuale prima di montare, installare, utilizzare o effettuare la manutenzione di questo prodotto. La mancata osservanza di queste avvertenze e le istruzioni possono causare morte, lesioni personali o danni a proprietà... - Seite 28 Machine Translated by Google SPECIFICHE Serie di modelli 1104 Capacità massima di peso (libbre) 53.3-64.2 Gamma di regolazione della lunghezza (pollici) 54,3-68,3 Gamma di regolazione della larghezza (pollici) ELENCO DELLE PARTI E SCHEMA DI MONTAGGIO Parte Immagine Descrizione Quantità Barra trasversale...
-
Seite 29: Descrizione Del Prodotto
Machine Translated by Google Piastra di collegamento superiore Piastra di supporto superiore Piastra di collegamento laterale Piastra di supporto laterale Bulloni M10*20 Bulloni M10*35 Dado M10 Staffa Chiave esagonale DESCRIZIONE DEL PRODOTTO passaggio 1 misurare la lunghezza del cassone del camion Assemblare la barra trasversale e la gamba di supporto insieme con 8 pezzi M10*25 bulloni e dadi, come di seguito, non stringere i bulloni. - Seite 30 Machine Translated by Google Fase 2: assemblare la piastra di collegamento superiore e la piastra di supporto utilizzando 10 bulloni e dadi M10*25. Fase 3: assemblare insieme la piastra di collegamento laterale e la piastra di supporto laterale, utilizzando 20 bulloni e dadi M10*25, su entrambi i lati, come di seguito.
- Seite 31 Machine Translated by Google Fase 4 Assemblaggio del portapacchi sul cassone del camion (serve aiuto) Fase 5 Assemblare il portapacchi sul cassone del camion. Stringere tutti i bulloni Due situazioni. - 6 -...
- Seite 32 Segnare e praticare i fori sul cassone del camion. Allineare i fori e fissare il portapacchi sul cassone del camion con 2 bulloni M10*35, come di seguito, quindi ripetere la procedura per le altre gambe. Supporto tecnico e certificato di garanzia elettronica www.vevor.com/support - 7 -...
- Seite 33 Machine Translated by Google Soporte t écnico y c ertificado d e g arantía e lectrónica w ww.vevor.com/support ESTANTERIA U TILITARIA P ARA C AMIONES Modelo: 1 104 Seguimos c omprometidos a b rindarle h erramientas a p recios c ompetitivos.
- Seite 34 Soporte t écnico y c ertificado d e g arantía electrónica w ww.vevor.com/support Estas s on l as i nstrucciones o riginales, l ea a tentamente t odas l as i nstrucciones d el m anual ...
-
Seite 35: Precauciones De Seguridad
Machine Translated by Google PRECAUCIONES D E S EGURIDAD L ea y c omprenda t odo e ste m anual a ntes d e e nsamblar, i nstalar, o perar o r ealizar m antenimiento a este ... - Seite 36 Machine Translated by Google PRESUPUESTO Serie d e m odelos 1104 Capacidad m áxima d e p eso ( lbs) 53.364.2 Rango d e a juste d e l ongitud ( pulgadas) 54.368.3 Rango d e a juste d e a ncho ( pulgadas) LISTA ...
-
Seite 37: Descripción Del Producto
Machine Translated by Google Placa d e c onexión a scendente Placa d e s oporte h acia a rriba Placa d e c onexión l ateral Placa d e s oporte l ateral Pernos M 10*20 Pernos M 10*35 Tuerca ... - Seite 38 Machine Translated by Google Paso 2 E nsamble l a p laca d e c onexión s uperior y l a p laca d e s oporte, u tilizando 1 0 p ernos y tuercas M 10*25. Paso ...
- Seite 39 Machine Translated by Google Paso 4 E nsamble e l s oporte d e l a p lataforma d el c amión e n l a p lataforma d el c amión ( necesita a yuda) Paso 5 Ensamble ...
- Seite 40 2 p ernos M 10*35, c omo s e muestra a continuación, y r epita c on l as o tras p atas. Soporte t écnico y c ertificado d e g arantía e lectrónica www.vevor.com/support 7 ...
- Seite 41 Machine Translated by Google Wsparcie techniczne i certyfikat gwarancji elektronicznej www.vevor.com/support REGAŁY UŻYTKOWE DO SAMOCHODÓW CIĘŻAROWYCH Model: 1104 Nadal staramy się oferować Państwu narzędzia w konkurencyjnych cenach. „Oszczędź połowę”, „Połowa ceny” lub inne podobne wyrażenia używane przez nas stanowią jedynie szacunkowe oszczędności, jakie możesz uzyskać kupując u nas określone narzędzia w porównaniu z głównymi markami i niekoniecznie oznaczają...
- Seite 42 To jest oryginalna instrukcja, przed użyciem należy uważnie przeczytać wszystkie instrukcje. VEVOR zastrzega sobie jasną interpretację naszej instrukcji obsługi. Wygląd produktu będzie zależał od produktu, który otrzymałeś. Prosimy o wybaczenie, że nie poinformujemy Cię ponownie, jeśli w naszym produkcie pojawią się jakiekolwiek aktualizacje technologiczne lub oprogramowania.
-
Seite 43: Środki Ostrożności
Machine Translated by Google ŚRODKI OSTROŻNOŚCI Przed montażem, instalacją, obsługą lub serwisowaniem tego produktu należy przeczytać i zrozumieć całą instrukcję. Nieprzestrzeganie tych ostrzeżeń i instrukcje mogą spowodować śmierć, obrażenia ciała lub uszkodzenie cennego mienia. Przestrzegaj wszystkich wymogów Departamentu Transportu (DOT) podczas Używając tego produktu, należy używać... - Seite 44 Machine Translated by Google SPECYFIKACJE Seria modeli 1104 Maksymalna nośność (funty) 53.3-64.2 Zakres regulacji długości (cale) 54,3-68,3 Zakres regulacji szerokości (cale) LISTA CZĘŚCI I SCHEMAT MONTAŻU Opis Zdjęcie Część Ilość Poprzeczka Noga podporowa - 3 -...
-
Seite 45: Opis Produktu
Machine Translated by Google Płyta łącząca w górę Płyta podporowa górna Płyta łącząca boczna Płyta podporowa boczna Śruby M10*20 Śruby M10*35 Nakrętka M10 Nawias Klucz imbusowy OPIS PRODUKTU krok 1 zmierz długość skrzyni ładunkowej ciężarówki Złóż poprzeczkę i nogę podporową razem za pomocą 8 szt. M10*25 śruby i nakrętki, jak poniżej, nie dokręcaj śrub. - Seite 46 Machine Translated by Google Krok 2 Złóż płytę łączącą i płytę podporową za pomocą 10 śrub M10*25 i nakrętek. Krok 3 Złóż boczną płytę łączącą i boczną płytę podporową, używając 20 śrub M10*25 i nakrętek po obu stronach, jak pokazano poniżej. Podnieś...
- Seite 47 Machine Translated by Google Krok 4 Montaż bagażnika na pace ciężarówki (potrzebna pomoc) Krok 5 Złóż bagażnik na skrzynię ładunkową ciężarówki. Dokręć wszystkie śruby Dwie sytuacje. - 6 -...
- Seite 48 Zaznacz i wywierć otwory w skrzyni ładunkowej ciężarówki. Wyrównaj otwory i zamocuj stelaż na skrzyni ładunkowej do skrzyni ładunkowej za pomocą dwóch śrub M10*35, jak pokazano poniżej, a następnie powtórz montaż pozostałych nóg. Wsparcie techniczne i certyfikat gwarancji elektronicznej www.vevor.com/ support - 7 -...
- Seite 49 Machine Translated by Google Technische ondersteuning en e-garantiecertificaat www.vevor.com/support TRUCK-GEREEDSCHAPSREKKEN Model: 1104 Wij streven er voortdurend naar om u gereedschappen tegen concurrerende prijzen te leveren. "Save Half", "Half Price" of andere soortgelijke uitdrukkingen die wij gebruiken, geven slechts een schatting weer van de besparingen die u kunt behalen door bepaalde gereedschappen bij ons te kopen in vergelijking met de grote topmerken en betekent niet noodzakelijkerwijs dat alle categorieën...
- Seite 50 Dit is de originele instructie, lees alle handleidingen zorgvuldig door voordat u het product gebruikt. VEVOR behoudt zich een duidelijke interpretatie van onze gebruikershandleiding voor. Het uiterlijk van het product is afhankelijk van het product dat u hebt ontvangen. Vergeef ons dat we u niet opnieuw zullen informeren als er technologie- of software-updates voor ons product zijn.
- Seite 51 Machine Translated by Google VEILIGHEIDSMAATREGELEN ÿ Lees en begrijp deze hele handleiding voordat u dit product monteert, installeert, bedient of onderhoudt. Als u deze waarschuwingen niet opvolgt, en instructies kunnen de dood, persoonlijk letsel of schade aan uw kind veroorzaken. waardevolle eigendommen.
-
Seite 52: Specificaties
Machine Translated by Google SPECIFICATIES Modelserie 1104 Maximale draagkracht (lbs) 53.3-64.2 Bereik van lengteaanpassing (inch) 54.3-68.3 Breedteverstellingsbereik (inch) ONDERDELENLIJST EN MONTAGESCHEMA Deel Beschrijving Afbeelding Hoeveelheid Dwarsbalk Steunpoot - 3 -... -
Seite 53: Productbeschrijving
Machine Translated by Google Omhoog verbinden plaat Steunplaat omhoog Zijverbindingsplaat Zijsteunplaat M10*20 bouten M10*35 bouten M10 moer Beugel Inbussleutel PRODUCTBESCHRIJVING stap 1 meet de lengte van de laadbak van de vrachtwagen Monteer de dwarsbalk en de steunpoot aan elkaar met 8 stuks M10*25 bouten en moeren, zoals hieronder, draai de bouten niet vast. - Seite 54 Machine Translated by Google Stap 2 Monteer de verbindingsplaat en de steunplaat met behulp van 10 M10*25 bouten en moeren. Stap 3 Monteer de zijverbindingsplaat en de zijsteunplaat aan elkaar met behulp van 20 M10*25 bouten en moeren aan beide kanten, zoals hieronder. Til de truck rack-assemblage op de truckbed (hulp nodig), pas het aan en draai alle bouten en moeren vast.
- Seite 55 Machine Translated by Google Stap 4 Monteer het laadbakrek op de laadbak van de vrachtwagen (hulp nodig) Stap 5 Monteer het truckbedrek op de truckbed. Draai alle bouten vast Twee situaties. - 6 -...
- Seite 56 Markeer en boor gaten op de laadbak van de vrachtwagen. Lijn de gaten uit en bevestig het rek voor de laadbak van de vrachtwagen met 2 M10*35-bouten op de laadbak van de vrachtwagen, zoals hieronder. Herhaal dit met de andere poten. Technische ondersteuning en e-garantiecertificaat www.vevor.com/support - 7 -...
- Seite 57 Machine Translated by Google Teknisk support och e-garanticertifikat www.vevor.com/support TRUCK UTILITY RACK Modell: 1104 Vi fortsätter att vara engagerade i att ge dig verktyg till konkurrenskraftiga priser. "Spara halva", "halva priset" eller andra liknande uttryck som används av oss representerar bara en uppskattning av besparingar du kan dra nytta av att köpa vissa verktyg hos oss jämfört med de stora toppmärkena och betyder inte nödvändigtvis att täcka...
- Seite 58 Detta är den ursprungliga instruktionen, läs alla instruktioner noggrant innan du använder den. VEVOR reserverar sig för en tydlig tolkning av vår användarmanual. Utseendet på produkten är beroende av den produkt du fått. Ursäkta oss att vi inte kommer att informera dig igen om det finns någon teknik eller mjukvaruuppdateringar på...
- Seite 59 Machine Translated by Google SÄKERHETSÅTGÄRDER ÿ Läs och förstå hela denna manual innan du monterar, installerar, använder eller servar denna produkt. Underlåtenhet att följa dessa varningar och instruktioner kan orsaka dödsfall, personskada eller skada på värdefull egendom. ÿ Följ alla krav från Department of Transportation (DOT) när använda den här produkten.
-
Seite 60: Specifikationer
Machine Translated by Google SPECIFIKATIONER Modellserie 1104 Maximal viktkapacitetÿlbsÿ 53,3-64,2 Längdjusteringsområde (tum) 54,3-68,3 Omfång för breddjustering (tum) DELLISTA OCH MONTERINGSDIAGRAM Bild Beskrivning Antal Cross Bar Stödben - 3 -... - Seite 61 Machine Translated by Google Upp anslutningsplatta Upp stödplatta Sidoanslutningsplatta Sidostödplatta M10*20 Bultar M10*35 Bultar M10 Mutter Konsol Insexnyckel PRODUKTBESKRIVNING steg 1 mät lastbilsflakets längd Montera ihop tvärstången och stödbenet med 8 st M10*25 bultar och muttrar, enligt nedan, dra inte åt bultarna. Och upprepa. - 4 -...
- Seite 62 Machine Translated by Google Steg 2 Montera Up Connect-plattan och stödplattan med 10 st M10*25 bultar och muttrar. Steg 3 Montera ihop sidoanslutningsplattan och sidostödplattan med 20 st M10*25 bultar och muttrar på båda sidor, enligt nedan. Lyft lastbilsstället på lastbilsflaket (behöver hjälp), justera det och dra åt alla bultar och mutter.
- Seite 63 Machine Translated by Google Steg 4 Montera lastbilsflaket på lastbilsflaketÿbehöver hjälpÿ Steg 5 Montera lastbilsflaket på lastbilsflaket. Dra åt alla bultar i två situationer. - 6 -...
- Seite 64 2 Borra hål vid behov, lämplig för större delen av lastbilen. Markera och borra hål på lastbilsflaket. Rikta in hålen och fixera lastbilsflaket på lastbilsflaket med 2 st M10*35 bultar, enligt nedan, och upprepa de andra benen. Teknisk support och e-garanticertifikat www.vevor.com/support - 7 -...