Sony HVL-IRM Bedienungsanleitung
Battery ir light
Quicklinks
お買い上げいただきありがとうございます。
3-073-920-05(1)
IR
バッテリー
ライト
電気製品は安全のための注意事項を守らない
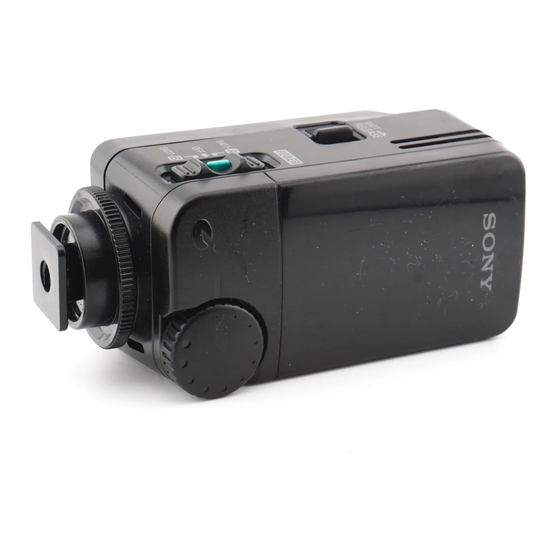
Battery IR Light
と、火災や人身事故になることがあります。
Lampe IR à batterie
この取扱説明書には、事故を防ぐための重要な
注意事項と製品の取扱いかたを示しています。
この取扱説明書をよくお読みのうえ、製品を安
全にお使いください。お読みになったあとはい
取扱説明書/Operating Instructions/
つでも見られるところに必ず保管してくださ
Mode d'emploi/Manual de instrucciones/
い。
Bendienungsanleitung/Gebruiksaanwijzing/
Bruksanvisning/Istruzioni per l'uso/Manual de
instruções/
/
/
/
/
HVL-IRM
Sony Corporation © 2002 Printed in Japan
A
BATT-
B
1, 2
3
4, 5
– 極を上に/
– side up/
1
Côté – vers le haut/
2
lado – hacia arriba/
3
+ 極を上に/
mit der – Seite nach
+ side up/
oben/
Côté + vers le haut/
– kant boven
lado+ hacia arriba/
mit der + Seite nach
oben/
+ kant boven
BATT-
C-1
1
2
3
C-2
D
3
1
A
日本語
主な特長
•IR
ライトは
NIGHTSHOT
(ナイトショット)
安全のために
付きのビデオカメラ・デジタルスチルカメラ
に対応しています。
NIGHTSHOT
ソニー製品は安全に充分配慮して設計されていま
距離を高めることができます。
す。しかし、まちがった使いかたをすると、火災
•
アクセサリーシューのないビデオカメラ・デ
などにより人身事故になることがあり危険です。
ジタルスチルカメラには、付属のシューブラ
事故を防ぐために次のことを必ずお守りください。
ケットを使用してバッテリー
付けることができます。
•
安全のための注意事項を守る
•
故障したら使わずに、ソニーの相談窓口に相談
する
取り扱い上のご注意
•
万一、異常が起きたら
1 電源を切る
変な音やにお
•
使用しないときは必ず
POWER
,
2 ソニーの相談窓口に相談す
い、煙が出た
切ってください。
場合は
る
•
本機を持って、カメラを持ち上げないでくだ
さい。
警告表示の意味
•
使用中、保管中にかかわらず次のような場所
取扱説明書では、次のような表示をしています。
には置かないでください。故障や、変形の原
表示の内容をよく理解してから本文をお読みくだ
因となります。
さい。
− 炎天下や夏場の窓を閉めきった自動車内の
この表示の注意事項を守らないと、
ように異常に高温になる所。
火災・感電などにより死亡や大けが
など人身事故の原因となります。
− 直射日光の当たる場所、熱器具の近く。
この表示の注意事項を守らないと、
− 激しい振動のある場所。
感電やその他の事故によりけがをし
•
使用後またはバッテリー
IR
たり周辺の家財に損害を与えたりす
ときは、バッテリーをはずしてください。
ることがあります。
使い終わったら
注意を促す記号
• POWER
スイッチを必ず「
さい。
•
充分に冷めてから収納してください。
行為を禁止する記号
お手入れのしかた
下記の注意事項を守
時々、柔らかい布でからぶきしてください。汚
火災・
らないと、
れがひどいときは、中性洗剤溶液を少し含ませ
感電
死亡
により
た布でふいてから、もう一度からぶきしてくだ
大けが
や
の原因と
さい。
なります。
シンナー、ベンジン、アルコールなどは表面の
仕上げをいためますので使わないでください。
点灯したまま放置しない
周囲の状況によっては火
リチウムイオン電池は、リサイクルでき
災の原因となることがあ
ます。
ります。使用しないとき
不要になったリチウムイオン電池は、金
は必ず
POWER
スイッチ
属部にセロハンテープなどの絶縁テープ
を「
OFF
」にしてくださ
を貼ってリサイクル協力店へお持ちくだ
い。
さい。
充電式電池の回収・リサイクルおよび
カメラに取り付けたままケースに収納
リサイクル協力店については
しない
有限責任中間法人
JBRC
ホームページ
万一誤ってカメラの電源スイッチおよび
http://www.jbrc.net/hp/contents/index.html
本機の
POWER
スイッチが「
ON
」 にな
を参照してください。
ると、発煙、発火の原因となることがあ
ります。
放熱孔をふさがない
主な仕様
内部の温度が上がり、火災や故障
の原因となります。
IR
ライト部
紙や布などの燃えやすいものを近付けな
電源
DC 7.2 V
い
最大消費電力
2 W
火災の原因となります。
到達可能距離
3
∼
20 m
IR
ライト点灯時連続使用時間
湿気やほこりの多い場所では使わない
バッテリー
連続使用時間
感電や火災の原因となることがありま
す。
NP-FM30
NP-FM50
アルコールやベンジンなど揮発性、引火
NP-QM71
性の高い薬品を近付けたりライトの近く
に置いたりしない
NP-QM91
約
発火、発煙の恐れがあります。
(充分に充電されているバッテリーパックの、おおよ
分解しない
その使用可能時間を示しています。)
感電の原因となります。内部の点検などは
電池
連続使用時間
ソニーの相談窓口にご相談ください。
単
3
形アルカリ電池
内部に液体をこぼしたり、燃えやすいも
のや金属類を落とさない
(新品の単
3
形アルカリ電池を
2
個使用した場合の、お
そのまま使用すると、火災や事故、故障の
およその使用可能時間を示しています。)
原因となります。
×
×
最大外形寸法
約
46
102
43 mm
け
下記の注意事項を守らないと、
奥行き)
が
家財
損害
をしたり周辺の
に
を
質量
約
90 g
与えたりすることがあります。
同梱物
バッテリー
IR
ライト (
シューブラケット (
印刷物一式
点灯中は赤外線発光部を直接見ない
強力な光は目を痛める恐れがあります。
本機の仕様および外観は、改良のため予告なく変更す
ることがありますが、ご了承ください。
English
A バッテリーを使う
取り付けるとき
WARNING
POWER
To prevent fire or shock hazard, do not expose the
バッテリーを取り付ける前に
スイッチ
unit to rain or moisture.
OFF
が「
」 になっていることを確認してくださ
To avoid electrical shock, do not open the cabinet.
Refer servicing to qualified personnel only.
い。
ソニー製インフォリチウム
M
シリーズがお使い
いただけます。
充電したバッテリーを
BATT-
に取り付ける。
For the customers in the U.S.A.
取りはずすとき
NOTE
This equipment has been tested and found to
BATT RELEASE
ボタンをスライドさせ、バッ
comply with the limits for a Class B digital device,
テリーを矢印の方向にずらしてはずす。
pursuant to Part 15 of the FCC Rules. These limits
are designed to provide reasonable protection
against harmful interference in a residential
installation. This equipment generates, uses, and
B 電池を使う
can radiate radio frequency energy and, if not
installed and used in accordance with the
instructions, may cause harmful interference to
取り付けるとき
radio communications. However, these is no
guarantee that interference will not occur in a
particular installation. If this equipment does cause
電池を取り付ける前に
POWER
スイッチが
harmful interference to radio or television
「
OFF
」になっていることを確認してくださ
reception, which can be determined by turning the
equipment off and on, the user is encouraged to try
い。
to correct the interference by one or more of the
単
3
形アルカリ電池を
2
個使用します。
following measures:
— Reorient or relocate the receiving antenna.
— Increase the separation between the equipment
1
電池ぶたを上にずらし
(
)
、矢印の方向に倒
1
— Connect the equipment into an outlet on a
して開く
(
)
。
2
2
BATT-
に電池を入れる。
— Consult the dealer or an experienced radio/TV
3
電池ぶたを閉める。
開くときと逆の順序でふたを閉じ、次にカ
You are cautioned that any changes or
modifications not expressly approved in this
チッというまで押し下げてください。
manual could void your authority to operate this
equipment.
ご注意
電池を入れるときは、極性(+、−) をまちが
Features
えないようにしてください。
• The battery IR light can be used on a video
camera recorder/digital still camera with the
NightShot function. Using the battery IR light,
you can record more distant subjects in
C 取り付ける
NightShot operation.
• If your video camera recorder/digital still
camera doesn't have the accessory shoe attached,
付属のシューブラケットを使う(
C-1
)
you can record with the battery IR light using the
shoe bracket.
1
付属のシューブラケットのシューに合わせて
つきあたるまで差し込む。
Precautions
2
IR
固定つまみを回して、バッテリー
ライト
• Avoid placing the battery IR light near
4
を固定する。
combustible or volatile solvents such as alcohol
3
IR
or benzine.
カメラとバッテリー
ライトの角度が合う
• Do not let any solid object or liquid fall onto or
ようにシューブラケットの角度を調整して、
into the battery IR light.
• Do not pick up the camera by the head of the
カメラの底部にある穴に固定ネジでしっかり
battery IR light.
取り付ける。
• Remove the battery IR light and shoe bracket
before putting the camera into a carrying case.
ご使用状況により、シューブラケットはカ
• Avoid placing or storing the battery IR light in
セット入れ側/液晶画面側のいずれかを選ん
locations that are
– Extremely hot such as in a car parked in the sun
で取り付けることができます。
– In areas subject to direct sunlight or sources of
ご注意
– Vibrating
• Remove the battery pack after using or when
シューブラケットの底面の穴に三脚を取り付けな
carrying the battery IR light.
いでください。
After use
• Be sure to set the POWER switch to OFF.
カメラのアクセサリーシューを使う
• Store in pouch after making sure that the unit
is cool enough to handle.
C-2
(
)
1
カメラのアクセサリーシューに合わせてつき
On cleaning
あたるまで差し込む。
Clean the battery IR light with a dry soft cloth. You
2
固定つまみを回して、バッテリー
IR
ライト
can remove stubborn stains with a cloth lightly
dampered with a mild detergent solution, then dry
を固定する。
the unit with a soft cloth.
Never use strong solvents, such as thinner or
使い終わったら
benzine, since these will damage the finish on the
surface.
POWER
スイッチを「
OFF
」 にする。
取りはずすとき
Specifications
固定つまみをゆるめて、バッテリー
IR
ライトを
IR light segment
はずす。
Power requirements
Maximum power consumption 2 W
Continuous lighting time
IR
D 暗闇で撮影する(
ライ
トを使う)
バッテリー
IR
ライトは
NIGHTSHOT
(ナイト
ショット)付きのカメラで使えます。
NIGHTSHOT
についての詳しい操作について
は、お使いのカメラの取扱説明書をご覧くださ
い。
1
緑色のボタンを押しながら
POWER
スイッ
チをスライドさせ、
BATT-
側 (電池使用
時) または
BATT-
側 (バッテリー使用時)
にする。
IR
ランプが点灯します。
Illumination distance
2
NIGHTSHOT
カメラの
スイッチを 「入」に
Dimensions
する。
3
IR CONTROL
Mass
カメラの画面を見ながら
つま
Included items
みを回して、バッテリー
IR
ライトの明るさ
を調節する。
被写体との距離が遠く、暗すぎる
Design and specifications are subject to change
without notice.
MAX
の方向に回す。
被写体との距離が近く、明るすぎる
A Using with the
MIN
の方向に回す。
ヒント
The rechargeable battery pack is to be set at the
N.S.
behind of the battery IR light, and it is indicated as
•
カメラのメニューで「
ライト」 を「入」 に
the BATT- .
設定すると、画像がより鮮明になります。
To attach the rechargeable
IR
•
明かりのない場所でバッテリー
ライトを
battery
使って撮影する場合、バッテリー
IR
ライトと
Attach the fully charged battery to the
被写体との距離は約
3
∼
20
mが目安です。距
battery IR light in the direction of the arrow.
離が近すぎると、
IR
ライトが充分にあたらな
To remove the rechargeable
いことがあります。被写体との距離は撮影状
battery
況によって変わります。録画を開始する前に
While sliding the BATT RELEASE button on
必ず画像を確認してください。
the battery IR light, slide out the battery in
the direction of the arrow.
IR
ライトについて
B Using with the dry
•
NIGHTSHOT
で撮影中の画像は実際の色が
表現されません。
IR
•
ライトは赤外線のため、目には見えませ
The dry batteries are to be set inside of the battery
IR light, and they are indicated as the BATT- .
ん。
(marked on the center of the battery compartment)
発光部は赤く見えることがあります。
1 Slide the lid in the direction of the arrow
の撮影可能
使い終わったら
2 Open the lid in the direction of the arrow
POWER
スイッチを「
OFF
」 にする。
3 Insert both of the size LR6 (AA) batteries
IR
ライトを取り
4 Lift up and close the lid in the direction of
保証書とアフターサービス
5 Slide the lid in the direction of the arrow
保証書について
•
この製品には保証書が添付されていますの
Note on the dry battery
で、お買い上げの際、お買い上げ店でお受け
Pay attention to the polality of the batteries when
スイッチを
取りください。
attaching.
•
所定事項の記入および記載内容をお確かめの
うえ、大切に保存してください。
C Attaching the battery
•
保証期間は、お買い上げ日より
1
年間です。
アフターサービスについて
Using supplied shoe bracket
調子が悪いときはまずチェックを
この説明書をもう一度ご覧になってお調べく
1 Insert the battery IR light into the shoe in
ださい。
それでも具合の悪いときは
2 Turn and tighten the lock knob to lock in
ソニーの相談窓口にご相談ください。
保証期間中の修理は
3 Align the camera mounting screw with
ライトを持ち運ぶ
保証書の記載内容に基づいて修理させていた
だきます。詳しくは保証書をご覧ください。
Using the accessory shoe of the
保証期間経過後の修理は
OFF
camera
」 にしてくだ
修理によって機能が維持できる場合は、ご要
1 Insert the battery IR light into the shoe of
望により有料修理させていただきます。
ご相談になるときは次のことをお知らせくださ
2 Follow the same procedure as above step
い。
•
型名:
HVL-IRM
To remove the battery IR light
•
購入年月日
Turn and loosen the lock knob to remove the
battery IR light in the opposite direction of
•
故障の状態:できるだけ詳しく
the arrow.
D Shooting in the dark
The IR light can be used on a camera with the
NightShot function. For details of the NightShot
operation, refer to the operating instructions
supplied with the camera.
1 Set the POWER switch to BATT-
2 Slide the NIGHTSHOT switch on the
3 View the picture in the viewfinder or on
Tip
The distance between the IR light and the subject
in the dark should be from about 3 m (9
m (65
cannot light the subject completely.
Since the recording distance will differ depending
on the environment, be sure to check the
brightness of the picture in step 3 before you start
recording.
Notes on IR light
• The picture recorded with the IR light is nearly
monochrome.
• IR light is invisible because it is infrared lighting.
The emitting section may turn red.
After use
約
160
分
約
320
分
Set the POWER switch to OFF.
約
680
分
1 080
分
約
60
分
(幅/高さ/
1
)
1
)
Français
AVERTISSEMENT
Afin d'éviter tout risque d'incendie ou
d'électrocution, ne pas exposer cet appareil à la
pluie ou à l'humidité.
Afin d'écarter tout risque d'électrocution, garder le
coffret fermé. Ne confier l'entretien de l'appareil
This symbol is intended to alert
qu'à un professionnel.
the user to the presence of
important operating and
maintenance (servicing)
instructions in the literature
Caractéristiques
accompanying the appliance.
• La lampe infrarouge à batterie peut être utilisée
sur un camescope ou un appareil photo
numérique doté de la fonction NightShot (Prise
de vues nocturne). Pendant l'utilisation de la
lampe infrarouge à batterie, vous pouvez
enregistrer des sujets plus éloignés en mode de
fonctionnement NightShot.
• Si votre camescope/appareil photo numérique
n'a pas de griffe porte-accessoires, vous pouvez
filmer avec la lampe IR en utilisant le porte-
griffe.
Précautions
• Evitez de poser la lampe IR près de combustibles
ou de solvants volatils, comme l'alcool ou la
benzine.
• Ne pas laisser d'objets solides ou de liquides
tomber sur ou pénétrer à l'intérieur de la lampe
IR.
• Ne pas saisir l'appareil par la lampe IR.
and receiver.
• Enlevez la lampe IR et le porte-griffe avant de
ranger l'appareil dans une sacoche de transport.
circuit different from that to which the receiver
is connected.
• Évitez de laisser ou ranger la lampe IR
– dans des endroits extrêmement chauds, comme
technician for help.
dans une voiture garée en plein soleil
– en plein soleil ou près de sources de
températures élevées, comme un appareil de
chauffage
– dans des endroits soumis à des vibrations
• Enlevez la batterie rechargeable après utilisation
ou lorsque vous transportez la lampe IR.
Après utilisation
• Veillez à régler le commutateur POWER sur
OFF.
• Rangez la lampe dans sa pochette après vous
être assuré que la lampe était suffisamment
froide pour pouvoir être manipulée.
Nettoyage
Nettoyez la lampe IR avec un chiffon sec et doux.
Vous pouvez enlever les tâches rebelles avec un
chiffon légèrement imprégné de détergent neutre.
Essuyez ensuite la lampe avec un chiffon doux.
Ne jamais utiliser de solvants puissants, tels qu'un
diluant ou de la benzine, car ils peuvent
endommager la finition.
Spécifications
Section lampe infrarouge
Alimentation
7,2 V CC
Consommation maximale
2 W
Temps d'éclairage continu
high temperature, such a heating device
Type de batterie
Temps d'éclairage
rechargeable
NP-FM30
NP-FM50
NP-QM71
NP-QM91
(Env. en minutes avec une batterie rechargeable
pleine)
Type de pile
Durée d'éclairage
sèche
LR6 (taille AA)
(Approx. en minutes lorsque deux piles sèches
sont utilisées.)
Distance d'utilisation recommandée
Env. 3-20 m
Env. 46 × 102 × 43 mm
Dimensions
13
× 4
1
(1
/
/
16
7.2 V DC
(l/h/p)
Poids
Env. 90 g (3 on.)
Articles inclus
Lampe IR à batterie (1)
Type of battery
Lighting duration
Porte-griffe (1)
pack
(min.)
Jeu de documents imprimés
NP-FM30
160
La conception et les spécifications peuvent être
NP-FM50
320
modifiées sans préavis.
NP-QM71
680
NP-QM91
1 080
A Utilisation avec la
(Approx. minutes using fully-charged battery
batterie rechargeable
pack)
La batterie rechargeable doit être mise au dos de la
Type of dry
Lighting duration
lampe IR et elle est indiquée par BATT- .
battery
(min.)
Pour mettre la batterie
LR6 (size AA)
60
rechargeable en place
(Approx.minutes using two new dry batteries.)
Fixez la batterie rechargeable (pleinement
chargée) sur la lampe IR en la faisant glisser
Approx. 3-20 m
dans le sens de la flèche.
Approx. 46 × 102 × 43 mm
× 4
× 1
(1
13
/
1
/
3
/
inches)
16
8
4
Pour retirer la batterie
(w/h/d)
Approx. 90 g (3 oz)
rechargeable
Battery IR Light (1)
shoe bracket (1)
Tout en poussant sur le bouton BATT
Set of printed documentation
RELEASE sur la lampe IR, sortez la batterie en
la faisant glisser dans le sens de la flèche.
B Utilisation avec des
piles sèches
rechargeable battery
Les piles sèches doivent être mises dans la lampe
IR et elles sont indiquées par BATT-
du logement de piles).
1 Faites glisser le couvercle dans le sens de
la flèche 1.
2 Ouvrez le couvercle dans le sens de la
flèche 2.
3 Insérez les deux piles de taille LR6 (AA) en
respectant la polarité.
4 Soulevez et fermez le couvercle dans le
sens de la flèche 3.
5 Faites glisser le couvercle dans le sens de
la flèche 4 jusqu'au déclic.
Remarque sur les piles sèches
Faites attention à la polarité des piles lorsque vous
batteries
les insérez.
C Fixation de la lampe
IR sur l'appareil
1.
Utilisation du porte-griffe
fourni
(illustration C-1 )
2.
1 Insérez la lampe IR dans la griffe et faites-
with correct polarity.
la glisser dans le sens de la flèche.
2 Serrez le bouton de verrouillage en le
the arrow 3.
tournant dans le sens de la flèche.
3 Alignez la vis de montage sur l'orifice
4 until it clicks.
fileté se trouvant sous l'appareil et serrez
bien la vis.
Utilisation de la griffe porte-
accessoire de l'appareil
(illustration C-2 )
1 Insérez la lampe IR dans la griffe de
IR light to the camera
l'appareil.
2 ci-dessus à l'étape 2.
(illustration C-1 )
Pour enlever la lampe IR
Desserrez le bouton de verrouillage pour
the direction of the arrow and slit on its
bottom until it reaches the end.
enlever la lampe IR en le tournant dans le
sens opposé de la flèche.
the direction of the arrow.
D Prise de vues nocturne
the hole on the bottom of the camera,
and tighten the screw firmly.
(utilisation de la
lampe IR)
(illustration C-2 )
La lampe IR peut être utilisée sur un appareil
dotée de la fonction NightShot. Pour des détails
the camera.
sur le fonctionnement en mode NightShot, veuillez
vous reporter au mode d'emploi de votre appareil.
2.
1 Réglez le commutateur POWER sur
BATT-
ou BATT-
de la lampe IR. Tout
en appuyant sur le petit bouton vert.
L'indicateur d'éclairage infrarouge A s'allume.
2 Réglez le commutateur NIGHTSHOT de
l'appareil sur ON.
3 Regardez l'image dans le viseur ou sur
l'écran LCD, et réglez la luminosité en
(using the IR light)
tournant la molette IR CONTROL.
Conseil
La distance entre la lampe infrarouge et le sujet
dans le noir devrait être comprise entre 3 m (9
pi.) et 20 m (65
3
/
pi.). Si le sujet est trop proche, la
or
5
lampe infrarouge ne pourra pas éclairer
BATT-
of the battery IR light while
complétement le sujet.
pushing the small green button.
La distance d'enregistrement variant en fonction
The IR indicator A lights up.
de l'environnement, n'oubliez pas de vérifier la
luminosité de l'image à l'étape 3 avant de
commencer l'enregistrement.
camera to ON.
Remarques sur la lampe IR
the LCD screen, and adjust the brightness
• L'image enregistrée avec la lampe IR est presque
by turning IR CONTROL.
monochrome.
• La lumière de la lampe IR est invisible parce
qu'elle est émise sous forme de rayons
infrarouges.
4
/
ft) to 20
La partie émettant la lumière devient rouge.
5
3
/
ft). When the subject is too close, IR light
5
Après utilisation
Réglez le commutateur POWER sur OFF.
Español
Deutsch
ADVERTENCIA
Vorsicht
Para evitar incendios o descargas eléctricas, no
Um Feuergefahr und die Gefahr eines elektrischen
exponga la unidad a la lluvia ni a la humedad.
Schlages zu vermeiden, darf das Gerät weder
Para evitar descargas eléctricas, no abra la unidad.
Regen noch Feuchtigkeit ausgesetzt werden.
En caso de avería, solicite los servicios de personal
Um einen elektrischen Schlag zu vermeiden, darf
cualificado.
das Gehäuse nicht geöffnet werden. Überlassen Sie
Wartungsarbeiten stets nur einem Fachmann.
Características
• La lámpara IR para batería solamente podrá
Besondere Merkmale
utilizarse con una videocámara/cámara digital
con función de videofilmación en la obscuridad.
• Die Batterie-Infrarotleuchte ist für Camcorder/
Utilizando la lámpara IR para batería, usted
digitale Standbildkameras mit NightShot-
podrá videofilmar motivos más distantes en la
Funktion bestimmt. Die Leuchte vergrößert den
operación de videofilmación en la obscuridad.
Bereich, in dem bei Dunkelheit aufgenommen
• Si su videocámara/cámara digital no está
werden kann.
provista de zapata para accesorios, podrá
• Wenn Ihr Camcorder/Ihre digitale
videofilmar con la lámpara IR para batería
Standbildkamera keinen Zubehörschuh besitzt,
utilizando el soporte para la zapata.
bringen Sie die Batterie-Infrarotleuchter auf der
Schuhhalterung an.
Precauciones
Zur besonderen Beachtung
• Evite colocar la lámpara IR para batería cerca de
combustibles o disolventes volátiles, como
alcohol o bencina.
• Legen Sie die Infrarotleuchte nicht in die Nähe
• No permita que dentro de la lámpara IR para
von leicht entflammbaren oder flüchtigen
batería entre ningún objeto sólido ni líquido.
Materialien wie Alkohol oder Benzin.
• No tome la cámara por la cabeza de la lámpara
• Achten Sie darauf, daß keine Flüssigkeit und
IR para batería.
kein Fremdkörper in die Infrarotleuchte gelang.
• Quite la lámpara IR para batería y el soporte de
• Fassen Sie beim Tragen der Kamera nicht an der
la zapata antes de colocar la cámara en una caja
de transporte.
Infrarotleuchte an.
• Evite colocar o guardar la lámpara IR para
• Nehmen Sie die Infrarotleuchte und die
batería en lugares
Schuhhalterung ab, bevor Sie den die Kamera in
– Extremadamente cálidos, como en un
die Tasche stecken.
automóvil estacionado al sol
• Halten Sie die Infrarotleuchte stets von folgenden
– Sometidos a la luz solar directa o a fuentes de
Plätzen fern:
alta temperatura, como un aparato de
– Plätze mit sehr hohen Temperaturen (wie sie
calefacción
beispielsweise auch in einem in der Sonne
– Sometido a vibraciones
geparkten Wagen auftreten können);
• Extraiga la batería después de haber
transportado la lámpara IR para batería.
– Plätze, die direktem Sonnenlicht oder anderen
Wärmequellen wie Heizungen usw. ausgesetzt
Después de la utilización
sind;
• Cerciórese de poner el interruptor POWER en
– Plätze, die Vibrationen ausgesetzt sind.
OFF.
• Nehmen Sie nach dem Betrieb und vor einem
• Después de haberse asegurado de que la
Transport den Akku heraus.
unidad está suficientemente fría como para
Nach dem Betrieb
manejarla, guárdela en la bolsa.
• Stellen Sie den POWER-Schalter auf OFF.
• Lassen Sie die Leuchte abkühlen, und stecken
Limpieza
Sie sie dann in die Schutztasche.
Limpie la lámpara IR para batería con un paño
suave y seco. Usted podrá eliminar las manchas
Zur Reinigung
difíciles con un paño ligeramente humedecido en
una solución de detergente suave, y después secar
Verwenden Sie ein weiches, trockenes Tuch.
la unidad con un paño suave.
Hartnäckige Verschmutzungen können mit einem
No utilice nunca disolventes fuertes, como diluidor
leicht mit milder Reinigungslösung angefeuchteten
de pintura ni bencina, ya que éstos podrían dañar
el acabado de la superficie.
Tuch entfernt werden. Wischen Sie die Leuchte
danach mit einem weichen Tuch trocken.
Starke Lösungsmittel wie Verdünner oder Benzin
Especificaciones
dürfen nicht verwendet werden, da sie das
Gehäuse angreifen.
Segmento de la lámpara IR
Alimentación
7,2 V CC
Technische Daten
Consumo máximo de energía 2 W
Tiempo de iluminación continua
Infrarotleuchte
Duración de iluminación
Stromversorgung
Tipo de batería
(min.)
(min.)
Max. Leistungsaufnahme
Durchgehende Leuchtdauer
NP-FM30
160
160
NP-FM50
320
320
NP-QM71
680
680
NP-QM91
1 080
1 080
(Minutos aproximados utilizando una batería
completamente cargada)
Duración de iluminación
Tipo de pila
(Ungefähre Angaben in Minuten für den Fall,
(min.)
(min.)
daß der Akku voll geladen ist.)
LR6 (tamaño AA)
60
60
(Minutos aproximados utilizando dos pilas
nuevas.)
Distancia de utilización recomendada
(Ungefähre Angaben in Minuten für den Fall,
Aprox. 3-20 m
daß zwei neue Trockenbatterien verwendet
Aprox. 46 × 102 × 43 mm
Dimensiones
werden.)
(an/al/prf)
× 1
3
/
pouces)
8
4
Masa
Aprox. 90 g
Empfohlener Abstand
Elementos incluidos Lámpara IR para batería (1)
Abmessungen
Soporte para la zapata (1)
Juego de documentación
Gewicht
impresa
Mitgeliefertes Zubehör Batterie-Infrarotleuchte (1)
El diseño y las especificaciones están sujetos a
cambio sin previo aviso.
Änderungen bei Design und technischen Daten
A Utilización con la
bleiben ohne vorherige Ankündigung vorbehalten.
batería
A Betrieb mit Akku
La batería es para colocarse detrás de la lámpara IR
para batería, y está indicada como BATT- .
Der Akku wird hinten an der Leuchte angebracht.
Beachten Sie die Markierung BATT- .
Para fijar la batería
Anbringen des Akkus
Fije una batería completamente cargada a la
lámpara IR para batería en el sentido de la
Schieben Sie den vollgeladenen Akku in
flecha.
Pfeilrichtung auf die Infrarotleuchte.
Para quitar la batería
Abnehmen des Akkus
Mientras deslice el mando BATT RELEASE de
Halten Sie BATT RELEASE-Taste an der
la lámpara IR para batería, deslice hacia
Infrarotleuchte gedrückt, und schieben Sie
afuera la batería en el sentido de la flecha.
den Akku in Pfeilrichtung.
B Utilización con pilas
B Betrieb mit
Las pilas son para instalarse en el interior de la
lámpara IR para batería, y se indican como BATT-
Die Trockenbatterien werden in die Infrarotleuchte
. (marcado en el centro del compartimiento de la
eingesetzt. Beachten Sie die Markierung BATT-
batería).
(in der Mitte des Batteriefachs).
1 Deslice la tapa en el sentido de la flecha
1 Schieben Sie den Deckel in Pfeilrichtung
1.
(au centre
2 Abra la tapa en el sentido de la flecha 2.
1.
2 Öffnen Sie den Deckel in Pfeilrichtung 2.
3 Inserte ambas pilas de tamaño LR6 (AA)
3 Legen Sie die beiden Mignonzellen (LR6,
con la polaridad correcta.
AA) mit richtiger Polarität ein.
4 Levante y cierre la tapa en el sentido de la
4 Schließen Sie den Deckel in Richtung von
flecha 3.
5 Deslice la tapa en el sentido de la flecha
Pfeil 3.
5 Schieben Sie den Deckel bis zum Klicken
4 hasta que chasquee.
in Richtung von Pfeil 4.
Nota sobre las pilas
Hinweis zu Trockenbatterien
Preste atención a las pilas cuando las instale.
Setzen Sie die Batterien mit richtiger Polarität ein.
C Fijación de la lámpara
C Anbringen und
IR para batería a la
cámara
Utilización del soporte para
zapata suministrado
Anbringen des Leuchte an der
(ilustración C-1 )
mitgelieferten Schuhhalterung
1 Inserte la lámpara IR para batería en la
zapata en el sentido de la flecha y
1 Schieben Sie die Infrarotleuchte in
deslícela hacia abajo hasta que llegue al
Pfeilrichtung ganz bis zum Ende auf dem
final.
Schuh.
2 Gire y apriete el mando de bloqueo para
2 Drehen Sie die Schraube in Pfeilrichtung
bloquear en el sentido de la flecha.
zu, um die Leuchte zu befestigen.
3 Alinee el tornillo de montaje a la cámara
3 Richten Sie die Schraube auf die
con el orificio en la base de la cámara, y
Gewindebohrung an der Unterseite des
apriete firmemente el tornillo.
der Kamera aus, und drehen Sie die
Schraube gut zu.
Utilización de la zapata para
accesorios de la cámara
Anbringen der Leuchte am
(ilustración C-2 )
Zubehörschuh der Kamera
1 Inserte la lámpara IR para bateria en la
zapata para accesorios de la cámara.
1 Schieben Sie die Leuchte auf den Schuh
2 Siga el mismo procedimiento que en el
der Kamera.
paso 2 anterior.
2 Führen Sie den obigen Vorgang ab Schritt
2 aus.
Para extraer la lámpara IR para
batería
Abnehmen der Infrarotleuchte
Gire y afloje el mando de bloqueo para
Lösen Sie die Befestigungsschraube, und
quitar la lámpara IR para batería en el
schieben Sie die Infrarotleuchte in
sentido opuesto al de la flecha.
entgegengesetzte Pfeilrichtung.
D Fotografiado en la
D Verwendung der
obscuridad
(utilizando la
lámpara IR)
La lámpara IR para vídeo podrá utilizarse en una
Die Infrarotleuchte ist für Kameras, die mit
cámara con función de fotografiado en la
NightShot-Funktion ausgestattet sind, bestimmt.
obscuridad (NightShot). Con respecto a los
Einzelheiten zur NightShot-Funktion entnehmen
detalles sobre la operación de fotografiado en la
Sie bitte der Anleitung des der Kamera.
obscuridad, consulte el manual de instrucciones
suministrado con la cámara.
1 Während Sie die kleine grüne Taste
gedrückt halten, stellen Sie den POWER-
1 Ponga el selector POWER de la lampara IR
Schalter an der Infrarotleuchte auf
en BATT-
o BATT-
de la lámpara IR
BATT-
para batería manteniendo presionado el
Die IR-Anzeige A leuchtet auf.
pequeño el botón verde.
2 Stellen Sie den NightShot-Schalter am
El indicador IR A se encenderá,
Kamera auf ON.
2 Deslice el interruptor NIGHTSHOT de la
3 Kontrollieren Sie das Bild im Sucher oder
cámara hasta ON.
auf dem LC-Display, und justieren Sie die
3 Observe la imagen en el visor o en la
Helligkeit mit IR CONTROL ein.
pantalla de cristal líquido, y ajuste el
brillo girando IR CONTROL.
Tip
Das Motiv sollte zwischen 3 m und 20 m von der
Sugerencia
Infrarotleuchte entfernt sein. Wenn das Motiv zu
4
/
5
La distancia entre la lámpara IR y el motivo en la
nahe ist, wird es von der Infrarotleuchte nicht
obscuridad deberá ser de unos 3 a 20 m. Cuando el
vollständig ausgeleuchtet.
motivo esté demasiado cerca, la lámpara IR no
Die Reichweite der Infrarotleuchte hängt von den
podrá iluminarlo completamente.
Umgebungsbedingungen ab. Stellen Sie Sie die
Como la distancia de fotografiado diferirá
Helligkeit ein (siehe Schritt 3), bevor Sie mit der
dependiendo del medio ambiente, cerciórese de
Aufnahme beginnen.
comprobar el brillo de la imagen en el paso 3 antes
de iniciar el fotografiado.
Hinweise zur Infrarotleuchte
Notas sobre la lámpara IR
• Beim Aufnehmen mit der Infrarotleuchte gehen
die Farben fast vollständig verloren.
•Las imágenes grabadas con la lámpara IR serán
• Infrarotlicht ist für das menschliche Auge nicht
prácticamente monocromas.
sichtbar.
• La luz IR es invisible porque es infrarroja.
Der Infrarotstrahler schimmert manchmal
La sección de emisión puede volverse roja.
rötlich.
Después de la utilización
Nach dem Betrieb
Ponga el selector POWER en OFF.
Stellen Sie den POWER-Schalter auf OFF.
Nederlands
WAARSCHUWING
Stel het apparaat niet bloot aan regen of vocht, om
gevaar voor brand of een elektrische schok te
voorkomen.
Open om dezelfde reden ook niet de behuizing.
Laat reparaties over aan hiertoe bevoegd
vakpersoneel.
Kenmerken
• De infrarode batterijlamp is speciaal geschikt
voor gebruik op een videocamera/recorder of
digitale fotocamera met NightShot
nachtopnamefunctie. Met deze infrarode
batterijlamp zult u in het donker verder
verwijderde onderwerpen kunnen opnemen.
• Als uw videocamera/recorder of digitale
fotocamera niet beschikt over een vaste
accessoireschoen, dan kunt u voor het opnemen
de infrarode batterijlamp op de accessoirebeugel
bevestigen.
Voorzorgsmaatregelen
• Plaats de infrarode batterijlamp niet te dicht in
de buurt van licht ontvlambare stoffen als
alcohol (spiritus) of benzine.
• Pas op dat er geen vloeistof of kleine voorwerpen
in de infrarode batterijlamp terechtkomen.
• Til nooit de camera op aan de kop van de
infrarode batterijlamp.
• Verwijder de infrarode batterijlamp en de
accessoirebeugel van de camera voor u deze in
een draagtas of koffer plaatst.
• Leg de infrarode batterijlamp niet op de
volgende plaatsen:
– In een in de zon geparkeerde auto, etc. waar het
apparaat erg heet kan worden.
– In direct zonlicht of dicht in de buurt van een
warmtebron zoals een verwarmingsradiator.
– Op plaatsen onderhevig aan trillingen.
• Verwijder het batterijpak na het gebruik en voor
het meenemen van de infrarode batterijlamp.
Na afloop van het gebruik
• Zorg dat u de POWER knop weer op "OFF"
zet.
• Wacht tot het apparaat voldoende is
afgekoeld en steek het dan in het
draaghoesje.
Reinigen
Gebruik voor het reinigen van de batterijlamp een
zacht, droog doekje. Hardnekkig vuil kunt u
verwijderen door een doekje licht te bevochtigen
met milde vloeibare zeep, maar droog daarna in
elk geval de batterijlamp na met een zacht, droog
doekje. Maak de batterijlamp niet te nat en gebruik
geen vluchtige stoffen als alcohol (spiritus) of
benzine, aangezien deze de afwerking kunnen
aantasten.
Technische gegevens
Infraroodlamp-functies
7,2 V Gleichspannung
Stroomvereiste
7,2 volt gelijkstroom
2 W
Maximaal stroomverbruik 2 watt
Continue belichtingsduur
Leuchtdauer
Belichtingsduur
Type batterijpak
Akkutyp
(min.)
(in minuten)
NP-FM30
160
NP-FM30
NP-FM50
320
NP-FM50
NP-QM71
NP-QM71
680
NP-QM91
1 080
NP-QM91
1 080
(Aantal minuten bij benadering, bij gebruik van
een volledig opgeladen batterijpak.)
Type
Belichtingsduur
Leuchtdauer in Minuten
Batterietyp
staafbatterijen
(in minuten)
(min.)
LR6 (AA-formaat)
LR6 (Größe AA)
60
batterijen
(Aantal minuten bij benadering, met twee
nieuwe staafbatterijen)
Aanbevolen afstand voor gebruik
ca. 3-20 m
Ca. 3-20 meter
ca. 46 × 102 × 43 mm
Ca. 46 × 102 × 43 mm
Afmetingen
(B/H/T)
(w/h/d)
ca. 90 g
Gewicht
Ca. 90 gram
Bijgeleverd toebehoren Infrarode batterijlamp (1)
Schuhhalterung (1)
Accessoirebeugel (1)
Anleitungen
Handleiding en
documentatie
Wijzigingen in ontwerp en technische gegevens
voorbehouden, zonder kennisgeving.
A Gebruik met het
oplaadbare
batterijpak
Het oplaadbare batterijpak kan achterop de
infrarode batterijlamp worden aangebracht; het is
aangeduid als BATT- .
Bevestigen van het batterijpak
Schuif het volledig opgeladen batterijpak in
de richting van de pijl op de infrarode
batterijlamp vast.
Losmaken van het batterijpak
Trockenbatterien
Schuif het BATT RELEASE knopje op de
infrarode batterijlamp opzij en schuif het
batterijpak in de richting van de pijl van de
batterijlamp af.
B Gebruik met gewone
staafbatterijen
De gewone staafbatterijen kunnen binnenin de
infrarode batterijlamp worden aangebracht; ze zijn
aangeduid als BATT- . (Zie de markering op het
midden van het batterijvak.)
1 Schuif het deksel van het batterijvak
omhoog in de richting van de pijl 1.
2 Klap het deksel open in de richting van de
pijl 2.
3 Plaats twee LR6 (AA-formaat) batterijen
Abnehmen der
met de juiste polariteit van plus en min in
het batterijvak.
Infrarotleuchte von der
4 Til het deksel op en sluit het in de richting
Kamera
van de pijl 3.
5 Schuif het deksel in de richting van de pijl
4 tot het dicht klikt.
(siehe Abb. C-1 )
Bij inleggen van de gewone
staafbatterijen
Let goed op de juiste polariteit van plus en min.
C Aanbrengen van de
infrarode
batterijlamp op de
camera
Bij gebruik van de bijgeleverde
accessoirebeugel
(siehe Abb. C-2 )
(zie afb. C-1 )
1 Schuif de infrarode batterijlamp in de
richting van de pijl zo ver mogelijk tussen
de gleuven van de accessoireschoen op de
beugel.
2 Draai de borgschroef vast in de richting
van de pijl.
3 Plaats de beugel zo onder de camera dat
de montageschroef precies in de
schroefopening van de camera komt en
draai de montageschroef stevig vast.
Infrarotleuchte zum
Bij gebruik van de
Aufnehmen bei
accessoireschoen van de
Dunkelheit
camera
(zie afb. C-2 )
1 Schuif de infrarode batterijlamp op de
accessoireschoen van de camera.
2 Volg de aanwijzingen in de bovenstaande
stap 2.
Losmaken van de infrarode
oder BATT- .
batterijlamp
Draai de borgschroef tegen de richting van
de pijl in los om de infrarode batterijlamp te
verwijderen.
D Opnemen in het donker
(met de infrarode lamp)
De infrarode videolamp is geschikt voor gebruik
op een camera met NightShot
nachtopnamefunctie. Zie voor nadere
bijzonderheden over de NightShot nachtopname
de gebruiksaanwijzing die bij uw camera is
geleverd.
1 Druk (op de infrarode batterijlamp) het
kleine groene knopje van de POWER
schakelaar in en zet de schakelaar in de
"BATT- " voor een batterijpak of de
"BATT- " stand voor staafbatterijen.
Het infrarood-indicatorlampje A gaat branden.
2 Schuif de NIGHTSHOT schakelaar van de
camera in de "ON" stand.
3 Bekijk het beeld in de zoeker of op het
LCD scherm en stel de helderheid naar
wens in met de IR CONTROL regelaar.
Tip
De juiste afstand van de infrarode videolamp tot
een onderwerp in het donker loopt van ongeveer 3
meter tot ongeveer 20 meter. Als het onderwerp te
dichtbij is, kan het infraroodlicht het onderwerp
niet volledig verlichten.
De optimale afstand verschilt afhankelijk van de
opname-omstandigheden, dus controleert u vooral
eerst de helderheid van het beeld zoals in stap 3
hierboven, voor u gaat opnemen.
Opmerkingen betreffende de
infrarode lamp
• Het beeld opgenomen met behulp van de
infrarode lamp is praktisch zwartwit.
• Het licht van de infrarode lamp is niet zichtbaar.
De infraroodstraler kan roodgekleurd zijn.
Na afloop van het gebruik
Zet de POWER knop terug op "OFF".
160
320
680
60

Verwandte Anleitungen für Sony HVL-IRM


Inhaltszusammenfassung für Sony HVL-IRM
- Seite 1 Precauciones bevestigen. Sony Corporation © 2002 Printed in Japan instructions, may cause harmful interference to 取り付けるとき radio communications. However, these is no Zur besonderen Beachtung • Evite colocar la lámpara IR para batería cerca de guarantee that interference will not occur in a Précautions...
- Seite 2 Непрерывное время освещения 照明距離 約3∼20 m 使用之后 約46 × 102 × 43 mm(寬 高 Pulizia Especificações 尺寸 将 POWER 开关设置到 OFF 位置。 Тип батерейного Продолжительность 縱深) Pulire la lampada IR a batteria con un panno блока освещения (мин.) 質量 約 90 g Segmento da luz infravermelha 索尼公司...