VEVOR LTCZ-B Bedienungsanleitung
Inhaltsverzeichnis
Verfügbare Sprachen
Verfügbare Sprachen
Quicklinks
Technical Support and E-Warranty Certificate www.vevor.com/support
TIRE CHANGER
MODEL: LTCZ-B
We continue to be committed to provide you tools with competitive price.
"Save Half", "Half Price" or any other similar expressions used by us only represents an
estimate of savings you might benefit from buying certain tools with us compared to the major
top brands and does not necessarily mean to cover all categories of tools offered by us. You
are kindly reminded to verify carefully when you are placing an order with us if you are
actually saving half in comparison with the top major brands.
Inhaltsverzeichnis

Verwandte Anleitungen für VEVOR LTCZ-B


Inhaltszusammenfassung für VEVOR LTCZ-B
- Seite 1 Technical Support and E-Warranty Certificate www.vevor.com/support TIRE CHANGER MODEL: LTCZ-B We continue to be committed to provide you tools with competitive price. "Save Half", "Half Price" or any other similar expressions used by us only represents an estimate of savings you might benefit from buying certain tools with us compared to the major top brands and does not necessarily mean to cover all categories of tools offered by us.
- Seite 2 This is the original instruction, please read all manual instructions carefully before operating. VEVOR reserves a clear interpretation of our user manual. The appearance of the product shall be subject to the product you received. Please forgive us that we won't inform you again if...
-
Seite 3: Safety & Warning
Net Weight Package Size Model Diameter Weight (kg) (mm) (inch) (kg) LTCZ-B 8-16 14.5 15.5 940×230×230 Safety & Warning Read and understand this entire manual before assembling, installing, operating, or servicing this product.Failure to follow these warnings and instructions can cause death, personal injury or damage to valuable property. -
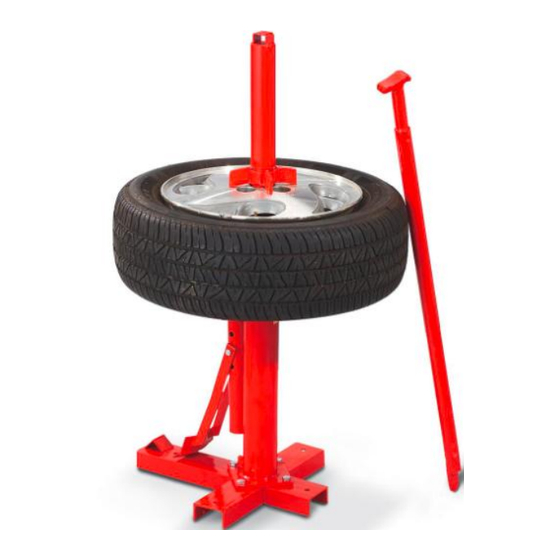
Seite 4: Package Contents
PACKAGE CONTENTS... - Seite 5 Description Description Item No. Item No. Qty. Qty. Platen Long Leg Threaded Rod Short Leg Crowbar Support Rod Casina Pipe Bolt M10×25 Lock PIN Nut M10 R Pin Spring Washer Plate Washer Arc Shovel INSTALLATION GUIDE: A. Place the short leg(2) on either side of the long leg(1) and align it vertically.Attach support rod (3) to short leg(2) and long leg (1)with bolts (11) ,nuts (12),spring washer(13)and plate washer (14) .
- Seite 6 OPERATION. A. Remove the tire 1.Insert the crowbar(10) to the casina pipe(4).Place the arc shovel between the hub and the tire.Press hard on the crowbar(10) to free the tire from the hub.
- Seite 7 2.Place the whole wheel on the and place the hole tire changer of the wheel in line with the dowel pin. 3.Insert the platen(8) and threaded rod (9), rotate the threaded rod so that the platen compacts the hub.
- Seite 8 4.Use the crowbar(10) to pry one side of the tire from the hub, and rotate against the threaded rod (9) to peel the tire from the hub. 5.Repeat step 4 to remove the other side of tire from the hub.
- Seite 9 B、Tire assembly 1.Attach the hub to the tire changer crowbar(10) 2.Insert one side of the tire and rotate with the against threaded rod (9) to load one side of the tire into the hub.
- Seite 10 3.Repeat step 2 to load the other side of tire into the hub.
- Seite 11 Address:Baoshanqu Shuangchenglu 803long 11hao 1602A-1609shi Shanghai Imported to AUS: SIHAO PTY LTD, 1 ROKEVA STREETEASTWOOD NSW 2122 Australia Imported to USA: Sanven Technology Ltd., Suite 250, 9166 Anaheim Place, Rancho Cucamonga, CA 91730 Pooledas Group Ltd Unit 5 Albert Edward House, The Pavilions Preston, United Kingdom SHUNSHUN GmbH Römeräcker 9 Z2021, 76351...
- Seite 12 Technical Support and E-Warranty Certificate www.vevor.com/support Made In China...
- Seite 13 Machine Translated by Google Assistance t echnique e t c ertificat d e g arantie é lectronique w ww.vevor.com/support DÉMONTEPNEU MODÈLE : L TCZB Nous c ontinuons à n ous e ngager à v ous f ournir d es o utils à d es p rix c ompétitifs.
- Seite 14 à n ous c ontacter : A ssistance t echnique e t c ertificat d e g arantie électronique w ww.vevor.com/support Il s 'agit d e l a n otice d 'utilisation d 'origine. V euillez l ire a ttentivement t outes l es ...
- Seite 15 Machine Translated by Google CARACTÉRISTIQUES Brut Pneu a dapté Poids n et Taille d u p aquet Modèle Diamètre Poids (kg) (pouce) (kg) LTCZB 816 14.5 15,5 940×230×230 Sécurité e t a vertissement L isez e t c omprenez l 'intégralité d e c e m anuel a vant d 'assembler, d 'installer, d 'utiliser o u d 'entretenir ce ...
-
Seite 16: Contenu D U C Olis
Machine Translated by Google CONTENU D U C OLIS... - Seite 17 Machine Translated by Google Qté. Qté. N ° d 'article Description Description Numéro d 'article Platine Jambe l ongue Tige f iletée Jambe c ourte Pied d e b iche Tige d e s upport Boulon M 10×25 Pipe C asina Écrou ...
- Seite 18 Machine Translated by Google OPÉRATION. A. R etirez l e p neu 1. I nsérez l e p ieddebiche ( 10) d ans l e t uyau d e l a c asina ( 4). P lacez l a pelle à a rc e ntre l e m oyeu e t l e p neu. A ppuyez f ort s ur l e p ieddebiche ( 10) p our libérer ...
- Seite 19 Machine Translated by Google 2. P lacez l a r oue e ntière s ur l e d émontepneus e t p lacez l e t rou d e l a roue e n l igne a vec l a g oupille. 3. ...
- Seite 20 Machine Translated by Google 4. U tilisez l e p ieddebiche ( 10) p our r etirer u n c ôté d u p neu d u m oyeu et f aitesle t ourner c ontre l a t ige f iletée ( 9) p our r etirer l e p neu d u m oyeu. 5. ...
- Seite 21 Machine Translated by Google BAssemblage d e p neus 1. F ixez l e m oyeu a u d émontepneu. 2. I nsérez u n c ôté d u p neu e t f aitesle t ourner a vec l e p ieddebiche ( 10) c ontre la ...
- Seite 22 Machine Translated by Google 3. R épétez l ’étape 2 p our c harger l ’autre c ôté d u p neu d ans l e m oyeu.
- Seite 23 Machine Translated by Google Adresse : B aoshanqu S huangchenglu 8 03long 1 1hao 1 602A1609shi Shanghai Importé e n A ustralie : S IHAO P TY L TD, 1 R OKEVA S TREET, A STWOOD NSW 2 122 A ustralie Importé ...
- Seite 24 Machine Translated by Google Assistance t echnique e t c ertificat d e g arantie électronique w ww.vevor.com/ support F abriqué e n C hine...
- Seite 25 Machine Translated by Google Technischer Support und E-Garantie-Zertifikat www.vevor.com/support REIFENWECHSLER MODELL: LTCZ-B Wir sind weiterhin bestrebt, Ihnen Werkzeuge zu wettbewerbsfähigen Preisen anzubieten. „Sparen Sie die Hälfte“, „Halber Preis“ oder andere ähnliche Ausdrücke, die wir verwenden, stellen nur eine Schätzung der Ersparnis dar, die Sie beim Kauf bestimmter Werkzeuge bei uns im Vergleich zu den großen Topmarken erzielen können, und decken nicht unbedingt alle von uns angebotenen Werkzeugkategorien ab.
- Seite 26 Dies ist die Originalanleitung. Bitte lesen Sie alle Anweisungen sorgfältig durch, bevor Sie das Gerät in Betrieb nehmen. VEVOR behält sich eine klare Auslegung unserer Bedienungsanleitung vor. Das Erscheinungsbild des Produkts richtet sich nach dem Produkt, das Sie erhalten haben. Bitte verzeihen Sie uns, dass wir Sie nicht erneut informieren,...
-
Seite 27: Spezifikationen
Paketgröße Modell Durchmesser Gewicht ÿmmÿ (kg) (Zoll) (kg) LTCZ-B 8-16 14.5 15.5 940×230×230 Sicherheit und Warnung ÿ Lesen Sie das gesamte Handbuch sorgfältig durch, bevor Sie mit der Montage, Installation, Bedienung oder Wartung dieses Produkts beginnen. Bei Nichtbeachtung dieser Warnungen und Anweisungen können zu Tod, Verletzungen oder Schäden am... -
Seite 28: Packungsinhalt
Machine Translated by Google PACKUNGSINHALT... - Seite 29 Machine Translated by Google Artikelnr. Stk. Beschreibung Menge Artikelnr . Beschreibung Walze Langes Bein Gewindestange Kurzes Bein Brecheisen Stützstange Schraube M10×25 Casina-Pfeife PIN sperren Mutter M10 R-Pin Federscheibe Bogenschaufel Plattenwaschmaschine INSTALLATIONSANLEITUNG: A. Platzieren Sie das kurze Bein (2) auf beiden Seiten des langen Beins (1) und richten Sie es aus vertikal.
-
Seite 30: Den Reifen Abnehmen
Machine Translated by Google BETRIEB. A. Den Reifen abnehmen 1. Führen Sie das Brecheisen (10) in das Casina-Rohr (4) ein. Platzieren Sie die Bogenschaufel zwischen Nabe und Reifen. Drücken Sie fest auf das Brecheisen (10), um den Reifen von der Nabe zu lösen. - Seite 31 Machine Translated by Google 2. Setzen Sie das ganze Rad auf den Reifenwechsler und richten Sie das Loch im Rad auf eine Linie mit dem Passstift aus. 3. Setzen Sie die Platte (8) und die Gewindestange (9) ein und drehen Sie die Gewindestange, sodass die Platte die Nabe verdichtet.
- Seite 32 Machine Translated by Google 4. Hebeln Sie mit dem Brecheisen (10) eine Seite des Reifens von der Nabe und drehen Sie gegen die Gewindestange (9), um den Reifen von der Nabe zu lösen. 5. Wiederholen Sie Schritt 4, um die andere Seite des Reifens von der Nabe zu entfernen.
- Seite 33 Machine Translated by Google B. Reifenmontage 1. Befestigen Sie die Nabe am Reifenwechsler. 2. Führen Sie eine Seite des Reifens ein und drehen Sie ihn mit dem Brecheisen (10) gegen Die Gewindestange (9) dient zum Belasten einer Seite des Reifens in die Nabe.
- Seite 34 Machine Translated by Google 3. Wiederholen Sie Schritt 2, um die andere Seite des Reifens in die Nabe zu laden.
- Seite 35 Machine Translated by Google Adresse: Baoshanqu Shuangchenglu 803long 11hao 1602A-1609shi Schanghai Nach AUS importiert: SIHAO PTY LTD, 1 ROKEVA STREETEASTWOOD NSW 2122 Australien Importiert in die USA: Sanven Technology Ltd., Suite 250, 9166 Anaheim Place, Rancho Cucamonga, CA 91730 Pooledas Group Ltd UK REP Einheit 5 Albert Edward House, Die Pavillons Preston, Vereinigtes Königreich...
- Seite 36 Machine Translated by Google Technischer Support und E-Garantie-Zertifikat www.vevor.com/support In China hergestellt...
- Seite 37 Machine Translated by Google Supporto tecnico e certificato di garanzia elettronica www.vevor.com/support CAMBIO GOMME MODELLO: LTCZ-B Continuiamo a impegnarci per fornirvi strumenti a prezzi competitivi. "Risparmia la metà", "Metà prezzo" o qualsiasi altra espressione simile da noi utilizzata rappresenta solo una stima del risparmio che potresti ottenere acquistando determinati utensili con noi rispetto ai principali marchi principali e non significa necessariamente coprire tutte le categorie di utensili da noi offerti.
- Seite 38 Questa è l'istruzione originale, si prega di leggere attentamente tutte le istruzioni del manuale prima di utilizzare. VEVOR si riserva una chiara interpretazione del nostro manuale utente. L'aspetto del prodotto sarà soggetto al prodotto ricevuto. Vi preghiamo di perdonarci se non vi informeremo di nuovo se ci sono aggiornamenti tecnologici o software sul...
- Seite 39 Dimensioni del pacco Modello Diametro Peso (mm) (kg) (pollice) (kg) LTCZ-B 8-16 14.5 15.5 Dimensioni: 940×230×230 Sicurezza e avvertenza ÿ Leggere e comprendere l'intero manuale prima di montare, installare, utilizzare o effettuare la manutenzione di questo prodotto. La mancata osservanza di queste avvertenze e le istruzioni possono causare morte, lesioni personali o danni a proprietà...
- Seite 40 Machine Translated by Google CONTENUTO DELLA CONFEZIONE...
-
Seite 41: Guida All'installazione
Machine Translated by Google Articolo n. Quantità Articolo n . Descrizione Descrizione Quantità Platina Gamba lunga Barra filettata Gamba corta Piede di porco Asta di supporto Bullone M10×25 Tubo Casina Dado M10 PIN di blocco Perno R Rondella elastica Pala ad arco Rondella per piastre GUIDA ALL'INSTALLAZIONE: A. - Seite 42 Machine Translated by Google OPERAZIONE. A. Rimuovere il pneumatico 1. Inserire il piede di porco (10) nel tubo della casina (4). Posizionare la pala ad arco tra il mozzo e il pneumatico. Premere con forza sul piede di porco (10) per liberare il pneumatico dal mozzo.
- Seite 43 Machine Translated by Google 2. Posizionare l'intera ruota sullo smontagomme e allineare il foro della ruota con il perno di centraggio. 3. Inserire la piastra (8) e la barra filettata (9), ruotare la barra filettata in modo che la piastra compatti il mozzo.
- Seite 44 Machine Translated by Google 4. Utilizzare il piede di porco (10) per staccare un lato del pneumatico dal mozzo e ruotare contro la barra filettata (9) per staccare il pneumatico dal mozzo. 5. Ripetere il passaggio 4 per rimuovere l'altro lato del pneumatico dal mozzo.
- Seite 45 Machine Translated by Google BÿMontaggio pneumatici 1. Fissare il mozzo allo smontagomme. 2. Inserire un lato del pneumatico e ruotare con il piede di porco (10) contro la barra filettata (9) per caricare un lato del pneumatico nel mozzo.
- Seite 46 Machine Translated by Google 3. Ripetere il passaggio 2 per caricare l'altro lato del pneumatico nel mozzo.
-
Seite 47: Importato In Aus: Sihao Pty Ltd, 1 Rokeva Streeteastwood
Machine Translated by Google Indirizzo: Baoshanqu Shuangchenglu 803long 11hao 1602A-1609shi Sciangai Importato in AUS: SIHAO PTY LTD, 1 ROKEVA STREETEASTWOOD Nuovo Galles del Sud 2122 Australia Importato negli USA: Sanven Technology Ltd., Suite 250, 9166 Anaheim Place, Rancho Cucamonga, CA 91730 Gruppo Pooledas Ltd Unità... - Seite 48 Machine Translated by Google Supporto tecnico e certificato di garanzia elettronica www.vevor.com/support Made in China...
- Seite 49 Machine Translated by Google Soporte t écnico y c ertificado d e g arantía e lectrónica w ww.vevor.com/support CAMBIADOR D E N EUMÁTICOS MODELO: L TCZB Seguimos c omprometidos a b rindarle h erramientas a p recios c ompetitivos.
- Seite 50 A sistencia t écnica y c ertificado d e g arantía electrónica w ww.vevor.com/support Estas s on l as i nstrucciones o riginales, l ea a tentamente t odas l as i nstrucciones d el manual a ntes d e u tilizar e l p roducto. V EVOR s e r eserva u na i nterpretación c lara d e n uestro ...
- Seite 51 Machine Translated by Google PRESUPUESTO Bruto Ajuste d e n eumáticos Peso n eto Tamaño d el p aquete Modelo Diámetro Peso (mm) (kilogramo) (pulgada) (kilogramo) ZLCB 816 14.5 15.5 940×230×230 Seguridad y a dvertencias L ea y c omprenda t odo e ste m anual a ntes d e e nsamblar, i nstalar, o perar o r ealizar m antenimiento a ...
- Seite 52 Machine Translated by Google CONTENIDO D EL P AQUETE...
- Seite 53 Machine Translated by Google Artículo N ro. Descripción Cant. N .º d e a rtículo Descripción Cantidad. Platina Pierna l arga Varilla r oscada Pierna c orta Palanca Varilla d e s oporte Perno M 10×25 Tubo C asina Tuerca M 10 PIN ...
- Seite 54 Machine Translated by Google OPERACIÓN. A. R etire e l n eumático 1. I nserte l a p alanca ( 10) e n e l t ubo d e l a c asina ( 4). C oloque l a p ala d e arco ...
- Seite 55 Machine Translated by Google 2. C oloque t oda l a r ueda e n e l c ambiador d e n eumáticos y c oloque e l orificio d e l a r ueda e n l ínea c on e l p asador. 3. ...
- Seite 56 Machine Translated by Google 4. U tilice l a p alanca ( 10) p ara h acer p alanca e n u n l ado d el n eumático desde e l c ubo y g ire c ontra l a v arilla r oscada ( 9) p ara d espegar e l n eumático d el c ubo. 5. ...
- Seite 57 Machine Translated by Google BConjunto d e n eumáticos 1. C onecte e l c ubo a l c ambiador d e n eumáticos. 2. I nserte u n l ado d el n eumático y g írelo c on l a p alanca ( 10) c ontra la ...
- Seite 58 Machine Translated by Google 3. R epita e l p aso 2 p ara c argar e l o tro l ado d el n eumático e n e l c ubo.
- Seite 59 Machine Translated by Google Dirección: B aoshanqu S huangchenglu 8 03long 1 1hao 1 602A1609shi Llevar a l a f uerza Importado a A ustralia: S IHAO P TY L TD, 1 R OKEVA S TREETEASTWOOD Nueva G ales d el S ur 2 122 A ustralia Importado ...
- Seite 60 Machine Translated by Google Soporte t écnico y c ertificado d e g arantía e lectrónica www.vevor.com/support Hecho e n c hina...
- Seite 61 Machine Translated by Google Wsparcie techniczne i certyfikat gwarancji elektronicznej www.vevor.com/support MONTAŻOWNICA OPON MODEL: LTCZ-B Nadal staramy się oferować Państwu narzędzia w konkurencyjnych cenach. „Oszczędź połowę”, „Połowa ceny” lub inne podobne wyrażenia używane przez nas stanowią jedynie szacunkowe oszczędności, jakie możesz uzyskać, kupując u nas określone narzędzia w porównaniu z głównymi markami i niekoniecznie oznaczają...
- Seite 62 E-Gwarancji www.vevor.com/support To jest oryginalna instrukcja, przed użyciem należy uważnie przeczytać wszystkie instrukcje. VEVOR zastrzega sobie jasną interpretację naszej instrukcji obsługi. Wygląd produktu będzie zależał od produktu, który otrzymałeś. Prosimy o wybaczenie, że nie poinformujemy Cię ponownie, jeśli w naszym produkcie pojawią się jakiekolwiek aktualizacje technologiczne lub...
- Seite 63 Rozmiar opakowania Model Średnica Waga (mm) (kg) (cal) (kg) LTCZ-B 8-16 14.5 15,5 940×230×230 Bezpieczeństwo i ostrzeżenia Przed montażem, instalacją, obsługą lub serwisowaniem tego produktu należy przeczytać i zrozumieć całą instrukcję. Nieprzestrzeganie tych ostrzeżeń i instrukcje mogą spowodować śmierć, obrażenia ciała lub uszkodzenie cennego mienia.
-
Seite 64: Zawartość Opakowania
Machine Translated by Google ZAWARTOŚĆ OPAKOWANIA... -
Seite 65: Instrukcja Instalacji
Machine Translated by Google Pozycja nr. Opis Ilość. Nr pozycji . Opis Ilość. Długa noga Płyta dociskowa Pręt gwintowany Krótka noga Łom Pręt podporowy Śruba M10×25 Rura kasyna Zablokuj PIN Nakrętka M10 Pin R Podkładka sprężysta Myjka talerzowa Łopata łukowa INSTRUKCJA INSTALACJI: A. - Seite 66 Machine Translated by Google DZIAŁANIE. A. Zdejmij oponę 1. Włóż łom (10) do rury obudowy (4). Umieść łopatę łukową między piastą a oponą. Mocno naciśnij łom (10), aby uwolnić oponę z piasty.
- Seite 67 Machine Translated by Google 2. Umieść całe koło na montażownicy i ustaw otwór koła w jednej linii z kołkiem ustalającym. 3. Włóż płytę (8) i pręt gwintowany (9), obróć pręt gwintowany tak, aby płyta zacisnęła piastę.
- Seite 68 Machine Translated by Google 4. Za pomocą łomu (10) podważ jedną stronę opony od piasty i obracaj ją w kierunku przeciwnym do pręta gwintowanego (9), aby zdjąć oponę z piasty. 5. Powtórz krok 4, aby zdjąć drugą stronę opony z piasty.
- Seite 69 Machine Translated by Google B, Montaż opon 1. Przymocuj piastę do montażownicy. 2. Włóż jedną stronę opony i obróć ją łomem ( 10) pręt gwintowany (9) w celu obciążenia jednej strony opony do piasty.
- Seite 70 Machine Translated by Google 3. Powtórz krok 2, aby umieścić drugą stronę opony w piaście.
- Seite 71 Machine Translated by Google Adres: Baoshanqu Shuangchenglu 803long 11hao 1602A-1609shi Szanghaj Importowane do AUS: SIHAO PTY LTD, 1 ROKEVA STREETEASTWOOD NSW 2122 Australia Importowane do USA: Sanven Technology Ltd., Suite 250, 9166 Anaheim Place, Rancho Cucamonga, CA 91730 Grupa Pooledas Ltd. Jednostka 5 Dom Alberta Edwarda, Pawilony REP WIELKIEJ BRYTANII Preston, Wielka Brytania...
- Seite 72 Machine Translated by Google Wsparcie techniczne i certyfikat gwarancji elektronicznej www.vevor.com/support Wyprodukowano w Chinach...
- Seite 73 Machine Translated by Google Technische ondersteuning en e-garantiecertificaat www.vevor.com/support BANDENWISSELAAR MODEL: LTCZ-B Wij streven er voortdurend naar om u gereedschappen tegen concurrerende prijzen te leveren. "Save Half", "Half Price" of andere soortgelijke uitdrukkingen die wij gebruiken, geven alleen een schatting van de besparingen die u kunt behalen door bepaalde gereedschappen bij ons te kopen in vergelijking met de grote topmerken en betekent niet noodzakelijkerwijs dat alle categorieën gereedschappen die wij aanbieden, worden gedekt.
- Seite 74 Dit is de originele instructie, lees alle handleidingen zorgvuldig door voordat u het product gebruikt. VEVOR behoudt zich een duidelijke interpretatie van onze gebruikershandleiding voor. Het uiterlijk van het product is afhankelijk van het product dat u hebt ontvangen.
-
Seite 75: Specificaties
Netto gewicht Pakketgrootte Model Diameter Gewicht (mm) (kg) (duim) (kg) LTCZ-B 8-16 14.5 15.5 940×230×230 Veiligheid en waarschuwing ÿ Lees en begrijp deze hele handleiding voordat u dit product monteert, installeert, bedient of onderhoudt. Als u deze waarschuwingen niet opvolgt, en instructies kunnen de dood, persoonlijk letsel of schade aan uw kind veroorzaken. -
Seite 76: Inhoud Van Het Pakket
Machine Translated by Google INHOUD VAN HET PAKKET... - Seite 77 Machine Translated by Google Artikelnr. Beschrijving Aantal Artikelnr . Beschrijving Aantal Platen Lange Been Draadstang Korte Been Koevoet Steunstang Bout M10×25 Casina-pijp Moer M10 Vergrendelingspincode R-pin Veerring Plaatwasser Boog schop INSTALLATIEGIDS: A. Plaats het korte been (2) aan weerszijden van het lange been (1) en lijn het uit verticaal.
- Seite 78 Machine Translated by Google WERKING. A. Verwijder de band 1. Steek de koevoet (10) in de buis van de cabine (4). Plaats de boogschep tussen de naaf en de band. Druk hard op de koevoet (10) om de band los te maken van de naaf.
- Seite 79 Machine Translated by Google 2. Plaats het hele wiel op de bandenwisselaar en plaats het gat in het wiel op één lijn met de paspen. 3. Plaats de plaat (8) en de draadstang (9), draai de draadstang zodat de plaat de naaf samendrukt.
- Seite 80 Machine Translated by Google 4. Gebruik de koevoet (10) om één kant van de band van de naaf los te wrikken en draai tegen de draadstang (9) om de band van de naaf te pellen. 5. Herhaal stap 4 om de andere kant van de band van de naaf te verwijderen.
- Seite 81 Machine Translated by Google BÿBandenmontage 1. Bevestig de naaf aan de bandenwisselaar. 2. Plaats één kant van de band en draai met de koevoet (10) tegen de zijkant . de draadstang (9) om één zijde van de band in de naaf te laden.
- Seite 82 Machine Translated by Google 3. Herhaal stap 2 om de andere kant van de band in de naaf te laden.
- Seite 83 Machine Translated by Google Adres: Baoshanqu Shuangchenglu 803long 11hao 1602A-1609shi Sjanghai Geïmporteerd naar AUS: SIHAO PTY LTD, 1 ROKEVA STREETEASTWOOD NSW 2122 Australië Geïmporteerd naar de VS: Sanven Technology Ltd., Suite 250, 9166 Anaheim Place, Rancho Cucamonga, CA 91730 Pooledas Groep Ltd VK REP Unit 5 Albert Edward House, De Paviljoens Preston, Verenigd Koninkrijk...
- Seite 84 Machine Translated by Google Technische ondersteuning en e-garantiecertificaat www.vevor.com/support Gemaakt in China...
- Seite 85 Machine Translated by Google Teknisk support och e-garanticertifikat www.vevor.com/support DÄCKVÄXARE MODELL: LTCZ-B Vi fortsätter att vara engagerade i att ge dig verktyg till konkurrenskraftiga priser. "Spara hälften", "halva priset" eller andra liknande uttryck som används av oss representerar bara en uppskattning av besparingar du kan dra nytta av att köpa vissa verktyg hos oss jämfört med de stora toppmärkena och betyder inte nödvändigtvis att täcka alla kategorier av verktyg som erbjuds...
- Seite 86 Detta är den ursprungliga instruktionen, läs alla instruktioner noggrant innan du använder den. VEVOR reserverar sig för en tydlig tolkning av vår användarmanual. Utseendet på produkten är beroende av den produkt du fått. Ursäkta oss att vi inte kommer att...
-
Seite 87: Specifikationer
Nettovikt Paketstorlek Modell Diameter Vikt ÿmmÿ (kg) (tum) (kg) LTCZ-B 8-16 14.5 15.5 940×230×230 Säkerhet och varning ÿ Läs och förstå hela denna manual innan du monterar, installerar, använder eller servar denna produkt. Underlåtenhet att följa dessa varningar och instruktioner kan orsaka dödsfall, personskada eller skada på... -
Seite 88: Förpackningens Innehåll
Machine Translated by Google FÖRPACKNINGENS INNEHÅLL... -
Seite 89: Installationsguide
Machine Translated by Google Art.nr. Beskrivning Antal. Art.nr. Beskrivning Antal. Platen Långt ben Gängad Stång Kort ben Kofot Stödstång Bult M10×25 Casina Pipe Lås PIN-kod Mutter M10 R Pin Fjäderbricka Plattbricka Bågskyffel INSTALLATIONSGUIDE: A. Placera det korta benet (2) på vardera sidan av det långa benet (1) och rikta in det vertikalt. - Seite 90 Machine Translated by Google DRIFT. A. Ta bort däcket 1ÿSätt in kofoten (10) i casinaröret (4). Placera bågspaden mellan navet och däcket. Tryck hårt på kofoten (10) för att frigöra däcket från navet.
- Seite 91 Machine Translated by Google 2. Placera hela hjulet på däckväxlaren och placera hjulets hål i linje med stiftet. 3ÿSätt in plattan (8) och den gängade stången (9), rotera den gängade stången så att plattan komprimerar navet.
- Seite 92 Machine Translated by Google 4ÿAnvänd kofoten (10) för att bända en sida av däcket från navet och rotera mot den gängade stången (9) för att dra bort däcket från navet. 5. Upprepa steg 4 för att ta bort den andra sidan av däcket från navet.
- Seite 93 Machine Translated by Google B, Däckmontering 1. Fäst navet på däckväxlaren. 2ÿSätt i ena sidan av däcket och rotera med kofoten (10) mot den gängade stången (9) för att ladda en sida av däcket i navet.
- Seite 94 Machine Translated by Google 3ÿ Upprepa steg 2 för att ladda den andra sidan av däcket i navet.
- Seite 95 Machine Translated by Google Adress: Baoshanqu Shuangchenglu 803long 11hao 1602A-1609shi Shanghai Importerad till AUS: SIHAO PTY LTD, 1 ROKEVA STREETEASTWOOD NSW 2122 Australien Importerad till USA: Sanven Technology Ltd., Suite 250, 9166 Anaheim Place, Rancho Cucamonga, CA 91730 Pooledas Group Ltd UK REP Enhet 5 Albert Edward House, The Pavilions Preston, Storbritannien...
- Seite 96 Machine Translated by Google Teknisk support och e-garanticertifikat www.vevor.com/support Tillverkad i Kina...