
Verwandte Anleitungen für HANSGROHE PHARO ML 29610 Serie


Inhaltszusammenfassung für HANSGROHE PHARO ML 29610 Serie
- Seite 1 Pharo Module ® Dampf-Duschmodul Pharo Dampf- Duschmodul ML/Steam 29610XXX ® Pharo Dampf- Duschmodul DeLuxe 29611XXX ® Montageanleitung Installation Instructions Istruzioni di montaggio...
-
Seite 2: Inhaltsverzeichnis
INHALTSVERZEICHNIS CONTENTS INDICE Masse Dimensions Ingombri Bestandteile Components Componenti Serviceteile DG 3 kW Spare parts DG 3 kw Parti di ricambio DG 3 kW Serviceteile DG 4,5 kW Spare parts DG 4,5 kw Parti di ricambio DG 4,5 kw Technische Daten DG 3 kw Technical Data DG 3 kw Dati tecnici DG 3 kw Technische Daten DG 4,5 kw... -
Seite 3: Masse
MASSE DIMENSIONS INGOMBRI 29610xxx ML/Steam 29611xxx Deluxe... -
Seite 4: Bestandteile
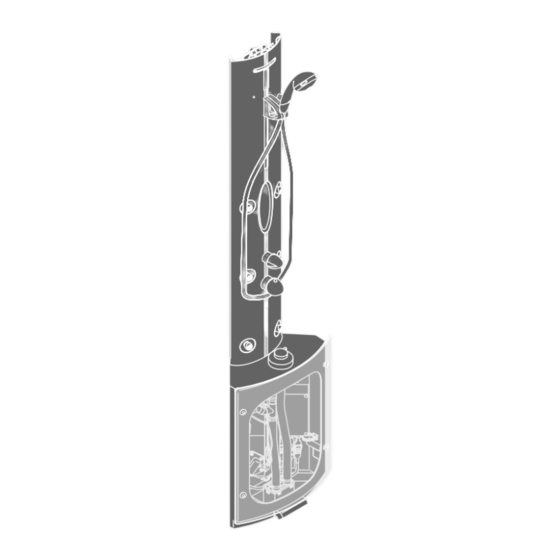
BESTANDTEILE COMPONENTS COMPONENTI Karton 1 Carton 1 Imballo 1 A Eckpaneel A Corner panel A pannello angolare B Eckschrank mit Dampftechnik inklu- B Corner cabinet with steam system B armadietto angolare con tecnologia sive Aromadispenser oder automa- including aroma dispenser or auto- del vapore incluso Aromadispenser tischer Duftstoffdosierung (Option) matically aroma metering (option) -
Seite 6: Serviceteile Dg 3 Kw
SERVICETEILE SPARE PARTS PARTI DI RICAMBIO Pos. Bezeichnung Description Descrizione Nr./Nr./No. Trafo transformer trasformatore 97068000 Schieber kpl. support, assy cursore completa 97024xxx Eckpaneel kpl. corner panel cpl. pannello angolare completo 97071980 Eckpaneel kpl. corner panel cpl. pannello angolare completo 97071980 Duftbefülleinheit kpl. - Seite 7 29611xxx 29610xxx...
-
Seite 8: Serviceteile Dg 4,5 Kw
PARTI DI RICAMBIO DG 4,5 KW SERVICETEILE DG 4,5 KW SPARE PARTS DG 4,5 KW Pos. Descrizione Nr./Nr./No. Bezeichnung Description trasformatore 97068000 Trafo transformer cursore completa 97024xxx Schieber kpl. support, assy pannello angolare completo 97071980 Eckpaneel kpl. corner panel cpl. pannello angolare completo 97071980 Eckpaneel kpl. - Seite 9 29611xxx 29610xxx...
-
Seite 10: Technische Daten Dg 3 Kw
TECHNISCHE DATEN DG 3 KW TECHNICAL DATA DG 3 KW DATI TECNICI DG 3 KW Mindestfließdruck: 2 bar Minimum flow pressure: 2 bar Pressione minima: 2 bar Betriebsdruck: max. 10 bar Operating pressure: max. 10 bar Pressione di servizio: max. 10 bar Empfohlener Betriebsdruck: 2 –... - Seite 11 Das Dampfmodul ist geeignet um einen The steam module is suitably to steam a Il modulo vapore è adatto per produrre geschlossenen Raum von ca. 2,5 m aus- closed room of approx. 2.5 m vapore sufficiente per un locale chiuso di reichend zu bedampfen! ca.
- Seite 12 TECHNISCHE DATEN DG 3 KW TECHNICAL DATA DG 3 KW DATI TECNICI DG 3 KW Legende Legenda Legenda A Tubo vuoto di posa 1 con Ø interno 25 A Leerrohr 1 mit Innen-Ø 25 mm für A Wiring conduit 1 with internal mm per l‘alimentazione elettrica: Stromversorgung: diameter of 25 mm for power...
- Seite 13 locali (manicotto di collegamento DN15 1⁄2“, Die Leerrohre und Anschlüsse können a filo con piastrelle). wahlweise links oder rechts vorgesehen Il tubo vuoto di posa ed i raccordi di werden. collegamento possono essere predisposti a scelta sia a destra che a sinistra. Installation of modules on the tiles! Befestigungspunkte X für das Dampf- modul bei der Rohinstallation berück-...
-
Seite 14: Technische Daten Dg 4,5 Kw
TECHNISCHE DATEN DG 4,5 KW TECHNICAL DATA DG 4,5 KW DATI TECNICI DG 4,5 KW Mindestfließdruck: 2 bar Minimum flow pressure: 2 bar Pressione minima: 2 bar Betriebsdruck: max. 10 bar Operating pressure: max. 10 bar Pressione di servizio: max. 10 bar Empfohlener Betriebsdruck: 2 –... - Seite 15 Das Dampfmodul ist geeignet um einen The steam module is suitably to steam a Il modulo vapore è adatto per produrre geschlossenen Raum von ca. 4 m aus- closed room of approx. 4 m vapore sufficiente per un locale chiuso di reichend zu bedampfen! ca.
- Seite 16 TECHNISCHE DATEN DG 4,5 KW TECHNICAL DATA DG 4,5 KW DATI TECNICI DG 4,5 KW Legende Legenda Legenda A Tubo vuoto di posa 1 con Ø interno 25 A Leerrohr 1 mit Innen-Ø 25 mm für A Wiring conduit 1 with internal mm per l‘alimentazione elettrica: Stromversorgung: diameter of 25 mm for power...
- Seite 17 Die Leerrohre und Anschlüsse können locali (manicotto di collegamento DN15 1⁄2“, a filo con piastrelle). wahlweise links oder rechts vorgesehen Il tubo vuoto di posa ed i raccordi di werden. collegamento possono essere predisposti a scelta sia a destra che a sinistra. Befestigungspunkte X für das Dampf- modul bei der Rohinstallation berück- Durante l’installazione dei tubi, tenere in...
-
Seite 18: Vorwort
VORWORT FOREWORD INTRODUZIONE Die vorliegende Anleitung ist für den In- These instructions are intended for the Il seguente manuale è destinato agli stallateur gedacht, sie beschreibt die für installer, they describe the systems and installatori, descrive sistemi e metodi einen korrekten Einbau anzuwendenden methods to be used for correct instal- da adottare per eseguire una corretta Systeme und Methoden. -
Seite 19: In Der Anleitung Verwendete Symbole
IN DER ANLEITUNG VERWEN- SYMBOLS USED IN THE INSTRUC- SIMBOLI UTILIZZATI NEL MANU- DETE SYMBOLE TIONS In der vorliegenden Einbauanleitung The symbols described below appear Nel presente manuale di istruzioni di montag- und an einigen Stellen auf dem Produkt in these Installation Instructions and in gio si trovano dei simboli alcuni dei quali si selbst befinden sich Symbole, die hier some locations on the product itself. -
Seite 20: Sicherheitsvorschriften
SICHERHEITSVORSCHRIFTEN SAFETY PRECAUTIONS PRESCRIZIONI DI SICUREZZA Vor dem Einbau des Produktes muss ge- Before installing the product check if all Prima dell‘installazione del prodotto si prüft werden, ob alle technologischen technological equipment are available. deve controllare se sono disponibili tutte Ausrüstungen vorhanden sind. -
Seite 22: Benötigtes Werkzeug
BENÖTIGTES WERKZEUG REQUIRED TOOLS UTENSILI RICHIESTI Sich vor dem Einbau mit folgendem Make sure the following tools are avai- Prima di procedere al montaggio, pro- Werkzeug ausrüsten: lable before installation: curarsi i seguenti attrezzi: Schlagbohrmaschine A Hammer drill A trapano battente Bohrer Ø... -
Seite 24: Montage Haltewinkel
MONTAGE HALTEWINKEL ANGLE BRACKET INSTALLATION MONTAGGIO DEGLI ANGOLARI DI SUPPORTO 1. Löcher Ø 6 mm für Eckmontagewin- 1. Draw 6 mm diameter holes for cor- 1. Segnare fori Ø 6 mm per l‘angolare kel anzeichnen, bohren und Dübel ner bracket, drill holes and insert di montaggio, forare ed applicarvi i setzen. -
Seite 26: Montage Eckschrank
MONTAGE ECKSCHRANK CORNER CABINET INSTALLATION MONTAGGIO DELL'ARMADIETTO ANGOLARE 1. Trafokabel B durch das Leerrohr zum 1. Put the transformer cable B through 1. Far passare il cavo del trasformatore Eckschrank führen. wiring conduit (from outside to the B attraverso il tubo vuoto di posa fino corner cabinet). -
Seite 28: Montage Eckpaneel
Montage eckpaneel corner panel InStallatIon MontaggIo Del pannello angolare 1. Press grey rubber seal a at the bot- 1. Premere la guarnizione in gomma 1. Graue Gummidichtung a unten auf tom onto the corner panel. grigia a sotto sul pannello angola- das Eckpaneel drücken. Surge shower: Doccia a cascata: Schwallbrause: 2. Connect supply hose B to surge 2. Collegare il tubo di alimentazione B 2. Versorgungsschlauch B mit Schwall- shower. - Seite 30 MONTAGE ECKPANEEL CORNER PANEL INSTALLATION MONTAGGIO DEL PANNELLO ANGOLARE 1. Distanzbolzen A auf Haltewinkel B 1. Screw spacer A to angle bracket B. 1. Avvitare il bullone distanziale A schrauben. sull'angolare di supporto B. 2. Position panels in attachment bracket 2.
- Seite 32 MONTAGE ECKPANEEL CORNER PANEL INSTALLATION MONTAGGIO DEL PANNELLO ANGOLARE 1. Das Eckpaneel nach oben drücken 1. Press the corner panel upwards and 1. Premere il pannello angolare verso und mit der Schraube A sichern. secure with screw A. l‘alto e fissarlo con la vite A. 2.
-
Seite 34: Endmontage
EnDmontAGE FinAl WorK montAGGio FinAlE 1. a Dampfmodul mit Aromadispenser: Steam modul with aroma dispenser: modulo vapore con Aromadispenser: Den Duftstoffbegrenzer E, das Fit fragrance adjusting E, fragrance Montare il dosatore contagocce delle Duftsieb A und den Deckel B mon- sieve A and cover B. essenze aromatiche E, filtro delle es- tieren. senze A e montare il coperchio B. 1. b Steam modul with automatically essen- Dampfmodul mit automatische Duft- tial oils addition: m o d u l o... - Seite 35 1. a 1. b...
-
Seite 36: Funktionsprüfung
FUNKTIONSPRÜFUNG FUNCTIONAL CHECK CONTROLLO DEL FUNZIONAMENTO K IV STEAM PLUS K IV STEAM PLUS K IV STEAM PLUS 1. Die Handbrause aus dem Halter 1. Take handshower out of holder, 1. Togliere la doccetta dal supporto, gi- nehmen, den Ab-/Umstellhebel A select „hand shower“... - Seite 38 FUNKTIONSPRÜFUNG FUNCTIONAL CHECK CONTROLLO DEL FUNZIONAMENTO K IV LITE STEAM K IV LITE STEAM K IV LITE STEAM 1. Die Handbrause aus dem Halter neh- 1. Take hand shower out of holder and 1. Togliere la doccetta a mano dal men und mit der Handbrausentaste activate it with hand shower push- supporto ed attivarla con il tasto...
-
Seite 40: Funktionsprüfung
FUNKTIONSPRÜFUNG FINAL WORK MONTAGGIO FINALE Nach erfolgreicher Funktionsprüfung After the performed functional check, Una volta eseguito con successo il die Glasscheibe der Revisionsöffnung install the glass panel of the inspection controllo del funzionamento, mon- mit Glasschutzhülse A, mit Flachdich- opening with glass protection sleeve A, tare il pannello di vetro dell‘apertura tung B (11x6x1) und Schraube C (SW 4 flat seal B (11x6x1) and screw C (SW 4... -
Seite 42: Safety Function
SAFETY FUNCTION SAFETY FUNCTION SAFETY FUNCTION Dank der Safety Function lässt sich die The desired maximum temperature Grazie alla funzione antiscottature Safety gewünschte Höchsttemperatur von z. B. for example max. 42° C can be pre-set la temperatura massima , per esempio max. -
Seite 44: Thermostat Justierenk Iv Steam Plus
THERMOSTAT JUSTIEREN THERMOSTAT ADJUSTMENT TARATURA DEL TERMOSTATO K IV STEAM PLUS K IV STEAM PLUS K IV STEAM PLUS Nach erfolgter Montage muß die After finishing the installation, check the Una volta eseguito il montaggio è Auslauftemperatur des Thermostaten thermostat outlet temperature. Correc- necessario controllare la temperatura überprüft werden. - Seite 46 THERMOSTAT JUSTIEREN THERMOSTAT ADJUSTMENT TARATURA DEL TERMOSTATO K IV LITE STEAM K IV LITE STEAM K IV LITE STEAM Nach erfolgter Montage muß die Aus- After finishing the installation, check the Una volta eseguito il montaggio è lauftemperatur des Thermostaten über- thermostat outlet temperature.
-
Seite 48: Steuerung K Iv Steam Plus (Ml/Steam)
STEUERUNG K IV STEAM PLUS K IV STEAM PLUS CONTROL CONTROLLO K IV STEAM PLUS (ML/STEAM) (ML/STEAM) (ML/STEAM) A = Lichttaste A = light push-button A = pulsante per l'illuminazione (Licht ein / aus) (Light on / off) (illuminazione acceso / spento) B = display B = Display B = display... - Seite 50 STEUERUNG K IV STEAM PLUS K IV STEAM PLUS CONTROL CONTROLLO K IV STEAM PLUS (ML/STEAM) (ML/STEAM) (ML/STEAM) 4. Licht ein / aus 4. Light on / off 4. Luce acceso / spento Premendo brevemente il pulsante per Durch kurzes Drücken der Lichttaste A Briefly pressing light push-button A l'illuminazione A si accende e si spegne wird die Duschbeleuchtung ein- bzw.
-
Seite 52: Steuerung K Iv Lite Steam (Deluxe)
STEUERUNG K IV LITE STEAM K IV LITE STEAM CONTROL CONTROLLO K IV LITE STEAM (DELUXE) (DELUXE) (DELUXE) A = Lichttaste A = light push-button A = pulsante per l'illuminazione (illuminazione acceso / spento) (Licht ein / aus) (Light on / off) B = display B = Display B = display... - Seite 54 STEUERUNG K IV LITE STEAM K IV LITE STEAM CONTROL CONTROLLO K IV LITE STEAM (DELUXE) (DELUXE) (DELUXE) 4. Duschen mit der Handbrause 4. Taking a shower with the hand sho- 4. Funzione doccetta Durch Drücken der Handbrausentas- Premendo il tasto "doccetta a mano" H te H wird die Handbrause aktiviert Press hand shower push-button H si attiva la funzione doccetta (pulsante il-...
- Seite 56 STEUERUNG K IV LITE STEAM K IV LITE STEAM CONTROL CONTROLLO K IV LITE STEAM (DELUXE) (DELUXE) (DELUXE) 9. Dampffunktion 9. Steam function 9. Funzione vapore Durch Drücken der Dampftaste I wird Press steam push-button I to activa- Premendo il tasto vapore H si attiva il der Dampfgenerator aktiviert (Taste generatore di vapore (pulsante illumi- te the steam generator (button with...
- Seite 58 STEUERUNG K IV LITE STEAM / STEUERUNG K IV STEAM PLUS � � � � � � � � � � � � � � � � � � � � � � � � � � � � � � � � � � � � � � � � � � � �...
- Seite 59 K IV LITE STEAM CONTROL / K IV STEAM PLUS CONTROL �������� ���������������������������� ��������������� ������������������� ���� �� �������������������������������� �� ������������������������ �� ���������������� ������������������������ ����������������� � ������������������������ �� ����������������������������� �� ��������������������������� ����������������������� ��������������������������� �������� ����������������������������� �� ��������������������������� �� ������������������������ ���������� ������� ��������...
- Seite 60 CONTROLLO K IV LITE STEAM / CONTROLLO K IV STEAM PLUS �������� ���������������������� ���������������� ����������������� ������ �������������������� ����������������������������� �������������������������� � � � ����������������� �������������������������� � ����������������������� �������������������������������� ������������������������������� � � ��������������������� �������������������������� ����������� ��������������������� �������� � ���������������������� ���������������������������� ��������������������������� � �...
-
Seite 62: Bedienung (Ml/Steam)
BEDIENUNG OPERATION (ML/STEAM) (ML/STEAM) (ML/STEAM) 1. Die Gleiteigenschaft des höhen- 1. Use Allen screw A (SW 2.5 mm) to ad- 1. Utilizzare la vite ad esagono incassato verstellbaren Handbrausenhalters just the slide resistance of the height- (misura 2.5 mm), per regolare in kann über die Inbusschraube A (SW adjustable hand-shower holder. -
Seite 64: Bedienung (Deluxe)
BEDIENUNG OPERATION (DELUXE) (DELUXE) (DELUXE) 1. Die Gleiteigenschaft des höhen- 1. Use Allen screw A (SW 2.5 mm) to ad- 1. Utilizzare la vite ad esagono incassato verstellbaren Handbrausenhalters just the slide resistance of the height- (misura 2.5 mm), per regolare in kann über die Inbusschraube A (SW adjustable hand-shower holder. -
Seite 66: Bedienung
BEDIENUNG OPERATION Dampfmodul mit Aromadispenser: Steam modul with aroma dispenser: Modulo vapore con Aromadispenser: 1.1 In den umgedrehten Deckel A des 1.1 Liquid essential oils can be filled 1.1 Capovolgendo il coperchio A del Aromadispenser kann flüssiger into turned over cover A of the Aromadispenser è... - Seite 68 BEDIENUNG OPERATION 1. Die Lamellen in der Dampfaust- 1. The fins in steam nozzle can be 1. Le lamelle della griglia di uscita del rittsdüse können verstellt werden, adjusted. With this adjustment the vapore, si possono regolare per so dass die Ausströmrichtung des exhaust way can be enhanced.
-
Seite 70: Reinigung Wartung
Gefäss geben (Füllstand A ca. 20 b. Thoroughly rinse shower head. te contenente agente decalcificante mm). ad azione veloce Hansgrohe (Nu- b. Brausekopf sorgfälltig abspülen. mero d'ordine 90900000) (livello di riempimento A ca. 20 mm). 5. Maintenance of non return valve b. -
Seite 72: Entkalken
Dampfgenerator leeren. cabina. Far defluire l’acqua rimasta dal water from the steam generator, 8. Den Dampfgenerator mit 2,5 l Hansgrohe generatore di vapore. 8. Fill the steam generator with 2.5ltr of Schnellentkalker (Art. - Seite 73 2,5 l...
- Seite 74 Hansgrohe · Postfach 1145 · D-77761 Schiltach · Telefon +49 (0) 78 36/51-1282 · Telefax +49 (0) 7836/511440 E-Mail: info@hansgrohe.com · Internet: www.hansgrohe.com...