Werbung
Verfügbare Sprachen
Verfügbare Sprachen
Quicklinks
1
2
3
4
5
CON
6
7
8
9
ETH
RES ET
S58 50- 48T 4Q
SYS
-PE
S5850-48T4Q-PE
ETHERNET SWITCH
ETHERNET-SWITCHES
SWITCH ETHERNET
イーサネットスイッチ
Quick Start Guide
Quick-Start Anleitung
Guide de Démarrage Rapide
クイックスタートガイド
10 11
12 13
14 15
16
17
18 19
20 21
22 23
24 25
26 27
V2.0
28 29
30 31
32
33
34 35
36 37
38 39
40 41
42 43
44 45
46 47
48
49
50
51
52
40G E Bre ako
ut
1
2
3
40G
4
Werbung

Verwandte Anleitungen für FS S5850-48T4Q-PE


Inhaltszusammenfassung für FS S5850-48T4Q-PE
- Seite 1 36 37 38 39 40 41 42 43 RES ET S58 50- 48T 4Q 44 45 46 47 40G E Bre ako S5850-48T4Q-PE ETHERNET SWITCH ETHERNET-SWITCHES SWITCH ETHERNET イーサネットスイッチ Quick Start Guide V2.0 Quick-Start Anleitung Guide de Démarrage Rapide クイックスタートガイド...
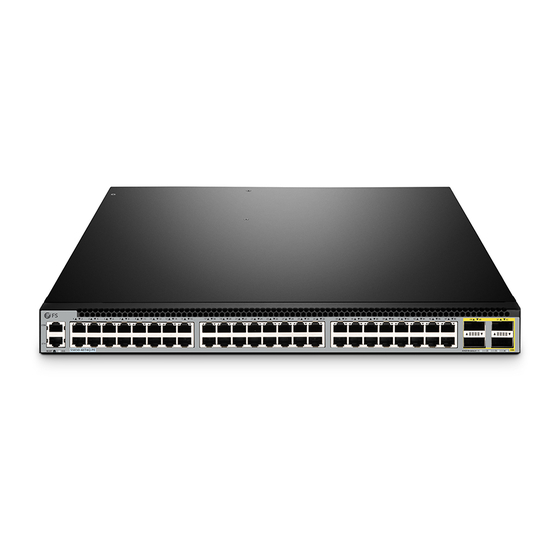
- Seite 2 28 29 30 31 34 35 36 37 38 39 40 41 42 43 44 45 46 47 S5850-48T4Q-PE 40GE Breakout RESET S5850-48T4Q-PE Accessories Power Cord x2 Console Cable x1 Grounding Cable x1 Mounting Bracket x2 Power Cord Tie x2...
- Seite 3 28 29 30 31 34 35 36 37 38 39 40 41 42 43 44 45 46 47 S5850-48T4Q-PE 40GE Breakout RESET Ports Description RJ45 10G BASE-T ports for Ethernet connection QSFP+ QSFP+ ports for 40G transceivers An RJ45 console port for serial management...
- Seite 4 LEDs State Description The port is linked. RJ45 Green Blinking Packets are receiving or transmitting. The port is linked. Green Blinking Packets are receiving or transmitting. The port is linked at 10G. QSFP+ Orange Blinking Packets are receiving or transmitting at 10G. The port is not linked.
- Seite 5 Mounting the Switch Desk Mounting CO N 12 13 RE SET S5 85 0-4 8T 4Q 10 11 12 13 14 15 18 19 20 21 22 23 24 25 26 27 28 29 30 31 RESE T S58 50- 48T 34 35 4Q- PE 36 37...
- Seite 6 18 19 20 21 22 23 24 25 26 27 28 29 30 31 34 35 36 37 38 39 40 41 42 43 44 45 46 47 40G E Bre ako 40 G 2. Attach the switch to the rack using four M6 screws and four cage nuts. Grounding the Switch CO N 12 13...
- Seite 7 Connecting the RJ45 Ports 12 13 14 15 18 19 20 21 22 23 24 25 26 27 28 29 30 31 34 35 36 37 38 39 40 41 42 43 44 45 46 47 RES ET S58 50- 48T 4Q 40G b Bre ako ut 1.
- Seite 8 Connecting the Console Port C O N 1 0 1 1 1 2 1 3 1 4 1 5 ET H 1 8 1 9 R E S E T SY S S 5 8 5 0 -4 8 T 4 Q -P E 1.
- Seite 9 Connecting the Power 2 2 2 3 2 4 2 5 2 6 2 7 2 8 2 9 3 0 3 1 3 4 3 5 3 6 3 7 3 8 3 9 4 0 4 1 4 2 4 3 4 4 4 5 4 6 4 7 1.
- Seite 10 Con guring the Switch Con guring the Switch Using the Web-based Interface Step 1: Connect the computer to the Management port of the switch using the network cable. Step 2: Set the IP address of the computer to 192.168.1.x ("x" is any number from 2 to 254). Set the subnet mask of the computer to 255.255.255.0.
- Seite 11 Quick Connect Protocol: Serial Flow Control Port: COM3 DTR/DSR 115200 Baud rate: RTS/CTS Data bits: XON/XOFF Parity: None Stop bits: Name of pipe: Show quick connect on startup Save session Open in a tab Connect Cancel Step 4: After setting the parameters, click Connect to enter. Troubleshooting Loading Failure After loading fails, the system will keep running in the original version.
- Seite 12 User Password Lost If the system password is lost or forgotten, the following method can be used to reset the password: 1. Connect the console port of the switch to the computer through the console cable. 2. Press ctrl+b to enter the U-Boot mode. 3.
- Seite 13 Product Warranty FS ensures our customers that for any damage or faulty items due to our workmanship, we will o er a free return within 30 days from the day you receive your goods. This excludes any custom-made items or tailored solutions.
- Seite 14 24 25 26 27 28 29 30 31 34 35 36 37 38 39 40 41 42 43 44 45 46 47 S5850-48T4Q-PE 40GE Breakout RESET S5850-48T4Q-PE Zubehör Netzkabel x2 Console-Kabel x1 Erdungskabel x1 Montagehalterung x2 Netzkabelbinder x2 M4-Schraube x8 HINWEIS: 1.
- Seite 15 26 27 28 29 30 31 34 35 36 37 38 39 40 41 42 43 44 45 46 47 S5850-48T4Q-PE 40GE Breakout RESET Ports Beschreibung RJ45 10G BASE-T-Ports für Ethernet-Verbindungen QSFP+ QSFP+-Ports für 40G-Transceiver Ein RJ45-Console-Port für die serielle Verwaltung...
- Seite 16 LEDs State Description Der Port ist verbunden. RJ45 Grün Blinkt Pakete werden empfangen oder gesendet. Der Port ist verbunden. Grün Blinkt Pakete werden empfangen oder gesendet. Der Port ist mit 10G verbunden. QSFP+ Orange Blinkt Die Pakete werden mit 10G empfangen oder gesendet. Der Port ist nicht verbunden.
- Seite 17 Montage des Switches Tisch-Montage CO N 12 13 RE SET S5 85 0-4 8T 4Q 10 11 12 13 14 15 18 19 20 21 22 23 24 25 26 27 28 29 30 31 RESE T S58 50- 48T 34 35 4Q- PE 36 37...
- Seite 18 14 15 18 19 20 21 22 23 24 25 26 27 28 29 30 31 34 35 36 37 38 39 40 41 42 43 44 45 46 47 40G E Bre ako 40 G 2. Befestigen Sie den Switch mit vier M6-Schrauben und vier Kä gmuttern am Rack. Erdung des Switches CO N 12 13...
- Seite 19 Anschließen der RJ45-Ports 12 13 14 15 18 19 20 21 22 23 24 25 26 27 28 29 30 31 34 35 36 37 38 39 40 41 42 43 44 45 46 47 RES ET S58 50- 48T 4Q 40G b Bre ako ut 1.
- Seite 20 Anschließen des Console-Ports C O N 1 0 1 1 1 2 1 3 1 4 1 5 ET H 1 8 1 9 R E S E T SY S S 5 8 5 0 -4 8 T 4 Q -P E 1.
- Seite 21 Anschließen der Stromversorgung 2 2 2 3 2 4 2 5 2 6 2 7 2 8 2 9 3 0 3 1 3 4 3 5 3 6 3 7 3 8 3 9 4 0 4 1 4 2 4 3 4 4 4 5 4 6 4 7 1.
- Seite 22 Kon gurieren des Switches Kon gurieren des Switches über die webbasierte Schnittstelle Schritt 1: Schließen Sie den Computer mit dem Netzwerkkabel an den Management-Port des Switches an. Schritt 2: Stellen Sie die IP-Adresse des Computers auf 192.168.1.x ein („x“ ist eine beliebige Zahl von 2 bis 254).
- Seite 23 Quick Connect Protocol: Serial Flow Control Port: COM3 DTR/DSR 115200 Baud rate: RTS/CTS Data bits: XON/XOFF Parity: None Stop bits: Name of pipe: Show quick connect on startup Save session Open in a tab Connect Cancel Schritt 4: Nachdem Sie die Parameter eingestellt haben, klicken Sie auf Verbinden, um die Verbindung herzustellen.
- Seite 24 Benutzerpasswort verloren Wenn Sie das Systempasswort verloren oder vergessen haben, können Sie das Passwort mit der folgenden Methode zurücksetzen: 1. Verbinden Sie den Console-Port des Switches über das Console-Kabel mit dem Computer. 2. Drücken Sie strg+b, um den U-Boot-Modus aufzurufen. 3.
- Seite 25 Kontakt https://www.fs.com/de/contact_us.html Produktgarantie FS garantiert seinen Kunden, dass wir bei Schäden oder fehlerhaften Artikeln, die auf unsere Verarbeitung zurückzuführen sind, eine kostenlose Rückgabe innerhalb von 30 Tagen nach Erhalt der Ware anbieten. Dies gilt nicht für Sonderanfertigungen oder maßgeschneiderte Lösungen.
- Seite 26 28 29 30 31 34 35 36 37 38 39 40 41 42 43 44 45 46 47 S5850-48T4Q-PE 40GE Breakout RESET S5850-48T4Q-PE Accessoires Câble de Mise Câble d'Alimentation x2 Câble de Console x1 à la Terre x1 Attache pour...
- Seite 27 28 29 30 31 34 35 36 37 38 39 40 41 42 43 44 45 46 47 S5850-48T4Q-PE 40GE Breakout RESET Ports Description RJ45 Ports 10G BASE-T pour la connexion Ethernet QSFP+ Ports QSFP+ pour émetteurs-récepteurs 40G Un port de console RJ45 pour la gestion série...
- Seite 28 LED Statut Description Activé Le port est lié. RJ45 Vert Clignotant Les paquets sont en train de recevoir ou de transmettre. Activé Le port est lié. Vert Clignotant Les paquets sont en train de recevoir ou de transmettre. Activé Le port est relié à 10G. Orange QSFP+ Clignotant...
- Seite 29 Installation du Switch Installation sur Bureau CO N 12 13 RE SET S5 85 0-4 8T 4Q 10 11 12 13 14 15 18 19 20 21 22 23 24 25 26 27 28 29 30 31 RESE T S58 50- 48T 34 35 4Q- PE 36 37...
- Seite 30 14 15 18 19 20 21 22 23 24 25 26 27 28 29 30 31 34 35 36 37 38 39 40 41 42 43 44 45 46 47 40G E Bre ako 40 G 2. Fixez le switch au rack à l'aide de quatre vis M6 et quatre écrous cage. Mise à...
- Seite 31 Connexion des Ports RJ45 12 13 14 15 18 19 20 21 22 23 24 25 26 27 28 29 30 31 34 35 36 37 38 39 40 41 42 43 44 45 46 47 RES ET S58 50- 48T 4Q 40G b Bre ako ut 1.
- Seite 32 Connexion du Port Console C O N 1 0 1 1 1 2 1 3 1 4 1 5 ET H 1 8 1 9 R E S E T SY S S 5 8 5 0 -4 8 T 4 Q -P E 1.
- Seite 33 Branchement de l'Alimentation 2 2 2 3 2 4 2 5 2 6 2 7 2 8 2 9 3 0 3 1 3 4 3 5 3 6 3 7 3 8 3 9 4 0 4 1 4 2 4 3 4 4 4 5 4 6 4 7 1.
- Seite 34 Con guration du Switch Con guration du Switch à l'Aide de l'Interface Web Étape 1 : Connectez l'ordinateur au port de gestion du switch à l'aide du câble réseau. Étape 2 : Dé nissez l'adresse IP de l'ordinateur sur 192.168.1.x. (""x"" est un nombre quelconque compris entre 2 et 254.).
- Seite 35 Quick Connect Protocol: Serial Flow Control Port: COM3 DTR/DSR 115200 Baud rate: RTS/CTS Data bits: XON/XOFF Parity: None Stop bits: Name of pipe: Show quick connect on startup Save session Open in a tab Connect Cancel Étape 4 : Après avoir dé ni les paramètres, cliquez sur Connect pour entrer. Dépannage Échec du Chargement Après l’échec du chargement, le système continue de fonctionner dans la version d’origine.
- Seite 36 Mot de Passe Utilisateur Perdu En cas de perte ou d’oubli du mot de passe système, la méthode suivante peut être utilisée pour réinitialiser le mot de passe : 1. Connectez le port console du commutateur à l’ordinateur à l’aide du câble de la console. 2.
- Seite 37 Garantie du Produit FS garantit à ses clients que tout article endommagé ou défectueux en raison de sa fabrication pourra être retourné gratuitement dans un délai de 30 jours à compter de la date de réception de la marchandise. Cette garantie ne s'applique pas aux articles fabriqués sur mesure ou aux solutions personnalisées.
- Seite 38 24 25 26 27 28 29 30 31 34 35 36 37 38 39 40 41 42 43 44 45 46 47 S5850-48T4Q-PE 40GE Breakout RESET S5850-48T4Q-PE アクセサリー 電源コード x� コンソールケーブル x� アースケーブル x� マウントブラケット x� 電源コードタイ x� M�ネジ x�...
- Seite 39 20 21 22 23 24 25 26 27 28 29 30 31 34 35 36 37 38 39 40 41 42 43 44 45 46 47 S5850-48T4Q-PE 40GE Breakout RESET ポート 説明 RJ�� イーサネット接続用��G BASE-Tポート QSFP+ ��Gモジュール用QSFP+ポート シリアル管理用RJ��コンソールポート イーサネット管理ポート フロントパネルのLED RJ45...
- Seite 40 LED 状態 説明 点灯 ポートがリンクしています。 RJ�� 緑 点滅 パケットが送受信されています。 ポートがリンクしています。 点灯 緑 点滅 パケットが送受信されています。 点灯 ポートは��Gでリンクしています。 QSFP+ オレンジ 点滅 パケットは��Gで送受信されています。 消灯 ポートがリンクしていません。 設置要件 設置前に、以下の条件が整っていることを確認してください。 プラスドライバー 高さ�U以上の標準サイズ��インチ幅ラック ネットワーク機器接続用カテゴリー�eまたはその以上のRJ��イーサネットケーブル 設置環境 環境温度が��℃を超える場所では使用しないでください。 設置場所は換気の良い場所にしてください。 危険な状態を避けるため、スイッチが水平で安定していることを確認してください。 CO N 12 13 14 15 18 19 20 21 22 23 ほこりの多い環境には設置しないでください。...
- Seite 41 スイッチの取り付け デスクマウント CO N 12 13 RE SET S5 85 0-4 8T 4Q 10 11 12 13 14 15 18 19 20 21 22 23 24 25 26 27 28 29 30 31 RESE T S58 50- 48T 34 35 4Q- PE 36 37 38 39...
- Seite 42 18 19 20 21 22 23 24 25 26 27 28 29 30 31 34 35 36 37 38 39 40 41 42 43 44 45 46 47 40G E Bre ako 40 G �. �本のM�ネジと�つのケージナットを使用して、スイッチをラックに取り付けます。 スイッチの接地 CO N 12 13 14 15 ET H RE SE T...
- Seite 43 RJ��ポートの接続 12 13 14 15 18 19 20 21 22 23 24 25 26 27 28 29 30 31 34 35 36 37 38 39 40 41 42 43 44 45 46 47 RES ET S58 50- 48T 4Q 40G b Bre ako ut �.
- Seite 44 コンソールポートの接続 C O N 1 0 1 1 1 2 1 3 1 4 1 5 ET H 1 8 1 9 R E S E T SY S S 5 8 5 0 -4 8 T 4 Q -P E �.
- Seite 45 電源コードの接続 2 2 2 3 2 4 2 5 2 6 2 7 2 8 2 9 3 0 3 1 3 4 3 5 3 6 3 7 3 8 3 9 4 0 4 1 4 2 4 3 4 4 4 5 4 6 4 7 �.
- Seite 46 スイッチの設定 ウェブベースインターフェースによる設定 Step �:ネットワークケーブルを使用してコンピュータをスイッチの管理ポートに接続します。 Step �:コンピュータのIPアドレスを「���.���.�.x」(「x」は�~���の任意の数字)に、サブ ネットマ スクを「���.���.���.�」に設定します。 I nternet Protocol Version 4 ( TCP/IPv4) Proper ties General Yo u c a n g e t I P s e t t i n g s a s s i g n e d a u t o m a t i c a l l y i f y o u r n e t w o r k s u p p o r t s t h i s c a p a b i l i t y.
- Seite 47 Quick Connect Protocol: Serial Flow Control Port: COM3 DTR/DSR 115200 Baud rate: RTS/CTS Data bits: XON/XOFF Parity: None Stop bits: Name of pipe: Show quick connect on startup Save session Open in a tab Connect Cancel Step �:パラメータを設定したら、「Connect」をクリックして接続します。 トラブルシューティング ローディングの失敗 ローディングに失敗した後、システムは元のバージョンで動作し続けます。...
- Seite 48 ユーザー名/パスワードの紛失 ユーザー名/パスワードを紛失または忘れた場合、以下の方法でパスワードをリセットでき ます。 �. コンソールケーブルでスイッチのコンソールポートとコンピュータに接続します。 �. ctrl+bを押してU-Bootモードに入ります。 �. パスワードなしの空の設定ファイルでシステムを起動します。 Bootrom#boot_flash_nopass Bootrom#Do you want to revert to default config file?[Y|N|E]: ユーザー名とパスワードを忘れてコンソールポートから復元すると、設定が 注: 失われ、運用に支障をきたす可能性があります。ユーザー名とパスワードを忘れな いようにしてください。 電源システムのトラブルシューティング 電源インジケーターが点灯していない場合、電源システムは動作していません。次のことを確 認してください: �. スイッチの電源線が正しく接続されていますか。 �. スイッチの電源が必要な電源と一致ますか。...
- Seite 49 オンラインリソース ダウンロード https://www.fs.com/jp/products_support.html ヘルプセンター https://www.fs.com/jp/service/fs_support.html お問い合わせ https://www.fs.com/jp/contact_us.html 製品保証 FSは、 カスタム製品又はカスタムソリューションを除き、 当社の過失による製品の破損や不良品があ った場合、 お客様が製品を受け取った日から��日以内に無料で返品、 交換をすることを保証します。 製品保証: 本製品は、 材料または製造上の欠陥に対して�年間の限定保証を提供します。 保証の詳細については, 下記のURLをご参照ください。 https://www.fs.com/jp/policies/warranty.html 返品/交換: 返品、 交換を希望される場合、 下記のURLをご参照ください。 https://www.fs.com/jp/policies/day_return_policy.html...
- Seite 50 2014/35/EU, 2011/65/EU und (EU)2015/863 konform ist. Eine Kopie der EU-Konformitätserklärung nden Sie unter www.fs.com/de/company/quality_control.html. FS.COM GmbH déclare par la présente que ce dispositif est conforme à la Directive 2014/30/EU, 2014/35/EU, 2011/65/EU et (EU)2015/863. Une copie de la Déclaration de Conformité de l'UE est disponible à l'adresse suivante https://www.fs.com/fr/company/quality_control.html.
- Seite 51 Contact the appropriate electrical inspection authority or an electrician if you are uncertain that suitable grounding is available. UKCA Hereby, FS.COM Innovation Ltd declares that this device is in compliance with the Directive SI 2016 No. 1091, SI 2016 No. 1101 and SI 2012 NO. 3032. FS.COM INNOVATION LTD...
- Seite 52 Do not dispose of WEEE as unsorted municipal wasteand have to collect such WEEE separately. Q.C. PASSED Copyright © 2024 FS.COM All Rights Reserved.