Bluetti AC240P Benutzerhandbuch
Vorschau ausblenden
Andere Handbücher für AC240P:
- Benutzerhandbuch (96 Seiten) ,
- Benutzerhandbuch (96 Seiten) ,
- Benutzerhandbuch (96 Seiten)

Verwandte Anleitungen für Bluetti AC240P


Inhaltszusammenfassung für Bluetti AC240P
- Seite 33 AC240P Tragbare Powerstation Benutzerhandbuch V1.0 Lesen Sie dieses Handbuch vor Gebrauch sorgfältig durch und bewahren Sie es zum späteren Nachschlagen auf.
- Seite 34 Warnung 1. Laden Sie das Gerät vor dem ersten Gebrauch auf. 2. Verwenden Sie keine Solarpaneele mit einer Leerlaufspannung von mehr als 60 V. Der Eingangsspannungsbereich für Solarstrom beträgt 11–60 VDC. 3. Laden Sie das Gerät umgehend auf, wenn der Wert für den Ladezustand unter 5 % fällt. Wenn der Wert für den Ladezustand auf 0 fällt, schalten Sie das Gerät aus und laden Sie es mindestens 30 Minuten lang auf, bevor Sie es neu starten.
- Seite 35 BLUETTI engagiert sich von jeher für eine nachhaltige Zukunft – mit außergewöhnlich umweltfreundlichen Energiespeicherlösungen, von denen nicht nur Haushalte, sondern wir alle profitieren. Aus diesem Grund wird BLUETTI in mehr als 100 Ländern gerne genutzt und genießt das Vertrauen von Millionen Kunden auf der ganzen Welt. Schweden Niederlande Österreich...
- Seite 36 Inhalt Sicherheitshinweise Packliste Produkteinführung Produktübersicht Ein-/Ausschalten LED-Bildschirm Laden Entladen Settings Erweiterungsanschluss AC240P + B210P Paralleler Betrieb BLUETTI App Technische Daten Anweisungen zur Bedienung der Tasten Fehlerbehebung Anhang 1 Schätzung der Betriebszeit Anhang 2 FAQ...
-
Seite 37: Sicherheitshinweise
Produkts und diesbezügliche Sicherheitshinweise zu informieren. Die darin aufgeführten Sicherheitsanforderungen dienen der Veranschaulichung, erheben jedoch keinen Anspruch auf Vollständigkeit. Der tatsächliche Betrieb muss allen geltenden Sicherheitsnormen entsprechen. Bei Fragen wenden Sie sich bitte an den BLUETTI Support oder an Ihren BLUETTI Händler. 1.1 Erklärung Zur Gewährleistung eines sicheren Betriebs müssen die folgenden Bedingungen... -
Seite 38: Personenbezogene Vorsichtsmassnahmen
• Die Verwendung von Zubehörteilen, die nicht vom Hersteller empfohlen oder verkauft werden, kann zu Brand-, Stromschlag- oder Verletzungsgefahr führen. • Um das Risiko einer Beschädigung des Steckers und des Kabels zu verringern, ziehen Sie beim Trennen des Produkts von der Stromversorgung am Stecker und nicht am Kabel. -
Seite 39: Anweisungen Zur Erdung
• Stapeln Sie keine Gegenstände auf dem Produkt, während es gelagert wird oder in Betrieb ist. Bewegen Sie das Produkt nicht, während es in Betrieb ist, da Vibrationen und plötzliche Stöße die Verbindungen der Gerätehardware beeinträchtigen können. • VORSICHT: Verwenden Sie dieses Produkt nicht im Regen •... - Seite 40 Beachten Sie die elektrischen Hinweise und Sicherheitsinformationen auf der Außenseite des Gehäuses, bevor Sie das Gerät installieren oder in Betrieb nehmen. BEWAHREN SIE DIESE ANLEITUNG AUF BLUETTI haftet nicht für Geräteschäden, die durch die Missachtung der vorgenannten Hinweise verursacht werden. JUST POWER ON...
-
Seite 41: Packliste
2. Packliste Standardzubehör Artikel Bild Anz. Tragbare Powerstation AC-Ladekabel Autoladekabel Solarladekabel Erdungsschraube AC240P Tragbare Powerstation Benutzerhandbuch V1.0 Lesen Sie dieses Handbuch vor Gebrauch sorgfältig durch und bewahren Sie es zum späteren Nachschlagen auf. Benutzerhandbuch Garantiekarte JUST POWER ON... -
Seite 42: Optionales Zubehör
Optionales Zubehör (Auf der offiziellen BLUETTI Website verfügbar: https://www.bluettipower.com) Artikel Bild Erweiterungsbatterie B210P USB-C-zu-USB-C-Kabel (Ausgang) Bleibatterie-Ladekabel (Zum Laden der AC240P mit Strom aus einer Bleibatterie) Parallelbox AC-Parallel-Ladekabel (Das Aussehen des Kabels hängt vom erhaltenen Kabel ab.) Wohnmobil-Netzkabel (Für 12V-Geräte in Wohnmobilen) -
Seite 43: Produkteinführung
Und wenn Sie noch mehr Strom benötigen, können Sie einfach einen weiteren AC240P anschließen, um tagelang ununterbrochen Strom zu haben. Die Verwaltung des AC240P ist dank der BLUETTI App, mit der Sie die verschiedenen Funktionen und Einstellungen des Geräts ganz einfach steuern können, ein Kinder- spiel. -
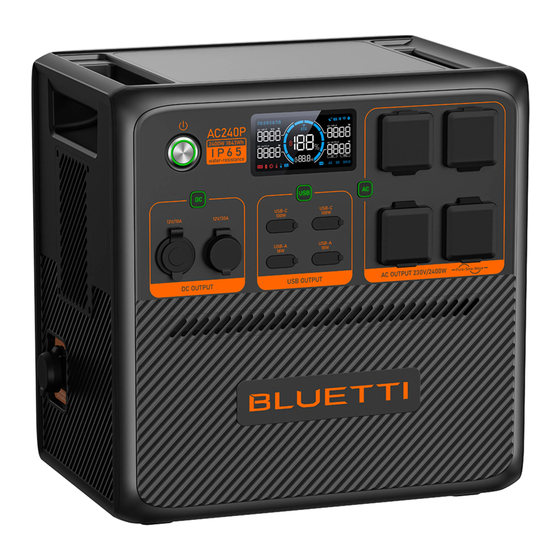
Seite 44: Produktübersicht
4. Produktübersicht 4 5 6 7 EU Version UK Version Batterieerweiterungsanschluss USB-C-Anschluss ① ⑨ USB-A-Anschluss Zigarettenanzünderbuchse ② ⑩ ⑪ Ein-/Ausschalttaste Wohnmobilanschluss ③ ⑫ DC-Taste DC-Eingang ④ ⑬ AC-Eingang LED-Bildschirm ⑤ ⑭ Taste USB Power Erdungspol ⑥ ⑮ AC-Taste Entlüftungsventil ⑦ ⑯... -
Seite 45: Ein-/Ausschalten
• Ausschalten: Halten Sie die Einschalttaste mindestens zwei Sekunden lang gedrückt, um das Gerät auszuschalten. • AC ein/aus: Drücken Sie bei eingeschalteter AC240P die Einschalttaste, um AC ein-/auszuschalten. • USB ein/aus: Drücken Sie bei eingeschalteter AC240P die USB-Einschalttaste, um AC ein-/auszuschalten. -
Seite 46: Led-Bildschirm
6. LED-Bildschirm Der AC240P verfügt über ein informatives LED-Display, das einen einfachen Zugang zu allen wichtigen Informationen über den Status und die Leistung des Geräts bietet. Wenn Sie das Gerät einschalten, leuchtet der LED-Bildschirm auf, und wenn Sie das Gerät ausschalten, schaltet sich auch der Bildschirm aus. - Seite 47 Die Temperatur im Inneren des Geräts ist höher als 70 °C. Der AC240P ist überlastet. Der AC240P nimmt zu viel Strom auf, was zu Schäden am Gerät oder an verbundenen Geräten führen kann. Es liegt ein Problem mit dem AC240P vor, das möglicherweise eine Fehlersuche oder Reparatur erfordert.
-
Seite 48: Laden
Ladevorgang, um eine Überladung zu vermeiden. Für eine schnelle Aufladung können Sie in der BLUETTI App das Schnellladen aktivieren, mit dem das Laden bei einer Umge- bungstemperatur von 25 °C auf 80% ige Kapazität in nur 45 Minuten ermöglicht wird. - Seite 49 Solarpaneele mit einer Leerlaufspannung zwischen 60 V und 145 V können zum Laden der AC240P verwendet werden. Schließen Sie die Solarpaneele einfach über den PV-Spannungsregler an die AC240P an, um sie nahtlos und mühelos mit Solarstrom aufzuladen. 7.3 Laden per Auto Schließen Sie AC240P über das Autoladekabel an den 12V-Zigarettenanzünder des...
-
Seite 50: Laden Von Blei-Säure-Batterien
7.4 Laden per Generator Schließen Sie die AC240P mit dem AC-Ladekabel an einen Generator an. Die AC240P beendet den Ladevorgang automatisch, wenn sie vollständig aufgeladen ist. Hinweis: Vergewissern Sie sich, dass Ihr Generator den Wechselstromausgang mit der Ladespannung, der Frequenz und der Spannung des Netzanpassungsmodus liefert, die den Spezifikationen des AC240P entsprechen. -
Seite 51: Entladen
8. Entladen Neben dem Anschluss für den Zigarettenanzünder, USB-A und USB-C verfügt der AC240P auch über zwei Arten von Netzsteckdosen und einen Anschluss für Wohnmobile, die Ihre Lademöglichkeiten erweitern. 8.1 Wechselstrom-Entladen Anschluss Bild Beschreibung Wechselstrom- Für elektrische Wechselstromgeräte. Netzsteckdose x 4 8.2 DC-Entladung... -
Seite 52: Settings
Halten Sie bei eingeschaltetem Bildschirm mehr als zwei Sekunden lang die AC- und die DC-Taste gedrückt, bis die Ausgangsfrequenz blinkt, um in den Einstellmodus zu gelangen. 9.2 ECO-Modus Der AC240P verfügt über zwei ECO-Modi, die Ihnen helfen, Strom zu sparen und die Akkulaufzeit zu verlängern: • AC-ECO-Modus In diesem Modus schaltet sich das Gerät automatisch ab, wenn die AC-Leistung für eine... -
Seite 53: Frequenzumschaltung
Hinweis: Schalten Sie den Netzschalter aus, bevor Sie die Frequenz einstellen. 9.4 WLAN- & Bluetooth-Verbindung Um den AC240P mit der BLUETTI App zu verbinden, schalten Sie zuerst das WLAN oder Bluetooth ein. Drücken Sie im Einstellmodus die Taste DC Power, um durch die Einstel- lungsoptionen zu navigieren. - Seite 54 In diesem Modus wird der AC240P hauptsächlich durch Solarenergie geladen, um Strom zu sparen. Sie können auch einen bestimmten Schwellenwert für den Ladezu- stand (State of Charge, SoC) festlegen. AC240P lädt vom Netz bis zum Erreichen des vorgesehenen SoC und schaltet dann nahtlos auf Solarladung für die verbleibende Kapazität um.
-
Seite 55: Beenden Des Einstellmodus
9.8 Netzselbstanpassungsmodus Wenn Sie den AC240P aufgrund der instabilen Spannung nicht mit einem Generator oder einer instabilen Netzspannung laden können,wird empfohlen, den tzselbstan- passungsmodus über die BLUETTI-App zu aktivieren, um ein stabiles, sicheres Ladeer- lebnis für den AC240P und Ihre Geräte zu gewährleisten. -
Seite 56: Erweiterungsanschluss Ac240P + B210P
1. Stellen Sie sicher, dass sowohl AC240P als auch B210P ausgeschaltet sind. 2. Verbinden Sie die beiden Geräte mit dem Batterieerweiterungskabel. 3. Schalten Sie die AC240P ein. Die B210P schaltet sich automatisch ein. Auf dem Bildschirm der AC240P wird angezeigt. -
Seite 57: Paralleler Betrieb
1. Stellen Sie sicher, dass beide AC240P-Geräte ausgeschaltet sind. 2. Verbinden Sie sie mit der Parallelbox. 3. Schalten Sie ein AC240P-Gerät ein, und das andere Gerät schaltet sich automatisch ein. Wenn Sie Ihr Parallelsystem an eine Steckdose anschließen, werden Ihre Geräte je nach ihrem Strombedarf entweder vom Netz oder vom System mit Strom versorgt. -
Seite 58: Bluetti App
12. BLUETTI App Scannen Sie den nachstehenden QR-Code oder suchen Sie im App Store oder bei Google Play nach „BLUETTI“, um die BLUETTI App herunterzuladen. Ausführliche Angaben finden Sie in der Anleitung der BLUETTI APP. 13. Technische Daten Modell AC240P Batteriekapazität... - Seite 59 AC-Ausgang Leistung 2.400 W gesamt 2500W<Last< 3000W@2min ; Überlastungsleistung 3000W<Last< 3600W@10s ; 3600W< Last @500ms ; Spannung 230 VAC Strom 11 A Frequenz 50 Hz/60 Hz DC-Ausgang 12 VDC/10 A Zigarettenanzünderbuchse × 1 Max. 18 W (QC3.0: 5 V/3 A; 9 V/2 A; 12 V/1,5 A) USB-A ×...
-
Seite 60: Anweisungen Zur Bedienung Der Tasten
Einstellungsmodus Wenn innerhalb von einer Minute gedrückt, bis die Ausgangsfre- keine Eingabe erfolgt, beendet die quenz blinkt AC240P den Einstellmodus automa- tisch und es werden keine Änderun- gen gespeichert. Das blinkende Einstellungselement ist ausgewählt und kann bearbeitet werden. Im Einstellmodus werden die... -
Seite 61: Fehlerbehebung
15. Fehlerbehebung Halten Sie im Einstellungsmodus die Gleichstromtaste gedrückt, um die Statusseite zu wechseln, bis das Symbol und der Fehlercode gleichzeitig auf dem Bildschirm erscheinen. In der nachstehenden Tabelle finden Sie nützliche Hinweise. Fehlercode Alarmsymbol Beschreibung Fehlerbehebung Prüfen Sie, ob der Stromverbrauch der Überlastung Wechselrichter angeschlossenen Geräte zu hoch ist. - Seite 62 Überfrequenz im Netz örtlichen Stromversorger. Prüfen Sie, ob die Netzfrequenz zu niedrig Unterfrequenz im Netz ist. Wenden Sie sich bei Bedarf an Ihren E100 örtlichen Stromversorger. Wenden Sie sich bitte an den BLUETTI Sonstige Support, um Unterstützung zu erhalten. JUST POWER ON...
-
Seite 63: Anhang 1 Schätzung Der Betriebszeit
Woher weiß ich, ob meine Geräte mit diesem Produkt harmonieren? Ermitteln Sie die Dauergesamtlast Ihrer Geräte. Wenn die maximale Ausgangsleis- tung der AC240P (2400 W) nicht überschritten wird, können Sie Ihre Geräte mit dieser Powerstation betreiben. Hinweis: Manche Geräte mit integrierten Motoren oder Kompressoren können mit dem Zwei- bis Vierfachen der Nennleistung anlaufen, was die AC240P leicht überlasten kann. - Seite 65 For more information, please visit: @ BLUETTI Support @ BLUETTI Official @bluetti_official @ bluetti.inc @ bluetti_inc sale-eu@bluettipower.com sale-uk@bluettipower.com Kundendienstanschrift EU: Lise-Meitner-Straße 14, 28816 Stuhr, Deutschland Kundendienstanschrift UK: Unit 2 Northgate, Bolsover Busines Park, Woodhouse Line, Chesterfield England S44 6BD Company: POWEROAK GmbH Company: POWEROAK ENERGY UK CO.,LTD...
- Seite 66 Ce r ti fi c a te Inspector: Q C : P/N: 17.0303.0706-00A0...