CCV Pad Next Erste Schritte
Vorschau ausblenden
Andere Handbücher für Pad Next:
- Erste schritte (48 Seiten) ,
- Kurzanleitung (8 Seiten)
Inhaltsverzeichnis
Verfügbare Sprachen
Verfügbare Sprachen
Quicklinks
Inhaltsverzeichnis

Verwandte Anleitungen für CCV Pad Next


Inhaltszusammenfassung für CCV Pad Next
- Seite 1 CCV Pad Next Erste Schritte Für jede Branche die perfekte Lösung! www.ccv.eu/de...
-
Seite 2: Sicherheitshinweise
Sicherheits- hinweise Stromversorgung • Vergewissern Sie sich, dass Sie zuerst das Netzteil des Netzteil sicher. Benutzen Sie das Netzteil nicht an Terminals in die Steckdose stecken und erst dann das Orten mit eingeschränkter Luftzirkulation. Netzteil mit dem Terminal verbinden. Das Netzteil ist mit einer Eingangsleistung von 100 - 240 VAC 50/ 60 •... -
Seite 3: Reparaturen
Transaktionen • Das Terminal ist ausschließlich für bargeldlose verwendet werden. Die Akzeptanz der Karten ist Zahlungen gültigen Debit-/Kredit- abhängig von Ihrem Vertrag mit dem Acquirer/ Kundenkarten (Magnetstreifen/Chip/kontaktlos) Netzbetrieb. konstruiert darf für diese Karten Reparaturen • Versuchen Sie unter keinen Umständen das Gerät sicherheitsrelevanten Daten gelöscht und das Gerät selbst zu reparieren. -
Seite 4: Produktbeschreibung
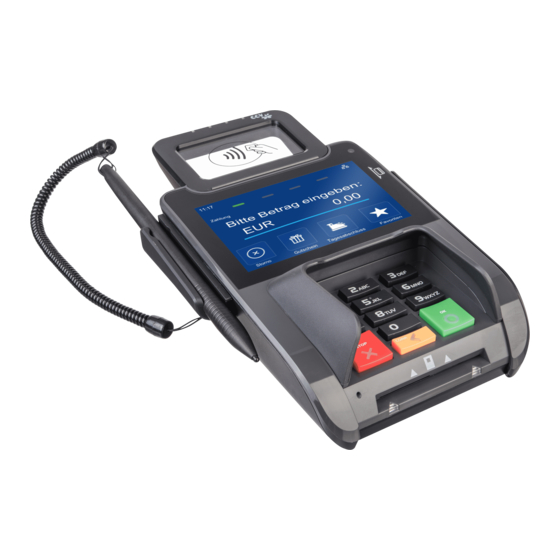
Produkt- beschreibung Kontaktlos LEDs Kontaktlosfeld Stift für Signaturerfassung Display Magnetstreifen-Leser Tastatur Chipkarten-Leser Reset Button Kensington-Lock Schraube Terminaldeckel Terminaldeckel Wandaufhängung... - Seite 5 Inbetrieb- nahme Inhalt Terminal CCV Pad Next Externes Netzteil 5VDC,1A Dokumentation Stylus Pen (Zubehör) Kommunikationskabel „Erste Schritte“ Verbinden RS232 Kasse Power...
-
Seite 6: Kommunikation Einrichten
Ablauf Verbinden Sie das Terminal über das Netzteil 1. Verbinden mit der Stromquelle. Das Gerät fährt hoch. 2. Einschalten Starten Sie die Inbetriebnahme mit „JA“. Wählen Sie die gewünschte Terminalsprache. 3. Inbetriebnahme starten Geben Sie die von Ihrem Netzbetreiber genannte 8stellige Terminal-ID wiederholen Sie diese. -
Seite 7: Initialisierung
Initialisierung Grundzustand Das Terminal startet am Ende der Inbetrieb- Statusleiste nahme automatisch eine Initialisierung, eine (Kontaktlos-Anzeige, erweiterte Diagnose und eine EMV-Konfigura- Uhrzeit, Kommuni- tionsdiagnose. kations-Status) Bitte kontrollieren Belege. erkennen die erfolgreiche Abarbeitung am Anzeige Text „Erfolgreich durchgeführt“. Das Terminal „Terminal bereit“ befindet sich danach im Grundzustand und kann verwendet werden. -
Seite 8: Bedienung
Bedienung Tagesabschluss 1. Funktion Tagesabschluss 2. Beleg kontrollieren („gebucht“) Zahlung 1. Betrag eingeben 2. Karte einlesen 3. PIN-Eingabe (opt.) 4. Beleg kontrollieren Chip-, Magnet- oder und Bestätigung Kontaktlos- Karte (siehe Kartenleser) Kartenleser Chip-Karte stecken Magnetstreifen-Karte Kontaktlose Karte (Chip nach oben) Zügig durchziehen Karte an Antenne vorhalten. -
Seite 9: Umsatzinformationen
Storno 1. Funktion Storno 2. Transaktionsnummer 3. Karte einlesen 4. PIN-Eingabe (opt.) eingeben Chip-, Magnet- oder und Bestätigung Kontaktlos-Karte (siehe Kartenleser S.8) Zahlungsverfahren (optional) Sofern freigeschaltet, kann das Zahlungsverfahren select select im Zuge der Zahlung gewählt werden. ODER „Karte bitte“ Bildschirm › Anwendungsauswahl CORR aktivieren (select-Button oder gelbe CORR -Taste) ›... - Seite 10 Bitte beachten Sie, dass die Softkey-Bele- gung vom Netzbetreiber definiert wird. Softkeys Bestimmte Funktionen müssen vor Nut- zung freigeschaltet werden. Menü-Aufruf (Passworteingabe Kassierer, MENU Manager oder Techniker) Favoriten-Aufruf (Anzeige der möglichen Anwendungsauswahl (Wahl des Zahlungsverfahrens) Softkey-Funktionen) select Belegwiederholung (druckt Händler– und Softkey-Reihenfolge ändern Kundenbeleg nochmals aus)
-
Seite 11: Technische Daten
CE Declaration of Conformity Hereby declares CCV Germany GmbH the accordance of the radio equipment CCV Pad Next and its power supply to the directive 2014/53/EU. The complete texts of the EU declarations of conformity are available on following internet address:... - Seite 12 Prüfen Sie dieses Siegel bitte regelmäßig auf Beschädigungen. Bei dem Siegel handelt es sich um ein Hologramm, das aus verschiedenen Blickwinkeln die Farbe ändert. Sollte das Siegel gebrochen oder verletzt sein, kontaktieren Sie bitte unverzüglich Ihren Netzbetreiber! © CCV GmbH https://www.ccv.eu Alle Rechte vorbehalten. Änderungen vorbehalten.