Inhaltsverzeichnis
Werbung
Verfügbare Sprachen
Verfügbare Sprachen
Quicklinks
Mod.
1093
DS1093-601
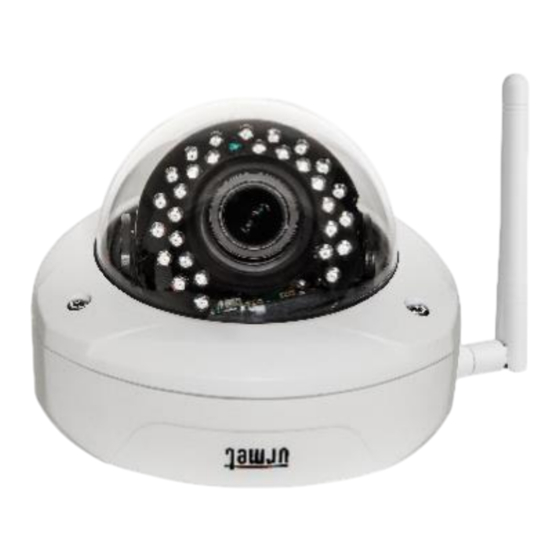
TELECAMERA VANDAL DOME ANTIVANDALO WiFi 720P
DAY & NIGHT OTTICA VARIFOCAL MOTORIZZATA 2.8-12MM
720P WiFi DAY & NIGHT VANDAL-PROOF DOME CAMERA
2.8-12MM MOTORIZED VARIFOCAL LENS BUILT-IN
VANDALISMUSGESCHÜTZTE WiFi 720P TAG & NACHT
KAMERA VARIFOKUS MIT MOTORANTRIEB 2.8-12MM
CAMÉRA DOME ANTI-VANDALISME WiFi 720P JOUR & NUIT
OPTIQUE VARIFOCAL MOTORISÉE 2.8-12MM
Sch./Ref./Typ/Réf. 1093/182WM1A
GUIDA RAPIDA
QUICK GUIDE
SCHNELLANLEITUNG
GUIDE RAPIDE
Werbung
Inhaltsverzeichnis

Verwandte Anleitungen für urmet 1093/182WM1A


Inhaltszusammenfassung für urmet 1093/182WM1A
- Seite 1 720P WiFi DAY & NIGHT VANDAL-PROOF DOME CAMERA 2.8-12MM MOTORIZED VARIFOCAL LENS BUILT-IN VANDALISMUSGESCHÜTZTE WiFi 720P TAG & NACHT KAMERA VARIFOKUS MIT MOTORANTRIEB 2.8-12MM CAMÉRA DOME ANTI-VANDALISME WiFi 720P JOUR & NUIT OPTIQUE VARIFOCAL MOTORISÉE 2.8-12MM Sch./Ref./Typ/Réf. 1093/182WM1A GUIDA RAPIDA QUICK GUIDE SCHNELLANLEITUNG GUIDE RAPIDE...
- Seite 2 ➢ Questa apparecchiatura non è progettata come antifurto ma principalmente per trasmettere ed eventualmente per registrare immagini. Perciò, qualora l’utilizzatore subisca un furto, la società URMET S.p.A. non può essere considerata responsabile di alcuna perdita o danno conseguente. ➢ Effettuare una registrazione di prova prima di utilizzare l’apparecchiatura per verificare che l’operazione avvenga correttamente.
- Seite 3 DICHIARAZIONE DI CONFORMITÀ UE SEMPLIFICATA Il fabbricante, URMET S.p.A., dichiara che il tipo di apparecchiatura radio: TELECAMERA 1093/182WM1A è conforme alla direttiva 2014/53/UE. Il testo completo della dichiarazione di conformità UE è disponibile al seguente indirizzo Internet: www.urmet.com INSTALLAZIONE Si consiglia di attenersi ai seguenti accorgimenti per una corretta installazione e configurazione della telecamera: Prima di procedere con l’installazione, assicurarsi che tutte le unità...
-
Seite 4: Messa In Rete Della Tlc
CONFIGURAZIONE SU RETE WIFI DA APP La telecamera può essere facilmente configurata su rete WiFi da smartphone, in tal caso fare riferimento alla Quick Guide cartacea dell’APP URMET V-Stream fornita a corredo del prodotto. CONFIGURAZIONE SU RETE CABLATA E CONNESSIONE DA APP Utilizzare il cavo di rete per collegare la telecamera al router e alimentarla, la telecamera riceverà... - Seite 5 Dopo aver rilevato la Telecamera IP premere il pulsante destro del mouse e selezionare “open in IE” (aprire in IE), verrà aperta una pagina Web su IE. Qualora dovesse essere richiesta l’installazione di un componente ActiveX, fare riferimento alla sezione dedicata del manuale completo. Nella schermata di accesso aperta dal browser è...
- Seite 6 Premere il pulsante “Search” (Ricerca), si aprirà la seguente schermata che visualizzerà le reti WiFi disponibili e la potenza del segnale rilevato per ciascuna rete: Selezionare l’SSID della rete Wifi cui va collegata la telecamera, inserire la chiave di rete salvare configurazione tramite...
- Seite 7 Guida rapida e manuale completo del dispositivo sono disponibili al seguente indirizzo Guida rapida e manuale completo sono altresì disponibili per il DOWNLOAD dal sito URMET al percorso: PRODOTTI → VIDEOSORVEGLIANZA → ricerca la scheda del prodotto → DOCUMENTAZIONE E RISORSE del prodotto.
-
Seite 8: Simplified Eu Declaration Of Conformity
Video recording ➢ This device is not designed as a burglar system but mainly to transmit and record video images. URMET S.p.A. is not in any way responsible for loss or damages of the user consequent to theft. ➢ Before using the device, record a demo video to verify the correct functionality of this feature. - Seite 9 INSTALLATION It is advisable to proceed as follows for correct camera installation and configuration: Make sure that no units are powered before starting the installation procedure. Mount the aerial on the camera. It is advisable to install and configure one camera at a time if you are installing multiple cameras on the same network.
-
Seite 10: How To Configure The Camera In A Network
IP 192.168.1.168 to itself. Download the URMET App V-Stream from the store and use it to connect to the camera by simply scanning its QR code label, then it will be possible to display the camera’s pictures on the smartphone through the internet. - Seite 11 After having detected the IP camera, right click and select “open in IE” (aprire in IE) to open a Web page on IE. See the applicable section in the complete manual if installation of an ActiveX component is required. You can select user name (default: admin), password (default: admin), stream type (Main/Sub/Mobile Stream) and language on the log in page.
- Seite 12 Press the “Search” (Ricerca) button to open the following page showing all the available WiFi networks and the signal power detected for each one: Select the SSID of the WiFi network you want to connect the camera to, enter the network key and save the configuration by pressing the “Save”...
- Seite 13 Disconnect the network cable from the camera to switch it to WiFi mode. Press the “Refresh List” (Aggiorna) button of “EasyTool” to check that the camera appears again when it is connected to the WiFi network. If you want the camera to record and store video files on a micro SD card (not included), plug the micro SD card into the slot when the camera is powered off.
- Seite 14 Quick guide and complete user manual of the product are available at the following link Quick guide and complete user manual of the product are also available for download from the URMET website under the path: PRODUCTS → CCTV–VIDEO SURVEILLANCE → find the product →...
- Seite 15 Die Kamera ist im DHCP Modus eingerichtet. Falls das Netzwerk bei dem die Kamera eingebunden wird, nicht DHCP fähig ist, startet die Kamera automatisch mit der IP-Adresse IP 192.168.1.168. Mit Hilfe der Software Urmet " Easy Tool " kann die Kamera im Netzwerk erfasst und danach konfiguriert werden.
-
Seite 16: Vereinfachte Eu-Konformitätserklärung
VEREINFACHTE EU-KONFORMITÄTSERKLÄRUNG Hiermit erklärt URMET S.p.A., dass der Funkanlagentyp kamera 1093/182WM1A der Richtlinie 2014/53/EU entspricht. Der vollständige Text der EU-Konformitätserklärung ist unter der folgenden Internetadresse verfügbar: www.urmet.com INSTALLATION Wir empfehlen Ihnen, für eine ordnungsgemäße Installation und Konfiguration der Kamera die folgenden Hinweise zu beachten: Vergewissern Sie sich vor der Installation, ob alle anzuschließenden Einheiten stromlos... -
Seite 17: Wie Wird Die Kamera In Einem Netzwerk Konfiguriert
WIE WIRD DIE KAMERA ÜBER DIE APP IN EIN NETZWERK HINZU GEFÜGT Die Kamera kann einfach über das WLAN Netzwerk mittels eines Smartphones konfiguriert werden, hierzu nutzen Sei bitte die Schnellanleitung der Urmet App “V-Stream” die sich im Lieferumfang des Produkts befindet. - Seite 18 Die Software „EasyTool“ auf dem PC starten. Durch Auswahl von werden automatisch die IP-Adresse, die Subnet Mask, das Gateway und die MAC- Adresse aller im LAN aktiven Kameras eingeblendet, wie in der Abbildung im Anschluss dargestellt. Nach Erfassung der IP-Kamera rechte Maustaste drücken und „open in IE“ (in IE öffnen) wählen;...
- Seite 19 Menü „Remote Setting“ (Remote-Einstellungen) und dann links unter „Network“ (Netzwerk) das Menü „Wireless“ wählen. Taste „Search“ (Suche) betätigen; daraufhin öffnet sich die folgende Ansicht mit den verfügbaren Wifi-Netzwerken und der Signalstärke der einzelnen Netzwerke. Wählen Sie die SSID des Wifi-Netzwerks, mit dem die Kamera verbunden werden soll, geben Sie den Netzwerkcode ein und speichern Sie die Konfiguration mit der Taste „Save“...
- Seite 20 Das Netzwerkkabel von der Kamera trennen, damit diese in den WiFi-Modus übergehen kann, die „Refresh List“-Taste (Aktualisieren) der „EasyTool“-Software drücken, um sicherzustellen, dass die Kamera erneut angezeigt wird, aber diesmal mit dem WiFi-Netzwerk verbunden ist. Für eine Speicherung der Aufzeichnungen auf einer Mikro SD-Karte (nicht im Lieferumfang), führen Sie die Karte bei ausgeschalteter Kamera in den SD- Kartenslot ein.
-
Seite 21: Zuweisung Einer Statischen Ip-Adresse
Die Schnellanleitung, sowie die komplette Bedienungsanleitung stehen unter dem folgenden Link zur Verfügung Die Schnellanleitung, sowie die komplette Bedienungsanleitung stehen außerdem auf der URMET Internetseite in der Sektion: PRODUCTS → CCTV–VIDEO SURVEILLANCE → finde das Produkt → DOCUMENTATION AND RESOURCES des Produkts (Die Webseite wird in Englisch dargestellt). - Seite 22 Ce dispositif a été principalement conçu afin de transmettre et enregistrer des images vidéo, et non pas en tant qu’avertisseur d’effraction. URMET S.p.A. ne saurait être tenu pour responsable de quelque façon que ce soit des pertes ou des dommages consécutifs à...
-
Seite 23: Déclaration Ue De Conformité Simplifiée
DÉCLARATION UE DE CONFORMITÉ SIMPLIFIÉE Le soussigné, URMET S.p.A., déclare que l’équipement radioélectrique du type caméra Réf. 1093/182WM1A est conforme à la directive 2014/53/UE. Le texte complet de la déclaration UE de conformité est disponible à l’adresse internet suivante: www.urmet.com INSTALLATION Pour la bonne installation et configuration de la caméra, il est conseillé... - Seite 24 DHCP sur le réseau, la caméra attribue automatiquement à soi-même l'adresse d'usine 192.168.1.168. Utilisez l’application pour smartphone URMET V-Stream disponible sur les stores pour scanner le code QR de la caméra et pouvoir visionner les images à travers Internet.
- Seite 25 Après avoir détecté la caméra IP, appuyer sur la touche droite de la souris et sélectionner « open in IE » (ouvrir sur IE) pour ouvrir une page Web sur IE. Si le système demande d'installer un composant ActiveX, se reporter à la section dédiée du manuel complet.
- Seite 26 Appuyer sur la touche « Search » (Rechercher) pour ouvrir l'écran suivant affichant les réseaux Wi-Fi disponibles et la puissance du signal détecté par chaque réseau : Sélectionner le SSID du réseau Wi-Fi auquel il faut connecter la caméra, saisir la clé de réseau et enregistrer la configuration par la touche «...
- Seite 27 Débrancher le câble de réseau de la caméra pour la porter en mode Wi-Fi, appuyer sur la touche « Refresh List » (Actualiser) du logiciel « EasyTool » pour s'assurer que la caméra est affichée à nouveau cette fois sur le réseau Wi-Fi. En cas d’enregistrement sur carte micro-SD (qui n’est pas fournie avec le produit) bien insérer la carte mémoire dans la fente et formater la carte micro-SD par la page de la caméra ou par l’applicaion mobile avant d’activer l’enregistrement.
- Seite 28 Guide rapide et manuel d'utilisation complet du produit sont également disponibles en téléchargement à partir du site Web URMET dans la section: PRODUCTS → CCTV–VIDEO SURVEILLANCE → chercher le produit → DOCUMENTATION AND RESOURCES du produit (le site web est en anglais).
- Seite 29 DS1093-601...
- Seite 30 DS1093-601...
- Seite 31 DS1093-601...
- Seite 32 DS1093-601 Prodotto in Cina su specifica URMET Made in China to URMET specification DS1093-601...