Herunterladen Diese Seite drucken

Werbung

Verfügbare Sprachen

Verfügbare Sprachen

EUF1900FW
.................................................. ...............................................
DE GEFRIERGERÄT
FR CONGÉLATEUR
IT CONGELATORE
EN FREEZER
BENUTZERINFORMATION
NOTICE D'UTILISATION
ISTRUZIONI PER L'USO
USER MANUAL
2
20
37
54

Werbung

loading

Inhaltszusammenfassung für Electrolux EUF1900FW

  • Seite 1 ....................EUF1900FW DE GEFRIERGERÄT BENUTZERINFORMATION FR CONGÉLATEUR NOTICE D'UTILISATION IT CONGELATORE ISTRUZIONI PER L’USO EN FREEZER USER MANUAL...
  • Seite 2 12. UMWELTTIPPS ............19 WIR DENKEN AN SIE Vielen Dank, dass Sie sich für ein Electrolux Gerät entschieden haben. Sie haben ein Produkt gewählt, hinter dem eine jahrzehntelange professionelle Erfahrung und Innovation steht. Bei der Entwicklung dieses großartigen und eleganten Geräts haben wir an Sie gedacht.
  • Seite 3 DEUTSCH SICHERHEITSHINWEISE Lesen Sie zu Ihrer Sicherheit und für die dem Entsorgen des Altgerätes un- optimale Geräteanwendung vor der Instal- brauchbar. So verhindern Sie, dass das lation und dem Gebrauch des Gerätes die Gerät nicht zu einer Todesfalle für Kinder vorliegende Benutzerinformation aufmerk- wird.
  • Seite 4 WARNUNG! • Lagern Sie keine feuergefährlichen Gase Elektrische Bauteile (Netzkabel, oder Flüssigkeiten in dem Gerät. Explosi- Stecker, Kompressor) dürfen zur onsgefahr. Vermeidung von Gefahren nur vom • Legen Sie Lebensmittel nicht direkt vor Kundendienst oder einer Fachkraft den Luftauslass in der Rückwand. (Wenn ausgewechselt werden.
  • Seite 5 DEUTSCH bei dem Sie es erworben haben. Bewah- nur von einem qualifizierten Elektriker ren Sie in diesem Fall die Verpackung oder einem Elektro-Fachmann durchge- auf. führt werden. • Lassen Sie das Gerät mindestens vier • Wenden Sie sich für Reparaturen und Stunden stehen, bevor Sie es elektrisch Wartung nur an Fachkräfte der autori- anschließen, damit das Öl in den Kom-...
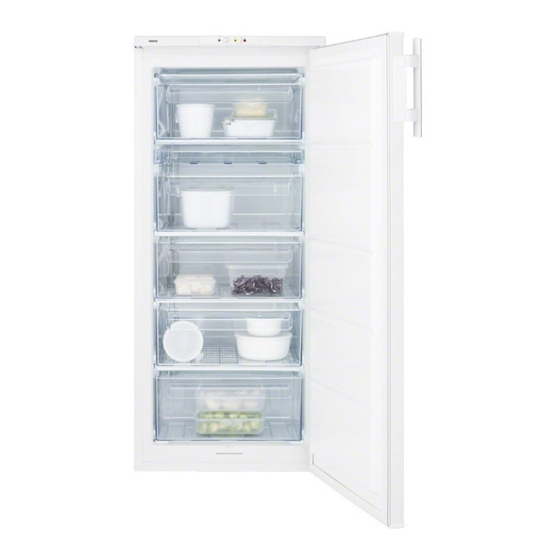
  • Seite 6 2. GERÄTEBESCHREIBUNG Bedienfeld Geschirrwagen Gefrierschubladen Typenschild (an der Innenseite) Gefriertablett Abtauwasserauslauf 3. BEDIENFELD Grüne Ein/Aus-Kontrolllampe Stecken Sie den Stecker in die Netz- steckdose. Temperaturregler und Ein-/Aus-Schal- Drehen Sie den Temperaturregler im Uhrzeigersinn auf eine niedrigere Tem- Gelbe Superfrost-Kontrolllampe peratur unterhalb der - 16 °C-Position.
  • Seite 7 DEUTSCH ist eine akustische Signalabfolge zu (rote Alarm-Kontrolllampe) und als akusti- hören, die durch einmaliges Drücken scher Alarm gibt das Gerät eine akustische der Taste zum Abschalten des Alarm- Signalabfolge aus. signals und für die Superfrost-Funktion Der Alarmton kann durch einmaliges Drü- abgeschaltet werden kann.
  • Seite 8 Platz für ein erneutes Falls die Superfrost-Taste verse- Schnellgefrieren zu schaffen. hentlich eingeschaltet bleibt, schal- tet sich die Funktion automatisch 48 Stunden später aus. Die gelbe Superfrost-Kontrolllampe erlischt dann ebenfalls. 4. ERSTE INBETRIEBNAHME Verwenden Sie keine aggressiven 4.1 Reinigung des Innenraums...
  • Seite 9 DEUTSCH 6. PRAKTISCHE TIPPS UND HINWEISE • Werden Eiswürfel direkt nach der Ent- 6.1 Hinweise zum Einfrieren nahme aus dem Gefrierfach verwendet, Im Folgenden finden Sie einige wertvolle können sie Frostbrand auf der Haut ver- Tipps für einen optimalen Gefriervorgang: ursachen.
  • Seite 10 10 www.electrolux.com VORSICHT! Ziehen Sie nicht an Leitungen und/ oder Kabeln im Innern des Kühl- Fassen Sie eingefrorene Lebens- schranks und achten Sie darauf, mittel nicht mit nassen Händen an. diese nicht zu verschieben oder zu Ihre Hände könnten an den Le- beschädigen.
  • Seite 11 DEUTSCH WARNUNG! Trennen Sie das Gerät von der Netz- Entfernen Sie Reif und Eis vom versorgung. Verdampfer bitte niemals mit Entnehmen Sie alle Lebensmittel. scharfen Gegenständen, da dieser Tauen Sie das Gerät ab; reinigen Sie dadurch beschädigt werden könn- den Innenraum und das gesamte Zu- behör.
  • Seite 12 12 www.electrolux.com Problem Mögliche Ursache Abhilfe Es wurden zu große Men- Warten Sie einige Stunden gen an Lebensmitteln und prüfen Sie dann die gleichzeitig zum Einfrieren Temperatur erneut. eingelegt. In das Gerät eingelegte Le- Lassen Sie Lebensmittel auf bensmittel waren noch zu Raumtemperatur abkühlen,...
  • Seite 13 DEUTSCH Problem Mögliche Ursache Abhilfe Das Gerät ist nicht einge- Schalten Sie das Gerät ein. schaltet. Es liegt keine Spannung an Rufen Sie einen Elektriker. der Netzsteckdose an (schließen Sie zum Test ein anderes Gerät an). Das Gerät kühlt Der Stecker ist nicht richtig Stecken Sie den Netzste- überhaupt nicht.
  • Seite 14 14 www.electrolux.com 9.2 Distanzstücke hinten Im Beutel mit Dokumentationsunterlagen befinden sich zwei Distanzstücke, die wie in der Abbildung gezeigt, angebracht werden müssen. 45° Setzen Sie die Distanzstücke in die Öff- nungen ein. Stellen Sie sicher, dass der Pfeil (A), wie in der Abbildung ge- 45°...
  • Seite 15 DEUTSCH 9.4 Standort Das Gerät sollte in ausreichendem Abstand von Wärmequellen wie Heizungen, Boilern, 100 mm direkter Sonneneinstrahlung, usw. aufgestellt werden. Vergewissern Sie sich, dass Luft an der Rückseite des Gehäuses frei zirkulieren kann. Wenn das Gerät unter einem Hänge- schrank installiert wird, muss der Abstand zwischen der Geräteoberseite und dem Hän- geschrank mindestens 100 mm betragen,...
  • Seite 16 16 www.electrolux.com • Schrauben Sie den Stift des oberen Tür- scharniers ab und schrauben Sie ihn an der gegenüberliegenden Seite wieder an. • Hängen Sie die Gerätetür in den Stift des oberen Scharniers ein. • Entfernen Sie das untere Scharnier. Ste- cken Sie es in Pfeilrichtung auf den Stift.
  • Seite 17 DEUTSCH 10. GERÄUSCHE Während das Gerät in Betrieb ist, entste- hen bestimmte Geräusche (Kompressor und Kühlkreislauf). HISSS! BRRR! BRRR! BRRR! BLUBB! BLUBB!
  • Seite 18 18 www.electrolux.com HISSS! HISSS! SSSRRR! SSSRRR! CRACK! CRACK! 11. TECHNISCHE DATEN Abmessungen Höhe 1250 mm Breite 545 mm Tiefe 640 mm Lagerzeit bei Störung 18 Std. Spannung 230 V Frequenz 50 Hz...
  • Seite 19 DEUTSCH Die technischen Daten befinden sich auf der linken Seite sowie auf der Energiepla- dem Typenschild im Innern des Gerätes auf kette. 12. UMWELTTIPPS Recyceln Sie Materialien mit dem Symbol Information: Wohin mit den Altgeräten? Überall dort wo neue Geräte verkauft .
  • Seite 20 12. EN MATIÈRE DE PROTECTION DE L'ENVIRONNEMENT ......36 NOUS PENSONS À VOUS Merci d'avoir choisi ce produit Electrolux. Avec ce produit, vous bénéficiez de dizaines d'années d'expérience professionnelle et d'innovation. Ingénieux et élégant, il a été conçu sur mesure pour vous.
  • Seite 21 FRANÇAIS CONSIGNES DE SÉCURITÉ Pour votre sécurité et garantir une utilisa- 1.2 Consignes générales de tion correcte de l'appareil, lisez attentive- sécurité ment cette notice, y compris les conseils et avertissements, avant d'installer et d'utiliser AVERTISSEMENT l'appareil pour la première fois. Pour éviter toute erreur ou accident, veillez à...
  • Seite 22 22 www.electrolux.com Ne branchez pas le cordon d'ali- • Un produit décongelé ne doit jamais être mentation à une rallonge. recongelé. Assurez-vous que la prise n'est pas • Conservez les aliments emballés confor- écrasée ou endommagée par l'arriè- mément aux instructions de leur fabri- re de l'appareil.
  • Seite 23 FRANÇAIS chauffe. Pour assurer une ventilation suf- torisé, exclusivement avec des pièces fisante, respectez les instructions de la d'origine. notice (chapitre Installation). • Placez l'appareil dos au mur pour éviter 1.7 Protection de tout contact avec le compresseur et le l'environnement condenseur (risque de brûlure).
  • Seite 24 24 www.electrolux.com 3. BANDEAU DE COMMANDE Voyant Marche/Arrêt vert Pour mettre l'appareil hors tension, dé- branchez la fiche d'alimentation de la Thermostat et interrupteur Marche/Ar- prise murale. rêt Voyant Congélation rapide jaune 3.3 Réglage de la température Touche Arrêt du signal sonore et Con- gélation rapide...
  • Seite 25 FRANÇAIS Lorsque vous mettez en fonction- des performances de congélation opti- nement le congélateur pour la pre- males, retirez le compartiment de con- mière fois, le voyant d'alarme rouge gélation et les tiroirs (si présents) et clignote jusqu'à ce que la tempéra- rangez les aliments directement sur ture interne atteigne le niveau re- l'évaporateur.
  • Seite 26 26 www.electrolux.com trier, les emballer et les ranger dans les 5.3 La décongélation compartiments de stockage. Les aliments surgelés ou congelés peuvent être décongelés à température ambiante. 5.2 Conservation des aliments Les petites pièces peuvent même être cui- congelés tes sans décongélation préalable : dans ce cas, la cuisson est plus longue.
  • Seite 27 FRANÇAIS • évitez d'ouvrir trop souvent la porte du • ne dépassez pas la durée de conserva- congélateur et ne la laissez ouverte que tion indiquée par le fabricant. le temps nécessaire ; • une fois décongelés, les aliments se dé- tériorent rapidement et ne peuvent pas être recongelés ;...
  • Seite 28 28 www.electrolux.com 7.3 En cas d'absence prolongée ou de non-utilisation Prenez les précautions suivantes : débranchez l'appareil retirez tous les aliments dégivrez et nettoyez l'appareil et tous les accessoires laissez la porte/les portes ouverte(s) pour prévenir la formation d'odeurs désagréables.
  • Seite 29 FRANÇAIS 8. EN CAS D'ANOMALIE DE FONCTIONNEMENT AVERTISSEMENT L'appareil fonctionne de façon dis- Avant d'intervenir sur l'appareil, dé- continue. L'arrêt du compresseur branchez-le électriquement. ne signifie donc pas l'absence de La résolution des problèmes non courant électrique. L'appareil doit mentionnés dans la présente notice être débranché...
  • Seite 30 30 www.electrolux.com Anomalie Cause possible Solution La température à Le thermostat n'est pas ré- Modifiez la position du ther- l'intérieur du congé- glé correctement. mostat pour obtenir plus de lateur est trop éle- froid. vée. La porte ne ferme pas de Vérifiez que la porte ferme...
  • Seite 31 FRANÇAIS Anomalie Cause possible Solution Clignotement du Capteur de température Faites appel au service voyant vert défectueux après-vente 8.1 Fermeture de la porte Si nécessaire, remplacez les joints de porte défectueux. Contactez votre ser- Nettoyez les joints de la porte. vice après-vente.
  • Seite 32 32 www.electrolux.com 9.3 Mise à niveau Lorsque vous installez l'appareil, veillez à le placer de niveau. Servez-vous des deux pieds réglables se trouvant à l'avant de l'appareil (2). Si besoin est, réglez les pieds en retirant l'entretoise (1). 9.4 Emplacement L'appareil doit être installé...
  • Seite 33 FRANÇAIS 9.5 Réversibilité de la porte Pour effectuer les opérations sui- vantes, il est conseillé de se faire aider par une autre personne pour maintenir fermement les portes lors de toute manipulation de l'appareil. Pour changer le sens d'ouverture de la por- te, procédez comme suit : •...
  • Seite 34 34 www.electrolux.com Si la température ambiante est basse (par exemple, en hiver), il se peut que le joint n'adhère pas parfaitement. Dans ce cas, attendez que le joint reprenne sa taille natu- relle. Si vous ne souhaitez pas effectuer person- nellement les opérations décrites ci-des-...
  • Seite 35 FRANÇAIS BRRR! BRRR! BLUBB! BLUBB! HISSS! HISSS! SSSRRR! SSSRRR!
  • Seite 36 36 www.electrolux.com CRACK! CRACK! 11. CARACTÉRISTIQUES TECHNIQUES Dimension Hauteur 1250 mm Largeur 545 mm Profondeur 640 mm Autonomie de fonctionne- 18 h ment Tension 230 V Fréquence 50 Hz Les caractéristiques techniques figurent sur gauche à l'intérieur de l'appareil et sur l'éti- la plaque signalétique située sur le côté...
  • Seite 37 12. CONSIDERAZIONI AMBIENTALI ..........53 PENSATI PER VOI Grazie per aver acquistato un'apparecchiatura Electrolux. Avete scelto un prodotto che ha alle spalle decenni di esperienza professionale e innovazione. Ingegnoso ed elegante, è stato progettato pensando a voi.
  • Seite 38 38 www.electrolux.com INFORMAZIONI PER LA SICUREZZA Per garantire un impiego corretto e sicuro 1.2 Norme di sicurezza generali dell'apparecchio, prima dell'installazione e AVVERTENZA! del primo utilizzo leggere con attenzione il libretto istruzioni, inclusi i suggerimenti e le avvertenze. Per evitare errori e incidenti, è...
  • Seite 39 ITALIANO Evitare che il lato posteriore dell'ap- • Gli alimenti congelati non devono essere parecchiatura possa schiacciare o ricongelati una volta scongelati. danneggiare la spina, causandone il • Riporre gli alimenti surgelati preconfezio- surriscaldamento con un conse- nati secondo le istruzioni del produttore guente rischio di incendio.
  • Seite 40 40 www.electrolux.com una ventilazione sufficiente seguire le 1.7 Tutela ambientale istruzioni di installazione. Questo apparecchio non contiene • Se possibile il retro dell'apparecchio do- gas che potrebbero danneggiare lo vrebbe essere posizionato contro una strato di ozono nel circuito refrige- parete per evitare di toccare le parti cal- rante o nei materiali isolanti.
  • Seite 41 ITALIANO 3. PANNELLO DEI COMANDI Spia On/Off verde 3.3 Regolazione della temperatura Regolatore della temperatura e inter- ruttore On/Off La temperatura all'interno dell'apparecchia- Spia di congelamento rapido gialla tura è controllata dal Regolatore della Tem- Interruttore disattivazione segnale acu- peratura che si trova sul Pannello dei co- stico e congelamento rapido mandi.
  • Seite 42 42 www.electrolux.com Quando si accende il congelatore Sistemare gli alimenti nei vani del con- per la prima volta, la spia di allarme gelatore (il primo ed il secondo conte- rossa lampeggerà fino a quando la nitore). Per ottenere la massima pre-...
  • Seite 43 ITALIANO 5.2 Conservazione dei surgelati 5.3 Scongelamento Al primo avvio o dopo un periodo di non Prima dell'utilizzo, i cibi surgelati o congelati utilizzo, lasciare in funzione l'apparecchia- possono essere scongelati a temperatura tura per almeno 2 ore con una regolazione ambiente.
  • Seite 44 44 www.electrolux.com 7. PULIZIA E CURA ATTENZIONE 7.2 Sbrinamento del congelatore Staccare la spina dell'apparecchio È normale che sui ripiani del congelatore e prima di eseguire lavori di manu- intorno allo scomparto superiore si formi, tenzione. con il tempo, uno strato di brina.
  • Seite 45 ITALIANO Accendere l’apparecchiatura. 7.3 Periodi di inutilizzo Girare il termostato sulla posizione di Se l'apparecchiatura non viene utilizzata << -18 °C >> e lasciarlo in funzione per un lungo periodo, adottare le seguenti per almeno 4 ore in modalità congela- precauzioni: mento rapido.
  • Seite 46 46 www.electrolux.com Problema Possibile causa Soluzione La porta viene aperta trop- Limitare il più possibile il po frequentemente. tempo di apertura della por- Sono stati introdotti molti Attendere alcune ore e ri- alimenti da surgelare con- controllare la temperatura. temporaneamente...
  • Seite 47 ITALIANO Problema Possibile causa Soluzione L'apparecchiatura non rice- Provare a collegare un'altra ve corrente apparecchiatura elettrica alla presa di alimentazione L'apparecchiatura non è Accendere l'apparecchiatura accesa. Nella presa di alimentazio- Rivolgersi a un elettricista. ne non è presente tensione (provare a collegarvi un'al- tra apparecchiatura elettri- L'apparecchiatura La spina non è...
  • Seite 48 48 www.electrolux.com 9.2 Distanziatori posteriori Nella custodia della documentazione sono inclusi due distanziatori, da installare come mostrato nella figura. Inserire i distanziatori nei fori. Controlla- 45° re che la freccia (A) sia posizionata co- me illustrato nella figura. Ruotare i distanziatori di 45° in senso 45°...
  • Seite 49 ITALIANO 9.4 Posizione L'apparecchiatura deve essere installata lon- tano da fonti di calore come per esempio ter- 100 mm mosifoni, boiler, luce solare diretta, ecc.. Veri- ficare che sul lato posteriore sia garantita un'adeguata circolazione dell'aria. Per otte- nere prestazioni ottimali, se l'apparecchiatura è...
  • Seite 50 50 www.electrolux.com • Svitare il perno della cerniera superiore della porta dell'apparecchiatura, quindi riavvitarlo in sede sull'altro lato. • Montare la porta dell'apparecchiatura sul perno della cerniera superiore. • Rimuovere la cerniera inferiore. Inserire il perno nella direzione della freccia.
  • Seite 51 ITALIANO 10. RUMORI Durante l'uso, alcuni rumori di funziona- circuito refrigerante) sono da considerarsi mento (come quelli del compressore o del normali. HISSS! BRRR! BRRR! BRRR! BLUBB! BLUBB!
  • Seite 52 52 www.electrolux.com HISSS! HISSS! SSSRRR! SSSRRR! CRACK! CRACK! 11. DATI TECNICI Dimensioni Altezza 1250 mm Larghezza 545 mm Profondità 640 mm Tempo di risalita 18 h Tensione 230 V Frequenza 50 Hz...
  • Seite 53 ITALIANO I dati tecnici sono riportati sulla targhetta no dell'apparecchiatura, e sull'etichetta dei del modello, applicata sul lato sinistro inter- valori energetici. 12. CONSIDERAZIONI AMBIENTALI Informazioni: Dove portare gli Riciclare i materiali con il simbolo apparecchi fuori uso? In qualsiasi Buttare l'imballaggio negli appositi negozio che vende apparecchi nuovi contenitori per il riciclaggio.
  • Seite 54 12. ENVIRONMENT CONCERNS ..........69 WE’RE THINKING OF YOU Thank you for purchasing an Electrolux appliance. You’ve chosen a product that brings with it decades of professional experience and innovation. Ingenious and stylish, it has been designed with you in mind.
  • Seite 55 ENGLISH SAFETY INFORMATION In the interest of your safety and to ensure Keep ventilation openings, in the appliance the correct use, before installing and first enclosure or in the built-in structure, clear using the appliance, read this user manual of obstruction. carefully, including its hints and warnings.
  • Seite 56 56 www.electrolux.com If the power plug socket is loose, do 1.4 Care and cleaning not insert the power plug. There is a • Before maintenance, switch off the appli- risk of electric shock or fire. ance and disconnect the mains plug You must not operate the appliance from the mains socket.
  • Seite 57 ENGLISH • This product must be serviced by an au- together with the urban refuse and thorized Service Centre, and only genu- rubbish. The insulation foam con- ine spare parts must be used. tains flammable gases: the appli- ance shall be disposed according to the applicable regulations to ob- 1.7 Environment Protection tain from your local authorities.
  • Seite 58 58 www.electrolux.com Temperature Regulator and On/Off • turn the Temperature Regulator toward Switch higher settings to obtain the maximum coldness. Yellow Fast Freeze Indicator Light Acoustic Signal Stop and Fast Freeze A medium setting is generally the Switch most suitable.
  • Seite 59 ENGLISH evaporator. In case of freezing smaller compartments (storing compartments) food volumes do not need to remove to make room for another freezing. the freezer tray and drawers. If the Fast Freeze Switch is acci- Once the food is completely frozen (it dentally left on, the fast-freeze may take up to 24 hours) you can function will be automatically...
  • Seite 60 60 www.electrolux.com 6. HELPFUL HINTS AND TIPS • water ices, if consumed immediately af- 6.1 Hints for freezing ter removal from the freezer compart- To help you make the most of the freezing ment, can possibly cause the skin to be process, here are some important hints: freeze burnt;...
  • Seite 61 ENGLISH casing of this appliance is only cleaned with In order to speed up the defrosting warm water with a little washing-up liquid process, place a pot of warm water added. in the freezer compartment. In ad- After cleaning, reconnect the equipment to dition, remove pieces of ice that the mains supply.
  • Seite 62 62 www.electrolux.com 8. WHAT TO DO IF… WARNING! The appliance operates discontinu- Before troubleshooting, disconnect ously, so the stopping of compres- the mains plug from the mains sor does not mean being no cur- socket. rent. That is why you must not...
  • Seite 63 ENGLISH Problem Possible cause Solution Food placed in the appli- Allow food to cool to room ance was too warm temperature before storing. Products to be frozen are Place the products in a way placed too closely to each so that cold air could circu- other late among them It is too cold inside...
  • Seite 64 64 www.electrolux.com appliance at a location where the ambient Cli- Ambient temperature temperature corresponds to the climate mate class indicated on the rating plate of the class appliance: +10°C to + 32°C +16°C to + 32°C +16°C to + 38°C +16°C to + 43°C...
  • Seite 65 ENGLISH 9.4 Location The appliance should be installed well away from sources of heat such as radiators, boil- 100 mm ers, direct sunlight etc. Ensure that air can circulate freely around the back of the cabi- net.To ensure best performance, if the appli- ance is positioned below an overhanging wall unit, the minimum distance between the top of the cabinet and the wall unit must be at...
  • Seite 66 66 www.electrolux.com • Unscrew the top door hinge pin of the appliance then screw it back on the oth- er side • Fit the appliance door on the upper door hinge pin. • Remove the lower hinge. Put over the pin in the direction of the arrow.
  • Seite 67 ENGLISH HISSS! BRRR! BRRR! BRRR! BLUBB! BLUBB!
  • Seite 68 68 www.electrolux.com HISSS! HISSS! SSSRRR! SSSRRR! CRACK! CRACK! 11. TECHNICAL DATA Dimension Height 1250 mm Width 545 mm Depth 640 mm Rising Time 18 h Voltage 230 V Frequency 50 Hz...
  • Seite 69 ENGLISH The technical information are situated in the rating plate on the internal left side of the appliance and in the energy label. 12. ENVIRONMENT CONCERNS and electronic appliances. Do not dispose Recycle the materials with the symbol appliances marked with the symbol with Put the packaging in applicable containers to recycle it.
  • Seite 70 70 www.electrolux.com...
  • Seite 71 ENGLISH...
  • Seite 72 www.electrolux.com/shop...