Herunterladen Inhalt Inhalt Diese Seite drucken
IMG STAGE LINE ODC-100/RGB Bedienungsanleitung

IMG STAGE LINE ODC-100/RGB Bedienungsanleitung

Dmx-led-scheinwerfer dmx led spotlight
Vorschau ausblenden Andere Handbücher für ODC-100/RGB:
Inhaltsverzeichnis

Werbung

Verfügbare Sprachen
  • DE

Verfügbare Sprachen

  • DEUTSCH, seite 1
DMX-LED-Scheinwerfer
DMX LED Spotlight
ODC-100/RGB
Bestell-Nr. • Order No. 38.7090
BEDIENUNGSANLEITUNG
INSTRUCTION MANUAL
MODE D'EMPLOI
ISTRUZIONI PER L'USO
GEBRUIKSAANWIJZING
MANUAL DE INSTRUCCIONES
INSTRUKCJA OBSŁUGI
SIKKERHEDSOPLYSNINGER
SÄKERHETSFÖRESKRIFTER
TURVALLISUUDESTA
ELECTRONICS FOR SPECIALISTS ELECTRONICS FOR SPECIALISTS ELECTRONICS FOR SPECIALISTS ELECTRONICS FOR SPECIALISTS
PARC-100/RGB
Bestell-Nr. • Order No. 38.7120

Werbung

Inhaltsverzeichnis
loading

Inhaltszusammenfassung für IMG STAGE LINE ODC-100/RGB

  • Seite 1 DMX-LED-Scheinwerfer DMX LED Spotlight ODC-100/RGB PARC-100/RGB Bestell-Nr. • Order No. 38.7090 Bestell-Nr. • Order No. 38.7120 BEDIENUNGSANLEITUNG INSTRUCTION MANUAL MODE D’EMPLOI ISTRUZIONI PER L’USO GEBRUIKSAANWIJZING MANUAL DE INSTRUCCIONES INSTRUKCJA OBSŁUGI SIKKERHEDSOPLYSNINGER SÄKERHETSFÖRESKRIFTER TURVALLISUUDESTA ELECTRONICS FOR SPECIALISTS ELECTRONICS FOR SPECIALISTS ELECTRONICS FOR SPECIALISTS ELECTRONICS FOR SPECIALISTS...
  • Seite 2 SAFETY ROPE POWER IN POWER OUT DMX IN DMX OUT MENU ENTER UP DOWN ODC-100/ RGB ➀ SAFETY ROPE POWER IN POWER OUT DMX IN DMX OUT FUSE MENU ENTER UP DOWN PARC-100/ RGB ➁...
  • Seite 3 Deutsch . . . . . . . . . . Seite English . . . . . . . . . . . Page Français .
  • Seite 4: Inhaltsverzeichnis

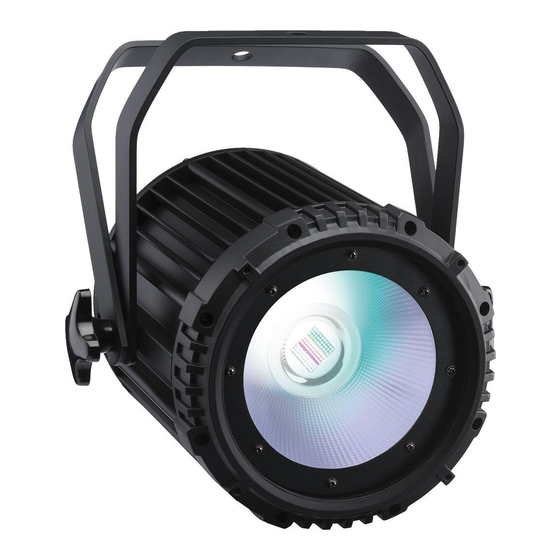
    DMX-LED-Scheinwerfer 1 Einsatzmöglichkeiten Diese Anleitung richtet sich an Bediener mit Dieser LED-Scheinwerfer dient zur Beleuchtung Grundkenntnissen in der DMX-Steuerung . Bitte z . B . auf Bühnen, in Diskotheken und Festsälen . lesen Sie die Anleitung vor dem Betrieb gründlich Als Lichtquelle ist eine lichtstarke COB-LED einge- durch und heben Sie sie für ein späteres Nach- setzt (COB = Chip-on-Board-Technologie): Viele...
  • Seite 5: Inbetriebnahme

    • 3.3 Stromversorgung Wird das Gerät zweckentfremdet, nicht sicher montiert, nicht richtig angeschlossen, falsch Mit dem Anschluss des Scheinwerfers ans Strom- bedient oder nicht fachgerecht repariert, kann netz ist er eingeschaltet . Das Display zeigt den keine Haftung für daraus resultierende Sach- zuletzt gewählten Menüpunkt und erlischt nach oder Personenschäden und keine Garantie für 30 s .
  • Seite 6: Parc-100 / Rgb

    4.1 Eigenständiger Betrieb entstehen . Darum nur maximal 19 Geräte ODC-100 / RGB miteinander verbinden . 4.1.1 Farbstrahler und Stroboskop 2) Am letzten Gerät auf die Kupplung des Ka- In diesem Modus strahlt der Scheinwerfer kon- bels POWER OUT die beiliegende Schutzkappe stant in einer einstellbaren Farbe .
  • Seite 7: Musiksteuerung

    4.1.4 Showprogramme und Szenenfolgen 2) Die Taste UP oder DOWN so oft drücken, bis das Display anzeigt . 10 Showprogramme ( … ) sind im Scheinwerfer gespeichert . Außerdem können 10 3) Die Taste ENTER drücken . Das Display zeigt Szenenfolgen ( …...
  • Seite 8: Synchrone Steuerung Mehrerer Scheinwerfer (Master / Slave-Modus)

    6) Nachdem die erste Szene eingestellt ist, die Das Drücken dieser Tasten wird jeweils mit Taste MENU drücken . Das Display zeigt wieder einem Stern ( ) im Display quittiert . die Szenennummer an . Mit der Taste UP die f) Den Kopiervorgang mit der Taste ENTER zweite Szene anwählen, die Taste ENTER drü- starten .
  • Seite 9: Anzahl Der Dmx-Kanäle Einstellen

    DMX-Ausgang des letzten DMX-gesteuerten Einstellung Anzahl der DMX-Kanäle Geräts . Kanäle ( Kap . 4 .3 .5, Abb . 8) ☞ 2) Den Ausgang DMX OUT mit dem DMX-Ein- Kanäle gang des nächsten DMX-Geräts verbinden . 1 = Rot, 2 = Grün, 3 = Blau Dessen Ausgang wieder mit dem Eingang des 4 Kanäle nachfolgenden DMX-Geräts verbinden usw .,...
  • Seite 10: Unteradressen Verwenden

    4.3.4 Unteradressen verwenden Durch die Verwendung von Unteradressen lassen sich über eine einzige DMX-Startadresse bis zu Unter- DMX- Unter- DMX- Unter- DMX- 66 Scheinwerfer (-gruppen) unabhängig von- adresse Wert adresse Wert adresse Wert einander steuern . Die maximal mögliche Anzahl alle 000 –...
  • Seite 11: Funktionen Der Dmx-Kanäle

    4.3.5 Funktionen der DMX-Kanäle 10-Kanal-Betrieb 3-Kanal-Betrieb DMX- DMX- DMX- DMX- Funktion Funktion Kanal Wert Kanal Wert 000 – 255 Helligkeit Rot 000 – 255 Dimmer 0 %  100 % 000 – 255 Grundhelligkeit Rot 000 – 255 Helligkeit Grün 000 –...
  • Seite 12: Weißabgleich

    1) Die Taste MENU so oft drücken, bis die oberste b) Die Taste DOWN zweimal drücken, sodass Menüebene erreicht ist . das Display anzeigt . c) Die Taste ENTER drücken . Das Display 2) Die Taste UP oder DOWN so oft drücken, bis springt auf die Anzeige das Display anzeigt .
  • Seite 13: Scheinwerfer Auf Die Werkseinstellung

    Für den eigenständigen Betrieb mit der Für den eigenständigen Betrieb mit der Taste MENU den Betriebsmodus wählen und Taste MENU den Betriebsmodus wählen und mit der Taste ENTER den Modus einschalten . mit der Taste ENTER den Modus einschalten . 5.4 Scheinwerfer auf die 6 Reinigung des Geräts Werkseinstellung zurücksetzen...
  • Seite 14: Applications

    DMX LED Spotlight 1 Applications These instructions are intended for users with This LED spotlight is used for illumination, e . g . basic knowledge in DMX control . Please read the on stage, in discotheques and function rooms . instructions carefully prior to operation and keep The light source is a powerful COB LED (COB = them for later reference .
  • Seite 15: Setting The Spotlight Into Operation

    intended, if it is not safely installed or not WARNING correctly connected or operated, or if it is not To prevent damage to your eyes, repaired in an expert way . never look directly into the light source for any length of time . If the unit is to be put out of operation Please note that fast changes in lighting may definitively, take it to a local recycling...
  • Seite 16: Parc-100 / Rgb

    3.3.2 PARC-100 / RGB 2) Press the button UP or DOWN repeatedly until the display indicates For power supply, the unit is equipped with Power con connections . 3) Press the button ENTER . The display now indi- cates , , and a number .
  • Seite 17: Music Control

    = brightness of the colour red of scenes most recently selected ( … = brightness of the colour green = brightness of the colour blue 4) Use the button UP or DOWN to select the show programme or sequence of scenes de- 6) Use the button ENTER to select the colours sired .
  • Seite 18: Synchronous Control Of Multiple Spotlights (Master / Slave Mode)

    For DMX signal transmission, special cables should highest menu level has been reached . be used (e . g . CDMXN-… from IMG STAGE LINE) . b) Press the button UP or DOWN repeatedly For cable lengths exceeding 150 m or for control...
  • Seite 19: Setting The Number Of Dmx Channels

    The easiest way to terminate the DMX out- to the light controller, each unit must have its put of the ODC-100/RGB is to separate an own start address . If the first DMX channel of the extension cable ODP-34DMX and to connect spotlight is to be controlled by the light controller the resistor to the pins 2 and 3 of the plug .
  • Seite 20: Using Subaddresses

    4.3.4 Using subaddresses With subaddresses, it is possible to independently control up to 66 spotlights (spotlight groups) via Sub- Sub- Sub- one DMX start address . Thus, the maximum address value address value address value number of DMX units that may be controlled is 000 –...
  • Seite 21: Functions Of The Dmx Channels

    4.3.5 Functions of the DMX channels 3-channel mode 10-channel mode Function Function channel value channel value 000 – 255 brightness red 000 – 255 dimmer 0 %  100 % 000 – 255 brightness green 000 – 255 basic brightness red 000 –...
  • Seite 22: White Balance

    2) Press the button UP or DOWN repeatedly until b) Press the button DOWN twice so that the the display indicates display indicates c) Press the button ENTER . The display 3) Press the button ENTER . The display indicates changes to 4) Press the button UP or DOWN repeatedly until d) Press the button UP or DOWN repeatedly...
  • Seite 23: Resetting The Spotlight To Its Factory Settings

    6 Cleaning the Spotlight 5.4 Resetting the spotlight to its factory settings Clean the pane in front of the LED at regular inter- The factory settings of the spotlight are as fol- vals depending on impurities . This is the only way lows: to ensure that light will be emitted at maximum brightness .
  • Seite 24: Possibilités D'utilisation

    Projecteur DMX à LED 1 Possibilités d’utilisation Cette notice s’adresse à l’utilisateur ayant des Le projecteur LED permet de créer des effets connaissances de base en gestion DMX . Veuillez d’éclairage, par exemple sur scènes, en disco- lire la notice avec attention et conservez-la pour thèques et dans des salles des fêtes .
  • Seite 25: Fonctionnement

    • 3.2 Volets Uniquement pour le ODC-100 / RGB : tout cor- don secteur endommagé ne doit être remplacé Pour diminuer l’angle du faisceau lumineux, les que par un technicien spécialisé . volets PARC-100B, disponibles en option, se • vissent sur la face avant . Nous déclinons toute responsabilité...
  • Seite 26: Parc-100 / Rgb

    ATTENTION ! Le courant total dans les câbles 4.1 Fonctionnement indépendant de branchement ne doit pas dépasser 10 A, 4.1.1 Projecteur de couleurs et stroboscope sinon une surcharge de câble peut provoquer Avec ce mode, le projecteur diffuse en continu un incendie .
  • Seite 27: Gestion Par La Musique

    Important : Si après l’arrêt et le redémarrage, 2) Appuyez sur la touche UP ou DOWN de ma- nière répétée jusqu’à ce que l’affichage in- le projecteur doit à nouveau fonctionner via la dique musique, ne quittez pas le point de menu avec la touche MENU .
  • Seite 28: Gestion Synchrone De Plusieurs Projecteurs (Mode Master Slave)

    = luminosité rouge (0 – 255) b) Appuyez sur la touche UP ou DOWN de manière répétée jusqu’à ce que l’affichage = luminosité vert (0 – 255) indique = luminosité bleu (0 – 255) c) Appuyez sur la touche ENTER . L’affichage = fréquence des éclairs (0 –...
  • Seite 29: Réglage Du Nombre De Canaux Dmx

    Sur le modèle ODC-100 / RGB, reliez la 1) Appuyez sur la touche MENU de manière ré- fiche mâle (C) du câble DMX IN à la fiche fe- pétée jusqu’à atteindre la plage supérieure du melle (D) du câble livré doté de la fiche XLR menu (dans la structure du menu pages 78 et mâle .
  • Seite 30: Utilisation Des Sous-Adresses

    3) Appuyez sur la touche ENTER . L’affichage in- 9) Appuyez sur la touche UP ou DOWN jusqu’à dique maintenant et un nombre entre 1 et ce que l’affichage indique 512 . 10) Appuyez sur la touche ENTER . Si l’affichage 4) Réglez l’adresse de démarrage avec la touche indique , la fonction pour la sélection...
  • Seite 31: Fonctions Des Canaux Dmx

    4.3.5 Fonctions des canaux DMX Mode 10 canaux Mode 3 canaux Canal Valeur Canal Valeur Fonction Fonction 000 – 255 dimmer 0 %  100 % 000 – 255 luminosité rouge 000 – 255 luminosité de base rouge 000 – 255 luminosité...
  • Seite 32: Compensation Du Blanc

    2) Appuyez sur la touche UP ou DOWN de ma- a) Appuyez sur la touche MENU de manière nière répétée jusqu’à ce que l’affichage in- répétée jusqu’à ce que l’affichage indique dique à nouveau b) Appuyez deux fois sur la touche DOWN 3) Appuyez sur la touche ENTER .
  • Seite 33: Réinitialisation Du Projecteur

    Sélectionnez le réglage voulu avec la touche 6) Pour réinitialiser, appuyez sur la touche ENTER UP ou DOWN . (l’affichage confirme brièvement avec ) ou annulez le processus avec la touche MENU . 6) Pour pouvoir gérer le projecteur par DMX, 7) Pour que le projecteur puisse être géré...
  • Seite 34: Possibilità D'impiego

    Proiettore DMX con LED 1 Possibilità d’impiego Queste istruzioni sono rivolte agli utenti con Questo proiettore con LED serve per l’illumina- conoscenze base dei comandi DMX . Vi preghiamo zione, per esempio sul palcoscenico, in discoteche di leggerle attentamente prima della messa in o in saloni .
  • Seite 35: Messa In Funzione

    3.3 Alimentazione responsabilità per eventuali danni consequen- ziali a persone o a cose e non si assume nessuna Il proiettore si accende collegandolo con la rete . Il garanzia per l’apparecchio . display indica la voce del menu scelta per ultima e si spegne dopo 30 s .
  • Seite 36: Parc-100 / Rgb

    4.1 Funzionamento autonomo 2) Sull’ultimo apparecchio, sulla presa del cavo POWER OUT avvitare la copertura protettiva 4.1.1 Proiettore di colori e stroboscopio in dotazione . Il cavo è sotto tensione di rete! In questo modo, il proiettore emette costante- 3) Inserire la spina del primo apparecchio in una mente un colore impostabile .
  • Seite 37: Comando Tramite La Musica

    4.1.4 Programmi show e scenari 2) Premere il tasto UP o DOWN tante volte finché il display indica Nel proiettore sono memorizzati 10 programmi show1 ( … ) . Inoltre è possibile pro- 3) Premere il tasto ENTER . Il display visualizza ora grammare individualmente 10 scenari ( …...
  • Seite 38: Comando Sincronizzato Di Più Proiettori

    Premere il tasto ENTER . Il display passa alla DMX IN visualizzazione Fig. 4 Connessione DMX ODC-100/RGB d) Premere il tasto UP o DOWN tante volte Collegare il connettore XLR con l’uscita DMX finché il display indica dell’unità...
  • Seite 39: Impostare Il Numero Dei Canali Dmx

    2) Collegare l’uscita DMX OUT con l’ingresso Imposta- Numero dei canali DMX DMX dell’apparecchio successivo e la sua zione uscita con l’ingresso dell’apparecchio DMX canali ( Cap . 4 .3 .5, Fig . 8) ☞ seguente ecc ., finché tutti gli apparecchi con canali comando DMX sono collegati formando una 1 = rosso, 2 = verde, 3 = blu...
  • Seite 40: Utilizzare Sottoindirizzi

    4.3.4 Utilizzare sottoindirizzi Tramite l’utilizzo di sottoindirizzi è possibile ge- stire in modo indipendente e per mezzo di un Sottoin- Valore Sottoin- Valore Sottoin- Valore solo indirizzo di start DMX fino a 66 (gruppi di) dirizzo dirizzo dirizzo proiettori . In questo modo, il numero massimo tutti 000 –...
  • Seite 41: Funzioni Dei Canali Dmx

    4.3.5 Funzioni dei canali DMX Funzionamento a 10 canali Funzionamento a 3 canali Canale Valore Canale Valore Funzione Funzione 000 – 255 Dimmer 0 %  100 % 000 – 255 Luminosità rosso 000 – 255 Luminosità base rosso 000 – 255 Luminosità...
  • Seite 42: Correzione Del Bianco

    1) Premere il tasto MENU tante volte finché è b) Premere due volte il tasto DOWN in modo raggiunto il livello superiore del menù . che il display visualizzi c) Premere il tasto ENTER . Il display passa ora 2) Premere il tasto UP o DOWN tante volte finché alla visualizzazione il display indica 3) Premere il tasto ENTER .
  • Seite 43: Resettare Il Proiettore All'impostazione Della Fabbrica

    Per il funzionamento autonomo, con il 7) Perché il proiettore possa essere comandato tasto MENU scegliere il modo di funziona- con DMX, con il tasto MENU ritornare sul li- mento e attivarlo con il tasto ENTER . vello superiore del menù . Per il funzionamento autonomo, con il tasto MENU scegliere il modo di funziona- 5.4 Resettare il proiettore...
  • Seite 44: Toepassingen

    DMX-ledschijnwerper 1 Toepassingen Deze handleiding is bedoeld voor de gebruiker Deze led-schijnwerper wordt gebruikt voor ver- met basiskennis van de DMX-besturing . Lees de lichting bv . op podia, in discotheken en feest zalen . handleiding grondig door, alvorens het apparaat Als lichtbron wordt een krachtige COB-led ge- in gebruik te nemen, en bewaar ze voor latere bruikt (COB = Chip-on-Board-technolo gie): Er...
  • Seite 45: Ingebruikname

    50 cm bedragen . POWER IN 230 V/50 Hz WAARSCHUWING Als het apparaat op een plek Afb. 3 Netaansluiting ODC-100/RGB wordt geïnstalleerd, waar per- OPGELET! De kabel POWER OUT voert netspan- sonen onder kunnen komen ning . Als er geen ander apparaat op de kabels...
  • Seite 46: Parc-100 / Rgb

    4.1 Autonoom bedrijf 2) Op het laatste apparaat schroeft u de bij- geleverde beschermkap op de koppeling 4.1.1 Kleurenstraler en stroboscoop van de kabel POWER OUT . De kabel voert In deze modus straalt de schijnwerper constant net spanning! in een instelbare kleur . Daarnaast kunt u ook de 3) Plug de netstekker van het eerste apparaat in stroboscoopfunctie inschakelen .
  • Seite 47: Muzieksturing

    4.1.4 Showprogramma’s en scènereeks 3) Druk op de toets ENTER . Op het display wordt nu een van de 11 geheugenplaatsen weerge- 10 showprogramma’s ( … ) zijn in geven ( … ) en de schijnwerper de schijnwerper opgeslagen . Bovendien kunnen straalt in de bijbehorende wittint .
  • Seite 48: Meerdere Schijnwerpers Synchroon Besturen (Master-Slavemodus)

    6) Nadat de eerste scène ingesteld is, drukt u op wordt dit bevestigd met een stersymbool de toets MENU . Op het display wordt opnieuw ( ) op het display . het scènenummer weergegeven . Selecteer f) Start de kopieerprocedure met de toets met de toets UP de tweede scène, druk op ENTER .
  • Seite 49: Aantal Dmx-Kanalen Instellen

    2) Verbind de uitgang DMX OUT met de DMX-in- Instelling Aantal DMX-kanalen gang van het volgende DMX-apparaat . Ver- kanalen ( hfdst . 4 .3 .5, fig . 8) ☞ bind de uitgang hiervan opnieuw met de in- gang van het nageschakelde DMX-apparaat kanalen 1 = rood, 2 = groen, 3 = blauw etc ., tot alle DMX-gestuurde apparaten in een...
  • Seite 50: Subadressen Gebruiken

    4.3.4 Subadressen gebruiken Door het gebruik van subadressen kunt u via één enkel DMX-startadres tot 66 schijnwerpers Sub- DMX- Sub- DMX- Sub- DMX- (schijn werpergroepen) onafhankelijk van el- adres waarde adres waarde adres waarde kaar besturen . Het maximaal mogelijke aantal alle- 000 –...
  • Seite 51: Functies Van De Dmx-Kanalen

    4.3.5 Functies van de DMX-kanalen 3-Kanaalbedrijf 10-Kanaalbedrijf DMX- DMX- DMX- DMX- Functie Functie kanaal waarde kanaal waarde 000 – 255 helderheid rood 000 – 255 dimmer 0 %  100 % 000 – 255 helderheid groen 000 – 255 basishelderheid rood 000 –...
  • Seite 52: Witbalans

    1) Druk enkele keren op de toets MENU tot u zich a) Druk enkele keren op de toets MENU tot in het bovenste menuniveau bevindt . op het display verschijnt . b) Druk tweemaal op de toets DOWN, zodat 2) Druk enkele keren op de toets UP of DOWN de melding op het display verschijnt .
  • Seite 53: De Fabrieksinstellingen Van De Schijnwerper Herstellen

    6) Voor DMX-besturing van de schijnwerper keert 7) Voor DMX-besturing van de schijnwerper keert u met de toets MENU terug naar het bovenste u met de toets MENU terug naar het bovenste menuniveau . menuniveau . Voor autonoom bedrijf selecteert u de be- Voor autonoom bedrijf selecteert u de be- drijfsmodus met de toets MENU en schakelt u drijfsmodus met de toets MENU en schakelt u...
  • Seite 54: Aplicaciones

    = tecnología chip on board): Muchos chips LED En la página 2, encontrará los proyectores individuales se colocan densamente en una PCB ODC-100/RGB y PARC-100/RGB . El menú para para ofrecer una distribución uniforme de la luz . los ajustes del proyector se puede encontrar en El proyector está...
  • Seite 55: Puesta En Marcha Del Proyector

    si no se instala, no se conecta o no se utiliza ENTER, UP o DOWN), el visualizador se iluminará adecuadamente, o si no se repara por expertos . de nuevo otros 30 segundos . Si va a poner el aparato definitivamente ADVERTENCIA Para prevenir daños oculares, no fuera de servicio, llévelo a la planta mire nunca directamente hacia la...
  • Seite 56: Parc-100 / Rgb

    4.1 Funcionamiento independiente cable POWER OUT . ¡El cable contiene voltaje de corriente! 4.1.1 Proyector de color y estroboscopio 3) Conecte el conector de corriente del primer En este modo, el proyector irradia luz constante- proyector a un enchufe (230 V/ 50 Hz) . mente en un color ajustable .
  • Seite 57: Control Por Música

    4.1.4 Programas de muestra y 3) Pulse el botón ENTER . Ahora el visualizador secuencias de escenas indica una de las memorias ( … y el proyector irradia el matiz de blanco co- En el proyector hay 10 programas de muestra rrespondiente .
  • Seite 58: Control Sincronizado De Varios Proyectores (Modo Master / Slave)

    = duración de la escena en segundos UP, DOWN, UP, DOWN . Cada vez que se pulse uno de estos bo- = tiempo de fundido tones, aparecerá un asterisco ( ) en el vi- Utilice el botón UP o DOWN para ajustar el sualizador .
  • Seite 59: Ajuste Del Número De Canales Dmx

    por DMX, a la salida DMX del último aparato Ajuste Número de canales DMX controlado por DMX . canales ( apartado 4 .3 .5, fig . 8) ☞ 2) Conecte la salida DMX OUT a la entrada DMX canales del segundo aparato DMX . Conecte la salida 1 = rojo, 2 = verde, 3 = azul del segundo aparato DMX a la entrada del 4 canales...
  • Seite 60: Utilizar Subdirecciones

    4.3.4 Utilizar subdirecciones Con las subdirecciones, se pueden controlar in- dependientemente hasta 66 proyectores (grupos Sub- Valor Sub- Valor Sub- Valor de proyectores) mediante una dirección de inicio dirección dirección dirección DMX . De este modo, el número máximo de apa- Todas 000 –...
  • Seite 61: Funciones De Los Canales Dmx

    4.3.5 Funciones de los canales DMX Funcionamiento con 10 canales Funcionamiento con 3 canales Canal Valor Canal Valor Función Función 000 – 255 Dimmer 0 %  100 % 000 – 255 Brillo del rojo 000 – 255 Brillo del verde 000 –...
  • Seite 62: Compensación Del Blanco

    2) Pulse el botón UP o DOWN hasta que en el c) Pulse el botón ENTER . El visualizador cam- visualizador aparezca biará a 3) Pulse el botón ENTER . En el visualizador apare- d) Pulse el botón UP o DOWN hasta que en cerá...
  • Seite 63: Reajuste A Fábrica Del Proyector

    6 Limpieza del Proyector 5.4 Reajuste a fábrica del proyector Los ajustes de fábrica del proyector son los si- Limpie el panel frontal del LED regularmente guientes: dependiendo de las impurezas . Este es el único modo para asegurar que la luz se emita con su Objeto Función Ajuste de fábrica...
  • Seite 64: Zastosowanie

    Reflektory diodowe DMX 1 Zastosowanie Niniejsza instrukcja przeznaczona jest dla użyt- Niniejsze reflektory diodowe przeznaczone są do kowników posiadających co najmniej podsta- celów oświetleniowych np . na scenie, w dysko- wową wiedzę na temat sterowania DMX . Przed tece lub jako element dekoracyjny . Emitują świa- rozpoczęciem pracy z urządzeniem, prosimy za- tło wykorzystując technologię...
  • Seite 65: Przygotowanie Do Pracy

    3.3 Zasilanie obrażenia użytkownika w przypadku gdy urzą- dzenie jest wykorzystywane w innych celach niż Po podłączeniu zasilania, urządzenie jest włą- to się przewiduje lub jeśli jest nieodpowiednio czone . Na wyświetlaczu pokazane zostanie ostat- zainstalowane, użytkowane lub naprawiane . nie wybrane polecenie menu, po 30 sekundach wyświetlacz zgaśnie .
  • Seite 66: Parc-100 / Rgb

    4 Obsługa 2) Należy zabezpieczyć gniazdo nakablowe POWER OUT ostatniego reflektora dołączoną Do poruszania się po menu i wyboru różnych zaślepką, gdyż znajduje się ono pod napię- funkcji służą przyciski MENU, ENTER, UP oraz ciem! DOWN . Na rys . 14 na stronach 78 i 79 pokazano strukturę...
  • Seite 67: Sterowanie Muzyką

    4.1.4 Programy show oraz sekwencje scen (lewy koniec ze struktury menu na stronach 78 i 79) . W pamięci urządzenia zapisane jest 10 pro- gramów show ( … ) . Ponadto, 2) Wcisnąć przycisk UP lub DOWN kilka razy, aż możliwe jest zaprogramowanie 10 sekwencji wyświetlacz pokaże scen (...
  • Seite 68: Synchroniczne Sterowanie Kilkoma Reflektorami (Tryb Master / Slave)

    6) Po ustawieniu pierwszej sceny, wcisnąć przy- wcisnąć następującą sekwencję przycisków: cisk MENU . Wyświetlacz ponownie pokaże UP, DOWN, UP, DOWN numer sceny . Przyciskiem UP wybrać kolejną Po każdym wciśnięciu przycisku na wyświe- scenę, wcisnąć przycisk ENTER i wprowadzić tlaczu pojawi się...
  • Seite 69: Ustawianie Liczby Kanałów Dmx

    Podłączyć wtyk XLR, za pomocą kabla przedłu- 3) Wcisnąć przycisk ENTER . Wyświetlacz po- żającego, do wyjścia kontrolera DMX, lub in- kazuje teraz bieżące ustawienie: nego urządzenia sterowanego sygnałem DMX . Ustawienie Liczba kanałów DMX 2) Podłączyć wyjście DMX OUT do wejścia DMX 10 kanałów ( rozdz .
  • Seite 70: Wykorzystywanie Subadresów

    4.3.4 Wykorzystywanie subadresów Dzięki wykorzystaniu subadresów możliwe jest niezależne sterowanie max 66 reflektorami (gru- Sub- Wartość Sub- Wartość Sub- Wartość pami reflektorów) poprzez pojedynczy adres star- adres adres adres towy DMX . W ten sposób ilość sterowanych urzą- wszystkie 000 – 009 dzeń...
  • Seite 71: Funkcje Kanałów Dmx

    4.3.5 Funkcje kanałów DMX Praca 10-kanałowa Praca 3-kanałowa Kanał Wartość Kanał Wartość Funkcja Funkcja 000 – 255 ściemniacz 0 %  100 % 000 – 255 jasność czerwonego 000 – 255 podstawowa jasność czerwonego 000 – 255 jasność zielonego 000 – 255 podstawowa jasność...
  • Seite 72: Balans Bieli

    2) Wcisnąć przycisk UP lub DOWN kilka razy, aż pokaże teraz wyświetlacz pokaże d) Wcisnąć przycisk UP lub DOWN kilka razy, 3) Wcisnąć przycisk ENTER . Wyświetlacz pokaże aż wyświetlacz pokaże e) Wcisnąć przycisk ENTER . Jeżeli wyświetlacz 4) Wcisnąć przycisk UP lub DOWN kilka razy, aż pokaże , odcień...
  • Seite 73: Resetowanie Urządzenia Do Ustawień Fabrycznych

    6 Czyszczenie urządzenia 5.4 Resetowanie urządzenia do ustawień fabrycznych Przedni panel reflektora należy czyścić regular- Fabryczne ustawienia są następujące: nie, zależnie od warunków pracy . Zapewni to uzyskanie maksymalnej jasności światła . Przed Polecenie Funkcja Ustawienie fabryczne przystąpieniem do czyszczenia należy bez- liczba kanałów DMX = 10 kanałów względnie odłączyć...
  • Seite 74: Vigtige Sikkerhedsoplysninger

    Læs nedenstående sikkerhedsoplysninger grun- digt igennem før ibrugtagning af enheden . Bort- set fra sikkerhedsoplysningerne henvises til den engelske tekst . Vigtige sikkerhedsoplysninger rengøring af linsen kan der benyttes almindelig Denne enhed overholder alle relevante EU-direk- vindues- / skærmrens . tiver og er som følge deraf mærket Det vejrbestandige chassis på...
  • Seite 75: Säkerhetsföreskrifter

    Läs igenom säkerhetsföreskrifterna innan enheten tas i bruk . Ytterligare information återfinns på övriga språk i manualen . Säkerhetsföreskrifter Det väderbeständiga höljet till ODC-100 / RGB Denna enhet uppfyller alla relevanta direktiv inom kan även rengöras med en fuktig trasa och ett EU och har därför fått märkning .
  • Seite 76 Ole hyvä ja tutustu seuraaviin ohjeisiin varmis- taaksesi tuotteen turvallisen käytön . Tarvitessasi lisätietoja tuotteen käytöstä löydät ne muun kie- lisistä käyttöohjeista . Turvallisuudesta • Käytä laitteen ulkopuoliseen puhdistamiseen Tämä laite täyttää kaikki siihen kohdistuvat EU- ainoastaan kuivaa, pehmeää kangasta . Älä mil- direktiivit ja sille on myönnetty hyväksyntä...
  • Seite 80 MONACOR INTERNATIONAL GmbH & Co. KG • Zum Falsch 36 • 28307 Bremen • Germany Copyright by MONACOR INTERNATIONAL. All rights reserved. A-1653.99.02.05.2016 ©...

Diese Anleitung auch für:

Parc-100/rgb

Inhaltsverzeichnis