Inhaltsverzeichnis
Werbung
Verfügbare Sprachen
Verfügbare Sprachen
Weather station • Stazione meteo • Wetterstation • Station météo • Estación meteorológica
7-in-1 WiFi Advanced
Professional Weather Station
Art.No.: WSX3001
INSTRUCTION MANUAL ............... 2
EN
ISTRUZIONI PER L'USO ...............34
IT
BEDIENUNGSANLEITUNG ............68
DE
MODE D'EMPLOI ....................... 102
FR
MANUAL DE INSTRUCCIONES ... 136
ES
INDEX
HISTORY
MAX
MIN
CHANNEL
Werbung
Inhaltsverzeichnis

Verwandte Anleitungen für Bresser WSX3001


Inhaltszusammenfassung für Bresser WSX3001
- Seite 1 Weather station • Stazione meteo • Wetterstation • Station météo • Estación meteorológica 7-in-1 WiFi Advanced Professional Weather Station Art.No.: WSX3001 INSTRUCTION MANUAL ....2 ISTRUZIONI PER L’USO ....34 BEDIENUNGSANLEITUNG ....68 MODE D'EMPLOI ....... 102 MANUAL DE INSTRUCCIONES ... 136...
-
Seite 2: About This Instruction Manual
INSTRUCTION MANUAL ABOUT THIS INSTRUCTION MANUAL These operating instructions are to be considered a component of the device. Please read the safety instructions and the operating instructions carefully before use. Keep these instructions for renewed use at a later date. When the device is sold or given to someone else, the instruction manual must be provided to the new owner/user of the product. -
Seite 3: Inhaltsverzeichnis
TABLE OF CONTENTS ABOUT THIS INSTRUCTION MANUAL ......... 2 GENERAL WARNINGS . -
Seite 4: Introduction
INTRODUCTION Thank you for selecting the 7-in-1 WiFi Advanced Professional Weather Station. This system gathers and automatically uploads accurate and detail weather data to Weather Underground and Weathercloud website - the famous weather service which allows weather observers to upload their local weather data with automated personal weather stations (PWS) - at which you can access and upload your weather data freely. -
Seite 5: Lcd Display
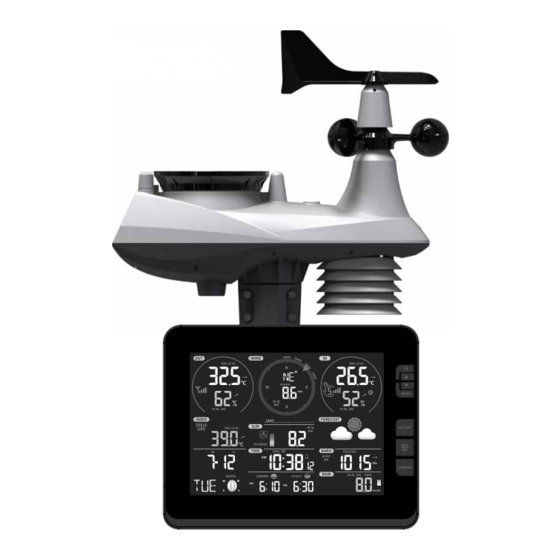
LCD DISPLAY Display section: 1. Outdoor temperature & humidity 7. Calendar & moon phase 2. Wind direction & speed 8. Time / alarm 3. Indoor (Ch) temperature & humidity 9. Barometer 10. Sunrise & sunset time 4. Weather index 5. UV index & light intensity (SUN) 11. -
Seite 6: Wireless 7-In-1 Sensor
WIRELESS 7-IN-1 SENSOR 1. Wind vane 7. Battery door 2. Wind cups 8. [ RESET ] key 9. Transmission status LED 3. Antenna 4. Radiation shield 10. Bubble level gradienter 5. Thermo-hygro sensor 11. Rain collector 6. Mounting parts (fit for 35 ~40mm diameter 12. -
Seite 7: Installation And Setup
SMART VENTILATING FAN Ventilating fan A ventilating fan is installed inside the radiation shields to reduce the impact of sun heat effect. The fan is driven by solar panel and will automatically start spinning under 2 conditions: 1. When the sun is shining on the solar panel, and 2. Average windspeed is below 5m/s for 1 minute. - Seite 8 Note: Plastic pole placed under the egg tray, please check before disposal of the packaging. PLASTIC MOUNTING INSTALLATION 1. Fasten the plastic pole onto your fix pole with mounting base, clamp, washers, screws and nuts. Following below 1a, 1b, 1c sequences: 1a.
-
Seite 9: Install Wireless Indoor Sensor
3. Place the 7-in-1 sensor over the mounting pole and align it to North direction before fastening the screws. MOUNTING POLE AND DIRECTION ALIGNMENT Install the wireless 7-IN-1 sensor in an open location with no obstructions above and around the sensor for accurate rain and wind measurement. -
Seite 10: Setup The Console
PLACING THE WIRELESS INDOOR SENSOR Place a screw on the wall that you wish to hang the sensor on. Hang the sensor onto the screw by the wall mounting holder. You can also place the sensor on a table by itself. SETUP THE CONSOLE POWER UP THE CONSOLE 1. -
Seite 11: Synchronizing Additional Wireless Sensor(S) (Optional)
CHANGING BATTERIES AND MANUAL PAIRING OF SENSOR Whenever you changed the batteries of the wireless indoor or 7-in-1 weather sensor, re- synchronization must be done manually. 1. Change all the batteries to new ones in the sensor. 2. Press [ SENSOR / WI-FI ] key on the console to enter sensor synchronization mode. 3. -
Seite 12: Create Weathercloud Account
3. In "My Weather Station" page bottom, press the "Add New Device" button to add your device. 4. Follow their instruction to enter your station information, in the Step "Tell Us More About Your Device", (1) enter a Name for your weather station. (2) choose “Other” in “Device Hardware”... - Seite 13 NOTE: Use the valid email address to register your account. 2. Sign in weathercloud and then you will go the "Devices" page, click "+ New" to create new device. 3. Enter all the information in Create new device page, for the Model* selection box select the "W100 Series"...
-
Seite 14: Create Awekas Account
You have the possibility to use a weather service of a third party provider, as shown here with the example of AWEKAS (https://join.awekas.at). Detailed instructions for setting up AWEKAS are available for download: http://www.bresser.de/download/WSX3001 SETUP WI-FI CONNECTION 1. When you power up the console for the first time, the console LCD will show flashing "AP"... -
Seite 15: Setup The Weather Server Connection
- Recommended browsers, such as the latest version of Chrome, Safari, Edge, Firefox or Opera. - WI-FI network interface of PC or mobile subject to change. WI-FI CONNECTION STATUS Below is the WI-FI icon status on the console LCD: Stable: Console is in Flashing: Console is trying to Flashing: Console currently in connection with WI-FI router... -
Seite 16: Advance Setting In Web Interface
NOTE: - When WI-FI setup is completed, your PC or mobile will resume your default WI-FI connection. - During AP mode, you can press and hold the [ SENSOR / WI-FI ] key for 6 seconds to stop AP mode and the console will restore your previous setting. TIME ZONE To automatically set the time display to your time-zone, change the time zone in SETUP page of previous section from '0:00' (default) to your time zone (e.g.+1:00 for Germany). -
Seite 17: View Your Weather Data In Wunderground
CALIBRATION 1. User can input the offset and/or gain values for different parameters while current offset and gain values are shown next to their corresponding blank. at the bottom of the SETUP page 2. Once completed, press Apply The current offset value will show the previous value that you entered, please input the new value in the blank if any changes needed, the new value will effective once you press Apply icon in SETUP page. -
Seite 18: Other Setting & Functions Of The Console
Current firmware Firmware version: 1.00 Please to select the firmware file for version Browse update Upload Press to start upload the firmware Bottom of web interface ADVANCED page to console FIRMWARE UPDATE STEP 1. Download the latest version firmware to your PC. 2. -
Seite 19: Daylight Saving Time (Dst)
DAYLIGHT SAVING TIME (DST) DST function is set to "AUTO" by default (for EU or US version). If the current date on display is with in the summer daylight saving period, the time will will be automically adjusted forward by +1 hour, and DST icon will be shown on the LCD dsiplay. -
Seite 20: Temperature / Humidity Function
NOTE: Once the ice pre-alert activates, the pre-set alarm will sound and ice-alert icon will flash 30 minutes earlier if the outdoor temperature is below -3°C. When clock reach the alarm time, alarm sound will start. Where it can be stopped by following operation: - Auto-stop after 2 minutes alarming if without any operation and the alarm will activate again in the next day. -
Seite 21: Trend Indicator
seconds to toggle auto-cycle mode to display the connected channels at 4 seconds interval. During auto-cycle mode, the icon will show on the indoor channel section of the console's display. Press [ CHANNEL ] key to stop auto cycle and display the current channel. TREND INDICATOR The trend indicator shows the trends of changes in the forthcoming few minutes. -
Seite 22: Weather Index
12 ~ 19 km/h 8 ~ 12 mph Leaves and small twigs constantly moving, Gentle breeze light flags extended. 7 ~ 10 knots 3.4 ~ 5.4 m/s 20 ~ 28 km/h 13 ~ 17 mph Moderate Dust and loose paper raised. Small 11 ~ 16 knots breeze branches begin to move. -
Seite 23: Weather Forecast
DEW POINT - The dew point is the temperature below which the water vapor in air at constant barometric pressure condenses into liquid water at the same rate at which it evaporates. The condensed water is called dew when it forms on a solid surface. - The dew point temperature is determined by the temperature &... -
Seite 24: Barometric Pressure
BAROMETRIC PRESSURE The atmospheric pressure is the pressure at any location of the earth caused by the weight of the column of air above it. One atmospheric pressure refers to the average pressure and gradually decreases as altitude increases. Meteorologists use barometers to measure atmospheric pressure. -
Seite 25: Light Intensity, Uv Index & Sunburn Time
LIGHT INTENSITY, UV INDEX & SUNBURN TIME This section of display show the sunlight intensity, UV index and sunburn time. Press the [ SUN ] key to change the mode. LIGHT INTENSITY MODE: 1. During light intensity mode, press and hold [ SUN ] key for 2 seconds to enter unit setting 2. -
Seite 26: Past 24 Hours History Data
TO CLEAR THE MAX/MIN RECORDS Press and hold [ MAX / MIN ] key for 2 seconds to reset the current on display MAX or MIN records. NOTE: " icon, data records time & date. The LCD will also display the " "... -
Seite 27: Backlight
3. Press [ ] or [ ] key to adjust the value or press and hold the key to change rapidly. 4. Press [ ALERT ] key to confirm the value. 5. Press [ ALARM ] key to toggle the regarding alert on / off. 6. -
Seite 28: Wireless 7-In-1 Sensor Maintnance
WIRELESS 7-IN-1 SENSOR MAINTNANCE CLEANING THE RAIN COLLECTOR REPLACE THE WIND VANE 1. Rotate the rain collector by turning Unscrew and remove the wind it 30°anti-clockwise. vane for replacement 2. Gently remove the rain collector. 3. Clean and remove any debris or insects. -
Seite 29: Precautions
Temperature reading too 1. Check the ventilation fan inside the radiation shield to make sure it can work properly. high in the day time 2. Make certain that the sensor array is not too close to heat generating sources or strictures, such as buildings, pavement, walls or air conditioning units. - Seite 30 Backup battery 3 x AAA size 1.5V batteries (alkaline recommended) -5˚C ~ 50˚C Operating temperature range Wi-fi Communication Specification Wi-fi standard 802.11 b/g/n Wi-fi operating frequency : 2.4GHz WPA/WPA2, OPEN, WEP (WEP only support Hexadecimal Supported router security type password) Built-in Wi-fi with AP mode function smart devices, laptops Supported device for setup or PCs: Android smart phone, Android pad, iPhone, iPad or...
- Seite 31 Resolution °C / °F (1 decimal place) Display modes Current Memory modes Historical data of past 24 hours, daily Max / Min Alarm Hi / Lo temperature alert Indoor / Outdoor Humidity Display & Function Specification Note: The following details are listed as they are displayed or operate on the console. Humidity unit 1 ~ 99% Display range...
-
Seite 32: Wireless 7-In-1 Sensor
Operating range EC DECLARATION OF CONFORMITY Hereby, Bresser GmbH declares that the equipment type with part number: WSX3001 is in compliance with Directive: 2014/53/EU. The full text of the EU declaration of conformity is available at the following internet address: www.bresser.de/download/WSX3001/CE/WSX3001_CE.pdf... -
Seite 33: Ukca Declaration Of Conformity
(QR code) for available versions. Alternatively you can also send an email to manuals@bresser.de or leave a message on +49 (0) 28 72 – 80 74-220*. Please always state your name, precise address, a valid phone number and email address, as well as the article number and name. -
Seite 34: Informazioni Sul Manuale Di Istruzioni
ISTRUZIONI PER L’USO INFORMAZIONI SUL MANUALE DI ISTRUZIONI Il presente manuale è parte integrante del prodotto. Non azionare il dispositivo prima di aver letto attentamente le istruzioni di sicurezza e le istruzioni per l'uso in esso contenute. Il manuale deve essere conservato in modo che sia possibile consultarlo anche in seguito. Nel caso in cui il dispositivo venga venduto o ceduto a terzi, dovrà... - Seite 35 INDICE DEI CONTENUTI INFORMAZIONI SUL MANUALE DI ISTRUZIONI ........34 AVVERTENZE GENERALI .
-
Seite 36: Introduzione
INTRODUZIONE Grazie per avere scelto la stazione meteo Wi-Fi con sensore professionale 7-in-1. Questo sistema racco- glie e carica automaticamente dati meteo precisi e dettagliati sul sito Weather Underground e Weather- cloud, il famoso servizio meteo che consente agli osservatori meteo di caricare i propri dati meteo locali con stazioni meteo personali (PWS) automatizzate, consentendo di accedere e caricare liberamente i dati meteo. -
Seite 37: Display Lcd
DISPLAY LCD Sezione display: 1. Umidità e temperatura esterna 7. Calendario e fase lunare 2. Velocità e direzione del vento 8. Ora/sveglia 3. Umidità e temperatura interna (Ch) 9. Barometro 4. Indice meteo 10. Ora alba e tramonto 5. Indice UV e intensità della luce (SUN) 11. -
Seite 38: Sensore 7-In-1 Wireless
SENSORE 7-IN-1 WIRELESS 1. Segnavento 7. Sportello vano batterie 2. Giranti eoliche 8. Tasto [ RESET ] 9. LED stato di trasmissione 3. Antenna 4. Protezione da radiazioni 10. Livella a bolla 5. Sensore termoigrometrico 11. Collettore acqua piovana 6. Parti di montaggio (adatte per palo con 12. -
Seite 39: Installazione E Configurazione
VENTILATORE INTELLIGENTE Ventilatore Un ventilatore è installato all'interno degli schermi di radiazione per ridurre l'impatto dell'effetto del calore del sole. Il ventilatore è azionato da un pannello solare e inizia automaticamente a girare in 2 condizioni: 1. Quando il sole splende sul pannello solare, e 2. La velocità media del vento è... - Seite 40 Nota: Palo di plastica posto sotto il vassoio per le uova, controllare prima dello smaltimento dell'imballaggio. PLASTICA INSTALLAZIONE DI MONTAGGIO 1. Fissare il palo di plastica sul palo fisso con la base di montaggio, il morsetto, le rondelle, le viti e i dadi. Seguire le seguenti sequenze 1a, 1b, 1c: 1a.
-
Seite 41: Installazione Del Sensore Interno Wireless
3. Posizionare il sensore 7-in1 sull'asta di montaggio e allinearlo in direzione nord prima di fissare le viti. PALO DI MONTAGGIO E ALLINEAMENTO DELLA DIREZIONE Installare il sensore wireless 7-IN-1 in un luogo aperto e senza ostacoli sopra e intorno al sensore per una misurazione accurata della pioggia e del vento. -
Seite 42: Configurazione Della Console
- Evitare di esporre i sensori a luce solare diretta, pioggia o neve. - Per evitare errori nell’associazione tra sensore e console durante la configurazione della nuova console, accendere prima il sensore e quindi premere il tasto [ RESET ] sull’unità principale (non serve agire sui sensori). -
Seite 43: Sincronizzazione Di Ulteriori Sensori Wireless (Facoltativo)
RISINCRONIZZAZIONE DEI SENSORI Premere una volta il tasto [ SENSOR / WI-FI ] per consentire alla console di accedere alla modalità di sincronizzazione dei sensori, in modo che la console possa registrare nuovamente i sensori registrati in precedenza, senza quindi perdere la connessione dei sensori associati prima. -
Seite 44: Creazione Di Un Account Weather Underground
CREAZIONE DI UN ACCOUNT WEATHER UNDERGROUND 1. In https://www.wunderground.com, fare clic su "Join" nell’angolo in alto a destra per aprire la pagina di registrazione. Seguire le istruzioni per creare il proprio account. NOTA: Utilizzare un indirizzo e-mail valido per registrare l’account. 2. -
Seite 45: Creazione Di Un Account Weathercloud
5. Annotare "Station ID" e "Station key" per proseguire nella configurazione. CREAZIONE DI UN ACCOUNT WEATHERCLOUD 1. In https://weathercloud.net, inserire le proprie informazioni nella sezione "Join us today", quindi seguire le istruzioni per creare il proprio account. NOTA: Utilizzare un indirizzo e-mail valido per registrare l’account. 2. -
Seite 46: Create Awekas Account
C’è la possibilità di utilizzare un servizio meteo offerto da terzi, come mostrato nell’esempio con AWEKAS (https://join.awekas.at). Istruzioni dettagliate per l'impostazione di AWEKAS sono disponibili per il download: http://www.bresser.de/download/WSX3001 CONFIGURAZIONE DELLA CONNESSIONE WI-FI 1. Alla prima accensione della console, l’LCD mostra l’indicazione "AP" e l’icona "... - Seite 47 PWS-XXXXXX PWS-XXXXXX Interfaccia di rete Wi-Fi del PC (Windows 10) Interfaccia di rete Wi-Fi del dispositivo Android 4. Una volta stabilita la connessione, inserire l’indirizzo IP seguente nella barra degli indirizzi del browser, così da accedere all’interfaccia web della console: http://192.168.1.1 NOTA: - Alcuni browser elaborano 192.168.1.1 come una ricerca, pertanto includere l’intestazione...
-
Seite 48: Configurazione Della Connessione Del Server Meteo
CONFIGURAZIONE DELLA CONNESSIONE DEL SERVER METEO Inserire le seguenti informazioni nella pagina "SETUP" sottostante dell’interfaccia web per connettere la console al server meteo. Se non si desidera utilizzare Wunderground.com o Weathercloud.net, svuotare ID e chiave della stazione in modo da ignorare i dati caricati. NOTA: - Al termine della configurazione WI-FI, il PC o il dispositivo mobile riprendono la connessione Wi-Fi predefinita. -
Seite 49: Impostazione Avanzata Nell'interfaccia Web
STATO DI CONNESSIONE DEL TIME SERVER Una volta connessa a Internet, la console tenta di connettersi al time server per ottenere l’ora UTC. A connessione stabilita e una volta aggiornata l’ora della console, sull’LCD compare l’icona “ ”. IMPOSTAZIONE AVANZATA NELL’INTERFACCIA WEB Premere il tasto "ADVANCED"... -
Seite 50: Visualizzazione Dei Propri Dati Meteo In Wunderground
NOTA: - La calibrazione della maggior parte dei parametri non è richiesta, ad eccezione della pressione relativa, che deve essere calibrata sul livello del mare per tenere conto degli effetti dell'altitudine. - I valori di calibrazione della temperatura e dell'umidità interne non sono applicabili per questa console. -
Seite 51: Procedura Di Aggiornamento Del Firmware
AGGIORNAMENTO FIRMWARE La console supporta la funzionalità di aggiornamento firmware OTA. Il firmware può essere aggiornato via etere in qualsiasi momento (ogni volta che è necessario), tramite qualsiasi browser web su un PC con connettività Wi-Fi. La funzione di aggiornamento, tuttavia, non è disponibile da dispositivi mobili/smart. -
Seite 52: Fase Lunare
2. La sequenza dell’impostazione: DST AUTO/OFF Minuti Secondi Formato 12/24 ore Anno Mese Giorno Formato M-G/G-M Sincronizzazione ora ON/ Lingua giorno della settimana. ] per modificare il valore. Tenere premuto il tasto per regolare 3. Premere il tasto [ ] o [ velocemente. -
Seite 53: Attivazione Della Sveglia E Funzione Di Pre-Allerta Temperatura
] per modificare il valore. Tenere premuto il tasto per regolare 2. Premere il tasto [ ] o [ velocemente. 3. Premere di nuovo il tasto [ ALARM ] per passare all’impostazione dei minuti. La cifra corrispondente lampeggia. 4. Premere il tasto [ ] o [ ] per regolare il valore della cifra lampeggiante. -
Seite 54: Indicatore Di Tendenza
NOTA: - L'indicazione di comfort può variare alla stessa temperatura, a seconda dell'umidità. - Non vi è alcuna indicazione di comfort quando la temperatura è inferiore a 0 °C (32 °F) o superiore a 60 °C (140 °F). RICEZIONE DEL SEGNALE DEL SENSORE WIRELESS 1. - Seite 55 IMPOSTAZIONE DELL’UNITÀ DELLA VELOCITÀ E DEL FORMATO DI VISUALIZZAZIONE DELLA DIREZIONE DEL VENTO 1. In modalità normale, tenere premuto il tasto [ WIND ] per 2 secondi per accedere all’unità ] per modificare della velocità del vento. L’unità lampeggia. Premere il tasto [ ] o [ l'unità...
-
Seite 56: Indice Meteo
89 ~ 102 km/h 55 ~ 63 mph Sradicamento di alberi. Considerevoli Tempesta 48 ~ 55 kn danni strutturali. 24,5 ~ 28,4 m/s 103 ~ 117 km/h 64 ~ 73 mph Tempesta Vasti danni alla vegetazione. Considerevoli 56 ~ 63 kn violenta danni strutturali. -
Seite 57: Previsioni Meteo
RAFFREDDAMENTO DA VENTO Una combinazione dei dati di temperatura e velocità del vento del sensore 7-in-1 wireless determina il fattore di raffreddamento da vento corrente. PREVISIONI METEO Il barometro incorporato monitora continuamente la pressione atmosferica. Sulla base dei dati raccolti, può prevedere le condizioni meteo nelle 12~24 ore successive entro un raggio di 30~50 km (19~31 miglia). -
Seite 58: Intensità Della Luce, Indice Uv E Tempo Di Scottatura
1. HOURLY - precipitazioni totali nell’ultima ora Periodo di precipitazioni 2. DAILY - precipitazioni totali dalla mezzanotte (impostazione predefinita) 3. WEEKLY - precipitazioni totali della settimana in corso 4. MONTHLY- precipitazioni totali del mese di calendario in corso 5. Total - precipitazioni totali dall’ultimo ripristino 6. -
Seite 59: Registrazione Dati Max / Min
TABELLA DI INDICE UV E TEMPO DI SCOTTATURA Estremo Livello di Basso Moderato Alto Molto alto esposizione 12~16 Indice UV Tempo di 45 minuti 30 minuti 15 minuti 10 minuti scottatura Indicatore di Livello UV moderato Livello UV molto alto o estremo! o alto! Si consiglia di Si consiglia di indossare occhiali protezione... -
Seite 60: Impostazione Dell'allerta Meteo
IMPOSTAZIONE DELL’ALLERTA METEO La funzione di allerta meteo può avvisare in merito a condizioni meteo specifiche. Una volta soddisfatto il criterio di allerta, è riprodotto l’allarme e l’icona di allerta sull’LCD inizia a lampeggiare. IMPOSTAZIONE DELL’ALLERTA 1. Premere [ ALERT ] per selezionare e visualizzare la lettura desiderata per l’allerta meteo, nella sequenza elencata nella tabella sottostante: Intervallo Sezione display... -
Seite 61: Retroilluminazione
Allerta Alto / Basso Allerta disattivo attivo Allerta attivo Allerta disattivo 7. Premere un tasto qualsiasi sul lato anteriore per salvare lo stato di attivazione / disattivazione dell’allerta e tornare alla modalità normale, oppure si tornerà automaticamente alla modalità normale dopo 30 secondi di mancata pressione di un tasto. SILENZIAMENTO DELL’ALLERTA Premere il tasto [ALARM / SNOOZE] per silenziare l’allerta, oppure lasciare che l’allerta si spenga automaticamente dopo 2 minuti. -
Seite 62: Manutenzione Del Sensore 7-In-1 Wireless
MANUTENZIONE DEL SENSORE 7-IN-1 WIRELESS PULIZIA DEL COLLETTORE DI SOSTITUIRE IL ACQUA PIOVANA SEGNAVENTO Svitare e 1. Ruotare il collettore di acqua rimuovere il segnavento per piovana ruotando di 30° in senso consentirne la sostituzione antiorario. 2. Rimuovere delicatamente il collettore di acqua piovana. -
Seite 63: Precauzioni
Offset di 1 ora sul grafico 1. Assicurarsi che il fuso orario del dispositivo sia impostato correttamente su Wunderground Wunderground Precip. 2. Assicurarsi che fuso orario e ora legale siano corretti sulla Accum. Total in caso di ora console. legale 3. - Seite 64 Browser web consigliato per Browser web che supportano HTML 5, come le ultime iU di configurazione versioni di Chrome, Safari, Edge, Firefox o Opera. Specifiche di comunicazione sul lato del sensore wireless 1 sensore meteo esterno 7-in-1 wireless e fino a 7 sensori Sensori supportati termoigrometrici interni wireless Radiofrequenza...
-
Seite 65: Specifiche Per Display E Funzione Dell'indice Uv
Unità umidità 1 ~ 99% Intervallo di visualizzazione 1 ~ 90% RH ± 2.5% RH @ 25°C (77°F) Precisione interna/esterna 90 ~ 99% RH ± 3.5% RH @ 25°C (77°F) Risoluzione Modalità display Corrente Modalità memoria Dati cronologici delle ultime 24 ore, max / min Allerta Allerta umidità... -
Seite 66: Sensore 7-In-1 Wireless
Specifiche per display e funzione dell’indice meteo Nota: i dettagli seguenti sono elencati così come visualizzati o utilizzati sulla console Percepita, Raffreddamento da vento, Indice di calore e Punto Modalità indice meteo di rugiada Intervallo di visualizzazione -65 ~ 50 °C temperatura percepita Intervallo di visualizzazione -20 ~ 80 °C... -
Seite 67: Dichiarazione Di Conformità Ce
DICHIARAZIONE DI CONFORMITÀ CE Con la presente Bresser GmbH dichiara che il tipo di apparecchiatura identificato con il codice WSX3001 è conforme alla direttiva 2014/53/UE. Il testo integrale della dichiarazione di conformità UE è disponibile all’indirizzo Internet: www.bresser.de/download/WSX3001/CE/WSX3001_CE.pdf NOTE SULLA PULIZIA •... -
Seite 68: Zu Dieser Anleitung
BEDIENUNGSANLEITUNG ZU DIESER ANLEITUNG Lesen Sie vor der Benutzung des Geräts aufmerksam die Sicherheitshinweise und die Bedienungsanleitung. Bewahren Sie diese Bedienungsanleitung für die erneute Verwendung zu einem späteren Zeitpunkt auf. Bei Verkauf oder Weitergabe des Gerätes ist die Bedienungsanleitung an jeden nachfolgenden Besitzer/Benutzer des Produkts weiterzugeben. - Seite 69 INHALTSVERZEICHNIS ZU DIESER ANLEITUNG ..........68 ALLGEMEINE SICHERHEITSHINWEISE .
-
Seite 70: Einführung
EINFÜHRUNG Vielen Dank, dass Sie sich für die W-LAN Wetterstation mit professionellem 7-in-1 Sensor entschieden haben. Dieses System sammelt und lädt automatisch genaue und detaillierte Wetterdaten auf die Weather Underground und Weathercloud Website - den berühmten Wetterdienst, der es Wetterbeobachtern ermöglicht, ihre lokalen Wetterdaten mit automatisierten persönlichen Wetterstationen (PWS) hochzuladen - auf denen Sie Ihre Wetterdaten frei abrufen und hochladen können. -
Seite 71: Lcd-Bildschirm
LCD-BILDSCHIRM Anzeigebereich: 1. Außentemperatur & Luftfeuchtigkeit 7. Kalender & Mondphase 2. Windrichtung & -geschwindigkeit 8. Zeit / Alarm 3. Innenraum (Ch) Temperatur & 9. Barometer Luftfeuchtigkeit 10. Sonnenauf- und -untergangszeit 11. Niederschlag & Niederschlagsrate 4. Wetterindex 5. UV-Index & Lichtintensität (SUN) 6. -
Seite 72: Kabelloser 7-In-1 Sensor
KABELLOSER 7-IN-1 SENSOR 1. Windfahne 7. Batteriefachabdeckung 2. Windbecher 8. [ RESET ] Taste 9. LED für den Übertragungsstatus 3. Antenne 4. Strahlenschutz 10. Dosenlibelle 5. Thermo-Hygro-Sensor 11. Regensammler 6. Montageteile (passend für Stangen mit 35 12. UV / Lichtsensor ~ 40mm Durchmesser) 13. -
Seite 73: Installation Und Einrichtung
INTELLIGENTER VENTILATOR Ventilator Ein Ventilator ist im Inneren der Strahlungsabschirmung installiert, um die Auswirkungen der Sonnenwärme zu reduzieren. Der Lüfter wird von einem Solarpanel angetrieben und beginnt unter 2 Bedingungen automatisch zu laufen: 1. Wenn die Sonne auf das Solarmodul scheint, und 2. -
Seite 74: Montage Der Kunststoffhalterung
Hinweis: Die Plastikstange befindet sich unter der Eierschale. Bitte vor der Entsorgung der Verpackung überprüfen. MONTAGE DER KUNSTSTOFFHALTERUNG 1. Befestigen Sie die Plastikstange mit Kunststoffhalterung, Klemme, Unterlegscheiben, Schrauben und Muttern an Ihren Mast. Folgen Sie der untenstehenden Reihenfolge 1a, 1b, 1c: 1a. -
Seite 75: Kabellosen Innensensor Installieren
3. Setzen Sie den 7-in1 Sensor auf den Montagepol und richten Sie es vor dem Anziehen der Schrauben in Richtung Norden aus. MOUNTING POLE AND DIRECTION ALIGNMENT Installieren Sie den drahtlosen 7-IN-1-Sensor an einem offenen Ort ohne Hindernisse über und um den Sensor herum für eine genaue Regen- und Windmessung. -
Seite 76: Platzieren Des Kabellosen Innensensors
PLATZIEREN DES KABELLOSEN INNENSENSORS Setzen Sie eine Schraube an die Wand, an der Sie den Sensor befestigen möchten. Hängen Sie den Sensor mit Hilfe der Wandhalterung an der Schraube an. Sie können den Sensor auch auf einen Tisch stellen. EINRICHTEN DER KONSOLE EINSCHALTEN DER KONSOLE 1. -
Seite 77: Synchronisierung Zusätzlicher Drahtloser Sensor(En) (Optional)
SENSOREN RESYNCHRONISIEREN Drücken Sie einmal die Taste [ SENSOR / WI-FI ], damit die Basisstation in den Sensorsynchronisationsmodus wechselt, und die Basisstation registriert alle Sensoren neu, die bereits vorher an der Basisstation registriert wurden, d.h. die Basisstation verliert nicht die Verbindung zu den Sensoren, die Sie zuvor gekoppelt haben. - Seite 78 HINWEIS: Verwenden Sie die gültige E-Mail-Adresse, um Ihr Konto zu registrieren. 2. Nachdem Sie Ihr Konto erstellt und die E-Mail-Validierung abgeschlossen haben, gehen Sie bitte zurück zur WUndergound Webseite, um sich anzumelden. Klicken Sie dann oben auf die Schaltfläche “My Profile”("Mein Profil"), um das Dropdown-Menü zu öffnen, und klicken Sie auf "My Weather Station"("Meine Wetterstation").
-
Seite 79: Weathercloud-Konto Erstellen
WEATHERCLOUD-KONTO ERSTELLEN 1. Geben Sie unter https://weathercloud.net Ihre Daten im Abschnitt "Join us today"("Heute beitreten") ein und folgen Sie dann den Anweisungen zur Erstellung Ihres Kontos. HINWEIS: Verwenden Sie eine gültige E-Mail-Adresse, um Ihr Konto zu registrieren. 2. Melden Sie sich bei weathercloud an und gehen Sie dann auf die Seite "Devices" ("Geräte"), klicken Sie auf "+ New"... -
Seite 80: Awekas-Konto Erstellen
Sie haben die Möglichkeit einen Wetterdienst von Drittanbietern zu nutzen, wie hier am Beispiel von AWEKAS gezeigt (https://join.awekas.at). Eine ausführliche Anleitung zur Einrichtung von AWEKAS steht zum Download bereit: http://www.bresser.de/download/WSX3001 W-LAN-VERBINDUNG EINRICHTEN 1. Wenn Sie die Basisstation zum ersten Mal einschalten, zeigt das Konsolen-LCD das blinkende "AP"- und "... -
Seite 81: Status Der W-Lan-Verbindung
PWS-XXXXXX PWS-XXXXXX PC (Windows 10) W-LAN Android W-LAN Netzwerkschnittstelle Netzwerkschnittstelle 4. Geben Sie nach der Verbindung die folgende IP-Adresse in die Adressleiste Ihres Internetbrowsers ein, um auf die Weboberfläche der Basisstation zuzugreifen: http://192.168.1.1 HINWEIS: - Einige Browser behandeln 192.168.1.1 wie eine Suche. Stellen Sie daher sicher, dass Sie auch http:// vor der IP-Adresse eingeben. -
Seite 82: Erweiterte-Einstellungen Im Webinterface
SETUP-Seite Drücken Sie das Symbol "ADVANCED" SETUP ADVANCED auf der Seite Advanced Sprache der Setup-Benutzeroberfläche English Language: Drücken Sie diese auswählen WiFi Router setup Taste, um den Router Router (SSID) für die Verbindung auswählen ROUTER_A zu suchen Search Router: Manuelle Eingabe der SSID, falls nicht in der Drücken Sie diese Add Router Liste enthalten... -
Seite 83: Kalibrierung
Seite (Erweiterte Einstellungen) ADVANCED Drücken Sie das "SETUP"- Symbol auf die Setup- Seite zu gelangen SETUP ADVANCED Einstellungseinheit Temperature Humidity % auswählen Indoor Current offset: 1 Current offset: -5 Outdoor Current offset: -9 Current offset: 10 CH 1 Current offset: 2 Current offset: -5 Abschnitt für Abschnitt für Außen- und Ch 1~7... -
Seite 84: Anzeigen Ihrer Wetterdaten In Der Wathercloud
Eine weitere Möglichkeit, Ihre Station anzuzeigen, ist die URL-Leiste des Webbrowsers, die Sie unten in die URL-Leiste eingeben können: https://www.wunderground.com/dashboard/pws/XXXX Ersetzen Sie XXXX durch Ihre Wunderground Station ID, um direkt zur Live-Ansicht Ihrer Station zu gelangen. ANZEIGEN IHRER WETTERDATEN IN DER WATHERCLOUD 1. -
Seite 85: Andere Einstellungen & Funktionen Der Basisstation
3. Klicken Sie auf im Abschnitt Firmware-Update und suchen Sie nach dem Browse Speicherort der Datei, die Sie in Schritt 1 heruntergeladen haben. Um die W-LAN Firmware zu aktualisieren, klicken Sie auf Browse im Bereich W-LAN Firmware. , um die Übertragung der Firmware- 4. -
Seite 86: Sommerzeit (Dst)
halten, um zum normalen Modell zurückzukehren. SOMMERZEIT (DST) Die Sommerzeitfunktion ist standardmäßig auf "AUTO" eingestellt (für EU- oder US-Version). Wenn das aktuelle Datum auf der Anzeige mit der Sommerzeit übereinstimmt, wird die Zeit automatisch um +1 Stunde vorwärts eingestellt und das Sommerzeitsymbol wird auf dem LCD- Display angezeigt. -
Seite 87: Temperatur- / Luftfeuchtigkeitsfunktion
Alarmfunktion zu aktivieren. Oder drücken Sie die Taste [ ALARM ] zweimal, um den Alarm mit Frostwarnung zu aktivieren. Alarm aus Alarm ein Alarm mit Frostwarnung HINWEIS: Sobald die Frostwarnung aktiviert ist, ertönt der voreingestellte Alarm und das Eiswarnsymbol blinkt 30 Minuten, wenn die Außentemperatur unter -3°C liegt. Wenn die Uhr die Weckzeit erreicht, ertönt ein Weckton. -
Seite 88: Ansicht Der Anderen Indoor-Kanäle (Optionale Funktion Mit Zusätzlichen Sensoren)
drücken, um den Sensor wieder anzuschließen. ANSICHT DER ANDEREN INDOOR-KANÄLE (OPTIONALE FUNKTION MIT ZUSÄTZLICHEN SENSOREN) Diese Basisstation ist in der Lage, sich mit einem drahtlosen 7-IN-1-Sensor und bis zu 7 drahtlosen Innensensoren zu verbinden. Wenn Sie über 2 oder mehr Innensensoren verfügen, können Sie die Taste [ CHANNEL ] drücken, um zwischen verschiedenen Funkkanälen im Normalmodus zu wechseln, oder Sie können die Taste [ CHANNEL ] 2 Sekunden lang gedrückt halten, um den automatischen Zyklusmodus umzuschalten, um die angeschlossenen... -
Seite 89: Bodenbeschaffenheit
BEAUFORT SKALA TABELLE Die Beaufort-Skala ist eine internationale Skala von Windgeschwindigkeiten zwischen 0 (ruhig) und 12 (Hurrikanstärke). Bodenbeschaffenheit Beaufort-Skala Beschreibung Windgeschwindigkeit < 1 km/h < 1 mph Ruhig Ruhig. Rauch steigt vertikal an. < 1 Knoten < 0,3 m/s 1.1 ~ 5km/h 1 ~ 3 mph Der Rauchabzug zeigt die Windrichtung Leichte Luft... -
Seite 90: Wetterindex
103 ~ 117 km/h 64 ~ 73 mph Weit verbreitete Vegetation und 56 ~ 63 Knoten Heftiger Sturm strukturelle Schäden wahrscheinlich. 28.5 ~ 32,6 m/s bei 32,6 ≥ 118 km/h Schwere, weit verbreitete Schäden an ≥ 74 mph Vegetation und Bauwerken. Schutt und Hurrikan-stärke ≥... -
Seite 91: Wettervorhersage
WETTERVORHERSAGE Das eingebaute Barometer überwacht kontinuierlich den Atmosphärendruck. Basierend auf den gesammelten Daten kann es die Wetterbedingungen in den kommenden 12~24 Stunden innerhalb eines Radius von 30~50km (19~31 Meilen) vorhersagen. Sonnig Teilweise Bewölkt Regnerisch Regnerisch / Verschneit bewölkt Stürmisch HINWEIS: - Die Genauigkeit einer allgemeinen druckbasierten Wettervorhersage liegt bei etwa 70% bis 75%. -
Seite 92: So Wählen Sie Den Anzeigemodus Für Niederschläge Aus
SO WÄHLEN SIE DEN ANZEIGEMODUS FÜR NIEDERSCHLÄGE AUS Drücken Sie die Taste [ RAIN ], um zwischen den Einstellungen zu wechseln: 1. Stündlich - die gesamte Niederschlagsmenge in der Niederschlagsdauer letzten Stunde 2. TÄGLICH - die gesamte Niederschlagsmenge ab Mitternacht (Standard) 3. -
Seite 93: Max / Min Datensatz
UV-INDEX & SONNENBRANDZEITPLAN Expositionsniveau Extrem Niedrig Mäßig Hoch Sehr hoch 12~16 UV-Index Sonnenbrandzeit 45 Minuten 15 Minuten 10 Minuten Minuten Empfohlene Mäßiger oder Sehr hoher oder extremer UV- Level! Empfehlenswert sind hoher UV-Anteil! Schutzanzeige Empfehlenswert Sonnenbrille, breiter Hut und sind Sonnenbrille, langärmelige Kleidung. -
Seite 94: Wetteralarm-Einstellung
WETTERALARM-EINSTELLUNG Der Wetter Alarm kann Sie über bestimmte Wetterbedingungen informieren. Sobald das Alarmkriterium erfüllt ist, wird der Alarmton aktiviert und das Alarmsymbol auf dem LCD- Bildschirm blinkt. SO STELLEN SIE DIE WARNUNG EIN 1. Drücken Sie [ ALERT ], um den gewünschten Wetteralarm in der in der folgenden Tabelle aufgeführten Reihenfolge auszuwählen und anzuzeigen: Ausschnitt Alarm Lesereihenfolge... -
Seite 95: So Deaktivieren Sie Den Warnalarm
4. Drücken Sie die Taste [ ALERT ], um den Wert zu bestätigen. 5. Drücken Sie die Taste [ ALARM ], um den betreffenden Alarm ein- und auszuschalten. 6. Drücken Sie die Taste [ ALERT ], um zur nächsten Alarmmeldung zu gelangen. Hoch / Niedrig Warnung aus Warnung an... -
Seite 96: Drahtloser 7-In-1 Sensor Wartung
DRAHTLOSER 7-IN-1 SENSOR WARTUNG REINIGUNG DES ERSETZEN SIE DIE REGENSAMMLERS WINDFAHNE 1. Drehen Sie den Regensammler um Lösen und entfernen Sie die 30° gegen den Uhrzeigersinn. Windfahne zum Austausch. 2. Entfernen Sie vorsichtig den Regensammler. 3. Reinigen und entfernen Sie alle ERSETZEN SIE DEN Ablagerungen und Insekten. -
Seite 97: Vorsichtsmassnahmen
1. Vergewissern Sie sich, dass die Zeitzone des Gerätes Gesamtdarstellung auf Wunderground korrekt eingestellt ist. des Graphen der 2. Stellen Sie sicher, dass die Zeitzone und die Sommerzeit Niederschlagsansammlung auf Ihrer Basisstation korrekt sind. auf Wunderground um 3. Wenn Sie Ihre Station außerhalb der US-Zeitzonenregion 1 Stunde verschoben in Wunderground lokalisiert haben, ist die Sommerzeit (während der Sommerzeit) - Seite 98 WPA/WPA2, OPEN, WEP (WEP unterstützt nur Unterstützter Router- Sicherheitstyp hexadezimales Passwort) Eingebautes Wi-fi mit AP-Modus Funktion Smart Devices, Unterstütztes Gerät zur Einrichtung der Laptops oder PCs: Android Smartphone, Android Pad, Benutzeroberfläche iPhone, iPad oder Windows Laptop Empfohlener Webbrowser Webbrowser, die HTML 5 unterstützen, wie beispielsweise für die Einrichtung der die neueste Version von Chrome, Safari, Edge, Firefox oder Benutzeroberfläche...
-
Seite 99: Uv-Index Anzeige Und Funktionsspezifikation
Innen-/Außenluftfeuchtigkeitsanzeige & Funktionsspezifikation Hinweis: Die folgenden Details sind so aufgelistet, wie sie auf der Konsole angezeigt oder bedient werden. Feuchteeinheit 1 ~ 99% Anzeigebereich 1 ~ 90% RH ± 2.5% RH @ 25°C (77°F) Außengenauigkeit Innen/ 90 ~ 99% RH ± 3.5% RH @ 25°C (77°F) Außen Auflösung Anzeigemodi... -
Seite 100: Kabelloser 7-In-1-Sensor
0 ~ 200Klux Anzeigebereich Auflösung Klux, Kfc und W/m² (2 Dezimalstellen) Speichermodi Historische Daten der letzten 24 Stunden, Max Alarm Warnung vor hoher Lichtintensität Wetterindexanzeige & Funktionsspezifikation Hinweis: Die folgenden Details sind aufgelistet, wie sie auf der Konsole angezeigt werden oder bedient werden Wetter-Index-Modus Feels Like, Windkühlfaktor, Wärmeindex und Taupunkt... -
Seite 101: Eg-Konformitätserklärung
Link (QR Code) für verfügbare Versionen. Alternativ können Sie uns auch eine E-Mail an die Adresse manuals@bresser.de schicken oder eine Nachricht unter +49 (0) 28 72 – 80 74-220* hinterlassen. Bitte geben Sie stets Ihren Namen, Ihre genaue Adresse, eine gültige Telefonnummer und E-Mail-Adresse sowie die Artikelnummer und -bezeichnung an. -
Seite 102: A Propos De Ce Mode D'emploi
Connectez l'adaptateur AC/DC à la station de base et insérez 3 piles AAA comme alimentation de secours. 3 piles AA sont nécessaires pour le Multisensor et 2 piles AA pour le capteur intérieur. MANUAL DOWNLOAD: SERVICE AND WARRANTY: www.bresser.de/download/WSX3001 www.bresser.de/warranty_terms... - Seite 103 TABLE DES MATIÈRES A PROPOS DE CE MODE D’EMPLOI ......... 102 AVERTISSEMENTS - GÉNÉRALITÉS .
-
Seite 104: Introduction
INTRODUCTION Nous vous remercions d’avoir choisi la station météo Wifi équipée d’un capteur professionnel 7-en-1. Ce système recueille et télécharge automatiquement des données météo précises sur les sites internet Weather Underground et Weathercloud. Ce service météo bien connu vous permet de télécharger vos données météo locales par le biais de stations météo personnelles automatisées (PWS). -
Seite 105: Écran Lcd
ÉCRAN LCD Section d’affichage : 1. Température et humidité extérieure 7. Calendrier et phase de la lune 2. Direction et vitesse du vent 8. Heure / alarme 3. Température et humidité intérieure (Ch) 9. Baromètre 4. Indice météo 10. Heure de lever et de coucher du soleil 5. -
Seite 106: Capteur 7-En-1 Sans Fil
CAPTEUR 7-EN-1 SANS FIL 1. Girouette 7. Couvercle du compartiment des piles 2. Anémomètre à coupelles 8. Touche [ RESET ] 9. LED d’état de transmission 3. Antenne 4. Abri anti-rayonnements 10. Inclinomètre avec niveau à bulles 5. Capteur thermo-hygro 11. -
Seite 107: Installation Et Configuration
VENTILATEUR INTELLIGENT Ventilateur Un ventilateur est installé à l'intérieur des écrans anti-rayonnement pour réduire l'impact de la chaleur du soleil. Le ventilateur est alimenté par un panneau solaire et se met automatiquement en marche sous deux conditions : 1. Lorsque le soleil brille sur le panneau solaire, et 2. - Seite 108 Remarque: Poteau en plastique placée sous le plateau à oeufs, veuillez vérifier avant de jeter l'emballage. PLASTIQUE INSTALLATION DE MONTAGE 1. Fixez le poteau en plastique sur votre poteau fixe à l'aide de la base de montage, de l'étrier, des rondelles, des vis et des écrous. En suivant les séquences 1a, 1b, 1c ci-dessous : 1a.
- Seite 109 3. Placez la matrice de capteurs 7-en-1 sur le poteau de montage et alignez-la dans la direction du nord avant de fixer les vis. MÂT DE MONTAGE ET ALIGNEMENT DIRECTIONNEL Installez le capteur sans fil 7-IN-1 dans un endroit ouvert sans obstruction au-dessus et autour du capteur pour une mesure précise de la pluie et du vent.
-
Seite 110: Installation De La Console
POSITIONNEMENT DU CAPTEUR INTÉRIEUR SANS FIL Fixez une vis sur le mur sur lequel vous souhaitez accrocher le capteur. Accrochez le capteur à la vis à l’aide du support de montage mural. Vous pouvez également positionner le capteur sur une table. INSTALLATION DE LA CONSOLE MISE EN MARCHE DE LA CONSOLE 1. -
Seite 111: Synchronisation De Capteur(S) Sans Fil Supplementaire(S) (Optionnel)
RESYNCHRONISATION DES CAPTEURS Appuyez une fois sur la touche [ SENSOR / WI-FI ] pour faire passer la console en mode de synchronisation et celle-ci va réenregistrer tous les capteurs déjà enregistrés sur la console par le passé. Autrement dit la console ne perdra pas la connexion des capteurs qui ont déjà été connectés par le passé. -
Seite 112: Création D'un Compte Weather Underground
CRÉATION D’UN COMPTE WEATHER UNDERGROUND 1. Sur la pagehttps://www.wunderground.com cliquez sur «Join» dans le coin supérieur droit pour ouvrir la page d’inscription. Suivez les consignes pour créer votre compte. REMARQUE : Utilisez une adresse email valide pour créer votre compte. 2. -
Seite 113: Création D'un Compte Weathercloud
CRÉATION D’UN COMPTE WEATHERCLOUD 1. Sur le site https://weathercloud.net, saisissez vos coordonnées dans la partie «Join us today» (« Rejoignez-nous aujourd’hui ») puis suivez les consignes pour créer votre compte. REMARQUE : Utilisez une adresse email valide pour créer votre compte. 2. -
Seite 114: Création D'un Compte Awekas
(https://join.awekas.at). Des instructions détaillées pour la mise en place de l'AWEKAS sont disponibles en téléchargement : http://www.bresser.de/download/WSX3001 CONFIGURATION DE LA CONNEXION WIFI 1. Lorsque vous allumez la console pour la première fois, l’écran LCD affiche en clignotant »... - Seite 115 PWS-XXXXXX PWS-XXXXXX Interface réseau Wifi d’ordinateur Interface réseau Wifi Android (Windows 10) 4. Une fois la console connectée, saisissez l’adresse IP qui suit dans la barre de recherche de votre navigateur internet pour accéder à l’interface web de la console : http://ws.awekas.at http://192.168.1.1 REMARQUE :...
-
Seite 116: Configuration De La Connexion Au Serveur Météo
CONFIGURATION DE LA CONNEXION AU SERVEUR MÉTÉO Saisissez les informations suivantes sur la page « SETUP » de l’interface web ci-dessous pour connecter la console au serveur météo. Si vous ne souhaitez pas utiliser Wunderground.com ou Weathercloud.net, effacez l’identifiant et la clé de station et ignorez l’étape de téléchargement des données. -
Seite 117: Parametres Avancés Dans L'interface Web
ETAT DE CONNEXION DU SERVEUR HORAIRE Une fois que la console est connectée à internet, elle tentera de se connecter au serveur horaire pour obtenir l’heure UTC. Lorsque la connexion est établie et que l’heure de la console a été mise à jour, l’icône « »... -
Seite 118: Visualisation De Vos Données Meteo Dans Wunderground
CALIBRATION 1. L’utilisateur peut saisir les valeurs de compensation et/ou de gain pour différents paramètres tandis que les valeurs de compensation et de gain actuelles sont indiquées à côté de leur plage vide respective. 2. Une fois terminé, appuyez sur au bas de la page de CONFIGURATION Apply La valeur de compensation actuelle indiquera la valeur saisie précédente, veuillez saisir... -
Seite 119: Mise A Jour Du Firmware
MISE A JOUR DU FIRMWARE La console dispose d’une fonction de mise à jour du firmware via signal wifi. Le firmware peut être mis à jour (lorsque cela est nécessaire) par signal wifi via un navigateur web sur un PC doté... -
Seite 120: Autres Parametres Et Fonctions De La Console
AUTRES PARAMETRES ET FONCTIONS DE LA CONSOLE REGLAGE MANUEL DE L’HORLOGE Cette console est conçue pour obtenir l’heure locale par synchronisation avec le serveur horaire internet assigné. Si vous souhaitez l’utiliser hors ligne, vous pouvez régler l’heure et la date manuellement. Lors du premier démarrage, maintenez la touche [ SENSOR / WI-FI ] enfoncée pendant 6 secondes et laissez la console repasser en mode normal. -
Seite 121: Heure De Lever Et De Coucher Du Soleil
HEURE DE LEVER ET DE COUCHER DU SOLEIL La console indique l’heure de lever et de coucher du Soleil de votre lieu en fonction du fuseau horaire, de la latitude et de la longitude que vous avez indiqués. Veuillez saisir les informations correctes dans les paramètres correspondants. -
Seite 122: Fonction Température / Humidité
FONCTION TEMPÉRATURE / HUMIDITÉ - Les relevés de température et d’humidité sont affichés sur la section extérieure et intérieure (CH). - Utilisez l’interrupteur coulissant [ °C / °F ] pour sélectionner l’unité d’affichage de la température. - Si la température / l’humidité est inférieure à la plage de mesure, l’affichage indique « Lo ». Si la température / l’humidité... -
Seite 123: Vent
VENT SECTION VITESSE ET DIRECTION DU VENT Indicateur de direction du vent en temps réel Direction du vent Direction du vent au cours des 5 dernières minutes Vitesse des rafales de vent / moyenne Vitesse du vent Indicateur de niveau RÉGLAGE DE L’UNITÉ... -
Seite 124: Indice Météo
29 ~ 38 km/h 18 ~ 24 mph Les branches de taille moyenne bougent. Brise fraîche 17 ~ 21 nœuds Les petits arbres feuillus se balancent. 8,0 ~ 10,7 m/s 39 ~ 49 km/h De grandes branches bougent. On entend 25 ~ 30 mph siffler le vent. -
Seite 125: Prévisions Météo
POINT DE ROSEE - Le point de rosée est la température en-dessous de laquelle la vapeur d'eau contenue dans l'air à une pression barométrique constante se condense en eau liquide à la même vitesse à laquelle elle s’évapore. L’eau de condensation est appelée rosée lorsqu’elle se dépose sur une surface solide. -
Seite 126: Precipitations
CHANGEMENT D’UNITÉ DE LA PRESSION BAROMÉTRIQUE En mode normal, appuyez sur la touche[ BARO ] pour changer l’unité du baromètre dans cet ordre : hPa → inHg → mmHg RÉGLAGE DE PRESSION BAROMÉTRIQUE ABSOLUE OU RELATIVE En mode normal, maintenez la touche [ BARO ] pour basculer entre pression barométrique ABSOLUE / RELATIVE . -
Seite 127: Enregistrement Des Données Max / Min
MODE INTENSITE LUMINEUSE : 1. En mode d’intensité lumineuse, maintenez la touche [ SUN ] pendant 2 secondes pour passer au réglage de l’unité ] pour changer l’unité 2. Appuyez sur la touche[ ] ou [ dans cet ordre : Klux → Kfc → W/m². 3. -
Seite 128: Historique Des Donnees Des Dernieres 24 Heures
EFFACEMENT DES ENREGISTREMENTS MAX/MIN Maintenez la touche [ MAX / MIN ] enfoncée pendant 2 secondes pour réinitialiser les enregistrements MAX ou MIN actuellement affichés. REMARQUE : L’écran LCD affichera aussi l’icône « » / « », « », l’heure et la date des enregistrements de données. -
Seite 129: Retroeclairage
Alerte en cas de température 20°C ressentie élevée -65°C ~ 50°C Alerte en cas de faible 0°C température ressentie Alerte en cas de point de rosée 10°C élevé -40°C ~ 80°C Indice météo Alerte en cas de faible point de -10°C rosée Alerte en cas d’indice de... -
Seite 130: Contraste De L'affichage
CONTRASTE DE L’AFFICHAGE ] en mode normal pour régler le contraste de l’écran LCD pour Appuyez sur la touche [ qu’il soit adapté à l’angle du pied de table ou du montage mural. MAINTENANCE REMPLACEMENT DES PILES Lorsque le témoin de pile faible « »... -
Seite 131: Spécifications
Aucune connexion Wifi 1. Vérifiez que le symbole Wifi se trouve sur l’écran, il devrait y être affiché en permanence. 2. Veillez à vous connecter sur la bande 2.4G et non 5G de votre routeur Wifi. Les données ne sont pas 1. - Seite 132 Navigateurs web Navigateurs web compatibles avec HTML 5 tels que Chrome, recommandés pour l’interface Safari, Edge, Firefox ou Opera dans leurs versions les plus récentes. utilisateur Spécification de communication de capteur sans fil 1 capteur météo extérieur 7-EN-1 sans fil et jusqu’à 7 Capteurs compatibles capteurs intérieurs thermo-hygro sans fil Fréquence RF...
- Seite 133 Alerte de température haute / basse Alarme Affichage de l’humidité intérieure / extérieure et spécification des fonctions Remarque : Les détails suivants sont listés comme ils sont affichés sur la console. Unité d’humidité Plage d’affichage 1 ~ 99% Précision des mesures 1 ~ 90% RH ±...
-
Seite 134: Capteur 7-En-1 Sans Fil
AFFICHAGE DE L’INTENSITE LUMINEUSE ET SPÉCIFICATION DES FONCTIONS Remarque : Les détails suivants sont listés comme ils sont affichés sur la console. Unité de l’intensité lumineuse Klux, Kfc et W/m² Plage d’affichage 0 ~ 200 Klux Résolution Klux, Kfc et W/m² (2 chiffres après la virgule) Modes de mémoire Données historiques des dernières 24 heures, max Alerte en cas d’intensité... -
Seite 135: Déclaration De Conformité Ce
Plage d’utilisation DÉCLARATION DE CONFORMITÉ CE Par la présente, Bresser GmbH déclare que le type d’appareil de numéro de pièce : WSX3001 satisfait à la Directive : 2014/53/UE. L’intégralité de la déclaration de conformité UE est disponible à l’adresse internet suivante : www.bresser.de/download/WSX3001/CE/WSX3001_CE.pdf... -
Seite 136: Sobre Este Manual De Instrucciones
MANUAL DE INSTRUCCIONES SOBRE ESTE MANUAL DE INSTRUCCIONES Este manual de instrucciones debe considerarse un componente del aparato. Por favor, lea atentamente las instrucciones de seguridad y las instrucciones de uso antes de usar el producto. Guarde estas instrucciones para volver a utilizarlas en una fecha posterior. Cuando el dispositivo se vende o se entrega a otra persona, el manual de instrucciones debe entregarse al nuevo propietario/usuario del producto. - Seite 137 TABLA DE CONTENIDOS SOBRE ESTE MANUAL DE INSTRUCCIONES ........136 ADVERTENCIAS DE CARÁCTER GENERAL .
-
Seite 138: Introducción
INTRODUCCIÓN Gracias por seleccionar la estación meteorológica WI-FI con sensor profesional 7 en 1. Este sistema recopila y carga automáticamente datos meteorológicos precisos y detallados en el sitio web de Weather Underground and Weathercloud, el famoso servicio meteorológico que permite a los observadores meteorológicos cargar sus datos meteorológicos locales con estaciones meteorológicas personales automatizadas (PWS), en las que puede acceder y cargar sus datos meteorológicos libremente. -
Seite 139: Sensor Higrotérmico Inalámbrico Para Interiores
20. Interruptor deslizante 22. Soporte de mesa [ OFF / HI / LO ] 23. Enchufe de alimentación. 21. Puerta de la batería PANTALLA LCD Visualizar sección: 1. Temperatura y humedad exterior 7. Calendario y fase lunar 2. Dirección del viento 8. -
Seite 140: Sensor Inalámbrico 7-En-1
SENSOR INALÁMBRICO 7-EN-1 7. Puerta de la batería 1. Veleta 2. Cazoletas 8. Tecla[ RESET ] 9. LED de estado de la transmisión 3. Antena 4. Escudo contra radiación 10. Gradiente de nivel de burbuja 5. Sensor termo-higro 11. Colector de lluvia 6. -
Seite 141: Instalación Y Configuración
VENTILADOR INTELIGENTE Ventilador En el interior de los escudos contra la radiación se ha instalado un ventilador para reducir el impacto del efecto del calor del sol. El ventilador es accionado por el panel solar y comenzará a girar automáticamente bajo 2 condiciones: 1. Cuando el sol brilla sobre el panel solar, y 2. La velocidad media del viento es inferior a 5 m/s durante 1 minuto. - Seite 142 Nota: Poste de plástico colocado debajo de la bandeja de huevos, por favor, compruebe antes de desechar el embalaje. PLÁSTICO INSTALACIÓN DE MONTAJE 1. Fije el poste de plástico a su poste fijo con la base de montaje, la abrazadera, las arandelas, los tornillos y las tuercas.
-
Seite 143: Instale Un Sensor Inalámbrico Para Interiores
3. Coloque el sensor 7 en 1 sobre el poste de montaje y alinéelo en dirección norte antes de fijar los tornillos. MONTAJE DE POSTES Y ALINEACIÓN DE DIRECCIÓN Instale el sensor inalámbrico 7-IN-1 en un lugar abierto sin obstrucciones por encima y alrededor del sensor para una medición precisa de la lluvia y el viento. -
Seite 144: Configuración De La Consola
COLOCACIÓN DEL SENSOR INALÁMBRICO DE INTERIOR Coloque un tornillo en la pared en la que desee colgar el sensor. Cuelgue el sensor en el tornillo del soporte de montaje en la pared. También puede colocar el sensor sobre una mesa por sí solo. -
Seite 145: Sincronización Sensor(Es) Inalámbrico(S) Adicional(Es) (Opcional)
de sensores, y la consola volverá a registrar todos los sensores que ya han sido registrados en ella anteriormente. CAMBIO DE PILAS Y EMPAREJAMIENTO MANUAL DEL SENSOR Siempre que cambie las baterías del sensor inalámbrico de interior o del sensor L de profundidad 7 en 1, la resincronización debe hacerse manualmente. -
Seite 146: Cuenta De Create Weather Underground
CUENTA DE CREATE WEATHER UNDERGROUND 1. En https://www.wunderground.com haga clic en "Join" en la esquina superior derecha para abrir la página de registro. Siga las instrucciones para crear su cuenta. NOTA: Utilice la dirección de correo electrónico válida para registrar su cuenta. 2. -
Seite 147: Crear Una Cuenta Weathercloud
CREAR UNA CUENTA WEATHERCLOUD 1. En https://weathercloud.net introduzca sus datos en la sección "Join us today" y siga las instrucciones para crear su cuenta. NOTA: Utilice la dirección de correo electrónico válida para registrar su cuenta. 2. Inicie sesión en weathercloud y luego irá a la página "Dispositivos", haga clic en "+ Nuevo" para crear un nuevo dispositivo. -
Seite 148: Crear Una Cuenta Awekas
Tiene la posibilidad de utilizar un servicio meteorológico de un proveedor tercero, como por ejemplo el servicio AWEKAS (https://join.awekas.at). Las instrucciones detalladas para configurar AWEKAS están disponibles para su descarga: http://www.bresser.de/download/WSX3001 SETUP CONEXIÓN WI-FI 1. Cuando encienda la consola por primera vez, la pantalla LCD de la consola mostrará el icono "AP"... -
Seite 149: Configurar La Conexión Con El Servidor Meteorológico
PWS-XXXXXX PWS-XXXXXX PC (Windows 10) Interfaz de red WI-FI Interfaz de red Android WI-FI 4. Una vez conectado, introduzca la siguiente dirección IP en la barra de direcciones de su navegador de Internet para acceder a la interfaz web de la consola: http://192.168.1.1 NOTA: - Algunos navegadores tratan 192.168.1.1.1 como una búsqueda, así... -
Seite 150: Zona Horaria
Página SETUP Pulse el icono "ADVANCED" para ir a la SETUP ADVANCED página Avanzado Seleccione el idioma de visualización de English Language: Pulse aquí para buscar la interfaz de usuario de configuración WiFi Router setup el router Seleccione el enrutador (SSID) para la ROUTER_A Search Router:... -
Seite 151: Advance Setting En Interfaz Web
ADVANCE SETTING EN INTERFAZ WEB Pulse la tecla "ADVANCED" en la parte superior de la interfaz web para entrar en la página de ajustes avanzados, esta página le permite configurar y ver los datos de calibración de la consola, así como actualizar la versión del firmware en el navegador web del PC. Página AVANZADA Presione el icono "SETUP"... -
Seite 152: Vea Sus Datos Meteorológicos En Wunderground
NOTA: - No se requiere la calibración de la mayoría de los parámetros, con la excepción de la Presión Relativa, que debe calibrarse al nivel del mar para tener en cuenta los efectos de la altitud. - Los valores de calibración de temperatura y humedad en interiores no son aplicables para esta consola. -
Seite 153: Otros Ajustes Y Funciones De La Consola
web en un PC con conectividad WI-FI. La función de actualización, sin embargo, no está disponible a través de dispositivos móviles/inteligentes. Versión actual del Firmware version: 1.00 Por favor, seleccione el archivo de firmware firmware para la actualización Browse Upload Pulse aquí... -
Seite 154: Fase Lunar
3. Pulse la tecla [ ] or [ ] para cambiar el valor. Mantenga pulsada la tecla para un ajuste rápido. 4. Presione la tecla[ CLOCK SET ] para guardar y salir del modo de configuración, o la unidad saldrá automáticamente del modo de configuración 60 segundos después sin presionar ninguna tecla. -
Seite 155: Activación De La Función De Alarma Y Prealarma De Temperatura
3. Pulse la tecla [ ALARM ] de nuevo para pasar el valor de ajuste a Minuto con el dígito de Minuto parpadeando. ] para ajustar el valor del dígito intermitente. 4. Pulse la tecla [ ] o [ 5. Pulse la tecla [ ALARM ] para guardar y salir de la configuración. NOTA: - En el modo de alarma, el icono "... -
Seite 156: Indicador Tendencia
- No hay indicación de confort cuando la temperatura está por debajo de 0°C (32°F) o por encima de 60°C (140°F). RECEPCIÓN INALÁMBRICA DE LA SEÑAL DEL SENSOR 1. La intensidad de la señal de la pantalla de la consola para el(los) sensor(es) inalámbrico(s), según la siguiente tabla: Sensor 7 en 1 para exteriores... - Seite 157 entrar en el modo de unidad de velocidad del viento y la unidad parpadeará. Pulse la tecla [ ] or [ ] para cambiar la unidad de velocidad del viento en esta secuencia: m/s km/h nudos 2. Pulse de nuevo la tecla [ WIND ] para volver al modo normal. PARA SELECCIONAR EL MODO DE VISUALIZACIÓN DEL VIENTO En modo normal, pulse la tecla [ WIND ] para cambiar entre la escala BEAUFORT, la velocidad media y la velocidad del viento GUST.
-
Seite 158: Índice Meteorológico
89 ~ 102 km/h Los árboles están rotos o arrancados, 55 ~ 63 mph Tormenta es probable que se produzcan daños 48 ~ 55 nudos estructurales. 24.5 ~ 28.4 m/s 103 ~ 117 km/h 64 ~ 73 mph Tormenta Vegetación generalizada y daños 56 ~ 63 nudos violenta estructurales probables. -
Seite 159: Pronóstico Del Tiempo
ESCALOFRÍOS Una combinación de los datos de temperatura y velocidad del viento del sensor inalámbrico 7-en-1 determina el factor de sensación térmica actual. PRONÓSTICO DEL TIEMPO El barómetro incorporado monitorea continuamente la presión atmosférica. Basándose en los datos recogidos, puede predecir las condiciones meteorológicas en las próximas 12~24 horas en un radio de 30~50km (19~31 millas). -
Seite 160: Intensidad De Luz, Indice De Uv Y Tiempo De Quemadura
1. HORARIO - el total de precipitaciones en la última hora Periodo de lluvia 2. DIARIAMENTE - el total de precipitaciones a partir de la medianoche (por defecto) 3. SEMANAL - la precipitación total de la semana en curso 4. MENSUAL- la precipitación total del mes calendario actual 5. -
Seite 161: Registro De Datos Max / Min
ÍNDICE DE UV Y TABLA DE TIEMPO DE QUEMADURAS SOLARES MODERADO Extremo Nivel de Baja Alto Muy alto exposición índice 12~16 ultravioleta Tiempo de 45 minutos 30 minutos 15 minutos 10 minutos exposición al Indicador de Nivel de UV moderado Nivel de UV muy alto o extremo! o alto! Sugiera usar Sugiera usar gafas de sol,... -
Seite 162: Configuración De La Alerta Meteorológica
NOTA: La pantalla LCD también mostrará el icono " ", registros de datos históricos con hora y fecha. CONFIGURACIÓN DE LA ALERTA METEOROLÓGICA La alerta meteorológica puede alertarle de ciertas condiciones meteorológicas. Una vez que se cumpla el criterio de alerta, se activará el sonido de alarma y el icono de alerta de la pantalla LCD parpadeará. -
Seite 163: Luz De Fondo
Alto / Bajo Desconexión de alertas Alerta el Alerta el Desconexión de alertas 7. Presione cualquier tecla de la parte frontal para guardar el estado de alerta de encendido/ apagado y volver al modo normal, o volverá automáticamente al modo normal después de 30 segundos sin presionar ninguna tecla. -
Seite 164: Sensor Inalámbrico 7-En-1 Mantenimiento
SENSOR INALÁMBRICO 7-EN-1 MANTENIMIENTO LIMPIEZA DEL COLECTOR DE LLUVIA (SUMIDERO) REEMPLAZAR LA ALETA 1. Gire el colector de lluvia 30° en DESATORNILLAR Y sentido antihorario. RETIRAR LA ALETA PARA 2. Retire suavemente el colector de SUSTITUIRLA lluvia 3. Limpie y elimine cualquier residuo REEMPLAZAR LA COPA o insecto. -
Seite 165: Precauciones
1. Asegúrese de que la zona horaria del dispositivo en Wunderground Precip. Wunderground esté correctamente ajustada Accum. Desviación total 2. Asegúrese de que la zona horaria y el DST de su consola del gráfico 1 hora de sean correctos. restablecimiento, durante el 3. -
Seite 166: Especificaciones
ESPECIFICACIONES CONSOLA Especificaciones Generales Dimensiones (An x Al x Pr) 215 x 172 x 29mm (8.5 x 6.8 x 1.1in) Peso 639g (con pilas) Potencia principal Adaptador DC 5V 1A pila de reserva 3 x pilas AAA de 1,5 V (alcalinas recomendadas) Rango de temperatura de -50˚C DIFUNDE LA PALABRA- funcionamiento... - Seite 167 (700 ~ 1100hPa ± 5hPa) / (540 ~ 696hPa ± 8hPa) (20.67 ~ 32.48inHg ± 0.15inHg) / (15.95 ~ 20.55inHg ± Precisión: 0.24inHg) (525 ~ 825mmHg ± 3.8mmHg) / (405 ~ 522mmHg ± 6mmHg) Típico a 25°C (77°F) Resolución: 1hPa / 0.01inHg / 0.1mmHg Soleado / Claro, Ligeramente Nublado, Nublado, Lluvioso, Pronóstico del tiempo Lluvioso / Tormentoso y Níveo...
- Seite 168 Datos históricos de las últimas 24 horas, Max Gust / Modos de memoria Promedio Alarma Alerta de Velocidad del Viento (Promedio) Modo de visualización de la 16 direcciones o 360 grados dirección del viento Pantalla y función de la lluvia Especificación Nota: Los siguientes detalles se enumeran a medida que se muestran o funcionan en la consola.
-
Seite 169: Sensor Inalámbrico 7-En-1
Rango de visualización de la -65 ~ 18°C (velocidad del viento >4.8km/h) sensación térmica Modos de visualización Corriente Datos históricos de las últimas 24 horas, Max / Min Modos de memoria Se siente como Max/Min Alerta; Alerta Punto de rocío alto/ Alarma Bajo;... -
Seite 170: Declaración De Conformidad Ce
(código QR) para ver las versiones disponibles. O envíenos un correo electrónico a servicio.iberia@bresser.de o llame al (+34) 916 797 269* Asegúrese de indicar su nombre, dirección, teléfono y dirección de correo electrónico, así como el número del artículo y su descripción. -
Seite 172: Service And Warranty
MANUAL DOWNLOAD: SERVICE AND WARRANTY: www.bresser.de/download/WSX3001 www.bresser.de/warranty_terms Bresser GmbH Gutenbergstr. 2 · DE-46414 Rhede · Germany www.bresser.de · service@bresser.de Bresser UK Ltd. Suite 3G, Eden House, Enterprise Way, Edenbridge, Kent TN8 6Hf, Great Britain www.bresseruk.com...